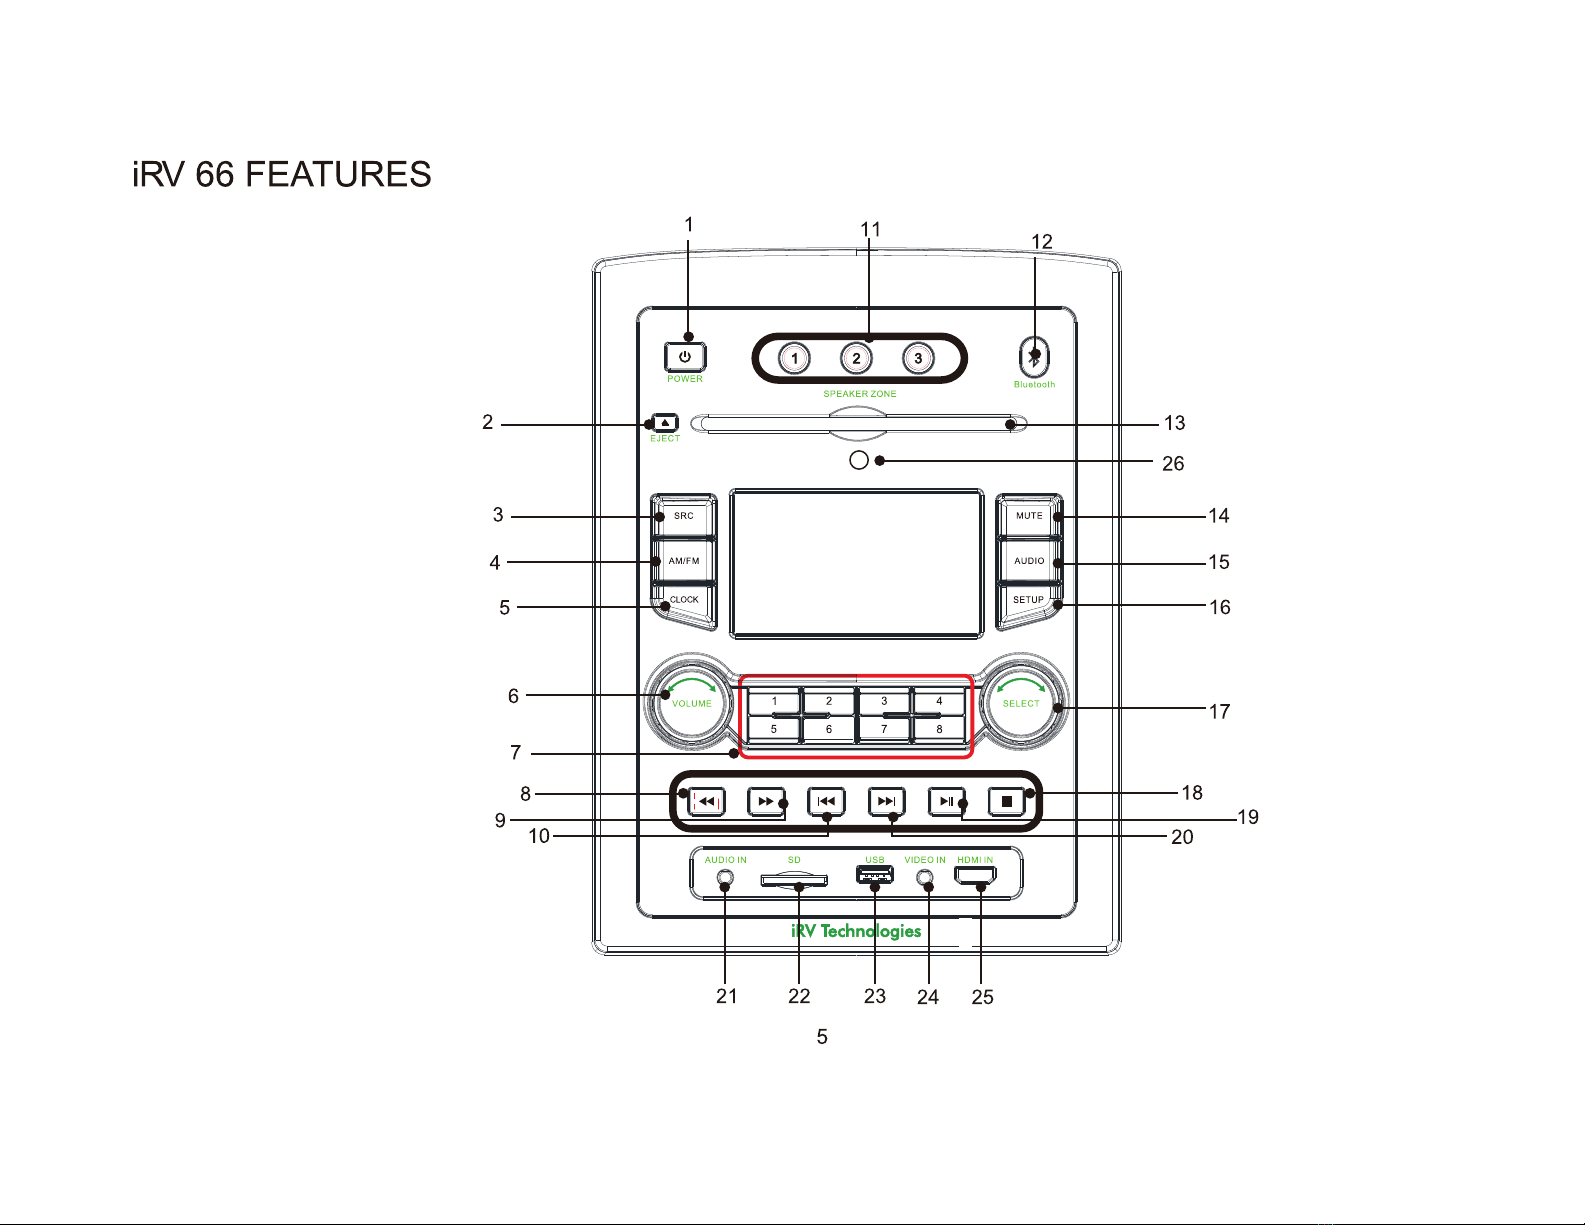
iRV Technologies iRV66 User manual


Contents
Safety Guidlines
Important safety instructions
Safetycompliance 2
Warnings 2
iRV technologies 3
iRV 66 Features 5
Radio Operation 9
DVD/CD/MP3/MP4 Operation
12
App Operation 13
Bluetooth Syncing 14
Remote Control Guide 15
System Setup 18
Lanugage 19
Audio 20
Speakersetup 20
Wiring Diagram
21
Troubleshooting 22
iRV
66
Specifications 23
CAUTICN:To.....,..tii•.W.:tle-.:tricetock,e'*
"""'"wvw
(o
r
bact)
.
No
I.IMI"'HNNCMtH
.,.,.
INkle..
R.WMPWidn
fiiiiD
ft
LIIIIItlild...W:.
,.._.,.,..
.
WARNING- To reduce the risk ofelectrical shock, do not
remove cover (oropen unit).
NO
USER SERVICEABLE parts are
inside. Refer servicing to QUALIFIED SERVICE PERSONNEL.
The design and manufacture
of
this player takes personal safety
into consideration. However, any improperoperation may result
in electric shock, fire,
or
otherhazard.
DO NOT open the cabinet byyourselfto prevent electric shock.
Please contact a professional technician to preform any service
needed. Please use only components recommended byfactory
when replacement is necessary.
Please turn unit offwhen not
in
use. Use a dry, soft cloth to clean
face with the system turned off.
PRECAUTION -Moisture may cause the lens on loader
in
this
unitto malfunction. To remedy the problem, turn unit on, eject
disc and run 1-2 hours to vaporize moisture inside the unit. Do
not repeatedly turn unitoffand on. Afterturning unit offwait 10
seconds before turning
on
again. Do not use broken, scratched,
or
twisted discs in player.This could result
in
damage to the unit.
Use only5", 12cm discs
in
this unit.
2

iRV Technologies
iRV 66
CD/MP3/MP4/DVD Disc Player
Compatible with standard size CD, MP3, MP4 and DVD discs
(4.75"
or
12cm). The iRV 66 is designed to read standard
DVD, MP3, MP4, CD, CD-R, CD-RW, JPEG-CD Disc. Because
of
variations in recording methods some discs may not play on
this unit. This unitwill play region 1 DVD's (USAand Canada).
USB/SO
Card
This unit allows users to play files stored on both USB and SD
cards including MP3 music, MP4 short video clips and JPEG
photo files.The USB port will also charge many devices like
iPods and MP3 players.
Built-In AM/FM Tuner
27
preset FM stations and 18
AM
stations available to select.
HDMI
3 HDMI input and 3 HDMI output.
1 HDMI ARC.
3


iRV 66 FEATURES
1
11
12
;.>-- -
<.!J
(
(@
@)
@)
] •
POWER Bluetooth
SPEAKERZONE
2
......,
~
-
13
0
26
3 E MUTE
14
4
AMIFM
AUDIO
15
5
CLOCK
SETUP
16
~
~
I~
~
6
~
&
~
1 2 3 4 v 17
5 6 7 8
7
8 i
"G
8
[;1
[!;1
G
@i
18
10
20
9 19
AUDIOIN SD
~
S
~
VIDEO
IN
HDMIIN ]
u • G
i VTechnc ogies
21
22
23 24 25
5

iRV
66 FEATURES
1 POWER
Turns the poweron and off.
Note: Pressing and Holding the POWER button
for
5 seconds
wi
ll
re-boot the radio and reset all defaults. Itwill leave the radio
off
. Press the on button to continue operation.
2 EJECT
3
4
5
Press
to
ejecta Discfrom your iRV66 built in player.
SRC
Select between Radio/DVD/USB/SD/BT/F-AV IN/TV
audio/FR-audio/DOT-DCC in/R-HDMIIN1/R-HDMIIN2/F-
HDMIIN/HDMIARC.
AM/FM
Allows you to select FM1, FM2, FM3,
AM1
,
or
AM2.Each band
can be auto programmed with 8 station presets. 24 total preset
stations for
FM
and 16 total preset stations
for
AM. (See FFWD
or FRWD Radio Mode
for
auto scan features.)
CLOCK
Press this to seetime. This function works in all modes and
even when the unit isturned off. Press
to
change
to
the clock
display. Press and hold to tum the display indication and button
illumination
off
or
on.
6 VOLUME
Increase or decrease the volume in all rooms where sound is
being played.
7 1-8
[1]
,
[2].
...
[8]
numberbuttons
are
used
to enter number,e.g.No.of
track,DVD chapter No.,time data,etc.
8/9
F.
RWD
+~
..
Radio Mode: Press to auto scan and memorize band preset
stations. Scan through all lower preset stations.
Disc Mode: Select different levels
of
fast reverse.
10/20
FWD and RWD buttons
...,.
~
6
Radio Mode: Press
to
select next frequency, higher
or
lower.
DVD Mode : Moves menu selection.
11
SPEAKERS 1-2- 3
Turns sound
on
or
offin corresponding ZONE 1, 2 or3.
12
Bluetooth
Press this to enable Bluetooth connectivity.

iRV
66
FEATURES
13
CD/MP3/MP4/DVD Disc loading slot
Insert a disc to play. Compatible with standard size CD, MP3,
Mp4 and DVD discs (4.75" or
12cm).
The unit is designed
to read standard CD, MP3, MP4, DVD, DVD+R, DVD-R Disc.
Because ofvariations
in
recording methods some discs may
not play
on
this unit. This unit will play region 1 DVD's (USA
and Canada).
14
MUTE
Push to mute,push again to unmute.
15
AUDIO
Controls under this menu include volume,Bass,Treble,
Balannce and EQ controls.
Volume: 45 different levels
Bass: 12 different levels
Treble:
12
different levels
Balance :
12
different levels
EQ:
POP,Ciass,Rock,Fiat
16 SETUP
Press for DVD setup menu,Menu navigation screens will
appear
on
video monitor.
7
17
SELECT
When reading the USB,MP3,CD discs,such as rotate this
knob can choose to play,and then click
on
the confirm this
knob.
18
STOP
Press to stop playback ofdisc. Press Play to continue the
playback
19
PLAY I
PAUSE~~
Press to play disc
or
pause playback
of
disc.
During
radio
mode:(Auto-storage
/Preset
scan)
1)
When
press,
the
radio
searches
from
the
current
frequency
and
checks
the
signal
strength
level until 8
station
are
found. And then
the
8
stations
frequency
are
preset
to
the
corresponding
preset
memory
numbered
bank. When press and hold
for
more
than
1second,
The
auto-storage
operation
is
implemented in the each
selected band. When the
auto-storage
operation
is
finished, the
radio
execute
the
Preset
scan.
21
AUDIO
IN
Audio inputfrom Mp3 or iPod player,This is a 3.5mm input.


RADIO OPERATION
2 Frequency Indicator
I CH
FM1
1
--+--
3 Preset Numeral Indicator
I
I
1 Band Indicator
POWER
Turns the poweron and off.
Radio Reception Mode
Press to access the radio, press to activate desired band: AM1,
AM2,
FM
1, FM2, FM3.
Manual Tuning
Select Band, Select single arrowed button to move the chanels
down
or
up.
9
Press forpower"On orOff'
(
AM/FM
)
Activate radio
(
AM/FM
)
(
AM/FM
)
Press for
desired Band
-----
backward
forward
Select
knob
Select Band Chanel Down Chanel
Up

Auto Search Tuning
Push to auto search for an available station at a higher
or
lower
frequency. When this function is selected the unitwill stay
at
the
selected station untill anotherfunction is selected.
Manual Frequency Presets
Select Band, Select desired frequency, Hold desired numeral
for
3 seconds. Frequency is set. Repeat to change. Frequency can
be preset forAM1, AM2, FM
1,
FM2, FM3.
Recall Frequency Presets
Select Band AM1, AM2, FM1, FM2, FM3, then select desired
numeral
Automatic Store I Preset Scan
A.
Automatic Scan & Store
While listening to the Radio, Long press the
"IIJlil"
button,
The receiverwill automatically scan and save the station
listening to.
B.
Scan Saved Stations
Short press
the"
IIJlil"
button once to perform the scanning
functions.
10
( )
..
..
AM/FM
PREVIOUS NEXT
Select Band Auto Search Auto Search
Down Up
( AMIFM )
!!
d
!!
a
The panel
numberkeys
Select Band
AM1, AM2, FM1,
FM2, FM3
(
AM/FM
)
Select Band
AM1, AM2, FM1,
FM2, FM3
Select
Frequency
a
The panel
numberkeys
Select Numeral
..
Play/pause
Select Numeral


DVD/CD/MP3/MP4 OPERATION
2 Chapter
on
DVD
I
Tack
on
CD-MP3
1 Title
of
DVD
3 Elapsed Time
on
DVD-CD-MP3
Fast Reverse I Fast Forward
2X, 4X, 8X,
20X
To select a normal speed, push the
PLAY button.
Previous I Next
Select previous
or
next track.
12
Cl
..
FRWD
FFWD
Push the
Push
the
Fast Rewiind button Fast Forward button
to
rewind
DVD
to
advance the
DVD
PREVIOUS
NEXT

DVD/CD/MP3/MP4 OPERATION
To
Load USB and
SD
Media
Insert USB device
or
SD card into proper socket on the front
of
the radio to begin playing media. To view, navigate and select
between music and video/photo media the
TV
or
Monitor must
be on and setto
AV
mode. Use remote NAVIGATION buttons to
navigate on screen menu.
Because
of
variations
in
3rd party recording methods some discs, USB
devices
or
SD cards may not play on this unit. Also, the SD and USB
ports are capable
of
playing short video clips. Long playing video files
may experience buffering delays and video freeze
if
viewing is attempted
through these ports. Bluetooth is notvideo enabled and will not play
video files.
APP
OPERATION
On
Your
iPhone
or
iPad:
•
Click
on
'App
Store'
•
Click
'Search'
at
the
bottom
of
the
screen
•
In
the
search
bar,
type
either
iRV33
or
iRV66
*If
using
iPad,
make
sure
to
click
the
'iPhone
apps'
option
On
Your
Android
Device:
•
Click
on
'Google
Play'
•
In
the
search
bar,
type
either
iRV33
or
i
RV66
at
the top
of
the
screen
*Please
note
that
there
is
no
space
in
iRV33
or
iRV66
for
either
type
of
device.
13
USB
I--
II

Bluetooth PAIRING
Pairing
the
iRV
66
with
a Bluetooth device
With the iRV 66 powered on Press the button marked
"Biuetooth"to enter Bluetooth setup. The iRV66 screen will
report "BT NO LINK" until a Bluetooth device is successfully
paired with the iRV 66.
The iRV66 will send a pairing request to the Bluetooth device
that reads
11
1RV
66
11
request to pairing with yourcell,please
confirm the numeric code
II
XXXXXX
II
shows on the
II
IRV
66
11
,click "pairing",the iRV 66 screen will
report"
BT
LINK"
to
confirm a Bluetooth devices is successfully paired with the iRV
66.
14
..
....
Press
the
Enter a numeric
"Biuetooth " PassKey
button
to
enter
setup


REMOTE CONTROL Guide
6.PLAYI PAUSE
Press PLAY/PAUSE button to suspend the
playback
of
CD, MP3, MP4, VCD and DVD media.
Press
it
again to return to normal playback mode.
7.MODE
Select between Radio/DVD/USB/SD/BT/F-AV
IN/TVaudio/FR-audio/DOT-DCC in/R-HDMI in1/R-
HDMI in2/F-HDMI in/HDMI
ARC.
&.NAVIGATION BUTTONS
Pressthe appropriate button to move around
any
menus
that
are selected on screen. Center button is
the selectI
enter
button.
9.0K
Use to finalize selection.
10.AM/FM
Allows you to select
FM
1,
FM2, FM3,AM1,
or
AM2.Each band can be auto programmed with 8
station presets. 24 total presetstations
for
FM
and
16 total preset stations
for
AM. (See FFWD
or
FRWD Radio Mode
for
auto scan features.)
11.ZONE 1, 2
and
3
Turns sound on
or
off
in the corresponding ZONE 1,
2
or3.
12.ZOOM-
DVD
Only
DVD, VCD: Press the ZOOM button once to enable
2X
zoom mode. Pressing the ZOOM button
repeatedly moves the zoom mode through 3X, 4X,
1/2X, 1/3X, and 1/4Xzoom levels. Press ZOOM
again to
exit
the zoom mode.
13.SUBTITLE
(SUB-
T)
DVD only. Returns to previously selected tracks.
Press to selectlanguage
or
to
turn
off
subtitles.Press and hold
for
3 seconds to return
to
previous chapter.
14.PREVIOUSI NEXT
Radio
Mode:
Press to select higher
or
lower
stations.
Disc
Mode:
Press
to
selectprevious
or
Next
track
or
chapter.
Pushing the Previous button, the
unit
will playthe
disc
from the beginning
of
the previoustrack.
16 Pushing the Next button,the unitwill play the
disc

REMOTE CONTROL Guide
from the beginning
of
the
next
track.
15.REPEAT
DVD Mode: Press REPEAT to repeat
the current track being played. Press ittwice
to
repeat playing all
of
the tracks.CD, MP3, VCD
Mode: Press REPEAT to repeat the current
track being played. Press
it
twice to cancel the
repeatfunction.
16.STOP
DVD, VCD, CD: Press STOP to suspend playback
mode. STOPwill
display
on the
TV
Screen.
Pressing STOP a second timewill end all
disc
playback.
17.MUTE
Press the MUTE button to turn
off
the sound in all
ZONE 1, 2, and 3. Press
it
again to resume the
previous sound levels.
18.AUDIO-
DVD
Only
Adjuststhe surround sound mode aswell as selects
the language. Mustbe
set
before play.
19.VOLUME
Press the
VOLUME(+
or-)
button to increase
or
decrease the volume level respectively.
20.SETUP
Press
for
DVD setup menu,Menu navigation
screens will
appear
on Video Monitor.
17

SYSTEM SETUP
ON
4801/5761
t:l
t:l.
4:3PS
-Iii
18
Press the
..
SETUA'' button to
activate
the
System Setup on
screen
display
Video
Monitor
Only
menu.
Use the NAVIGATION buttons to
navigate the following OSD
menu options.
RESTORE

LANGUAGE SETUP
ENGLISH
ENGLISH
••
19

AUDIO
SETUP
SPEAKER
SETUP
20
Table of contents