ISA ET A19 User manual

ET A19
Producl Monuol

1. Appearance and Keypad 0perations
*l
a. iE1:Fi..
i *iit_M.
home
a l']ress this button to return home from any
applicat ion or' interface.
a Press it to open recently opened application
o Preds it to start the nenu,' which a1lows you to
perfoim actions in the current interface or
opt ions' menu.
back a Press it io return to the previous interface,
or to close dialog box , options' menu -
notifiaation.panel or the keypad.
power a Press.lt to open the phone' s menu, then you
could choose to lock the screen. lurn off the phone,
or set it to the silent mode

up a Press it to increase the volume
o l'ress i t to turn the phone to vibration mode from
the silent mode.
down a Pr-.ss it to decrease the volume_
2. Using Memory Card as U Disk
f )qr wt to sd m6t, pict,s q otls fles to the phone! memory erd {rom
tre urper. yo slnld saneruyGrd 6 u di*first.
Set neruy ad a u dsk
1) Cmned d.E ptffi to tl-E (mrubr wi$ tJsB cble
appear in tiP gts bq
2) Use USB mobile transmission line will
computer
3) ln the notifietion panel touch USB is @nntrted , then touch "open'the USB
Stmge Device "
. Uninstall the U Disk from computer
The Methods as the same as connection, see the following
picture:
1 ) cell phone connections media equipment (MTP)
2 ) In the Settings, developers in closed USB debugging
options.
3 ) Use USB mobile transmission line will connected to the
computer
4) ]n the notification panel, the choice of "media equipment
can be in the PC for SD card
The notifiGtion i@n will
connected to the
-:4!i1!
',dEiri
',4[&i!]
,l[Br]
:l{rii 1d.-.
:lqE
i+G
E#{ !:;ti!irtrti:f!rij, i

. Notice: If you in the cell phone connections to the computer
playing media equipment, the mobtle phone will not be able to
identii/ memory CARDS. You will not be able to use some of the
mobile phone applications, like camera.
. The phone connection camera (pTp)
1) Using the USB mobile transmission line will connected to
the computer. Y{u don't have to shut down USB debugging, see
below. Only under the camera view images
2 ) After the connection can be directly in the pC check images
captured on camera.
. Notice: different PC operating system to how to operate to
normal use the U disk.
1' W|NT Can directly use
2 ) XP update windows media player to 11
3 ) lnstall wpdmtp.inf driver
4 ) Vista Unconfirmed
. Notice :On the PC operation assistant tool such as mobile phone,
Must be open the USB debugging.
3. I{IFI
Wi-Fi prcvides as far as 300feet (100M) Enge of wirelesharcd< acs. tf you ue
cell phone to @nnect wifi, you should @nnect to the wirds G pcint or lhot
spotsl.
. Notices: The availability and coverage of Wi-Fi signal depend on
the number, infrastructure and other objects penetrated bV the
signal.
Open Wi-fi and to connect to the wireless network
1) Press home>menu, then touch settings>wifi and internet
2) Seled the w:fi box, to open Wi-Fi. phone will automati@lly Gn for aEilable
wireless netrcds.

3) ToudrWi-Fisttings.lhen alistof Wi-Fi networkwillshrythefoundednetrcrk
name and surity sttings. (open nehffik or WEP. WPMruPA2 wi$ pmrd).lf
yomble the notifictim in Wi-Fi sttings, The sbtus bq will shN this io
1 Ellufi"nop"n *ilablewirelss netrcrkfounded.
4) Touch one of the Wi-Fi choices to connect the network. When
you choose open network, phone will connect to it automatically. lf
you choose WEP. WPA/WPA2 with password, you should type the
password first, then touch to connect it.
. Notices: when the phone is connected to the wireless network,The
stat$ bd witt siw this wi+i * L , and the appuimaJsignal
strengBEn(th€numberof litban).tfoudrttreqn(ted network, will displaythe
name of WHi retwrk stahs, s@, signal strength, surity infumatim
and lP addm. tf \pu Mflt to delete the wjrels sttings, dss touch "not
rere"o in the nght picture. tf you Mnt to @nnet b this netrcrk, you $ould
Hnterth* sttings,
. Notices:
Unls you cl@g not to em the netrcrk, otheMis, there is no need to
Hnter the mponding pawrd M)en nqt time @nnecting to the pebdy
strl/pted wirel6 network Wi-Fi wjll ffirch autotrEtiGlly, that i5 phone neednt
to perbrm additional step6 to @nnect Wi-Fi netrcd€.
. Notics:
Unls\ou chre not to rsre the netrcrkwith paMrd, otheruis, there'E rc
reed to @nter the @rgponding pawrd when nqt time qn(ting to the
pBiesv enoypM wirels netwrk. Wi-Fi will sarch automati@lly that it phse
reedn tto perfom additional stepsto connectWi-Fi netrcrk.
. Connsttootherwi-Fi netuod€
1) lntheinterlaceof wirelsand net\rc4toudrWi-Fiettings.ThefoundedWi-Fi
netrcdG will show on the Wi Fi netrcrk lisl.
2) Toudrotherwi-Fi netrcrls,andthenyouononnecttothisnetmrk
. NotiE: ln addition, you can surf the internet via GPRS. We default
that the GPRS in SlMl is opened after started, users can select
manually ,the specific location is " settings>wireless and
internet>data connection ", touch " SlMl . 5lM2 . no data
connection", when the dotturns green, it's already opened..
4. Bluetooth
Tum on Bluetooth tr set the phone en be detected
1) P6 home>renu,thetouch Ettins.
2) Touch wirels and intemet then ch@e Blueiooth bq to open tlE Bluebdir
tunctim. After started, the status box will shtr thn -n I). r* "* ".
dwiG" the itsbrEtosnforall dwiewi*rin nnge.
3) Touch Bluetooth settings, all the devices founded will display in
the list under the icon.
(select the box "can be detected", set it to be detected, the other
Bluetooth devices will be able to find the phone. )
important: the maximum detectingtime ofthe phone is 2 minutes.
. Pairing and connection of Bluetooth headset
1) Press home>menu, then touch settings.
2)Touch wireless and internet>Bluetooth settings, then select
Bluetooth box, then your phone will scan for the Bluetooth devices
within range ,and show the founded devices in the list under the

tcon.
. Tips:
a. lf the list can't find your equipment, touch scanning equipment to
re-scan it.
b. Make sure that the devices wanted are under the detected mode.
3) Touch headset in the equipment list to finish the connection.
. Notices: generally Bluetooth devices need password to be paired,
often use IOOOO.] as the default password,4)The pairing and
connecting status will show under the headset in the Bluetooth
devices list. When the headset connected to your phone, the status
box will show this icon (8)r".n, .onnected. Then you can use the
headset to make or receive callings.
. Cut the connection to the Bluetooth
1) Press home>menu>settings>wireless and internet>Bluetooth
settings.
2) ln the list of Bluetooth equipment, touch or tap and hold the
connected hand-free headset.
3) Press and select 'tancel the pairing".
. Bluetooth proximity sensor
After pairing the two device,you can test out the signal is strong or
weak by the Bluetooth proximity sensor device
5. Mail
5.1Gmail
. Create an electronic mail account
Select mail> settings. You can activate or edit existing e-mail
accounts as well as create a new e-mail account.
a. Select mail, Google account setting interface appears. Then touch
' next step' > create account>enter name, last name and e-mail
account.
b. Google servers determine whether the name can be used, if so,
new interface appears prompting enter password, then iudge the
password' security, users who doesn't meet the requirements need
to re-enter the password,
c. Successfully register a new Gmail account, a messenger created
automatically for testing.
. Loading mail account
a. Open Gmail skip introduction screen>loading interface appears
>select load
b. Enter name, password then load
E-mail account initialization,prompting "login successful" All Google
accounts will be synchronized.
. Creating and sen{ing,mails
When creatinB mails, select mail > creating mails. Enter the
address(recipient). theme and contents. Press MENU you could
'append'. 'Add Cc/Bcc' , select send or discarded.
. Receive mails
There is tone for new mails, in the status box will show this button
K6
f :il1il
U, or"r, ,enu > 'refresh' , refresh and update the number
of the unread mails in a proper way.
. Delete mails
When loading a mail account, ifyou want to delete it, you need to
restore factory settings . When loading a second one, you could
press the menu button to delete it.
L1

\
Notices: many functions depend on Gmail Account, for example:
Electronic Market. Google Talk. Sync Contact and Calendar
5.2 Email
. Load Email.
a. Open network connection,
b. In setting the account interface, input the correct email
address and password and click next mobile phone
automatically complete the sending and receiving server
Settings. Pop-up mail find frequency, and user Settings
interface, complete Settings, click next.
c. For account creation name/ the editor of the law that email
useT name/ and click next. Complete set, synchronous mailbox.
. Create and send Email
When creating mails, select mails > create mails. Enter the
address(recipient), theme and contents. Press lvlENU you oould
'append'. 'Add Cc/Bcc', select send or discarded oT save as
draft.
. Check the Email files
Click on the bottom folder options, list all folder options
@
X rihrx
& r,,!s
6. Phone
When the icon of internet server appears in the screen, you could
dial or receive callings. The signal bar on the top right corner show
the strength of network signal (the maximum with 4 signal bars) .
. Start dialinc
Open application's main menu>phone. You could choose SlMl or
SlM2 to do the dialing.
ffiq
. Dialling
At the dialing Keboard , enter the phone number, and then click the
dialing key, after that,you should choose one SIM card or internet
call. lf needed to call the extension,you could click the "dial pad" in
the bottom of the screen to open the interface or press menu key to
::*:;i:lay 2 seconds", and then enter the number of the
The dialup keyboard input number, click Menu can IP diaFup or
speed dial
. Video call: video call usually refers to the Interhet and mobile
Internet based on (3 G Internet) end, through the phone
between the speech of the real-time transmission and image
(user of bust, photographs, items, etc.) of a way to
13

comrnunicate. Only 3 G to support this function. Input a number
click video dial-up, each other answers the phone after both ian
through camera for vjdeo calls.
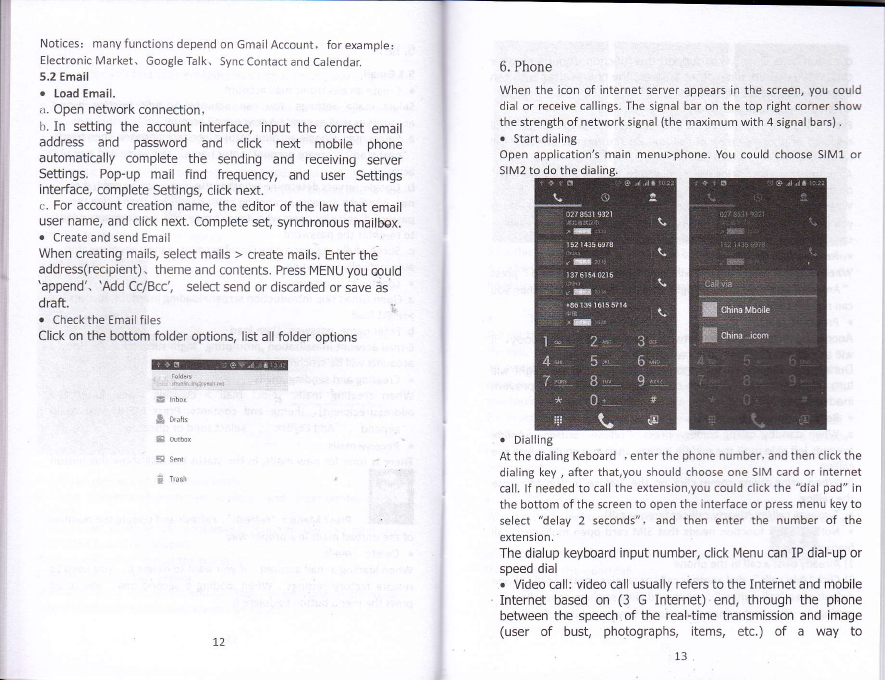
. Telephone calls in the call log
Every telephone number called and received ;n ,,SlM1, SlM2', will
reserved in phone's menu of call log. on the top left of every call
record will show "SlM1 or StM2,,
All numbers in the call log can be dialed by clicking the button ,dial,,
on the right side of the screen.
When number list appearing, click it to catch detalls: press it Ior ong
you could dial via "SlM1 or SIM 2,,, meanwhile you can edtt delere,
save the number or do other operations.
. Receive callings
When calling comes ( top left will show from which SIM card ) gress
"Answer" and slide towards right until the middle button, then you
can recetve callings.
. Proximity sensor
According to the distance between phone and human body, it
will adjust automatically the switch of the backlight.
During the call, close the phone to the ear, flie backlight will
turn off automatically, which could save batteries and [revent
inadvertently touching.
. Refuse to answer the phone
a. When standby, calling comes, press .,refuse,, button and slide
towards left side untjl the middle button, then you could refuse the
calling.
b. When using,calling (omes,click on the ,,reluse,,button to reluse
the calling.
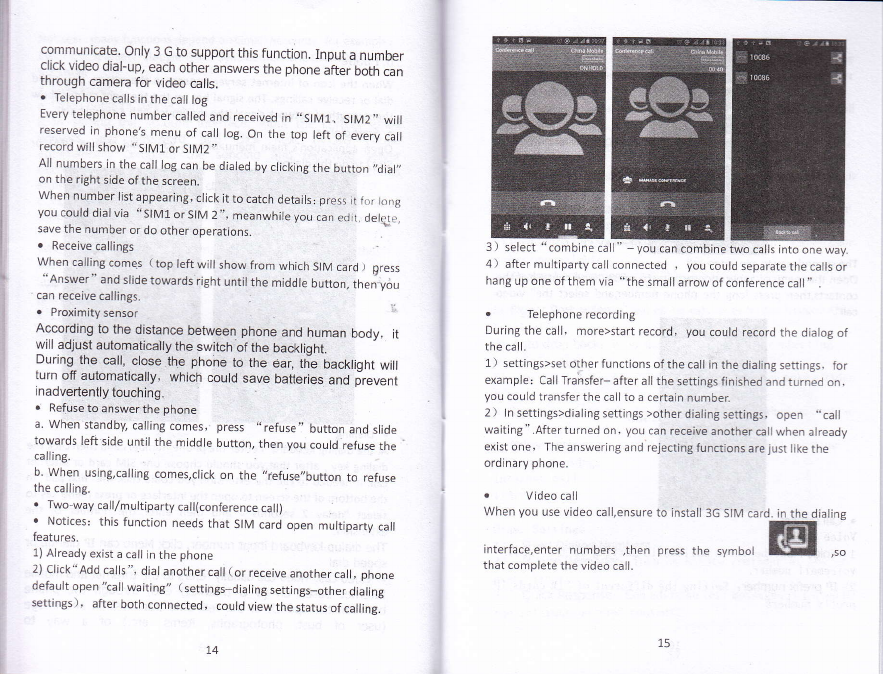
. Two-way call/multiparty call(conference call)
. Notices: this function needs that SIM card open multiparty cajl
features.
1) Already exist a call in the phone
2) Click"Add calls ", dial another call ( or receive another call, phone
default open "call waitjng,, (settings-dialing settings_other dialing
settings), after both connected, could viewthestatusof calling.
3) select "combine call" -you can combinetwo cails into one way.
4 ) after multiparty ca I connected , you could separate the calls or
hang up one of themvia "the small arrowof conference call"
. Telephone recording
Duringthe call, more>start record, you could record the dialog of
the call.
1 ) settings>set other functions of the call in the dialing settings. for
example : Call Transfer- after all the settings finished and turned on,
you could transfer the call to a certain numben
2 ) ln settings>dialing settings >other dialing settings. open .'call
waiting " .After turned on, you can receive another call when already
exist one, The answering and rejecting functions are just like the
ordinary phone.
. Video ca ll
When you use video call,ensure to install 3G SIM card. in the dialing
m
in:er:dce,enier "unoers ,:hen press tne symool lU ,so
that comolete the video call.

The second way to use video call
Open the menu of applications>contacts, press one contact of tfie.
contacts,tnen press long the phone number,and select the" vidFo
call".
3) Call forwarding: Can scl respectjvely 2 a SIM card, the
line is busy, and no one has to roceive, not be conncct lour
connccti ng way
3) Call barring, Can set respectively two to the SIIY card call
restrictions
4) AdditionalSettings, a.Uy phonc number b.Calt r{aitting"
Video Ca11
1) Local video replacement: Set a picture to display when
camera oft use.
2) Displaypeervideo: Display picture fol leplacing peer
video when it is unavailable.
3) PeerVideo replacement: Set apicturc 1o displar- vhen peer
video unavailable.
4) Enable back camera, Availurble to sNitch cameras if turn
on.
5) Bigger Peer video' Turn on lo make peer video blgger than
1oca1 video.
6) Autodropback, Drop back to vojcc call connccting
rr"n ic,l)
7) Outgoing video call: Displa_v local vjdeo rhen make a vid(,o
ca 11.
8) Incoming video call, Display local video rvhen acccpl an
inconing vidco call.
9) Othersettinqs, a. Ca11 fonarding h.Ca1l harring
c.Additional settings
Jntetnet cal l
I ) Account
2) Lse 1 ntcrnet cal I 1 ng
other Settings
1) Fixed Dialing Numbers
'2) lt4inute Reminder, Tuln on minute reninder at 50s of
c.vot1, ltirul o.
3) Quick Response: Ca! .,dit the text messagcs rojectcd by
the information \,hen content.
. Call settings
I'oice Call
1 ) \'oice lvlail The voicc nailbox in setting in
r:rcenai I numbc.r.
: IP preflx number: Settins the dift'erent of
::-:::t ::umbers
the lnput
Sll\,1 calds lP
7"1

7. Messaging
. lmportantr the message title of this phone is the phone number,
will be reserved in s similar for of dialog, instead of the usual folder
structure. Messages with blue background are those received, and
messages with white background are those sent.
. Send SMSto certain phone number
1) Press home>messaging, touch ,,new messages,,
2) ln the interface of "edit":
a. Click " recipient" box to start input method, you can also click
" enter" box to start input method, ,n that way you can enter
characters.
b. Click thebuttonof "sendfromSiMlorSilVt2'tostartsending.
. SendMMstocertainphonenumber t.
When creating message. it was defaulted as SMS. it will be turned to
MMS when following operations were done. you can send MMS:via
clicking "send" after editing.
1) ln the interface of "edit", Click the button of ,,Menu,,:
2) Click "append ", you can spend the following attachments, then
II
t
i
I
I
I
i
1*: Slide l
!'-'a slide 2
f-i si;de4
:-*l slide 5
i*-i slide 5
a, lf you want send MMS with many
pages/ you should select "append
PPT" in the "append" interface-
b, You can append 10 pictures, with
the form of GlF, JPEG.
c, Click "adding themes", the box of
l-"1' slide 8
i-:
. Send messagesto multiple numbers
Enter multiple numbers in the box of entering, each number is
divided by the comma in English.
Click on the right side of the head with the receiver plus icon,
in the address book

. Notices: For now this phone can mass messages to almost 20
numbers, the correct number depends on the characters. you can
only enter 312 characters in the box of " recipient,, .
When a message is sent or sent again, a little yellow letter will
appear The number L or 2 on the letter refers to SlMl or SlM2.
When message sending failed, a red triangle with exclamation will
appear.
when editing information other functions of Menu button
r,i:,,!. &
Add Sid--**--inrtdd subject
' ;**
2)click search lcons, You can enter the people search interface.
a.To enter the Numbers or letters and the list of names ofthe
agreement. which
lxl3
1?!?
itiz
Discard ----------!aE;riscff d
1:-.. .
lnsqL'crl.rt-InsFrr quiqk rcrl
I]
*trrsert
*------.3C-Updare abrur sstri.ss
8. Peop1e
. Open the menu of applications>people
Default display phone contacts and SIM card contacts, sort contacts
by first letter of alphabet.
Sa{ings
wrr3
i&{2ma
x*x:2ca
;$d34&
ffi44
:Blit!48{
20

You can edit contact head,
save name, telephone number, group,
lick "finish"
b.If it were not so sdarch to match of the contact, interface will
appear 'not find any contact.
3 ) Click "Add Contact,, lcons,Can create New Contacts
Select save _contacts to phone or a a SIM card. into contact
editing interFace.
In the mobile phone can local. SIM card and SD card three
parties achieve contact information of the copy each other.
First choose the "copy source', and then select the next step,
selecting copy contact to, can complete the contact's copy.
e. Menu >Accounts
Account and synchronization set routine synchronous Settings,
can choose background data and automatic synchronization.-
f. Menu >Share visible contacts
All contacts can be imported into the SD card, or through
bluetooth, email, text message or MMS share
. Open the application interface >Contact, change to the
group.
1) Click "Add group" lcons can create new group, Justto be saved
in a cell phone group
,, .]
::l1l:
- :::tl,_
ir
tt-
i. -l .:l
ul
9'
w
4) In contact interface, click on the Menu button
{t2
i8
-
2) In "the group name" column input group name, in ,'typ€ in
the contact's name" column input contact key word, can be in
all of contact search, and added to the group. Finally click
"finish''.
3) In a group, click on the Menu button, Menu functions
a. Menu >Delete contacts
Can "All"Icons checked, click the delete button, delete all the
contact person, including cell phone and Sllvl card of contact.
can separate check one or more contacts, click the delete,
delete the selected all contacts.
b. Menu> To display of the contact
You can choose alI contact, one a SIM card of contact, the
mobile phone contacts
c. Choose from the definition, but also on a Sllvl card and cell
phone choice whether or not to show that all the lone contacts.
d- Menu >lmport/export
I
t
a. Menu>Update
You can modifli the group name, delete or add group of
contacts
b. Menu >Delete
You can delete the group, and will not delete the contact itself.
*an.-only, hsl(€...ra.i
22 23

enter URL.
. Homepage
c, Menu >Send messaging by group.
Automatic new information, and the group added to contact the
address bar recipients
d. Menu >Send Email by group
If contact group have the same email address, the automatic
new mail, and E-mail address in the address bar add to the
receiver
9. Browser
lnternet explorer
1)ln the interface of browser, touch address filed and enter the UgL.
2)Use keypad to enter URL. The approprjate web sites will appear on
the screen. You can touch it directly go to the page or continue to
. Functions of menu
1) Menu>Backward
After browsing through multiple pages, will return to the previous
page the current page,
2) Menu>Farward
After browsing through multiple pages, will move to a web page
after the current page.
3) Menu>Windows
You can view all open windows to the current.
4) Menu>Bookmarks
a. Click the "Bookmarks"to make the current URL as a bookmark
saved.
b. Click the bookmark under the bookmarks list,will open the URL.
5) N4enu>More
a. Add bookmarks,save the current URL as bookmark.
b. Find on page,search what you need in current page.
c. select text,in the text, click and drag to select a piece of text.
d. Page info,display page address and other information ofthe
current browsing.
e. Share page,select the Bluetooth or SMS to share the current page.
f. Downloads,show all the content downloaded.
g. History, Show your browsing history, and view the most visited
pages of information
h. Setting,containts a variety of browser settings.
10 Sound Recorder
Recorder can record voice, and send it quickly via Bluetooth or N4MS
as well as make it as ring tone.
. Notices: recorder can only save the audio files as AMR format.
1) Click the recorder application.
2) Keepthe phone's microphone nearthevoicesource.
3) Click recorder to record voices,and click to stop or Recordinglist.
All recordings save in my recording folder in the default music
program.
i,
lf you do
nfigEi
rrt:&
:ll xs,3
r.- w
/ "\ /'*\
r @ s..w
Select "homepage", youcould load inthesethomepage
not set it, you will use the vendor's pre set sites

XM
11. Clock
1) open the menu of apptication, ctickffi
ii
2) Click screen except the alarm at any position, screens. black.
time with white shows, this time the sianaOv time to siieen wiij
not extinguish screen. Click again on the i.r".n, unO i"ltoi"
normal clock interface
3)Click screen set alarm button and enter the alarm clock set
interface
@IK
-'!
l
. Alarm
After funclions set. phone will arrives in the setting time to alert you
by ringing or vibratjng to achieve jt's function. press Menu to add
alarm, you can also add it from the adding interface. you could set
the alarm according to your needs. ln the interface of alarm will
show three closed alarms (two alarm clocks are Monday to Friday
8:30,9:00).
Edit
You can edit the current alarm, you could edit time. ringing tones.
vibration, repeat form and tabs.
72. Caaslator
calculator
this function can turn your phone into calculator, it can do some
simple calculations.
. Touch the number keys to make it appear in the blank box.
ln the interface of calculator, press MENU button or hold down the
screen to the left, then the senior panel appears.

H
13. Camera
13.1camera
. Prior preparation
lnstall memory card before using the camera or video camera. Ail
your photos or videos taken by the phone are stored in memory
card.
. Open camera
Press home, touch menu, select camera, Choose the video mode if
you want to make videos. The screen will automatically switch to
landscape mode.
. Take pictures
1 ' Aim your obiect with the screen.
2 ) Touch the "shutter" button on the screen.
3 ) After taking, photos will save to the camera,s galley folder with
the name of taking time.
4 ) You can view the photos by touching the preview box button.
5 ) Camera settings
You can touch the button of "setting Menu,,in the interface of
camera to do the settings
Under aamera viewfinder mode, press Menu, you can switch to
video or photos' galiery.
ln the top right of camera viewfinder mode, display the preview of
:re previous picture. Touch preview box, the photo display on full
:creen and you can enlarge it to view details.
. Camcra Sottings
1) Capture mode: normal. Face beauty. Smile shot. Best shot,
EV bracket shot . 4 shots. 8 shots. 16 shots.
2) HDRsettings: off, on.
3) Flashmode: Auto, on. off.
4) White balance: Auto, lncandescent. Daylight. Fluorescent.
Coudy, Twilight. Shade. Warmfluorescent.
5) Coloreffect: None. Mono, Sepia. Negative, Aqua- Blackboard.
Whiteboard.
6) Scene mode, Auto, Normal, Night, Sunset. Party . Portrait.
Landscape, Night portrait. Theatre. Beach. Snow. Steady Photo,
Fireworks, Sport. Candle light.
7) Camerasettings: Exposure, Selftimer. sharpness, Hue,
Saturation, Brightness. Contrast. PictureSize. lSO. AEmeter,
Anti-flicker. Restore defaults.
13.2 Video camera
. Prior preparation
nstall memorv card before using the camera or video camera. All
f,

you. photos or videos taken by the phone are stored in memory
card.
. Open camera
Press home, touch menu, select camera, Choose vjdeo camera mode.
The screen will automatically switch to landscape mode.
. Take pictures
1) Aim your object with the screen
2) Touch the "shut,"r,, Uu,,* on,t",.r""n.
3) After taking, photos will save to the camera,s galley folder with
the name of taking time.
4) You can viewthevideos bytouchingthe preview box button.
5) Video camera settings
You can touch the button of,,set,, in the interface of camera to do
the settings
Under camera viewfinder mode, press lienu, you can switch torideo
or photos'gallery.
On the top right of camera viewlinder mooe, o splav the preview,of
the previous video. Touch preview box, the vioeo wilt d;splay on futi
screen and you can touch the play button to vjew it.
o Videos settings.
1) Flashmode, on. off.
2) Whitebalance: Auto . lncandescent,
cloudy. Twilight, Shade. Warmfluorescent.
3) Color effect: None. Mono. Sepia. Negative. Aqua. Blackboard.
Whiteboard.
4) Timelapseinterval: 1s. 1.5s. 2s. 2.5s. 3s. 5s. 10s.
5) Video quality: Low. Medium, High. Fine.
5) Camera settings: Exposure. Self timer, Sharpness, Hue.
Saturation. Brightness, Contrast. Picture Size. lSO. AE meter,
Anti-flicker, Restore defaults.
14. Ga1 lery
. Open gallery
Press home, touch label of applications, then touch photos'galley.
ln the interface of camera, Press menu to open it, then touch to
operate.
2) Files lnterface
a. In the library the interface, upper right a slide show the play
button, click on the way to the slide circulation play all image
files.
b. Click on the images, enter the picture to see intedace.
c. Choose a long press image files, pop-up corresponding
operation.
31

. Use images
After taking pictures, you can view them and share them with your
friends.
a.Use E-mail to send pictures, choose Gmail or E-mail, pictures
will be automatically added to an E-matl. Write your
information, click send.
b.Use Messaging to send pictures: Select the information,
pictures will be additional to the MMS. Write your
information, click send.
C.Use Bluetooth : Bluetooth list, select already pairing of
bluetooth equipment, through bluetooth send a picture.
4 ) check pictures
In the photo view interface, on the screen or so slip, can
forward or backward view photosEdit picture.
a. Edit light: Fill Light Hightights Shadows Auto-Fix.
b.td r .n E *t.'e, 5 : Cross.process posterile Lono
Documentary and so on.
c. Coior Eflects: Warmtn SaLurdtion B &W Sepia Negative
Tint Duo-tone Doodle.
d. Crop:Crop Red Eye Straighten Rotate Flip Sharpen.
6 ) Crop picturesl
a. If you want to adjust the size of the clip, please hold the edge
of the cutting tools. The arrow appears clip, from the trim your
flngers inside or outside the center to drag, can adjust its size. b
If you want to adjust the big hours in the clip that keep
proportion, please hold down any of the tour corners of the one.
c. If you move to the clip of the picture area of the other, please
hold cutting is internal, then move to drag the flngers to the
position.
. View images
1) ln the picture interface, touch photo album to view images.
2) Touch the thumbnail to view pictures on full screen.
You can choose to display small or large thumbnai s. Hold down the
screen towards the eft side to view the next photo or towards right
to view the previous one.
ln the photo album or list, press and hold down the picture towards
left to view the next picture, or towards right to view the previous
one.
32 33

bti.te s.h&le .otrr.ol Plared or pMe tutro! Sqe.n ..al ins td'G,
15. Music
The phone can play digltal audio files in memory cardThe
followingformatsareavailable:AMR. M4A. MtDl, Mp3. WAV.
OGG.
. Open Music
PB home, toudr the labelof appli,ctiont torch m6ic Tien the irErhe of Music
Media appeaE
. Music Media
Your music files are dsified a@ding to the following four etegis: artss,
albumt engs and play lisb. Ioudl ore of thffi etegorie; pu en viw the list
imi,Ce.
Continue the operations, until your wanted music appears. Such as,
if you choose Artists a ljst of artists sorted by the numbers in English
will appeaI Choose any on to open the list, then all the albums and
songs will appear Select one album, then the songs in it will be
played.
. Tips: You can play all of the songs in the interface of
music media, in random sequence . Press Menu, and then touch
the Party Shuffle. Then will start playing the first song randomly
selected . To close tfie Party Shuffle, press Menu, then touch to turn
off the Party Shuffle.
_l
r6:di &,rr.n.riir tiPl cr* b. l
*oor-".,,'r.. _ |
.1ru* dii drr tt {sbil. io er dt rhe

. View lyrics
When the corresponding tracks have lyrics file, the player displays
the lyrics sources. Click the up arroW you can play music, view lyrics
at the same tlme,
16. Calender
Enter the calender application
Load Goggles accounts, enter the application, ln the interface of
month or week will use gray to highlight the day. Display default the
date on the current month.
ln the interface, press menu, 4 display modes will appear:
1) Schedule lntrface shows a certain schedule{click on the initial
time and view forward,click the final time to view backwards )
2) day lrterhce displa\6 a day's rhedule (ld dirJed daE)Side arcund to tum
page a@ring day
3) reek lnterhc displ4,s a rek's sdredule (ld didcd date)flide arcund to
tum page a@ringwk.
4)today lnterhc displq6 a day's sdredule, ln the inErhe of rcnth or rek ue
gEyto highliehtthe day.
5) month nterface displq/s a mnth,srhedule (lat dij€d date) Side arcund
to tum page ac@ring month.
. New activities
1) P6menu, more<touchnewactivities
2) Enterttrenameof activityintheactivitied bq.
Noti6: Such as special occasions such as birthday or a day with
events, set the all-day option to Yes, lf the activity is at a certain
time period, select the start time and end time.
3)Enter the rent lcuon, desription, guests, repeat, remind time
4) clickfinishtoretumtoclendar
@KP
r-irr.r,. ,. l xq :.r)i:l'r.r.'.
& m,t
$ spi
1lt
17. FM Radio
FM Radio
Through this program, you may listen to FM radio on the device,
FM radio use the wired headset as an antenna to receive
signals, before opening this program ,you can install lhe
ori-ginal equipment-headphones, when listening, you can switch
it manually to speakers or the mode with wired headphones.
;,::" "":" M to op"n tn" apprication or FM radio,
1) Click on the "search", automatic scanning search FN4 channel,
and channel in list inteface, list all channels
2)Click "FM recording", listening to the radio to the current can

be recorded. The tape recording to default file name can be
arbitrary well-preserved input fllename. Save to FM recording
the default file.
3)Click "exit" closed FM radio, cannot listen to in the
background,
4) N4ust be insert cable headphones as antenna, but click on the
horn button, can Dut the FM radio.
5) Click on the frequency of the rear of the five-pointed star icon,
channel was added to the collection channel list.
dd€d i. rn. c,lleer
. Listen to Fly radio background
Click to return to key, the radio program moved to the
background, right now you can still continue to listen to the
show. and can also carry out any other program.
18. Settings
Your service provider may default some device settings, so you may
not be able to change these settings.
. SIM managemenl
1l Touch it to choose or to disable the slM card, the card is grey
when disabled, the flight mode displays on status baI
2) The default slM card,you can choose Voice call,Video
cll,Messaging,Data connection.
o Wireless and inter""B
Wi-Fi and Wi-Fi settings rouchwi-Fi E.
oo"n E. open wi-Ft,itcan search foravailable
networks automaticaily, networkswithout password can be used
directly, others need to enter the password first.
Notice: Open Wi-Fi then the flight mode, wi-Fi will close
automaticallyr Open flight modethen connect Wi-Fi' it can be used
normally.
. Bluetooth
Bluetooth switch and setting up the touch bluetooth open, will
automatically be search nearby bluetooth open the equipment.
. Data usage
1. Data usage 'set up mobile data traffic limit, flow more than
limit will be close mobile data services.
. More
a. Airplane mode
b. VPN
c. Tethering&portable hotspot
d. Mobile networks
o Audion profiles
This option gives the phone tones' settinBs under the status of
receiving calls or notification. lncluding: Vibration, volume, iing
tones, ring tones notification and feedback ( Button operation tone,
select sound, screen lock tone, touch ) To adapt every environment.
l) Select "General /Silent /Meeting / Outdoor, Touch the spot on
the right, when turns green ,it opens.
2)Volume: lncluding the ring volume and alarm clock settings, you
38
Table of contents