Isotonik Studios Percolator User manual


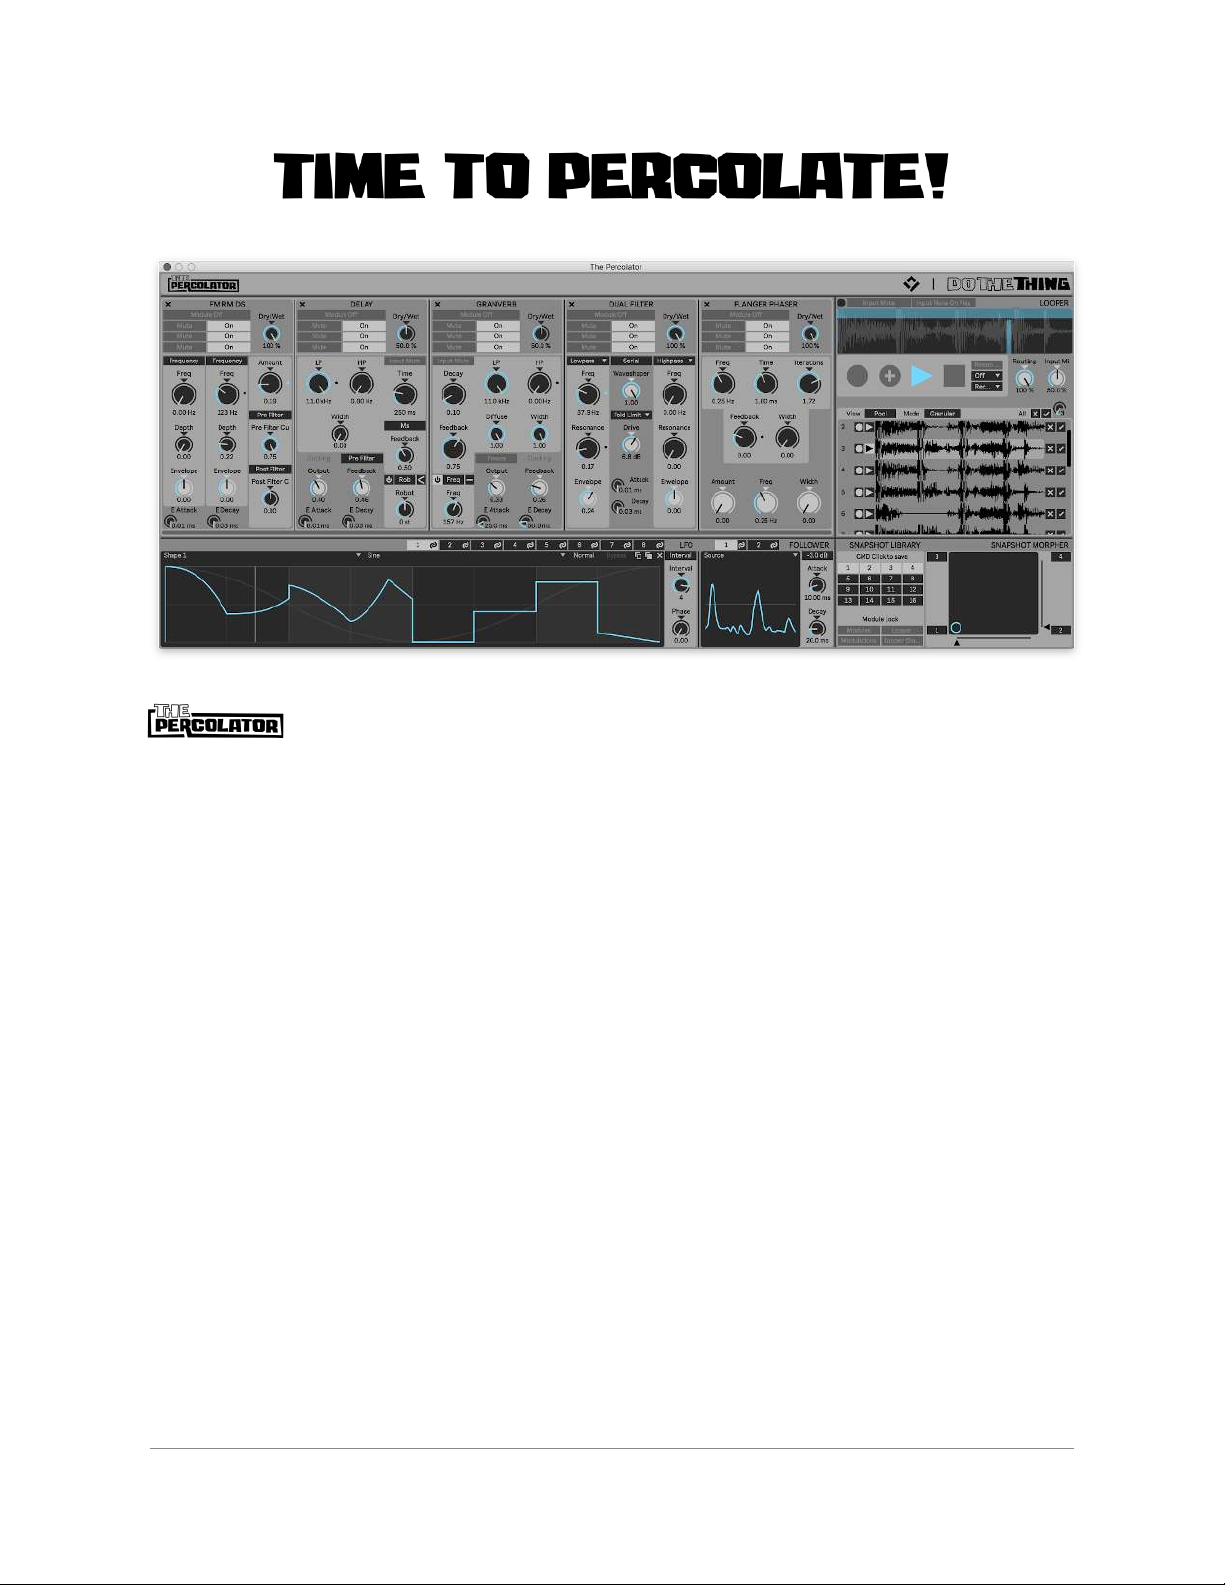
is a semi-modular multi effects audio processor packed with an
extensive modulation, a Granular Looper and a modular Snapshot System. We
designed The Percolator with both sound design and also live performance in mind
and hope that the Percolator delivers you a unique and intuitive way to tackle a wide
range of sound bending tasks, from adding gentle movement to pads and chords,
creating interesting textures and movement, through to completely mangling and
rearranging loops or even whole mixes into new unrecognizable results.
The Percolator was inspired by a desire to try to somehow meld hardware and
software characteristics into one audio processing experience. We wanted a singular
interface, with everyone in one place and always accessible with familiar modules
and control. We needed a way to instantly and effortlessly record things when magic
happens. We added a few twists of our own to the effect modules, but the real heart
of The Percolator is the interplay between the effects, the modulations and
snapshots and the Looper. That’s where the good times are.
We have put a whole bunch of love and aspiration into the design and development
for The Percolator and are super happy and proud of how the product has evolved
through this process. We hope you have as much fun creating with it as we did
designing and building it - and as we do have using it ourselves.
Go! Mangle! Modulate! Percolate!
S & S. Dec 2020.
2 The Percolator Getting Started Guide. © 2020 Chaos Culture & Do The Thing

Getting Started Guide
Getting Started Guide 3
1. Overview 5
2. Effect Rack & Modules 7
3. Effect Module Mixer Section 8
4. FM RM DS 9
5. Flanger Phaser 11
6. Delay 13
7. Dual Filter 15
8. Granverb 17
9. Mixer 19
10. Modulation 20
11. LFO Module 20
12. Envelope Follower Module 21
13. Mapping Modulation Sources to Targets 22
14. Internal Modulation and Live’s Automation 23
15. Snapshot Module 24
15.1. SnapShot Library 24
15.2. XY Pad 4 way morpher 24
16. Looper Module 26
17. Looper: The Loop Pool 27
17.1. How to Record Loops 28
17.2. How to Record several consecutive takes into the Loop Pool. 28
17.3. How to Overdub the currently playing Loop through the effect
modules to a new Pool Slot. 28
17.4 Loop Pool Playback Modulation 28
17.5 Loop Pool and Snapshots 28
18. Looper: Granular Player 29
3 The Percolator Getting Started Guide. © 2020 Chaos Culture & Do The Thing

1. Overview
1. Effect Rack Slots
2. Effect Module
3. LFO Module
4. Envelope Follower Module
5. Snapshot Module
a. Library
b. XY Pad Morpher
6. Looper Module with Granular Player
The Effect Rack can hold up to 5 Effect Modules simultaneously in a serial, left to
right, configuration and can be easily reordered. The Effect Rack includes an internal
limiter which sits on the Effect Rack output and before the Looper.
Modulation is handled by 8 LFOs, consisting of up to 8 shape variations each
(different Shapes can be saved to different Snapshots), and 2 Envelope Followers,
with some modules having further limited Envelopes on board. Almost anything can
be a modulation target and sources can be mapped to several targets.
The Modular Snapshot System consists of 2 components; a Library with 16 Snapshot
Slots and an XY Pad which enables morphing between 4 assignable Snapshots. Each
Snapshot can save the automatable parameters of the Effects Modules, the
Modulation Module and mappings and the Looper including the Granular Player.
The different Module sections (all effect modules are treated as one layer) are each
5 The Percolator Getting Started Guide. © 2020 Chaos Culture & Do The Thing

assigned their own Snapshot layer and layers from different Snapshots can be
recombined and even saved to new Snapshots.
The Looper enables recording of the output signal of the Effects Modules. The output
of the Looper can be routed back through the effect modules for endless resampling
and mixed with incoming audio. Up to 16 Loops can be temporarily saved to the
Loop Pool and recalled to the player. Playback of Loops stored in the Loop Pool can
be modulated.
The Looper also features a Granular Player with up to 8 Grains simultaneously
available for getting all weird, grainy and stretched out.
6 The Percolator Getting Started Guide. © 2020 Chaos Culture & Do The Thing

2. Launcher Device & Options
1. Click Open to launch The Percolator interface.
2. Click the Option button to expose the device options.
1. Theme sets the theme for The Percolator interface.
2. Accent sets the Accent colour only to any particular theme.
3. Framerate sets the frame rate for a variety of interface feedback including the
Mixer module meters, LFO and Looper playheads and so forth. Lower frame
rates are less demanding on the Max for Live framework and may help with
performance when using many MfL devices simultaneously.
4. Hints Menu enables hints to be displayed when hovering the cursor over any
parameter, explaining what that parameter does or reveals key commands.
5. Scrollbars shows or hides a scroll bar for the Effect Rack if The Percolator
interface is resized by the user and cannot display all 5 Rack Slots.
7 The Percolator Getting Started Guide. © 2020 Chaos Culture & Do The Thing

3. Effect Rack & Modules
The Effect Rack section of The Percolator can hold up to 5 simultaneous Effects
Modules at any time. We’ve included 6 modules with this release and have some
interesting ideas for possibly adding further modules in the future. All effect
modules share some common features and interactions. A visual reference, the serial
signal path runs left to right through the Effect Modules and then to the Looper. The
output of which can then be routed back to the Effect Rack input.
To load a Module click on the “+” symbol in any of the empty slots.
Click on any Module Icon to select it from the pop-up Menu.
8 The Percolator Getting Started Guide. © 2020 Chaos Culture & Do The Thing

4. Effect Module Mixer Section
All Effects share a common Mixer section at the top of the module.
1. To Delete a Module click on the (X) in the top left corner of any Module.
2. Each module can be individually activated or bypassed by clicking on the
Module On/ Off button.
3. Change any module's position in the rack by clicking and holding on the title
bar and dragging the module to the desired slot.
4. Each module features High, Mid & Low Frequency Band Output Mute and
Module On/ Off Buttons . These allow you to apply module effects to, or Mute
the output of, any single band, any combination of bands, or all bands.
5. To the Right of the Frequency Band Mute and Bypass buttons is the Wet/ Dry
mix.
Try different combinations of Muting and Bypassing bands to hear the difference
in tone and behaviour at the click of a button.
Change the position of any effect module in the Rack to quickly and easily
experiment with how the effect modules interact with each other in different
configurations.
* Although the Percolator can swap modules in real time, this can cause a
momentary audio drop out and is not intended as a performance feature.
The effect modules can generate frequencies that cross the band crossover
settings, even when those bands are bypassed or muted.
9 The Percolator Getting Started Guide. © 2020 Chaos Culture & Do The Thing

5. FM RM DS
This module features Frequency Modulation, Ring Modulation and Downsampler
components.
Frequency Modulation (FM) Mode
1. Frequency/ Note Button toggles between frequency and musical interval
modes for the Frequency/ Note dial.
2. Frequency/ Note Dial sets the position of the frequency modulator’s pitch.
3. Depth sets the amount of the frequency modulator effect.
4. Depth Envelope sets the amount of the envelope in positive or negative
values.
Ring Modulation (RM) Mode
5. Frequency/ Note Button toggles between frequency and musical interval
modes for the Frequency/ Note dial.
6. Frequency/ Note Dial sets the position of the Ring Modulator’s pitch.
7. Depth sets the amount of the Ring Modulator effect.
8. Depth Envelope sets the amount of the envelope in positive or negative
values.
9. Envelope Attack
10 The Percolator Getting Started Guide. © 2020 Chaos Culture & Do The Thing

10. Envelope Decay
- Attack and Decay control the attack and release time for the FM and RM
Depth Envelope.
Downsampler (Sample Rate Reduction)
11. Amount sets the amount of rate reduction being applied.
12. Pre Filter On/ Off Button activates the Low Pass filter placed before the
Downsampler. This combination can be used to create the typical "YAYA"
effect that you can often hear in old Daft Punk records.
13. Amount controls the filter cutoff frequency.
14. Post Filter Fader On/ Off
15. Amount activates the low pass filter placed after the Downsampler. Here, the
more you downsample, the lower the filter goes. You can use this to hide the
very nasty aliasing created by the downsampling which can help to produce a
less digital, more lofi style sound.
11 The Percolator Getting Started Guide. © 2020 Chaos Culture & Do The Thing

6. Flanger Phaser
This module features two sections. The first can generate Chorus through to FLanger
style effect and the second is a discrete lo-fi Phaser.
Chorus/ Flanger
Chorus and Flanging effects can be achieved through by applying a sine wave
modulating its own delay time
1. Frequency sets the frequency of the sine wave.
2. Time changes the maximum delay time the sine wave can achieve, similar to
an amount parameter.
3. Iterations can double the amount of delays for each the left and right side.
Width offsets the phase of each sine wave (every delay for every iteration has
its own sine wave).
4. Feedback causes the result output of the delays to loop back into the
Feedback input.
5. Stereo Width adjusts the stereo width of the effect.
Phaser
6. Amount adjusts the Phaser depth.
7. Frequency sets the Phaser’s rate.
8. Stereo Width adjusts the stereo width of the Phaser effect.
12 The Percolator Getting Started Guide. © 2020 Chaos Culture & Do The Thing

How to make a Chorus-like effect
- Apply higher settings to the Iteration parameter and lower settings to the Time
and Feedback parameters to achieve a stronger Chorus character.
How to make a Flanger-like effect
- Apply higher settings to the Feedback parameter and reduce the Width
parameter to achieve a stronger Flanger character.
13 The Percolator Getting Started Guide. © 2020 Chaos Culture & Do The Thing

7. Delay
Our Delay features a feedback section with Low and High Pass filters which can be
placed before or after the feedback loop. We’ve included Pitch and Frequency
shifting modes as well two ducking style behaviours.
1. Input Mute is used to mute the module input. Selective muting of the module
input can let delay tails ring without being retriggered by incoming audio.
2. Time adjusts the delay time.
3. Time Mode selects Ms or Interval mode for the Time dial.
4. Feedback adjusts the amount of feedback. Setting of 1.00 or above will result
in a persistent loop, even if Live’s transport is stopped.
5. Feedback Frequency & Pitch Shifting Mode On/ Off
6. Feedback Frequency & Pitch Shifting Mode toggles the shift amount mode
between Freq (Frequency) and Robot (Pitch).
7. Position assigns the Frequency/ Pitch circuit to either the Feedback or to the
Module Output.
- When assigned to the feedback loop, the pitch is applied to each loop as
it is generated, resulting in a constantly rising or lowering pitch effect,
similar to a Shepard's Tone.
8. Feedback Frequency & Pitch Shifting Amount adjusts the Frequency or
Pitch Shifting amount in positive (clockwise from center) or negative (counter
clockwise from center) values.
14 The Percolator Getting Started Guide. © 2020 Chaos Culture & Do The Thing

9. Pre/ Post Filter Toggle places the Feedback before or after the Low Pass and
High Pass Filter section.
10. Feedback Low Pass Filter
11. Feedback High Pass Filter
- Low and High Pass filters in a serial configuration assigned to the Delay tail
and Feedback only. The dry module input is not affected by the filters.
12. Stereo Width widens the delay’s stereo image. Extreme settings will result in
a stereo ping pong delay effect.
13. Ducking Section
a. Output Ducking is used to duck the wet delay output of the Delay
module against the audio signal coming into the module. The dry input
signal is unaffected.
b. Feedback Ducking reduces the Feedback amount based on the input
signal. This achieves a similar effect to placing an envelope follower on
the feedback parameter.
c. Ducking Envelope Attack
d. Ducking Envelope Release
e. Ducking Envelope Release
- Attack and Release times for the Output and Feedback Ducking
amount.
When using high feedback settings with Frequency or Pitch shifting, be cautious
when stopping playback. With feedback settings of 1.00 and above the Delay will
continue to loop and feedback when Live’s transport is stopped. If the Frequency
or Pitch shifting are activated they will continue to feedback and can potentially
continuously rise to painful levels. Forever.
The Robot pitch shifting can cause tiny time lags in the delay processing due to
the nature of the pitch shifting method.
15 The Percolator Getting Started Guide. © 2020 Chaos Culture & Do The Thing

8. Dual Filter
The Dual Filter consists of two identical multi-mode resonant filters alongside a drive
section.
1. Filter Type selects the filter mode. Available types are High Pass, Low Pass,
Bandpass, Notch and Peak.
2. Cutoff Frequency adjusts the Frequency cutoff amount.
3. Resonance adjusts the filter resonance.
4. Cutoff Frequency Envelope adjusts the Envelope depth applied to the cutoff
frequency.
5. Filter Envelope Attack
6. Filter Envelope Decay
- Attack and Decay amounts for both filter’s cutoff frequencies.
7. Serial or Parallel Configuration sets the configuration of the filter to be either
Serial, with the Waveshaping and Drive sections after Filter 1 and before Filter
2, or Parallel with the Waveshaping and Drive sections assigned to Filter 1 only.
8. Waveshaper Amoun t adjusts the waveshaping amount which applies
character to the distortion, not just gain.
9. Waveshaper Shape selects the Waveshape type used by the Waveshaper.
10. Drive controls a gain stage for overdriving the signal.
16 The Percolator Getting Started Guide. © 2020 Chaos Culture & Do The Thing

9. Granverb
The Reverb features very similar feedback, filtering and ducking behviour to the
Delay. The diffuse parameter can be used to reduce the smear of the reverb to short
delay-like taps.
1. Input Mute is used to mute the module input. Selective muting of the module
input can let the reverb tail ring without being retriggered by incoming audio.
Decay Time sets the amount, or size, of the reverb.
2. Decay sets the decay time.
3. Feedback sets the amount of feedback being applied to the reverb tail.
4. Feedback Frequency & Pitch Shifting Mode On/ Off
5. Feedback Frequency & Pitch Shifting Mode toggles the mode between Hz
(Frequency) and Robot (Pitch).
6. Position assigns the Frequency or Pitch Shift to either the feedback loop or to
the module output.
7. Feedback Frequency & Pitch Shifting Amount adjusts the Frequency or
Pitch Shifting amount in positive (clockwise from center) or negative (counter
clockwise from center) values.
8. Freeze can be used to catch short sections of reverb and loop them.
9. Feedback Low Pass Filter
10. Feedback High Pass Filter
- Low and High Pass filters are assigned to the Delay tail and Feedback only.
The dry module input is unaffected.
17 The Percolator Getting Started Guide. © 2020 Chaos Culture & Do The Thing

11. Diffuse changes the nature of the reverb effect. At low settings the Reverb will
generate delay like taps and at high settings the reverb’s decay will wash out
in a more typical reverb manner.
12. Stereo Width widens the reverb’s stereo image.
13. Ducking Section
a. Output Ducking is used to duck the wet delay output of the Delay
module against the audio signal coming into the module. The dry input
signal is unaffected.
b. Feedback Ducking reduces the Feedback amount based on the input
signal. This achieves a similar effect to placing an envelope follower on
the feedback parameter.
c. Ducking Envelope Attack
d. Ducking Envelope Release
- Attack and Release times for the Output and Feedback Ducking
amount.
18 The Percolator Getting Started Guide. © 2020 Chaos Culture & Do The Thing

10. Mixer
The Mixer module features 3 bands set at the same frequency crossover points as
the per-module Mute & Bypass functions as well as Master volume control.
High, Mid & Low Bands
1. Stereo Width adjusts the stereo width of the band.
2. Pan Position sets the pan position of the band.
3. Volume sets the band volume.
Mix Volume
4. Mix sets the overall module output volume.
The Mixer is a fun place to play with pushing different bands into the inbuilt
Limiter to create different emphasis with your mix.
Adding more stereo width can increase the relative volume for the band.
19 The Percolator Getting Started Guide. © 2020 Chaos Culture & Do The Thing

11. Modulation
Modulators. We has ‘em.
12. LFO Module
1. LFO 1-8 Selection Tabs are used to assign the selected LFO to the front panel
editor and controls.
2. LFO 1-8 Mapping Mode On/ Off Tabs are used to activate the mapping mode
which enables linking the LFO to modulation target parameters.
3. Shape is a menu which is used to select the LFO shape for use. The Shape
menu can hold 8 Shapes per LFO. Different LFO shapes can be saved to, and
recalled by, Snapshots.
4. The Preset Library is a library of LFO shapes which can be loaded into the
Shape menu.
5. Playback Direction sets the playback direction of the LFO.
6. Bypass is used to activate and deactivate the LFO’s mapping assignments.
7. Copy LFO Shape copies the current LFO shape.
8. Paste LFO Shape pastes the copied LFO shape to the currently selected LFO.
9. X is used to delete breakpoints. If some breakpoints are currently selected, it
only deletes those selected points. If no breakpoints are selected, it deletes the
whole shape and replaces it with the default shape
10. LFO Rate Mode is used to select either Hz or Interval modes for the LFO Rate.
- When the LFO is setting to Frequency timing, the LFO playhead will
continue to cycle when Live’s playhead is stopped. In Interval mode, the
playhead will only cycle when Live’s playback is active.
11. LFO Rate sets the rate for the LFO.
12. Phase is used to offset the LFO start position. Moving the Start position will
cause the LFO to begin playback from the selected position.
20 The Percolator Getting Started Guide. © 2020 Chaos Culture & Do The Thing
Table of contents