iSymphony LCD26iH56 User manual

26" HD LCD Television with Built-in DVD Player
LCD26iH56

Contents
Safety and warnings.......................................................................................2-4
Introduction..................................................................................................5
Installation................................................................................................... 6-9
Remote Control............................................................................................10
Operation..................................................................................................... 11-14
DVD operation........................................................................................... . . . 15-18
DVD Trouble shooting...................................................................................19
Trouble Shooting...........................................................................................2 0
Instruction For Wall Mount............................................................................ 21
Warranty Card.............................................................................................. 22
-1-

-2-
SAFETY AND WARNINGS
1.Read these safety instructions.
2.Keep these safety instructions.
3.Heed all warnings.
4.Follow all safety instructions.
5.Do not use this apparatus near water.
6.Clean only with dry cloth.
7.Do not block any ventilation openings. Install in
accordance with the manufacturers instructions.
8.Do not install near any heat sources such as radiators ,
stoves, or other apparatus (including amplifiers)that
produce heat.
9.Protect the power cord from being walked on or
pinched particularly at power outlets, and the point
where they exit from the apparatus.
10.Only use attachments/accessories specified by the
manufacturer.
11.Unplug this apparatus during lightning storms or
when unused for long periods of time.
12.Refer all servicing to qualified service personnel.
Servicing is required when the apparatus has been
damaged in any way, such as the power-supply cord
or plug is damaged, liquid has been spilled or objects
have fallen into the apparatus, the apparatus has been
exposed to rain or moisture , does not operate normally,
or has been dropped.
13.Apparatus must not be exposed to dripping or
splashing and no objects filled with liquids, such as
vases, should be placed on the apparatus.
IMPORTANT SAFETY INSTRUCTION
TO REDUCE THE RISK OF ELECTRIC SHOCK, DO
NOT REMOVE COVER (OR BACK).NO USER
SERVICEABLE PARTS INSIDE. REFER SERVICING
TO QUALIFIED SERVICE PERSONNEL.
RISK OF ELECTRIC SHOCK
DO NOT OPEN!
CAUTION
CAUTION
The symbol indicates that dangerous voltages
constituting a risk of electric shock are present
within this unit.
The symbol indicates that there are important
operating and maintenance instructions in the
literature accompanying this unit.
To prevent fire or shock hazard, do not expose this
appliance to rain or moisture.
WARNING:

-3-
High voltages are used in the operation of this television
receiver. Do not remove the cabinet back from your set.
Refer servicing to qualified service personnel.
SAFETY AND WARNINGS
To prevent fire or electrical shock hazard, do not expose
the television receiver to rain or moisture.
Do not drop or push objects into the television cabinet
slots or openings. Never spill any kind of liquid on the
television receiver.
Do not block the ventilation holes in the back cover.
Adequate ventilation is essential to prevent failure of
electrical components.
Do not trap the power supply cord under the television
receiver.
Never stand on, lean on, or suddenly push the television or
its stand. You should pay special attention to children.
Serious injury may result if it falls.
Do not place your television on an unstable cart, stand,
shelf or table. Serious injury to an individual , and damage
to the television, may result if it falls.
When the television receiver is not used for an
extended period of time, it is advisable to disconnect
the AC power cord from the AC outlet.
Avoid exposing the television receiver to direct sunlight
and other sources of heat. Do not stand the television
receiver directly on other products which give off heat,
e.g. video cassette players and audio amplifiers. Do not
place naked flame sources, such as lighted candles on
the television.
Dim:5 15*320 mm(不包括底座)
If the television is to be built into a compartment or similar
enclosure, the minimum distances must be maintained. Heat
build-up can reduce the service life of your television, and
can also be dangerous.

-4-
Thank you very much for purchasing this TV. To enjoy
your product from the very beginning, read this manual
carefully and keep it handy for easy reference.
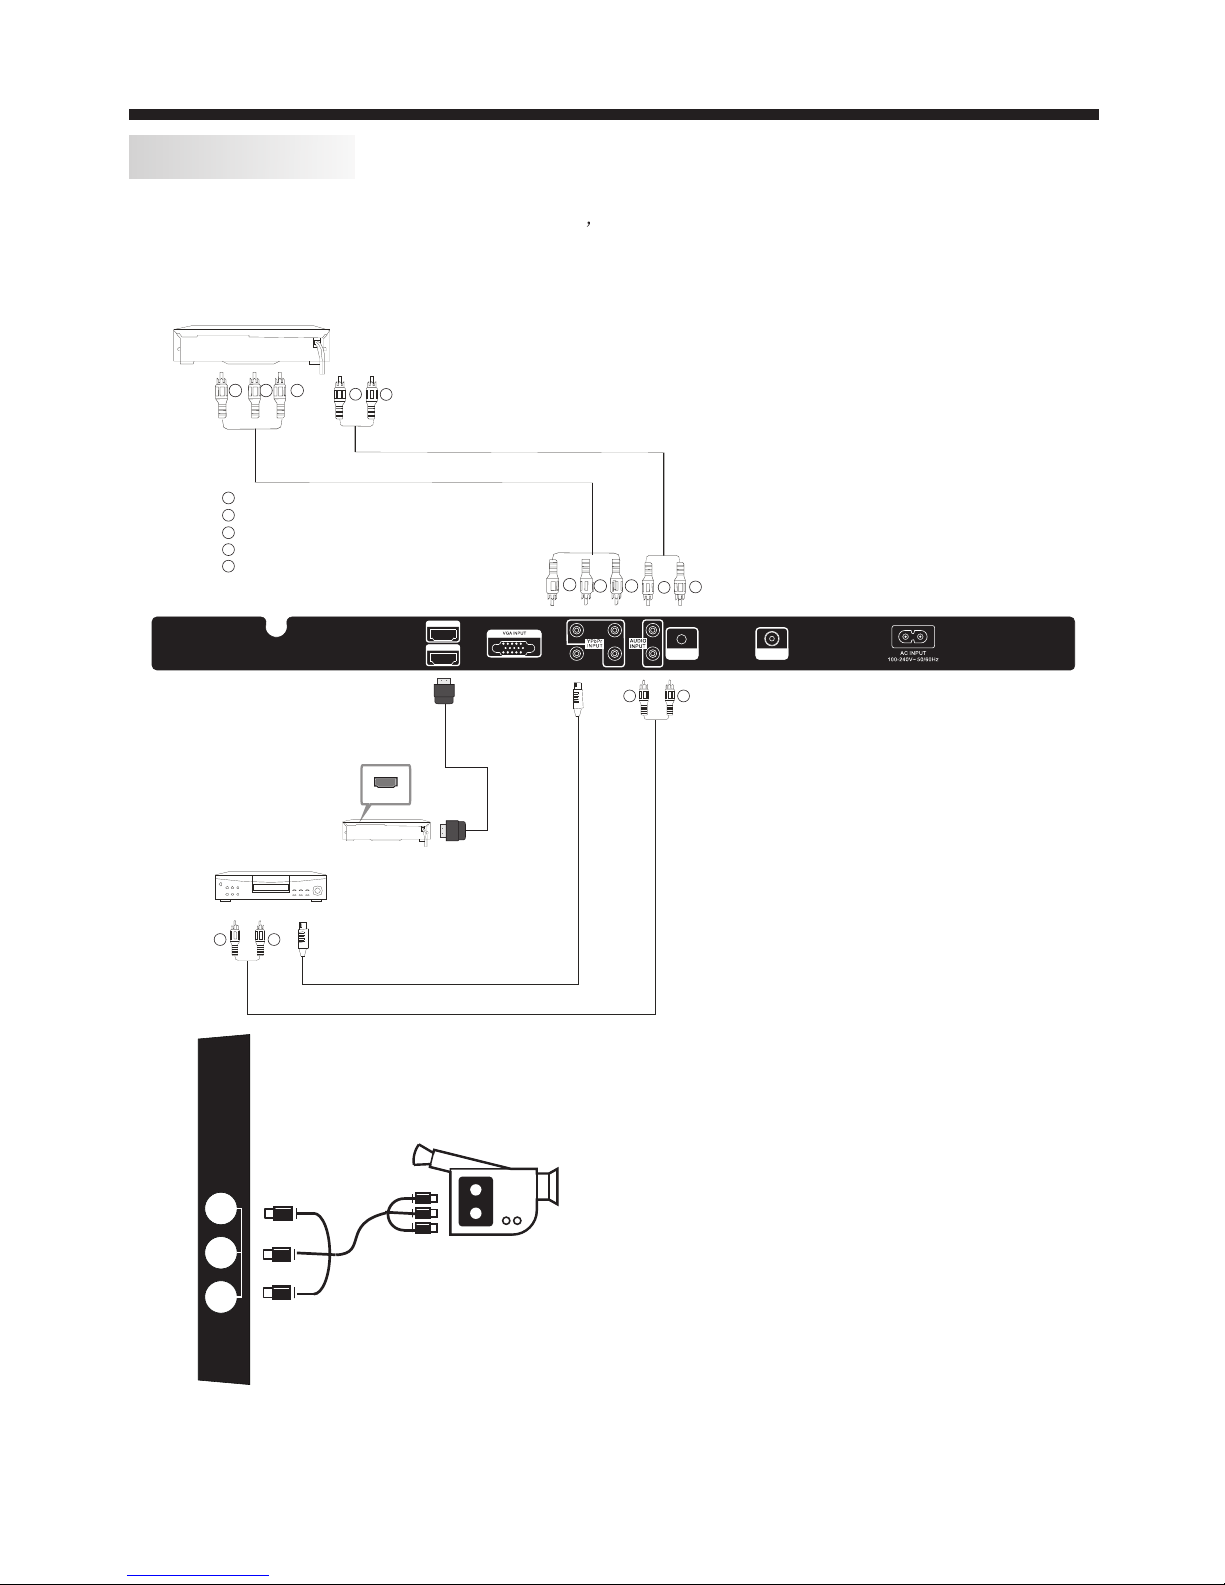
INSTALLATION
CAUTION
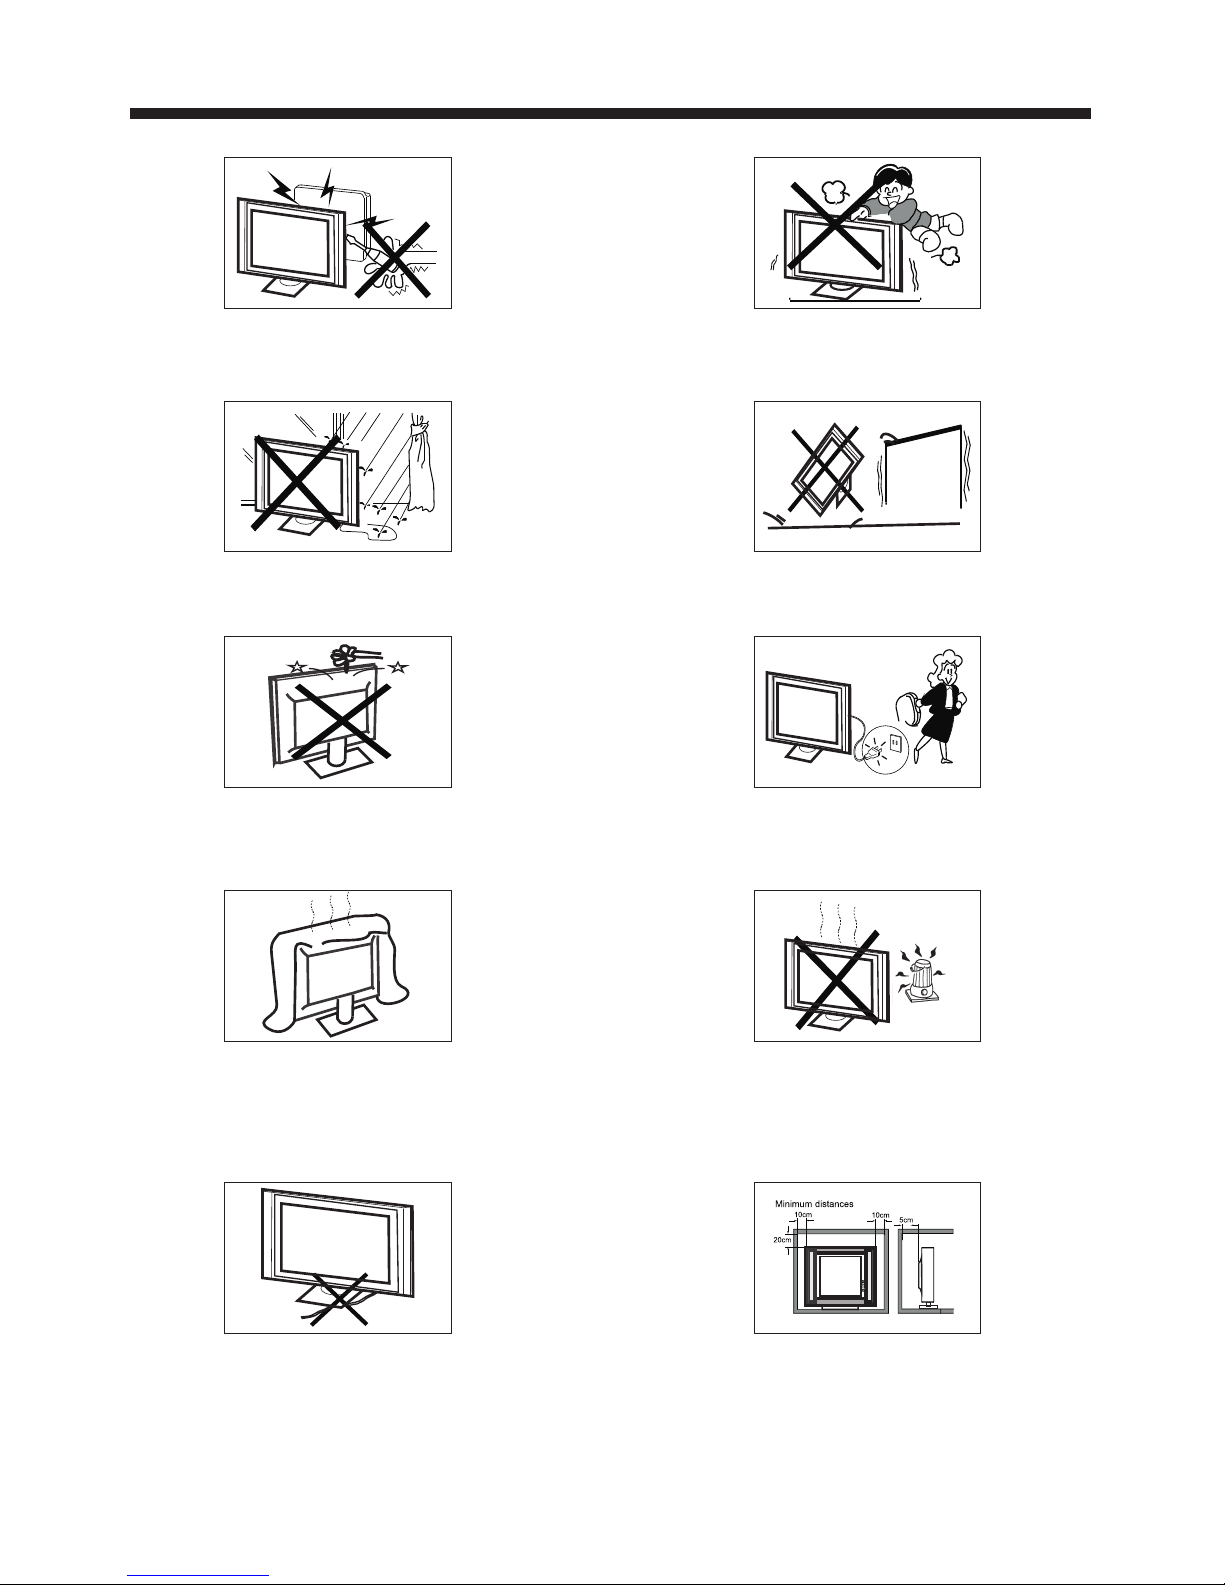
Locate the TV in the room where light does not strike
the screen directly.
Total darkness or a reflection on the picture screen can
cause eyestrain. Soft and indirect lighting is recommended
for comfortable viewing.
Allow enough space between the TV and the wall to
permit ventilation.
Avoid extremely warm locations to prevent possible
damage to the cabinet or premature component failure.
This TV can be connected to AC 100-240 Volts. 50/60 Hz.
Never connect to a DC supply or any other power supply.
Do not cover the ventilation openings when using the TV.
Never tamper with any components inside the TV, or any
other adjustment controls not mentioned in this manual.
All LCD-TVs are high voltage instruments. When you
clean up dust or water drops on the LCD PANEL or
CABINET, the power cord should be pulled out from the
receptacle, then wipe the TV with a dry soft cloth. During
thunder and lighting, unplug the power cord and antenna
cord to prevent damage to your TV. All repairs to this TV
should only be performed by qualified TV service personnel.
Earthing connection--- The apparatus shall be connected
to MAINS socket outlet with a protective earthing connection。
MAINS plug or appliance coupler of the apparatus is used
as disconnect device, it should remains readily operable。
SAFETY AND WARNINGS
Warning: Change or modifications to this unit not expressly
by the part responsible for compliance could void the user 's
authority to operate the Equipment.
NOTE:
This equipment has been tested and found to comply with
the limits for a Class B digital device, pursuant to Part 15
of the FCC Rules. These limits are designed to provide
reasonable protection against harmful interference in a
residential installation. This equipment generates, uses, and
can radiate radio frequency energy and, if not installed and
used in accordance with the instructions, may cause harmful
interference will not occur in a particular installation. If this
equipment does cause harmful interference to radio or
television reception, which can be determined by turning
the equipment off and on, the user is encouraged to try to
correct the interference by one or more of the following
measures:
- Reorient or relocate the receiving antenna.
- Increase the separation between the equipment and receiver.
- Connect the equipment into an outlet on a circuit different
from that to which the receiver is connected .
-Consult the dealer or an experienced radio TV technician
for help.
Shield cables must be used with this unit to ensure
compliance with the Class B FCC limits.
This symbol indicates that this productincorporates
double insulation between hazardous mains voltage
and user accessible parts. When servicing use only
identical replacement parts.
WARNING: To reduce the risk of fire or electric shock,
do not expose this apparatus to rain or cords.

-5-
INTRODUCTION
Main features Accessories
AC Power Cord......................... 1
Infrared Remote Control........... 1
User’s M anual ........................ 1
Battery(AAA).......................... 2
Accessories
Resolution:
Aspect Ratio:
TV System:
Video Signal System:
Receiving Channel:
Input Power Voltage:
Power consumption:
Main parameter
YCb(Pb)Cr(Pr) Input
Horizontal definition(TV line)
Viewing Picture Size(diagonal)
1366x768
16:9
ATSC Digital system and NTSC Analog system
130W
Audio Output Power(THD 7%): 2x3W
NTSC/PAL/SECAM
Cable :1-135/ Air: 2-69(ATV&DTV)
AC 100V-240V 50/60Hz
Analog RGB(VGA) Input x 1
High-Definition Multimedia Interface(HDMI) Input 2
Audio Input x 3
Composite Video Input >=350
x 1
YCb(Pb)Cr(Pr) >=400
Video Input >=400
26 inch
Composte Video Input x 2
■ 1366 x 768 native resolution for HD performance
■ Integrated ATSC TV tuner for HDTV broadcast reception
■ Built-in progressive scan DVD player
■ Built-in 3-in-1 card reader (SD, MMC, MS) and USB port
for playing digital media files
■ High brightness provides a vivid and brilliant picture
■ Deeper blacks and brighter whites with high contrast
■ Wide Screen aspect ratio (16:9) for a complete home
theater experience
■ HDMI input for true digital connection
■ VGA port for connection to PC
■ Built-in stereo speaker system
■ Full-function Remote Control
x

-6-
INSTALLATION
Front panel
REAR AV PASTER
1.HDMI Input
2.VGA Port (PC Input)
3.Component Video (YPbPr) Input
4.Audio Input
5.Composite Video Input
6.PC Audio Input
7.Antenna Socket
8.AC Power Socket
Note: 1.Composite video input and component video input share the audio input.
2.When "DVI to HDMI cable" is used, the audio output for DVI needs to be connected to the
PC Audio Input (above 7).
HDM I1 I NPUT
HDM I2 INPU T
PC
AUD IO INPU T
L
R
AV1
Pr
Y
Pb
RF INPU T
⑤
①
②③④⑥⑦⑧
1: Remote control sensor.
2: Indicator LED: GREEN POWER ON.
RED STANDBY.
3: Key board
4: USB Port
5: 3-in-1 Card Slot (SD, MS, MMC)
6: DVD Disc loading Slot
1.SOURCE:Display the input source menu.
2.MENU:Display main MENU.
3.CH+/CH-:In TV mode,press“CH+”or“CH-”to
change the channel up and down.In MENU mode, press
“CH+”or“CH-”to select items .In standby mode,
press“CH+”or“CH-”to turn on the TV.
4.VOL+/VOL-:Adjust sound level.In MENU mode,
press“VOL+”or“VOL-”to adjust the item that you
selected.
5. STANDBY : Press this button to turn the unit ON
from STANDBY mode. Press it again to turn the set
back to STANDBY.
6.VIDEO INPUT
7.AUDIO INPUT-L
8.AUDIO INPUT-R
Side panel
SOURCE
MENU
CH+
CH-
VOL+
VOL-
STANDBY Video
L
R
AV2
R
L
VIDEO
4
5
6
1 2 3
4 5 6
7 8 9 0
+
CH
_
+
_
VOL
30 30
3
1
2

-7-
INSTALLATION
STEPS:
PC
Be sure both the TV and computer are set to Power off.
1.Connect VGA and audio cable.
2.Connect the power cord.
3.Power on the TV, switch to VGA mode.
4.Power on the VGA.
This sequence is very important.
PRESET MODE
1
2
3
4
5
6
7
8
9
10
720*400
640*480
640*480
800*600
800*600
1024*768
1024*768
1024*768
1280*1024
1280*1024
70
60
75
60
75
60
70
75
60
75
31.47
31.47
37.50
37.88
46.88
48.36
56.48
60.02
63.98
80.00
RESOLUTION V.Freq.(Hz) H.Freq.(KHz)
HDMI 1 IN PUT
HDMI 2 INPUT
PC
AUD IO INPU T
L
R
AV1
Pr
Y
Pb
RF IN PUT

ANTENNA
Note:
Aerial connections:IEC(female).
Input impendance:75 unbalanced.
INSTALLATION
-8-

-9-
INSTALLATION
To audio outputs
VIDEO EQUIPMENT
TO VIDEO
output
Yellow (video)
White(audio L)
Red(audio R or Pr)
Y
W
R
WR
W R
W R
GBR
GR
B
Blue(Pb)
Green(Y)
B
G
AV EQUIPMENT
It can be connected to the following appliances: VCR, multi disc player, DVD, camcorder, video game
or stereo system, etc.....
YPbPr can support these video formats:480i,576i,480p,576p,720p,1080i.
This TV provides one group of AV ,one group of YPbPr for convenient connectionto VCR,DVD or
other video equipment. Please refer to the owner s manual of the equipment to be connected as well.
You can use the input terminals on TV set rear as follows.
VIDEO EQUIPMENT with YPbPr
WR
HDMI
HDM I1 I NPUT
HDM I2 INPU T
PC
AUD IO INPU T
L
R
AV1
Pr
Y
Pb
RF INPU T
VIDEO
L
R
AV2

-10-
1:POWER
To set the TV standby or on.
2:NUMBER KEY:
For direct access to program.
3:MENU
To display TV menu or to return to the previous menu.
4:CURSOR
To move within the menu.
5:EXIT
Used to exit menu.
6:VOL+/-
To adjust sound level.
7:P.M
To switch picture mode.
8:PAGE DOWN/PAGE UP
In EPG mode, use this key to page up/down the EPG
information.
9:SLEEP
Set time to turn off the TV.
10:P.G
Setting the Parental Control level control.
11:MUTE
To disable or enable the sound.
12:RECALL
To access the previously viewed program.
13:SOURCE
To display or exit TV input source menu.
14:ENTER
Confirms selection.
15:TV DISPLAY
Displays/removes the program Information
16:S.M
To switch sound mode.
17:CH+/CH-
To access the next or previous Program.
18:ASPECT
To change picture aspect .
19:CH LIST:
Used to display the channel list.
20:EPG:
Display all the information of DTV programs.
21:FAV:
Used to access your favourite channels in digital TV mode.
27:CC
Enable or disable the CC function (only used for TV and
AV source).
31:MTS/SAP
Switch the sound stereo, SAP and mono.
REMOTE CONTROL
-10-
Insert Batteries Into the Remote Control
1 2 3
Remark:
1. Remove the battery cover.
2. Inserting the 2 AAA 1.5V batteries making sure the
polarity (+ or -) of the batteries matches the polarity
marks inside the unit.
3. Mount the battery cover.
Replace with new batteries when the TV set begins
to show the following symptoms:
Operation is unsteady or erratic. Sometimes the TV
set does not function with Remote Control Unit.
1) Alkaline Battery Recommended.
2) Remove batteries when they are exhausted or if the
remote control is not to be used for long time.
1
ENTER
23
456
7 8 9 0
+
CH
_
+
_
VOL
SLEEP P.G
S.M
EXIT
P.M
TV DISPLAY
SOURCE
MENU
MUTE
POWER
ASPECT
RECALL
CH LIST EPG
1
2
3
4
5
6
7
8
9
10
19
20
11
12
13
14
15
16
17
18
32
21
PAGE UP PAGE DOWN
24 22
25 23
26
27
30
EPG
31
RETURN DISPLAY SUBTITLE
AUDIO
MTS/SAPCC
DVD/USB GOTO MENU SETUP
FAV
28
29 33
NOTE:
For the function of DVD button,please refer to the
DVD part at the back of this instruction book.

OPERATION
-11-
The first item of the MENU is PICTURE MENU.
You can adjust picture effect here, such as contrast,
brightness, etc.
Press to select, press to adjust, press MENU
to exit.
2.AUDIO menu
The second item of the MENU is AUDIO MENU.
You can adjust sound here.
Press to select, press to adjust, press MENU
to exit.
Note:
If you want to adjust contrast, brightness, color,
and sharpness , the picture mode must return to
“personal”status.
Picture mode Standard
Contrast 50
Brightness 50
Color 50
Tint 0
Sharpness
Color Temp. Normal
50
Select Adjust Menu Exit
Sound mode Standard
Bass 50
Treble 50
Balance 50
Surround
AVC
Audio language English
Select Adjust Menu Exit
Off
Off
Timer Setup V-CHIP Channel
Audio Timer Setup Channel
V-CHIP
1. PICTURE MENU
3.TIMER MENU
The third item of the MENU is TIMER MENU.
You can adjust time here.
Press to select, press to adjust, press MENU
to exit.
Sleep timer
Time zone
Daylight Saving Time
Clock
Select Adjust Menu Exit
1999/12/31 04:03PM
Pacific
Off
Off
Setup Channel
Timer V-CHIP
1).SLEEP TIMER: adjust this item , you can set the
sleep timer .
Note:
The item of Time zone, the item of Daylight Saving
Time and the item of clock are available in ATSC
program
4. SETUP MENU
The forth item of the MENU is SETUP MENU.
You can setup system here.
Press to select, press to adjust, press MENU
to exit.
Menu language
Transparency
Aspect
Noise Reduction
Select Adjust Menu Exit
Weak
On
16:9
English
Advanced
XVS
Restore Default
Off
Closed caption
Setup Channel
Timer V-CHIP
Note:
Restore Default: Reset all the settings to default
value.
Note:
The item of Audio language is available in ATSC
program.
Picture Audio
Picture
Picture
Picture
Audio
Audio

1). Advanced: In PC Mode is available.
(1).H-Pos:Adjust the horizontal position of the screen.
(2).V-Pos:Adjust the vertical position of the screen.
(3).Clock: Fine tune the screen width.
(4).Phase: Fine tune the phase of the screen. Usually
don`t adjust this item.
(5).Auto: Auto adjust to fit the screen.
Press button to select Advanced ,Press
button, the screen will display as follow:
OPERATION
2). Closed Caption: switch close caption mode.
(2):Option:Used to edit CC font.
Press button, the screen will display as follow:
-12-
Press button to select Closed Caption ,Press
button, the screen will display as follow:
H-pos
V-pos
Clock
Phase
Select Adjust Menu Exit
50
Auto
50
50
50
Setup Channel
Timer V-CHIP
CC Mode
Basic Selection
Advanced Selection
Option
Select Adjust Menu Exit
Off
CC4
Service 3
Setup Channel
Timer V-CHIP
Mode
Font style
Select Adjust Menu Exit
Custom
Default
Font size Default
Font Edge style Default
Font Edge color Default
FG color Default
BG color Default
FG opacity Default
BG opacity Default
Setup Channel
Timer
NOTE: Only ATSC program is available.
5. V-CHIP MENU
The fifth item of the MENU is V-CHIP MENU.
You can setup here.
Press to select, press to adjust, press MENU
to exit.
Parental Control
Parent control: input the password, it will go into
menu. Factory default password
is 6666.
Parental Control
Enter password
Select Adjust Menu Exit
----
Channel
Timer Setup
5.1 .
as follow:
Input the correct password ,the screen will display
Change password
Select Adjust Menu Exit
P.G switch On
US
Canada
RRT setting
Reset RRT
Channel
Timer Setup
1). Change Password: Press button, the screen will
display as follow:
New password
Select Adjust Menu Exit
Confirm password
----
----
Channel
Timer Setup
1).New password: Input the new password
2).Confirm password: Input the new password again
V-CHIP
V-CHIP
V-CHIP
V-CHIP
(1):Advanced selection: only ATSC program is available.
Audio
Picture
Picture Audio
Audio
Picture
Picture Audio
Picture Audio
Picture Audio

OPERATION
5.2 V-CHIP switch:
When the switch is ON, the below
options can be adjusted.
Parental Control
5.3
follow:
US: Press button, the screen will display as
TV
Select Adjust Menu Exit
MPAA X
Channel
Timer Setup
1):TV: Press button, the screen will display as
follow:
TV rating
Select Adjust Menu Exit
ALL FV V S L D
TV-Y
TV-Y7
TV-G
TV-PG
TV-14
TV-MA
Block Press ENTER to lock or unlock
Channel
Timer Setup
And use ENTER key to switch lock/ unlock
feature.
Parental
Control
Rating Content
FV
(Fantasy
violence)
V
(Violence)
S
(Sexual
situation)
L
(Adult
language)
D
(Sexually
suggestive
dialog)
Suggested
age
TV-Y (All
children)
TV-Y7(Direct to
order children)
TV-G(General
audience)
TV-PG(Parental
Guidance
suggested)
TV-14(Parents
strongly
cautioned)
TV-MA(Mature
audience only)
X
X
X
X
X
X
X
X
X
X
X
X
Content
2).MPAA:switch the movie-rating control level; N/A,
G,PG, PG-13,R,NC-17,X.
Rating Description
Age
G General audiences, All Ages admitted
PG
Parental Guidance suggested. Some material may not be
Suitable for children.
PG-13 Parents strongly cautioned. Some material .may be
Inappropriate for children under 13.
R
NC-17
X
Restrict. Under 17 requires accompanying parent or adult
guardian(age varies in some jurisdictions)
No one 17 and under admitted.
X is an order rating that is unified with NC-17 but may be
encoded in the data of order movies.
5.4
displayed as follow:
Canada: Press button, the screen will be
Canada English
Select Adjust Menu Exit
Canada French
14+
E
Channel
Timer Setup
1): Canada English: switch the english rating control
level:E,C,C8+,G,PG,14+,18+.
Rating Description
Age
E Exempt: Includes news, sports, documents and other information
programming: talk shows, music videos, and variety programming.
C Children: Intended for younger children under the age of 8 years.
Pays careful attention to themes that could threaten their sense of
securityand well-being.
C8+ Children over 8 years old: Contains no portrayal of violence as the
preferred, acceptable, or only way to resolve conflict; nor encourage
children to imitate dangerous acts which they may see on the screen .
G General: Considered acceptable for all age groups, Appropriate
viewing for the entire family, contains very little violence, physical,
verbal or emotional.
PG Parental Guidance: Intended for a general audience, but may not be
suitable for younger children (under the age of 8) because it could
contain controversial themes or issues.
14+ Over 14 Years: Could contain themes where violence is one of the
dominant elements of the storyline But it must be integral to the
devel opment of plot or character. Language usage could be profane
and nudity , present within the context of theme.
18+ Adults: Intended for viewers 18 years and older and might contain
depictions of violence, which while related to the development of
plot, character or themes, are intended for adult viewing. Could
contain graphic language and portrayals of secretary and nudity.
-13-
V-CHIP
P.G
P.G
Picture Audio
Picture Audio
Picture Audio

2).Canada French: switch the French-rating control
level: E, G,8ANS+,13 ANS+,16ANS+,18ANS+.
Rating Description
Age
E Exempt programming
G General :All ages and children, contains minimal direct violence,
but may be integrated into the plot in a humorous or unrealistic
manner .
8ans+ General but inadvisable for young children :May be viewed by a
wide public audience, but could contain scenes disturbing to
children under 8 who cannot distinguish between imaginary and
real situations. Recommended for viewing with paren.
13ans+ Over 13 years: Could contain scenes of frequent violent scenes
and in tense violence.
16ans+ Over 16 years: Could contain frequent violent scenes and violence.
18ans+ Over 18 years: Only for adult viewing. Could contain frequent
violent scenes and extreme violence.
OPERATION
5.6
displayed as follow:
Reset RRT: Press button, the screen will be
5.5
adjusted
RRT setting: in ATSC digital TV mode, it could be
-14-
Select Adjust Menu Exit
Are you sure?
NO YES
Channel
Timer Setup
6. Channel MENU
The sixth item of the MENU is Channel MENU.
You can adjust digital and analoge TV Channel .
Press to move, press to adjust here.
Air/cable
Select Adjust Menu Exit
Auto Scan
Cable
Favorite
Show/Hide
Channel NO.
Channel Lable.
DTV signal :
2-1
Channel
Timer Setup
1). Air/Cable: select Air TV signal and cable TV signal.
2). Auto Scan: If it's the first time you use the TV, you
should scan all the TV channels first,
press the button to confirm, you will see below
menu :
Select Adjust Menu Exit
Start to scan
Channel
Timer Setup
A: Start to scan:
press the button to confirm, you
will see below menu which indicates auto search is
in process.
R F CH: 4
Select Adjust Menu Exit
FOUND: 0
Channel
Timer Setup
3). Favorite: Press button to choose/delete the
favorite channel .
4). Show/Hide: Press button to display or hide
currently channel.
5). Channel NO . :Display the currently channel number.
6). Channel lable: Press button to edit currently
channel name.
7). DTV signal: Display DTV signal intension. It can't be
selected and adjusted.
V-CHIP
V-CHIP
V-CHIP
V-CHIP
Picture Audio
Picture Audio
Picture Audio
Picture Audio

DVD SIDE PANEL
Caution
ThisDVDPlayerhasaClass1laserwhichmaybeharmful
toyoureyes.Donotattempttodisassemblethecabinetor
makeAndadjustments.Referallservicingtoaqualifiedp
refessional.
CLASS 1 LASER
PRODUCT
Caution:
When using USB/3 in 1 Card Reader
function, please do not insert in the wrong
direction, or else it will damage the unit.
DVD OPERATION
-15-
OPEN/CLOSE
PLAY/PAUSE
STOP
PREV
NEXT
Disc data side
USB
Disc label side facing you
USB
In DVD mode, press DVD/USB button on the
Remote control, insert a USB or a MP3 player with
USB interface to play the MP3, JPEG and MPEG4
files.
3 in 1 Card Reader
In DVD mode, press DVD/USB button on the
Remote control, you can insert three kinds of card
(SD, MMC, MS) to play the mp3 music or MPEG4
movie and JPEG files. All the function is the same
as playing a disc.
Please make sure to stop playing disc before
inserting a USB/CARD. You can play USB/CARD
by pressing keys on the remote control with the
following sequence.
1. DVD/USB key
2. UP/DOWN key to select DISC/USB/CARD
3. ENTER key to confirm

MENU OPERATION
Press the SETUP button on the remote control, the
SETUP MENU will be displayed. After accessing the
setup menu, press the direction buttons for up and
down movement to select an item desired, and press
RIGHT direction button to select the lower item.
Then press the ENTER button to confirm. Press
LEFT direction button return to the menu of upper
level. To exit the setup, press the SETUP button
again. In the SETUP MENU, you may choose any of
the following options as you like.
LANGUAGE SETUP
Select Language in the setup menu, and display the
Language submenu:
OSD Language
Use this item to select the language of the setup menu
and screen display.
Subtitle
This option provides the preset subtitle language.
Select different MPEG4 subtitle encoding option.
Audio
Select the built-in disc dubbing language options.
DVD Menu
This option provides the film's menu language
options.
VIDEO SETUP
Select Video in the setup menu, and display the
Video submenu:
MPEG4 Subtitle(optional)
Note: Not all players support this item.
SYSTEM SETUP
Aspect Ratio
Select the aspect ratio.
Notes:
TV System
Select the different TV system.
For more information of output format,
refer to the instructions or your TV set.
RATING SETUP
Select Rating in the setup menu, and display
the Rating submenu:
The image display ratio is related to the recorded disc
format. Some disc can not display images in the
aspect ratio you choose. If you play a disc recorded in
4:3 format on a wide screen TV, black bars will
appear on the left and right side of the screen. You
must adjust the screen setting depending on the type
of the television you have.
Note: The DVD player setting should be matched to
your TV set.
Parental Control
Set the parental control feature of the player
Note: Password is needed before setting Parental
Control.
Set Password
Input four digits (password), then press ENTER to
confirm.
Note: If you forget your password, please use the
universal password 6666 to unlock.
MISC SETUP
Select MISC in the setup menu, and display
the submenu:
Use Default Settings
Reset setup data to factory default value.
DVD OPERATION
-16-

-17-
DVD OPERATION
MP3/WMA/JPEG/MPEG4 PLAYBACK
The MP3/WMA/MPEG4 disc has such a directory
structure as shown .
Press Direction key to choose the root directory and
then press ENTER button to enter into the sub
directory. Press Direction key to choose the desired
track and then press ENTER or PLAY to enjoy the
music or movie. If you want to return to the upper
menu, press Direction key to choose the icon
and press ENTER button.
Filter: Allows selecting the categories of files
displayed in the browser list.
Repeat: To switch different repeat playing mode
Mode: Select different playing mode as follows:
picture above
Normal: Shuffle mode is cancelled.
Shuffle: Shuffle mode enabled. When playback
reaches the end of the currentchapter/track, playback
jumps to a random chapter/track. As the end of each
chapter/track is reached, another random
chapter/track will be played until all tracks/chapters
have been played or the Shuffle mode is cancelled by
toggling to a different Mode Option.
Edit Mode:
Program CD or MP3 Disc :
1.CD/MP3 Playback manual will appear on screen
once you insert the dics in the slot . Disc will start
playback automatically .
2.IN STOP MODE : press right button , then press
UP/Down button to highlight the Edit Mode and
press ENTER to confirm .
3.Press left button to move cursor back to TRACK
and select desired tracks which you prefer to
program , then press ENTER to confirm .
4. Press right button to move cursor to " ADD
PROGRAM" , then press ENTER button to confirm .
5. Highlight " PROGRAM VIEW" and press
"ENTER" , the programmed tracks will appear and
press PLAY button on the remote control to start
Program Play .
6. If you wish to clear those you have
programmed , press STOP button twice , then move
Left cursor to highlight the programmed tracks , use
UP/DOWN button to select the tracks you wish to
clear , then press ENTER button,press RIGHT button
to highlight the " CLEAR PROGRAM " and press
ENTER button to clear all . ( If you wish to return to
Disc Menu , use Right arrow to highlight "
BROWSER VIEW" and press " ENTER" button .
PICTURE CD PLAYBACK
The PICTURE CD disc has such a directory structure
structure as shown in the following picture.
Press Direction key to choose the root
directory and then press ENTER button to
enter into the sub directory. Press Direction
key to choose the desired picture and then
press ENTER or PLAY to enjoy the picture. If
you want to return to the upper menu, press
Direction key to choose the icon and press
ENTER button.
Image rotation
In picture play state, press Direction key to
rotate the picture.
CARD READER ,USB
3 In 1 Card Reader
If the player has a 3 in1 card jack and it's NOT
in “disc playing” status, you can insert three
kinds of card (MMC, SD , MS) to play the
mp3 music or MPEG4 movie and JPEG files.
All the function is the same to playing a disc.
USB
If the player has a USB slot and it's NOT in “disc
playing” status, you can insert a USB device or a Mp3
Player with USB Interface to play the MP3 music or
and JPEG files. All the function is the same to play a
disc.
When the disc is playing, please stop playing first and
insert a USB/CARD, enjoying USB/CARD by press
DVD/USB key on the remote controller ,and then
press / key to select DISC/USB/CARD,and
press ENTER to confirm.
Not all USB/CARD device can be supported by this
system.
Note: When using USB/3 in 1 Card Reader function,
please do not insert in the wrong direction,
or else it will damage the unit.

OPEN/CLOSE
To open the disc tray, press
OPEN/CLOSE; To close the disc tray,
press OPEN/CLOSE again.
SUBTITLE
Press the button to choose different
captions(Requires support from disc)
GOTO
For DVD discs, press the button to
choose the desired title and chapter
andsearch the desired title time and
chapter time.For Super VCD,VCD,CD
discs, press this button to search the
desired disc time and track time and
choose the desired track.
Note: During VCD playback, the PBC
mode must be set to OFF.
0-9 keys
These keys are used to input the time,
as well as title, chapter and track
numbers.When a numeric item is
displayed on the screen, press the 0-9
keys to select the desired entry, and
press ENTER/OK to confirm.
When a VCD is playing(with PBC off),
press the 0-9 keys to select a track
directly.
MENU
During DVD playback, press MENU to
display the disc menu of the current
title.
During VCD/SVCD playback, press
MENU to control PBC ON/OFF.
SETUP
Press the button to enter the system
setting menu. Press the button again to
exit the menu.
RETURN
When DVD/SVCD/VCD displaying,
press RETURN button to the
menu(PBC ON only).
DISPLAY
Press the button to show the
information of the current playing disc.
ENTER
Press the button to confirm your choice
on screen.
REV:
During DVD, CD Mp3 or VCD
playback, press REV to scan in reverse.
The player will review the disc at
different times speed. Press
PLAY/PAUSE to resume normal
playback.
FWD
During DVD, CD,MP3, or VCD
playback, press FWD to scan
forward.The player will cue the disc at
different speed. Press PLAY/PAUSE to
resume normal playback.
PREV
During DVD, CD,MP3, or VCD
playback, press PREV to play the
previous chapter, title or track.
NEXT
During DVD,CD,MP3, or VCD
playback, press NEXT toplay the next
chapter, title or track.
STOP
Press the button once and the player
will be in memory stop state.
Continuously press this button twice
and the player will be in complete stop
state.
Play/Pause
In pause state or stop state, press the
button, the player will be in playing
state.In play state, press the button the
player will be in pause state.
Function Buttons
DVD OPERATION
-18-

DVD Trouble shooting
Ensure you have set the player s AUDIO
settings correctly.
If you have any questions, please consult the troubleshooting guide below:
NO PICTURE OR SOUND
Ensure the power button is on.
Ensure the power outlet is operational.
Ensure the power cord is not damaged.
Ensure the power plug is connected
firmly to the outlet.
PICTURE BUT NO SOUND
Ensure the audio is not set to mute.
POOR PICTURE OR SOUND
Ensure you have set the player s AUDIO
settings correctly
Ensure the disc is not scratched or stained.
“BAD DISC”DISPLAYED
Ensure the disc is not warped, damaged or
deformed.
Ensure the disc is not badly stained or
damaged.
Ensure the disc format is compatible with
the player.
Please check whether you have tried to play a
software CD. If so, please restart the player.
REMOTE NOT WORKING
Make sure the Main unit s POWER button is on
Ensure the remote batteries are working.
Point the remote control directly at the player s
IRsensor.
Remove any obstacles between the remote and
theIR sensor.
UNIT NOT WORKING
Turn off the power, and then turn it on
again.
“NO DISC”DISPLAYED
Ensure you have put the disc on the tray.
Ensure the disc is not upside down.
Ensure the disc is not distorted, stained or
scratched.
-19-
Other manuals for LCD26iH56
1
Table of contents
Other iSymphony TV DVD Combo manuals