Itek I60011 User manual

NOSTALGIC
MUSIC SYSTEM
MODEL I60011
YOUR SAFETY &
INSTRUCTION MANUAL
PLEASE READ CAREFULLY
www.itek-products.co.uk

2
CUSTOMER SUPPORT TEAM: +44 (0) 333 220 6058
TECHNICAL DATA
Description: Nostalgic Music System
Model: I60011
Adapter Voltage:
Input: 100-240V ~50/60Hz 0.35A
Output: DC 9.0V
Product rating: DC 9.0V 1000mAh
Audio Output: 1.8W x2RMS
Radio Frequency: FM 88 MHz-108MHz AM/MW 530-1600Mhz
CD Player Frequency: 100Hz - 16KHz
Cassette player: Tape speed 4.75 cm/sec Frequency Response 125Hz-6.3 KHz
Headphones: 3.5mm stereo jack plug 0-32 Ohms
DOCUMENTATION
We declare that this product conforms to the following product legislation in accordance with the
following directive(s):
2014/30/EU Electromagnetic Compatibility Directive.
2014/35/EU Low Voltage Directive.
2011/65/EU Restriction of Hazardous Substances Directive.
RK Wholesale LTD Quality Assurance, United Kingdom
WARRANTY
This product is guaranteed for 12 months from the date of original purchase. If any defect arises due
to faulty materials of workmanship, the faulty products must be returned to the place of purchase.
Refund or replacement is at the discretion of the retailer.
The following conditions apply:
• The product must be returned to the retailer with proof of purchase.
• The product must be installed and used in accordance with the instructions contained in this
instruction guide.
• It must be used only for domestic purposes.
• It does not cover wear and tear, damage, misuse or consumable parts.
• RK Wholesale LTD has limited liability for incidental or consequential loss or damage.
• This guarantee is only Valid in the UK and Eire Only.
An extended warranty is available for this appliance.
See back page for details.

3
www.itek-products.co.uk
PRODUCT SAFETY
When using any electrical appliance, basic safety precautions should
always be followed including the following:
• Check that the voltage of the
main circuit corresponds with
the rating of the appliance
before operating.
• Please ensure that the
appliance is used on a stable,
level, and heat resistant
surface.
• DO NOT immerse cords,
plugs or any part of the
appliance in water or any
other liquid.
• DO NOT leave the appliance
unattended while it is
operating.
• Close supervision is
necessary when any
appliance is used by or near
children or pets.
• This appliance can be used
by children aged from 8 years
and above and persons with
reduced physical, sensory
or mental capabilities or
lack of experience and
knowledge if they have
been given supervision or
instruction concerning use of
the appliance in a safe way
and understand the hazards
involved.
• Children shall not play with
the appliance.
• Cleaning and user
maintenance shall not be
made by children without
supervision.
• Switch o at the wall socket
then remove the plug from
the socket when not in use or
before cleaning.
• If the supply cord or appliance
is damaged, stop using
the appliance immediately
and seek advice from the
manufacturer or its service
agent or a similarly qualied
person.
• DO NOT let the cord hang
over the edge of a table or
counter or let it come into
contact with any hot surfaces.
• The use of accessory
attachments is not
recommended by the
appliance manufacturer
apart from those supplied
with this product. DO NOT
use extension cords with the
appliance..

4
CUSTOMER SUPPORT TEAM: +44 (0) 333 220 6058
• DO NOT pull the plug out by
the cord as this may damage
the plug and/or the cable.
• DO NOT use this product
for anything other than its
intended use.
• This appliance is for
household use only.
• DO NOT carry the appliance
by the power cord.
• DO NOT use the appliance
outdoors.
• DO NOT use in direct
sunlight.
• DO NOT use in wet or damp
conditions.
• DO NOT place the product
on or near sources of
electromagnetic pollution,
vibration or where the
ventilation is poor as this may
cause damage to the product
or could interfere with other
products.
• DO NOT place containers
lled with water or any other
liquid on the top of the
product as this may damage
the product.
• When handling electrical
items ensure that your hands
are dry.
• Never disconnect the plug
by pulling the power cable
as this may damage the plug
and/or socket.
• If water has entered the body
of the product please switch
o at the wall socket and then
consult a qualied electrician
for an inspection and /or
repair.
• Should the product
malfunction due to
electrostatic discharge,
switch o at the wall socket
and allow 30 minutes for the
charge to dissipate before
reconnecting the power
supply.
• Ensure that there are no
metallic objects placed in the
internal space of the product
as this may damage the
product and cause a risk of
electric shock to the user.
• In the unlikely event the
appliance develops a fault,
stop using it immediately
and seek advice from the
Customer Support Team.
HIGH VOLTAGE CLASS 1 LASER

5
www.itek-products.co.uk
WHAT’S IN THE BOX
Instruction Manual
Music System
Adaptor
Front View
1. Turntable Cover
2. Stereo Radio Display
3. Function Knob
4. Volume Knob
5. Band Knob
6. Tuning Knob
Side View
7. Play/Pause Indicator
8. Repeat Indicator
9. Program Indicator
10. FM Stereo Indicator
11. CD LED Display
12. Program Button
13. CD Back Button
14. CD Repeat Button
15. CD Next Button
16. CD Play/Pause Button
17. CD Stop Button
18. CD Open/Close Button
19. Earphone Jack
20. CD Door
21. Cassette Eject/F.FWD
22. Cassette Slot
Rear View
23. FM Antenna
24. AC Power Cord
Top View
25. Tone Arm
26. Speed Control Switch
27. Tone Arm Lock
28. Control Perch Lever
29. The Big Disc Centrepiece
30. Turntable
31. Turntable Screw
32. Auto-stop button
BEFORE YOUR FIRST USE:
1. Remove the parts from the packaging.
2. Assemble as instructed in the assembly page.
3. Your appliance is now ready for normal use.
Dispose of the packaging in a responsible manner.

6
CUSTOMER SUPPORT TEAM: +44 (0) 333 220 6058
USING YOUR APPLIANCE
How to position your unit:
Ensure that the product is placed on a at, level
surface in a dust free, cool, dry environment
with good ventilation, where it cannot be
knocked or bumped and the power cable will
not cause a trip hazard.
Before using your player:
• Ensure all packaging has been removed.
• Ensure that the household electrical circuit
is compatible with the product.
• If the product is unpacked in cold
damp conditions allow the product to
acclimatise to the conditions before
switching on.
Using your player:
• Ensure the wall socket is switched o and
insert the adaptor into the back of the
appliance. Then plug the appliance into
the socket and switch it on.
• Unwind the FM cable at the rear of the
product.
• Do not stretch the cable to reach the
socket. The product must be placed close
to the socket on a at level surface.
The radio:
• Make sure the power is on before using
the radio.
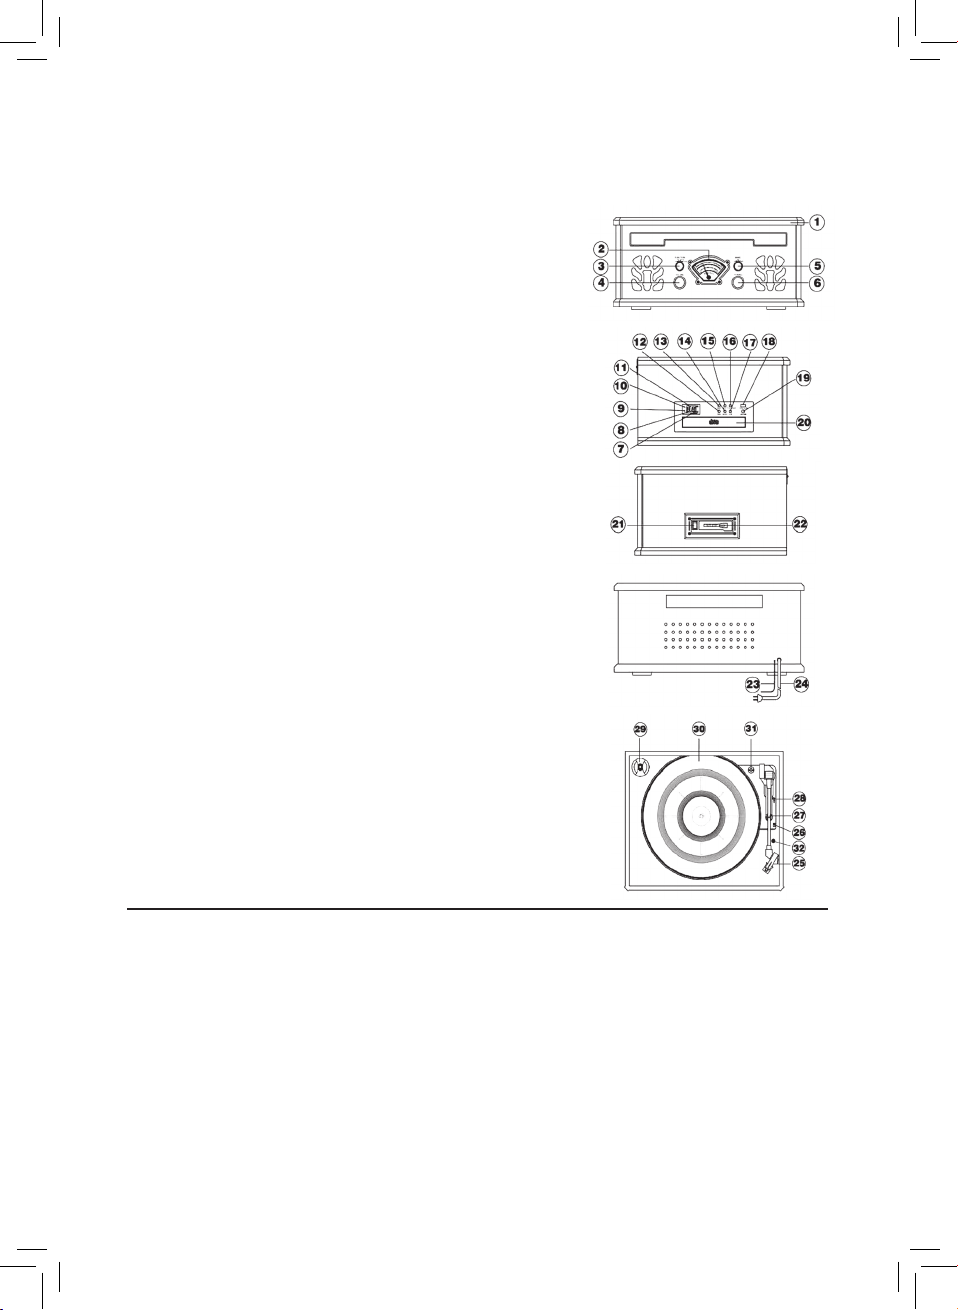
• Turn the function knob (3) to the radio.
• Use the AM/FM/FM ST band selector (5)
to select the required frequency band.
Then, use the tuning knob (6) to select the
radio station you require.
The record player:
• Before rst use, ensure that all the
packaging and the tie wrap holding the
arm in place have been removed.
• Set the function knob to record (phono)
(3).
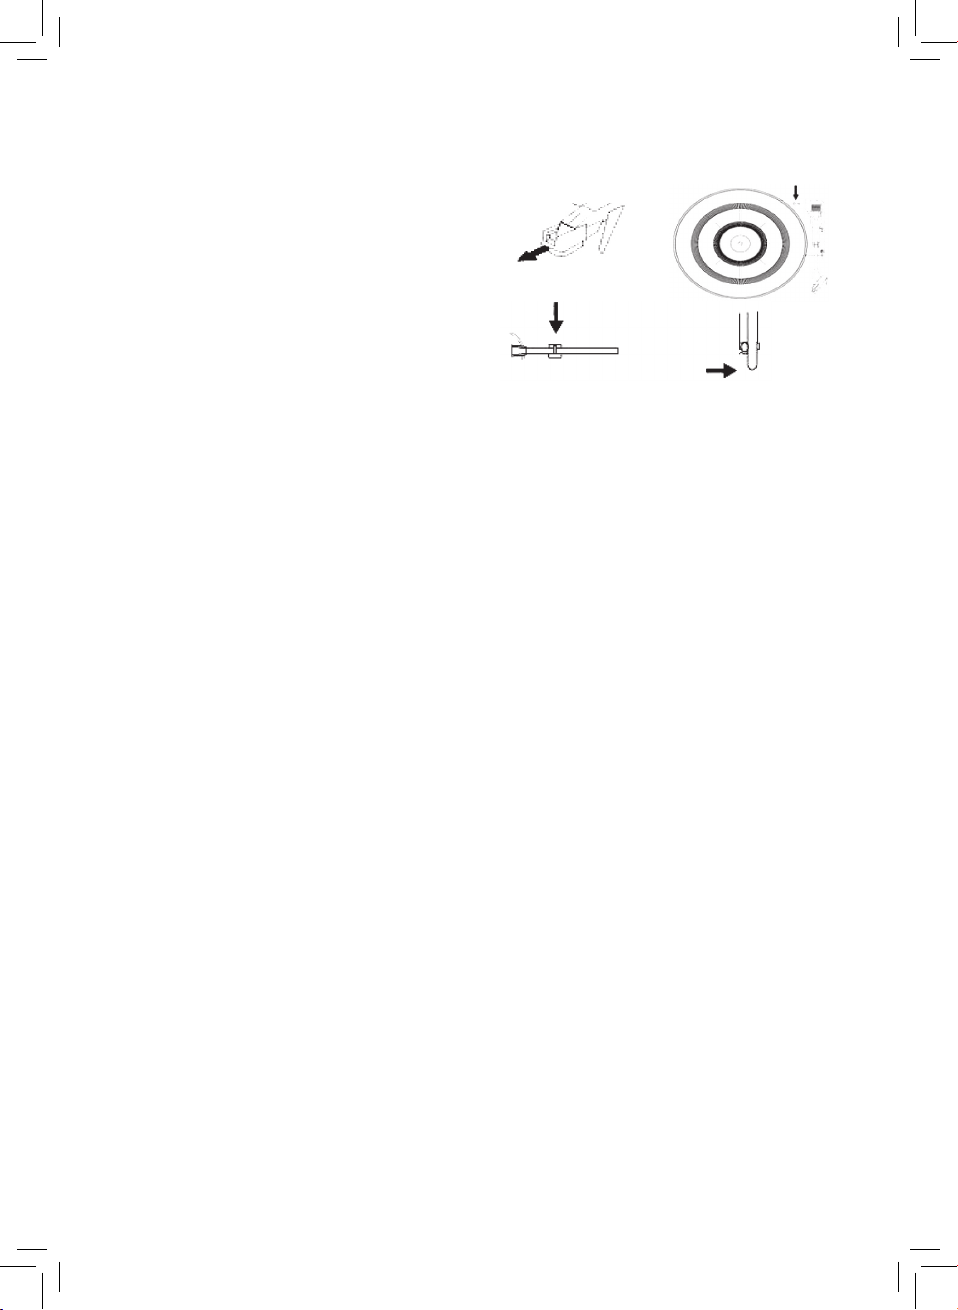
• Remove the protective needle guard by
gently pulling it forward and toward the
front of the product.
• Using a coin, turn the large chrome screw
(31) clockwise until it is fully down. This
will allow the turn table to oat on its
shock absorbers.
• Place the record on the turntable.
• Release the security hook that keeps
the tone arm (25) in place. To achieve
this, gently push this hook to the right to
release the tone arm lock (27). Lock the
security hook over the tone arm when not
in use.
• Using the speed control switch (26), set
the turntable to the required speed for
the record you wish to play. (33,45 or 78
RPM).
• Using the control perch lever (28) place
the stylus on the beginning of the record
and lower the tone arm gently. This can
also be done by hand.
• Set the volume to the desired level by
using the volume knob (4).
• When the stylus reaches the end of
the current side, the tone arm will
automatically stop and the turntable (30)
will stop turning.

7
www.itek-products.co.uk
Removing the stylus:
• Place the blade of a small implement
at the tip of the stylus and push down
toward point A, as shown in the diagram
above. To remove the stylus, pull forward
and down.
Replacing the stylus:
• To replace the stylus, insert the tip
towards point B. When it is in place, push
up towards point C, as shown in the
diagram above.
Auto Stop:
The turntable is equipped with an auto-stop
button. When the button is pressed down, the
auto-stop function is OFF.
When the button is released and in the raised
position this means the Auto Stop is in the ON
position.
When the auto-stop function is ON the tone
arm will stop when it reaches the end of the
record automatically.
When the auto-stop function is o, the record
will keep revolving until the tone arm is removed
and returned to its stand.
Using the CD player:
• When handling a compact disc (CD) place
a nger through the centre and hold the
edge of the disc with your thumb.
• Please ensure that you do not have direct
exposure to the laser beam as this may
harmful.
To use the CD function:
• Set the function knob (3) to the CD
position.
• Open the CD tray. This can be achieved
by pressing the door open button (18).
• Please do not force the tray to open as
this may damage it.
• Place the CD on the tray label side up and
close the CD tray. At this point the CD will
spin briey, and the LED display will show
the number of tracks that are on the disc.
• Please do not place anything other than a
CD in the CD tray as this may damage it.
• If the disc is dirty or scratched it may not
play correctly.
• Never insert more than one CD in the tray
at a time.
Playing the CD:
• Once the CD is loaded press the Play/
Pause Button (16).
• The LED display will display the track
number that is currently playing.
• If a CD is playing, you can stop it at any
time by pressing the Stop button. The CD
door will open once the button is pressed.
• To Pause the CD whilst playing, press the
Play/Pause button (16). The disc will stop
spinning, and the LED will ash showing
the current position.
• To restart the CD press the Play/Pause
button (16).

8
CUSTOMER SUPPORT TEAM: +44 (0) 333 220 6058
Using the skip/search function:
• The skip/search function can be used at
any time when playing a CD.
• Press the Next button (15) to select the
next track. Note: If the CD is on the last
track, playback will begin from the rst
track.
• To go back to the beginning of the current
track press the Back button (13) once.
• To go back to the previous track on your
playlist, press the Back button (13) twice.
• If you want to play a particular track
press the Next Button (15) until the track
number is shown in the LED display and
then press the Play/Pause button.
To program track selection:
• Make sure there is a CD in the CD tray
before programming a track.
• Short press the program button. The
numbers ‘01’ will ash on the LED screen
to indicate the program function has been
activated and the unit is ready for your
rst selection.
• Press the Next or Back button to choose
the track you want to save in position
01. Once you have selected your desired
track, press the program button again to
save your selection. The numbers ‘02’
will appear on the LED screen to indicate
the track in position 01 has been saved
and the unit is now ready for your next
selection. Repeat the above process to
save up to a maximum of 20 tracks.
• When you have made your selection press
the Play/Pause Button (16). The program
LED will light up and your rst selection
will start to play.
• Playback will automatically stop once
your last programmed selection has been
played.
• To cancel this function, press the Stop
button (17) at any time and open the CD
door (18).
• To repeat a track, press the Play/Pause
button to play your rst track, and then
press the Repeat button (14) once for a
particular track or twice to repeat an entire
selection.
Using the cassette player:
• Turn the function knob (1) to cassette.
• Put a cassette tape into the slot (22) and it
will start to play.
• To fast forward the tape gently press the
Fast Forward / Eject button (21) until it
reaches the rst position.
• To eject the tape, rmly press the Fast
Forward / Eject (21) button.
• Playback will automatically stop when the
tape reaches its end.
Fast Forward/Eject Cassette Slot

9
www.itek-products.co.uk
Cleaning and care:
CLEANING CDS
• Use a soft cloth to wipe o any
ngerprints and dust from the disc
surface.
• Wipe in a straight line from the centre
to the outside of the disc. Small dust
particles and light stains will not aect
reproduction quality.
• Never use chemicals such as record
sprays, anti-static sprays, benzene or
thinners to clean your CDs.
• To reduce the risk of scratches, please put
the CD back into its case after use.
• Do not expose CDs to direct sunlight, high
humidity or high temperatures for long
periods.
• Do not stick paper or write anything on
either side of the CD.
CLEANING THE LENS
• A dirty lens will cause the audio to skip.
If the lens is very dirty, the CD may not
work.
• If this is the case, use a lens cleaning CD
to remove dirt or dust from the lens.
WARNING:
DO NOT IMMERSE ANY ELECTRICAL PART
OF THE APPLIANCE IN WATER SUCH AS
MOTOR UNITS OR PLUGS.
PLEASE SEE CLEANING SECTION FOR
FURTHER INSTRUCTIONS.
DISPOSAL OF THE UNIT
Appliances bearing the symbol shown here
may not be disposed of in domestic rubbish.
You are required to dispose of old electrical
and electronic appliances like this separately.
Please visit www.recycle-more.co.uk or
www.recyclenow.co.uk
for access to information about the recycling
of electrical items.
Please visit www.weeeireland.ie for access to
information about the recycling of electrical
items purchased in Ireland.
The WEEE directive, introduced in August
2006, states that all electrical items must be
recycled, rather than taken to landll.
Please arrange to take this appliance to your
local Civic Amenity site for recycling, once it
has reached the end of its life.

10
CUSTOMER SUPPORT TEAM: +44 (0) 333 220 6058
Troubleshooting:
The unit does not turn on when
the power switch is pressed
The unit is unplugged. Connect the unit to the AC power
supply.
No sound comes out of the
speakers.
The volume is turned down (to MIN).
The input selector does not match the playback source.
Adjust the volume.
Re-select the desired input source.
The unit does not pick up a
station,and/or the signal appears
weak.
The station is not tuned properly.
Re-tune the unit to your required station.
A TV set may be in use nearby and is interfering with the
radio reception.
Turn o the TV or appliance that is interfering with the signal.
The antenna is not oriented
properly.
Re-orient the antenna until reception improves.
The CD stops immediately after
starting,or the unit pauses or
stops during play.
The CD is inserted upside down.
The CD is dusty or dirty or there is condensation on the CD.
Insert the CD with the printed side up.
Carefully clean and dry the CD.
No sound. The CD player is paused.
Press the PLAY/PAUSE button.
The sound from a specic CD is
distorted, or playback stops or
skips.
The CD is scratched damaged or warped.
The CD should be changed.
The disc is dirty.
Carefully clean the CD.

11
www.itek-products.co.uk
NOTES

We hope you enjoy your appliance for many years.
As a thank you for purchasing one of our fantastic products,
we are oering you an extra 1 year peace of mind.
*To receive your extra guarantee period, register your appliance online
within 28 days of purchase by visiting:
www.itek-products.co.uk
Make sure to retain your original receipt.
Should you have a problem
with your appliance or need any spare parts please call our
Customer Support Team on:
+44 (0) 333 220 6058
Distributed throughout the UK by RK Wholesale LTD
1118.V8
Table of contents
Popular Media Converter manuals by other brands

Omnitron Systems Technology
Omnitron Systems Technology FlexPoint 100Fx/Tx User instructions

Z3 Technology
Z3 Technology Zeus manual

HyQuest Solutions
HyQuest Solutions AD375MA user manual

Z3 Technology
Z3 Technology Z3-DME-10 User instructions

Kramer
Kramer VA-11 user manual

RLS
RLS RE36 series installation guide