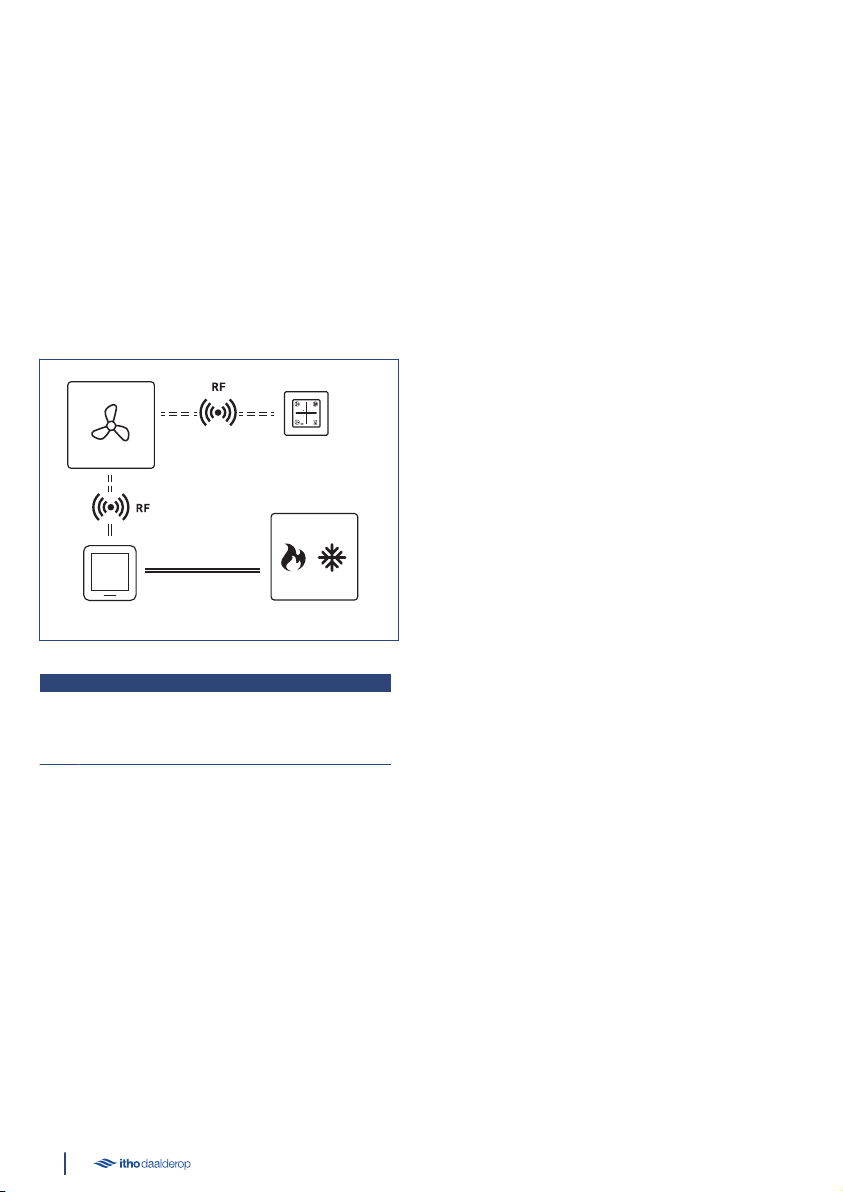
Itho Daalderop WPU 5G Series User manual

A+++
Itho Daalderop
WPU 5G
User manual

Translation of the original document.

Introduction
This manual is intended for the user and contains
important information concerning safe and correct use,
maintenance and troubleshooting the appliance.
The following definitions are used in this manual to draw
attention to hazards, instructions or indications related to
people, products, installations and/or the surroundings.
äDanger!
Indicates that action may result in serious or fatal
injuries.
äWarning!
Indicates a hazard that can cause severe injury and/or
severe damage to the product, system or surrounding
area.
äCaution!
Instructions important for the installation,
functioning, operation or maintenance of the product.
Failure to observe these instructions can result in
minor injury and/or severe damage to the product,
system or surrounding area.
Note
Instructions important for the installation,
functioning, operation or maintenance of the product.
Failure to observe these instructions can result in
minor damage to the product, system or surrounding
area.
Tip
Instructions that may be important for the
installation, functioning, operation or maintenance of
the product, but are not related to injury or material
damage.
The installer is responsible for the installation and
commissioning of the product and/or system.
●The installer must give the user instructions on:
- how the appliance works
- how to operate it;
- how to put it into service, fill and bleed it
- how to put it out of service and drain it;
- annual inspection and maintenance;
- troubleshooting.
Due to our continuous product improvement process, this
document may not match the appliance you received. You
can download the latest version of the manual from
www.ithodaalderop.nl.
Itho Daalderop cannot be held responsible for costs,
damage or personal injury if the product is not used in
accordance with the instructions given in the manual.
If you have any questions after reading this user manual,
please contact your installer.
Tip
Don't forget to register the product via the website of
Itho Daalderop to receive an extended guarantee!
Tip
Keep the installation instructions and user manual in
a safe place, e.g. with the appliance, so they are
available when needed.
3

Contents
1. Safety and other regulations 5
1.1. Safety 5
2. Product information 8
2.1. Application 8
2.2. The WPU heat pump - How does it
work?
8
2.3. Spider WP Climate thermostat 10
2.4. Zone control 10
2.5. Application in new-build houses 11
2.6. Recycling 11
3. Operation 12
3.1. Activation thermostat 12
3.2. Screen 12
3.3. Status 13
3.4. Ventilation 13
3.5. Temperature 14
3.6. Service 15
4. Time/date 16
4.1. Request time/date 16
4.2. Setting time/date 17
5. Temperature 18
5.1. Heating or cooling 18
5.2. Increase/reduce temperature 19
5.3. Settings heating/cooling 19
6. Hot water 21
6.1. Tap water comfort 21
6.2. Setting tap water comfort 21
6.3. Start time heating tap water 22
6.4. Legionella prevention 23
7. Ventilation 24
7.1. Wireless connection 24
7.2. Ventilation system 27
7.3. Standard ventilation 27
7.4. Auto-ventilation 28
7.5. Timer 29
8. The most frequent complaints 30
9. Notifications 34
9.1. Tap water 34
9.2. Battery 34
9.3. Fill with water 34
9.4. Replace air filter 35
9.5. Air quality 35
9.6. Communication 36
9.7. Sensor error 36
10. Faults 37
10.1. Error messages 37
10.2. Temperature error 37
10.3. Ventilation error 38
10.4. Error tables 39
11. Service and maintenance 42
11.1. Inspection and/or maintenance 42
11.2. Replacing thermostat batteries 43
11.3. Thermostat Factory Settings 44
12. Warranty 45
13. Declarations 46
4

1. Safety and other
regulations
1.1. Safety
●The installation,
commissioning, inspection,
maintenance and repair of this
product and/or system may
only be carried out by a
qualified installer (*) in
accordance with the (safety)
requirements set out in the
manual. Only original
accessories and parts
prescribed by the
manufacturer may be used.
●Do not use the product for
purposes other than those for
which it is intended, as
described in this manual.
●This product and/or system
may be operated safely by
children aged 8 years and
older and by people with
physical, sensory or mental
disabilities or a lack of
experience/knowledge if under
supervision or after having
received instructions regarding
safe use, and if they are aware
of the product and/or system
hazards.
●Cleaning and maintenance by
the user may not be done by
children or people with
physical, sensory or mental
disabilities or a lack of
experience/knowledge without
supervision.
●Do not allow children to play
with the product and/or
system.
●This product and/or system is
intended for use in domestic
and similar environments,
such as:
-personnel kitchens in
shops, offices and other
work environments;
-farms;
-by customers in hotels,
motels and other residential
environments;
-bed and breakfast
environments.
5

Use in other environments in
consultation with the product
and/or system manufacturer.
●The safety instructions must
be followed in order to prevent
physical injury and/or damage
to the product.
●Maintenance instructions must
be followed to prevent damage
and excessive wear and tear.
●The product may not be
modified.
●Ensure that the electrical
system to which the product is
connected meets the
necessary conditions.
●If the power cable is damaged,
it must be replaced by the
manufacturer, their agent or a
qualified person to avoid any
danger.
●The electrical connection must
always be readily accessible
for disconnection of power.
●Do not expose the product to
the elements.
●Inspect the product regularly
for faults. In the event of
faults, immediately contact
your installer or Itho
Daalderop.
●Take the following steps before
carrying out work on an open
appliance:
-Switch the power off.
-Make sure that the power
cannot be switched back on
accidentally.
-Avoid contact with electrical
components when power is
required for working. Risk
of electric shock.
*) The Netherlands:
A qualified installer is an installer employed by a central
heating or mechanical installation company registered with the
Chamber of Commerce and listed in the SEI accreditation
register (Foundation for Accreditation of Installation
Companies) or which has a Sterkin accreditation.
Belgium
A qualified installer is a technician employed by an HVAC or
electrical installation company registered with the Crossroads
Bank for Enterprises with a valid VAT number.
6

7

2. Product information
2.1. Application
The WPU heat pump is suitable for:
●heating a home;
●cooling a home;
●heating tap water.
WPU
4
3
2
1 1
The WPU heat pump system of Itho Daalderop consists of
the following parts:
1. Source system
2. Heat pump
3. Central heating system
4. Tap water system
2.2. The WPU heat pump - How does it
work?
The WPU heat pump can heat a home and generate hot
domestic water in an energy-efficient way. In order to do
this, the heat pump extracts heat from a source. This heat
is upgraded to a usable level and used for low
temperature heating and/or hot domestic water.
2.2.1. Source system
The following source systems are used by the WPU heat
pump system as sustainable heat source:
Ground
Suitable for:
●WPU 5G i
●WPU 5G c
●WPU 5G kc
Vertical pipes (ground coils) are placed in the ground and
filled with water. This water is circulated by the heat punt
for the drawing or releasing of heat to the ground.
Depending on the energy demand, a deep sounding is
required for each home of between 100 to 200 metres
deep.
District heating
Suitable for:
●WPU 5G co
District heating uses residual heat of an industrial
company, such as a power plant or a waste incineration
plant, for the central heating of water. This heated water
is transported to homes, office buildings or companies
nearby via an underground network of insulated pipes for
heating and/or hot domestic water. This way, energy that
would otherwise have been lost is re-used sustainably.
8

2.2.2. Heat pump
The WPU heat pump is an electrically powered device, in
which liquid is pumped around in a closed circuit; this
liquid reaches boiling point and evaporates at a low
temperature and low pressure. This liquid is also referred
to as a refrigerant and is in liquid or gaseous state,
depending on the pressure and temperature. The
refrigerant's change from gas or liquid causes heat to be
absorbed or released.
The refrigerant circuit in the heat pump consists of a
compressor C1, an expansion valve EV1 and two heat
exchangers HX1 and HX2.
C1
EV1
HX1 HX2
The refrigerant circuit works as follows:
1. The liquid refrigerant flows from the expansion valve
EV1 to the evaporator HX1. The evaporator is linked to
the source system. Due to the temperature
difference, the refrigerant absorbs the heat from the
heat source and evaporates.
2. The compressor C1 draws in the gas and compresses
it under high pressure, causing the temperature of
the gas to rise further.
3. The gas then enters the HX2 condensor. The
condensor is linked to the storage tank and the
central heating system of the home. Due to the
temperature difference, the heat of the gaseous
refrigerant will be released to the central heating
water or the tap water. In doing so, the gas will cool
down and condensate.
4. The liquid refrigerant cools down even further until
the expansion valve reduces the pressure.
5. After this, the process can start again.
2.2.3. Central heating system
An efficient use of the WPU heat pump requires the use of
supply systems, such as:
●Wall, floor or ceiling heating (pipes incorporated in
wall, floor or ceiling)
●LT-radiators (oversized radiators)
●LV-convectors (larger than standard convectors)
The benefit of wall, floor and ceiling heating is that the
surface is usually much greater than that of a regular
radiator. A relatively low temperature is therefore enough
to transfer sufficient heat to the environment.
In addition to improved efficiency, these low temperature
systems ensure an even heat distribution and create
more comfort.
LT-radiators and LT-convectors are supply systems that
can still emit sufficient heat at a relatively low water
temperature. They have an extra large surface area (often
due to additional slats or connections) or are equipped
with a ventilator, which enhances the convection effect.
When choosing the supply system, make sure that it is
also suitable for the cooling of the home.
2.2.4. Tap water system
Besides heating and cooling the home, the heat pump
also provides hot domestic water. A traditional gas boiler
can quickly supply an unlimited amount of water at high
temperature, but a heat pump cannot. In order to
guarantee a constant temperature, a storage vessel is
required. The heat pump slowly heats up the water in the
storage vessel.
The WPV storage vessels of Itho Daalderop were
especially designed fro the WPU heat pump, whereby the
power and temperature are harmonised.
9

2.3. Spider WP Climate thermostat
The Spider WP climate thermostat is a thermostat that
controls the temperature of the room in which it is fitted.
The thermostat is suitable for controlling the WPU heat
pump which can both heat and cool the home. The
connection between the thermostat and the heat pump is
OpenTherm® (wired).
This climate thermostat is unique in that it is also suitable
for controlling your Itho Daalderop ventilation system.
The wireless connection of the ventilation with the
thermostat ensures that you can also control the
ventilation and operate the RF-controls via the
thermostat.
C
AB
D
Schematic display thermostat connection
Key
ASpider WP climate thermostat
BHeat pump
CVentilation unit
DRF control ventilation
2.4. Zone control
Itho Daalderop Autotemp Spider is an optional zone
control that allows you to control the temperature in
multiple rooms, independently from each other. This
active temperature control ensures that the heating or
cooling is distributed depending on the desired
temperature in each room.
The Spider WP Room thermostat in the living room is the
main thermostat and controls where the home as a whole
is heated or cooled. It is not possible to control the
temperature of each individual room by only using the
main thermostat.
The temperature control in the other rooms is controlled
using their own Spider thermostat. Even when the living
room temperature is at the desired level, Autotemp
Spider makes sure that the desired temperature is also
reached in other rooms. Autotemp Spider can establish a
wireless connection with up to twelve thermostats.
10

2.5. Application in new-build houses
Each new-build house contains a large amount of
moisture, on average about 4,000 litres. This moisture
comes from wet construction materials, such as
concrete, cement, spray paint and glue. During
construction, rain can also make the construction
materials wet. The best way to get rid of the moisture is
by properly ventilating the home and keeping the
temperature as level as possible.
Forced drying - not too quickly.
By heating the home, you speed up the drying process of
the dwelling, this is also referred to as forced drying of a
home. The forced drying process should not take place
too quickly, as this could cause a lot of damage (such as
shrinkage cracks). It is therefore important to pay a lot of
attention to the forced drying process. Please note that
this forced drying process may take up to six months. Set
the heat to 15 to 18°C, and when you move into the
property to 20°C, Do not turn up the heat any higher, as
this will cause the materials to dry too quickly, damaging
the building construction.
Ventilation during forced drying.
During the drying process, proper ventilation and
circulation of the air are indispensable. Make sure to keep
approximately 5 centimetres of space between the walls
and your furniture during the first year, allowing the
moisture to escape. Open the windows for a while every
day. Furthermore, the mechanical ventilation system
must always be turned on, so never pull the plug. Set the
mechanical ventilation system in the highest position as
much as possible during the first months.
This creates the best possible air circulation in the home.
Energy bill.
Good and continuous ventilation is not only good for our
health, it is an important way of combating moisture
issues in the home. Ventilation causes heat-loss. The
forced drying process of a new-build property also results
in a higher energy consumption and a subsequently a
higher energy bill.
2.6. Recycling
This product was manufactured using sustainable
materials. It should be disposed of in a responsible
manner at the end of its life cycle. Your local authorities
can provide you with information on how to do so.
The product's packaging can be recycled. These materials
should be disposed of in a responsible manner in
accordance with government regulations.
As a reminder of the need to dispose of batteries and
electrical household appliances separately, the product
features a symbol consisting of a crossed-out wheeled
bin. This means that the product should not be disposed
of with the rest of your domestic waste at the end of its
life cycle. It must be taken either to a special separate
waste collection centre operated by the local council or to
an outlet specified by this service.
Any adverse effects on the environment and human
health are minimised by handling batteries and
household appliances separately. This ensures that the
materials comprising the appliance can be recycled,
thereby saving a significant amount of energy and raw
materials.
11

3. Operation
3.1. Activation thermostat
During normal operation, the thermostat is in a standby
mode. This means that the screen is turned off.
The thermostat is activated by pressing the Itho
Daalderop LOGO, after which it displays the active
operation status.
After operation, the thermostat returns to standby mode
after 20 seconds.
When the thermostat is activated for the very first time, it
will only display the current temperature. This is the case
when the thermostat has not yet been connected to the heat
pump and has no wireless connection to any other devices.
2
1
Key
1Screen
2Logo (activate/confirm button)
3.2. Screen
Status
Ventilation
Temperature
Service
The screen is a capacitive touch screen. This means that
the thermostat is controlled by the physical touching of
the symbols on the screen.
The screen will normally not be active (standby), as a
means of extending the battery life.
12

3.3. Status
STATUS
Symbol Description
Manual operation
Indicates that the thermostat operates without time programme.
Battery
Indicates that the battery capacity is low.
Time/Date
Requesting and setting the current time and date.
Tap water start
Setting the time at which the full hot water storage is heated every day.
3.4. Ventilation
VENTILATION
Symbol Description
Ventilation
Visible when the ventilation unit is connected.
To be used as option button during wireless pairing.
Low mode
Level 1, low speed; when one person is present during the day or night, or when no-one
is present.
Medium mode
Level 2, medium speed; during the day or night when more than one person is present.
High mode
Level 3, high speed; during cooking, showering or bathing, or when a lot of people are
present.
Auto-ventilation
Auto mode, automatic mode; control based on existing sensors (CO2 and/or RV). The
capacity is automatically controlled between the low mode and high mode.
Auto-Night (1)
The additional function ensures that the capacity is increased during the low mode,
ensuring an optimal climate during sleep.
Timer
Timer for switching the unit to high speed for a period of time that can be adjusted.
Replace filter (1)
If the ventilation unit has a filter, a notification will appear on the thermostat if the filter
is contaminated.
1) Only available if the connected product supports the functionality.
13

3.5. Temperature
TEMPERATURE
Symbol Description
Temperature
Visible when the heat pump is connected.
To be used as menu button or option button during wireless pairing.
Room temperature
The 'large' white numbers reflect the current room temperature.
Error code
An error code is displayed by way of the first two digits.
Desired temperature
The 'small' grey numbers reflect the desired temperature.
Serial number error
The serial number of an error is displayed by way of the first two digits.
Heating active
Indicates that the heat pump has heat demand.
Cooling active
Indicates that the heat pump has cooling demand.
Increase
By pressing the button, the desired temperature will be increased by 0.5°C.
Reduce
By pressing the button, the desired temperature will be reduced by 0.5°C.
Fill with water
If the water pressure of the central heating system is (too) low, then this notification will
appear on the thermostat.
Error code
Appears on the screen when an error is displayed by way of the error code.
Fault
Appears on the screen when an error is displayed without error code.
14

3.6. Service
SERVICE NOTIFICATIONS
Symbol Description
Home
Only visible as selection button during wireless pairing of the gateway.
Indoor climate Good (1)
The indoor air quality is good.
Indoor climate Reasonable (1)
The indoor climate is reasonable.
Indoor climate Poor (1)
The indoor climate is poor.
Service
Indicates that a connected device is in an error state.
Tap water comfort
Setting the tap water heating.
Tap water turned off
The tap water heating is in STAND-BY mode orOFF.
Tap water enabled
The tap water heating is in ECO mode, COMFORT mode or BOOSTmode.
Heating the tap water
Indicates that the tap water is heated.
1) Only available if the connected product supports the functionality.
15

4. Time/date
4.1. Request time/date
Time/Date
●When the heat pump is connected to monitoring, the
current time and date are automatically set by the
thermostat.
●When the heat pump is not connected to monitoring,
then the current time and date must be set via the
thermostat.
Note
If the current time is not automatically adjusted at the
start of summer or winter time, you will need to
manually adjust the correct time.
View the current time and date as follows:
a) Activate the thermostat.
b) Press the TIME/DATE button.
When the TIME/DATE button flashes, then the current time
and date is not yet set.
c) The time is displayed on the screen.
Example time (14:36).
d) By again pressing the TIME/DATE button, the date is
displayed.
Example date (27-11).
e) By again pressing the TIME/DATE button, the year is
displayed.
Example year (2018).
f) The thermostat will automatically return to the
operating status once it is not used for 10 seconds.
16

4.2. Setting time/date
Time/date
Increase
Decrease
The set-up is done as follows:
a) Activate the thermostat.
b) Press the TIME/DATE button for approximately 3
seconds until the settings are flashing.
If, during the set-up, the thermostat is not used for 10
seconds, then the thermostat will return to operating
status. The settings entered until that moment will be
saved.
c) year.
The year can be set by briefly pressing the INCREASE
or REDUCE button.
Confirm the setting by pressing the LOGO. The
thermostat moves to the next setting.
Example year (2018).
d) Month.
The month can be set by briefly pressing INCREASE
or REDUCE button.
Confirm the setting by pressing the LOGO. The
thermostat moves to the next setting.
Example month (11).
e) Day.
The day can be set by briefly pressing the INCREASE
or REDUCE button.
Confirm the setting by pressing the LOGO. The
thermostat moves to the next setting.
Example day (27).
f) Hours.
The hour can be set by briefly pressing the
INCREASE or REDUCE button.
Confirm the setting by pressing the LOGO. The
thermostat moves to the next setting.
Example hour (13).
g) Minutes.
The minutes can be set by briefly pressing the
INCREASE or REDUCE button.
Confirm the setting by pressing the LOGO. The date
and time are now set.
Example minutes (36).
h) For confirmation, the time is displayed for 3 seconds.
i) The thermostat will then automatically return to the
operating status.
17

5. Temperature
5.1. Heating or cooling
Temperature
Heating active
Cooling active
Heating
In a home with a heat pump system, it is recommended to
maintain a constant temperature. You set the thermostat
to a certain fixed temperature and it automatically
determines whether heating or cooling is required. As a
heat pump system is a slow-acting system (slower than a
boiler), and in order to not disrupt the switch between
heating and cooling, it is strongly discouraged to adjust
the temperature daily. If, however, you do wish to make a
minor night adjustment, you can still do so by slightly
adjusting the thermostat. An adjustment by more than 1°C
is therefore not recommended.
The heating temperature is adjustable between 18°C and
24°C.
Cooling in the summer period
Limited cooling of your home is possible during summer.
The room thermostat automatically switches on the
cooling depending on the outdoor temperature and the
desired room temperature. By directing the relatively cold
water from the source through your central heating
system, the heat is extracted from the home and
transported to the source. This gives a cooling effect in
the home as the indoor temperature is reduced to a few
degrees below the outside temperature.
The cooling temperature is adjustable between 20°C and
25°C.
äCaution!
You cannot switch off the COOLING function!
The cooling of the home has another important function,
namely the regeneration of the ground source. This
means that the heat from your home is released to the
ground and stored. This stored heat can be reused for low
temperature heating and/or hot tap water. A heated
source increases the efficiency of the heat pump and
reduces your energy costs.
äCaution!
You must therefore never switch off the heat pump.
Thermostat
To prevent the heat pump from turning on and off
unnecessarily, the thermostat will automatically adjust
the following settings:
●When switching to COOLING, the desired
temperature is increased by 1°C.
●When switching to HEATING, the desired
temperature is lowered by 1°C.
The desired temperature can always be adjusted
manually afterwards.
18

5.2. Increase/reduce temperature
Setting the desired temperature once will suffice for a
pleasant indoor climate. The heat pump will heat or cool
the home based on the set temperature and the season.
The heat pump works at its most economical at a
constant temperature. Lowering the temperature during
the night takes additional energy in a well-insulated
home. Lowering the temperature during the night is
therefore not recommended.
Increase
Reduce
Room temperature
Desired temperature
Changing temperature during
heating
Changing temperature during
cooling
The temperature can be adjusted as follows:
a) Activate the thermostat.
The 'large' white numbers reflect the current room
temperature. The 'small' grey numbers reflect the
desired temperature.
b) By pressing the INCREASE or REDUCE button, the
desired temperature can be increased or reduced by
0.5°C.
The HEATING or COOLING symbol will flash during the
change in temperature.
5.3. Settings heating/cooling
Temperature
The following (temporary) settings can be selected for the
heating or cooling of the home.
Description
Automatic heating/
cooling Thermostat enabled.
Electric heating (1) Electric additional heating of
the home.
Stand-by Thermostat switched off.
1) Option only visible if the heat pump is equipped with an electric
heating element.
Selecting setting
a) Activate the thermostat.
b) Press the TEMPERATURE button for about 3 seconds
until the current setting is displayed flashing on the
screen.
c) By pressing the TEMPERATURE button multiple
times, the various settings are displayed.
Automatic heating/cooling
Electric heating
Stand-by
d) Select the correct setting.
e) Confirm the choice by pressing the LOGO. The
selected setting is displayed for 3 seconds.
If the choice is not confirmed within ten seconds, then the
change will be cancelled and the thermostat will return to
operating status.
f) After which the thermostat will automatically return
to the operating status.
19

5.3.1. Automatic heating/cooling
By default, the heat pump system will automatically heat
or cool based on the temperature you set. After heating, it
takes at least 24 hours for the system to cool.
5.3.2. Electric heating
By switching on the ELECTRIC HEATING setting, the heat
pump will increase temperature faster in the event of
failure, or to increase comfort. After activating this
setting, the electrical element will switch on for 24 hours,
when necessary, for the additional heating of the home.
After 24 hours, the electrical additional heating switches
off automatically.
The ELECTRIC HEATING setting will result in a higher
energy consumption, which will result in a higher energy
bill.
If ELECTRIC HEATING is turned on, you'll see the letters
EE every two seconds at the place of the desired room
temperature.
For example:
5.3.3. Stand-by
It is possible to turn off the thermostat's temperature
demand (HEATING or COOLING) indefinitely, for example
during your holiday. To do this, the thermostat must be
set to STANDBY mode.
Although the thermostat's temperature demand is
switched off, the temperature in the home is continuously
monitored so that it doesn't get too cold or too hot. During
the STAND-BY setting, the house is not heated above 18°C
or cooled below 21°C.
äCaution!
After switching off STAND-BY mode, the heat pump
system takes some time to get the house back to its
set temperature.
If necessary, use the ELECTRIC HEATING setting to
reach the desired temperature faster.
If your thermostat is in STAND-BY mode, you'll see two
gray dashes at the place of the desired room
temperature.
For example:
20
This manual suits for next models
24
Table of contents
Popular Heat Pump manuals by other brands

Daikin
Daikin Altherma 3 H HT ECH2O Series installation manual

Lennox
Lennox Allied Air Enterprises BHP16L installation instructions

Duratech
Duratech DURA V Series manual

Payne
Payne PH10JA018000 User's information manual

Nibe
Nibe AG-AC10-65 Installer manual

American Standard
American Standard ASYSTAT655A Owner's guide & information

IVT
IVT 12 THR-N installation manual

Carrier
Carrier XPOWER 38VYX110 installation manual

Aquacal
Aquacal H/AT100R Owner's manual and installation guide

Carrier
Carrier Infinity 24VNA6 Service manual

Bosch
Bosch CS5000AW 38 O Quick installation guide

Semtic
Semtic NERS-B3Y Installation and operation instruction