ITT MiniDual User manual

1
Contents
1. Safety Notes............................................................................................................ 4
2. Phone Appearance .................................................................................................. 6
3. Preparation before Use ............................................................................................ 8
3.1 Install your SIM card..............................................................................................8
3.2 Install memory card ...............................................................................................8
3.3 Install battery .........................................................................................................9
3.4 Charge the battery.................................................................................................9
3.5 Usage of battery ..................................................................................................10
3.6 PIN code..............................................................................................................10
3.7 PIN codes of card 2 .............................................................................................10
4. Brief Introduction of Phone..................................................................................... 11
4.1 Call key of card 1.................................................................................................11
4.2 Call key of card 2.................................................................................................11
4.3 Switch-on/off key/ End key ..................................................................................11
4.4 Clear key .............................................................................................................11
4.5 Keypad lock.........................................................................................................11
4.6 Number keys .......................................................................................................11
4.7 Display icons in standby state on screen .............................................................12
4.8 Language and input methods ..............................................................................12
4.9 Prompt Modes of incoming call............................................................................12

2
4.10 Service ................................................................................................................13
4.11 Groups ................................................................................................................13
4.12 Definition of terms................................................................................................ 13
5. Basic Operation of Phone ...................................................................................... 14
5.1 Switch on the phone ............................................................................................14
5.2 Switch off the phone ............................................................................................15
5.3 Shortcut function in standby state........................................................................15
5.4 Dial call................................................................................................................15
5.5 Adjust volume of receiver ....................................................................................15
5.6 Answer call ..........................................................................................................15
5.7 Speed dial ...........................................................................................................16
5.8 Send DTMF signal...............................................................................................16
5.9 Read short message quickly................................................................................ 16
5.10 Missed call...........................................................................................................16
5.11 Connect Voice inbox............................................................................................16
6. Use Menu Function................................................................................................ 16
6.1 Video zone ..........................................................................................................16
6.1.1[Audio player]:......................................................................................................16
6.1.3[Video recorder]: ..................................................................................................17
6.1.4[Camera]:.............................................................................................................17
6.2 Personal information management ......................................................................18
6.2.1[Phone book] .......................................................................................................18

3
6.2.2[Message]............................................................................................................19
6.2.3Call Center ..........................................................................................................26
6.2.4Organizer.............................................................................................................30
6.3 Entertament.........................................................................................................31
6.3.1Game ................................................................................................................31
6.3.2Network Service ..................................................................................................31
6.3.3Multimedia ...........................................................................................................32
6.3.4Additional function ...............................................................................................33
6.4 System ................................................................................................................33
6.4.1 Settings...............................................................................................................33
6.4.2 Use profiles.........................................................................................................36
6.4.3 Shortcut function .................................................................................................37
6.4.4 File management ................................................................................................37
7. Appendix I............................................................................................................. 39
Troubleshooting...........................................................................................................39

4
1. Safety Notes
In order to use your mobile phone safely and effectively, please read the following information before your using.
Please switch off the phone when you are near chemical plant, gas station, oil storeroom or other exploders.
Keep your phone away from children.
Please use your earphone to communication during driving so as to ensure safety; except for emergency, please dial or
receive a call after you park your car at roadside; especially do not use the phone during high speed driving.
Don’t use mobile phone in the airplane. Please check out whether flight mode or automatic switch-off is set before going
on board.
Don’t use mobile phone in the hospital to avoid any interference to the normal operation of medical instruments, or
medical accidents may happen. If there are heart pacemaker, hearing aids and other medical electronic equipments nearby,
please be especially careful because the phone may influence these equipments.
Any accessories and fittings not from original factory can’t enjoy repair guarantee.
Don’t disassemble the phone by yourself. If your phone goes wrong, please contact the service center appointed by us.
Strictly prohibit connecting the phone with charger for charge when no battery in the phone; shut off power supply of the
phone when you need to take out the battery, or the phone memory may be damaged.
Charge must be performed under good ventilative and heat-eliminating environment and keep away from tinder and
explosives.
In order to avoid demagnetization, please keep the phone apart from magnetic materials such as disk and credit card.
Ensure that your phone has no touch with any liquid. Once the case happens, please take out the battery and contact
the service center appointed by us.
Avoid using the phone in over-hot or over-cold environment. Avoid exposing the phone in strong sunlight or humid
environment.
Don’t clean your mobile phone with liquid or damp cloth containing strong
Your mobile phone has functions of taking photographs and recording. Please use the functions in accordance with
related rules and regulations. Using the functions without authorization may break rules and regulations.
washing agent.
Don’t throw or beat your mobile phone when using it for fear of damaging its case and internal parts.
Don’t throw old battery into life rubbish. In places where specified provisions are provided for treating old battery, please
follow the prescriptive instructions.
<Remark>: The manual is using instruction under simplified Chinese mode. It is a little different under English mode.
<Warning>: For any aftereffects rendered by using the phone without regarding to above suggestions or incorrect usage, our
company will not bear any responsibility.
If the content of the manual differs from your phone, please take your phone as standard.
Our company has right to modify the manual at any time and no further notice will be given.

5
You can enter emergency call numbers such 112 and press Call Key to dial it out after you make sure your phone is powered
on and in service state, then report your location and explain the situation briefly. Don’t hang up the call until you are
permitted.
Note: Similar with any other mobile phones, this phone may not support all properties of mobile phone due to network
coverage or transmission status of wireless signal; some network even doesn’t support 112 emergency call service, so for the
very critical communication (such as medical first aid) you should not completely depend on the mobile phone. Please consult
the local network operators and ask for checkage.

6
2. Phone Appearance
There are 21 keys on keypad and 2 side keys on your phone. It is single-screen display. There are built-in vibration motor,
one earphone, a transmission port used for charger/data line and a port for outer connection with memory card (T-FLASH card).
The picture may be a little different from actual phone. Please take the actual phone as standard

7
(Front elevation of the phone is as follows:) (Back elevation of the phone is as follows:)

8
3. Preparation before Use
3.1 Install your SIM card
When you register your phone number, you can apply for two
different numbers and two different network providers. Then you
will get two SIM cards (Subscriber Identity Module cards
With the two SIM cards, you can use all functions of the
phone. Many parameters required for communication are
memorized in SIM cards and personal information including PIN
code (Personal Identity Number code), phone book, short
message and other additional system service can be stored too.
) provided
by network providers.
Warning: Don’t distort or scratch SIM cards. Don’t let them got
to static electricity, dust or water either. If the SIM cards are lost,
please contact your network operators immediately so as to seek
help.
Please switch off your phone before installing SIM cards. The
SIM cards shall be installed in back of the phone.
Please install the SIM cards according to following
diagrammatic presentation.
Note:
The SIM cards are tiny objects so please keep them out of children’s touch for fear that they may put them into mouth
by mistake!
3.2 Install memory card
The phone has no enough memory space itself. If you need to use some functions, you may need to install memory card
(T-FLASH memory card is used in this phone.)
Install T-FLASH card: Open the buckle of T-FLASH card, insert T-FLASH card into the jack and then a prompt “insert memory
card” will appear in the screen. Fasten the buckle and installation is finished.
Remove T-FLASH card: Open the buckle of T-FLASH card, press T-FLASH card inwards lightly and then it will come out

9
automatically. The prompt “remove memory card” will appear on the screen. Fasten the buckle and removing is finished.
Note:
T-FLASH card is a tiny object so please keep it out of children’s touch for fear that they may put it into mouth by
mistake!
3.3 Install battery
Original battery and fittings are appropriate for your phone. When the battery is not in use, please put it into protective box.
Please install the battery according to the following diagrammatic presentation.
Note:
Please perform correctly according to the diagrammatic presentation so as not to damage contact of the battery.
3.4 Charge the battery
Only after several continuous full charge and discharge can the new battery attain the best efficiency.
When the power is run out, please charge the battery in time. Overmuch discharge may damage your battery.
After the battery is fully charged, please cut off the connection between charger and AC power and then cut off its connection
with your phone.
Please connect the charger according to diagrammatic presentation.

10
When you charge the battery in switch-on state, icon of battery capacity on your phone screen will be displayed from right to
left in animation way. When the battery is fully charged, battery capacity will be displayed in full-grid and still way.
It is normal if the battery is slightly euthermic during charging.
3.5 Usage of battery
The performance of the battery is influenced by multiple factors including your radio bearer, network configuration, signal
intensity, the temperature when you use the phone, functions or settings you choose and use, fittings of the phone and voice, data
or other application mode you use.
Please follow the following rules to make the battery attain the best performance.
New battery or the battery not used for long time may need longtime charge;
Keep the battery at room temperature or near room temperature during charging;
It is normal if after long-term use, the battery needs longtime charge because of gradual wastage. But if you find the hold
time reduced and the charging time increased after normal charge, you need to buy battery from original factory or buy the battery
authorized by our company. Bad fittings may damage your phone and even induce danger!
When the battery is laid for long or of low power, it needs a while to display charging interface after plugging the charger.
Please wait patiently.
Note:
In consideration of your security and the environment, please don’t throw battery at will.
Warning:
Short circuit of battery in any fashion may result in severe aftereffects such as explosion, fire or personal injury.
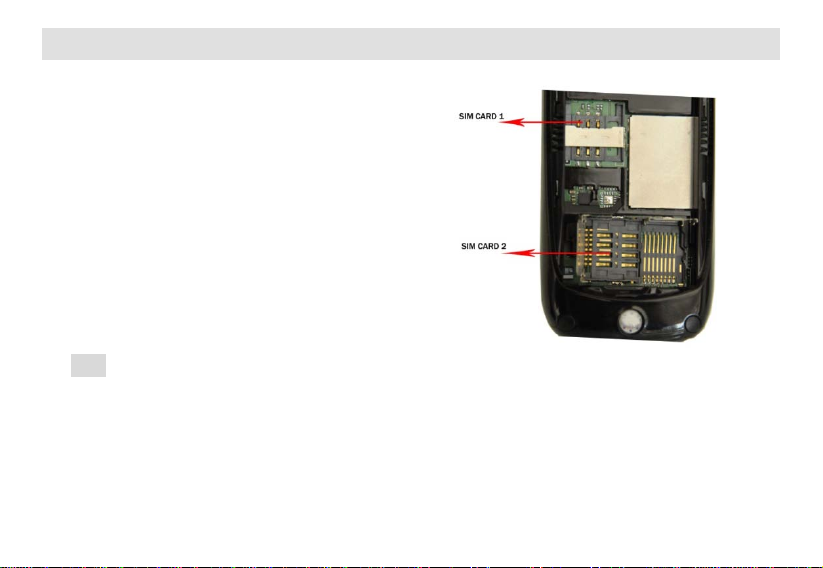
3.6 PIN code
PIN1 code: It is a personal identity number code used for entering SIM card. It can prevent others from using your SIM card
without your permission. If protective function of PIN1 code has been used in your phone, the screen will display “enter PIN” when
you switch on. When you enter PIN1 code, * will be displayed in the screen instead of what you enter. You can get PIN1 code
when you get SIM card from network operators.
PIN2 code: It is a personal identity number code required in using special functions such as call charges
<Warning>:
If you enter wrong
PIN codes for three times continuously, the SIM card will be locked. Please unlock it with PUK
code. Please unlock it with PUK2 code if you enter wrong
PIN2 code for three times continuously. Please contact network
operators for unlocking immediately. Unauthorized trial of unlocking may render permanent failure of the SIM card.
3.7 PIN codes of card 2
PIN1 code of card 2: It is a personal identity number code used for entering SIM2 card. It can prevent others from using your
SIM2 card without your permission. If protective function of PIN1 code of card 2 has been used in your phone, the screen will
display “enter PIN code of card 2” when you switch on. When you enter PIN1 code of card 2, * will be displayed in the screen
instead of what you enter. You can get PIN1 code when you get SIM card from network operators.
PIN2 code of card 2: It is a personal identity number code required in using special functions such as call charges.
PUK code and PUK 2code of card 2 (8 bits)
<Warning>:
If you enter wrong
PIN codes for three times continuously, SIM card will be locked. Please unlock it with PUK

11
code. Please unlock it with PUK2 code if you enter wrong
PIN2 code for three times continuously. Please contact network
operators for unlocking immediately. Unauthorized trial of unlocking may render permanent failure of the SIM card.
4. Brief Introduction of Phone
4.1 Call key of card 1
It is used to dial calls (when the number is entered or in phone book) or answer incoming call(s). In standby state, pressing
this key can display recent call register (all register including received, missed and dialed calls. 40 numbers can be displayed at
most). In standby state, pressing this key twice continuously can dial the latest call number.
4.2 Call key of card 2
It is used for calling with card 2 (when the number is entered or in phone book). Also it can be used for answering telephone.
In standby state, pressing this key can display recent call records (all records including received, missed and dialed calls. 90
numbers can be displayed at most).
4.3 Switch-on/off key/ End key
In calling state this key is used to stop calling. In communication state this key is used to end calls or exit menu and return to
standby state
4.4 Clear key
It is used for clearing and editing wrong content on the editing interface of the phone.
4.5 Keypad lock
When it is on standby interface, the phone will be locked automatically if you do no operation within a certain period. Press
Call Key and then click screen icon to unlock the phone. Keys on keypad of locked phone can’t be started casually; if there is
incoming call, the answering way is the same with that before. When the call is finished, the phone will return to “locked” state.
(Interval of locking can be set in settings.)
4.6 Number keys
In dial interface of screen, under entering or editing state, keys 1-9 can be used to enter numbers and characters and speed
dial number when standby (which shall be set before use). Press any key of 2-9 for more than 2 seconds to dial numbers in speed
dial list quickly.
Note:
Long pressing key ‘1’ in standby state means to call the voice inbox service center. This number shall be preset with
voice inbox service number
* and # keys have different functions in different states or function menus:
In dial interface of screen, long pressing “#” key can enter or exit mute mode.
In number dial interface, continuous short pressing or long pressing “*” key can enter characters such as “P”, “+” or “W”.

12
Among them “P” and “W” are convenient for calling extensions and “+” is used for making international long-distance call.
Tip: Difference between “P” and “W” is that “P” is to send DTMF directly after three seconds’ pause while for “W” a window
will pop up for asking the user whether send it to DTMF or not.
4.7 Display icons in standby state on screen
Antenna. The antenna icon shall be changed.
Alarm clock is started
Prompt of SMS on card 1. The icon of card 1 shall be changed.
Prompt of SMS on card 2. The icon of card 2 shall be changed.
Indication of battery power
Ringing, the icon here is different with alarm modes. It can be changed with following three icons: change the ringing
icon as red one.
Ringing after vibration
Vibration and ringing
Vibration
Missed call. Add the icons of missed calls on card 1 and card 2.
Lock
Line 1. Change this icon.
Line 2. Change this icon
MMS. Change this icon
Service inbox. Change this icon
GPRS Change this icon
All call transfer. Change and add the icons of call transfer of card 1 and card 2.
4.8 Language and input methods
Your phone provides 8 languages input methods. For specific operation, please refer to the relative chapters of each
language editing and you can get to know all kinds of input methods and their conversion well
4.9 Prompt Modes of incoming call
Your phone has built-in vibration motor and buzzer which can offer the following modes for incoming calls:

13
Ringing. Change the ringing icon as red one.
Vibration
Ringing after vibration
Vibration and ringing
4.10 Service
Service means the toolkit of SIM card. Your phone supports service function and the detailed menu items depend on the SIM
card and network. The service menu will be added to phone service automatically if both the network provides service business
and your SIM card supports the service function.
4.11 Groups
Groups in the phone can be divided into family, friend, colleague, personage and others. Users can set different incoming call
ring and head portraits for different groups.
4.12 Definition of terms
Dial domestic call
The easiest way for dialing domestic call is to enter phone number. Then press dial key of card 1 and you can start calling
of card 1. Press dial key of card 2 and you can start calling of card 2. If you need to modify phone number, please click “clear key”
to delete characters and perform modification. Display screen will display dial animation when you dial a number. If it is dial of card
1, “SIM1” will appear before the number. If it is dial of card 2, “SIM2” will appear before the number. Message of call status will be
displayed on the screen when the call is answered.
When the call ends, please press switch-on/off key to end the call.
Method for dialing domestic call is: Area Code + Phone Number + Dial Key.
Dial international call
When you need to dial international call, please long click “*” key until the prepositive sign “+” for international
long-distance telephone appears on the screen. This allows you to dial at any country without knowing local prepositive number
(for example, it is+86 for China) of international line.
After entering the prepositive number, please enter the complete phone number with country and area code you need to
dial. According usual routine, country code for German is 49, for Britain is 44 and for Sweden is 46.
Method for dialing installed phone is: “+”Country Code + Complete Phone Number with Area Code + Dial Key
Dial Extension of Installed Phone
Some extensions of installed phones can’t be connected directly, and you need dial an exchange number first, and then
dial an extension number. If you insert a pause character “P” between the exchange number and the extension number when
inputting telephone number, then this phone will finish all dialing for you, including auto dial and connection with the extension.
The method for inputting “P” is as follows: Long press “*” key or continuously short press “*” key for three times (it will show the
character “P” on the display screen at this point)

14
Method for dialing an extension of installed phone is (not containing plus):
Phone Number + “P” + Extension Number + Dial Key
Emergency Call
In any country using digital GSM network, as long as you are in the network covering range (which can be learned from the
indication bar of network signal strength on the left-upper corner of the phone screen), you can call an emergency service. If your
network operator does not provide roam service in the area, it will display a message “Emergency Call Only” on the phone screen
to indicate that you can only make such calls. If you are in the network covering range, you can dial emergency call even without
SIM card.
* In some areas, 112 (emergency phone) service is provided by network operators. If there is any abnormity, please consult
network operators!
IMEI
It is international mobile equipment identity code. Switch off you phone and remove the battery, and then you will find barcode
label printed with the number on back of the phone. The number is also stored in your phone. Enter screen dial interface and input
“*#06#” after switching on the phone to display the number.
IP dial
First you need to set correct IP connection number in “Settings/call settings”, then start it and enter phone book to choose “IP
dial”.
Note:
Please consult the network operators whether need to start IP dial when dialing local phone number.
5. Basic Operation of Phone
5.1 Switch on the phone
Long press the [On/Off] key to switch on the phone. If there are no passwords set for SIM card and the phone, startup logo
If the screen displays “please insert SIM card” after switching on, please switch off and check whether your SIM card is
installed correctly or whether it is installed.
will appear on the display screen and then the phone will search network automatically. When the phone is registered to network,
the name of network operator will appear at the middle of screen, and then you can dial or answer calls.
After the SIM card is inserted, the phone will automatically check whether the card is usable and then following prompts will
appear on the display screen in sequence:
1> “Input PIN” – if you have started SIM lock.
2> “Input phone lock password” – if you have started phone lock.
3> “No service” – indicates failed registration of network and you can’t make any call at the moment.
4> “Emergency call is allowed” – indicates that the phone is registered to other network and only 112 can be dialed
5> “Search” – the phone is searching network until proper service network is found.

15
If current switch-on mode is set to be “double cards are started” or “only card 2 is started”, when the phone has checked
automatically that SIM2 is usable, the following prompts will appear on the display screen in sequence:
6> “Input PIN of card 2” – if you have started the SIM lock of card 2.
7> “No service” – indicates failed registration of network for card 2 and you can’t call at the moment.
8> “Emergency call is allowed” – indicates that card 2 is registered to other network and only 112 can be dialed.
9> “Search” –card 2 is searching network until proper service network is found.
Note:
Please contact your network operator if you don’t know the PIN1 code of card 1 or card 2.
The default phone password is “1122”.
5.2 Switch off the phone
If you need to switch off your phone, please press the On/Off key until switch-off animation is displayed in the screen. Then
card 1 and card 2 will be closed together. Please don’t switch off your phone by taking down the battery directly, or SIM cards may
be damaged easily and also you may lose some information.
5.3 Shortcut function in standby state
Shortcut icons on the screen from left to right are network service, short message, shortcut, phone book and dial keypad.
5.4 Dial call
Input phone number on screen dial interface. Press Call Key of card 1 and you can dial call through card 1. Press Call
Key of card 2 and you can dial call through card 2. Please press [clear] key or [On/Off] key if you need to end or cancel the dialing.
When the telephone gets through, you can see
Dial call with phone book: enter and search name/phone number stored in phone book. Press Call Key of card 1 and you
can dial call through card 1. Press Call Key of card 2 and you can dial call through card 2.
call timer on the screen.
Redial numbers dialed recently: in standby state, press Call Key of card 1 or card 2 and you can look over 40 numbers or
names you called recently. Scroll to the number or name you need and press Call Key of card 1 or card 2 to make a call.
5.5 Adjust volume of receiver
You can press up and down key of the phone to adjust volume of receiver during communication.
5.6 Answer call
The phone will prompt you by the way you have set for incoming calls, including ringing, vibration, vibration & ringing and
ringing after vibration, if any call is dialed in.
Press dial/call key of either card 1 or card 2 if you want to answer incoming call.
Press On/Off key or end key or click [reject] in the lower right corner if you need to reject call,
If you have applied calling identification service, calling number will appear on the screen when a call is incoming. If the
number has been stored in phone book, then corresponding name will be displayed in the screen.
If card 1 is called, “SIM1” will be marked before incoming call number or name.

16
If card 2 is called, “SIM2” will be marked before incoming call number or name.
5.7 Speed dial
Your phone provides 9 shortcut keys. You can customize phone numbers corresponding to these keys (for detailed
description, please refer to “phone book”). Thus, as long as you long press corresponding number keys or activate screen dial to
click [2-9] keys in standby state, you can dial call quickly. Key [1] is designed for speed dial of voice inbox number and you can
use this key after setting voice inbox number.
Note:
You must use to click keys for more than 2 seconds to realize speed dial. If the shortcut key you have clicked isn’t
defined in “settings/phone settings/speed dial”, you are unable to dial out.
5.8 Send DTMF signal
If you have set the function of sending DTMF signal, then the number keys, * key and # key you pressed by screen dial
keypad during your communication, will be sent to the other party through DTMF signal. If you can’t start this function, you may fail
to realize functions such as calling an extension.
5.9 Read short message quickly
When the user receives new messages, the icon of new message will appear on the screen. Click “read” and you can enter to
read the message.
5.10 Missed call
If there is any missed call, the icon for missed call will appear on the screen. Click “read” to enter and view the missed call.
5.11 Connect Voice inbox
Your phone allows you to transfer incoming calls to voice inbox and then you will receive a notice about voice record.(the
number of the voice inbox center shall be preset)
6. Use Menu Function
6.1 Video zone
6.1.1 [Audio player]:
Support vivid video clip files in 3gp formats. In this mode you can perform the following operations to the specified files in 3GP
format.
Option description of animation player
Option
Function instruction
Play
Support the video files in 3GP formats. It is not limited by file size. Click the full screen icon of

17
play interface or press ‘*’ key to perform full screen play.
Send
Send appointed videos to phone book, screen protection, switch-on animation, switch-off
animation, MMS and Bluetooth.
Rename
Change the name of the specified video files.
Delete Delete the specified video files in 3GP formats.
Delete all Delete all files in Video folder in file management directory.
Save path
The files can be saved in phone or SIM card.
Order
For search convenience, Order the files according to name, type, time and size. Also you can
choose the option “none” to order the files.
6.1.3 [Video recorder]:
Enter Multimedia interface and short press camera shortcut to start video recording. Recording time is subject to time limit in
recorder set and capacity of memory card. Enter Option to do the following settings to the recorder.
Option Function instruction
Recorder settings In record mode, you can perform following settings: white balance, fill light, exposure
compensation, night shoot mode and flicker frequency.
Video settings
Set for animation quality, limit of document size, limit of record time, sound effect and
compressed format during video recording.
Special effect set 14 special effects can be selected.
Save path
The files can be saved in phone or SIM card.
Restore settings
Restore user’s setting under record mode to factory settings.
6.1.4 [Camera]:
Through this function table, you can use the built-in camera of the phone to take pictures and adjust camera position. The
lens of camera is located at back of the phone. The phone screen is taken as view window. The pictures generated by the camera
are in JPG format. Please use proper software to look if you have downloaded pictures into computer.
If your phone memory space is not enough for taking new pictures, you need to delete some old pictures or other files in
“document management” so as to release memory space.
Option description of camera
Option Function instruction

18
Photos
View the saved photos.
Camera settings
The following settings can be performed: fill light, shutter sound, exposure compensation, flicker
frequency, delay shoot and continuous capture.
Image settings Photo size:176*220、80*60、160*120、320*240、640*480
Photo quality: middle, high and low
White balance
Modes such as automatic, sunlight, osram lamp, fluorescent lamp, cloudy and incandescence can
be selected.
Scene mode Automatic and night shoot modes can be set.
Effect settings 6 special effects for choice
Storage The files can be saved in phone or SIM card.
Restore default Restore user’s setting under record mode to factory settings.
6.2 Personal information management
6.2.1 [Phone book]
You phone has phone book in name card type. The information of each linkman saved in the phone includes name, three phone
numbers (phone number, home number and company number), company name, E-mail, fax number, birthday, head portrait,
video connection, ringing choice and incoming groups (five groups such as family, friend, personage, colleague and others are
provided). For each linkman saved in card 1 and card 2, only the name and phone number can be saved.
The phone supports 300 groups of numbers.
Support speed dial. Click any number keys at screen dial interface and hold more 2 seconds to dial out the shortcut
number preset directly.
Search contact
Input the initial letter of Pinyin or English at the position where the cursor blinks to locate to the first satisfied record from many
numbers. For example, if you search the family name “zhang”, you can find it quickly through inputting “z”.
Add new contact
To SIM card 1: one piece of record can record the items of name and phone number.
To phone: one piece of record can record the items of name, phone number, home phone, company name, E-mail, company
phone, fax number, birthday, head portrait, video connection, ringing choice and incoming group.
To SIM card 2: One piece of record can record the items of name and phone number.

19
Note: If one piece of record has been set the functions of video link, ringing link and incoming group at the same time, the
function of incoming group will be invalid.
Copy all:
Copy all numbers from card 1 to the phone, from the phone to card 1, from card 2 to the phone and from the phone to card 2.
Delete:
Delete all: Delete the records in phone book from SIM card 1, SIM card 2, the phone or delete the records item by item.
Caller groups:
Set the incoming call rings, pictures, videos and members respectively for the 5 groups.
Extral numbers
Set My number and emergency number (the emergency number needs support of SIM card. For details, please consult the
network operator).
Phonebook Settings
Memory inquiry: view current use state of phone book including card 1, card 2 and phone memory. The display format is
“used memory/total capacity”.
Storage Position: select the save path for current number.
Name Card Settings: select the display items recorded in phone book and the display items when adding record
interface.
My card: Edit and send my card.
Caller picture
Set the head portrait of incoming calls.
Caller ringtone
Set the ringing of incoming calls.
6.2.2 [Message]
[SMS]
SMS function is a kind of network service. To send and receive SMS you should first apply this function to network operator,
Both the two cards in your phone support SMS. The SMS is first sent to network SMS center, then it is sent to target user
(GSM user) through network. Network will save this message temporarily if your phone is switched off or can’t receive new
message due to full memory, and the term is determined by the settings of sending user and the service operator.
SMS service use. Your phone can send and receive interlocking character messages, while this may affect the message cost.
For more details, please consult your service supplier.

20
One blinking icon of message will be displayed on the top line of the screen if the message memory is full. This phone has
two cards, and the messages of card 1 and card 2 are saved respectively, also, the prompt of message full of card 1 and card 2
will be displayed respectively. The card can receive new message only if some messages are deleted.
If the other party has received the message, you can hear the prompt tone of message report (if the function of message
receive prompt is On.)
Note:
The phone may display “message has been sent out” when you send message through SMS network service. It just
means your phone has sent the message to the message center e-mail box, not indicating that the specified consignee has
received the message. For more information about message service, please consult your network supplier.
Write message
You can create SMS in this menu.
Each piece of SMS can contain as many as 268 characters, but in some cities and districts, long SMS including 70 characters
(or 612 English letters) is not supported. When editing message, click the icon of input method at the bottom of the main screen to
switch input methods, click the ‘》’ icon on analog keypad to select the symbol you want: Click ‘Clear’ to delete 1 character just
before the cursor, click and hold “Clear” to delete all characters. Press End Key t return to standby state, left and right arrow keys
to select character, then click Select to input the character. (Also you can select the character input directly).
Your phone supports to send the interlocking message including more than 70 characters (the limit characters of common
text message). For common text message, if the characters are more than 70, then they will be sent out in two or more pieces of
messages.
When sending, you can select “finish SIM card 1 selection” or “finish SIM card 2 selection”, it depends on which card you
want to use to send message.
Option
Function instruction
Common phrase
10 pieces of SMS are preset in this phone.
Insert object
You can insert image, my image, preset animation, my animation, ring, my ring and preset rhythm
Character format
Set the font style align and paragraph
Input method
Smart English capital letter, Smart English small letter, phonetic notation, smart phonetic notation,
capital letter, small letter, number input, traditional Chinese stroke input, Pinyin input, stroke input.
Note: You can use image message only if your network operator or service supplier supports this function. Only the phone
with image message function can receive and display image message. However, the normal display of some image messages
shall be supported by the phone.
Table of contents
Other ITT Telephone manuals