Ivation IVA1208TLR User manual

Electric Tiller/
Cultivator
User Guide
IVA1208TLR

Thank you for purchasing the Ivation electric tiller cultivator. This User Guide is intended to provide you with guidelines to ensure that operation
of this product is safe and does not pose risk to the user. Any use that does not conform to the guidelines described in this User Guide may void
the limited warranty.
The Ivation electric tiller/cultivator facilitates soil preparation for your planting and hardscaping projects. It efficiently chews up weeds and
churns through clay soil and thick thatch, saving you time and labor. It's great for small to medium-size gardens and for landscaping prep and
maintenance. It may also be used to mix coarse soil with fertilizer, peat, and compost.
Read and make sure you understand and follow all instructions in this guide before operating this unit. Thoroughly familiarize yourself with the
controls and the proper use of the equipment. Know how to stop the unit and disengage the controls quickly.
Features
• Powerful 8-amp motor
• 12" tilling width
• 4 angled steel blades
• Up to 8" tilling depth
• Lightweight, ergonomic design
• 3-position wheel adjustment
• Safety lock
• 3-section folding handle for compact storage
• AC powered
Parts
1. On/off trigger switch
2. Extension cord holder
3. Safety lock button
4. Upper handle
5. Electrical cord connector
6. Upper handle knob and bolt (2)
7. Cable clip
8. Middle handle
9. Lower handle knob and bolt (2)
10. Carrying handle
11. Air vents
12. Motor housing
13. Blade guard
14. Lower handle
15. Wheels
16. Steel tines
17. Gear box
2
1
2
3
6
7
10
9
11
12
13
14
15
16
17
8
5
4

Safety Precautions
IMPORTANT!
IT IS IMPERATIVE THAT YOU READ THESE INSTRUCTIONS BEFORE USING THIS PRODUCT and always follow the safety guidelines herein.
Failure to do so may result in serious electric shock, fire, bodily injury or death.
This product is intended for private domestic use only. It is not intended for any commercial trade use.
Use this product only for its intended purpose.
Never allow children to have access to this equipment.
Do not use this device to till extremely dry or wet soil.
Work only in well-lit areas, open areas.
Always inspect the work area before using the machine. Remove all stones, sticks, wires, and other materials that could be thrown by the tines or
that could cause the operator to stumble or fall.
Keep children, bystanders, and pets at least 25 feet away from the work area when operating the machine.
Always plan your path to avoid discharge of dirt and debris toward people, pets, and property. Thrown objects can cause serious damage and
personal injury. Never allow anyone to stand in front of a running machine.
Dress properly. Do not wear jewelry or loose clothing as they can become caught in moving parts. Wear safety glasses, a protective covering to
contain long hair, and head protection. Protective gloves and heavy-duty, non-slip footwear are also highly recommended.
Never use the machine in the rain or in damp or wet locations or on slippery areas.
WARNING! Keep clear of moving parts. Moving parts will continue to run for several seconds after turning off the machine. Keep the blade guard
in place and in proper working order. Contact with rotating parts can amputate hands and feet.
Never use near flammable or combustible objects, liquids, or gases. Sparks from the motor may ignite fumes.
WARNING! To prevent serious personal injury, make sure the unit is unplugged, and the tines have come to a complete stop before inspecting,
cleaning, or servicing the unit.
WARNING! Keep electrical extension cord away from the blades.
Never operate the machine while under the influence of alcohol or drugs, or any medication or other substance that may affect your alertness
or judgment.
Do not carry the machine with your finger on the switch. Make sure the switch is off before plugging in or unplugging the unit.
Do not grasp the exposed cutting blades or cutting edges when picking up or holding the machine.
Electrical Safety
WARNING! Observe the technical requirements for this device to ensure safety.
To reduce the risk of electric shock, this product is equipped with a short power cord with a polarized plug (one blade is wider than the other.)
A proper extension cord is required for operation. To prevent electric shock, use only a UL-, CSA-, or ETL-rated extension cord for outdoor,
all-weather use, such as SW-A, SOW-A, STW-A, STOW-A, SJW-A, SJOW-A, SJTW-A, or SJTOW-A.
The appliance plug will fit into a polarized extension cord only one way. Do not modify the appliance plug, extension cord receptacle, or extension
cord plug in any way.
Do not use an extension cord longer than 100 ft. (30m). Make sure to use one heavy enough to carry the current to the product. See chart below.
An undersized cord will cause a drop in line voltage resulting in loss of power and overheating.
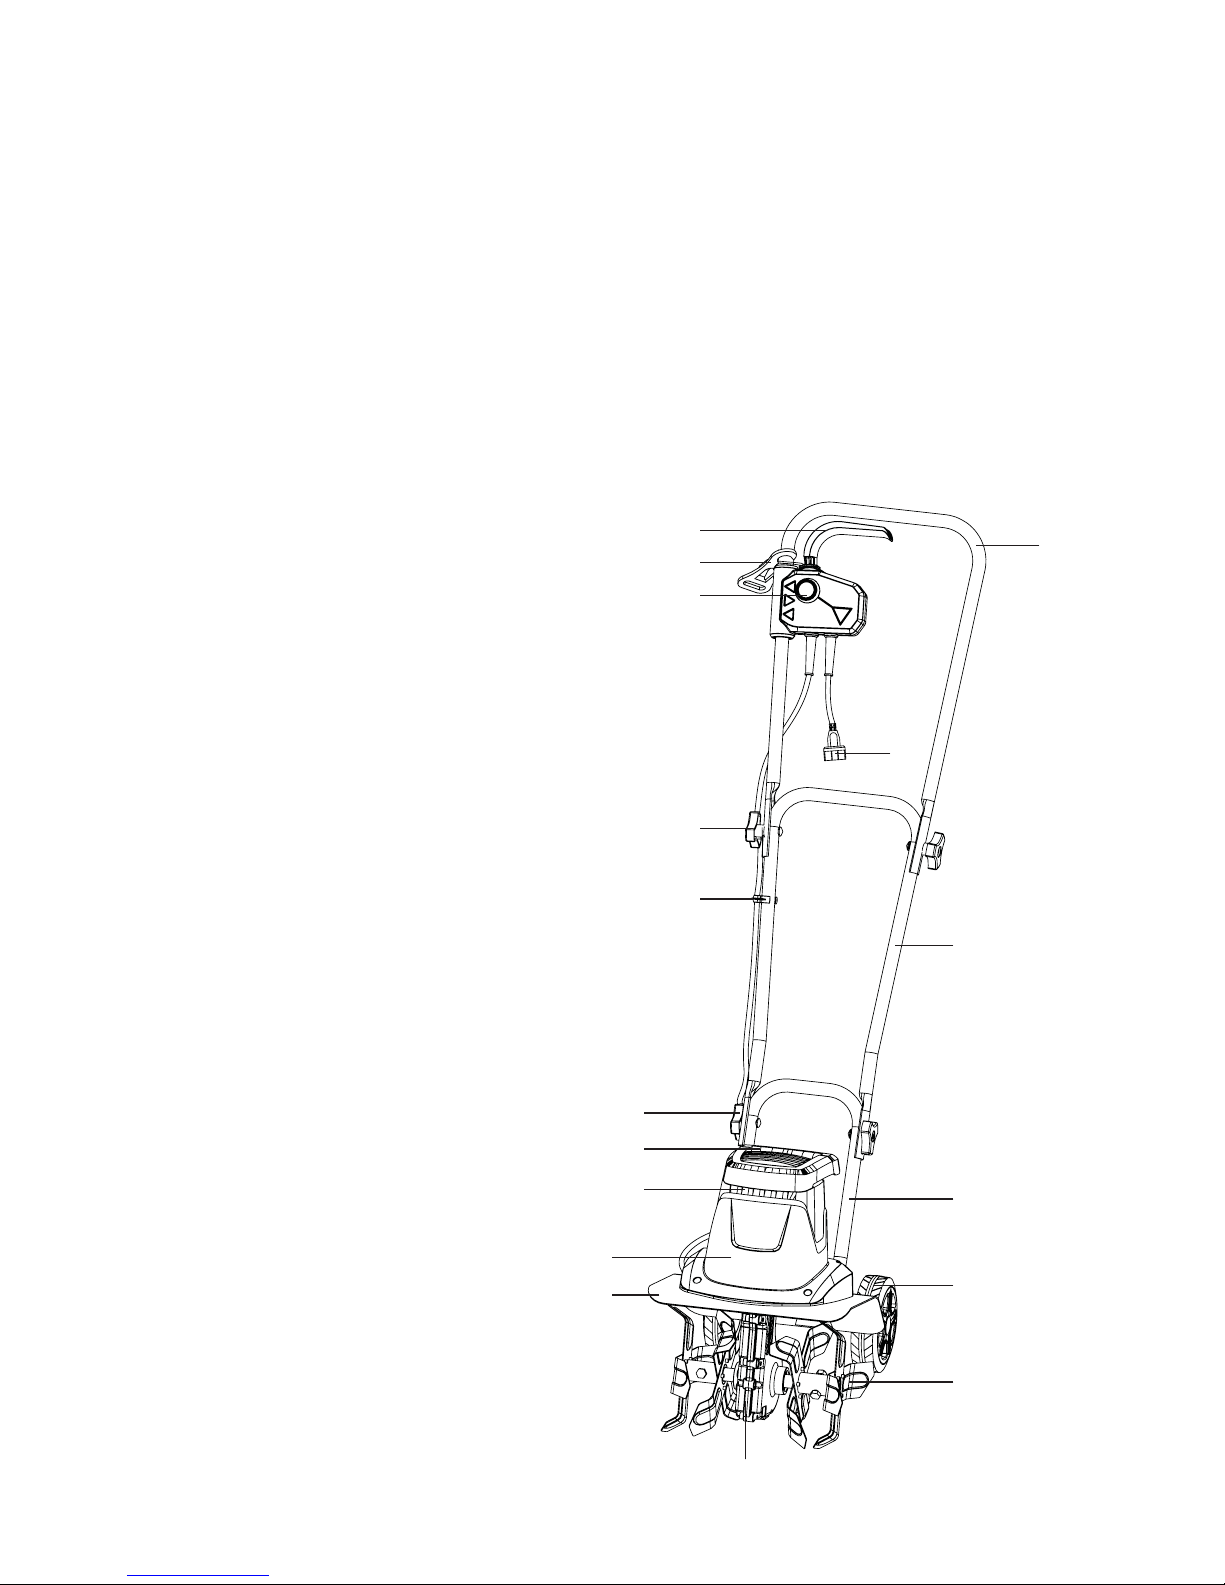
Use the extension cord holder (# 2) to keep the cord out of the way.
Never carry the machine by the cord or yank the cord to disconnect it from the receptacle. Keep the cord away from heat, oil, and sharp edges.
Replace a damaged cord immediately.
Connect only to an adequate power supply with ground fault circuit interrupter (GFCI) outlet that is protected against water.
Always use a residual-current device (RCD) or residual-current circuit breaker (RCCB) protected power supply.
Do not make contact with water while operating the machine. Do not touch the machine or plugs with wet hands or while standing in water.
If the machine becomes wet while turned off, wipe it dry before operating.
3
Extension Cord Chart
Extension Cord Length
Up to 50 ft.
(15m)
+50 ft. – 100 ft.
(+15m – 30m)
Wire Gauge (AWG)
16
14

Double-Insulated Appliances
In a double-insulated appliance, two systems of insulation are provided instead of grounding. No grounding means is provided on a double-
insulated appliance, nor should a means for grounding be added to the appliance. Servicing a double-insulated appliance requires extreme care
and knowledge of the system, and should be performed only by qualified service personnel. Replacement parts for a double-insulated appliance
must be identical to the parts they replace. A double-insulated appliance is marked with the words "Double Insulation" or a square-within-a-
square symbol.
Assembly
WARNING! Do not connect to the power supply until assembly is complete. Failure to comply could result in accidental starting and serious
personal injury. Do not operate if the unit is only partially assembled or assembled with damaged parts.
Connecting the Handles
1. Remove the bolts from the knobs and keep them handy.
2. Attach the cable clip to the middle handle. (Fig.1).
3. Secure the middle handle to the lower handle using the first
set of knobs and bolts (A). Tighten the knobs on each side to
ensure a secure fit (Fig. 2).
4
Fig. 1
Cable clip
Middle handle
Fig. 2
Knob + bolt
Middle handle
Lower handle
AA

4. Slide the extension cord holder onto the upper handle (Fig. 3).
5. Connect the upper handle to the middle handle using the second
set of knobs and bolts (B). Tighten the knobs on each side to
ensure a secure fit (Fig. 4).
6. Secure the cable inside the clip (Fig. 5).
7. Loop the extension cord through the slot on the extension cord
restraint holder (Fig. 6). Connect the appliance cord to a proper
outdoor extension cord.
SEE EXTENSION CORD CHART IN THE ELECTRICAL SAFETY
SECTION OF THIS GUIDE.
Connect the extension cord to an AC outlet with a ground fault
circuit interrupter (GFCI). WARNING! Check the voltage to ensure
it complies with the information on the rating label.
Wheel Adjustment
WARNING! Always switch the product off and disconnect it from the
power supply before making any adjustments.
The wheels can be adjusted to 3 different positions to control the
cultivating depth.
1. Pull the wheel and move it to the desired position; let go of the
wheel and make sure it locks into position (Fig. 7). Be sure to set
both wheels to the same height.
WARNING! Always make sure the wheels are securely locked. Do not
attempt to use the machine with the wheels in unlocked positions.
5
Fig. 3
Extension
cord restraint
holder
Fig. 4
Knob + bolt
Middle handle
Lower handle
Upper handle
B
B
Fig. 5
Cable
Cable clip
Fig. 6
Extension
cord restraint
holder
Extension
cord
Fig. 7
Transpor t
position
Wheel
adjustment
Wheel
Work position
(low)
Work position
(high)

Turning On and Off
1. To turn the tool ON, press and hold the safety lock button while
pulling the ON/OFF trigger toward you. Once the tool is running,
release the safety lock button (Fig. 8).
2. To switch OFF, release the ON/OFF trigger.
WARNING! The tines will continue to turn for a few seconds after the
machine has been switched off. Rotating tines may cause serious injury.
Contact with hot components (i.e. motor housing, gear box,
etc.) may cause burns. Allow the machine to cool before handling.
WARNING! Avoid starting the machine by accident. Never carry the
product with your finger on the switch. Make sure the switch is off
before plugging in or unplugging the unit.
Operation
Always inspect the area where the machine will be used. Remove all objects (i.e. stones, sticks, wires, and other foreign materials) that could
be thrown by the tines or cause the operator to trip. Thrown objects can cause serious injury to the eyes and body.
Before each use, check the machine and power cords for damage. Do not use the product if it is damaged or shows wear.
Make sure that all attachments are properly fitted.
Wear protective footwear and safety glasses.
Always hold the product by the handles. Keep the handles clean and dry to ensure a secure grip.
Keep the air vents unobstructed. Clean them if necessary with a soft brush. Blocked air vents may lead to overheating and damage to the product.
Switch the product off immediately if you are distracted while working or if people or animals enter the work area. Always let the machine come
to a complete stop before averting your attention.
CAUTION: Hard soil will cause the machine to buck and kick back. Always focus on the task and keep control of the machine.
The tines begin to rotate forward once the trigger switch is depressed and will continue to rotate until the trigger switch is released.
Walk the product through the soil at a normal pace and in as straight a line as possible. Do not run.
Do not force the tool; it will perform better with less likelihood of personal injury or mechanical damage if it is used at the rate for which it
was designed.
Do not overreach. Keep proper footing and balance at all times. Exercise caution to avoid slipping or falling.
If the machine strikes a foreign object, follow these steps:
• Stop the machine. WARNING! The tines will continue to turn for a few seconds after the machine has been switched off.
• Carefully remove the object from the machine's path.
• Inspect for damage.
• Repair any damage before restarting and operating the tool.
Keep hands and feet away from all rotating parts. Contact with rotating parts can amputate hands and feet.
Exercise caution when changing direction and operating the machine on slopes. Always keep feet and legs a safe distance away from the
machine. Look for hidden obstacles or hazards.
Do not overload machine capacity by attempting to cultivate too deeply. It will cause excessive resistance.
Turn the machine OFF and disconnect the electrical power when moving to a new work area. Allow the tines to completely stop rotating before
transporting the unit. Never leave the machine running when it is not attended.
If the machine vibrates abnormally, turn it off and inspect thoroughly
for damage.
Do not try to till too deeply or force the product into soil that is extremely
hard or resistant.
Till in slightly overlapping rows. To till most effectively, follow the
pattern indicated in Fig. 9. Start by moving the machine vertical lines,
then work horizontally from left to right. This will keep the rows even
and ensure that all the ground is tilled without missing any spots.
WARNING! Work ACROSS slopes; never work up and down
inclined surfaces.
6
Fig. 8
Safety lock
button
ON/OFF trigger
Fig. 9

Pay special attention when changing direction. Apply light pressure to the handle in order to lift the tines and facilitate the turn. Turn the product
around using the wheels as a guide. Gradually release pressure on the handle and move the tines back to the ground.
NOTE: In some locations, regulations define restrictions for use of such products, including the times and days when operation is permissible. Ask
your community for detailed information and observe these regulations.
WARNING! Some dust and debris created by the use of the tool could contain chemicals known to the State of California to cause cancer and
birth defects or other reproductive harm. Some examples of these chemicals are:
• Chemicals in fertilizers
• Compounds in insecticides, herbicides and pesticides
• Arsenic and chromium from chemically treated lumber
To reduce your exposure, work in a well-ventilated area and with approved safety equipment, such as dust masks that are specially designed to
filter out microscopic particles.
Cleaning and Maintenance
Always turn the machine off, disconnect it from the power supply, and let it cool completely before cleaning or storing.
Store idle machine indoors in a dry place. Keep locked up and out of reach of children.
Keep the cutting edges sharp and clean for optimal performance and to reduce the risk of injury.
Inspect the extension cord periodically and immediately replace it if is damaged or worn.
Keep the handles dry, clean, and free from oil and grease.
Regularly check the following:
• Tines are clear and can rotate freely. Accumulation of debris around the tines could impair performance or damage the motor. Inspect and
clean the area around the tines before every use.
• Safety devices are operating properly. Do not tamper with or adjust safety devices.
• Bolts and screws are properly tightened.
Specifications
Rated voltage: 120V, 60 Hz
Power: 8 amps
Rated input power consumption: 960W
No load speed: 300 ± 10% rpm
Rotor: 4 steel blades
Cultivating width: max. 12" (30 cm)
Cultivating depth: max. 8" (20 cm)
Weight: 23.15 lbs. (10.5kg)
Customer Service:
info@myivation.com
866-849-3049
7
Distributed by
C&A Marketing
2 Bergen Turnpike
Ridgefield Park, NJ 07660
Made in China
Ivation is a trademark of
C&A IP Holdings, LLC
©2016 All rights reserved
Table of contents
Popular Tiller manuals by other brands

Camon
Camon C2000 Operating instructions & safety notes

Craftsman
Craftsman 917.298350 owner's manual

red roo
red roo RH918 Operation, Safety & Maintenance Instructions

Clemens Technologies
Clemens Technologies RADIUS SL 860 operating manual

TMG
TMG TMG-RT83 product manual

Cub Cadet
Cub Cadet 340 Series owner's manual