IvoryBoard Mk1 User manual

IvoryBoard Mk1 Manual


1
1.User Manual Summary
1.1 About This Manual
-Please read this manual before riding your IvoryBoard for your safety and the longevity of the product.
-If you have any doubts outside of this guide please contact the IvoryBoards team directly.
1.2 Riding Risks
-Riding your IvoryBoard safely is your responsibility, however, this reading this manual will help to significantly reduce the risk of accident or injury
Warnings
Loss of control, crashing or misuse of this product may lead to injury and even death. You must read this manual in order to decrease the risks to yourself, your
environment and the product.
1.3 Preparatory Work
Please check that the wheels are securely fastened to the booster, the booster is securely fastened to the deck and that no warning lights are visible on the
board or remote before attempting to ride the board.
1.4 Relevant Information
The following key words “warning”, “attention”and notices”mentioned in the following manual pertain to the following
Warning: indicates that your activities will lead to physical injury.
Attention: Indicates that your activities may leads to damage to the product.
Notices: Indicates functional tips and information to which users should pay attention.

2
2.Product
2.1 Product Parameter
Parameters
Parameter values
Notices
Product Name:
IvoryBoard
1. Riding Speed will be effected by different modes,
road conditions, weight of rider, etc.
2. Mileage result based on following specific
environment: temperature 25°C; Loading 70Kg;
riding speed: Low. The mileage is affected by
factors, such as riding habit, temperature, surface
and so on.
3. Standard configuration of Booster is battery of 4.4
Ah.
4. Charging time maybe vary according to different
environment and battery age/usage.
Riding Speed:
Max 40km/h
Max Mileage:
28 Km
Max Climbing Grade:
Max 30%
(Note: Do not start the booster uphill)
Motor Type:
Electric Hub Motor
Wheel Material:
80A TPU Material
Truck and Frame:
ADC12 Aluminum Alloy
Max Loading Weight:
120 KGS
Battery:
36V 4.4 Ah Lithium Battery
Battery Storage Temp
-20°C- 50°C
Changing/Using Temp
-10°C- 50°C
Charging Requirements:
AC110 ~ 240V; 50 ~ 60Hz
Charging Time:
2-2.5Hrs
Net Weight:
4.5 KGS
Booster Size:
38.5 x 17.5 x 5.5 CM
Best Working Environment:
25°C
Waterproof level:
IP65 for motor; IP54 for Main Unit

3
2.2 Main Components of Booster

4
2.3 Remote Controller
*Speed modes can be toggled by pressing the power switch
*Reverse mode is activated by double pressing the power switch mode while
holding down the brake, the indicator light will begin to flash when engaged

5
2.4 The Booster Controller Working Pattern
Mode
Low
High
Reverse
Top Speed
28 KM/H
40 KM/H
15 KM/H
Acceleration
Slow
Quick
Slow
Indicator Light
Low
High
Flashing
Notice:
-Be aware of the strong acceleration as well as deceleration when riding the board. Always accelerate slowly and brake with caution.
3.Installation Of Booster
3.1 Box Contents
-Skateboard Booster Main Unit x 1
-Battery Pack x 1
-Front Wheels and Truck x 1
-Remote Control x 1
-Charging Cables x 2
-Shock Absorption Gasket x 1
-Installation Accessories x 1

6
3.2 Installation Diagram

7
4.Riding Your IvoryBoard
4.1 Riding
The IvoryBoard is a transport tool capable of high speed travel that may result in unpredictable injuries to yourself and to others around you. The following
tips will help you as a beginner avoid these troubles.
4.2 Matters That Need Attention Before Riding
-Please check the components of the IvoryBoard are secure installed and without any damage
-Ride preferably on flat, smooth surfaces
-You should fully understand surroundings, ride in areas free of others (e.g. cars, bikes etc)
-Be accompanied by someone who can understand this manual and may aid you if need be
-Please do not ride the board on smooth, wet surfaces due to the risk of slipping
-Please wear a helmet and protective equipment to avoid injury
-To ensure freedom of movement wear comfortable clothing and flat-soled shoes
4.3 How to Ride
-Step 1. Put the skateboard on open, flat ground, and make sure there are no dangers around (e.g. cars, bikes etc)
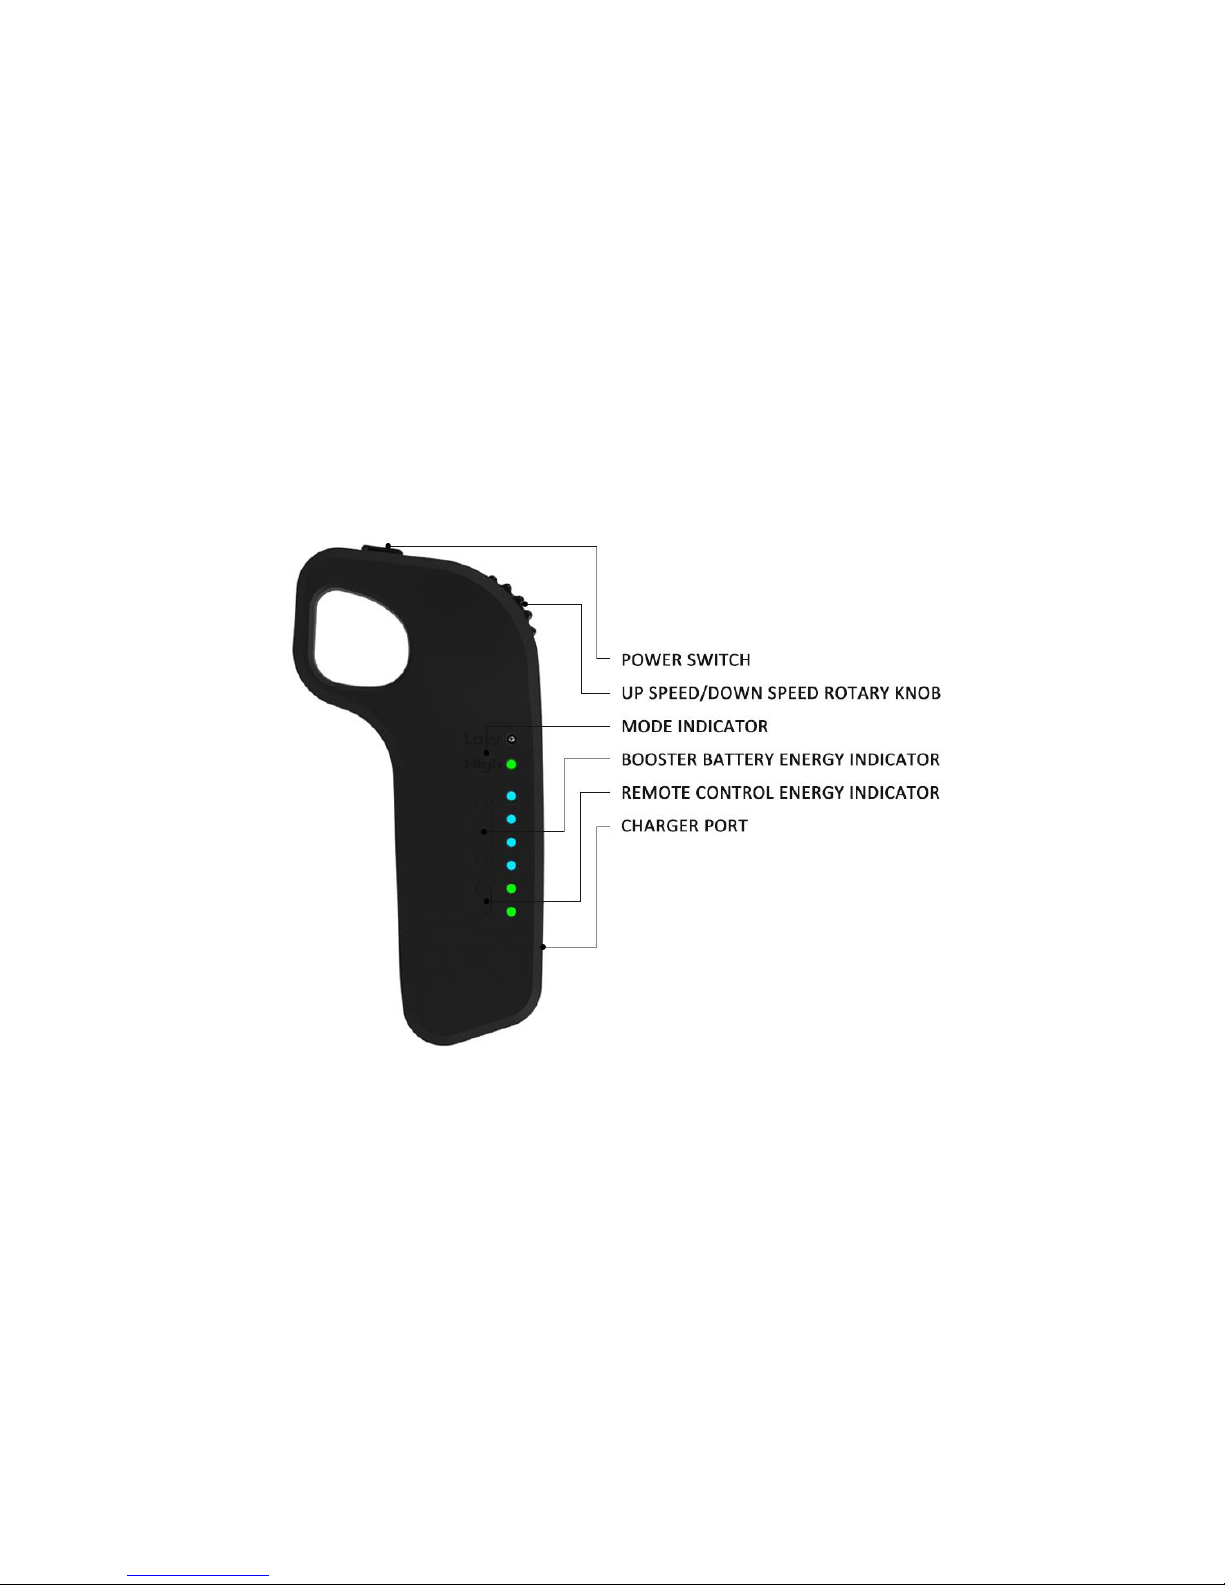
-Step 2. Power on the booster and power on the remote controller, remote will connect automatically
-Step 3. Pull back the speed knob to brake and keep the board still
-Step 4. Stand on the board carefully
-Step 5. Adjust your feet for balance and push/pull the speed knob slowly to speed up/brake carefully to avoid strong acceleration
-Step 7. To get off, gradually brake to a stop and step off while holding the brake to ensure the board is still

8
4.4 Power Capacity
-The battery capacity of the board is displayed by 4 LED bulbs. When all 4 bulbs are lit, the board is charged to 85% or more. The lights will turn off one
by one as battery capacity decreases
-When all 4 LED lights are flashing, the board is under 10% charge
-Mileage may decrease in cold temeperatures due to lithium ion technology
-When both remote LEDs are lit, the remote has 60% or more capacity, one light signifies over 10% charge and one red light signifies under 10% charge
4.5 The Mileage
Riding habits and environment have an important effect on mileage. Some of the most important factors are listed here.
Impact Factors
Reasons
Road Conditions
Mileage is best on smooth, flat surfaces compared to rough and mountainous terrain.
Speed And Riding Habit
Riding at constant speed on the “Low” setting is the best way to achieve maximum mileage
Loading
Lighter riders may also experience greater mileage
Temperature
Board performs best around 25 degrees Celsius
Battery
A new, well-maintained battery will give the best performance
Wind Direction
Riding with the wind rather than against it can also result in an increase in mileage
4.6 Regenerative Breaking
Do not brake downhill while the battery is fully charged as it will result in overcharging that may cause remote disconnection and damage to the product

9
5.Other Information of Battery
5.1 Using Battery Safety
Warning:
-Please obey regulations contained in this manual for your and others’safety as well as extended battery lifetime.
Below are the regulations that apply to the use of the IvoryBoard’s battery:
-Keep battery away from children and pets as damage to the battery may lead to fire risk
-Do not attempt to open the battery or insert any foreign objects as it may generate the risk of fire of electrical shocks
-Keep the battery away from sources of heat including the sun
-Please remove the battery pack if not using the skateboard
- Please power off the main unit before taking the battery out
-Only use the first-party charger supplied by IvoryBoards
-Obey local laws and regulations for the disposing and transport of the battery
5.2 Charging
-Charge and deplete the battery at least once a month
-Please charge in an appropriate environment and temperature (25 degrees Celsius is preferable)

10
5.3 Remove and Install Battery Pack

11
5.4 Battery Charges
After 500 cycles the battery capacity will be reduced to up to 80% of its original capacity. This is standard for lithium ion batteries such as those used in the
IvoryBoard.
Warning
-Charging time of Booster is 1.5-2.5 hrs approximately
-Charge battery once fully depleted for optimum use
-Please do not charge the pack if the port or battery is wet
-Do not attempt to modify the battery
6.Maintenance
6.1 Cleaning
Steps:
Ensure power been turn off, pull the plug and close charger port.
Use suds or water to wipe cover of Booster.
Please do not let water into charge port during cleaning processes and do not soak in water
6.2 Storage
Store indoor in a dry environment with a reasonable temperature (25 degrees Celsius preferably)
Table of contents
Popular Accessories manuals by other brands

Peregrine Manufacturing
Peregrine Manufacturing Glide AC100-2 owner's manual

ubicquia
ubicquia ubigrid TVM installation guide

Bogen
Bogen ZX3 install guide

Russound
Russound SB-1.8 BRACKET installation manual

ekwb
ekwb EK-FC1080 GTX Ti Strix RGB installation manual

Stiebel
Stiebel QuarryMaster operating instructions