IWCS iriComm 3.0 User manual

User Manual
IRIDIUM WATERPROOF COMMUNICATION SYSTEMS APS
iriComm 3.0
WIRED & WIRELESS HEADSET

2
CONGRATULATIONS ON YOUR NEW PRODUCT FROM
IRIDIUM WATERPROOF COMMUNICATION SYSTEMS
iriComm 3.0
IWCS HOPE YOU WILL ENJOY THE BENEFITS
OF TROUBLE FREE HIGH QUALITY INTER-
COM. PLEASE READ THESE INSTRUCTIONS
CAREFULLY BEFORE FIRST USE. IF INSTALLED,
OPERATED AND MAINTAINED ACCORDING
TO THIS MANUAL, IRICOMM 3.0 WILL BE A
RELIABLE PARTNER IN MANY YEARS TO
COME.
THOMAS B SVENNINGSEN
CO-FOUNDER OF IWCS
WIRED/WIRELESS HEADSET

3
CONTENT
CHAPTER 1 INTRODUCTION
1.1 Disclaimer Page 4
1.2 Copyright Page 4
1.3 Trademark Page 4
1.4 Safety Warning Page 5
CHAPTER 2 UNBOXING
2.1 In the box Page 6
2.2 Versions Page 7
CHAPTER 3 OPERATION
3.1 Main Descripon Page 9
3.2 Headband adjustment Page 9
3.3 Helmet aachment Page 10
3.4 Microphone Page 11
.3.5 EarPads Page 11 .
3.6 Lead Wire Page 11
CHAPTER 4 WIRED HEADSET
4.1 Basic Funconality Page 12
4.2 Radio Connecvity Page 13
4.3 PLUS Version Page 14

4
CONTENT
CHAPTER 5 WIRELESS HEADSET
5.1 Main Descripon Page 15
5.2 Charging Page 16
5.3 Power ON Page 17
5.4 Pairing - Mobile phone Page 17
5.5 Pairing - Intercom Page 17
5.6 Pairing - Peer-To-Peer Page 17
5.7 PTT Page 17
5.8 Handle Phone Calls Page 17
5.9 Voice prompts Page 17
5.10 Auto Power OFF Page 17
5.11 Master Reset Page 17
5.12 Range Page 18
5.13 PLUS Version Page 18
CHAPTER 4 SERVICE AND MAINTENANCE
6.1 Maintenance Page 20
6.2 Troubleshoot Page 21
6.3 Specicaons Page 22
6.4 Declaraon(s) of Conformity Page 23
Revision Date Descripon
1.2 2021.08.01 A4 prinng
1.1 2020.11.23 A4 prinng
1.0 2019.04.03 First release of this document

5
INTRODUCTION
1.1 DISCLAIMER
Any responsibility or liability for loss or damage in connecon with the use of this product and the accom-
panying documentaon is disclaimed by IWCS. The informaon in this manual is provided for informaon
purposes only, is subject to change without noce and may contain errors or inaccuracies.
Manuals issued by IWCS are periodically revised and updated. Anyone relying on this informaon should
acquire the most current version e.g. upon request at [email protected]
IWCS is not responsible for the content or accuracy of any translaons or reproducons, in the whole or in
part, of this manual from any other source.
1.2 COPYRIGHT
2019 Iridium Waterproof Communicaon Systems ApS. All right reserved. Printed in Denmark.
1.3 TRADEMARK ACKNOWLEDGEMENTS
iriComm 3.0 is a Trademark by Iridium Waterproof Communicaon Systems ApS

6
1.4 SAFETY WARNING
The following general safety precauons must be observed during all phases of operaon, service and
repair of this equipment. Failure to comply with these precauons or with specic warnings elsewhere in
this manual violates safety standards of design, manufacture and intended use of the equipment. IWCS
assumes no liability for the customer’s failure to comply with these requirements.
EMC / RF EXPOSURE
iriComm 3.0 is CE cered as stated in the Declaraon of Conformity, which is included in this manual.
FIRE
In case of re, harmful gases and fumes may occur. One should immediately leave the area and seek help.
In case of suspected smoke in the lungs, a doctor should be consulted.
POWER LOSS
In the event of a power outage, iriComm 3.0 will turn o and will automacally restart when power is
restored.
Power interrupons limited to iriComm 3.0 will not aect other users communicaon. A general power
outage will turn o the enre intercom system. IWCS is not responsible for any power outages or conse-
quences thereof, of any kind
WARRANTY LIMITATIONS
IMPORTANT - This unit is a sealed waterproof unit (classied IPX7). To create and maintain its waterproof
integrity it has been assembled in a controlled environment using special equipment. This unit is NOT a user
serviceable unit, and under no circumstances should the unit be opened except by authorized personnel.
Unauthorized opening of the unit will invalidate the warranty.
DISPOSAL
When disposing of iriComm 3.0 and related equipment, it must happen in accordance with applicable
naonal law. There can be baeries in iriComm 3.0 (wireless versions and some wired versions)

7
UNBOXING
2.1 IN THE BOX
The following items are included in the delivery of your new iriComm 3.0 from IWCS
• iriComm 3.0 Wireless Headset
• Windmu Kit
• USB Charge cable (only for versions including a baery)
• User manual
• Neckband

8
2.2 VERSIONS
iriComm 3.0 comes in dierent versions
IRICOMM 3.0 WIRELESS WIRED STD/PLUS HEADBAND HELMET
IR-34-1111-AA-BBBBB √STD √
IR-34-1211-AA-BBBBB √STD √
IR-34-1112-AA-BBBBB √PLUS √
IR-34-1212-AA-BBBBB √PLUS √
IR-34-2111-AA-XXXXX √STD √
IR-34-2211-AA-XXXXX √STD √
IR-34-2112-A1-XXXXX √PLUS √
IR-34-2212-AA-XXXXX √PLUS √
EAR-PAD OPTIONS STD GEL
AA = 01 √
AA = 02 √
CABLE OPTIONS CABLE/CONNECTOR FOR
BBBBB = AX001 Axnes/Polycon MP20
BBBBB = IR001 IWCS cable for iriHS (long)
BBBBB = IR002 IWCS cable for iriBelt (short)
BBBBB = NX001 Nexus TP120 (Peltor pinning)
These are only examples. Many
more versions avalable.

9
OPERATION
3.1 MAIN DESCRIPTION
iriComm 3.0 is a rugged waterproof headset, that comes in many versions, for both wireless or wired use,
with headband or for helmet aachment and with a variety of opons.
The soshell earcup provides a robust and shock absorbing housing for protecon against seawater, dirt,
impacts etc. The soshell earcup itself requires a minimum of maintenance.
The wired version must be connected to a suitable radio or a headset interface to establish RX and TX
connecons. If supported by the radio interface, PTT can be acvated from the buons on the earcup. For
radios supporng external power, PLUS version can be chosen.
The wireless version can communicate wirelessly with another Bluetooth device. iriComm 3.0 is not restrict-
ed to Master/Slave pairings, (HFP / HFP-AG) but can also handle Peer-To-Peer connecvity.
For wired versions Simplex/Semi Duplex/Full Duplex is limited only by the radio and not the headset.
For wireless versions communicaon iriComm 3.0 is Full Duplex.
3.2 HEADBAND ADJUSTMENT
The posion of the headband is important to secure a perfect t to the head. Loosen the 4 adjustment
screws on the 4 brackets, and posion the earcups in a comfortable posion, and ghten the screws.

10
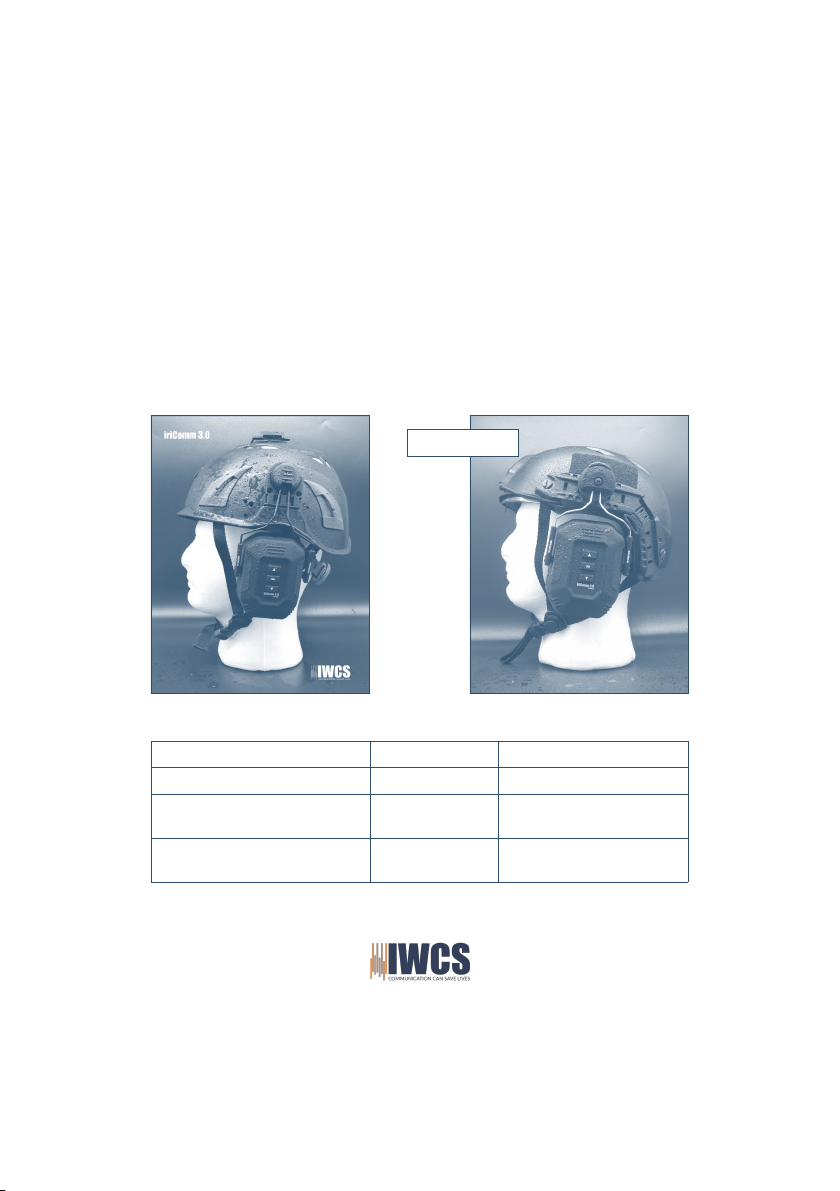
3.3 HELMET ATTACHMENT
iriComm supports many dierent helmet aachments.
If ordered as helmet aachments, the interconnect wire between the 2 earcups is 70 cm. Mount the wire in
a secure way, behind the neck of the helmet or inside the helmet. Consult the helmet supplier if any further
assistance is needed.
The distance between the 2 holders is 88mm, and ts standard IWCS, Peltor bracket etc.
Mount the helmet brackets according to Helmet instrucons.
Supported Helmets Bracket IWCS Part number
Team Wendy EXFIL SAR MARK Rail UT-MKIT-TWRail
OPS Core SAR OPS Core Bracket UT-MKIT-ARCRail
Future Safety Manta FS bracket + IWCS
universal bracket
FS-HS-BRCKT + SG-IC-0001
Many other helmets supported—consult
your dealer or IWCS for advice
OPS Core bracket

11
3.4 MICROPHONE
• Place the microphone at a distance of less than 1 cm in front of your mouth. The noise cancel-
ling, direconal microphone is a very sensive component, and must be placed in the right
posion for opmal performance. Underneath the wind mu there is a at surface indicang
which side must point towards your mouth.
3.5 EARPADS
• Ear Cushions can be replaced if needed. Please order our hygiene kit through your local dealer.
Due to the fully sealed and waterproof construcon, earpad replacement involves a gluing
process. To maintain the warranty of your product we strongly recommend that you let your
authorized dealer do this for you.
3.6 LEAD WIRE (WIRED VERSIONS ONLY)
• For models with wired connecons (see page 8) the headset must be connected to iriSound via
an acve headset interface (iriHS), or directly to a handheld radio.
• The right side earcup has a curly lead, which typically extends from 40cm up to 120cm when
pulled. Actual length vary depending on cable and terminaon type.
Your wired headset is now connected and ready to use.
IMPORTANT :
This at surface MUST point towards your
mouth

12
WIRED HEADSET
4.1 BASIC FUNCTIONALITY
iriComm 3.0 Wired is a rugged, waterproof communicaon headset designed for marime and mission
crical use.
As part of an iriSound intercom system:
iriComm 3.0 is connected to the intercom system via an iriHS (headset interface unit).
Volume control is handled by the iriHS unit.
PTT funcon on the headset is available to acvate a radio through the intercom system. Consult the
manuals for the iriSound intercom system for details.
Used in connecon with a handheld radio:
Your iriComm 3.0 headset is supplied with a radio-specic connector matching your handheld radio. De-
pending on radio model, aaching the headset may disable the radio’s internal microphone and speaker.
Volume control is handled by operang the radio’s volume seng.
PTT funcon on the headset is available to acvate the radio for outgoing calls. Consult the manuals for the
radio for addional details.

13
4.2 RADIO CONNECTIVITY
How to use your wired iriComm Headset
1. Headband adjustment
2. Boom
3. Microphone
4. Lead wire or charge connector
5. Control buons (some models)
Connector Weipu SC Weipu PC Nexus / Jack To Be Specied
Applicaon IWCS HS interface IWCS
Garmin
IWCS iriBelt Speaker Mics Portable Radio
Remarks Connect according to 3rd
party equipment User
Guide
Connect according to
Radio User Guide
1
2
3
4
5

14
Short Press ON
Short Press OFF
Long Press Adjustment
Short Press Store setting
PTT
LR
4.3 PLUS VERSION
LR
(If supported by
radio)
Vol UP
Connect your headset connector to the radio’s
external connector. Mount according to the radio
user guide.
When the radio is turned ON, the headset will work.
If the radio supports external PTT (read radio
instrucons) the middle buon on the le earcup
can be used as PTT.
When your headset includes the PLUS opon:
If your radio supports power to external equip-
ment (Voltage of 3-6VDC/100mW), the headset
will typically not have an internal baery.
If your radio does not supply power to external
equipment, the headset will have an internal,
rechargeable baery.
When Hear Through Mode is enabled, the next
Press will toggle back to Radio Mode.
LIGHT
Dimmed
High
Strobe
OFF
Hear Thru
Vol DN

15
WIRELESS HEADSET
5.1 MAIN DESCRIPTION
iriComm 3.0 Wireless is a mulfunconal communicaon tool, which lets you handle several connecons at
the same me.
As part of an iriSound intercom system:
iriComm 3.0 is paired with an iriConnect as the primary connecon.
In a pier to pier (P2P) setup :
iriComm 3.0 paired with another iriComm 3.0. This gives the possibility for 2 persons to be in Full Duplex
Intercom without using an iriSound Audio Mixer.
In addion to any of the above menoned use cases, the iriComm 3.0 can be paired with a mobile phone,
allowing the user to answer incoming phone calls.
Pairing of iriComm 3.0:
The rst me you start up your iriComm 3.0 headset it has no pairings.
When aempng to establish a new pairing with your iriComm 3.0, always make sure only the two acve
BlueTooth units are turned on. All other BlueTooth units must be switched o.
When aempng to establish a new pairing of your iriComm 3.0 with another unit (iriComm 2.0/3.0,
iriConnect or mobile phone), keep the two units within 1m of each other.
Before trying to re-pair to a device being paired with previously, you should perform a Master Reset of the
headset.

16
5.2 CHARGING
iriComm 3.0 wireless (and some wired PLUS versions) has an advanced baery and charge circuit. The 1000
mAh LiPo/LiIon baery provides long life and long operaonal me.
When the headset is turned ON, a Voice Prompt will inform of the present baery status with a “Baery
High” (80-100%), “Baery Medium” (20-80%) or “Baery Low” (10-20%). At the 10% baery level there is
an automac Cut O, which will turn o the headset.
When the Low Baery level is reached, the Status LED on the rear of right-side earcup, will ash RED every
5 seconds.
To charge the headset place the magnec connector in the boom of the right earcup. As soon as the
charge plug is connected, the baery is being charged. The Status LED will ash RED every 2 seconds, as
long as the baery is being charged. When the baery is fully charged the Status LED will stop ashing and
turn o.
It doesn’t maer if the headset is ON or OFF during charging.

17
5.3 to 5.11 - FUNCTIONS
iriComm 3.0 Wireless Headset can communicate with most Bluetooth devices. For any pairing make sure
that the other device is in pairing mode and all other near-by Bluetooth devices are OFF. Please follow the
instrucons for pairing for the paired device along with this manual.
2 sec. ON
7 sec. Pairing ONE
12 sec. Pairing TWO
17 sec. Pairing THREE
22 sec. Master Reset
32 sec. Automatic Shut Off
Incoming Phone Call
Answer
Ongoing Phone Call
Hang Up
Volume DOWN
2 sec. OFF
Volume UP
Mobile Phone
Intercom/Radio/
Peer To Peer - Master
Peer To Peer - Slave
Press and Hold Press and Hold
From OFF position From ON position
Press
Press
R

18
5.12 Range
iriComm 3.0 is designed for short to medium range wireless connecvity, and typical range is up to 80m
line-of-sight. The actual achievable range will vary depending on local factors. When used in an iriSound
marine intercom system, the range can be extended signicantly by using external antennas in the xed
installaon.
To change the range, press and hold the MODE buon for approx 22 sec. (from OFF posion) unl sound
signal (master reset mode). While in master reset mode, press the Volume UP buon for standard range or
the Volume DOWN buon for long range. To save the range seng press the MODE buon once. The range
seng is now saved and the headset is ready to be turned back ON.
When in master reset mode, if no range is chosen before MODE buon is pressed again, all previous
sengs will be deleted (master reset mode).
5.13 PLUS VERSION
iriComm 3.0 comes in versions with addional features - referred to as a PLUS version. Both Wired and
Wireless versions of iriComm 3.0 can be ordered with the PLUS opon.
The PLUS versions have two addional features - Acve Hear-Through and LED light.
Acve Hear-Through:
Acve Hear-Through provides ambient hearing without having to remove the headset. A small, waterproof
microphone picks up the ambient sound and passes it to the headset speakers. Simultaneously, the primary
sound (intercom/radio/phone) is aenuated by 24dB. This allows for monitoring primary communicaon at
reduced volume while having a normal conversaon with someone.
Hear-Through volume (sensivity) is adjustable and seng is stored in the headset’s permanent memory.
LED light:
A forward-facing white LED (Light Eming Diode) has been incorporated into the le earcup. This LED can
be used for e.g. map reading (low intensity light), for orientaon at night while moving around (high intensi-
ty light) and for emergency distress alerts (ashing beacon).
Press and Hold ≈ 22 sec. until
From OFF position
Press for standard range
Press for long range
Blue light indicator on right earcup
Red light indicator on right earcup

19
5.13 PLUS VERSION
Push
Hear Through Mode - Active
Intercom reduced by 24dB
Push
Hear Through Mode - Deactivated
5 sec. - Enter Settings
Adjust volume UP/DOWN on the
right earcup
Push - Save Settings
LIGHT
Low
High
Strobe
OFF
Hear Through
Wireless PTT
If supported by radio
L

20
SERVICE AND MAINTENANCE
6.1 MAINTENANCE
Do not use chemicals or solvents to clean your iriComm 3.0 headset. Use only a damp cloth, and cold/
lukewarm freshwater and wipe/rinse carefully the visible surfaces on your iriComm headset.
Saltwater crystals may be removed with cold/lukewarm freshwater. Rinse carefully over the earcup, to
removed any salt residue. Also rinse the microphone, and replace the microphone windmu if it has
absorbed salt crystals or in any other way is marked by salt. Let the microphone dry out totally, before
installing a new windmu.
Do not ush fresh water directly into the speaker openings. Rinse carefully. The speaker is a fragile compo-
nent.
When the headset is clean and salt residue and dirt removed, let the headset dry with the speakers facing
downwards allowing for water to run out.
Pressure, fricon, sharp objects, etc. can damage the product and the warranty may be void.
If the headset is not in use for a longer period of me, remember to charge the baery every 2 months to
extend baery life.
The charge connector is gold plated and require a minimum of maintenance. Salt crystals must be removed
to secure full connecon. Remove with cold/lukewarm water, and dry with a coon swab or so ssue.
Apply a thin layer of acid-free silicone based lubricate to protect the conducve gold surface.
To maintain hygiene standards, the earpads and the inside of the headband must be wiped with a non-
alcoholic anbacterial swipe.
Aer wet use, the headband must be dried completely to extend the life of the stches. The windmu must
be removed aer wet use. Flush and dry the windmu.
Table of contents
Other IWCS Wireless Headphones manuals