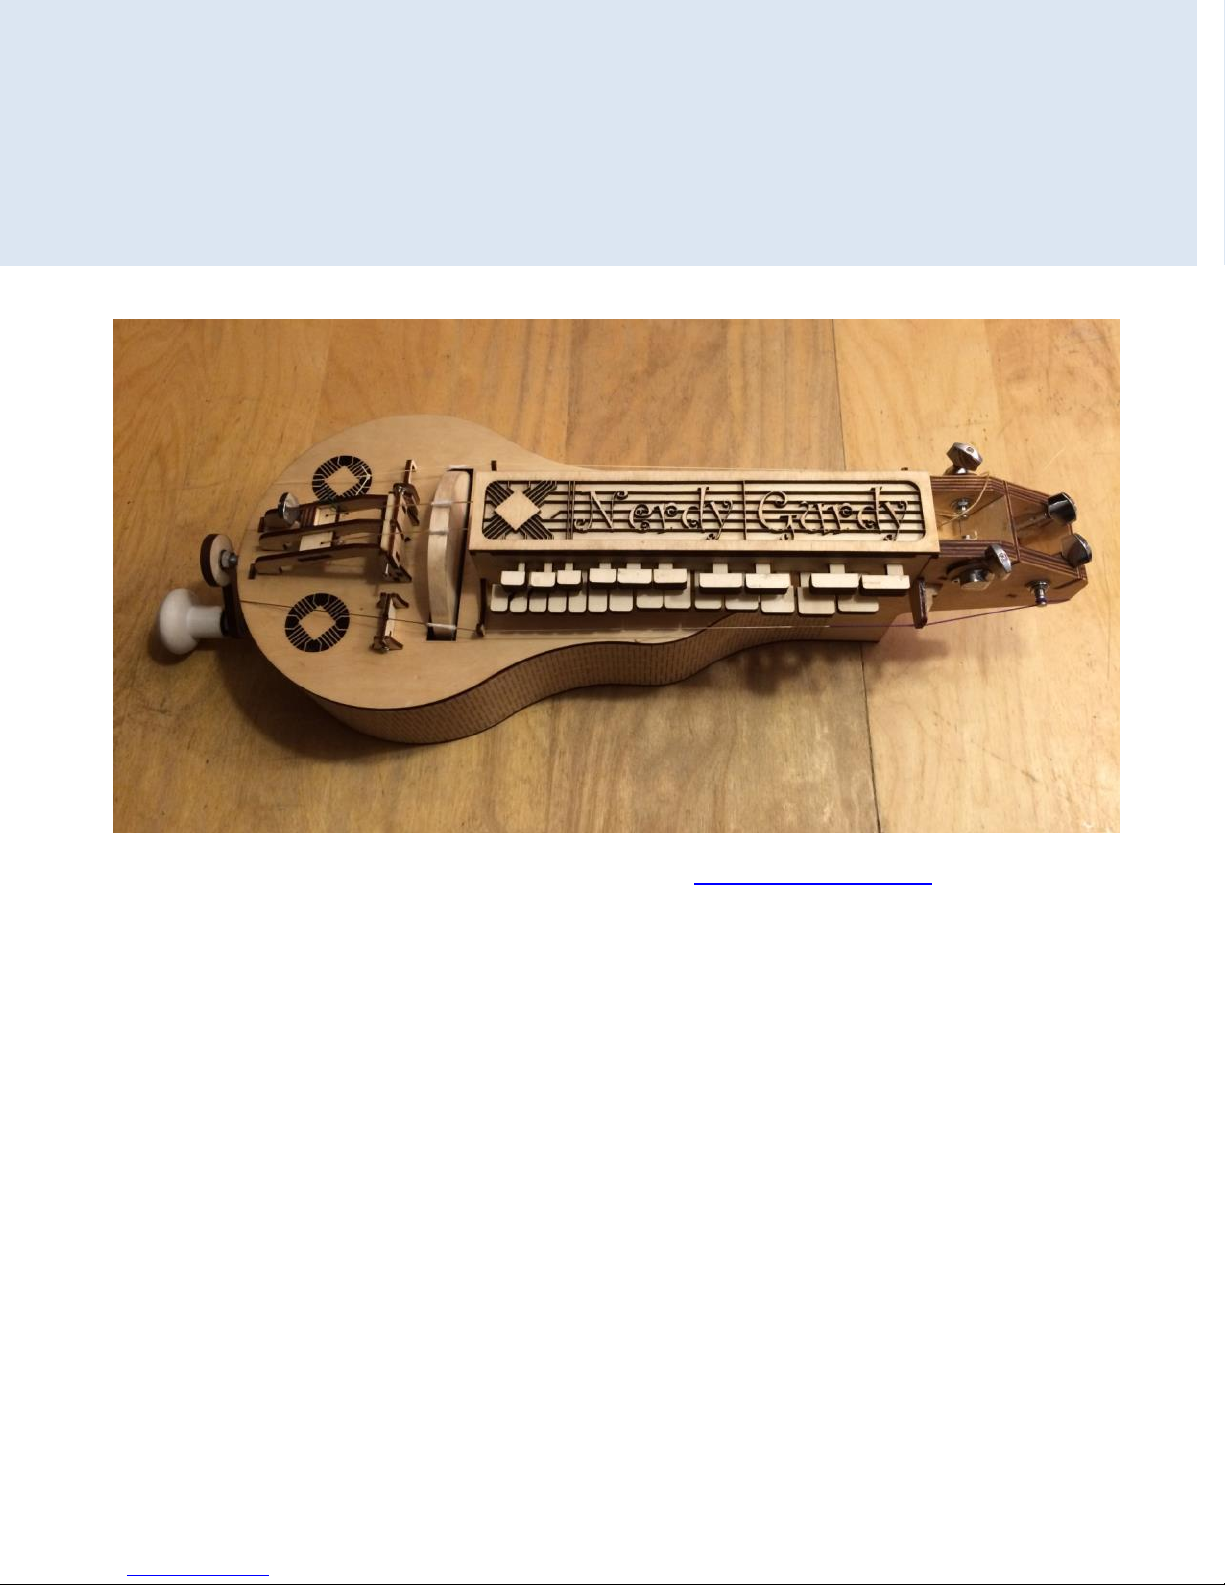
Jaap Brand Nerdy Gurdy User manual

Nerdy Gurdy
Assembly instructions
Nerdy Gurdy assembly instructions CC BY-NC 3.0 Jaap Brand, 2018-02-03
This manual describes how to assemble a Nerdy Gurdy kit. Go to http://www.nerdygurdy.nl for more info about
these instruments.
Jaap Brand
The Netherlands
January 2018
General directions:
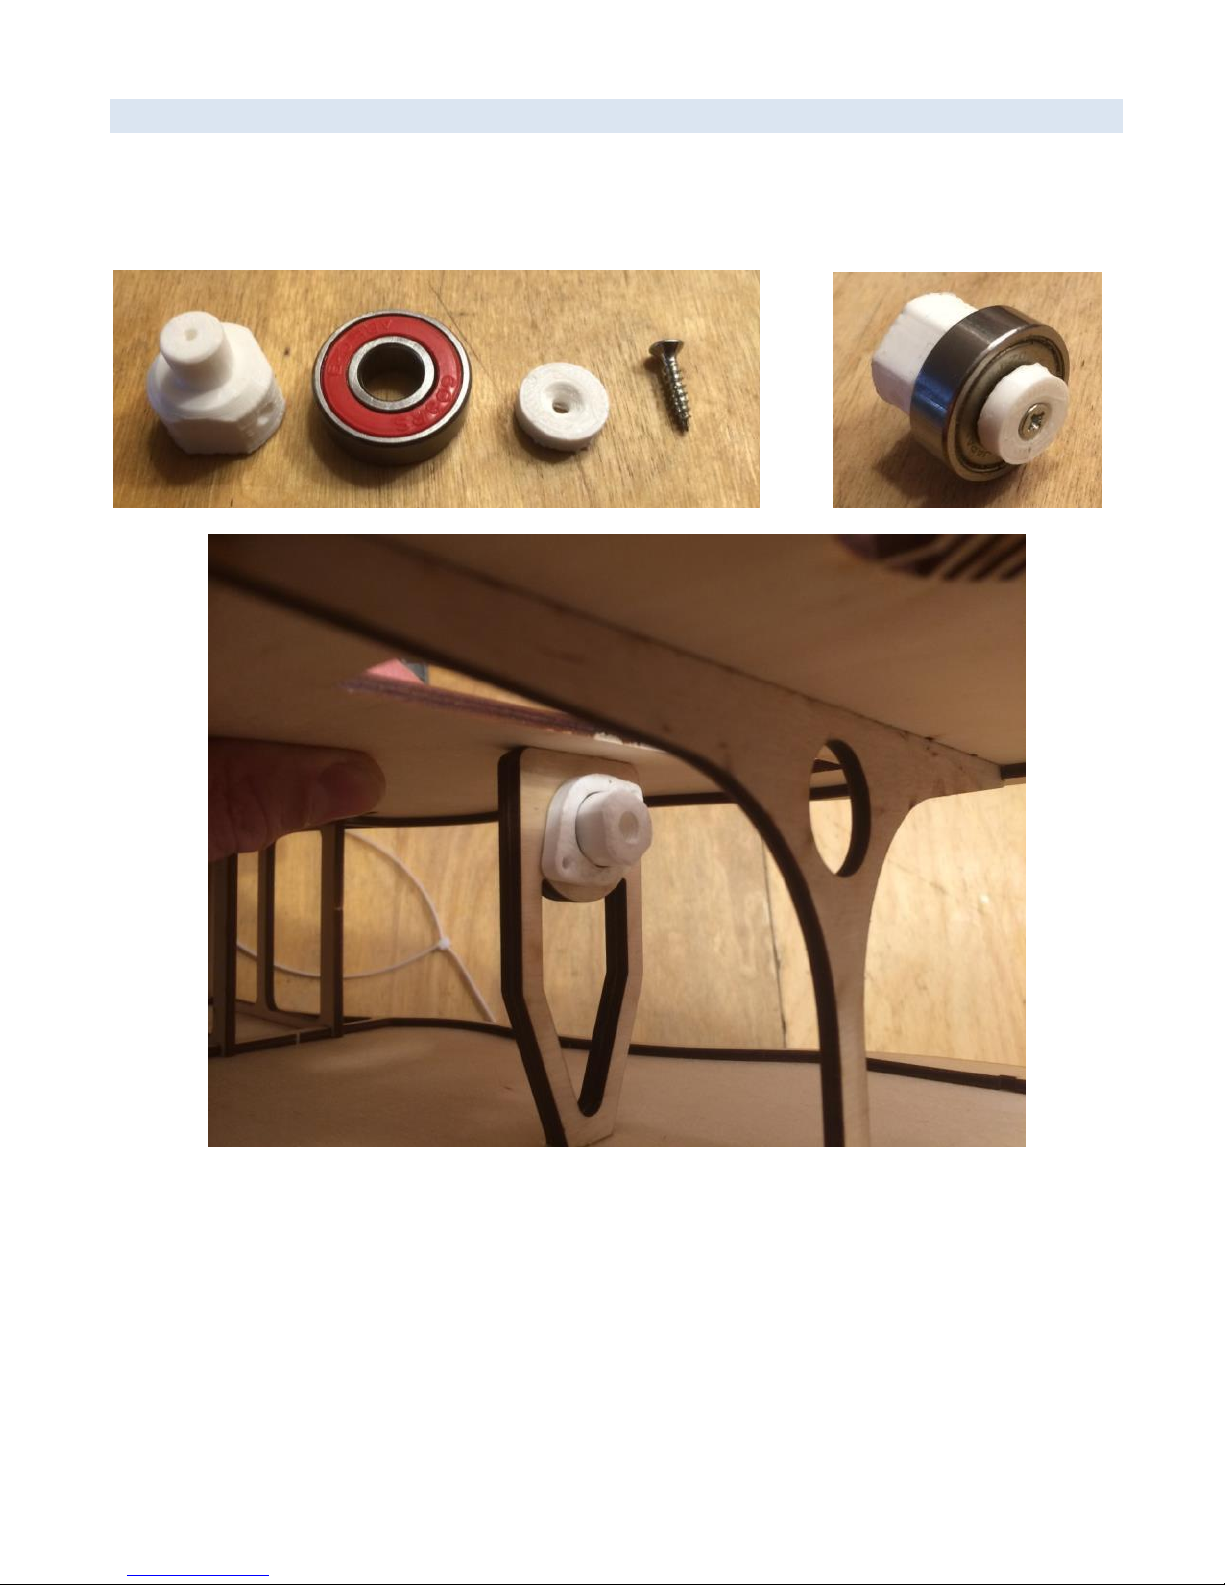
The parts are glued together with regular wood glue (not included in the kit).
Don’t glue the bridge or any part that’s adjustable.
Make sure that all surfaces that touch are fully glued together. This prevents undesirable vibration when
you’re playing.
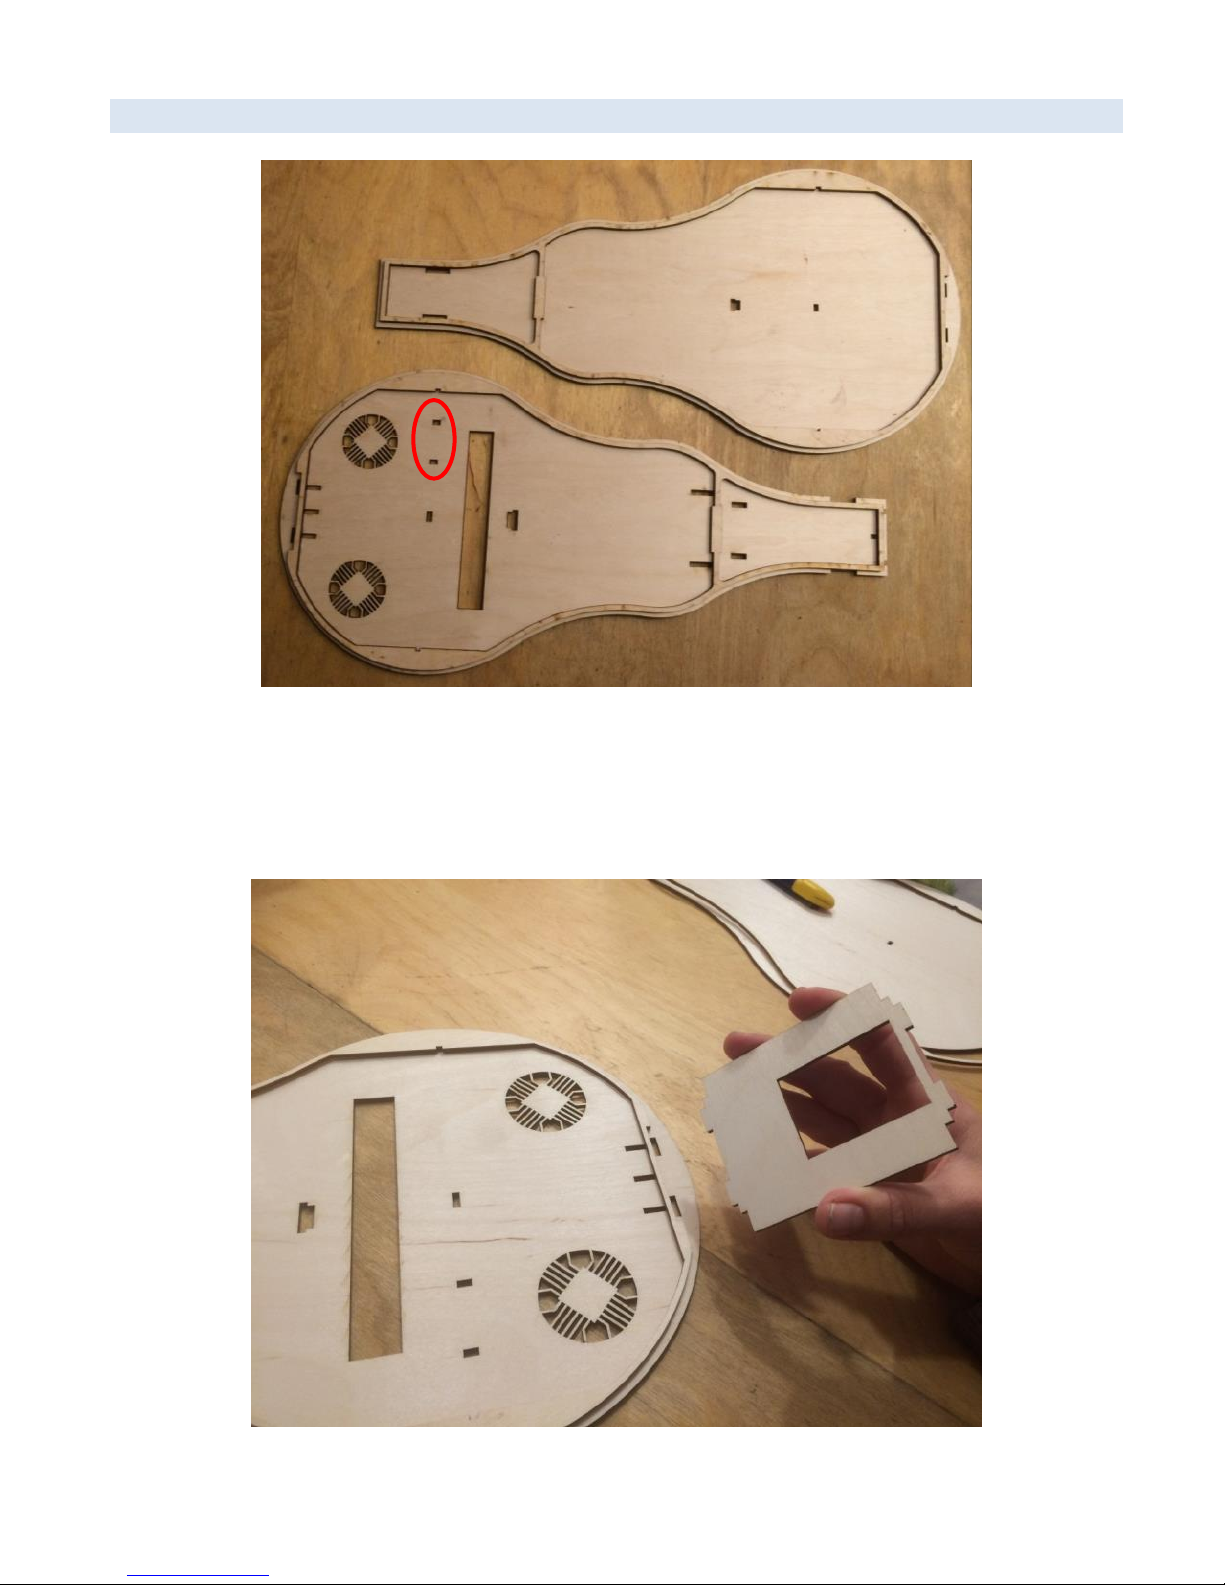
When removing parts from the plate that are still attached, it’s best to cut the attached points with a sharp
knife, to avoid splintering.
Before gluing, it is wise to assemble the parts without glue, so that you’re sure how they fit together. You
can assemble most of the instrument without glue, to get an idea of how the parts go together.
It’s best to read through the whole sequence, before starting.
If you do something wrong, it is possible to release wood glue by heating it (e.g. with a pressing iron)

Nerdy Gurdy assembly instructions CC BY-NC 3.0 Jaap Brand, 2018-02-03
Parts Included
wood
sheet 3mm
4x
sheet 6 mm
2x
Loose parts
pegs
5x
threaded rod M8 6cm
1x
threaded rod M8 24cm
1x
nut 8mm
11x
nut M3
4x
shaft bush-ring
1x
bolt M2,5 x 10
48x
bolt M3 x 10
4x
bearing 8x22
3x
screw 2,5 x 13
4x
screws back plate/strap pins 3.5 x 17
6x
spacer ring 8,4 mm
5x
felt
1x
ground ring terminal
2x
strings
chantarelle (viola)
2x
trompet
1x
bourdon (cello)
1x
printed parts
Knob (A)
1x
tangent high (B)
28x
tangent low (C)
20x
shaft nut (D)
1x
bearing ring (E)
2x
strap pin (F)
2x
Front bearing assy (G)
1x
backplate glueing jig (H)
1x
Finished parts
wheel
1x

Nerdy Gurdy assembly instructions CC BY-NC 3.0 Jaap Brand, 2018-02-03
Not included in kit
You will need the following materials to build your Nerdy Gurdy (not included in the kit):
Standard wood glue
(retractable) knife
A number of gluing clamps
Varnish (optional, but recommended)
Sand paper
Some tools (screw drivers, 13 mm spanner, etc.)
Some basic woodworking skill and patience :)

Nerdy Gurdy assembly instructions CC BY-NC 3.0 Jaap Brand, 2018-02-03
1) Glue the borders to the top and bottom of the Nerdy Gurdy
Notes:
Make sure that you glue the border to the correct side of the top plate: it’s not symmetric (red circle)
The two borders are symmetric and identical
Make sure that the parts are nicely centered. You can use mating parts to check alignment (picture below)
You can use some books to press the parts together

Nerdy Gurdy assembly instructions CC BY-NC 3.0 Jaap Brand, 2018-02-03
2) Assemble the ‘head’ and front bearing support
head
Front bearing support

Nerdy Gurdy assembly instructions CC BY-NC 3.0 Jaap Brand, 2018-02-03
3) Mount the head between the top, pillar and rear between the top plate and bottom
plate.
Notes:
Make sure that the opening at the rear side is at the top of the Gurdy (red circle).

Nerdy Gurdy assembly instructions CC BY-NC 3.0 Jaap Brand, 2018-02-03
Front bearing
The shaft is screwed into a bush at the front bearing, to avoid it from rattling. It’s most easy to assemble
this before you attach the sides to the instrument.
There is a hole in the bush to prevent it from rotating, when you’re assembling the shaft.
Attach the bearing holder with 2 x [screw, 2.5 x 13]

Nerdy Gurdy assembly instructions CC BY-NC 3.0 Jaap Brand, 2018-02-03
3) Mount the sides, starting from the head
Notes:
You can glue the parts in steps, if you don’t have enough clamps (like me).
I use the machine heads to clamp the head plates together.
Complete the head, assemble the bridge
Notes:
You don’t need to glue the bridge: it may be nice to be able to replace it. A spare part is included.
Some spacers are included (red circle)

Nerdy Gurdy assembly instructions CC BY-NC 3.0 Jaap Brand, 2018-02-03
Assemble the tailpiece
Make sure these parts are on the correct side, as shown
Notes:
Make sure that you insert the nuts, before you glue everything together.
I use the top plate as a mold, to ensure the spacing of the bridge parts is correct.

Nerdy Gurdy assembly instructions CC BY-NC 3.0 Jaap Brand, 2018-02-03
Place the bolts, wedge parts and bridge segments
There are two types of tuning peg. For the other positions both will fit ok. For the tail
piece you need to use the correct version.

Nerdy Gurdy assembly instructions CC BY-NC 3.0 Jaap Brand, 2018-02-03
Glue the rear cover pieces together
A tool is included to align the pieces for gluing
Assemble the key box

Nerdy Gurdy assembly instructions CC BY-NC 3.0 Jaap Brand, 2018-02-03
Glue the lid pieces together
Notes:
A blank plate is included in the kit, if you don’t want to have the lettering on top.
Glue the buzzing bridge support together

Nerdy Gurdy assembly instructions CC BY-NC 3.0 Jaap Brand, 2018-02-03
Apply lacquer
You may want to lacquer or paint your parts at this point in the assembly.
Glue an extra layer on top of the short keys
Notes: The numbers are on the top of the keys. That’s the side on which you need to stick the extra layer.

Nerdy Gurdy assembly instructions CC BY-NC 3.0 Jaap Brand, 2018-02-03
Glue the key box to the body, and assemble keys and tangents
Assemble the bourdon support and buzzing bridge support
Don’t glue these parts, just place them!

Nerdy Gurdy assembly instructions CC BY-NC 3.0 Jaap Brand, 2018-02-03
Assemble the shaft
Notes:
The printed ring is screwed to the back plate, to secure the bearing (2 x [screw, 2.5 x 13]).
You may need to add some glue to lock the thread of the nut that secures the knob. Else it may come loose
while turning. Alternatively you can use a locking nut (included in newest kits).

Nerdy Gurdy assembly instructions CC BY-NC 3.0 Jaap Brand, 2018-02-03
Assemble the wheel
The wheel slides into the slot on top, and you screw the shaft into the wheel. In the end, the shaft needs to be
screwed into the bush with the front bearing. Insert a pin into the bush, to prevent it from rotating:
You may need to tweak the locations of the nuts on the shaft a bit, to get the shaft properly aligned and
straight.
The shaft may not be perfectly straight, so you will need to ‘true’ the wheel after you assemble it. Rotate it
by hand and apply a scraping iron or horizontal chisel, until it is perfectly round. Afterwards, finish with fine
sanding paper.

Nerdy Gurdy assembly instructions CC BY-NC 3.0 Jaap Brand, 2018-02-03
Mount the strap pins
Mount the strings

Nerdy Gurdy assembly instructions CC BY-NC 3.0 Jaap Brand, 2018-02-03
Notes:
You need to tie a short string from the machine head at the rear, to the string. With this knob you can adjust
the trumpet effect. You may need to tweak the location of the string a bit, to get a good buzzing effect.

Nerdy Gurdy assembly instructions CC BY-NC 3.0 Jaap Brand, 2018-02-03
Final notes
I’ve designed this instrument with the purpose of making a Hurdy Gurdy with an acceptable sound, for a very
good price. I hope that it enables people to start playing the instrument who would not have had the means
otherwise, or are hesitant to invest thousands of dollars straight away.
The design is unconventional: it was designed from scratch with the above purpose in mind. Therefore the
construction method is in many ways different from traditional instruments. It does however sound pretty good,
and it is very playable. And because of the material and the method of construction, it is very stable
New players will still need to learn how to properly apply rosin to the wheel, and cotton to the strings. But there
are many tutorials online, if you don’t have experienced players who can teach you.
Enschede, January 2018
Ps. This manual and the Nerdy Gurdy itself are an ongoing project. Please let me know how they can be further
improved.
Table of contents
Popular Musical Instrument manuals by other brands

Allen Organ Company LLC
Allen Organ Company LLC MDS-10 owner's manual

VOX Amplification
VOX Amplification MARK V mini owner's manual

Allen Organ Company LLC
Allen Organ Company LLC ADC Three user manual

Generalmusic
Generalmusic WX400 Service manual

Allen Organ Company LLC
Allen Organ Company LLC ADC 3600 owner's manual

Odiseimusic
Odiseimusic Travel Sax user manual