Jabiru 3300 Instructions for use

Page No: 1 Issue No: 1 Date: 031100 Issued By: PJA
INSTRUCTION AND MAINTENANCE MANUAL
FOR
JABIRU 3300 AIRCRAFT ENGINE
This Manual has been prepared as a guide to correctly operate, maintain and
service the Jabiru 3300 engine.
Should you have any questions or doubts about the contents of this manual, please contact
Jabiru Aircraft Pty Ltd.

Page No: 2 Issue No: 1 Date: 031100 Issued By: PJA
Table of Contents
Paragraph Description Page
Table of Contents 2
List of Amendments 4
1.0 Description 5
1.1 Denomination of Cylinders 8
2.0 Technical Data 9
2.1 Dimensions & Weights 9
2.2 Normal Equipment 9
2.3 Performance Data 9
2.4 Fuel Consumption 9
2.5 Fuel & Lubricant 9
2.6 Cooling System 10
2.7 Operating Speeds & Limits 10
3.0 Performance Graphs 11
4.0 Operating Instructions 12
4.1 Pre-Start Checks 12
4.2 Starting Procedure 12
4.3 Warm-Up Period, Ground Test 12
4.4 Take-Off 12
4.5 Engine Stop 13
4.6 Engine Stop & Start During Flight 13
4.7 (Addition) Early Operation of Engine 13
5.0 Checks on Engine & Installation 14
5.1 Daily Checks 14
5.2 Periodic Checks 14
5.3 Check After Initial 25 Hours 15
5.4 50 Hours Check 16
5.5 100 Hours Check 16
5.6 TBO 16
5.7 Engine Preservation 17
5.8 Operation in Winter 20
6.0 Maintenance 21
6.1 Lubrication System 21
6.2 Air Intake Filter 21
6.3 Carburettor Adjustment 21
6.4 Compression Check 21
6.5 Spark Plugs 22
6.6 Exhaust System 22
6.7 Bolts & Nuts 22
6.8 Tappet Adjustment 23
6.9 Tachometer and Sender 23

Page No: 3 Issue No: 1 Date: 031100 Issued By: PJA
6.10 Additional Checks 23
7.0 Service & Repair 24
7.1 Engine Overhaul and TBO 24
7.2 Engine Removal Procedure 25
7.3 Disassembly 26
7.4 3300 Engine Overhaul 29
1 Subassembly A - Crankshaft Prop Mount and Con rods 30
2 Subassembly B - Crankcase and Camshaft 33
3 Subassembly C - Pistons, Cylinders and Cylinder Heads 35
4 Subassembly D - Sump and Oil Pump 42
5 Subassembly E - Flywheel and Ignition Coils & Alternator
& Alternator Operation 44
6 Subassembly F - Gear Case 49
7 Subassembly G - Fuel Pump & Carburettor
& Carburettor Operation 50
8 Subassembly H - Final assembly of subassemblies 56
9 Run in 65
7.5 Engine Installation and First 25 hours 66
7.6 Prop Strike Inspection 67
7.7 Build Sheets and Run in programme 68
8.0 Table of Lubricants 86
9.0 Torque Specifications 87
9.1 Prescribed Sealants and Primers 88
9.2 New Tolerances 89
9.3 Maximum Allowable Clearances (Wear Limits) 90
9.4 Electrical System Specifications 91
10.0 Trouble Shooting 92
10.1 Engine Won't Start 92
10.2 Engine Idles Unsteadily After Warm-Up
Period: Smoky Exhaust Emission 92
10.3 Engine Runs Erratically or Misfires Occasionally 92
10.4 Engine Runs Too Hot, Oil Temperature above 110
o
C (230
o
F) 93
10.5 Unsatisfactory Power Output 93
10.6 Low Oil Pressure 93
10.7 Engine Keeps Running with Ignition OFF 93
10.8 Excessive Oil Consumption 94
10.9 Knocking Under Load 94
10.10 Engine Hard to Start at Low Temperature 94
11.0 Engine Warranty Form 95
96

Page No: 4 Issue No: 1 Date: 031100 Issued By: PJA
List of Amendments
Page Amendment Date Issue

Page No: 5 Issue No: 1 Date: 031100 Issued By: PJA
1.0 DESCRIPTION OF DESIGN
94 Stroke
96 Cylinder
9Horizontally Opposed
9One Central Camshaft
9Pushrods
9OHV
9Ram Air Cooled
9Wet Sump Lubrication
9Direct Propeller Drive
9Dual Transistorised Magneto Ignition
9Integrated AC Generator
9Electric Starter
9Mechanical Fuel Pump
9Pressure Compensating Carburettor (Bing Type 94/40)
It is said that "aircraft are designed around available engines".
Jabiru believe that the Jabiru range of very light engines will now offer new opportunities
for light aircraft designers, to develop a new generation of light aircraft.
Jabiru engines are designed to be manufactured in small batch quantities using the very
latest Computer Numerically Controlled (CNC) machine tools. The vast majority of the
components are manufactured in Southern Queensland in a network of high technology
small companies. The crankcase halves, cylinder, crankshaft, starter motor housings,
gearbox cover (the gearbox powers the distributor rotors) and coil mounts together with
many smaller components are machined using the latest CNC machine tools. The sump
(oil pan) is the only casting. The cylinders are machined from solid bar 4140 chrome
molybdenum alloy steel, with the pistons running directly in the steel bores. The
crankshaft is also machined from solid bar 4140 chrome molybdenum alloy steel, the
journals of which are precision ground prior to being Magnaflux inspected. The camshaft
is manufactured of 4140 steel and hardened using a nitriding process.
The propeller is direct crankshaft driven and does not use a reduction gearbox. This
facilitates its light-weight design and keeps maintenance costs to a minimum. The
crankshaft features a removable propeller flange which enables the easy replacement of
the front crankshaft seal and provides for a propeller shaft extension to be fitted, should
this be required for particular applications. Cylinder heads are machined from solid
aluminium billet which is purchased directly from one of Australia's largest aluminium
companies, as is all alloy used in the engine, thereby providing a substantive quality trail
to material source. Conrods are machined from 4130 alloy steel, the 45mm big end
bearings are of the automotive slipper type.
Under a direct supply arrangement with Honda, various components of the engines are
sourced. These items include camshaft followers, and the bendix gear in the starter motor.

Page No: 6 Issue No: 1 Date: 031100 Issued By: PJA
The ignition coils are also sourced from Honda, but are modified by Jabiru for their own
particular application.
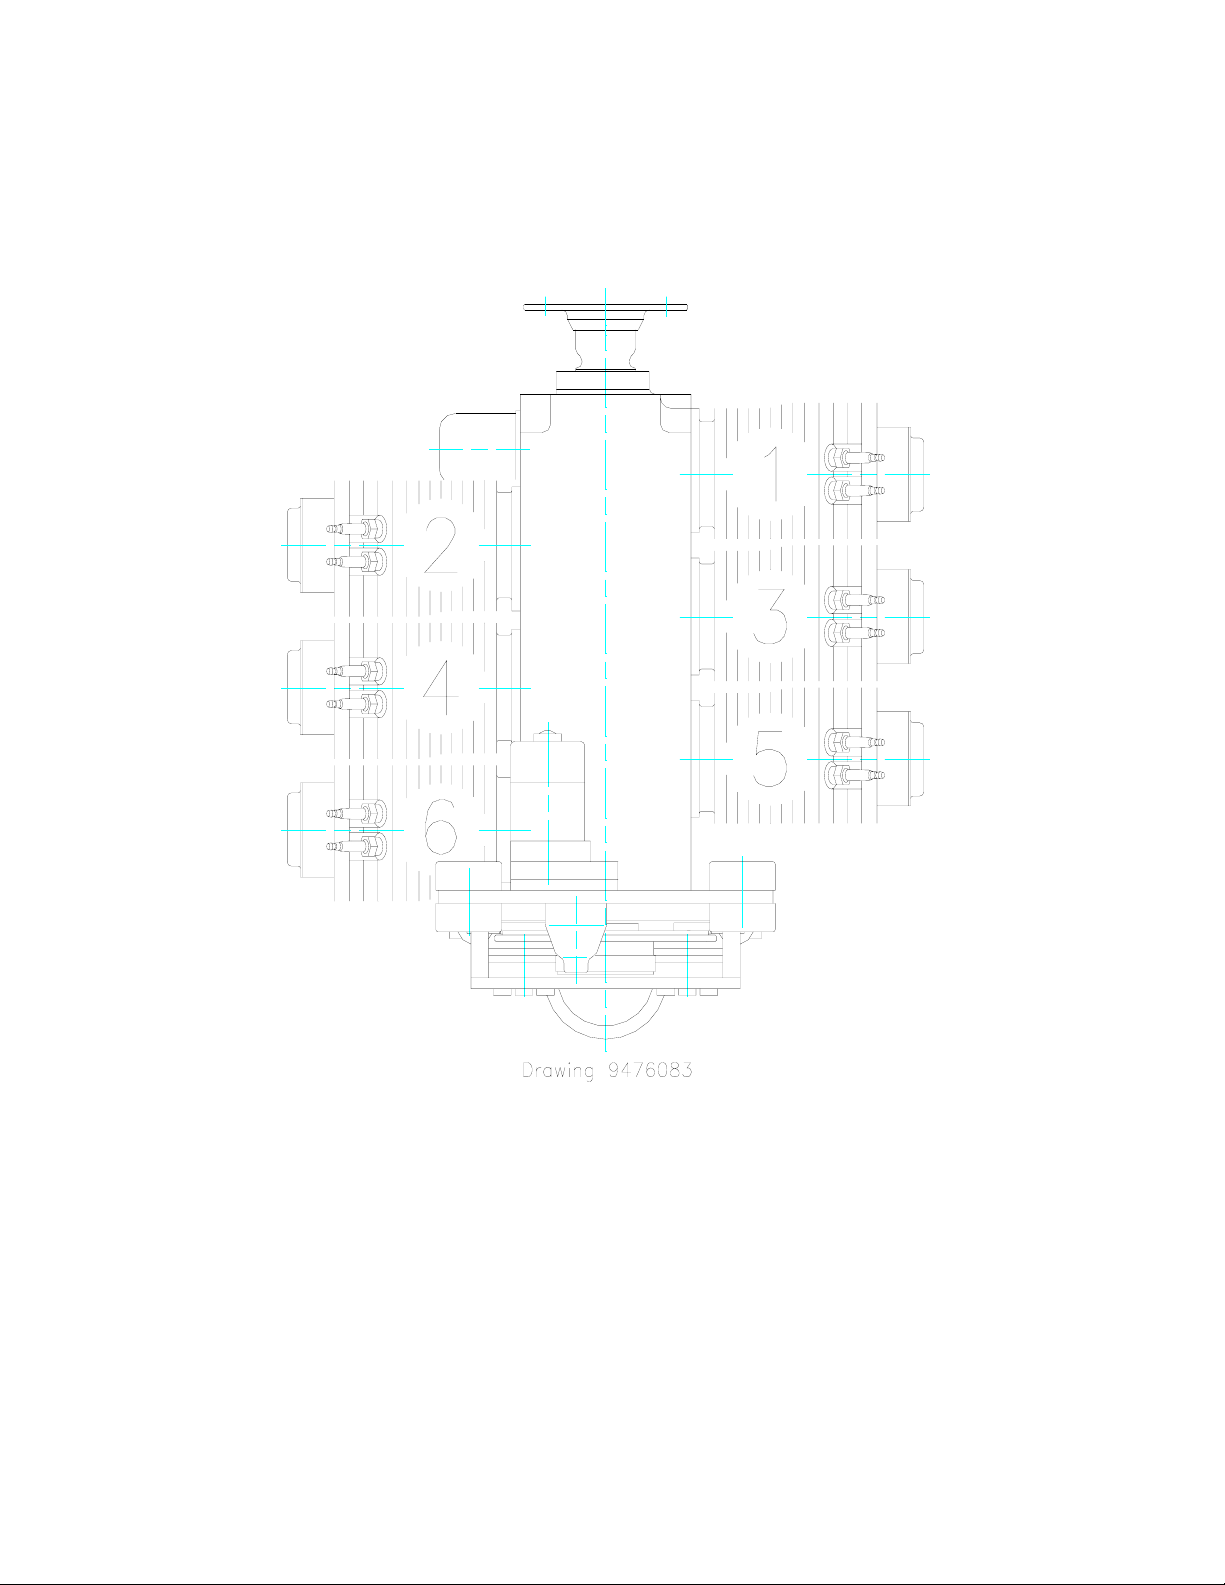
An integral alternator using rare earth magnets, provides alternating current for battery
charging and electrical accessory drive. The alternator is attached to the flywheel and is
driven directly by the crankshaft. The ignition system is a transistorised electronic system;
two fixed coils mounted adjacent to the flywheel are energised by rare earth magnets
attached to the flywheel. The passing of the coils by the magnets creates the high voltage
current which is then transported by high tension leads to the centre post of two
automotive type distributors (which are simply rotors and caps) before distribution to
automotive spark plugs, two in the top of each cylinder head. The ignition system is fixed
timing and, therefore, removes the need for timing adjustment. It is suppressed to prevent
radio interference. The ignition system is fully redundant, self-generating and does not
depend on battery power.
The crankshaft is designed with a double bearing at the propeller flange end and a main
bearing between each big end; it therefore does not have flying webs. 48mm main
bearings are also of the automotive slipper type. Thrust bearings are located for and aft of
the front double bearing allowing either tractor or pusher installation.
Pistons are General Motors aftermarket made in Australia and are re-machined to include
a piston pin circlip groove. They are fitted with 3 rings, the top rings being cast iron to
complement the chrome molybdenum cylinder bores. Valves are 7mm (stem dia) which
are purpose manufactured for the Jabiru engine in England.
The valve gear includes pushrods from the camshaft from the camshaft followers to valve
rockers which are CNC machined from steel plate, induction hardened and polished on
contact surfaces and mounted on a shaft through a teflon bronze-steel bush. Valve guides
are manufactured from aluminium/bronze, as is found in larger aero engines and high
performance racing engines. Replaceable valve seats are of nickel steel and are shrunk
into the aluminium cylinder heads. The valve gear is lubricated from the oil gallery.
An internal gear pump, direct mounted on the camshaft and incorporating a small
automotive spin-on filter, provides engine lubrication. An oil cooler adapter is provided.
Most installations require an oil cooler to meet oil temperature limits.
The standard engines are supplied with two RAMAIR cooling ducts, which have been
developed by Jabiru to facilitate the cooling of the engine and direct air from the propeller
to the critical areas of the engine, particularly the cylinder heads and barrels. The fitment
of these RAMAIR cooling ducts is a great bonus for the home builder or engine installer,
as they obviate the need to design and manufacture baffles and the establishment of a
plennum chamber, which is the traditional method of cooling air-cooled aircraft engines.
The fact that these baffles and plennum chamber are not required also ensures a "cleaner"
engine installation, which in turn facilitates maintenance and inspection of the engine and
engine component. So the hard work of engine installation has largely been done for you
by the Jabiru design team. RAMAIR ducts are available for tractor or pusher
configurations. Special ducts are available for certain installations.

Page No: 7 Issue No: 1 Date: 031100 Issued By: PJA
The engine is fitted with a 1 kw starter motor, which is also manufactured by Jabiru and
provides very effective starting. The engine has very low vibration levels,
however it is also supported by four large rubber shock mounts attached to the engine
mounts at the rear of the engine. An optional bed mount is available.
The fuel induction system comprises a BING pressure compensating carburettor.
Following carburation, the fuel/air mixture is transported to a small plennum chamber in
the sump casting, in which the mixture is warmed prior to entering short induction tubes
attached to the cylinder heads.
An effective stainless steel exhaust and muffler system is fitted as standard equipment,
ensuring very quiet operations, which in the Jabiru aircraft have been measured at 62dB at
1000' full power flyover (for 2200 engine).
For those owners wanting to fit vacuum instruments to their aircraft the Jabiru engine
design includes a vacuum pump drive, direct mounted through a coupling on the rear of
the crankshaft.
The Jabiru engine is manufactured within an Australian Civil Aviation Safety Authority
(CASA) approved Quality Assurance System to exacting standards.
Jabiru recommend a TBO of 1000 hours for both of their engines. A Guaranteed Fixed
Price Overhaul Plan* is offered with both engines. Contact your regional distributor or
Jabiru Aircraft for details.
Jabiru engine Warranty* is 200 hours or 12 months (whichever comes first) from date of
sale or from date of independently verified first flight.
*Conditions Apply

Page No: 8 Issue No: 1 Date: 031100 Issued By: PJA
1.1 Denomination of Cylinders

Page No: 9 Issue No: 2 Date: 031100 Issued By: PJA
2.0 TECHNICAL DATA
2.1 Dimensions and Weights
Bore: 97.5 mm
Stroke: 74 mm
Displacement: 3314 cc
Compression Ratio: 7.8:1
Direction of Rotation on Prop Shaft: Clockwise Pilot's view, tractor applications.
Engine Curb Weight: 81 kg (178 lb) complete with Engine Oil,
Exhaust
and Starter Motor.
2.2 Normal Equipment
Ignition Unit: Jabiru dual ignition - breakerless transistorised. Battery
Independent
Ignition Timing: 25 degrees BTDC
Firing Order: 1 - 4 - 5 - 2 - 3 - 6
Spark Plugs: NGK D9EA
Electrode Gap: 0.55 - 0.6mm (0.022" - 0.024")
Generator: Jabiru, permanently excited three phase or single phase
AC generator with rectifier/regulator
DC Output: 15 amps (continuous)
Carburettor: BING constant depression type 94/40
Air Intake Filter: 1 x folded paper cartridge
Fuel Filtration: 0.1 mm (100 Micron) maximum particle size.
Fuel Pump: Camshaft driven diaphragm type
Starting System: Electric 12 V / 1.0 kW
2.3 Performance Data
Maximum 90 kW (120 hp) @ 3300 RPM ISO STD Conditions
2.4 Fuel Consumption
Fuel Consumption @ Takeoff/Max Continuous Rating 28.5 litres/hr
2.5 Fuel and Lubricant
Fuel: AVGAS 100 LL & AVGAS 100/130

Page No: 10 Issue No: 2 Date: 031100 Issued By: PJA
Leaded and Unleaded Automotive Gasoline above 95 Octane Ron
Run in Period
Oil 80 100 120
Outside Air Temp -17oC to 25oC 15oC to 35oC Above 35oC
(1
oto 77oF) (59oto 95oF) (Above 95oF)
Normal Operations
Oil W80 W100 W120
Outside Air Temp -17oC to 25oC 15oC to 35oC Above 35oC
(1
oto 77of) (59oto 95oF) (Above 95oF)
2.6 Cooling System
Free air cooled. Ensure that baffles are correctly fitted & located.
The required pressure drop across the cylinders at 1.3 Vs in take off configuration is 4.3
cm (1.7") water gauge, minimum.
2.7 Operating Speeds and Limits
Maximum continuous speed 2750 RPM
Maximum 3300 RPM ISO STD Conditions
Idle Speed: 650 RPM
Oil Pressure: Normal Operations Min 220 kPa (31 psi)
Max 525 kPa (76 psi)
Idle Min 80 kPa (11 psi)
Starting & Warm up Max 525 kPa (76 psi)
Oil Temperature: Min. 15 oC (59oF)
Max. 118
oC (244of)
Continuous Temperature: 80 - 100 oC (176o- 212oF)
Max. Cylinder Head Temperature: 175 oC (348oF)
(reading on the sensor spot
of the hottest cylinder)
Continuous 150
o
C (302
o
F) Max.

Page No: 11 Issue No: 1 Date: 031100 Issued By: PJA
3.0 PERFORMANCE GRAPHS

Page No: 12 Issue No: 1 Date: 031100 Issued By: PJA
4.0 OPERATING INSTRUCTIONS
To ensure that the engine operates reliably, carefully observe all of the operating &
maintenance instructions.
4.1 Pre-Start Checks
Daily Checks (See Paragraph 5.1)
Move throttle position to FULL & check for ease of movement over the entire range.
4.2 Starting Procedure
Fuel Tap OPEN
Choke ON (in cold conditions)
Fuel Pump ON for 10 seconds then off
Throttle CLOSED to Stop
Master ON
Ignition BOTH ON
Starter PRESS
Attention: Activate Starter for a max. 20 seconds, followed by a cooling period of 1
minute.
When engine runs, adjust throttle to achieve smooth running at approximately 1200 RPM.
Deactivate Choke. Check Oil Pressure has risen within 5 seconds - if not, shut down.
4.3 Warming Up Period, Ground Test
Start the warming up period with the engine running at 1000 RPM. Continue at 1400
RPM depending on ambient temperature, until oil temperature reaches 15oC (59oF).
Check the two ignition circuits at 1600 RPM. Note: - RPM with only one ignition should
not drop by more than 100 RPM.
DO NOT apply full power until CHT reaches 100 oC (212oF)
DO NOT allow cylinder heads to rise above 150
o
C during ground running.
4.4 Take-Off
Climb with the engine at maximum continuous power. Observe Oil & Cylinder Head
Temperatures & Oil Pressure Limits must not be exceeded !

Page No: 13 Issue No: 1 Date: 031100 Issued By: PJA
4.5 Engine Stop
In normal conditions, cooling down the engine during descent & taxiing will permit the
engine to be stopped by switching OFF the ignitions.
4.6 Engine Stop and Start During Flight
Reduce power to 1000 RPM to cool engine for 30 seconds, then to idle. Switch ignitions
OFF. Starting procedure is the same as ground starting, without choke for a warm engine
& with choke for a cold engine. Note: Engine cools quickly with propeller stopped in
flight. Choke will therefore normally be needed to restart.
4.7 Addition} Early Operation of Engine
JABIRU ENGINE NOTES
NEW ENGINE NOTES:
This engine has been ground run to a specific run in program and
is ready for flight. It has been INHIBITED however if you intend to
store for any length of time please refer to 5.7 Section 3 of
INSTRUCTION AND MAINTENANCE MANUAL. Removing spark
plugs and turning over will help periodically. Before initial start,
oil engine 3.4 litres (with cooler) remove one plug per head
activate starter to remove excess inhibitor. Once oil pressure is
obtained replace plugs and continue start-up sequence.
The following are tips to ensure a long life.
1. OIL
Use a non-compounded AVIATION oil:-
¾Aero Shell 100
¾Mobil Red Band
¾BP Aviation Oil 100
Use for 20-25 hours.
Drain and replace with a compounded oil:-
¾Aero Shell W100
¾Aero Shell 15W50 (for cooler climates)
¾Mobil Aero 100 (SAE 50)
¾BP Aero Oil D100/BP Multigrade Aero Oil D SAE 20 W 50
¾Aero Shell W 100 Plus
The normal running oils are detergent and ashless dispersant
types. See MAINTENANCE SECTION 5.3

Page No: 14 Issue No: 1 Date: 031100 Issued By: PJA
2. Add 3.2 Litres (without oil cooler)
3.4 Litres (with an oil cooler)
3. Avoid prolonged ground running at elevated RPM. Engine can
be over heated, remember air ducts are designed for in flight
cooling. NOTE: remove ALL plastic bungs on engine.
EXHAUST (4) CARBY (2) OIL VENT (1) FUEL PUMP (1)
4. DO TAKE OFF AT FULL POWER.
For the first few take offs climb at a higher airspeed. Reduce
power at cross wind leg and shallow climb (lower nose).
5. VARY your RPM when flying.
6. Avoid high nose altitude continual climbs. The higher the climb
out speed the better for engine cooling. No low speed high
nose altitude climb outs.
7.
8. CIRCUIT WORK is possibly a good sequence for initial run in
work. Abbreviate circuits initially, step climb, climb shallow.
No glide approaches. Gradually reduce power. Avoid sudden
heating up and sudden cooling down.
9. RETORQUE heads as suggested on warning sheet.
24 ft lb and .010” valve clearance all done cold. Subsequent
torquing of around 22 to 24 seems to help in settling down
head bolts and heads.
10. Don’t BABY YOUR ENGINE but monitor carefully CHT and oil
temp initially especially during the first few hours of
operation.
Remember engines need to be flown. They are designed for
this purpose. Do not use full power before CHT reaches 100
o
C.
Ring bed in is accomplished better at 75% power and above. Avoid heat
build up. Monitor CHT and oil temps. Vary RPM. Initial temps will be
elevated due to friction of a new engine.

Page No: 15 Issue No: 1 Date: 031100 Issued By: PJA
11. Do not use any type of automotive oil. These oils have not
been blended for the purpose of air cooled aero engine
operation and will be detrimental to its operation.
12. Use AVGAS 100 LL or the highest Octane Mogas above 95
containing lead. Engines not shimmed on the cylinder base
should only be run on AVGAS.
13. When you change oil from the “run in” type to the “normal” oil
at or around 25 hrs replace oil filter. You may want to cut the
filter open for inspection. It is usual in Jabiru engines to find
a small amount of aluminium but definitely no metal. If
bearing metal is present contact the Jabiru Service
Department.
14. With ignition and master OFF and throttle closed turn the
prop by hand and observe engine for odd noises or heavy
movements.
Check for regular compressions, if irregular firstly check
tappet adjustment. Operation with incorrectly adjusted
tappets with result in damage to valves, valve seats, guides
and overhead gear.
HEAD TORQUING/VALVE SETTING
Your tension wrench should be accurate. It should have had some method of calibration. They can
vary to manufacturers claims.
Engines use a 9/16 thin walled or tubed socket and a blade screwdriver.
The purpose of breaking in an engine correctly is to ensure a long reliable
life. All moving parts need freeing up especially piston rings to cylinder
walls. This is best accomplished when the greatest B.M.E.P. (Break Mean
Effective Pressure) occurs. That is at 75% power and above. Careful
monitoring by the pilot is needed during this initial period to ensure long
life of the engine and its components.
24 ft lb on head bolts
.010” on valve clearance cold

Page No: 16 Issue No: 1 Date: 031100 Issued By: PJA
Easiest method of setting valves requires you to pull the prop
until exhaust valve on No.1 cylinder is fully depressed. Note the
O’clock position. Rotate prop 360
o
and adjust valve. (This puts the
cam and lifter at 180
o
to the peak lift). Repeat for each valve.
Heads and valves should be done at least twice at 5 hrs and 10
hrs on a new engine. You may also adjust each cylinders valves
on the firing stroke. (Firing order 145236 at TDC)
Remember to go over exhaust cap screws. They are fitted with
shakeproof washers to prevent loosening.
AIR DUCTS
Periodic research and development does cause at time changes to occur. Ones
supplied need to be fitted. See instructions manual.
FILTERS
Inspections down the track are a must for fuel and air filters. Conditions will dictate
when changed. The air box has a rubber flap to give partial inspection of filter.
SPARK PLUGS
NGK D9EA are recommended.
Plug gap of around .022” to .024”. Remember plugs are installed
at around 8 ft lb or given 1/2 turn after contact with head.
18mm Plug spanner used.
COMPRESSION TESTING
Condition of compression can be done by a compression gauge. Wide open throttle,
engine warm. Turn over on starter. Below 90 PSI would indicate removal of head
and possibly cylinder.
PRESSURE DIFFERENTIAL TEST (Leak down)
This is a much better test for condition of rings, bore, head sealing and valve. Engine in warm to hot
condition. This is the normal test used in aviation requiring specific equipment for the job. Pressure
input of 80 PSI; a second gauge reads the differential when supplying 80 PSI. This is done with piston
on TDC on the firing stroke. Prop needs to be restrained. The differential cut off is 80/60. Problems
can be better identified eg.
¾BLOW BY (CRANKCASE VENT) - RINGS, BORE SEAL
¾LEAKING FROM CARBY - INTAKE VALVE SEAL
¾LEAKING FROM EXHAUST - EXHAUST VALVE SEAL
¾HEAD LEAK - HEAD GASKET OR HEAD TO CYLINDER SEAL
Correction work can then be carried out.

Page No: 17 Issue No: 1 Date: 031100 Issued By: PJA
COIL GAP
Best done with a piece of plastic or thin card of a thickness .010”. Cut into a strip approximately
15mm wide.
Place between magnets on flywheel and coil.
STARTING
A warm idle of around 650 RPM will automatically create the right starting environment. Idle set
screw may have to be adjusted. Carby has been factory set. Normal start requires throttle closed, that
is the idle criteria has just cracked the butterfly in the throat body and also apply choke. The engine
is difficult to start if throttle is cracked open somewhat.
As the engine is cranked the choke should be pushed off. Engine should fire. The choke is only used
for a cold start. Prolonged cranking with choke will only “flood” the intake system making starting
difficult. Should this occur, leave or clear the system on full throttle momentarily (mags off).
Cranking speed if too slow (poor battery or starter fault) will prevent magneto operation.
Jump starting (with care) will point towards poor battery condition or faulty alternator charging.
Further testing would then be required in these areas to identify the problem.
POSSIBLE PROBLEMS
See “Trouble Shooting” Section of 10.0 of Maintenance Manual.
It is unusual for a problem to occur however a few of “common”
type are listed.
1. LOW OIL PRESSURE
A sudden drop of pressure usually is caused by a small piece of
foreign matter being lodged under the relief valve. Simply remove
oil filter and cooler adaptor (if fitted). Remove matter by
depressing plunger or removing relief mechanism. Replace and
check operation by ground run. If low pressure persists the
problem will need further investigation.
We strongly recommend the fitting of an approved oil cooler to
Jabiru engines.
2. FLICKING OF OIL PRESSURE GAUGE
It is not uncommon for the Jabiru engine to display flicking of the
needle pointer for brief periods but still within normal operating
regions. If it continues, check continuity of sender lead and or
possible sender change. (We are assuming oil level is OK).
3. CHT
Possible not reading can be cause by a break in the sender wires
or incorrect polarity. High readings can result with poorly centred
sender under the spark plug. Normal cruise CHT should not

Page No: 18 Issue No: 1 Date: 031100 Issued By: PJA
exceed 150
o
C and climb must not exceed 175
o
C. Air ducts
supplied at present give results below these figures.
4. RPM
Tacho’s may need adjustment when a new engine is fitted.
Inducted magnet sender units require coil gap to flywheel gear
teeth of .014” or .35mm. Tacho’s using this sender require a “pot”
adjustment, access through outside of case.
Tacho’s using the magneto as sender requires a sequence of
operation for correction. This information can be faxed if
required.
5. MAGNETO CHECKS
Possible causes of abnormal drop could be loose leads, faulty
leads, rotor buttons, coil gaps, spark plugs.
6. ROUGH CYLINDER RUNNING
Check plugs/valve clearance and the induction system for
looseness.
7. CARBY BREATHER
Later model carbies have a brass fitting for venting. This is easily
connected via a clear plastic hose to a fitting screwed into the
carby heat box. On earlier carbies we supplied a kit for this
purpose as no internal carby fitting was installed.
8. LIMITATIONS
Warranty notes follow.
Jabiru recommend TBO of 1000 hrs. A guaranteed fixed price
overhaul exists through the Jabiru factory.
Warranty is 200 hours or 12 months which ever comes first.
CAREFULLY READ MANUALS SUPPLIED

Page No: 19 Issue No: 1 Date: 031100 Issued By: PJA
5.0 CHECKS ON ENGINE & INSTALLATION
5.1 Daily Checks
* Ensure free movement of throttle & choke cables.
* Check Oil Level, replenish if necessary. Oil level should be between the MAX & MIN
marks - but must never be below the MIN mark. Before long periods of operation,
ensure that the level is at least at the mid position. Difference in the oil quantity
between MAX & MIN mark is 0.75 litres (0.792 US Quarts).
* Check security of spark plugs, leads & electrical connections.
* Check lubrication & fuel system for leaks.
* Check exhaust system for security & leaks.
* With Ignition & Master OFF and throttle closed, turn propeller by hand & observe
engine for odd noises or heavy movements. Check for regular compression. If irregular,
firstly check tappet adjustment (see para 6.8).
IMPORTANT
Prior to pulling through the propeller by hand, both ignition circuits & the Master must be
switched OFF, the brakes applied, throttle closed & the cockpit attended by a trained
person.
WARNING
A hot engine may fire with the ignition/s switched OFF.
CAUTION
Continued operation with incorrectly adjusted tappets will result in damage to valves,
valve seats, valve guides & overhead gear.
* Prior to takeoff - follow the Starting & Warm Up procedure, observe the engine
behaviour & throttle response.
* Check temperatures & pressures. Conduct a short ground test at full power (10 seconds
Max.) (consult aircraft Flight Manual).
5.2 Periodic Checks

Page No: 20 Issue No: 1 Date: 031100 Issued By: PJA
After the initial 25 hours, check in accordance with para. 5.3.
After 50 hours of operation, check in accordance with para. 5.4 & thereafter after each 50
hours of operation.
After 100 hours of operation, check in accordance with para. 5.5 and thereafter after each
100 hours of operation.
At TBO, overhaul in accordance with para. 5.6.
5.3 Check After Initial 25 Hours
Details of specific operations are shown in Chapter 6 "Maintenance".
* Remove engine cowlings, check engine mounts.
* Thoroughly check engine for missing or loose bolts, nuts, pins, etc., & for abrasions.
* Check induction and exhaust flange for loose bolts.
* Check safety wires, cooling air ducts & baffles, ignition wiring & hose connections.
* Oil Change 3.5 litres
* Change oil filter. (First 25 hours only)
* Inspect old filter.
* Retorque cylinder head bolts (24 ft lbs) in diagonal pattern
* Check tappet clearance and adjust as necessary (refer Para 6.8).
(0.010" cold inlet and exhaust)
* Check exhaust system.
* Check fuel system for leaks & abrasion.
* Check wiring for damage & for tightness.
* Engine test run.
Observe starting, warm up & acceleration behaviour to maximum RPM (10
seconds max)
Check temperatures & pressures.
Engine stop.
Other manuals for 3300
1
Table of contents
Other Jabiru Engine manuals