jacarta PowerZook User manual


Copyright
© Copyright 2018. Jacarta Ltd. All rights reserved.
Trademarks
All other trademarks belong to their respective proprietors.
Electronic Emission Notice
CE Notice
This device complies with the EMC directive of the European Community and meets or exceeds
the following technical standard:
•EN 55022:1998 –“Limits and Methods of Measurement of Radio interference
Characteristics of information Technology Equipment.” This device complies with the
CISPR Class B standard.
•EN 55024:1998 –”Electromagnetic compatibility – Generic immunity standard Part1:
Residential, and light industry.”
RoHS
This device is RoHS compliant.
WEEE
In accordance with the European Directive 2002/96/EC on Waste Electrical and Electronic
Equipment (WEEE), please return the product to Jacarta (at the end of its serviceable life) and
we will arrange for the appropriate disposal of the device.
Safety Information
Although this product is used on the outside of a cable please ensure that extreme force is not
used to close the PowerZook. Do not proceed with the install if the PowerZook can not be clipped
in to its final position by hand. Use of excessive force may cause damage to the PowerZook and
cable. The PowerZook should only be installed by an Authorised Engineer.

Introduction
The PowerZook is a True RMS current (Amps) measurement sensor designed to work with
2.5mm and 4mm 3 core cables (maximum 32Amps). It is designed to clip around a load
cable without the need to unplug the cable and therefore without the need of downtime to
any of the attached equipment.
PowerZook Overview
Hood: The hood opens to allow placement on the cable
Side Securing Clip: To secure the PowerZook on to the cable
Cable Restraint: To secure the PowerZook on to the cable
Position Arrow: To help with the calibration process
PoE Injector Overview
The PoE Injector allows users to power the PowerZook directly from any USB port and connect
the device directly to any network port on a laptop or computer. Calibration and network settings
can then be configured before connecting the sensor to your PoE Switch/Network.
The PoE Injector has 3 ports:
PoE Network Connects to PowerZook using standard cat5/6 cable
USB Power Connects to any standard USB port using the supplied cable
Network Connects to any RJ45 network port on laptops and computers

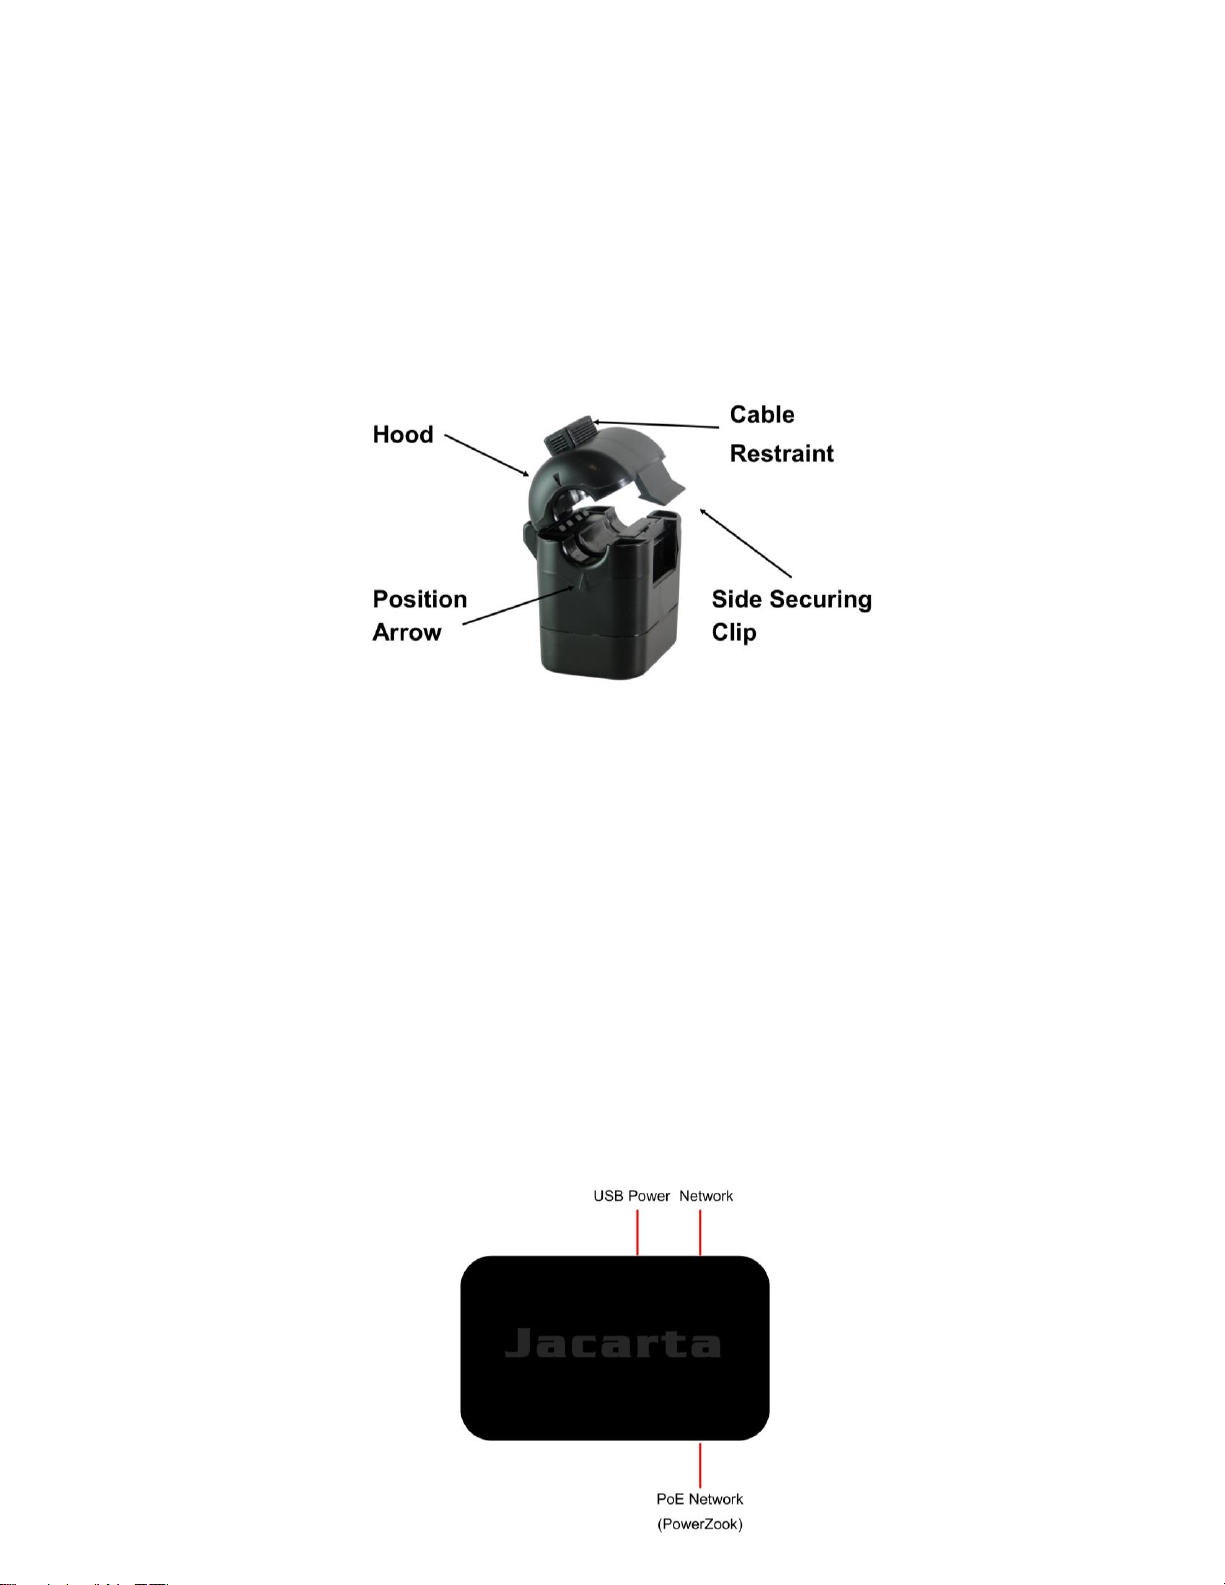
1. PowerZook Clamping Mechanism
The hood of the PowerZook has 2 mechanisms to secure
it in place for each position. A side securing clip, which
has 2 positions (see diagram right), each position giving
an audible click, and a cable restraint in the top of the
hood to put pressure on the cable as required. When
supplied the cable restraint will start 2 clicks down and can
be pushed further down as required, each position giving
an audible click. To achieve the Calibration and Final
Positions please follow these steps:
•Place the hood around the cable trapping the cable between the ferrite core of the
PowerZook and the cable restraint of the hood. Squeeze until the first side clip snaps into
place.
•To secure the PowerZook in to the Calibration Position it needs to be able to be moved
around the cable but not moved freely when let go. This can be achieved using both the
side securing clip and the cable restraint. For a table of standard cable sizes please see
Appendix A.
•After the calibration sequence (shown in section 4) has been accomplished, the
PowerZook needs to be secured in its final position. This will tightly secure the
PowerZook on the cable so that free movement is not possible and forced movement is
very difficult. For a table of standard cable sizes please see Appendix A.
Once the PowerZook is in place it need never be moved regardless of load on the cable
changing.
Please note, the cable restraint will push down but not come back up. If it is pushed too far it will
need to be pushed fully through and then pushed to one side to release from the bottom of the
hood (some pressure may need to be applied for it to release). It can then be re-inserted in the
top of the hood.

2. Powering PowerZook via a Laptop using the PoE Injector
The PowerZook is a PoE device so would normally require a connection to a PoE switch in
order to power on. However, with the Jacarta PoE Injector you can also use a USB port on your
PC to power the PowerZook.
One side of the PoE Injector has an RJ45 and a USB connector, the other side has a PoE RJ45
connector. If using the PoE injector, connect between your PC and the PowerZook as follows;
1. Connect the PoE RJ45 connector to the PowerZook
2. Connect the RJ45 connector to the network port on your PC
3. Connect the USB connector to any available USB port on your PC
The PowerZook will now power on.
3. Configuring PowerZook
The PowerZook has an on-board web browser and an initial static IP address of 192.168.1.200.
Configure your local network to have a static IP address in the same range as the PowerZook
(such as 192.169.1.222), then open any internet browser and browse to the PowerZook's IP
address.
*Note: PowerZook supports one web-browser connection at any time. If another user tries to
login whilst a session is underway connectivity will be affected.
You will be presented with a log in screen with 2 options:
1. Browser –This is for view only access and the default password is public.
2. Installer –This is for installation and the default password is PZadmin.

Log in as Installer (PZadmin)
Once you are logged in go to the following menu:
PowerZook Settings > Basic Settings
The basic settings page allows users to change the following values:
Voltage This defines the voltage figure used to calculate Amps reading.
Power Factor This defines the Power Factor used to calculate Amps reading. This is
set to 0.8 as default.
Frequency The frequency can be set to 50 or 60 Hz and will need to be set in
accordance with the power supply in the users region.
Measurement Mode G1 or G2 depending of the type of cable in use. G2 is used for most
current cable types.

4. Positioning PowerZook
PowerZook Settings > Positioning
Here you will see a bar with 2 parts to it:
1. A yellow place marker, this starts to the far left. The yellow marker represents the peak
reading and once you have completed a full rotation of the PowerZook around the cable the peak
reading identifies the best position to provide optimum reading accuracy.
2. A green bar that will fill in from the left once you start positioning the PowerZook on to a
load bearing cable. The green bar represents where the measurement currently is in
comparison to the peak reading.
Place the PowerZook on to a load bearing cable of the required type (please ensure there is 0.5A
of load on the cable already; this is the minimum for this process to be successful). The hood of
the PowerZook has 2 mechanisms to secure it in place. A side securing clip, which has 2
positions, each position giving an audible click, and a cable restraint in the top of the hood to put
pressure on the cable as required. The cable restraint will start 2 clicks down and can be pushed
further down as required, each position giving an audible click.
Follow these steps:
1. Using the 2 mechanisms detailed above, secure the PowerZook enough so that it can be
twisted around the cable but with enough resistance so that it will not easily slip along the
cable.
2. Twist the PowerZook slowly, in 2-3mm steps.

3. At each step wait for the Positioning bar to update, you will see the yellow marker and
green bar move towards the right. The yellow marker will not come back towards the left,
it will always remain static at the right-most point. The green bar will move up to the yellow
marker and back towards the left during this process.
4. Once you have completed one full rotation, keep turning until the green bar meets the
yellow marker.
5. When the green bar and the yellow marker meet, after at least one full rotation, then the
current position is the peak reading position. This is where the most accurate
measurement can be taken.
6. Secure the PowerZook fully so that it will not move along or around the cable anymore.
The final thing to do is to give the PowerZook the relevant TCP/IP address details for the
network that it is being installed on to. To do this browse to the Network menu. Here you can set
the PowerZook to use DHCP or to use a static address.
Once the TCP/IP address details are configured for the required network you can power off the
PowerZook by removing the PoE RJ45 cable and connect it to the local PoE switch.
The PowerZook does not need to be repositioned ever again, unless it is physically moved or
removed from its position on the load bearing cable.
assistance.

5. PowerZook Network Settings
Network > IP Settings
Once initial configuration and positioning has been completed you can assign the PowerZook the
necessary IP settings for use on the network.
6. PowerZook SNMP Settings
PowerZook Settings > SNMP Settings
PowerZook will provide Amp readings to any chosen NMS using SNMP v1. SNMP Port and
Community Settings can be amended as necessary.
A full OID list can be found in Appendix B.

7. PowerZook Tools
Tools > Change Password
It is possible to change the login credentials for both Installer and Browser accounts. Enter the
new password twice to verify.
Tools > Firmware
Firmware updates will be periodically made available via the Jacarta website. To update the
device firmware simply select Choose File, select the provided .fwe file, and click Update
Firmware. Once the firmware has been uploaded to the device the unit will need to be rebooted
for the upgrade to finalise.
All PowerZook settings should be saved but please do note down any key settings should they be
lost.

Tools > Factory Reset
PowerZook can be quickly and easily reset to factory defaults. Please note that the device will
revert to the default IP settings (192.168.1.200).
Tools > Reboot
When troubleshooting potential issues, or if the device becomes unresponsive it is possible to
reboot from the browser.

Appendix A: Standard Cable Sizes
Cable
Diameter
Cable
Type
Cable
Core
Size
Positioning Guidelines
Final Position
10mm
PVC
2.5mm2
Push the cable restraint down 5
times. Click the side securing clip
twice to enter the calibration
position.
Push the cable
restraint down 3
times.
11mm
Rubber
2.5mm2
Push the cable restraint down 3
times. Click the side securing clip
twice to enter the calibration
position.
Push the cable
restraint down
twice.
12mm
PVC
4mm2
Push the cable restraint down 3
times. Click the side securing clip
twice to enter the calibration
position.
Push the cable
restraint down
once.
14mm
Rubber
4mm2
With the cable restraint in its
starting position. Click the side
securing clip once to enter the
calibration position.
Click the side
securing clip in to
its second position.
Appendix B: PowerZook OID List
.1.3.6.1.4.1.19011.1.3.5.1.3.1.0 - Current/AMPS (x .001)
.1.3.6.1.4.1.19011.1.3.5.1.3.2.0 - Watts
.1.3.6.1.4.1.19011.1.3.5.1.3.3.0 - Voltage
.1.3.6.1.4.1.19011.1.3.5.1.3.4.0 - Power Factor
.1.3.6.1.4.1.19011.1.3.5.1.3.5.0 –Measurement Mode (usually G2, cable type dependent)
.1.3.6.1.4.1.19011.1.3.5.1.3.6.0 - Frequency
Table of contents
Other jacarta Accessories manuals