Jam JT864P-A User manual

1
JAM INTERNATIONAL
PROGRAMMABLE AUTOMATIC
FLAT-BED SEWING MACHINE
JT864P-A
JT864P-A-95
INSTRUCTION MANUAL

2
INDEX
GENERAL FEATURES 4
GENERAL WARNINGS 4
MANUFACTURER RESPONSABILITY 4
MODIFICATIONS 4
IDENTIFICATION PLATE 4
TECHNICAL SERVICE 5
SAFETY 6
TRAINING 6
SAFETY INSTRUCTIONS 6
NOT ALLOWED USE 7
INDIVIDUAL SAFETY DEVICES 7
REMAINING RISKS 7
SAFETY SIGNS 7
MOVING, STORAGE, DISPOSAL 8
MOVING AND TRANSPORTATION 9
LIFTING 9
PACKAGE 9
AIR NOISE 9
USE OF THE MACHINE 10
MINIMUM DISTANCE FOR A PROPER MAINTENANCE 10
CONNECTION TO THE ELECTRIC SYSTEM 11
CONNECTION TO THE PNEUMANTIC SYSTEM 11
MACHINE DESCRIPTION 11
SPECIFICATIONS 11
CONTROL PANEL BUTTON INDEX 12
STARTING 13
MACHINE POSITION AFTER HOME POSITION 14
DOWNLOAD THE SEWING PROGRAM FROM THE USB KEY 14
AUTOMATIC CYCLE 16
THREAD BREAKING 17
BOBBIN WARNING 17
STITCHING TEST 18
LOADING AND STITCHING TEST 19
STITCHING CHECK 19
PROGRAM SELECTION FROM THE MACHINE MEMORY 20
PROGRAM COPY 21
DELETE A PROGRAM FROM THE MACHINE MEMORY 23
PROGRAM TRANSFER FROM THE MACHINE MEMORY TO THE USB KEY 24
PARAMETERS 26
THREAD WINDING ON THE BOBBIN 27
JIGS REPLACEMENT 28

3
LOADING POINT ADJUSTMENT 29
SEWING PROGRAMS ADJUSTMENT 30

4
GENERAL FEATURES
•GENERAL WARNINGS
The machine can be operated exclusively by authorized and trained staff and only after having
read and understood the present manual.
The machine must be used exclusively for the purpose for which it has been produced and with
the respective safety devices working. The manufacturer is not responsible in case of any
different use.
Before doing any maintenance, replacing any part and when moving away from the working place
it is absolutely necessary to deactivate the machine by turning off the main switch, remove the
power cable from the socket and cut the air. Exceptions are possible only in case of set up and
functionality checks made by authorized staff trained on purpose.
Interventions on the electric system must be made only by specialized electricians or by staff
trained on purpose.
•MANUFACTURER RESPONSABILITY
AM INTERNATIONAL is not responsible for any mishap, breaking, accidents due to the missing
knowledge (or non application) of the instructions contained in the present manual. AM
INTERNATIONAL is not responsible as well for modifications, variations and/or installation of non
previously authorized accessories.
Particularly AM INTERNATIONAL declines any responsibility for damages due to:
Natural calamities
Wrong manoeuvring
Maintenance missing
Special interventions or machine overhauls made by non authorized staff
Incorrect use of the machine
•MODIFICATIONS
WARNING! AM INTERNATIONAL reserves the right to modify the machine for any
constructive or functional or commercial exigency, without being bounded to update
opportunely the instructions manual and the parts book.
•IDENTIFICATION PLATE
On the machine frame there is the identification plate
containing the following information:
Manufacturer details
CE mark
Production year
Machine model
Serial no.

5
•TECHNICAL SERVICE
The MANUFACTURER or the SELLER offer to the Customer their Technical Service to solve any
problem regarding the machine use and maintenance.
Any request for service or spare parts must be forwarded to:
JAM INTERNATIONAL s.r.l.
Via G. Perini 2
60010 Ostra Vetere AN – ITALY
Tel +39 071 67872
Fax +39 071 67873
e-mail parts@jaminternational.it
specifying the following:
Machine model
Serial number
Details regarding the faults verified
The checks made
Any other useful information
Part number and description of the required spare parts

6
SAFETY
•TRAINING
WARNIG! The use f the machine is all wed exclusively t auth rized staff pr perly
trained.
For a proper and safe use of the machine it is necessary to have entirely read and understood the
present manual and the attached instructions.
•SAFETY INSTRUCTIONS
Do not try to operate the machine until its functioning hasn’t been clearly understood. Anyway
the use of the machine is allowed exclusively to authorized staff properly trained. Do not allow
unauthorized people and especially children to get near the machine.
Before starting the machine, the operator must check the presence of clear faults on the safety
devices and on the machine and immediately report what found to the person in charge.
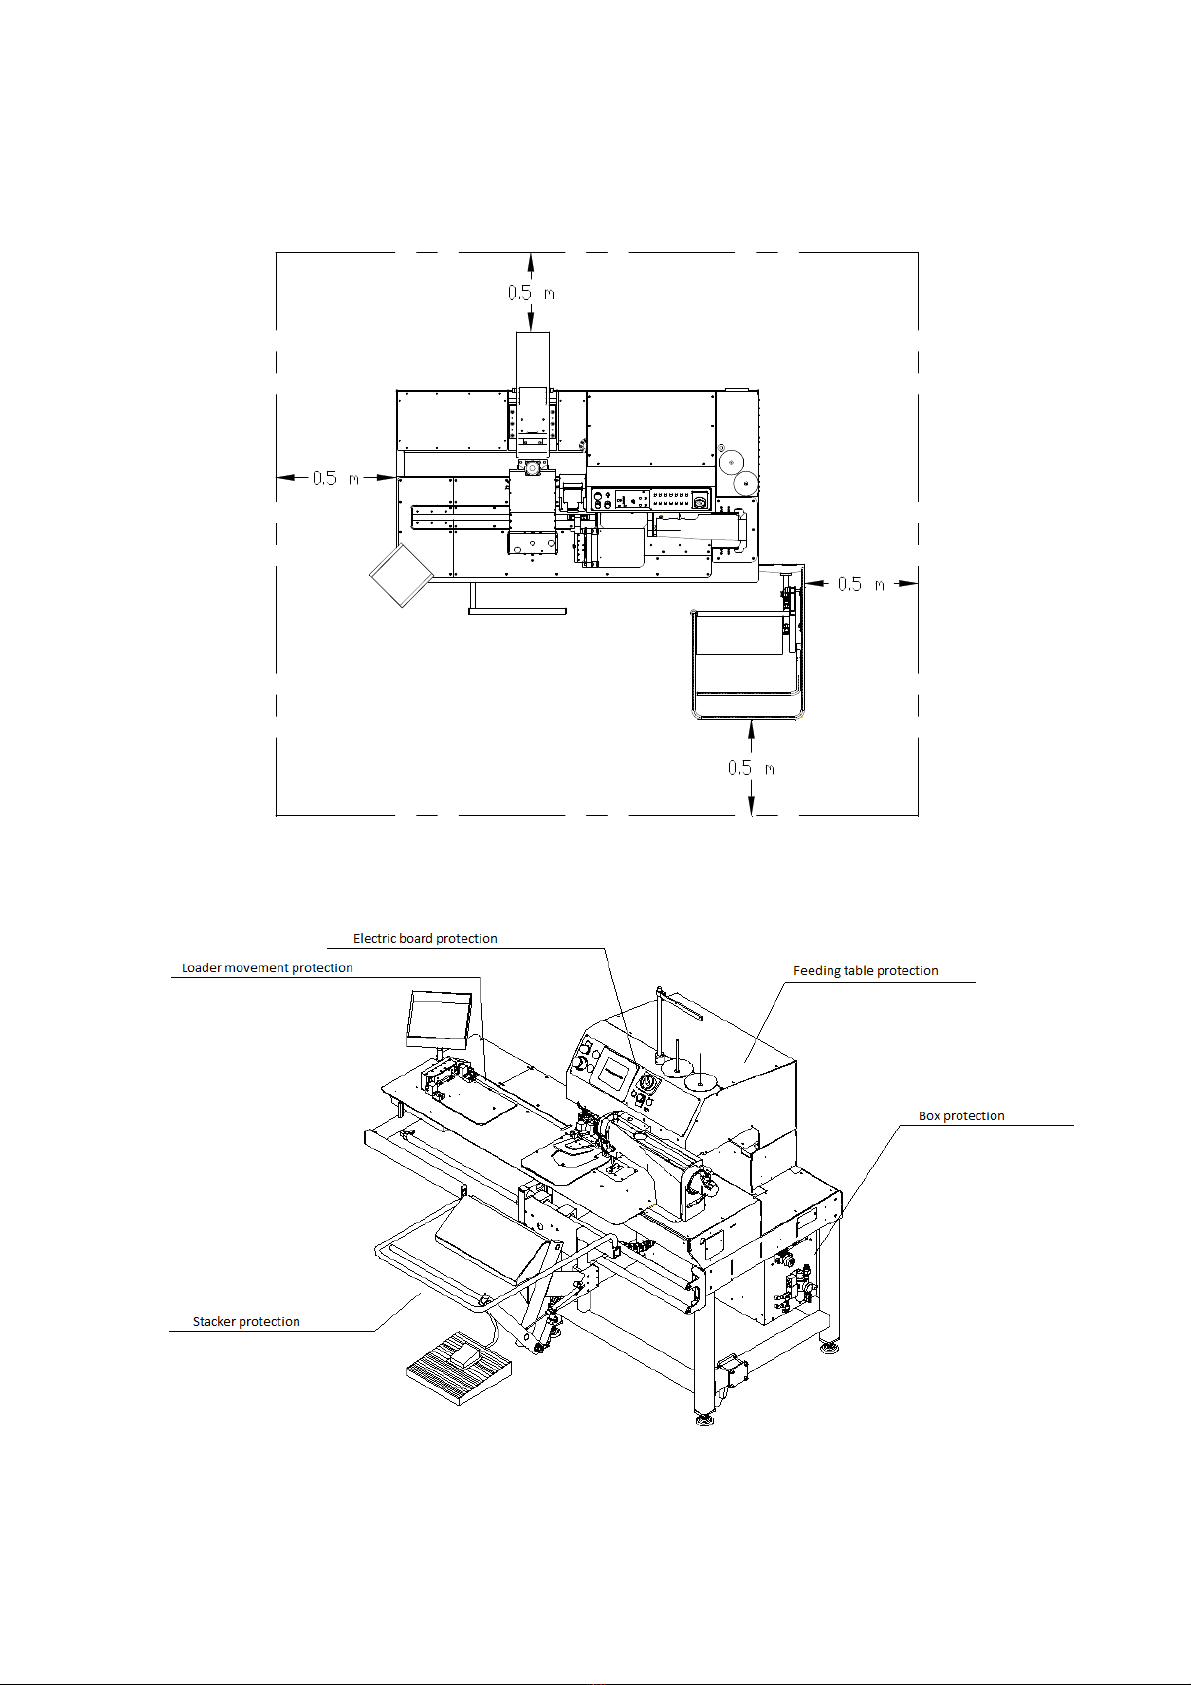
The only working position suitable for the operator is the fabric loading position, that is behind
the fixed safety bar. Do not occupy other positions different from the above mentioned one
during the machine functioning.
Never start the machine before having advised and averted anyone present nearby it.
Do not use the machine while wearing clothes, ornaments or accessories which can get caught on
any moving part. Gather up long hairs under a cap. Wear clothes which allow to bear objects and
tools in closed pockets.
The machine user must know the safety devices installed on it, as well as the respective proper
modalities of use. Check daily the proper functioning of the emergency buttons and of the safety
devices. Never use the machine without its safety devices properly installed and working.
Pay the maximum attention to every danger and prohibition symbol existing on the machine.
Keep every plate with danger and prohibition symbols in perfect conditions, clearly visible and
readable. In case of tear replace them quickly.
Do not operate the machine with damp hands and objects when it is connected to the electric
system.
Replace the parts considered damaged with original ones or in any case authorized by the
manufacturer. Never try hazardous solutions.
It is extremely dangerous to use the machine without its safety devices (emergency button, belt
protection and so on). Never use the machine without the safety devices.
The safety devices rem val is all wed exclusively during the machine maintenance and must be
d ne exclusively buy specialized staff

7
•NOT ALLOWED USE
The machine T864P-A / T864P-A-95 has been produced to be used in the clothing industry to
make seams on jeans and similar and automatic pre-creased pocket setting
The machine must never be used f r n t all wed purp ses r f r purp ses different
fr m th se f r which it has been pr duced. The manufacturer is n t resp nsible f r
impr per use f the machine
•INDIVIDUAL SAFETY DEVICES
During the machine running as well as during the maintenance and clearing operations it is suggested
to use the following individual safety devices: working clothes, shoes with anti-skid sole and gloves.
Wear the protective glasses when using the machine to avoid that, in case of needle breaking, the
possible splinters could hit the eyes.
Use the protective glasses and gloves when using lubricants and greases, in order to avoid the
contact with eyes and skin and the consequent risk of irritations and inflammations
The employer is compelled to provide the operator with the Individual Safety Devices and to inform
him about their proper use and maintenance.
•REMAINING RISKS
The machine has been designed and produced with the suitable devices to assure the maximum
operator safety.
Where remaining risks exist, these are pointed out through proper labels and danger and prohibition
symbols.
•SAFETY SIGNS
On the machine there are some labels showing the following symbols to highlight dangers and
prohibitions existing on the machine:
ELECTRIC DANGER
This symbol points out the existence of a danger caused by the electric power
HANDS CRUSHING DANGER
PROTECTION REMOVAL PROHIBITION
This symbols points out the prohibition to remove the safety devices

8
MOVING – STORAGE – DISPOSAL
WARNING! Any machine transp rt, m ving and st rage perati n described in this
chapter must be carried ut exclusively by qualified staff having suitable kn wledge
t perate safely f rklift trucks, crane trucks and anything else necessary t the
purp se
•MOVING
To avoid that any part may hurt the persons in case of machine fall, be sure that during the lifting
and moving operations there are no persons inside the action range of the lifting machines.
To lift up and move the machine it is necessary to use suitable means of transport according to its
weight.
Before starting moving the machine, check its stability.
•STORAGE
In case of long storage, keep the machine in a dry place, sheltered from rain and wind.
Protect well the electrical parts from the dust and from external agents.
The machine may suffer heavy damages if, while waiting for the installation, it is kept in
environments with critical temperatures. Never expose it to temperatures lower thatn –10° C and
higher than +60°C.
Do not deposit the machine or its parts in structures which have not been suitably built.
It is forbidden to put on the machine any material or equipments.
•DEMOLITION AND DISPOSAL
The disposal of the waste which comes out from the machine demolition must be carried out
respecting the environment, avoiding to pollute the ground, the air and the water.
For a proper disposal it is necessary to respect the local laws in force.

9
MOVING AND TRANSPORTATION
•LIFTING
WARNING :
The lifting operation must be carried out with the maximum care and by AUT ORIZED STAFF only.
During the lifting operations no unauthorized people are allowed to stand nearby.
To lift up and to position the machine use a forklift truck of proportionate dimensions and sturdiness.
Insert the forklift under the machine, be sure to take it for the entire width, fasten it well with belts
or ropes and lift it paying attention that it doesn’t tilt on one side.
•PACKAGE
The kind of package may be different according to the machine, the mean of transport and the
destination.
In a wooden crate in case of transport by sea or by air.
Wrapped in a protection film to be transported with road vehicles.
•AIR NOISE UTTERED BY THE MACHINE
The machine described in this manual does not represent a risk factor itself as the peak level of the
acoustic pressure on the workplace is minimum.
Therefore the possible high level of acoustic pressure existing in the environment where the machine
runs cannot be charged to it.
The weighed ac ustic pressure level n the w rking stati n d es n t exceed 70 dB(A)

10
USE OF THE MACHINE
After having unpacked the machine put it in its working place in a flat and stable position.
•MINIMUM DISTANCES FOR A PROPER MAINTENANCE
Leave a free space of at least 50 cm on each side of the machine
It is extremely dangerous to use the machine without its safety devices (emergency button, belt
protection and so on). Never use the machine without the safety devices.
The safety devices rem val is all wed exclusively during the machine maintenance and must be
d ne exclusively buy specialized staff.

11
•CONNECTION TO THE ELECTRIC SYSTEM
Connect the power cable to the socket.
WARNING:
Be sure that the p wer tensi n c rresp nds t the ne indicated by the manufacturer in the
specificati ns written n this manual.
Be sure to connect properly the earth cable. If the connection of the earth is not safe, there could be
the risk to get an electric shock and some problems with the correct machine functioning could
occur.
Use the machine in areas electric/electromagnetic noise sources free. Such disturbs could cause
problems to the correct machine running.
In case of lightning or electric storms, switch off the machine and disconnect the power cable from
the socket to avoid functioning problems or damages to the machine.
•CONNECTION TO THE PNEUMATIC SYSTEM
Connect the air pipe to the quick pipe fitting located on the pressure governor, let the air in and
check that the air gauge signals a maximum pressure as described in the specifications.
If necessary adjust the pressure on the correct value by lifting and turning the knob of the pressure
governor clockwise to increase it or anticlockwise to reduce it.
Block the knob when the air gauge indicates a correct pressure.
MACHINE DESCRIPTION
•MODEL
T864P-A / T864P-A-95 Automatic programmable pocket setter on shirts, with folding group and
automatic stacker, lockstitch, controlled by touch screen panel.
•SPECIFICATIONS
M del T864P-A / T864P-A-95
Electric p wer 220 V – L+N+Ground
Wrking air pressure U.M. [bar] [MPa] [Psi]
Pressure 6 0.6 87
Weight 354 kg
Dimensi ns [WxDxH] 1890 x 1720 x 1750 mm

12
CONTROL PANEL BUTTON INDEX
Fig 1. SCREEN
1. Number of stitches on the stitching program
2. Stitching speed
3. Program name
4. Program number
5. ----
6. Program file
7. Bobbin counter reset
8. Bobbing counter setting
9. Stacker button
10. Jig change button
11. Setting button
12. Manual forward movement button
13. Stitching test button
14. Manual backward movement button
15. Reset button
16. Automatic button
17. Warnings

13
1STARTING
Check that the emergency is over and everything is in order.
1.1 Switch on the machine by turning the main switch from
OFF to ON
Fig. 2
1.2 Press the green button, the green screen will appear as
in fig. 3
Fig. 3
1.3 Press the touch screen in the centre as pointed out by
the arrow (fig.2), the Home screen will appear as in fig.
4
Fig. 4
1.4 Press simultaneously the start buttons (positioned on the
right and left side of the panel holder bar as shown in
fig. 5). The machine will move to its home position and
will lift up the needle and the presser foot.
Fig. 5
1.5 The home screen will appear as shown in fig. 6
Fig. 6

14
2MACHINE HOME POSITION
When the machine is in its home position the loader is set in its back position, the upper loader clamp sensor is set on ON,
the upper external clamp sensor is set on ON, the internal fixed or retractable clamp sensor is set on OFF, the presser foot
and the needle are lifted up.
3DOWNLOAD THE SEWING PROGRAM FROM
THE USB
3.1.1 Insert the USB key in the USB device
3.1.2 While the automatic button is deactivated, press
the pedal until the screen will appear as in fig. 7
Fig.7
3.2 OPTION 1
3.2.1 Press the button “open” , the screen will appear
as in fig. 8
Fig.7
3.2.2 Press the button “CN IN” , the screen will appear
as in fig. 9, check that the USB icon is green
while the USB key is still connected
Fig.8
3.2.3 Select the program by using the arrows, press the button “open” and wait for the file transfer to be completed
3.2.4 Repeat the operation described on 3.2.3 to insert another program or press the button to go back to the screen as
in fig. 8
3.2.5 Highlight the program to be executed by using the arrows, press the button “open” and the home screen will
appear as in fig. 4
3.2.6 Press the button “reset” to get back to the main screen (Fig. 6)

15
3.3 OPTION 2
3.3.1 Press the button “setting” , the screen will appear
as in fig.10
Fig.9
3.3.2 Press the button “CN IN”
3.3.3 Select the program by using the arrows and press the button “open”
3.3.4 Repeat the operation described on 3.3.3 to insert another program
3.3.5 Press the button “Exit” , the home screen will appear (fig.4)
3.3.6 Press the button “reset” to get back to the main screen (fig. 6)

16
4AUTOMATIC C CLE
4.1 STACKER
4.1.1 On the main screen (fig.6) press the button “stacker” to choose to use it or to deactivate is (green=activated /
red=deactivated)
4.2 WORKING MODE
4.2.1 On the main screen press the button “automatic” (green= activated / red=deactivated)
4.2.2 Once activated the “automatic” button, set the fabric panel under the loading clamp
4.2.3 Press the pedal to lower or to lift up the loading clamp in order to adjust correctly the fabric panel position
4.2.4 Set the pre - creased pocket inside the loading clamp shape.
4.2.5 Press simultaneously the “start” buttons (fig.5)
4.3 CYCLE SEQUENCE
4.3.1 After pressing the “start” buttons the loading clamp moves on the “loading point” (under the sewing clamps)
4.3.2 The internal sewing clamp lowers
4.3.3 The loading clamp lifts up
4.3.4 The loader moves to the home position
4.3.5 The external sewing clamp lowers
4.3.6 The sewing cycle starts
4.3.7 Once the sewing cycle has been completed, if the stacker is activated, the garment will be automatically stacked. If
the stacker is deactivated the garment must be stacked manually.
4.3.8 While the machine is stitching and the loader is in home position, it is possible to load another garment in order to
work in sequence.

17
5THREAD BREAKAGE
5.1 When the thread sensor is activated, if a needle thread breakage occurs or in case the thread is finished , the machine
stops automatically.
5.1.1 Restore the thread
5.1.2 Press the button “manual movement backward” or the button “manual movement forward” to move to
the chosen position, then press simultaneously the “start” (fig.5)
If the machine shows again the same warning, check carefully the thread position, the needle position and the hook timing,
then repeat the operations described on 5.1.2.
6BOBBIN WARNING
6.1 BOBBIN WARNING SET UP
6.1.1 Press the button “pre – set bobbin counting” on the main screen ( Fig. 6 ) (circled in red), a
numerical keyboard will appear
6.1.2 Set the chosen number (corresponding to “stitches number”)
6.1.3 Press “ENTER” to confirm, go back to the previous screen
6.2 BOBBIN WARNING
6.2.1 When during the seam the bobbin counting reaches the set number, once the seam is finished the machine stops and
on the “warning string” (17) the words “BOBBIN WARNING” will appear
6.2.2 Replace the bobbin and check the correct threading.
6.2.3 Clear the counting by pressing twice the button “bobbin”
6.2.4 Resume work normally
6.2.5 If the problem arises again, repeat the operations described on 6.2..2, 6.2.3, and 6.2.4

18
7STITCHING TEST
7.1 SEAM CHECKING
7.1.1 Deactivate the button “automatic” and press the button “TEST” on the main screen ( Fig. 6 ). The “TEST”
button will keep pressed.
7.1.2 Press the pedal until the screen as Fig. 7 appears. The sewing clamps will lower. Pressing again the pedal the
sewing clamps will lift up.
7.1.3 Press simultaneously the “START” buttons ( Fig.5 ), the sewing clamps will move to the stitching start point.
7.1.4 Press the button “manual forward movement” to go ahead on the seam path.
7.1.5 Pressing the pedal after a few movements, it is possible to lower and to lift up the presser foot.
7.1.6 Check that during the seam, the needle and/or the presser foot do not hit the sewing clamps.
7.1.7 To get back on the seam path press the button “manual backward movement” .
7.1.8 Pressing the pedal while pressing the button “manual forward movement” or the button “manual backward
movement”, the seam path will be executed faster.
7.1.9 Once the seam path has been checked, press the button . The machine will get to its home position and the
button “TEST will be automatically released.
7.1.10 If the seam path is not correct or not satisfactory, read CAREFULLY the chapter “SEWING PROGRAM
ADJUSTMENT.

19
8LOADING AND STITCHING TEST
8.1.1 Deactivate the button “automatic” and press the button “TEST” on the main screen ( Fig. 6 ). The “TEST”
button will keep pressed.
8.1.2 Press the button “AUTOMATIC” on the main screen (Fig. 6) to enable it.
8.1.3 Once the button “AUTOMATIC” has been activated set the fabric panel under the loading clamp.
8.1.4 Press the pedal to lower/lift the loading clamp in order to adjust properly the fabric panel position.
8.1.5 Set the pre – creased pocket inside the loading clamp shape.
8.1.6 Press simultaneously the “START” buttons
8.1.7 After having pressed the “START” buttons , the loading clamp moves to the loading point (under the sewing
clamps)
8.1.8 The internal sewing clamp lowers
8.1.9 The loading clamps lifts up
8.1.10 The loader moves to the home position
8.1.11 The external sewing clamp lowers
8.1.12 The sewing clamps move to the stitching start point.
8.1.13 Check that the pocket is positioned at the centre of the external sewing clamp.
8.1.14 Execute the operations described from 7.1.4 to 7.1.9
8.1.15 If the loaded pocket position is not correct read CAREFULLY the chapter “LOADING POINT ADJUSTMENT”.
9STITCHING CHECK
9.1.1 Deactivate the button “AUTOMATIC” and press the button “TEST” on the main screen ( Fig. 6 ). The
“TEST” button will keep pressed.
9.1.2 Set a piece of fabric under the sewing clamps.
9.1.3 Press the pedal until the screen as in Fig. 7 appears. The sewing clamps lower.
Pressing again the pedal the sewing clamps lift up.
9.1.4 Press simultaneously the “START” buttons (Fig. 5), the machines performs the sewing cycle.

20
10 PROGRAM SELECTION FROM THE MACHINE
MEMOR
10.1.1 Deactivate the “AUTOMATIC” button , press
the pedal until the screen as in fig. 7 appears.
Figura 7
10.1.2 Press the button “OPEN” . The screen as in fig.
8 appears.
Figura 8
10.1.3 Select the program from the list by using the arrows.
10.1.4 Press the button “FILE” . The screen as fig. 4
appears.
Fig.4
10.1.5 Press the button “RESET” to get back to the main screen (Fig. 6).
10.1.6 Check the strings on “PROGRAM NUMBER (4) and “PROGRAM NAME”(3) that the program loaded is correct.
This manual suits for next models
1
Table of contents
Popular Sewing Machine manuals by other brands

emerio
emerio SEW-121820 instruction manual

Kenmore
Kenmore OVERLOCK 385. 564180 owner's manual

Singer
Singer 150W3 Instructions for using and adjusting

U.S. BLIND STITCH
U.S. BLIND STITCH 1118 Series Installation and operating instructions

Tivax
Tivax FHSM-505 instruction manual

Duerkopp Adler
Duerkopp Adler 550-12-23 Service instructions