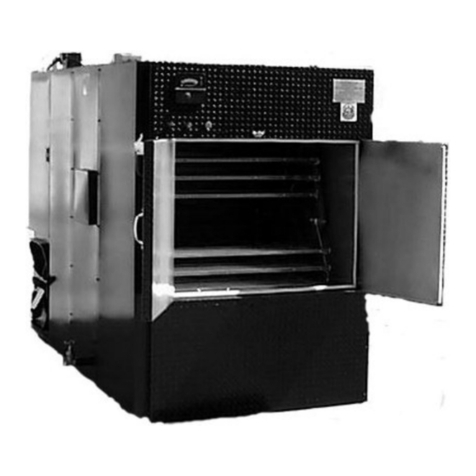
J&R Wood Show Broiler Operation manual

J&R MANUFACTURING, INC.(972) 285-4855 (Texas)
820 W. Kearney, Suite B (800) 527-4831 (All 50 States & Canada)
P. O. Box 850522 (972) 289-0801 (Parts & Service)
Mesquite, TX 75185-0522 (972) 288-9488 (Fax)
OPERATIONS AND SERVICE MANUAL

SN _______________

WARNINGS!
Disposal of Ashes
Ashes should be placed in a metal container with a tight-fitting lid. The closed
container of ashes should be placed on a noncombustible floor or on the ground,
well away from all combustible materials, pending final disposal. If the ashes are
disposed of by burial in soil or otherwise locally dispersed, they should be
retained in the closed container until all cinders have thoroughly cooled.
−−−−−−−−−−−−−−−−−−−−−−−−−−−−−−−−−−−−−−−−−−−−−−−−−
Creosote – Formation and Need for Removal –
When wood is burned slowly, it produces tar and other organic vapors, which
combine with expelled moisture to form creosote. The creosote vapors condense
in the relatively cool chimney flue of a slow-burning fire. As a result, creosote
residue accumulates on the flue lining. When ignited this creosote makes an
extremely hot fire. The chimney connector and chimney should be inspected at
least twice monthly during the heating season to determine if a creosote buildup
has occurred. If creosote has accumulated it should be removed to reduce the
risk of a chimney fire.
−−−−−−−−−−−−−−−−−−−−−−−−−−−−−−−−−−−−−−−−−−−−−−−−−
Exhaust Hood Required
This unit MUST BE INSTALLED under a Class 1 exhaust hood with an approved fire suppression
system
−−−−−−−−−−−−−−−−−−−−−−−−−−−−−−−−−−−−−−−−−−−−−−−−−
DANGER-Risk of Fire or Explosion
Do not burn garbage, gasoline, drain oil or other flammable liquids
−−−−−−−−−−−−−−−−−−−−−−−−−−−−−−−−−−−−−−−−−−−−−−−−−
WARNING-Risk of Fire
Do not operate with fuel loading doors or ash removal drawers open.
Do not store fuel or other combustible material within marked
installation clearances.
Inspect and clean flues and chimney regularly
−−−−−−−−−−−−−−−−−−−−−−−−−−−−−−−−−−−−−−−−−−−−−−−−−
CAUTION-Hot Surfaces
Keep children away
Do not touch during operation


WOOD SHOW BROILER
OPERATIONS AND
SERVICE MANUAL
MANUFACTURED BY:
J & R MANUFACTURING, INC
Rev. 09-17


CONTENTS
WOOD SOURCE ...............................................................................7
WARRANTY ......................................................................................6
WORDS OF CAUTION & CLEANING AND ASH REMOVAL ............................4
VENTING INSTRUCTIONS ....................................................................1
INSTALLATION...................................................................................2
MAINTENANCE AND SUGGESTIONS.......................................................5
OPERATING PROCEDURES..................................................................3


VENTING INFORMATION
B. For Canopy-type commercial cooking hoods the inside edge thereof shall
overhang or extend a horizontal distance of not less than six (6) inches
beyond the edge of the cooking surface on all open sides, and the vertical
distance between the lip of the hood and the cooking surface shall not
exceed four (4) feet.
In all cases, it is imperative to obtain the approval of the AHJ (Authority Having
Jurisdiction). This will typically be the mechanical inspection department of the
local municipality’s building inspection division and/or the local fire marshal.
C. A grease duct serving a Type 1 Hood shall be constructed of at least 0.054
inch thick (No. 16 Manufacturer’s Standard Gauge)steel or at least
0.043inch thick stainless steel (No. 18 MSG). Duct enclosures for grease
duct shall be constructed as the Building Code requires. Duct
enclosures shall be of at least one-hour fire-resistive construction in
all buildings and shall be of 2-hour fire-resistive construction in
buildings with four or more stories.
1
Notes :
1. Exhaust volume should be determined by the exhaust hood
manufacturer based on their products listing and local code
requirements. States such as California, Oregon, Washington, and
Connecticut all have code driven maximum exhaust volumes for specific
equipment. For example: California mandates that solid fuel exhaust
hoods for a wall mounted application can use NO MORE than 385 cfm/lf
for solid fuel.
2. Spark arrestor type filters are required
3. Hoods serving solid fuel equipment must be dedicated to solid fuel
only (no gas or electric) with their own dedicated fire protection system.
A. Exhaust hoods should be
Listed, Type 1 hoods with automatic fire
suppression systems and conform to NFPA 96 requirements.
D. Exhaust hood volume should be based on the specifications from the
2009 (or later) International Mechanical Code Section 507.

2
INSTALLATION
SHIPPING:
The Wood Show will be shipped fully assembled. The grates will be packed inside the unit,
along with the casters.
HANDLING:
The unit can be handled with a forklift with a 4000 pound capacity (larger, custom Wood
Shows may require a larger forklift). Install the casters on the unit while the forklift is available,
then it can be rolled into place.
CLEARANCE:
The unit must be installed to conform to the following minimum clearances (in inches):
From non-combustible walls:
Back and sides: 0
Front: 48
From combustible walls :
Front: 48”
Back and sides:
With no upper enclosure panels: 48
With upper enclosure panels: 2
Unit to be installed on a non-combustible floor.
GRATES AND GRATE FRAME :
Remove all items packed inside the unit. If your unit has a moveable cooking surface (with
lifting wheel), carefully allign the cables on the wheel shaft while the grate frame is resting on
the firebox floor, with no grates installed. Slowly turn the wheel to begin lifting the grate frame,
taking care to ensure that the cables spool onto the shaft without overlapping. The right and left
cables should simultaneously begin to lift their respective sides. If the grate frame is not level,
lower it and begin the lift again, adjusting the cable track to ensure a level frame. Install the
grates on the grate frame.

3
OPERATING PROCEDURES
Cooking on the Wood Show Broiler is practically the same as using a backyard
grill. A little common sense and basic cooking knowledge will go a long way
toward successful use of an open pit grill.
fire place. We recommend that kindling or safe (low volatility) solid fire-
NEVER USE VOLATILE CHEMICALS SUCH AS CHARCOAL LIGHTER
FLUID, GASOLINE, GREASE, ETC.TO START A FIRE SERIOUS
INJURY MAY OCCUR.
2. Most novices with a grill will build a much larger fire than is needed. The
fire should be large enough to cook properly with the food grate (or grill)
level with the top rim of the firebox. A quick and accurate measure of the
temperature of the fire is to hold your palm close to the cooking surface. If
you have to remove your hand within 2 seconds you have a (700° to 800°
F); 4 seconds, medium (300° to 400° F); 6 seconds, slow (190° to 250° F).
Here follows basic information for grilling various products:
FOOD FIRE SPECIAL COOKING TIME
Beef Steak 1” Well Done Slow Use Spatula, not fork 15 to 20 minutes
Beef Steak 1” Rare Hot Turn for marking 8 to 10 minutes
Pork Spareribs Med Hot Watch Carefully 1 to 1 ¼ hours
Chicken-half Med Bone down 1st 20
min.
45 to 50 minutes
Chicken-whole Med Breast up 1 ¼ to 1 ½ hours
Fish-Firm Fleshed Med Hot Brush & baste often 6 to 8 minutes
Fajita ¼” thick Med Hot Beef-Skirt Steak 2 to 3 min./side
3. Since cooking over an open flame (grilling) is a dry-heat method of cooking,
it is sometimes advantageous to marinate the food in an acidic
(vinegar, wine, fruit juice) marinade prior to grilling.
1. Building a fire in an open pit broiler or grill is practically the same as in a
starting blocks be used with small chunks of wood or with charcoal.
Adjust the air control damper on the ash drawer to the full open position
to allow additional air to be pulled into the firebox.
Turn on the exhaust fan before lighting the fire.
Once the fire becomes established, add larger wood. It is recommended
that the fire be built in the center of the firebox and then spread.

4
1. Your new Wood Show Broiler employs the use of “Chef-Cool Insulation”.
This consists of 2” of castable 2500° F refractory material forming the
interior walls, plus 2 inches of high temperature fiberglass insulation
between the refractory material and the outside wall of heavy-duty steel
treadplate. BUT—a word of caution: Do not throw logs of wood against the
inside cast walls…even though it’s very tough and rugged, repetitious hard
shocks may eventually cause cracks in the wall and require patching.
2. Do not let the flames get too high, this will cause not only the burning of
foods, but warpage of grate and possible weakening of the lifting cable.
3. Do not let the adjusting wheel free-fall, as this might snap the cable, or
weaken it.
4. Clean the grate surface after each use and grease well.
5. Do not turn the product until it has been on the grill long enough to seal
over, otherwise, the meat will stick to the surface.
6. Do not allow hot ashes and coals to remain in contact with the grate frame
(or grate frame legs if your unit employs a grate frame with legs). This will
cause premature failure of the steel due to heat corrosion.
Do not dump the ashes until you are sure that no embers remain.
Ashes can remain alive for several days.
WORDS OF CAUTION
Remove accumulated ash regularly, and use a metal receptacle only!
CLEANING /ASH REMOVAL / MAINTENANCE
Keep unit clean, wipe off during and after use.
Inspect the lifting cables regularly; replace if frayed.
Never
use water or ice to put out a fire. Repeated thermal shock will
cause the refractory to crack requiring replacement or repair.

5
HINTS AND SUGGESTIONS
A. Always remove meats from refrigerator 20 to 30 minutes prior to grilling.
B. Keep a water spray handy to quench flare-up.
C. It is often good to have a cover (such as a domed plate cover) to place over
items in which you may want extra smoke or moisture.
D. It is often best to pre cook (par-boil or microwave) some vegetables such as
potatoes, whole onions, rutabagas, carrots, etc., prior to kabobing.
E. If a marinade is heavy with sugar or syrups, it is best to baste for the last
few minutes only, to avoid caramelizing and burning.
F. Always test the doneness of your food. Chicken must be checked at the
thigh and leg joints for doneness. A sharp fork inserted should let clear
juices escape. Fish should be flaky when tested or in the case of swordfish
firm when pressed.
G. Never try to grill fish thinner than one (1) inch in thickness as it will dry
out rapidly. Fish must be brushed often with olive oil, lemon butter, etc.
H. By cooking with the food grill raised up and above the fire enclosure, you
will lose heat and smoke. This will waste wood. Raise the food grate by
turning the wheel on the Wood Show Broiler.
I. Keep the grates clean and oiled. A large onion speared on a cook’s fork
and dipped into oil is a flavorful and easy way to oil the grates between
cooks.

WARRANTY
1. This warranty does not apply if problems or claims are the result of: (a)
damage in transit (equipment becomes owner’s property upon shipment
from factory and owner must file claim with transport company); (b)
misuse, neglect, improper maintenance, and or unauthorized alterations
to equipment; (c) improper installation of exhaust stacks, air supply, and
extraneous exhaust systems; (d) improper voltage hook-up; (e) wind, rain,
hail, fire and acts of God.
5. The removal of manufacturer’s nameplate(s) voids the warranty.
contact its authorized service agency. If no authorized service agency is
available, please recommend a service company. The use of a service company
not specifically authorized by our Service Department at factory
headquarters may invalidate this warranty.
3. In the event it is necessary to use a service company, the factory will
checks as requested. Most problems are quick and easy to pinpoint and
resolve.
2. Cooperate with our Service Department by making certain visual
It is the aim of J & R Manufacturing, Inc. to build the finest equipment possible and to
facilitate quick solutions to all problems that might arise with the lowest expense
possible to the user(s). To help us achieve this goal, please follow these procedures:
a problem. Have ready the Model and Serial Number of your
equipment.
1. Telephone our service department at 972-289-0801 at the first sign of
3. Labor to remove, replace, or repair defects under this warranty
must be authorized by factory. Premium time (overtime) and
travel time are not included in the warranty.
J & R MANUFACTURING, INC. warrants its equipment against defective parts and
workmanship under normal use and when installed in accordance with
manufacturer’s recommendations for a period (after date of shipment*) of twelve
(12) months on parts and ninty (90) days on labor with the following provisions:
2. In-warranty replacement parts will be credited only upon receipt
and inspection of defective parts at the factory. All shipping
charges are the responsibility of the owner,but, at the discretion
of J&R Manufacturing, ground shipping charges may be waived or
credited.
4. Sales, excise, and other taxes, food loss, and down-time are
not covered under this warranty.
* or provable start up date, whichever is later (start up must be within 12 months of ship date)
Revised
04-01-2017
6

• Commercial: Ask for Rick
• Residential: Ask for Janice or Marie
Arnold Bros. Forest Products Inc.
201 N. Beltline Road, Irving, TX 75061
Phone: (972) 986-6339
Fax: (972) 790-1176
www.abfpinc.com
Serving the Dallas / Ft. Worth Metroplex’s finest
restaurants, as well as throughout the U.S. and
abroad since 1976.
Cooking woods available:
Oak – Pecan – Hickory – Mesquite
For delivery: Call (972)986-6339
1
7

This manual suits for next models
1
Table of contents
Other J&R Grill manuals
Popular Grill manuals by other brands

Outback
Outback ONYX 4 Burner Assembly and operating instructions

Electrolux
Electrolux ZANUSSI RCZ32-BL user manual

Barton
Barton 95541 Owner's manual and safety instructions

Proluxe
Proluxe Edge Plus Operation manual

Barbeques Galore
Barbeques Galore STS2611ALP Operator's manual

Klarstein
Klarstein Hannibal manual

Kenmore
Kenmore Elite 146.33578410 Use & care guide

Landmann
Landmann Smoky Mountain 591300 Assembly and operating instructions

KitchenAid
KitchenAid 720-0954R (LP) Installation Instructions and Use & Care Guide

Kenmore
Kenmore ELITE 141.157941 manual

Burns & Barkles
Burns & Barkles 013900 operating instructions

Garland
Garland XG24-JIB Installation and operation manual