janome.com • janome.ca
Page 2
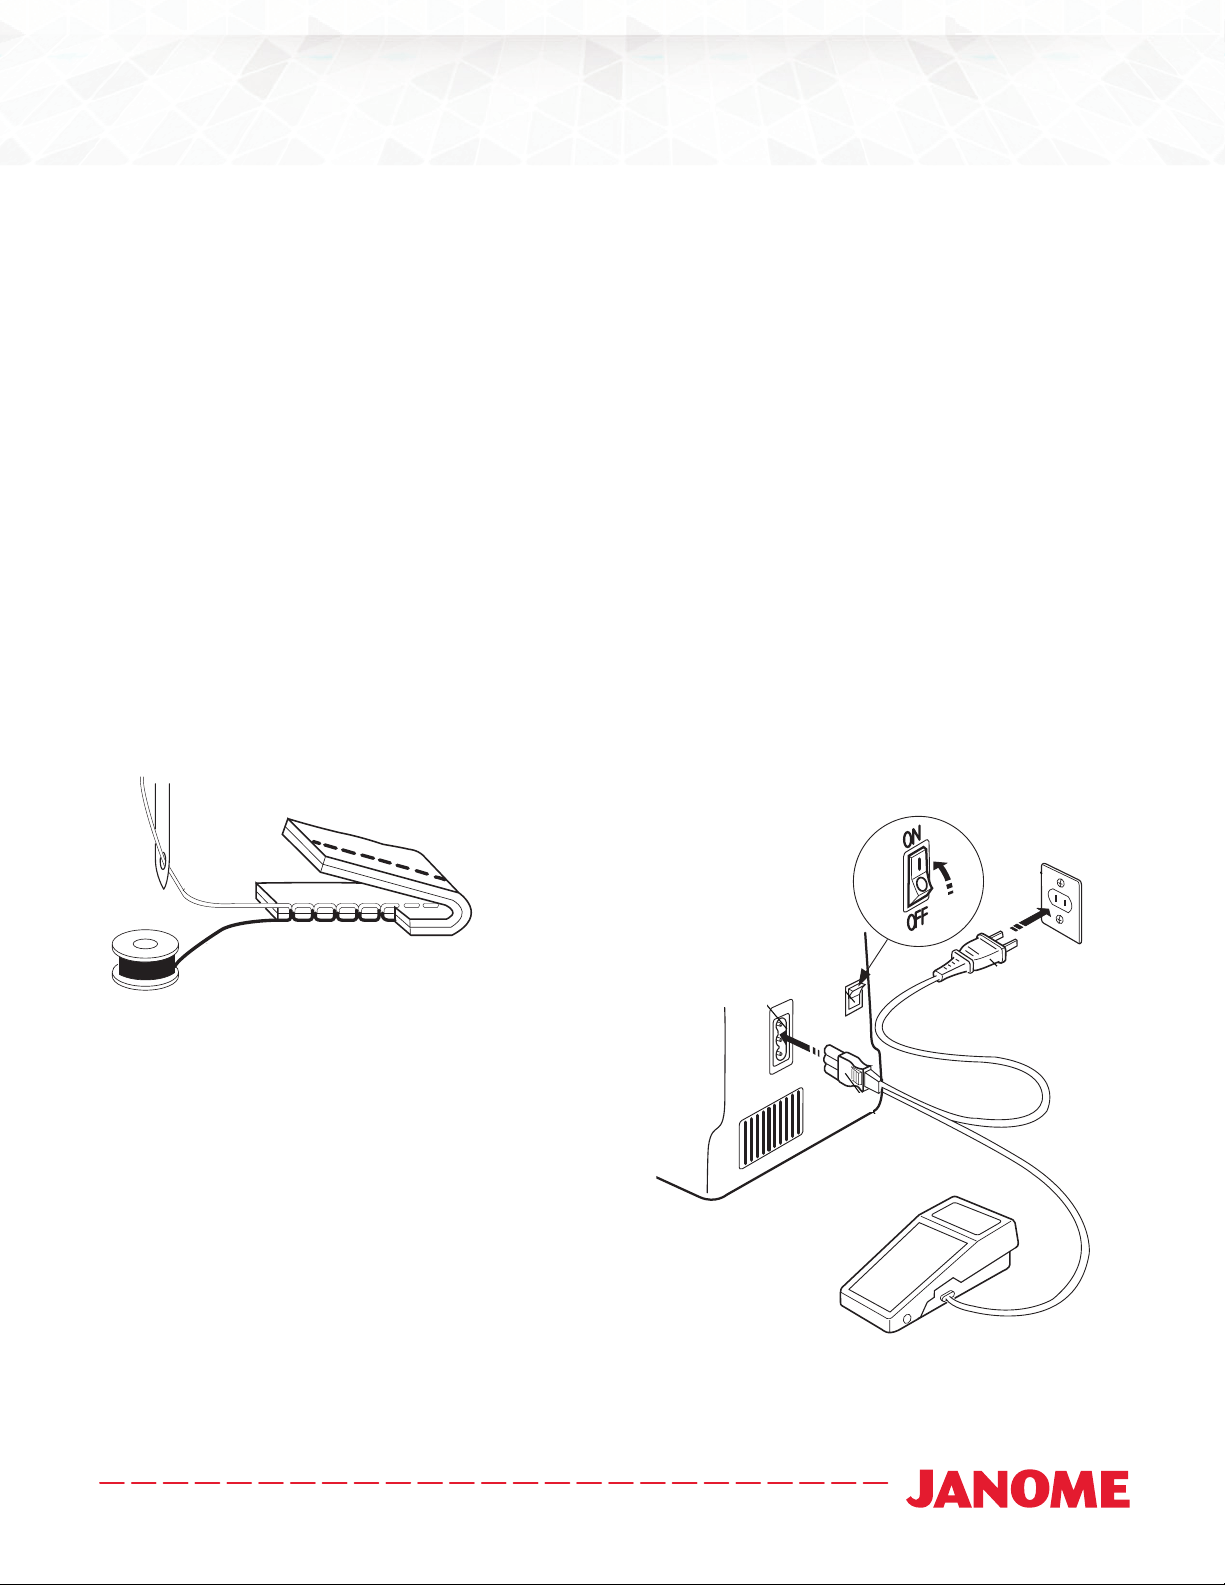
Picking up the Bobbin Thread
Before you begin to sew, the bobbin thread needs to be pulled up
onto the sewing bed. Gently hold the needle thread and turn the
handwheel towards you. In approximately two rotations, you will
see the bobbin thread looped around the needle thread. Using your
fingers, grab the bobbin thread and pull up a 6” length.
Hold the needle
thread lightly with
your left hand
Raise
presser foot
Pull up
bobbin thread
Pull both threads back and
under the presser foot
1
2345
1
2
3
4
Bobbin Threading
Before inserting the bobbin into the bobbin case, hold the bobbin in your hand and make sure that the
thread is coming off the bobbin in
a counterclockwise direction (it should look like a “P”).
This will allow
the bobbin thread to move correctly and to stay lodged in the bobbin tension guide.
Turn the power on.
Press the neelde up/
down button twice.
Getting Started Guide
Using the Needle Threader
Raise the needle to its highest position. Pull down the needle threader knob as far as it will go. Turn the
knob in the direction of the arrow in the second illustration, then insert the Hook into the needle eye.
Lead the thread around the Guide and under the Hook. Turn the knob in the direction of the arrow in the
third illustration, drawing the thread loop through the needle. Pull the thread through the needle eye.
F
C
CONNECTING TO POWER SUPPLY
QUICK START CHECK GUIDE FOR SEWING
• Always use good quality thread
• Use the correct size/type of needle
for the fabric you are stitching.
(We recommend Janome or
Schmetz needles.)
• Wind the bobbin evenly on
the machine
• It is essential to use the correct
bobbins as generic bobbins may
cause damage to your machine.
Before connecting the power cord, make
sure the voltage and frequency shown
on the machine conform to your power.
1. Turn off the power switch.
2. Insert the machine plug into the
machine socket.
3. Insert the power supply plug into
the outlet.
4. Turn on the power switch to turn
on the power and sewing light.
Power supply plug
A
A
B
D
E
Machine socket
D
Power switch
2
B
Machine plug
2
E
Outlet Socket
3
C
Foot control
3
6
F
The spool pins are used for holding
the spool of thread in order to feed
thread to the machine, To use, pull up
the spool pin. Push down for storage.
SETTING SPOOL PINS
If you are experiencinga problem with your machine it is important to check the
above procedures before returningit to the store. Should you have any queries
please contact our Customer Service Department helpline on 0161 666 6011.
TOP TIPS
ALWAYS TURN THE HANDWHEEL TOWARDS YOU
– Counter clockwise.
NO POWER
Check main power supply is turned on, foot control is connected.
MACHINE NOT FEEDING FABRIC
Check the Feed Dogs are raised and clean. These are the teeth under the presser
foot that feed the fabric when stitching. When the drop feed lever is moved from the
lowered position to the raised position the feed teeth do not come up at the needle
plate until you turn the balance wheel towards you.
Check stitch length is set for the correct weight of fabric
SKIPPED / BAD STITCHING:
Rethread the machine with the presser foot raised and the take up
lever in the highest position. Follow the threading guides and check
the thread is in the take up lever.
Check – the needle is inserted correctly, (flat side to the back)
Check – the needle is not bent or blunt and is the correct type of needle
Check – the tension setting is correct (average setting for a straight stitch is approx. 4)
Check – the tension disc area is clean
Check – the bobbin is placed in bobbin case correctly
Follow these simple steps and you’ll soon be enjoying your new project…
Happy Sewing!
USING THE NEEDLE THREADER
1
2
Raise the needle to its highest
position. Pull down the needle
threader knob as far as it will go.
Pull the thread
through the
needle eye.
4
3Turn the knob in the direction
of the arrow in the illustration,
drawing the thread loop
through the needle.
Turn the knob in the direction of
the arrow in the illustration, then
insert the Hook into the needle
eye. Lead the thread around the
Guide and under the Hook.
DRAWING UP THE BOBBIN THREAD
Raise the presser foot and hold the
needle thread lightly with you left hand.
Pull 15 cm (6”) of both threads
back and under the presser foot.
Turn the heandwheel slowly toward you with your right hand
until the needle goes down and continue turning the handwheel
until the take-up lever is at its highest position, Lightly draw up
the needle thread forming a loop of the bobbin thread.
101-980-009 (E)
Hook
Guide
1
2
3
F
C
CONNECTING TO POWER SUPPLY
QUICK START CHECK GUIDE FOR SEWING
• Always use good quality thread
• Use the correct size/type of needle
for the fabric you are stitching.
(We recommend Janome or
Schmetz needles.)
• Wind the bobbin evenly on
the machine
• It is essential to use the correct
bobbins as generic bobbins may
cause damage to your machine.
Before connecting the power cord, make
sure the voltage and frequency shown
on the machine conform to your power.
1. Turn off the power switch.
2. Insert the machine plug into the
machine socket.
3. Insert the power supply plug into
the outlet.
4. Turn on the power switch to turn
on the power and sewing light.
Power supply plug
A
A
B
D
E
Machine socket
D
Power switch
2
B
Machine plug
2
E
Outlet Socket
3
C
Foot control
3
6
F
The spool pins are used for holding
the spool of thread in order to feed
thread to the machine, To use, pull up
the spool pin. Push down for storage.
SETTING SPOOL PINS
If you are experiencinga problem with your machine it is important to check the
above procedures before returningit to the store. Should you have any queries
please contact our Customer Service Department helpline on 0161 666 6011.
TOP TIPS
ALWAYS TURN THE HANDWHEEL TOWARDS YOU
– Counter clockwise.
NO POWER
Check main power supply is turned on, foot control is connected.
MACHINE NOT FEEDING FABRIC
Check the Feed Dogs are raised and clean. These are the teeth under the presser
foot that feed the fabric when stitching. When the drop feed lever is moved from the
lowered position to the raised position the feed teeth do not come up at the needle
plate until you turn the balance wheel towards you.
Check stitch length is set for the correct weight of fabric
SKIPPED / BAD STITCHING:
Rethread the machine with the presser foot raised and the take up
lever in the highest position. Follow the threading guides and check
the thread is in the take up lever.
Check – the needle is inserted correctly, (flat side to the back)
Check – the needle is not bent or blunt and is the correct type of needle
Check – the tension setting is correct (average setting for a straight stitch is approx. 4)
Check – the tension disc area is clean
Check – the bobbin is placed in bobbin case correctly
Follow these simple steps and you’ll soon be enjoying your new project…
Happy Sewing!
USING THE NEEDLE THREADER
1
2
Raise the needle to its highest
position. Pull down the needle
threader knob as far as it will go.
Pull the thread
through the
needle eye.
4
3Turn the knob in the direction
of the arrow in the illustration,
drawing the thread loop
through the needle.
Turn the knob in the direction of
the arrow in the illustration, then
insert the Hook into the needle
eye. Lead the thread around the
Guide and under the Hook.
DRAWING UP THE BOBBIN THREAD
Raise the presser foot and hold the
needle thread lightly with you left hand.
Pull 15 cm (6”) of both threads
back and under the presser foot.
Turn the heandwheel slowly toward you with your right hand
until the needle goes down and continue turning the handwheel
until the take-up lever is at its highest position, Lightly draw up
the needle thread forming a loop of the bobbin thread.
101-980-009 (E)
Hook
Guide
F
C
CONNECTING TO POWER SUPPLY
QUICK START CHECK GUIDE FOR SEWING
• Always use good quality thread
• Use the correct size/type of needle
for the fabric you are stitching.
(We recommend Janome or
Schmetz needles.)
• Wind the bobbin evenly on
the machine
• It is essential to use the correct
bobbins as generic bobbins may
cause damage to your machine.
Before connecting the power cord, make
sure the voltage and frequency shown
on the machine conform to your power.
1. Turn off the power switch.
2. Insert the machine plug into the
machine socket.
3. Insert the power supply plug into
the outlet.
4. Turn on the power switch to turn
on the power and sewing light.
Power supply plug
A
A
B
D
E
Machine socket
D
Power switch
2
B
Machine plug
2
E
Outlet Socket
3
C
Foot control
3
6
F
The spool pins are used for holding
the spool of thread in order to feed
thread to the machine, To use, pull up
the spool pin. Push down for storage.
SETTING SPOOL PINS
If you are experiencinga problem with your machine it is important to check the
above procedures before returningit to the store. Should you have any queries
please contact our Customer Service Department helpline on 0161 666 6011.
TOP TIPS
ALWAYS TURN THE HANDWHEEL TOWARDS YOU
– Counter clockwise.
NO POWER
Check main power supply is turned on, foot control is connected.
MACHINE NOT FEEDING FABRIC
Check the Feed Dogs are raised and clean. These are the teeth under the presser
foot that feed the fabric when stitching. When the drop feed lever is moved from the
lowered position to the raised position the feed teeth do not come up at the needle
plate until you turn the balance wheel towards you.
Check stitch length is set for the correct weight of fabric
SKIPPED / BAD STITCHING:
Rethread the machine with the presser foot raised and the take up
lever in the highest position. Follow the threading guides and check
the thread is in the take up lever.
Check – the needle is inserted correctly, (flat side to the back)
Check – the needle is not bent or blunt and is the correct type of needle
Check – the tension setting is correct (average setting for a straight stitch is approx. 4)
Check – the tension disc area is clean
Check – the bobbin is placed in bobbin case correctly
Follow these simple steps and you’ll soon be enjoying your new project…
Happy Sewing!
USING THE NEEDLE THREADER
1
2
Raise the needle to its highest
position. Pull down the needle
threader knob as far as it will go.
Pull the thread
through the
needle eye.
4
3Turn the knob in the direction
of the arrow in the illustration,
drawing the thread loop
through the needle.
Turn the knob in the direction of
the arrow in the illustration, then
insert the Hook into the needle
eye. Lead the thread around the
Guide and under the Hook.
DRAWING UP THE BOBBIN THREAD
Raise the presser foot and hold the
needle thread lightly with you left hand.
Pull 15 cm (6”) of both threads
back and under the presser foot.
Turn the heandwheel slowly toward you with your right hand
until the needle goes down and continue turning the handwheel
until the take-up lever is at its highest position, Lightly draw up
the needle thread forming a loop of the bobbin thread.
101-980-009 (E)
Hook
Guide
1
2
3
1 2 3