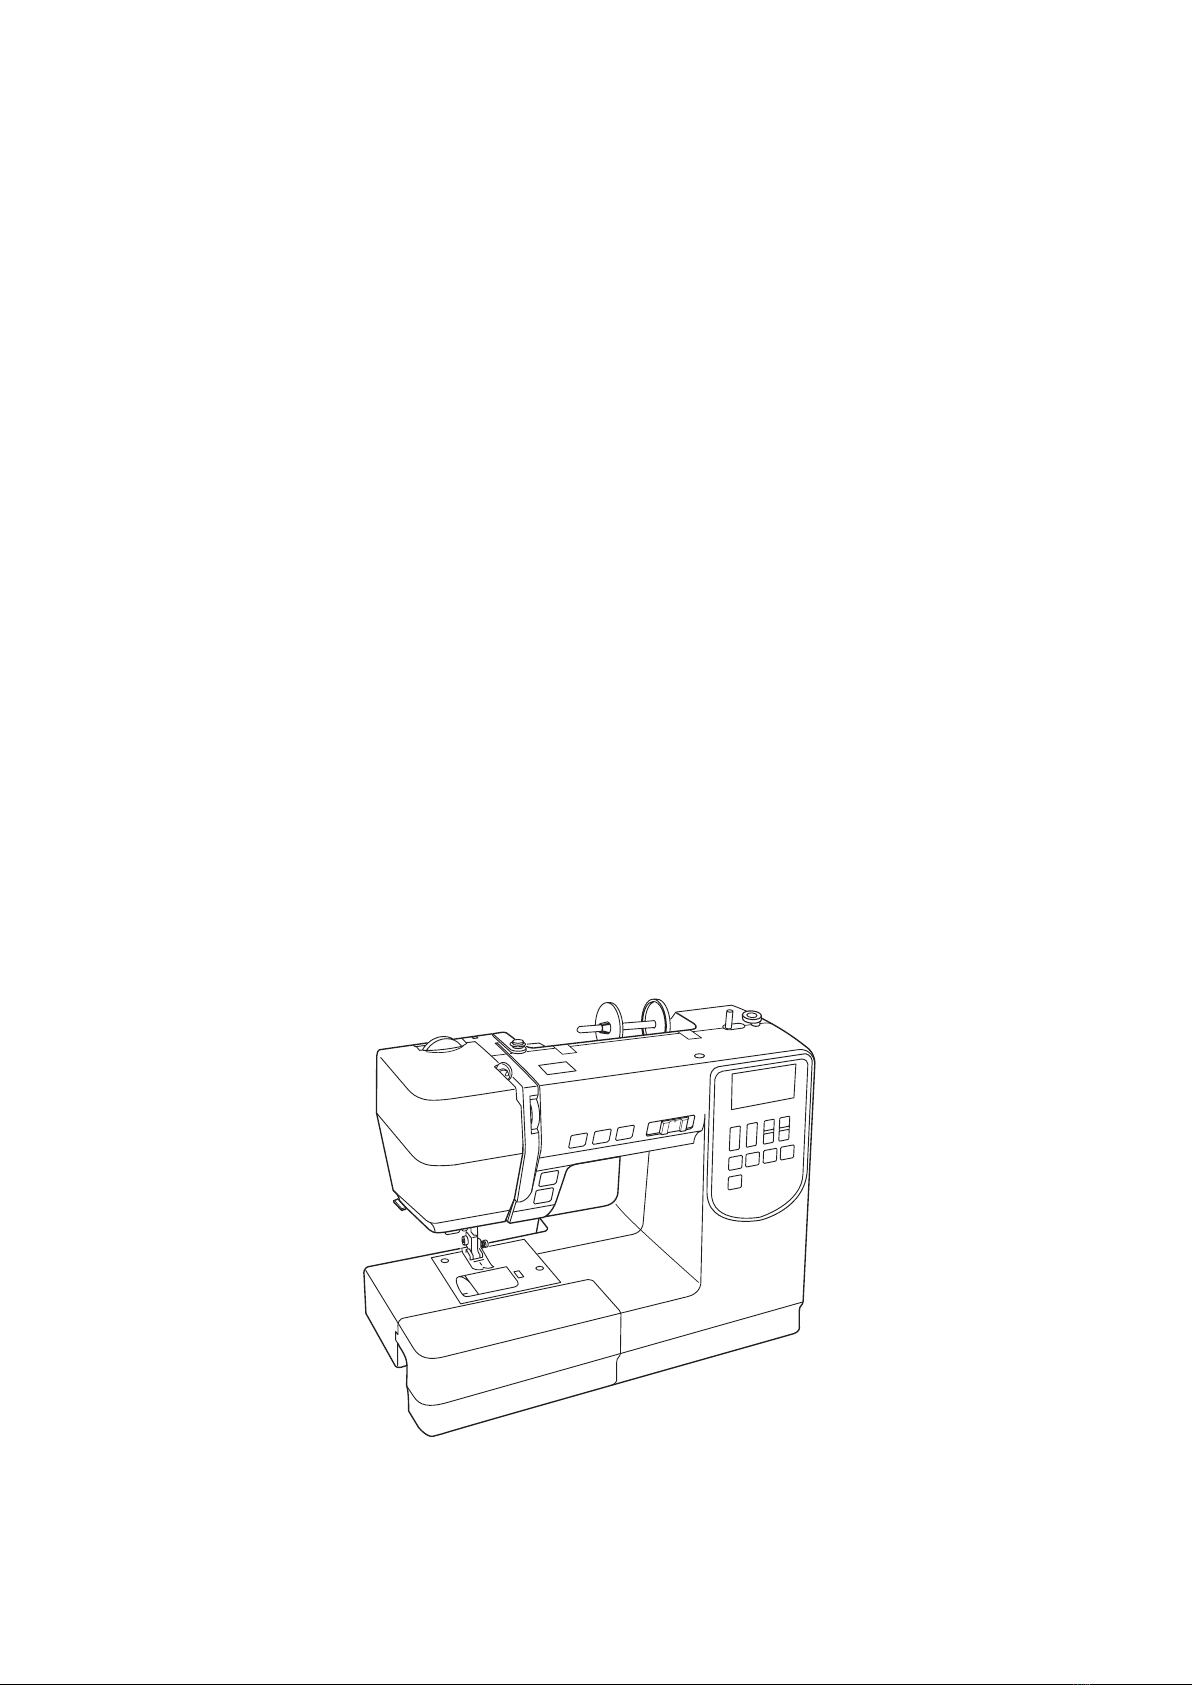
Janome M100QDC User manual

Instruction Book


1
IMPORTANT SAFETY INSTRUCTIONS
When using an electrical appliance, basic safety precautions should always be followed, including the
following:
This sewing machine is designed and manufactured for household use only.
Read all instructions before using this sewing machine.
DANGER— To reduce the risk of electric shock:
1. An appliance should never be left unattended when plugged in. Always unplug
this sewing machine from the electric outlet immediately after using and before
cleaning.
WARNING— To reduce the risk of burns, re, electric shock, or injury to persons:
1. Do not allow to be used as a toy. Close attention is necessary when this sewing machine is used
by or near children.
2. Use this appliance only for its intended use as described in this owner’s manual.
Use only attachments recommended by the manufacturer as contained in this owner’s manual.
3. Never operate this sewing machine if it has a damaged cord or plug, if it is not working properly, if
it has been dropped or damaged, or dropped into water.
Return this sewing machine to the nearest authorized dealer or service center for examination,
repair, electrical or mechanical adjustment.
4. Never operate the appliance with any air opening blocked. Keep ventilation openings of this
sewing machine and foot controller free from accumulation of lint, dust and loose cloth.
5. Never drop or insert any object into any opening.
6. Do not use outdoors.
7. Do not operate where aerosol (spray) products are being used or where oxygen is being
administered.
8. To disconnect, turn all controls to the off (“O”) position, then remove plug from outlet.
9. Do not unplug by pulling on cord. To unplug, grasp the plug, not the cord.
10. Keep ngers away from all moving parts. Special care is required around the sewing machine
needle and/or cutting blade.
11. Always use the proper needle plate. The wrong plate can cause the needle to break.
12. Do not use bent needles.
13. Do not pull or push fabric while stitching. It may deect the needle causing it to break.
14. Switch this sewing machine off (“O”) when making any adjustment in the needle area, such as
threading the needle, changing the needle, threading the bobbin or changing the presser foot, and
the like.
15. Always unplug this sewing machine from the electrical outlet when removing covers, lubricating, or
when making any other adjustments mentioned in this owner’s manual.
SAVE THESE INSTRUCTIONS
Please note that on disposal, this product must be safely recycled in accordance with relevant
National legislation relating to electrical/electronic products. If in doubt please contact your
retailer for guidance. (European Union only)
For Europe only:
This appliance can be used by children aged from 8 years and above and persons with reduced
physical, sensory or mental capabilities or lack of experience and knowledge if they have been given
supervision or instruction concerning use of the appliance in a safe way and understand the hazards
involved. Children shall not play with the appliance. Cleaning and user maintenance shall not be made
by children without supervision.
For outside Europe (except U.S.A and Canada):
This appliance is not intended for use by persons (including children) with reduced physical, sensory or
mental capabilities, or lack of experience and knowledge, unless they have been given supervision or
instruction concerning use of the appliance by a person responsible for their safety.
Children should be supervised to ensure that they do not play with the appliance.

2
TABLE OF CONTENTS
NAMES OF PARTS
Names of Parts................................................................3
Standard Accessories...................................................... 4
Large Extension Table ..................................................... 5
Stitch Chart......................................................................5
GETTING READY TO SEW
Connecting the Power Supply .........................................6
Before Using Your Sewing Machine ................................ 6
Operating Instructions: ....................................................6
Controlling Sewing Speed ...............................................7
Extension Table ...............................................................7
Free-arm Sewing.............................................................7
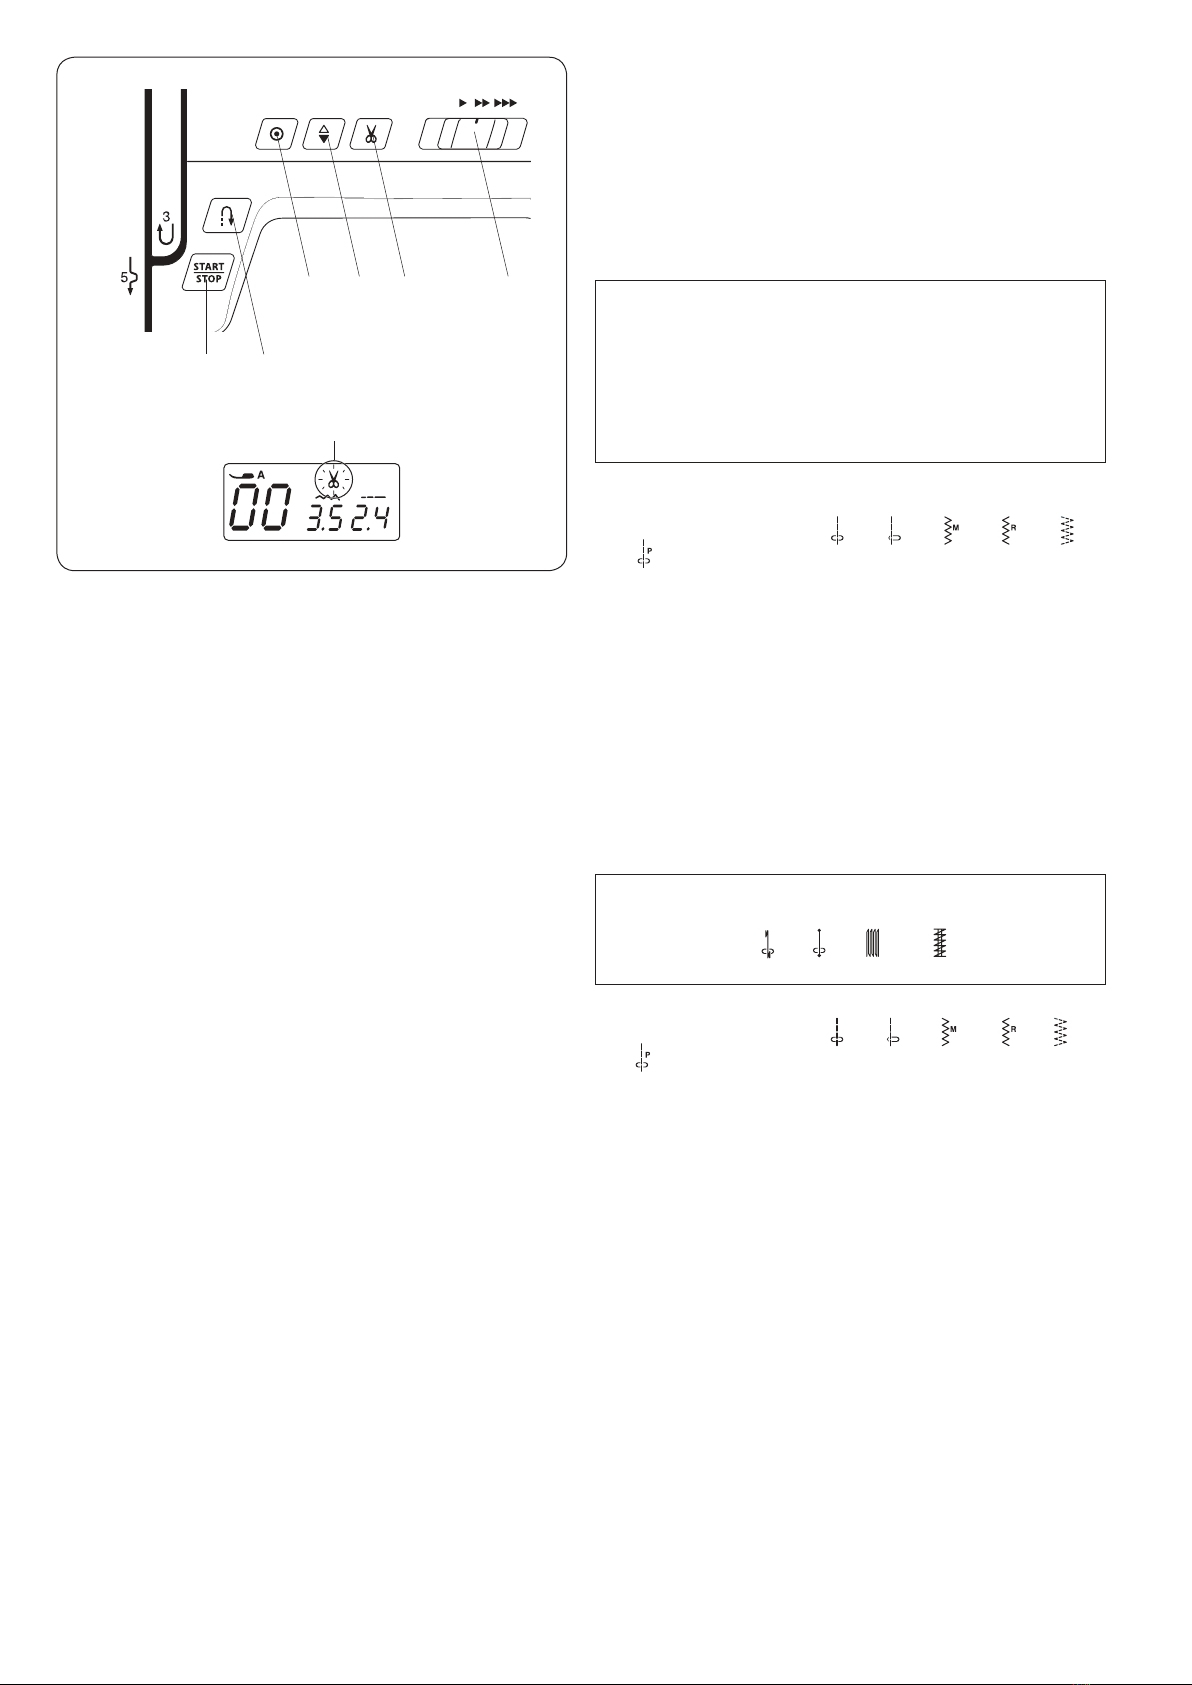
Machine Operating Buttons.............................................8
LCD Display.....................................................................9
Function Keys.................................................................. 9
Selecting the Stitch Patterns ...........................................9
Direct pattern selection..................................................9
Stitch width adjusting key .............................................. 9
Stitch length adjusting key.............................................9
Thread cut memory key................................................. 9
Presser Foot Lifter.........................................................10
Changing the Presser Foot............................................10
Removing and Attaching the Foot Holder......................10
Adjusting the Needle Thread Tension....................... 11-12
Dropping or Raising the Feed Dog................................13
Needle Stop Position Setting......................................... 13
Changing the Needle..................................................... 14
Fabric and Needle Chart ...............................................14
Setting the Spool of Thread........................................... 15
Bobbin Winding ........................................................15-17
Threading the Machine.................................................. 18
Needle Threader............................................................ 19
Drawing up the Bobbin Thread...................................... 20
BASIC SEWING
Straight Stitch Sewing ...................................................21
Auto Thread Cutting ......................................................21
Changing Sewing Direction ...........................................22
Sewing from the Edge of Thick Fabric...........................22
Using Seam Guides.......................................................22
Turning Square Corners ................................................ 22
Altering the Needle Drop Position .................................23
Altering the Stitch Length ..............................................23
Lock-a-matic Stitch........................................................24
Locking Stitch ................................................................24
Triple Stretch Stitch .......................................................24
Stretch Stitch .................................................................25
Sculpture Stitches..........................................................25
Zigzag Stitch.................................................................. 26
Overcasting with Zigzag Stitch ......................................27
Multiple Zigzag Stitch .................................................... 27
Overedge Stitch............................................................. 27
Knit Stitch ...................................................................... 28
Double Overedge Stitch ................................................ 28
Attaching Elastic............................................................28
Buttonholes....................................................................29
Square Buttonhole....................................................30-32
Round-end and Fine Fabric Buttonhole.........................33
Keyhole Buttonholes......................................................33
Stretch Buttonhole and Antique Buttonhole................... 33
Corded Buttonhole.........................................................34
Welted Buttonhole ....................................................35-36
Darning Stitch................................................................37
Tacking .......................................................................... 38
Eyelet.............................................................................39
Zipper Sewing...........................................................40-42
Blind Hemming ..............................................................43
Button Sewing ............................................................... 44
Gathering.......................................................................44
DECORATIVE STITCHING
Shelltuck........................................................................45
Applique.........................................................................45
Pintucking......................................................................46
Fringing..........................................................................46
Drawn Work...................................................................47
Cross Stitch ...................................................................47
Fagoting.........................................................................48
French Knots .................................................................48
Scallop Stitch.................................................................48
Smocking.......................................................................49
Stippling Stitch............................................................... 49
Clasp Stitches................................................................50
Satin Stitches.................................................................50
Decorative Stitches........................................................51
Correcting Deformed Stitch Patterns............................. 51
CARE OF YOUR MACHINE
Cleaning the Hook Race and Feed Dog........................ 52
Installing the Bobbin Holder...........................................52
Problems and Warning Signals .....................................53
Troubleshooting.............................................................54
Stitch Chart....................................................................55

3
q
w
e
r
t
y
u
i
o
!0
!1
!2
!3
!4
!5
!6
!7
!8
!9
@0
@1
@2
@3
@4
@5
@6
@7
@8
@9
#0
#1
#2
#3
#4
#5
#6
#7
#8
#9
$0
$1
$2
$3
$4
$5
$6
NAMES OF PARTS
Names of Parts
$6
Upper thread guide
Bobbin winding tension disk
Spool holder (large)
Spool pin
Hole for extra spool pin
Bobbin winder spindle
Bobbin winder stopper
LCD display
Function keys
Speed control slider
Automatic thread cutter button
Needle up/down button
Auto-lock button
Reverse button
Start/stop button
Extension table (Accessory box)
Thread cutter
Face cover
Thread tension dial
Presser foot pressure dial
Thread take-up lever
Lower thread guide
Needle clamp screw
Needle
Presser foot
Hook cover release button
Hook cover plate
Thread cutter
Needle plate
Feed dogs
Foot holder
Setscrew
Lever
Buttonhole lever
Needle threader
Carrying handle
Hole for stitch chart
Free-arm
Drop feed lever
Presser foot lifter
Power inlet
Foot control jack
Power switch
Ventilation openings
Handwheel
Feed balancing dial
qwerty
u
i
o
!0
!2
!3
!4
!5
!6
!7
!8
!9
@1
@3
@4
@5
@6
@9
#0
#1
#2
#3
#6
#8
#9
$0
$1
$2
$3
$4
$5
NOTE:
• To carry the sewing machine, hold the carrying
handle with your hand, and support the sewing
machine with the other hand.
• Design and specications are subject to change
without prior notice.
@7
#4
#5
#7
@0
!1
@8
@2

4
q
w
e
r
t
y
u
i
o
!0
!1
!2
!3
!4
!5
!6
!7
!8
!9
@0
@1
Standard Accessories
Zigzag foot: A (set on the machine)
Zipper foot: E
Satin stitch foot: F
Automatic buttonhole foot: R
Blind hem foot: G
Overedge foot: C
Spool holder (x 2) (large) (1 set on the machine)
Spool holder (x 2) (small)
Extra spool pin
Bobbins (x 4) (1 set on the machine)
Needle set
Seam ripper (Buttonhole opener)
Lint brush
Screwdriver
Stitch chart
Instruction book
Instructional DVD
Hard cover
Large extension table
Foot control
Power cable*
* The power cable included may differ from the
illustration.
q w e r
u i o
!0 !1 !2
t y
!3 !4 !5
!6 !7
@0
@1
!8
!9

5
Stitch Chart
Insert the stitch chart qinto the chart holder w.
Insert the pin einto the hole for the stitch chart r.
q Stitch chart
w Chart holder
e Pin
r Hole for stitch chart
q
w
e
r
You can ip the chart to the back of the machine when it
is not in use.
Large Extension Table
Attaching the table
Pull the table away from the machine.
Spread the legs of large extension table.
Holding the table with both hands and slide it gently to
the right.
Adjust the table height
Turn setscrews of the table legs with a screwdriver
(optional).

6
WARNING:
While in operation, always keep your eyes on the
sewing area and do not touch any moving parts such
as the thread take-up lever, handwheel or needle.
Always turn off the power switch and unplug from the
power supply:
- when leaving the machine unattended.
- when attaching or removing parts.
- when cleaning the machine.
Do not place anything on the foot control.
q
e
r
t
y
u
w
w
r
t
e
y
q
Operating Instructions:
The symbol “O” on the switch indicates the “off” position
of the switch.
Foot control model 21371 or YC-485EC-1 is used with
this sewing machine.
For the U.S.A and Canada only:
For appliances with a polarized plug (one blade wider
than the other): To reduce the risk of electric shock, this
plug is intended to t in a polarized outlet only one way.
If it still does not t, contact a qualied electrician to
install the proper outlet. Do not modify the plug in any
way.
GETTING READY TO SEW
Connecting the Power Supply
Using the foot control
Turn off the power switch.
Insert the pin connector into the jack.
Insert the machine plug into the power inlet.
Insert the power supply plug into the wall outlet.
Turn on the power switch.
qPower switch
wPin connector
eJack
r Machine plug
tPower inlet
yPower supply plug
uWall outlet
The foot control sign will be displayed when the foot
control is connected to the machine.
iFoot control sign
Before Using Your Sewing Machine
Before using your sewing machine for the rst time,
place a scrap of fabric under the presser foot and run the
machine without thread for a few minutes. Wipe away any
oil which may appear.
Using the start/stop button
Turn off the power switch.
Insert the machine plug into the power inlet.
Insert the power supply plug into the wall outlet.
Turn on the power switch.
qPower switch
w Machine plug
ePower inlet
rPower supply plug
tWall outlet
y Start/Stop button
i
NOTE:
The start/stop button does not work when the foot
control is connected.

7
Controlling Sewing Speed
Speed control slider
Sewing speed can be varied by the speed control slider
according to your sewing needs.
To increase sewing speed, move the slider to the right.
To decrease sewing speed, move the slider to the left.
Extension Table
The extension table provides an extended sewing area
and can be easily removed for free-arm sewing.
Detaching the table
Pull the table away from the machine, as illustrated.
qExtension table
Attaching the table
Slide the extension table along the free-arm and insert
the guides into the holes until the table snaps into the
machine.
wFree-arm
e Guide
rHole
Accessory storage
Accessories are stored inside the extension table.
Pull the lid toward you to open the accessory storage t.
tAccessory storage
q
Foot control
Depress the foot control to start the machine.
The further down you press on the foot control, the faster
the machine runs.
The maximum sewing speed can be varied by the speed
control slider.
w
r
e
qe
r
Free-arm Sewing
Free-arm is useful for sewing tubular garments and for
darning knee or elbow areas.
qFree-arm
t
NOTE:
The machine will not run and the presser foot mark
will blink if you start the machine with the presser foot
in the up position. Lower the presser foot and press
the foot control.

8
wReverse button
• When stitch pattern 00 , 03 , 06 , 07 , 08 or
55 is selected;
The machine will sew in reverse as long as the
reverse button is pressed. Release the button to sew
forward.
When the machine is stopped and foot control is
disconnected, the machine will sew in reverse slowly
as long as the reverse button is pressed. Release the
button to stop the machine.
• When any other stitches are selected;
If you press the reverse button when sewing any other
patterns, the machine will immediately sew locking
stitches and automatically stop.
Machine Operating Buttons
qStart/Stop button
Press this button to start or stop the machine.
The machine starts running slowly for the rst few
stitches, and it then runs at the speed set by the speed
control slider.
The machine runs slowly as long as this button is being
pressed.
eAuto-lock button
• When stitch pattern 00 , 03 , 06 , 07 , 08 or
55 is selected;
Press the auto-lock button to sew a locking stitch
immediately. The machine will automatically stop.
• When any other stitches are selected;
Press the auto-lock button to sew a locking stitch
at the end of current pattern. The machine will
automatically stop.
rNeedle up/down button
Press the needle up/down button to bring the needle up
or down.
tThread cutter button
Press the thread cutter button to trim the threads after
sewing.
The thread cutter mark will blink uwhile the machine
cuts the threads.
ySpeed control slider
Maximum sewing speed can be adjusted with the speed
control slider. Refer to page 7.
qw
ye r t
u
NOTE:
• The start/stop button cannot be used when the
foot control is connected to the machine.
• The machine will not run and the presser foot mark
will blink if you start the machine with the presser
foot in the up position. Lower the presser foot and
press the start/stop button.
NOTE:
There will be particular functions of the reverse button
when pattern 01 , 02 , 25 or 26 is selected.
Refer to page 24, 37 and 38 for instructions.

9
qLCD Display
The LCD display shows following information when the
machine is turned on.
q Identication letter of the recommended foot
w Stitch pattern number
e Stitch width
r Stitch length
w
e r
Function Keys
Selecting the Stitch Patterns
To select the desired stitch pattern, press the arrow keys
(qand w) until the pattern number of the desired stitch
is indicated.
To change the rst digit eof the stitch pattern number,
press the arrow keys q under the rst digit of the pattern
number.
To change the second digit rof the stitch pattern
number, press the arrow keys wunder the second digit
of the pattern number.
q Arrow keys (rst digit)
w Arrow keys (second digit)
e First digit
r Second digit
Direct pattern selection
You can select stitch patterns 00, 06, 09 and 18 directly
by pressing the corresponding direct pattern selection
key t.
The stitch image of stitch pattern are indicated on each
key.
Stitch width adjusting key
Press “+” or “–” yto change the stitch width or needle
drop position, depending on the selected stitch pattern.
Refer to pages 23, 26 and 32.
Stitch length adjusting key
Press “+” or “–” uto change the stitch length of the
selected pattern. You can also adjust the buttonhole
density, the evenness of darning, and the size of eyelet
with this key. Refer to pages 23, 26 and 32.
Thread cut memory key
To cut the threads automatically after locking stitches,
press the thread cutter memory key i(Refer to page 21).
w q
r e
t
y u
i

10
r
e
w
Presser Foot Lifter
The presser foot lifter raises and lowers the presser foot.
You can raise the foot about 1/4˝ (0.7 cm) higher than the
normal up position for easy removal of the presser foot,
or to help you place thick material under the foot.
qPresser foot lifter
wNormal up position
eHighest position
Changing the Presser Foot
Removing and Attaching the Foot Holder
q
r
e
w
q
q
e
w
w
e
q
Presser Foot Pressure Dial
Foot pressure can be adjusted by turning the presser foot
pressure dial.
Set the pressure between “3” and “6” for ordinary fabrics.
Set the pressure between “1” and “3” for ne fabrics and
applique sewing.
Set the pressure between “5” and “6” for heavyweight
fabrics.
q Presser foot pressure dial
CAUTION:
Turn OFF the power switch before changing the foot.
Always use the proper foot for the selected pattern.
The wrong foot can cause the needle to break. Each
foot is marked with an identication letter.
q Identication letter
Removing the presser foot
Raise the needle to its highest position by turning the
handwheel counterclockwise. Raise the presser foot, and
press the lever on the back of the foot holder.
wLever
Attaching the presser foot
Place the selected presser foot so that the pin on the foot
lies just under the groove in the foot holder.
Lower the presser bar to lock the foot into the place.
e Groove
rPin
CAUTION:
Turn OFF the power switch before detaching or
attaching foot holder.
Removing the foot holder
Remove the setscrew by turning it counterclockwise with
a screwdriver.
Attaching the foot holder
Align the hole in the foot holder with the threaded hole in
the presser bar.
Fit the setscrew into the hole.
Tighten the setscrew by turning it clockwise with the
screwdriver.
q Setscrew
wFoot holder
eHole
rThreaded hole

11
Adjusting the Needle Thread Tension
Straight stitch balanced tension
The ideal straight stitch has threads locked between two
layers of fabric, as illustrated (magnied to show detail).
If you look at the top and bottom of the seam, notice that
the stitches are evenly balanced.
qNeedle thread (top thread)
wBobbin thread (bottom thread)
eTo loosen
rTo tighten
When adjusting the needle thread tension, the higher the
number, the tighter the top thread tension.
Results depend on:
- stiffness and thickness of the fabric
- number of fabric layers
- type of stitch
q
w
e
r
r
q
w
t
e
Tension is too loose
The needle thread shows through on the wrong side of
the fabric, and the stitch feels bumpy. Turn the dial to a
higher number to tighten the needle thread tension.
qNeedle thread (top thread)
wBobbin thread (bottom thread)
eTo tighten tension
rRight side (top side) of fabric
tWrong side (bottom side) of fabric
r
q
w
t
e
Tension is too tight
The bobbin thread shows through on the right side of the
fabric, and the stitch feels bumpy. Turn the dial to a lower
number to loosen the needle thread tension.
qNeedle thread (top thread)
wBobbin thread (bottom thread)
eTo loosen tension
rRight side (top side) of fabric
tWrong side (bottom side) of fabric

12
Zigzag stitch
For an ideal zigzag stitch, the bobbin thread does not
show on the right side (top side) of the fabric, and the
needle thread shows slightly on the wrong side (bottom
side) of the fabric.
See the illustrations for the correct appearance.
To match this appearance, adjust the needle tension as
necessary.
q w
q w
q w
Tension is too tight
The corner of each zigzag pulls together on the right side
of the fabric
qRight side (top side) of fabric
wWrong side (bottom side) of fabric
Tension is too loose
The corner of each zigzag point pulls together on the
wrong side of the fabric.
qRight side (top side) of fabric
wWrong side (bottom side) of fabric
Balanced tension
Minimize the amount of needle thread visible on the
wrong side (bottom side) of the fabric without causing
excessive puckering, or causing the bobbin thread to
show on the right side (top side) of the fabric.
Results vary with fabric, thread and sewing conditions.
qRight side (top side) of fabric
wWrong side (bottom side) of fabric

13
Dropping or Raising the Feed Dog
The drop feed lever is located underneath the free arm
bed on the back of the machine.
To drop the feed dog, push the lever in the direction of
the arrow q.
To raise the feed dog, push the lever in the direction
of the arrow w, as illustrated, and turn the handwheel
toward you.
The feed dog must be up for normal sewing.
View from the rear
q
qw
Needle Stop Position Setting
You can set the needle stop position to up or down when
the machine stops.
To enter the needle stop position setting mode, turn the
power off.
Press and hold the needle up/down button q, and turn
the power switch on. Hold then needle up/down button
until the needle stop position setting screen appears as
shown.
w
The default setting is down and “dn” sign appears on the
screen.
Press the needle up/down button q.
The “uP” sign appears and the needle stop position is set
to up.
Press the START/STOP button wto apply the setting.
q
w
NOTE:
Set the stitch length value at the minimum when
lowering the feed dog.

14
q
w
Fabric Thread Needle
Fine
Lawn
Georgette
Tric ot
Organza
Crepe
Silk #80-100
Cotton #80-100
Synthetic #80-100
#9/65-11/75
Blue tip needle
Medium
Sheeting
Jersey
Broadcloth
Fleece
Silk #50
Cotton #50-80
Synthetic #50-80
#11/ 7 5 -14 /9 0
Heavy
weight
Denim
Tweed
Coating
Quilting
Silk #30-50
Cotton #40-50
Synthetic #40-50
#14/90-16/100
NOTE:
1 x blue tip needles (#11/75), 2 x #11/75 needles and
2 x #14/90 needles are included in the needle case
(Part No. 540401026).
Changing the Needle
Fabric and Needle Chart
• For general sewing, use needle size 11/75 or 14/90.
• A ne thread and needle should be used for sewing
lightweight fabrics, so the fabric will not be marred.
• Heavy fabrics require a needle large enough to pierce
the fabric without fraying the needle thread.
• Always test the needle size on a small scrap of the
fabric that will be used for actual sewing.
• In general, use the same thread for the needle and
bobbin.
• When sewing stretch fabrics, very ne fabrics and
synthetics, use a blue tip needle. The blue tip needle
effectively prevents skipped stitches.
CAUTION:
Turn OFF the power switch before changing the
needle.
Raise the needle to its highest position by turning the
handwheel counterclockwise, and lower the presser
foot.
A loose needle or a loose screw may cause machine
malfunction or needle to break.
Loosen the needle clamp screw by turning it
counterclockwise. Remove the needle from the needle
clamp.
Insert a new needle into the needle clamp with the at
side to the rear. When inserting the needle into the
needle clamp, push it up as far as it will go.
Tighten the needle clamp screw rmly by turning it
clockwise.
qNeedle clamp screw
wFlat side
To see if the needle is in good condition, place the at
side of the needle onto something at (needle plate,
glass etc.). The gap between the needle and the at
surface should be consistent. Never use a bent or blunt
needle.
A damaged needle can cause permanent snags or runs
in knits, ne silks and silk-like fabrics.

15
Setting the Spool of Thread
Horizontal spool pin
Lift up the spool pin. Place a spool of thread on the spool
pin.
Attach the large spool holder, and press it rmly against
the spool of thread so that the spool rests on the
supporter.
q Spool pin
w Spool of thread
eLarge spool holder
r Supporter
The small spool holder is used with narrow or small
spools of thread.
t Small spool holder
e
Bobbin Winding
Removing the bobbin
Gently slide the hook cover release button to the right
and remove the hook cover plate.
Lift out the bobbin.
qHook cover release button
wHook cover plate
eBobbin
q
w
er
t
y
u
i
Extra spool pin
The extra spool pin is for winding bobbins without
unthreading the machine.
Insert the extra spool pin into the hole.
The extra spool pin should point to the bobbin winder
tension disk.
Draw the thread from the spool and pass the thread
around the bobbin winding tension disk as shown.
yExtra spool pin
uHole for extra spool pin
iBobbin winder tension disk
w
q
NOTE:
Use the “J” plastic bobbins for horizontal hook (marked
with “J” r). Using other bobbins, such as pre-wound
paper bobbins, may cause stitching problems and/ or
damage to the bobbin holder.
r

16
Winding the bobbin
q
w
z
x c
v
b
n m
zDraw the thread from the spool and pass the thread
around the bobbin winding tension disk.
qBobbin winding tension disk
xThread through the hole in the bobbin from the inside
to the outside.
cPut the bobbin on the bobbin winder spindle.
vPush the bobbin to the right.
The bobbin icon appears on the LCD display.
wBobbin icon
bWith the free end of the thread held in your hand, start
the machine. Stop the machine when it has wound a
few layers, and then cut the thread close to the hole in
the bobbin.
n Start the machine. When the bobbin is fully wound, it
will stop spinning automatically.
Stop the machine and return the bobbin winder to its
original position by moving the spindle to the left.
NOTE:
Do not move the bobbin winder spindle while the
machine is running.
mRemove the bobbin. Cut the thread as shown.
Return the speed control slider position.
NOTE:
Set the speed control slider at its fastest position for
bobbin winding.

17
b Set the left edge of the hook cover plate into opening.
Push down the hook cover plate to t in place.
!0 Hook cover plate
Inserting the bobbin
t
y
u
i
o
!0
r
e
w
q
z
x
c
v
b
zPlace a bobbin in the bobbin holder with the thread
running off counterclockwise as shown on the hook
cover plate.
qEnd of thread
wBobbin holder
eHook cover plate
x Hold the bobbin with your ngertip so it does not
rotate.
Guide the thread into the front notch of the bobbin
holder.
Pull the thread to the left to pass it under the guide.
rFront notch
t Guide
cDraw the thread to the left to pass it into the guide
path marked “1”.
Make sure that the thread comes out from the side
notch of the bobbin holder.
y Guide path 1
u Side notch
vContinue to draw the thread along the guide path
marked “2” and pull the thread to the right through the
slit. The thread will be cut to a proper length and held
in place.
i Guide path 2
o Slit (Thread cutter)
uu
Correct Wrong
CAUTION:
Turn OFF the power switch before inserting the bobbin
and threading the bobbin holder.
NOTE:
If the thread does not come out from the side notch,
rethread from step z.
NOTE:
Unless otherwise noted, you can start sewing without
drawing up the bobbin thread.
Refer to page 20 for how to draw up the bobbin
thread.

18
CAUTION:
Turn OFF the power switch before threading the
machine.
z
x
c
v b
w
z
c
v
bx
zTurn the power switch off.
Draw the end of the thread around the upper thread
guide.
Threading the Machine
xWhile holding the thread near the spool w, draw
the end of the thread down around the check spring
holder e.
w Spool
eCheck spring holder
cFirmly draw the thread up from right to left over the
take-up lever, and down into the take-up lever eye.
v Pass the thread through the lower thread guide. Slide
the thread behind the needle bar thread guide on the
left.
bUse the needle threader to thread the needle (see
page 19).
w
Raise the presser foot. Press the
needle up/down button qto raise
the thread take-up lever to its
highest position.
qNeedle up/down button
q
e
Table of contents
Other Janome Sewing Machine manuals

Janome
Janome Sewing Machine User manual

Janome
Janome 639X User manual

Janome
Janome Memory craft 9900 User manual

Janome
Janome 415 User manual

Janome
Janome 712T User manual

Janome
Janome Continental M17 User manual

Janome
Janome 2149SX User manual

Janome
Janome Quilt Maker Pro 20 User manual

Janome
Janome COVER PRO 900CP User manual

Janome
Janome Horizon User manual

Janome
Janome 900CPX User manual

Janome
Janome HD2200 User manual

Janome
Janome Skyline 55 User manual

Janome
Janome Heavy Duty 1000 User manual

Janome
Janome Sewing Machine User manual

Janome
Janome MC6600P User manual

Janome
Janome Mylock 634D User manual

Janome
Janome stirling User manual

Janome
Janome MS 2028 User manual

Janome
Janome 1200D User manual