JanSan JS-BP31 User manual

1
Back Pack Vacuum
OWNER’S MANUAL
Model: JS-BP31
DistributedBy:
Po Box 14065
Merrillville, IN 46411
866-350-7160
www.JanSanMFG.com
Doc #: 98-20015
Rev: 04/2011

2
IMPORTANT SAFETY INSTRUCTIONS
When using an electrical appliance, basic precaution should always be followed, including the
following:
READ ALL INSTRUCTIONS
BEFORE USING (THIS APPLIANCE)
WARNING-To reduce the risk of fire, electric shock, or injury:
1. Do not leave vacuum cleaner when plugged in. Unplug from outlet when no use and before
servicing.
2. To reduce the risk of electric shock, do not use outdoors or on wet surfaces
3. Use only as described in this manual. Use only manufactures recommend attachments.
4. Do not use with damaged cord or plug. If vacuum cleaner is not working as it should, has been
dropped, damaged, left outdoors, or dropped into water, enter it to a service center.
5. Do not pull or carry on cord, use cord as a handle, close door on cord, or pull cord around
sharp edges or corners. Do not run vacuum cleaner over cord. Keep cord away from heated
surfaces.
6. Do not unplug by pulling on cord. To unplug, grasp the plug, not the cord.
7. Do not handle plug or vacuum cleaner with wet hands.
8. Do not put any object into openings. Do not use with any opening blocked. Keep
free of dust, lint, hair and anything that may reduce airflow.
9.Keep hair, loose clothing, fingers and all parts of body away from openings and
moving parts.
10.Turn all controls off before unplugging.
11.Use extra care when cleaning on stairs.
12.Do not use to pick up flammable or combustible liquids, such as gasoline, or use in
areas where they may be present
13.Hold plug when rewinding onto cord reel. Do not allow plug to whip when
rewinding.
14.Unplug before connecting the hose
15.Do not pick up anything that is burning or smoking, such as cigarettes, matches, or
hot ashes.
16.Do not use without dust bag and/or filter in place.
17.If the supply cord is damaged, it must be replaced by the manufacturer or its
service agent or a similarly qualified person in order to avoid a hazard.
SAVE THESE INSTRUCTIONS

3
Precautionary Measures
Important: If the suction opening of the unit, the hose or the extension tubes are
BlOCKED. Switch off the vacuum cleaner and remove the blocking substance
before you start the unit again.
1.Before inserting the power plug 4. Do not pick up anything that is
into the wall outlet, make sure that burning or smoking such as
your hands are dry. cigarettes, matches or hot ashes.
2. Before you start vacuuming. 5. Do not use without all filters and
make sure to remove large or dust bag in place.
Sharp objects that might 6. Do not vacuum any liquids.
3. When pulling out the power plug 7. Keep hair, loose clothing, fingers,
from the wall outlet, pull the plug feet and all parts of body away
Notthepowercord. fromopenings,rotatingagitator
andothermovingparts

4
GETTING TO KNOW YOUR BACK PACK VACUUM
Ref#Part#PartDescription
1
MainUnit
2
ExhaustGrill
3
50‐10030 On/OffPowerSwitch
4
CanisterLidTabs
5
WaistBand
6
ShoulderStraps
7
50‐40078 BackBoardPanel
8
50‐40079 CarryHandle
9
HoseInlet
10
50‐40080 CanisterLid
11
50‐40081 FlexibleHose
12
50‐40082 FlexibleHosehandle
13
VariableSuctionControl
14
TelescopicTubeReleaseButton
Ref#Part#PartDescription
15
50‐40083 TelescopicTube
16
WaistBandBackSupportPanel
17
WaistBandToolCarrier
18
50‐40084 DustingBrush
19
50‐40085 CreviceTool
20
50‐40086 BlowerPort
21
50‐40087 PetHairRemover
22
50‐40088 FloortoCarpetBrush
23
50‐40089 AirDrivenTurboBrush
24
50‐40090 BlowerAttachments(×3)
25(a)
40‐21002 HEPADustBag(soldin6pk)
25(b)
40‐21003 PaperDustBag(soldin6pk)
26
50‐60005 Shake‐OutBag
27
50‐60006 HEPAPre‐MotorFilter
28
50‐60007 ExhaustFilter

1
Operating Instructions
Warning: To reduce the risk of electric shock, the power cord must be
Disconnected before removing the dust bag, shake-out bag,
Changing the filters or performing maintenance or trouble-
Shooting checks.
Assembling Your Vacuum 5 The cardboard face of the new bag should
Cleaner restsecurelyinthedustbagcoverguides
Note: Always remove the power plug (Fig. 3)
from the wall outlet before assembling
or removing accessories.
Inserting the HEPA Dust Bag
Note: This unit can be used with the shake-
Outbagalone,howeveritmustbecleaned Fig.3
after every use if there is no HEPA dust bag 6 Ensure that the shake-out bag is in place.
installed. (Fig.4)
Important: Do NOT usethevacuumwith
Out all filters, shake-out bag, and with or without
HEPA dust bag in place.
1. Unplug the hose connecting power cord and
remove the flexible hose.
2. To open the canister lid press on the canister
lid tabs on each side of the unit and lift canister lid.
(Fig.1)
Fig.4
7FliptheHEPA bag holder over, pressing
the tab on the bag holder until it clicks,
thenreplacethecanisterlid.
8Thecanisterlidcanbereplacedonthe
Fig.1 unit with the hose opening on the right
3. Pull the tab on the HEPA dust bag holder out or left, as per your preference. (Fig 5)
slightlyandflipupwards.(Fig2)
4.Holding the HEPA dust bag in your hand, slice it
firmly between the slots in the bag holder. (Fig 2)
Fig. 2 Fig. 5

2
Operating Instructions
Attaching the Flexible hose to 3Toremovethetelescopictubefrom
The vacuum theflexiblehose,pressonthetelescopic
The flexible hose should be tube release button and pull it out.
connectedtothevacuumbefore (Fig.9)
strapping the unit to you back.
1. To connect the flexible hose into
the hose inlet, insert the threaded end
oftheflexiblehoseintothehoseinletand Fig.9
turn counter-clockwise until it locks into Note: Always remove the power plug from the
place.(Fig6) walloutletbeforeassemblingorremoving
accessories.
Manual Suction Control
Fig. 6 Your vacuum cleaner includes a manual variable
suction control on the flexible hose handle. The
suctionpowercanbeadjustedbymovingthe
suctionregulatortothedesiredpositionbetween
Open and Closed. (Fig. 10)
2. Plug the power cord into the Open gives you less suction, closed maximum
electrical outlet. Suction. For example, less suction is required on
3. To remove the flexible hose, unplug upholstery and draperies compared to thick
the power cord and then turn the hose carpets, which require maximum suction.
clockwise and pull the flexile hose out.
Attaching the Telescopic Tube to the
Flexible hose Handle
1 Holding the telescopic tube, insert the
handle into the telescopic tube receptacle.
pushthehandlein.(Fig.7) Fig10
Using the Floor to Carpet Brush
1.Toattachthefloortocarpetbrushto
Fig. 7 the telescopic tube, insert the telescopic
2 Push forward on the plastic button and tube into carpet to floor brush. (Fig.11)
pull the inner tube outward to extend for
alongerreach.(Fig.8)
Fig.8 Fig.11

3
Operating Instructions
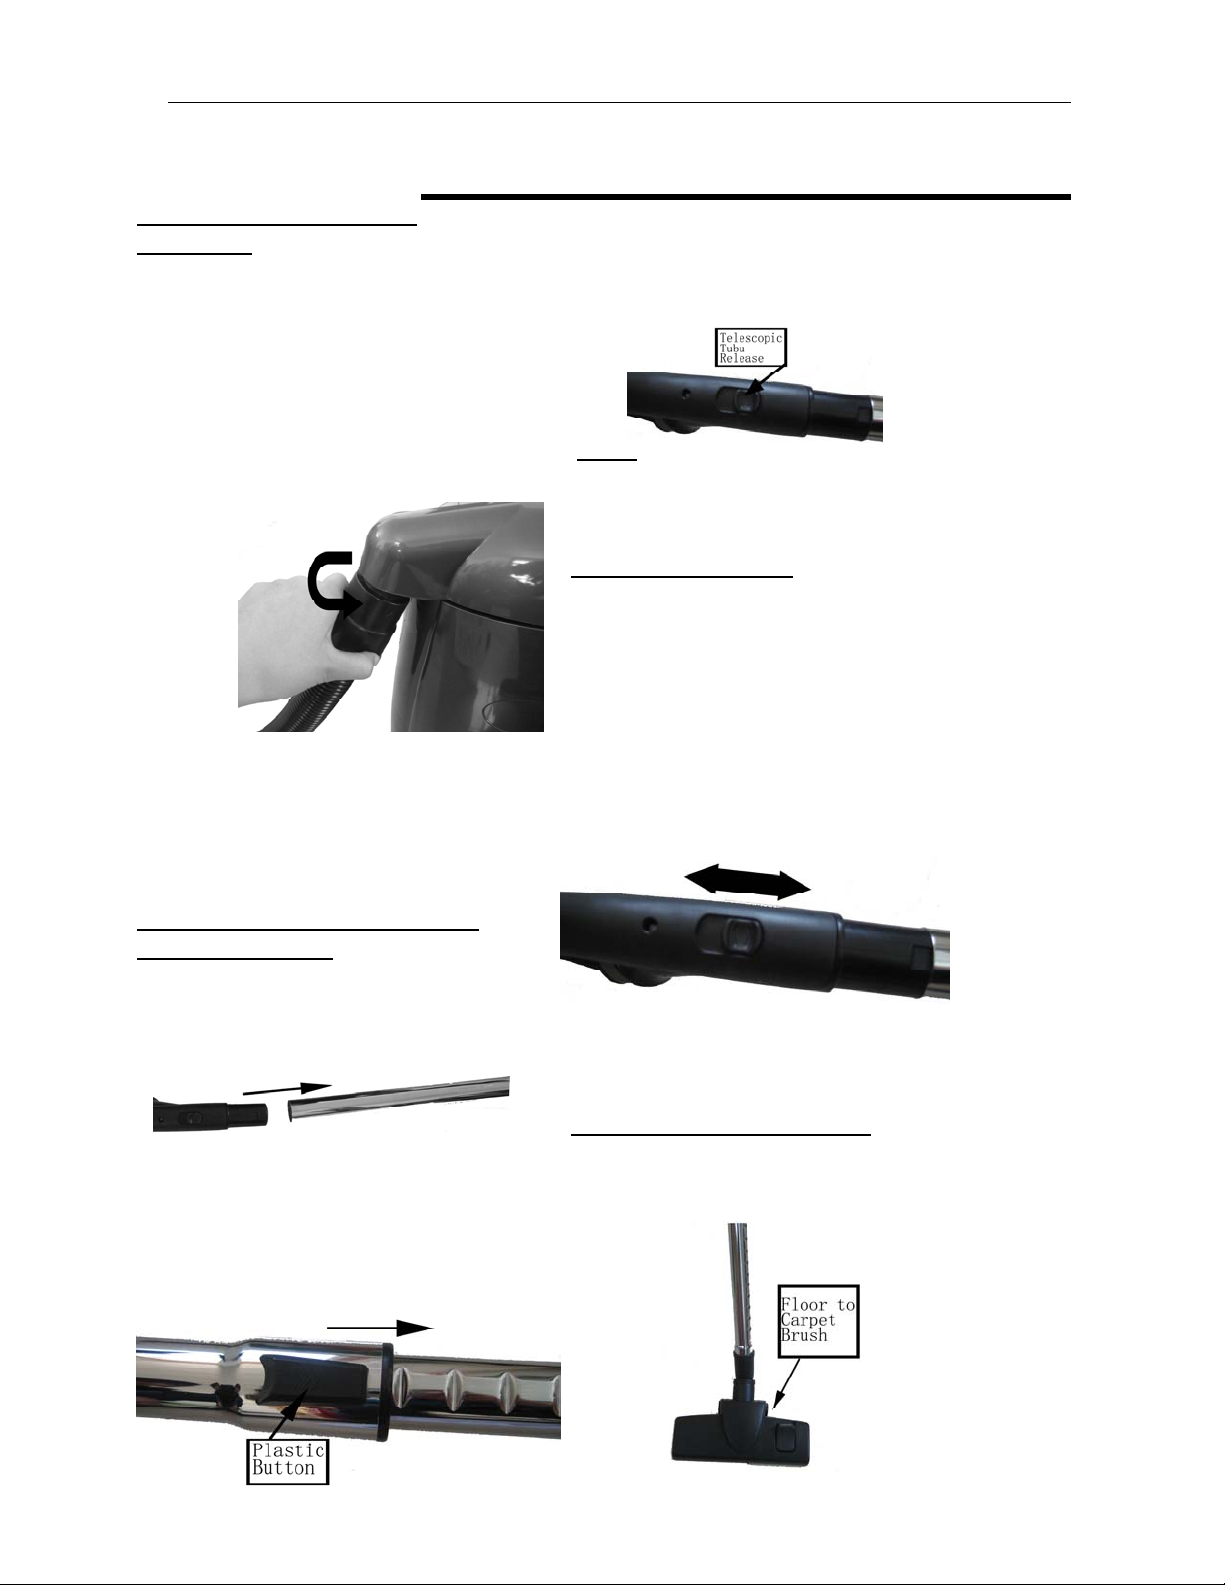
2 Step on the floor to carpet selector Using the Air Driven Turbo Brush
to adjust the height of the brushes.
there are two(2) different heights Warning: To reduce the risk of electric shock , the
one for floors and one for carpets. power cord must be disconnected before removing the
(Fig. 12) HEPA dust bag, the shake-out bag,
HEPA pre-motor filter, changing the filters or performing
maintenanceortroubleshootingchecks.Theefficiency
of your air driven turbo brush depends on the bristle
brushrotatingathighspeed.
Strongairsuctionisneededto
accomplishthis.Inordertoensurethat
Fig12 . maximumairsuctionismaintained,
3 To remove the telescopic tube from please read the following instructions:
the floor to carpet brush, pull the 1. Change the HEPA dust bag or empty
telescopic tube out from the floor to the shake-out bag frequently.
carpet brush. 2. Replace the pre-motor and
Using the Attachments exhaustfiltersasneeded.
Dusting Brush 3. Ensurethattherotatingbrushis
The dusting brush is used for the furniture kept free of hair and string which may accumulate
Crevice Tool anddecreasebrushperformance.
Use for radiators, crevices, corners, 4. To attach the air driven turbo brush,
baseboards and between cushions. insert the telescopic tube into the air
Pet Hair Remove Brush driventurbobrush.
The pet hair remove brush 5. To adjust the suction control on the air
is used for upholstery. The driven turbo brush slide the suction control
unique surface make s it an for more or less suction as desired
excellent tool for removing Note: The driven turbo brush has a suction
unwanted pet hair. Control on the top of the brush.
Note: This tool is not a grooming tool Open or close to increase or decrease
and should not be used on animals. the suction as desired, I, e, open for high
Caution: Do not use pet hair pile or closed for low pile carpets
Remove brush on delicate or woven Using the Blower Attachments
Fabrics that may snag, The blower attachments are extremely
Do not use pet hair remover brush on Useful for vacuuming in hard to reach crevices
Wooden floors as this accessory might and small compartments such as in cars.
Cause mild scratching. Important Note: When blocking the air holes,
Blower Attachments grasp the blower attachment firmly so that they
The blower attachments can be used do not blow off
With the vacuum to pick up very fine dirt Note: Do not use blower function to clear dust
Particles in tight crevices or spots, or to . Off of fragile or delicate objects unless they are
Inflate inflatable items or air mattresses. secured or held firmly in place as the blower
Actionisquitestrongandcausedamage.

4
Operating Instructions
The blower attachments have air bleed 5.To blow up inflatable items, select
holes.these air bleed holes help the appropriate size blower
relieve some air pressure so that the attachment that will fit into the air
attachment does not blow off. However, valve.(Fig.16)
should an increase in air pressure be
desired,simply cover one or more of
the air bleed holes.
To use the blower attachments:
1.Pull up and hold the exhaust tab, Fig.16
with the free hand pull out the
exhaust grill.(Fig.13)
6.Turntheunitonandholdtheblower
attachmentandairvalvewhhiethe
vacuumexhaustispumpingairinto
theinflatable.
7.Todetachtheflexiblehoseturn
Fig.13 clockwise and pull out from blower
2.Remove the exhaust filter. port.
3.To place the blower port into the Note:Firmly hold the flexible hose by
exhaust outlet,align the lower tabs the attachment when blowing dirt or
on the blower port with the slots on dust off of objects.
the exhaust.Pull up on the exhaust Using Your Vacuum
tab and push the top of the blower 1. Insert the power plug into the wall outlet.
port until it snaps into place. 2. Connect hose and telescopic tube if desired.
(Fig.14) 3. Correctly place shoulder straps on
each shoulder and secure the waist
band with hook and loop strips.
(Fig. 17)
Caution:If the waist band and both
Fig.14 Shoulderstrapsarenotproperlyand
4. To attach the hose to the blower Securely in place the umit could fall off
port,align the flexible hose and turn Your back causing damage or injury.
counter-clockwise until it stops.The
hose is now securely in place.
(Fig. 15)
Fig. 15 Fig. 17

5
Operating Instructions
4. Turn the unit on by pressing the 3. Holding the HEPA dust bag in your
switch located near the base of the hand,slide it out from the slots in
unit to turn the vacuum cleaner on. the bag holder .Hold carefully in
(Fig.18) ordertoavoidhavingdustfalloutof
HEPA dust bag.(Fig. 20)
Fig. 18
Fig. 20
Removing & Replacing HEPA
Dust Bag 4.ReplacetheHEPA dust bag with a
To remove the HEPA dust bag from the new bag. Do not reuse the same
vacuum: bag.
Important: DO NOT use the vacuum 5. The cardboard face of the new bag
without all filters,shake-out bag, and should rest securely in the dust
with or without HEPA dust bag in place. bag cover guides.(Fig. 21)
1. To remove the HEPA dust bag,
press on the canister lid tabs on
each side of the unit and lift canister Fig. 21
lid.(Fig.19)
6.Replacetheshake-outbagintothe
vacuum.
7.ToreplacetheHEPA dust bag
holder,fliptheholderandpresstab
untilitclicks.
8.Replacethecanisterlidontothe
Fig.19 vacuum.
2. Pull the tab on the HEPA dust bag Warning: Never over fill the HEPA
holder out slightly and fliy upwards. Dust bag –replace when bag is full and
(Fig.19) clean the shake-out bag and filter each
TimetheHEPA dust bag is replaced.
Warning: To reduce the risk of electric shock, the power cord must be
disconnected before removing the dust bag, shake-out bag,
changing the filters or performing maintenance or trouble-
shootingchecks.

6
Operating Instructions
Cleaning & Replacing the Cleaning the HEPA Pre-Motor
Shake-OutBag Filter
Note: Clean the shake-out bag out- Important, Please Note:
doors when changing the HEPA dust TheHEPA pre-motor filter will stop
bag. Optimum performance is achieved most of the tiniest dust particles and
by using the HEPA dust bag with the airborne allergens from re-entering the
shake-out bag decreasing the need for air you breathe. In fact it stops 99.97%
washing the shake-out bag. of all particles as small as 0.3 microns-
Cleaning the Shake-Out Bag when many times smaller than a human hair!
Used with the HEPA Dust Bag: Becauseofthisincrediblefiltration
1. Remove the shake-out bag,holding performance, the HEPA pre-motor filter
The handle at the bottom of the bag, will accumulate many fine dust particles
shake out doors vigorously over a that are difficult to see. Be assured that
garbage receptacle until there is no the HEPA pre-motor filter is doing the
moredust. job.CleantheHEPA pre-motor filter
2. Inspect shake-out bag regularly for after each use as described in this
tearsordamage.Replaceshake- section
out bags if damage or tears are present. 1. Remove the shake-out bag from the
Cleaning the Shake-Out Bag when canister. The HEPA pre-motor filter
Used Alone: islocatedundemeaththeshake-out
1. Remove the shake-out bag,empty bag. To remove the HEPA pre- contents into a
trash can, and shake motor filter, lift the form the
vigorously out doors until there is no sides of the HEPA filter.
moredust. 2. Vigorously”TapClean”theHEPA
2. The shake-out bag is hand wash- pre-motor filter on a hard surface to
ableinlukewarmwater. removeanyresidualdustthatmight
3. Allow to air dry for 24 hours. The stillbeontheHEPA pre-motor filter.
shake-out bag should be replaced 3. You can wash the HEPA pre-motor
when needed. Neverreplaceinto filter by running it under the tap and
the vacuum if still wet. allowing the water to run on the dirty
Note: If used often without HEPA dust side at least once a month or when
bag, replacement and washing will be suction appears to be decreased.
required more often
4. Replace clean shake-out bag in
Unit ,and replace the canister lid
Onto the vacuum.
Warning: To reduce the risk of electric shock, the power cord must be
disconnected before removing the dust bag, shake-out bag,
changing the filters or performing maintenance or trouble-
shootingchecks.

7
Environmental tips
Once any electronic product is no longer functional, it should be disposed of in such a way as to cause
minimum environmental impact, in accordance with the regulations of your local authority. In most
cases you can take such products to your local recycling station.
Parts Schematic
Ref#Part#PartDescription
1
50-40080 Canister Lid
2
50-40091 Inlet-Duct
3
50-50047 Screws
4
50-40092 Hose cuff
5
50-40093 HEPA bag holder
6a
40-21002 HEPA Dust Bag (sold in 6pk)
6b
40-21003 Paper Dust Bag (sold in 6pk)
7
See # 8
8
50-60005 Shake Out Bag
9
50-60006 HEPA Pre-Motor Filter
10
50-40094 Second filter plate
11
50-40095 Second filter plate Seal
12
50-40096 Inlet motor mount
13
50-10031 Motor
14
50-40097 Outlet motor mount
15
50-40098 Motor Shroud
16
50-40099 Foot
17
50-50048 screws
Ref#Part#PartDescription
18
50-40086 Blower Port
19
50-40100 Post filter cover
20
50-60007 Exhaust Filter
21
50-40101 Exhaust Filter Latch
22
50-40102 Exhaust Filter Latch Spring
23
50-40103 Front housing
24
50-40104 Sound Suppressor
25
50-50049 screws
26
50-10030 On/Off Power Switch
27
50-40105 Back housing
28
50-50050 Screws
29
50-40079 Carry handle
30
50-40106 Steain relief
31
50-10032 Power cord
32
50-40078 Back Plate
33
50-50051 Screws
34
50-40107 Shoulder strap
Table of contents
Other JanSan Vacuum Cleaner manuals