JASON Hydrotherapy HSC650 User manual

Jason International, Inc. • 501.771.4477 Page 1 of 16 Customer Service : 800.255.5766
Copyright © 2014 Jason International.
OWNER’S MANUAL
Home Spa
INSTALLATION, OPERATION, AND MAINTENANCE
49-1014-301
Date 05/2014
“TO BE REMOVED FOR USE BY THE OCCUPANT”
Jason International, Inc.
8328 MacArthur Drive
North Little Rock, AR 72118
www.jasoninternational.com
OWNER’S RECORD
Dealer:
Date Purchased:
Date Installed:
Installer:
PLACE SERIAL NUMBER CARD WITH
PRODUCT CONFIGURATION IN THIS BOX
INSPECTION
Inspect the unit prior to installation. In the event of a
problem, DO NOT install the unit.
All components are factory assembled to the bath and the
unit is water tested and inspected prior to leaving Jason
International, Inc.
If the carton shows sign of damage, inspect the product
before accepting and describe the problem on the Bill of
Lading.
NOTE: Transportation and insurance from Jason’s
factory are the buyer’s responsibility.
Damage sustained in transit is the responsibility of the
carrier. If damage is discovered,
The carrier must be immediately notified in writing with a
request for a representative to inspect the unit. Failure of
the carrier to respond should be reported to the seller and
carrier. Always file a freight claim promptly.
The installer is responsible for insuring that the unit is
free from defects or shipping damage. In the event of a
problem, DO NOT install the unit.
Jason International is not responsible for damage that
might have been avoided by inspection or testing prior to
installation.
If the carton shows sign of damage, inspect
the product before accepting and describe the
problem on the Bill of Lading.
Damage to the unit during installation will not be covered
by warranty and is the responsibility of the installer. ALL
WARRANTY CLAIMS ON ACRYLIC SURFACE DAMAGE
MUST BE MADE PRIOR TO INSTALLATION. Inspect
plumbing and bath surface for missing or damaged
components. Alert your dealer of any discrepancies.
To protect the unit from damage keep the bath in the
carton until ready for installation.
EQUIPMENT ACCESS
In accordance with Building Codes, service access to all
therapy bath equipment, controls, and electrical connections
must be provided during installation (See Table 1 -
Specifications for minimum access size). Access must be
provided for both the pump/control and the blower/control.
Insufficient access will hinder repair and maintenance.
Warranty service will not cover cost of providing equipment
access.
78 x78 x28 90/170 36 x 17 in 70.9
198 x198 x71 341/643 91 x 43 cm 346
78 x66 x28 80/160 36 x 17 in 64.6
198 x168 x71 303/606 91 x 43 cm 315
Min. Size
Access
Floor
Loading
L x W x H ( in. )
L x W x H ( cm)
Gallons
Liters
lbs/ft2
kg/M2
HSC650 (Round)
1
1.5
HomeSpa COLLECTION (Air Whirpool Bath)
Model
Overall Dimensions
Operating
Capacity
Blower
Pump
HSR6555
1
1.5
HP
HP
W x H (in.)
W x H (cm)
Table 1 - Specications

Jason International, Inc. • 501.771.4477 Page 2 of 16 Customer Service : 800.255.5766
Copyright © 2014 Jason International.
NOTE: Do not use a sand bed to install or level the
bath.
4. A finish frame under the bath rim should also always be
constructed to support the bath deck and insure proper
drainage toward the bath well. This frame is not intended
to support the full bath weight.
5. In addition, the seat area must be supported. Two 3” x 5”
wood blocks have been laminated into the seat areas. A
wooden 2”x4” support must be positioned between the
wood blocks and the floor. (HSC650 Only.)
6. A minimum ventilation opening of 2” x 4” for the blower
is required, and should be designed to draw in indoor
ambient air at a minimum of 22°C (72°F).
7. Locate the four (4) Sound Immersion transducers. Thread
the transducers onto the four (4) pre-attached mounting
studs located on the outside of the bath. The transducers
must be threaded on tight to get the best sound quality.
(See Figure 2.)
8. Connect the wiring from the audio device output into the
appropriate connection of the transducer’s terminal block.
CAUTION: The maximum wattage for each transducer
is 50 watts. Overload protectors have been included
with the transducers. Do not locate overload
protectors under the bath. Install in an accessible
location near the audio source. (See Figure 2A.)
9. Install the drain and overflow assembly to the bath
according to the instructions provided with the drain
and position the bath in the area of intended installation.
INSTALLATION
Each bathis provided with a cardboardbath well protector
that should be kept in the unit during installation and
throughout the bathroom construction process. Overflow
drains, fill spouts, and valves must be installed according
to the instructions herein.
See USER MAINTENANCE INSTRUCTIONS section of this
owner’s manual for humidity and mold prevention suggestions
prior to Installation.
1. The HomeSpa bath isequipped with separatebath pumps
and blower support bases which are joined for shipment
with packing boards. Remove the packing board before
installing the bath, Detach the packing board from
the bath and from underneath the blower and pumps.
2. Position the bath in the area of intended installation and
cut the blower and pump support strap(s) to allow the
blower and pump mount(s) to rest firmly on the floor. The
bottom of the blower and pump mount(s) must be
secured and level with the bottom of the bath. We
recommend securing the blower and pump mounts to
the floor with removable fasteners for ease of servicing.
WARNING: Any modification to the equipment is
not recommended and will void the Manufacturer’s
warranty.
3. Jason baths are designed to be supported at the base
of the bath. If the floor is smooth and level, the bath’s
Level Form™ Base will provide proper drainage and
support. (See Figure 1.)
The bath must be installed level for proper drainage.
Mortar is required when the subfloor is not smooth and
level, when additional sound insulation is desired, or when
the bath is installed in a drop-in application.
Figure 1
INSTALLATION INSTRUCTIONS
240V. 60Hz
POWER SUPPLY
PUMP
(2-EA.)
BLOWER
FULL SUPPORT BASE
2 X 4 SUPPORTS
(NOT SUPPLIED)
Neutral - White Wire
Hot - Black Wire
Ground - Green Wire
Dedicated
120V, 60 Hz
GFCI Protected
Service
Control Boxes
(3-EA)
Control Mount
Neutral - White Wire
Hot - Black Wire
Ground - Green Wire
Dedicated
120V, 60 Hz
GFCI Protected
Service
Pump Control (U1)
& Blower/JNP Control Pump Control (U2)
SOUND IMMERSION
TRANSDUCERS (4-ea.)
SANI-DESIGN AROMATHERAPY
20A.
240V.
50 OR 60Hz
DEDICATED
GFCI CIRCUIT.
PUMP CTRL
(U2)
PUMP CTRL
(U1)
&
BLOWER/JNP
CTRL
(BOXES NOT SUPPLIED)
20A.
240V.
50 OR 60Hz
DEDICATED
GFCI CIRCUIT.
NOTE: USE THE ABOVE
DIAGRAM FOR 240V, 50Hz
OR 60Hz SYSTEMS.

Jason International, Inc. • 501.771.4477 Page 3 of 16 Customer Service : 800.255.5766
Copyright © 2014 Jason International.
INSTALLATION INSTRUCTIONS (cont.)
Figure 2
Figure 2A
OVERLOAD
PROTECTOR
1.5A TIME
DELAY FUSE
1
4x 1-1/4
OVERLOAD
PROTECTOR
1.5A TIME
DELAY FUSE
1
4x 1-1/4
TO MEDIA DEVICE
REAR LEFT
TO MEDIA DEVICE
FRONT LEFT
TO MEDIA DEVICE
REAR RIGHT
TO MEDIA DEVICE
FRONT RIGHT
NOTE:
THE NEGATIVE TERMINAL IS
IDENTIFIED WITH THE RED
WIRE ON THE TRANSDUCER.
TO MEDIA DEVICE
LEFT
TO MEDIA DEVICE
RIGHT
Terminal
Block
Terminal
Block
LAMINATED
MOUNTING PLATE
THREADED
MOUNTING STUD
TRANSDUCER
WIRING
TO TERMINAL
BLOCK
TRANSDUCER

Jason International, Inc. • 501.771.4477 Page 4 of 16 Customer Service : 800.255.5766
Copyright © 2014 Jason International.
10. High Flow fill fittings have been installed on the sidewall
adjacent to the overflow drain. These can be attached
to any mixing valve. 3/4” inlet rough in plumbing is
recommended with 3/4” mixing valves to provide a flow
rate of approximately 20GPM. If a deck mounted fill spout
is preferred, install per manufacturer’s instructions and
leave the high flow fill fittings with their factory installed
plugs in place. A vacuum breaker may be required.
Follow all required plumbing codes during installation.
(See Figure 3.)
11. Before finishing the installation, it is recommended that
the bath be water tested (filled and operated), and the
bath and plumbing be inspected for leaks. Refer to the
OPERATING INSTRUCTIONS for testing.
NOTE: Before water testing the bath make sure the
pump unions are hand tight. Do not over tighten or use
a pipe wrench. This will damage the unions and cause
leaking. If the unit leaks with the unions hand tight, then
loosen the union(s) and check the O-ring seal to ensure
it is properly seated.
INSTALLATION INSTRUCTIONS (cont.)
12. The acrylic surface of this bath has been provided with a
protective film which helps protect the bath during shipment
and installation. Additonal protection may also be required
to protect the acrylic surface during installation. If the bath
is tiled in, remove the necessary portion of the film when
installing the tile.
13. After installation, remove the film and all loose debris
inside the bathwell and around the blower. Construction
plaster or excess grout can be removed with the use of
a wood (edge) trowel. Paint or tar stains may need to be
removed with a cleaner such as paint thinner, turpentine,
or isopropyl alcohol (rubbing alcohol).
14. Never allow cleaner the to soak against the surface
for long periods of time. Always rinse the surface
immediately following the use of cleaners. NOTE: Follow
the manufacturers instructions for safely using these
or similar products. If the surface becomes scratched
or dulled, it may be restored by using a quality plastic
polish, i.e., Novus Plastic Polish No. 2.
Figure 3
PLUG 1" MPT
REMOVE TO
CONNECT (2)

Jason International, Inc. • 501.771.4477 Page 5 of 16 Customer Service : 800.255.5766
Copyright © 2014 Jason International.
REMOTE MOUNTING OF AIR BLOWER
The Jason AirMasseur system has been factory installed following
E.T.L.Guidelines.Duringinstallation,ifremotemountingoftheblower
is desired or required, the following procedures should be followed.
NOTE: Do not remote mount the blower more than 15 feet
(457cm) away from the air inlet of the bath. Choose a location
as close as possible to the bath to assure maximum efficiency.
1. The installer must determine the layout of the piping; exact
remote mount location; and service access before begin¬ning
any work. Use 1.5” (38mm) ABS or PVC plastic tubing. Locate
the blower in an area accessible for servicing.
NOTE: A 15 foot extension replacement cable set can be
purchased from your Jason supplier, if needed. To insure
proper functioning of the system, avoid remote mounting
in a location which requires more than six (6) piping direc-
tion changes. A 90° direction change should be made up
of two 45° elbows for maximum efficiency.
2. If the blower has been factory installed, disconnect the blower
from the air bath plumbing by removing the two (2) screws on
the check valve outlet and disconnect the short piece of flex
pipe between the check valve and the elbow by removing the
two (2) screws in the elbow. (Omit this step on baths where the
blower is not factory installed and remote mounting is required.)
3. Install the blowerin the remote location.The remotemount loca-
tion’s ambient air temperature should remain at approximately
22°C (72°F) for optimum air heating.
4. Makesurethebloweriswellventilated.Theblowermountshould
be attached firmly tothefloor. Piping betweentheremoteblower
location and the bath can be insulated using a minimum of 1/2”
(13mm) thick insulation. Attach new piping to the elbow of the
existing piping.
INSTALLATION INSTRUCTIONS (cont.)
ELECTRICAL
Electrical Power Supply: These instructions are written
assuming 60Hz, 120V power supply. Special notations
are also included for export versions of the equipment
and power supply.
WARNING: Verification of electrical requirements must
be made before installation. refer to the equipment labels
for voltage and frequency requirements.
NOTE: This bath is designed for indoor use only. The
electrical equipment must not be exposed to direct
or indirect water or moisture contact. The electrical
equipment must also be protected from dust and other
airborne debris before, during, and after installation.
1. Electrical Service: A licensed electrician must provide
the “dedicated” electrical service protected by a GFCI.
The location of the GFCI must be at least five (5) feet (152
cm) away from the inside surface of the bath, accessible
for regular testing. Use copper conductors only.
DANGER : RISK OF ELECTRIC SHOCK: Connect
only to a circuit protected by a Ground Fault Circuit
Interrupter (GFCI). In the unlikely occurrence of
a current imbalance in the power conductors,
the GFCI will interrupt the power to the bath.
WARNING: The electrical service to the GFCI must not
be interrupted by any control device. Likewise, the
electrical service from the GFCI to the bath control
should be direct and not interrupted by a switch. Never
use a switch in conjunction with a control device.
This will VOID THE MANUFACTURER’S WARRANTY.
2. GROUNDING IS REQUIRED. The unit should be installed
by a qualified service representative and properly
grounded.
3. INSTALLSERVICE CONNECTIONATLEAST6”(15cm)
ABOVE SUB FLOOR.
ALL LOCAL AND STATE ELECTRICAL AND
PLUMBING CODES MUST BE OBSERVED. Where
there are no local codes the National Electric Code
(NEC) and Uniform Plumbing Code (UPC) shall be
observed. It is the responsibility of the installer/owner to
determine specific code compliance prior to installation
of the product.

Jason International, Inc. • 501.771.4477 Page 6 of 16 Customer Service : 800.255.5766
Copyright © 2014 Jason International.
INSTALLATION INSTRUCTIONS (cont.)
CLEANING
1. Remove all loose debris. Construction plaster or
excess grout can be removed with the use of a wood
(edge) trowel.
2. Paint or tar stains may need to be removed with a
cleaner such as paint thinner, turpentine, or isopropyl
alcohol (rubbing alcohol). Never allow the cleaner to
soak against the acrylic surface for long periods of time.
Always rinse the surface immediately following the use
of cleaners.
3. Follow the manufacturer’s instructions for safe use of
cleaning products. If the surface becomes scratched
or dulled, it may be restored by using a quality plastic
polish, like Novus Plastic Polish No. 2 (available from
the Jason Dealer). It is always preferable to protect
the acrylic surface during installation to minimize
cleanup and prevent surface damage.
WATER TESTING
Before finishing the installation, it is recommended that the
bath be water tested and the plumbing tested for leaks.
1. Before water testing the bath, make sure any pump
unions are hand tight. Do not over tighten or use a pipe
wrench. This will damage the unions and cause leaking.
If the unit leaks with the unions hand tight, then loosen
the unions(s) and check the O-ring seal to ensure it is
properly seated.
2. Fill and operate the bath. Close the drain and fill the
bath with water to at least 10 inches [25 cm] below the
bath deck. The inlet temperature should not exceed
40°C (104°F). Refer to the FILLING AND DRAINING
section of this owner’s manual for more information.
3. Inspect the plumbing for leaks.
4. Turn the equipment Off and then drain the water.
The bath unit and its plumbing are designed to drain
after each use whether used as a hydrotherapy bath,
soaking bath, or when taking a shower.
4. 120V Electrical Service - Home Spa Controls
Service Connection #1 (see Figure 1)
The blower and pump (U1) are prewired to their control
boxes. The control boxes have a 36” (91cm) cord
with plug end. The blower and pump control boxes
are mounted on a stand that is temporarily secured
to the packing board for shipping. These boxes
must remain on the control box bracket so that the
two boxes can communicate properly through their
infared communication feature. During installation,
the control box bracket and controls must be located
to permit access for inspection and servicing. The
control boxes must be plugged into a dedicated 120V,
20A, 60Hz, GFCI protected cirecuit.
Service Connection #2 (see Figure 1)
The second pump (U2) is prewired to the control box.
The control boxes have a 36” (91cm) cord with plug
end. The pump control box is mounted on a stand
that is temporarily secured to the packing board for
shipping. This box must remain on the control box
bracket so that the boxes can communicate properly
through their infared communication feature. During
installation, the control box bracket and controls
must be located to permit access for inspection and
servicing. The control box must be plugged into a
dedicated 120V, 20A, 60Hz, GFCI protected cirecuit.
5. 240V Electrical Service - Home Spa Controls
Service Connection #1 (See Figure 1)
The blower and pump (U1) are prewired to their
control boxes. The control boxes have a 36” (91cm)
cord with junction box connection. The blower and
pump control boxes are mounted on a stand that is
temporarily secured to the packing board for shipping.
These boxes must remain on the control box bracket
so that the two boxes can communicate properly
through their infared communication feature. During
installation, the control box bracket and controls
must be located to permit access for inspection and
servicing. The junction box must be connected into
a dedicated 240V, 20A, 50 or 60Hz, GFCI protected
circuit.
Service Connection #2 (see Figure 1)
The second pump (U2) is prewired to the control box.
The control box has a 36” (91cm) cord with junction
box connection. The pump control box is mounted on a
stand that is temporarily secured to the packing board
for shipping. This box must remain on the control
box bracket so that the two boxes can communicate
properly through their infared communication
feature. During installation, the control box bracket
and controls must be located to permit access for
inspection and servicing. The junction box must be
connected into a dedicated 240V, 20A, 50 or 60Hz,
GFCI protected circuit.

Jason International, Inc. • 501.771.4477 Page 7 of 16 Customer Service : 800.255.5766
Copyright © 2014 Jason International.
The Jason Home Spa System is the most advanced bath
manufactured by Jason International, Inc. and features the
ultimate in luxury bathing for the leisure bath industry. All
components must be properly connected for the bath to
function correctly.
The Home Spa Control Box
The pumps, blower, keypads, LED light, Ozone Sanitation
Unit and the water level / temperature sensor must be
plugged into the proper receptacles for correct operation of
the Home spa system. See Figure 4 for connections.
(A) The power cords for the Service Connection #1 control
boxes must be connected into a 120V, 20amp, GFCI
dedicated circuit.
(B) The U1 Whirlpool pump’s power cord should be plugged
into the female cord connection on the ozone unit, prewired
to the control box.
INSTALLATION INSTRUCTIONS (cont.)
Figure 4
HOME SPA CONTROL BOX CONNECTIONS
(C) Eight-pin mini-DIN terminal for the Home Spa U1
keypad.
(D) Six-pin mini-DIN terminal for LED light.
(E) Six-pin mini-DIN terminal for installation of the water
sensor to the U1 pump control box.
(F) The blower’s power cord will need to be pugged into the
center control box. Refer to the ELECTRICAL section of the
manual for connnecting the blower to the control box.
(G) The power cord for the Service Connection #2 control
box must be connected into a 120V, 20amp, GFCI dedicated
circuit.
(H) The U2 Whirlpool pump’s power cord should be plugged
into the female cord on U2 pump control box.
(I) Eight-pin mini-DIN terminal for the Home Spa U2 keypad.
(J) The jetted neck pillow (JNP) solenoid cables should be
connected into the green solenoid terminal located in the
center control box.
ED
C
Ozone
IMC-213
ISD-237
Remote
[REM]
U1
Keypad
LEDs
I
IMC-213
Blower
U1
JNP
Solenoids
U2
JNP
Solenoids
U2
Keypad
Water/
Temp
Sensor
A
To Dedicated
120V / 60Hz 20A
GFCI Protected Service
CPH
Pump
U2
U1
CPH
Pump
To Dedicated
120V / 60Hz 20A
GFCI Protected Service
B
C
D
E
F
G
H
I
J

Jason International, Inc. • 501.771.4477 Page 8 of 16 Customer Service : 800.255.5766
Copyright © 2014 Jason International.
INTRODUCTION
This manual contains all of the information needed for the
proper installation and operation of your Jason Home Spa
bath. The Home Spa bath has been designed to give you years
of relaxing trouble-free service, provided the unit is maintained
and operated in accordance with these instructions.
Thoroughly clean and disinfect the unit as described in
the CLEANING section of the USER MAINTENANCE
INSTRUCTIONS of this owner’s manual before its first use
and periodically thereafter.
CAUTION: Keep hair, towels, and clothing away from the
suction fitting whenever the Home Spa bath equipment is
On. Never operate the equipment with the suction cover off,
doing so VOIDS THE MANUFACTURER’S WARRANTY. It
is a safety cover designed to eliminate the potential of hair and
body entrapment.
All Jason Home Spa baths are pre-plumbed at the factory.
WARNING: Before operating refer to the instructions
pertaining to the risk of fire, electric shock, or injury to
persons at the end of this owner’s manual.
FEATURES AND CONTROLS
The Jason Home Spa bath provides both an air bath [requires
a minimum water depth of approximately 12” (30cm) from
the bath deck, which is approximately 80 gallons (302
liters)] and whirlpool bath system [requires a minimum
water depth of approximately 6” (15cm) from the bath
deck which is approximately 170 gallons (644 liters)].
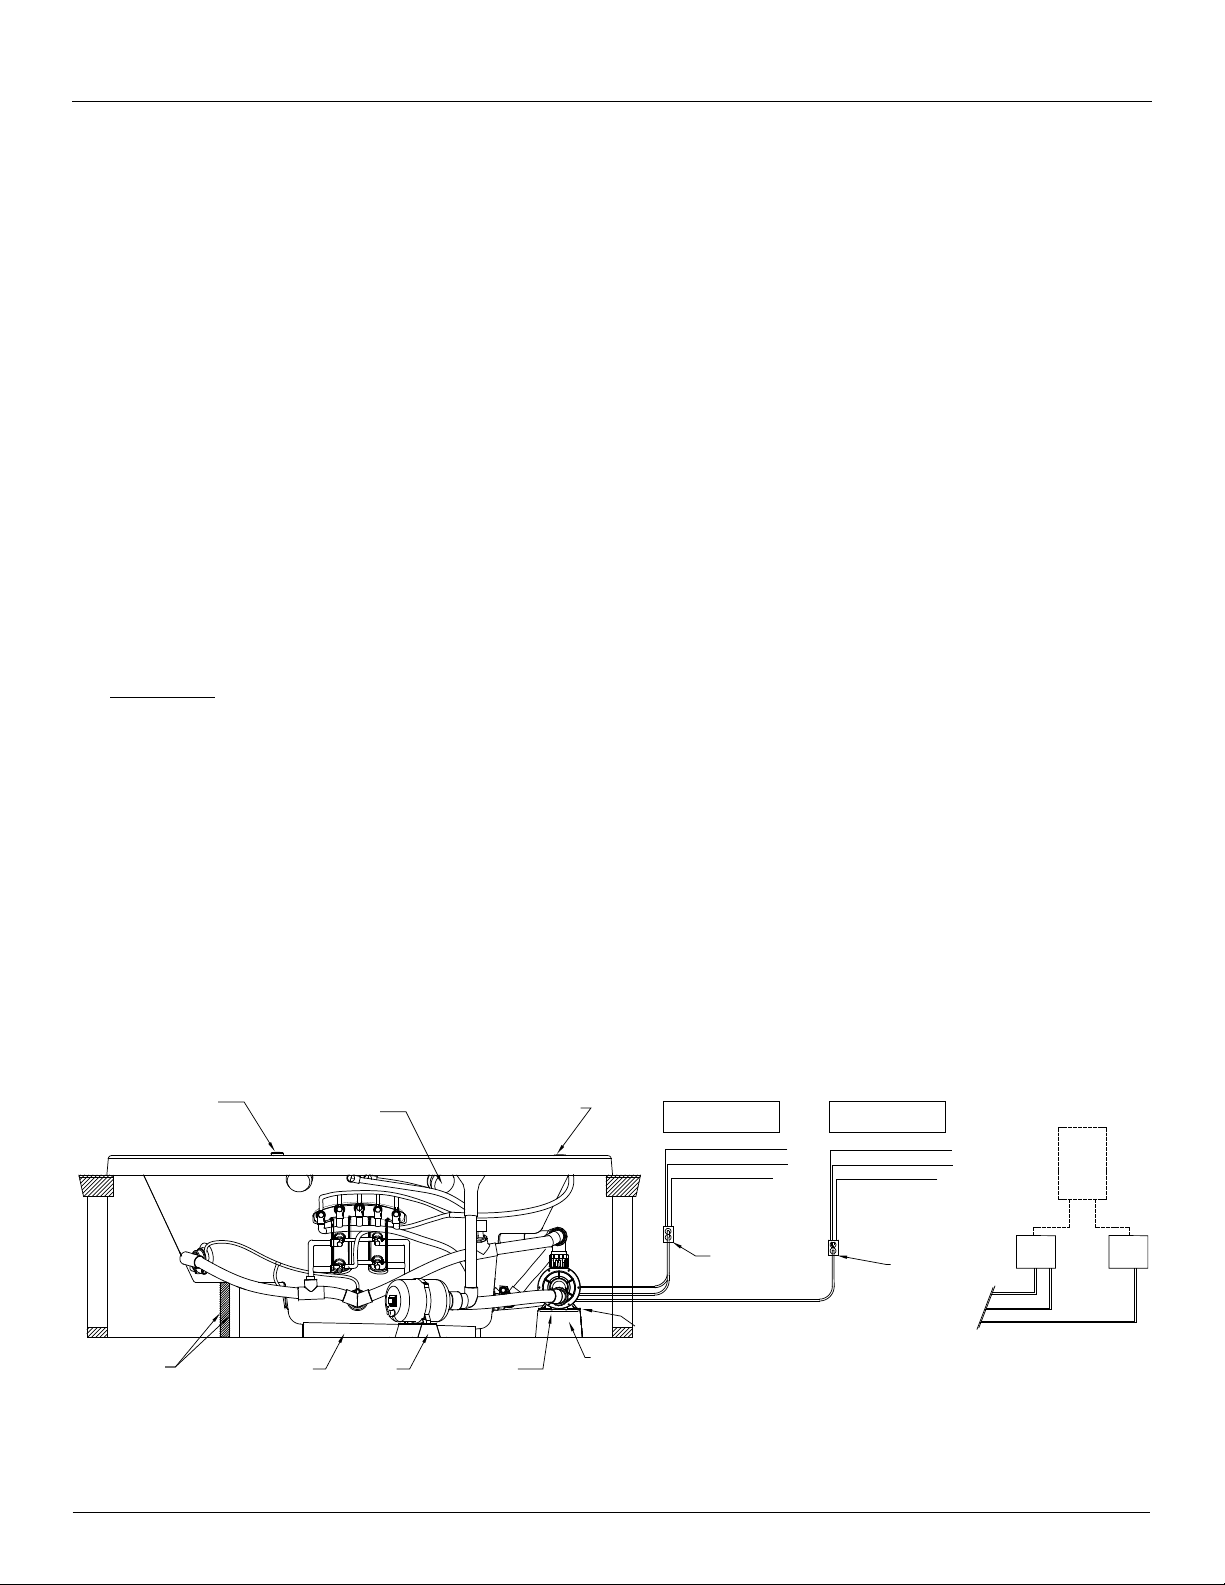
The Home Spa air bath system includes a variable-speed,
1-HP air blower with heater; and three (3) massage modes:
Continuous, Wave or Pulse. The Home Spa whirlpool system
includes two 11/2-HP, combination pump/heater units; and
low water level and temperature sensor. A built in timer shuts
the blower and/or pump off 20 minutes after being activated.
Home Spa Touchpad
Two control touchpads, with an LCD readout, are mounted on
the bath wall which alternately indicate the water temperature
(+/- 5°F) and whirlpool or air bath time remaining.
Home Spa Remote Control
In addition to the two control touchpads installed on the
bath walls, a floating, waterproof Universal Remote Control
is provided with all Home Spa baths. This remote control
provides the same control functions as the bath’s main control
console, plus the bather may remotely operate a TV, DVD,
CD, etc. Refer to the Instruction Manual provided with the
remote control for detailed instructions.
Automatic Purge
Twenty (20) minutes after the control has shut off, the blower
will start again for a two minute purge cycle that dries the air
channel. Note that the LCD display will read “PURGE” and
begin to countdown the 10 or 20 minute pause before the
purge cycle begins. The readout will display “PURGE ON”
during the purge cycle. Any time during the pause before the
purge cycle begins, pressing and holding the Blower Speeds
icon will reduce the pause from 20 minutes to 10 minutes.
During the two-minute purge, pressing the “Blower On/Off”
icon will stop the purge.
Daily Purge
The daily purge can be activated through the customized
settings of the Signature Edition touchpad. When activated,
the daily purge will start the blower for two-minutes at the
same time every day to dry the air channel. See “Operating the
Signature Edition Air-Whirlpool Touchpad” section for details
on activating this setting.
Jason Automatic Ozone Sanitation System
Jason Ozone Technology guards your Home Spa bath
from bacteria, viruses, etc. while leaving plumbing lines
clean and fresh. The system starts and stops automatically
in conjunction with the pump motor. The Corona Hybrid
technology provides highly efficient ozone generation.
Hybrid systems use solid-state drivers with EMI and surge
suppression to ensure bath controls are not affected
when the unit is started or operating. This unit is thermally
protected to prevent overheating in the event that airflow is
interrupted. The Jason ozone sanitation system is factory
installed and ready to operate. The Ozone unit is pre-
wired to the primary control box, no additional electrical
connections are needed.
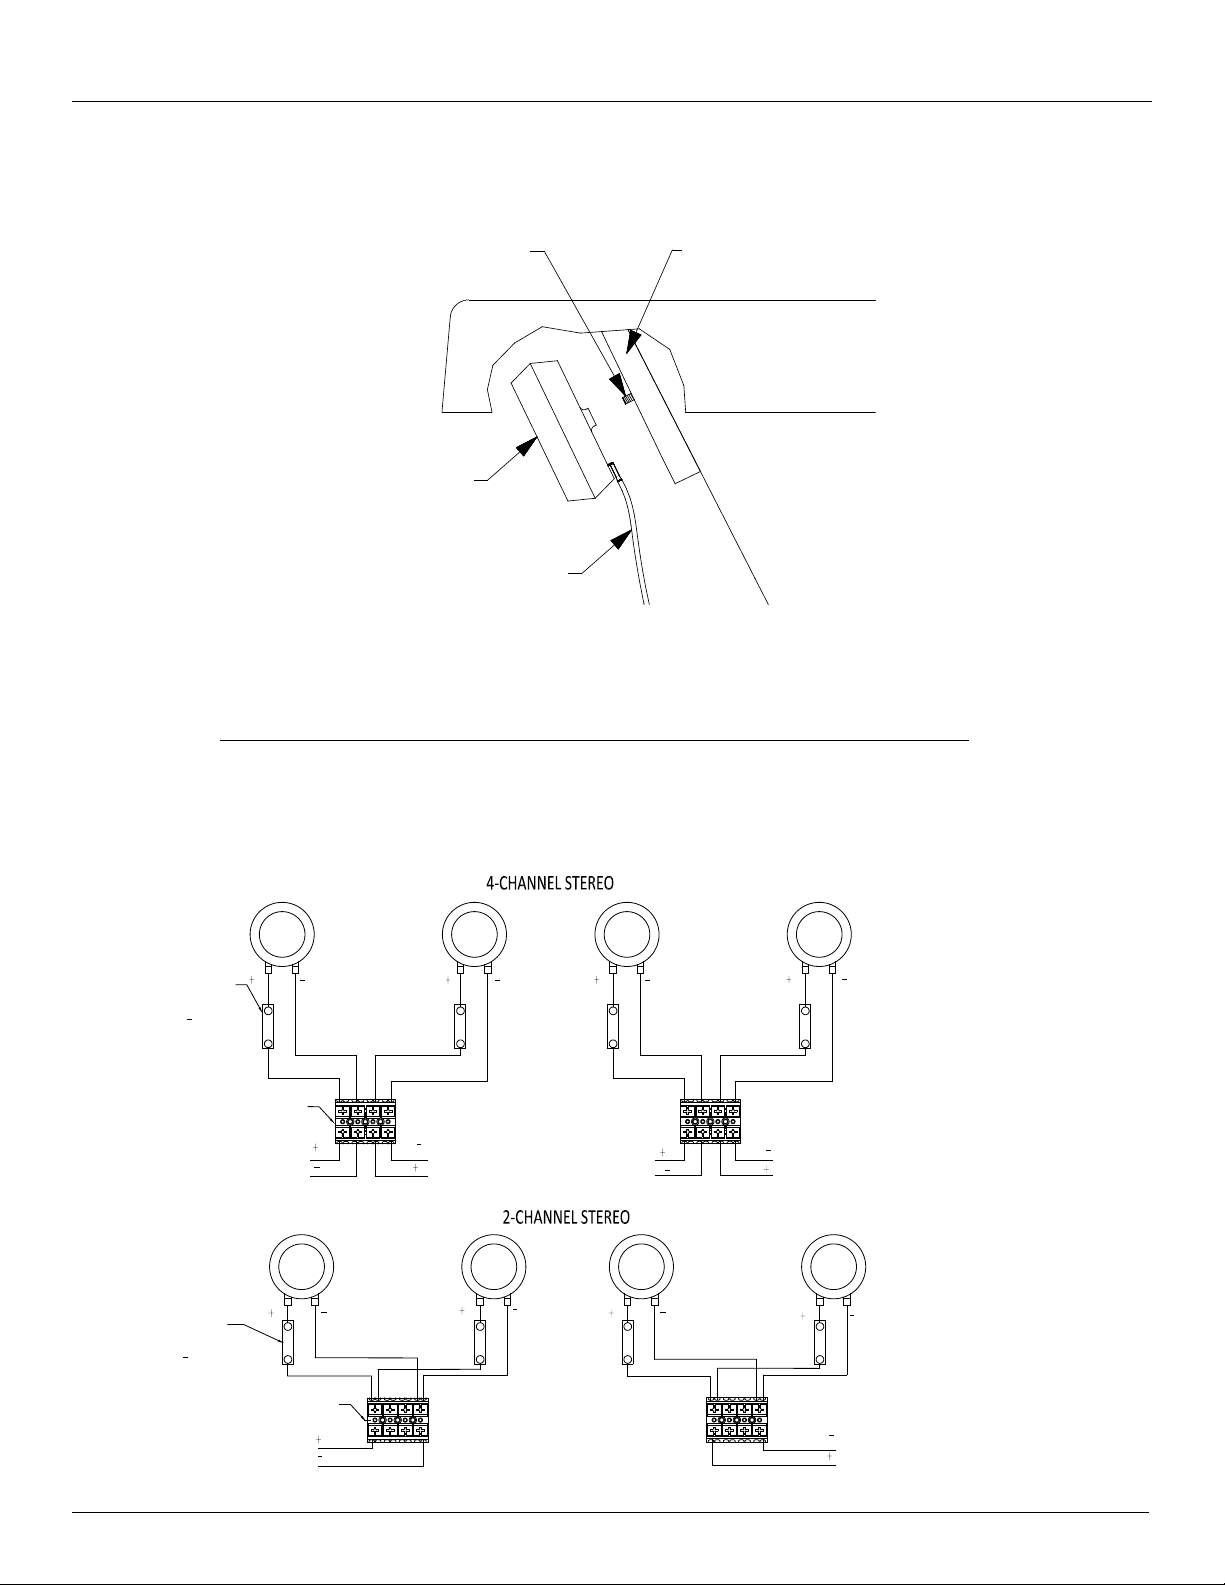
Jason Sound Immersion System
Your Jason Home Spa bath comes equipped with the
Jason Sound Immersion system (see Figure 2A) to bathe
you in music. It consists of four strategically located, sound
transducers. These transducers are to be connected to
your home entertainment system.
Jason Aromatherapy
The Jason Home Spa bath is equipped with the Jason
Aromatherapy system. It is located on the top deck of the
bath. Remove the cap and load the basket with aroma
beads or oil applied to a wick. The Jason Aromatherapy
system will not contaminate the bath water as conventional
methods do. The aroma is applied to the air system only,
the source material does not come in contact with the water.
OPERATING INSTRUCTION, FEATURES, AND CONTROLS

Jason International, Inc. • 501.771.4477 Page 9 of 16 Customer Service : 800.255.5766
Copyright © 2014 Jason International.
Jason Sani-DesignTM Cleaning System
The Jason Home Spa bath is equipped with the Jason
Sani-DesignTM cleaning system. It is located on the top
deck of the bath. The Jason Sani-DesignTM system makes
easy work of cleaning all of the plumbing and air channels.
The Jason Bath System Cleaner is a specially formulated
solution to aid cleaning of the bath well, all plumbing and air
channels, and is designed to be used in the Sani-DesignTM
System. It cleans the places you could never reach and is a
powerful yet safe and gentle cleaner for you and your bath.
Jets
Strategically placed whirlpool jets are provided for complete
enjoyment of your bath. The jets are specially designed
for maximum whirlpool action with either directional or
rotational capabilities. By changing the direction of the jets,
you can concentrate the massaging jet stream to your area of
preference. You can also individually adjust the flow of each jet.
Pumps
Pumps provided on Jason Air-Whirlpool baths are factory
tested when assembled and retested after installation on
the Air-Whirlpool bath. These pumps are of efficient design
incorporating high quality long life seals which provide superior
service. However, should the pump need service, suction and
discharge unions are provided for easy pump removal.
Blower
The blower generates warm air and pushes it through the air
jets. Blowers provided on Jason AirMasseur baths are factory
tested when assembled and again retested after installation
on the bath.
FILLING AND DRAINING
Close the drain and fill the bath with water at least two (2)
inches (50mm) above the jets. The inlet temperature should
not exceed 40°C (104°F). When bath is in use, turn the unit Off
before draining the water. The bath unit and its plumbing are
designed to drain after each use.
NOTE: If the unit fails to operate, check the breaker panel to
insure that the circuit breaker is on. Check the GFCI by testing
and resetting it. Also check the water level in the bath; it must
be above the jets for the pump to operate. If the unit still fails
to operate, refer to the Trouble Shooting Guide section of this
manual. If the unit still fails to operate and is out of warranty,
contact an authorized service technician for repair. If the unit is
within the warranty period, contact JASON Technical Services
at 800-255-5766. DO NOT ATTEMPT TO RESOLVE THE
PROBLEM.
OPERATING INSTRUCTIONS, FEATURES, AND CONTROLS (cont.)

Jason International, Inc. • 501.771.4477 Page 10 of 16 Customer Service : 800.255.5766
Copyright © 2014 Jason International.
HOME SPA TOUCHPAD
All functions of the Jason Home Spa bath can be conveniently
operated with either one of the two Home Spa digital keypad
controls which control the operation of the two whirlpool
pumps, the air blower, underwater mood lights, and the jetted
neck pillows. The dual keypads are used to run individual
pumps and jetted neck pillows. The same blower and lights
are controlled from both keypads.
Whirlpool On/O Icon
To control the operation of the whirlpool pump motor, press
and release for each setting: On or Off. A 20 minute decreasing
timer will be initiated when the pump motor starts. Press and
hold the Pump icon to cycle through each pump setting. The
Pump icon lights when the water is at operating level and the
LCD displays “System Ready”. The LCD will display “WP Off”
or “WP On” when the key is pressed. It also toggles between
Temperature and Timer at 5 second intervals. “Low Water”
is displayed for 5 seconds if no water is detected.
Jetted Neck Pillow Icon
To control the operation of the jetted neck pillow, press and
release for each setting, you can set for a constant flow on
both jets, a pulsing flow on both jets, or a pulsing alternating
flow between jets. Press and hold the Pillow icon to cycle
through the various pillow settings. The Pillow icon will light
whenever the pump is running. The solenoids will open for
two (2) minutes to drain during the purge cycle countdown.
The LCD will display “Pillow On”, “Pillow Pulse1”, “Pillow
Pulse2”, or “Pillow Off” while the key is pressed.
AirMasseur® On/O and Mode Icon
To control the operation of the blower, simply press and
release to change the setting to Constant, Wave, Pulse or
Off. A 20 minute decreasing timer will be initiated when the
blower motor starts. Press and hold the Blower icon to cycle
through blower modes. The Blower icon should remain lit as
long as the bath is connected to a power supply. The LCD
will display “Const Air” and blower speed, “Wave Air” and
blower speed, or “Pulse Air” and blower speed, while the
key is pressed. The time remaining on the purge cycle is
displayed after the bath has drained. “Purge Stop” is displayed
while the key is pressed during the purge cycle. This action
will terminate the purge cycle. The mode settings will be
remembered on the next startup.
Blower Speeds Icon
Hold the key in Constant mode to go from High to Low then
release and hold again to go from Low to High. Hold the
key in Wave and Pulse mode to go from High to Medium
and Medium to High. The system remembers the last speed
setting on the next startup. The Blower Speeds icon will light
up when the blower is running. The LED displays the blower
speed from “10” (Low) or “55”(Med) to “99” (High) while the
key is pressed. You can reduce the auto purge idle time
from 20 minutes to 10 minutes, by pressing and holding the
key for more than 5-seconds during the purge idle period.
LED Light Icon
Hold the key for less than two (2) seconds to turn the lights
Off or On. Hold the key for more than two (2) seconds to
change modes. The Light icon should remain lit as long as
the bath is connected to a power supply. This function has
a two-hour timer and remembers the last mode. The LCD
displays “Light On” or “Light Off while the key is pressed
for less than two (2) seconds, “Light Cycle” is displayed if
pressed for more than two (2) seconds.
P
AirMasseur®On/Off, Mode
Blower Speeds
LED Light
IR for Remote
Whirlpool On/Off
Pillow On/Off
OPERATING INSTRUCTIONS, FEATURES, AND CONTROLS (cont.)
Figure 5

Jason International, Inc. • 501.771.4477 Page 11 of 16 Customer Service : 800.255.5766
Copyright © 2014 Jason International.
Option (“O” Icon)
This key is reserved for future options.
Customized Settings
The 12 character LCD display can be customized by pressing
the AirMasseur®and Blower Speeds icon simultaneously for
five (5) seconds, while the system is off.
NOTE: Use the above figure to locate the icons. A menu will
be displayed to choose the following: Purge 24, (starts the
blower every 24 hours for two (2) minutes at the time the
purge was set), Product Test Diagnostics, Temperature (F
or C) and Language (English or Spanish).
Menu Instructions
Use the AirMasseur®icon to scroll through the different menu
items. Use the blower speeds icon to change an option. For
example, press and release the top icon to change from
Product Test to the Temperature option. Press and release
the bottom icon to change the temperature display from F
(Fahrenheit) to C (Celsius).
Product Test Diagnostics
After selecting the Product Test option from the menu, the unit
will perform a series of tests to confirm correct installation of
components. The test will begin by displaying the configuration
number, followed by the software revision number. Next,
the auxiliary control box will be tested to ensure proper IR
communication. The display will then test the Temperature and
Low Water level sensor (ITW-209). Next, each of the six (6)
icon buttons will begin to light. Press the illuminated button to
proceed to the next icon. After the icon test, the pump will start
for two (2) seconds on the High setting. Lastly, the LED Light
unit will be tested. If you receive an error on any of the tests,
confirm proper installation of component to the correct control
box. (See the CONTROL BOX CONNECTIONS section).
Remote Control
The Signature Edition control system includes a waterproof
floating Universal Remote Control. It controls all bath functions
plus a TV, DVD, CD, etc. which can be heard through the
Sound Immersion Transducers.
OPERATING INSTRUCTIONS, FEATURES, AND CONTROLS (cont.)

Jason International, Inc. • 501.771.4477 Page 12 of 16 Customer Service : 800.255.5766
Copyright © 2014 Jason International.
SURFACE MAINTENANCE
Areas with minor scratches or dull surfaces can be restored
by applying commercially available plastic polish (i.e. Novus
Plastic Polish No. 2, available at your Jason dealer), followed
by an application of acrylic paste wax. Buff the surface with a
clean soft cloth. Do not use sandpaper, steel wool, or abrasive
rubbing compounds. If scratches are too deep to rub out, or if
the damage penetrates the acrylic surface, consult your dealer
for recommendations on surface repair.
AIR HEATER AND AIR TEMPERATURE
The air heater incorporated into the air blower is designed to
preheat the incoming air to body temperature, not to heat the
bath water. The air heater automatically comes on when the air
bloweris activated.Eventhough allair baths providepreheatedair,
occasionally some people with sensitive skin might experience a
cold air sensation. This sensation is caused by the swiftly moving
heated air bubbles blowing on the wet skin. This phenomenon
can be related to the use of a fan for cooling on a hot day. While
the ambient temperature does not change, the moving air makes
you feel cooler. Avoiding this cold air sensation is among the
reasons Jason avoids placing air jets directly beneath the body.
If you experience a cool air sensation, which is most noticeable
during the first few minutes of an air bath, simply move your body
slightly away from the closest jets.
FLUSHING / SANITIZING
Upon start-up and not to exceed 90 days, your bath and plumbing
system should be flushed. To do so, close the drain and fill the
bath with warm water to at least two (2) inches [5.1 cm] above the
highest jet. Pour in Jason Bath System Cleaner and follow the
directions on the bottle. DO NOT use bleach or other chlorinated
cleansers directly on the metal trim.
REPAIR
Refer all plumbing or electrical repair to a qualified service
technician.DONOT ATTEMPT TO RESOLVETHEPROBLEM.
This can result in danger of electrical shock or damage to the unit
and will VOID THE WARRANTY. Remember, when contacting
your dealer or service representative, always have your serial
number, proof of purchase, and model number. This will insure
a quick response on warranty items. The serial number can be
foundonthefrontpage ofthis manualor onthe smallcard adhered
to the back of the bath just above the equipment.
HUMIDITY
WARNING: Avoid high humidity levels in your home.
Mold, mildew, fungi and bacteria which may be harmful to
health thrive in areas with continued high humidity levels;
therefore, every precaution should be taken to make sure
your plumbing fixtures including bathtubs, therapy baths,
or showers do not become a source of high humidity due
to improper installations or leaks.
To avoid having your plumbing fixtures become a source of
unwanted humidity, please make sure the following steps are
taken prior to installation.
1. Make sure the area where the bathtub or shower is installed is
well vented and allows enough ventilation and air circulation
to dry the bathroom environment within a short time after
taking a bath or shower.
2. If your bath or shower unit is tiled-in, use units with an integral
tile flange or make sure a tile flange kit or a similar mechanical
barrier is installed to prevent shower spray, splash, or overflow
to leak behind the bathtub.
3.Makesuretheplumberproperly testsyourtherapybathbefore it
is roughed in to make sure there are no leaks and it is installed
with proper access to bath equipment.
4. Make sure that all the plumbing and fixtures in the bathroom
are in good working order and have no leaks.
5. Do not use carpeting or other materials or furniture, which can
hold moisture in your bathroom.
6. Use disinfectant to clean any bathroom surfaces which are
regularly exposed to moisture.
7. Clean and disinfect humidifier and dehumidifiers as
recommended by the manufacturer. Replace the air filter on
the HVAC unit once a month.
8. Clean moldy surfaces as soon as any mold appears by using a
detergent/soapy solution and appropriate household cleaner.
Always use gloves during cleaning. Dispose of any sponges
or rags used to clean mold.
CLEANING
With minimum care, your acrylic-surfaced bath will retain its high-
luster finish for many years. For regular cleaning use Jason Bath
Cleaner or a mild NONABRASIVE liquid detergent solution (i.e.
glass cleaner) and a soft, wet cloth or sponge. Do not run the
hydrotherapy system with foaming cleaners or soaps. Rinse the
bath thoroughly after cleaning.
USER MAINTENANCE INSTRUCTIONS

Jason International, Inc. • 501.771.4477 Page 13 of 16 Customer Service : 800.255.5766
Copyright © 2014 Jason International.
AIRMASSEUR®BLOWER SYSTEM
SYMPTOMS POSSIBLE CAUSES RECOMMENDED ACTION
Air bath system won’t operate.
a) No power to air bath unit. a) Reset circuit breakers and check GFCI. Check fuses
and replace if bad.
b) Blower motor is not plugged in. b) Make sure plug is fully inserted into the outlet.
c) Keypad is disconnected. c) Check and reconnect if necessary.
Blower shuts off by itself or before
time elapses.
a) Blower motor overheated
and thermal protection device
deactivated motor (possibly low
voltage).
a) Check that blower has sufficient ventilation and that the
intake into the blower is not blocked. Clear and allow
the motor to cool down. (Check service & wire size.)
b) GFCI tripped. b) Refer to installer/dealer.
Circuit breaker trips repeatedly.
a) Defective breaker. a) Replace breaker.
b) Short circuit between bath and
blower breaker box. b) Refer to installer/dealer.
c) Other items are connected to
the same circuit. c) Refer to installer/dealer.
Blower does not shut off. a) Defective keypad or timer. a) Refer to installer/dealer. Replace keypad or control.
Air bath does not function properly
while in the Pulse or Wave mode
(Signature Edition).
a) Blower speed setting is set too
low. a) Change to a mid-range air speed setting before
switching over to Wave or Pulse modes.
LED Chromatherapy light will not
operate.
a) LED light is loose in socket. a) Access LED light and assure it is properly installed in
socket..
b) LED cable disconnected. b) Verify correct cabel connections.
TROUBLE SHOOTING GUIDE
If you believe the unit to be within the warranty period, you must contact Jason Customer Service: 1-800-255-5766 with the
bath’s Product and Serial numbers before work is started.
ALL WARRANTY REPAIRS MUST BE AUTHORIZED BY JASON BEFORE WORK IS STARTED.
FOR SERVICE, ALWAYS CONTACT YOUR DEALER OR AUTHORIZED SERVICE CENTER
WARNING: Always turn off power at the mail electrical service panel when servicing the bath.

Jason International, Inc. • 501.771.4477 Page 14 of 16 Customer Service : 800.255.5766
Copyright © 2014 Jason International.
Jason International, Inc. (Jason), warrants its baths to be free from defects in workmanship and materials as provided in the enclosed Warranty
Statement and Warranty validation card.
The pre-addressed warranty registration card MUST be filled out by the purchaser within thirty (30) days from purchase and mailed to Jason Inter-
national, Inc., in order for limited warranty to become effective.
WARRANTY
Troubleshooting Guide (cont.)
WHIRLPOOL PUMP SYSTEM
SYMPTOMS POSSIBLE CAUSES RECOMMENDED ACTION
Pump system won’t start.
a) No power to the pump unit. a) Reset circuit breakers and check GFCI. Check fuses
and replace if bad.
b) Pump motor is not plugged in. b) Make sure plug is fully inserted into the ourlet.
c) Insufficient water. c) Check and reconnect if necessary.
Pump operates, but no air is
injected into water.
a) Air line is clogged. a) Refer to installer/dealer.
Pump operates, but water is not
being pumped.
a) Suction or discharge blocked. a) Remove obstruction.
b) Suction air leak. (System usu-
ally surges.) b) Make sure union is tight on suction side of the purmp.
Pump does not manually shutoff. a) Defective keypad or control a) Refer to installer/dealer. Replace keypad or control.
Pump unions leak.
a) Unions cracked, under-tight-
ened, over-tightened, or O-ring
is not seated properly (possi-
bly pinched).
a) Refer to installer/dealer. Replace keypad or control.
Pump shuts off by itself before set
time elapses.
a) Pump motor overheated and
thermal protection device
deactivated motor. (Possibly
low voltage.)
a) Make sure motor air cooling vents are not blocked.
Clear and allow motor to cool down. (Check service &
wire size.)
b) GFCI tripped. b) Refer to installer /dealer.
c) Water fell below rec-
ommended level. c) Fill to recommended level (2” [50 mm] above jets).
Pump does not turn off after set
time elapses
.
a) Wiring error or control prob-
lem. a) Refer to installer/dealer.
LED Chromatherapy light will not
operate.
a) LED light is loose in socket. a) Access LED light and assure it is properly installed in
socket.
b) LED cable disconnected. b) Verify correct cabel connections.
WARRANTY REGISTRATION: Register your product's warranty online at www.jasoninternational.com.

Jason International, Inc. • 501.771.4477 Page 15 of 16 Customer Service : 800.255.5766
Copyright © 2014 Jason International.
IMPORTANT SAFETY INSTRUCTIONS
INSTRUCTIONS PERTAINING TO THE RISK OF FIRE, ELECTRIC SHOCK, OR INJURY TO PER-
SONS.
This manual contains information and instructions for proper operation and maintenance of your therapy bath. Failure to follow these
instructions could result in personal injury, electrical shock, or fire.
WARNING: When using this unit, basic precautions should always be followed, including the following:
READ AND FOLLOW ALL INSTRUCTIONS CAREFULLY
DANGER: TO REDUCE THE RISK OF INJURY FOLLOW THESE PRECAUTIONS:
A. Do not permit children to use this product unless they are closely supervised at all times.
B. Use this unit only for its intended use as described in this manual. Do not use attachments not recommended by the manufac-
turer.
C. The water in a therapy bath should never exceed 40°C (104°F). Water temperatures between 38°C (100°F) and 40°C (104°F) are
considered safe for a healthy adult. Use time should be limited to approximately 30 minutes, followed by a shower to cool down.
Longer exposures may result in hyperthermia. The symptoms of this condition are nausea, dizziness and fainting, and it can be
fatal. Lower water temperatures are recommended for extended use (exceeding 10 -15 minutes) and for young children.
D. Since excessive water temperatures have a high potential for causing fetal damage during the early months of pregnancy,
pregnant or possibly pregnant women should limit therapy bath water temperatures to 38°C (100°F).
E. The use of drugs or alcoholic beverages before or during therapy bath use may lead to unconsciousness with the
possibility of drowning. Never use the therapy bath while under the influence of alcohol, anticoagulants, stimulants,
antihistamines, vasoconstrictors, vasodilators, hypnotics, narcotics, or tranquilizers.
F. Persons with a medical history of heart disease, low or high blood pressure, circulatory system problems, or diabetes should
consult a physician before using a therapy bath.
G. Persons using medication should consult a physician before using a therapy bath since some medication may induce drowsiness
while other medication may affect heart rate, blood pressure, and circulation.
DANGER: To reduce the risk of injury, enter and exit the bath slowly. Do not operate this unit unless the suction cover is attached over
the suction inlet fitting and the jet assemblies are installed. There should be at least two (2) inches of water above the highest jet
location during therapy bath operation. NEVER RUN UNIT DRY.
WARNING: Never operate electrically connected devices in or near the bath. Never drop or insert any object into any opening.
This unit must be connected to a supply circuit that is protected by a GFCI. Such a device should be installed by a licensed electrician
and should be tested on a regular basis (at least monthly). To test the GFCI push the TEST button. The GFCI should interrupt the
power. Push the RESET button and the power should be restored. If the GFCI fails to operate in this manner, there is the possibility
of an electric shock. DO NOT USE. Disconnect the unit and have the problem corrected by a qualified service technician.
To avoid the possibility of personal injury and discoloration of the acrylic surface, the inlet water temperature should not exceed
40°C (104°F). The bath should be drained after each use. Each bather should start their bath with fresh water. Do not use oil base
additives in your therapy bath.
CAUTION: Do not use harsh abrasives or solvents for cleaning this unit.
INSTALLER/OWNER BEARS ALL RESPONSIBILITY TO COMPLY WITH ALL STATE
AND LOCAL CODES WHEN INSTALLING THIS PRODUCT.
SAVE THESE INSTRUCTIONS

Jason International, Inc. • 501.771.4477 Page 16 of 16 Customer Service : 800.255.5766
Copyright © 2014 Jason International.
Jason InternatIonal, Inc.
8328 MacArthur Drive • North Little Rock • Arkansas • 72118
www.jasoninternational.com
This manual suits for next models
1
Table of contents
Popular Hot Tub manuals by other brands

Master Spas
Master Spas INT MP FORCE owner's manual

ActiveForever.com
ActiveForever.com CL 100-C owner's manual

Aquatic
Aquatic SERENITY 6 Specification sheet

Sunrise spas
Sunrise spas 670 EZ owner's manual

Sundance Spas
Sundance Spas Kingston 980 Series owner's manual

Jacuzzi
Jacuzzi HE96000 Installation and operation instructions