JBL 6810 User manual

Professional
Video
Products
FIELDSERVICEGUIDE
MODEL6810AND6820
VIDEOPROJECTOR
CAUTION!
USEANISOLATIONTRANSFORMERWHENSERVICINGTHIS
JBLInternational
8500BalboaBlvd.
Northridge,CA91329
(818)893-8411
SAFETYNOTICE!
Rev.4.28
JBL
ANYPERSONATTEMPTINGTOSERVICETHISCHASSISMUST
FAMILIARIZEHIMSELFWITHTHECHASSISANDBEAWAREOF
THENECESSARYSAFETYPRECAUTIONSTOBEUSEDWHEN
SERVICINGELECTONICEQUIPMENTCONTAININGHIGH
VOLTAGES.

SubjectCONTENTPage
ServiceandSafetyPrecautions3
Introduction
UsingtheTroubleshootingCharts3
Non-ServiceableAdjustments3
TheTwoGroundSystem4
IsolationProtection4
TVSystemOverview4
AdjustingtheNewCRT4
TS10PTuningSystemBlockDiagram5
6810SignalRowBlockDiagram6
Electro/MechanicalFocusingProcedure7
AdjustmentProcedures7
NonserviceableAreas7
HorizontalOscillator7
AGC7
VerticalHeight7
ComputerTextCentering7
WhiteBalance/GrayScaleTracking8
VideoProcessorPanel8
LuminancePeakingControl8
TroubleshootingtheChassis8
PowerSupplyPanel9
DeflectionPanel9
AllBandTuner10
TS10TunerInterfacePanel10
TS10PController11
Audio/VideoInput/OutputModule11
Stereo/SAPDecoderModule11
SoundProcessingModule12
StereoPowerAmplifier12
VideoProcessorPanel13
CombFilterModule13
CRTDrivePanels14
HorizontalDelayModule14
ConvergencePanel14
TroubleshootingtheChassis
DeadSet- Chart
1
15
NoAudio,NoVideo- Chart2 15
NoAudio- Chart3 15
NoAudio,NoVideo- Chart4 16
NoVerticalDeflection- Chart5 16
PictureRolls- Chart6 16
SetShutsDown- Chart7 17
TunerVoltages- Chart8 17
OneColorMissing- Chart9 17
ColorBandAtBottomOfPicture- Chart1018
SetDoesNotConverge- Chart1118
PincushionErrorTop/BottomAndSides- Chart1219

Servicing
AndSafetyPrecautions
1.
Becarefulofshockhazardwhenoperatingprojector
with
thecoveroff.
2.
Useanisolationtransformerwhen
servicing
theunitto
protect
boththesetandthe
test
equipmentelectronics.
3.
Always
wearsafetyglasseswhenservicing
CRT's.
4.
Donotremovesolid
state
devicesfrom
circuits
whilethesetisturnedon.
5.
Donot
operate
thesetforlongperiodsoftimewhentheshutdown
circuit
defeated.
6.Becertain
that
eachvoltage
test
is
made
fromthecorrectground.
7.
Becertain
that
all
grounds,groundstraps,andwiresareproperlyconnectedto
protect
thesetelectronicsandtheuserfrom shock.
8.
Always
checkforshockhazardaftercompletionofchassisrepairs.Referto
Service
Manual
for
proper
"SafetyCheck"procedures.
Introduction
This
Service
GuideincludesinstructionfortheModel6810Projection
TV
circuitry.
Itincludes
adjustmentproceduresplussymptomandtroubleshootingchartstolocateeitherfaultypanels,
socketedsolid
state
devices,ormodules.A signal
flow
blockdiagramandpanel/modulelayout
diagramsareincluded.
Before
exchangingpanelsormodules,itisimportanttomakesomepreliminarychecks.These
checksinclude:operationofthecustomercontrols,cableconnectionsandplugseating,acces-
sory
connection,antennaconnections,andoperational
mode
checks.On
sets
usingon-screen
characters,observationofthescreenisveryusefulintroubleshooting.If
these
checksdonot
locatetheproblem,thentheCovermustberemovedanda
visual
inspection
made
of
all
wiring
harnessesandconnectors.
Look
forbroken
wires,
overheatedcomponents,openfuses,etc.If
the
visual
checkandpreliminaryinspection
does
notlocatethemalfunction,usethe
TroubleshootingCharts,listedbysymptomand
page
numberintheSymptomIndex.
NOTE:
Useanisolationtransformerwhentroubleshootingthischassis!The
unithastwogroundsystems.Itisveryimportanttousethecorrectgroundfor
test
equipmentwhenmakingmeasurements.
Non-serviceableAdjustments
The
followingnon-serviceableadjustmentsare
critical
andshouldnotbeadjustedinthe
field:
RP1
B+ControllerandRP2HVAdjustonthePowerSupplyPanel,and
RP1
OverVoltage
SenseontheDeflection
Panel.
(Theseadjustmentsaresealedtopreventmis-adjustment.)
R7AGC
Delay
IF
Module
LI
31.5kHzOsc
Horiz.
Osc.Module
RP1RGB
Centering
Horiz.
Osc.Module
RP2
Height
Horiz.
Osc.Module
RP3V.
Linearity
DeflectionPanel
C70
Color
Osc.
VideoProcessor
RP1
Luminance
PeakVideoProcessor
RP4
SubBrightnessVideoProcessor
RP5
PeakContrastVideoProcessor

UsingtheTroubleshootCharts
Whenusing theTroubleshootingCharts,determinethesymptombyscreenobservationand
controlaction.ChecktheSymptomIndexandfind thesymptomthatmostcloselydescribesthe
problem.
ThepageindicatingthatkindofproblemhastheTroubleshootChartdealingwithit.
theTroubleshootChartslistadjustments,panelsandmodulestobechecked.Ifacheckresults
ina symptomchange,locatethenewsymptomintheIndexandfollowthechartdirections.
TwoGroundSystem
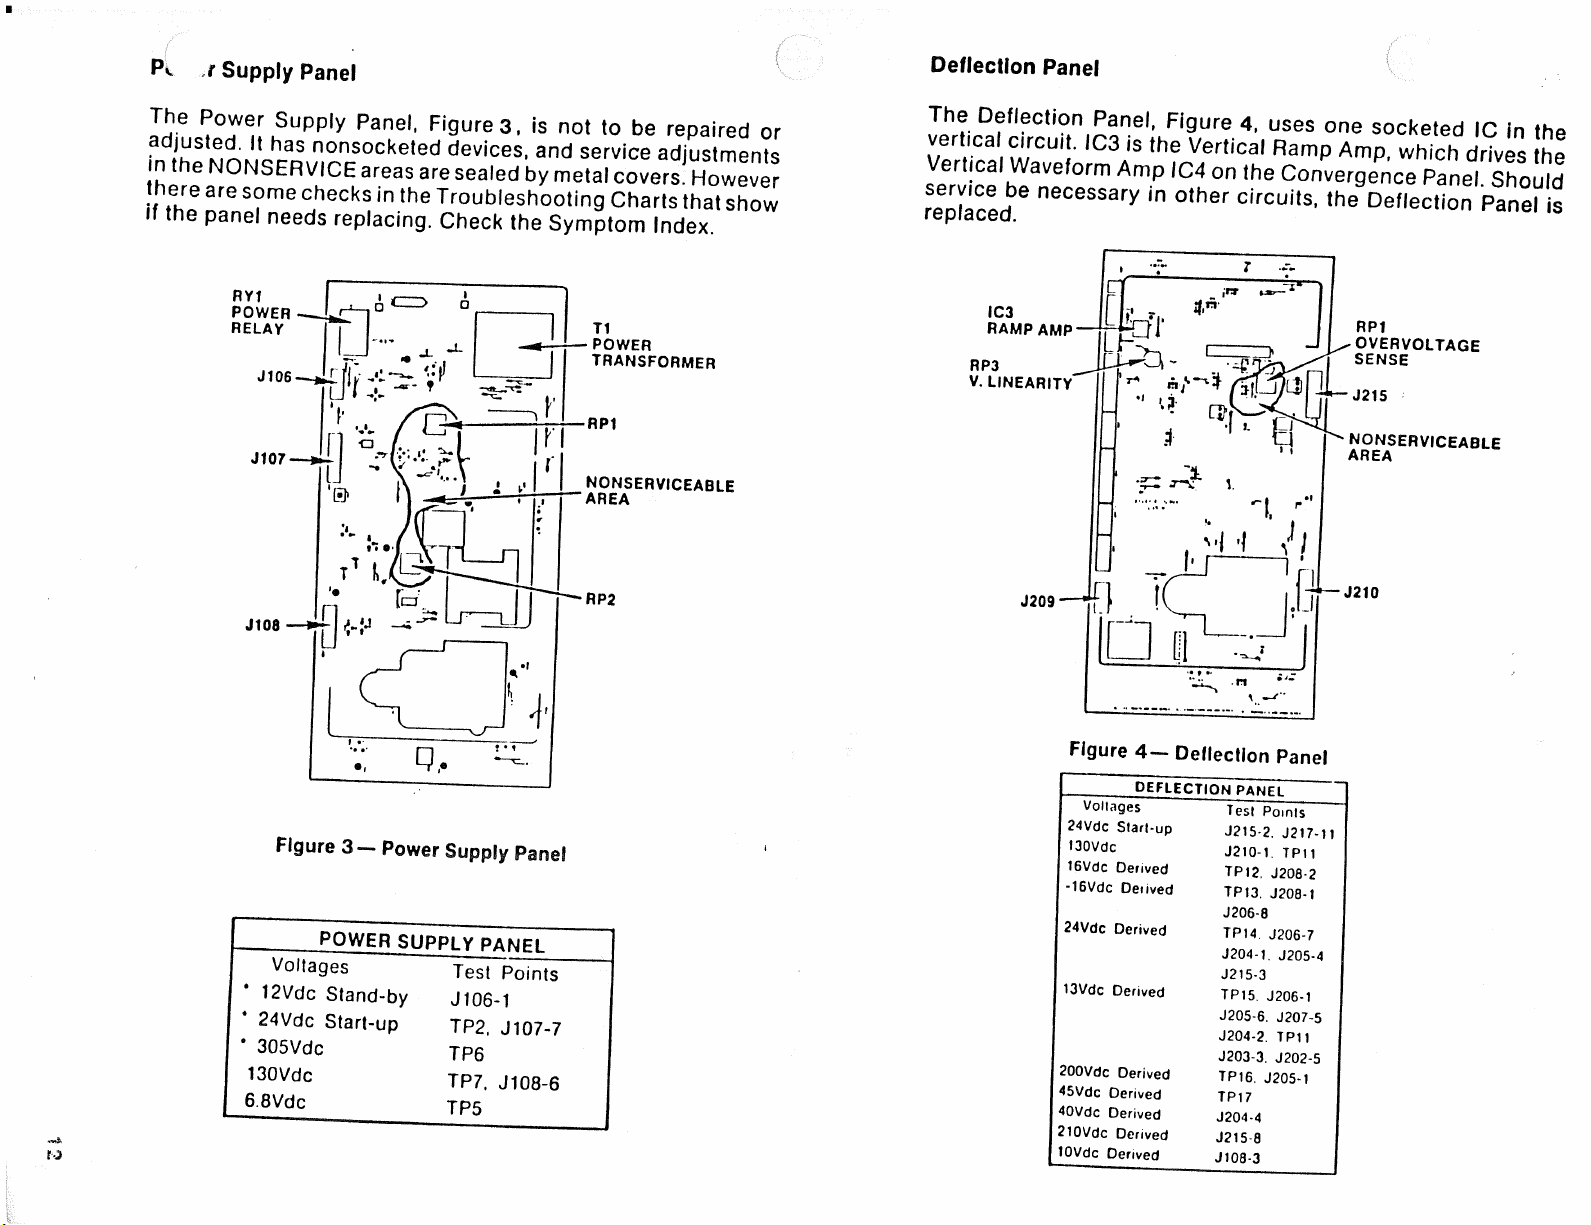
ThetwogroundsystemusedonthePowerSupplyPanelandDeflectionPanelare"AC"or
"Hot"groundand"Signal"or"Cold"ground.TestpointsTP3andTP9aremeasuringequip-
mentgroundsusedwhencheckingaclineconnectedcircuits."Signal"or"Cold"groundtest
pointsTP1andallshieldingonthesignalplugstopanelsandmodulesareusedfortestequip-
mentgroundswhenmeasuringcircuitsconnectedto"Signal"ground.
Isolationbetween"Hot"groundand"Cold"groundisdevelopedbyPowerTransformerTl,HV
TransformerT4,andOpticCoupler
IC1
onthePowerSupplyPanel.HorizontalDriveTrans-
formerTlandHorizontalOutputTransformerT2providetheisolationontheDeflectionPanel.
IsolationProtection
ItisimperativeanIsolationTransformerbeusedonthetwo-groundsystemtoprotectthetest
andmeasuringinstrumentsaswellasthesetelectronicsfrom mis-polarizedaclinecordplugs.
TVSystemOverview
WhenthePowerplugisconnectedtotheacline,Stand-byvoltageisfedtotheTS10PCon-
troller,Figure1,
and
regulatedto5VdctokeeptheMicrocomputeralive.A Power-Onkey
pressattheRemoteTransmitteroron-setKeyboardtunesthesettoChannel3,selectsthe
AntennaRFInput,andplacestheaudiosystemintheMonauralmode.TheTS10PController
displayson-screengraphicstoidentifythemode.TheMicrocomputeracceptsalldatafromthe
keyboard.Ifthechanneldataisincorrect,theTS10Pdisplayblinkssixtimesandontheseventh
blinkrevertstothepreviouschannelnumber.Incompletechannelnumbersreverttotheprevious
channeliftheseconddigitisnotenteredwithineightseconds.Zerocancellationisusedonall
numbersbelow10.Volumeiscontrolledin64steps.Soundismuteduntilthechannelistuned
andwhentheMutekeyispressedontheRemoteTransmitter.PresstheRemoteTransmitter
MutebuttonorVolumeUpbuttontoun-mute.
Figure2 showsthePanelandmodulefunctions,interconnectcables,plugs,andjacks.The
heavierlinesidentifythesignalflowfromtheRFSwitchertotheStereoSpeakerterrninalsand
theRed,GreenandBlueCRTs.Switchingsignals,controlvoltages,andotheroperationalvolt-
agesareshownwithlighterlines.
Adjustinga newCRT
AfterinstallinganewCRT,checkthepositionofthenewCRTrasteragainsttheCrosshair
patternoftheothertwoCRTsusing thefollowingprocedure.
1.
Placethealikemagneticringtabstogether.
2.
Rotatetheyoketopositionthecrosshairpatternstogether.Ifthepatternsdonot
match,
adjustthemagneticringtabstopositionthecrosshairpointstogether.
3.UseaCrosshatchpatterngeneratortochecktheoverallconvergence,andtouch
upconvergenceifnecessary.

Figure1 - TS10TuningSystemBlockDiagram

Figure2-SignalFlowBlockDiagram

Electro/MechanicalFocusingProcedure
1.
SettheBrightness,Picture,andColorcontrolsforbestpicture.
2.
Loosenthewingnutsoneachlens.
3.AdjusttheelectricalFocuscontroltoeachCRTforsharpestscanlinesviewedon
thetubefaceplatethroughthelens.
4.
Mechanicallyfocuseachlensforsharpestpictureviewedonthescreen.
AdjustmentProcedures
Non-serviceableAreas
Thenon-serviceableareasfoundonthePowerSupplyPanelandDeflectionPanelarecircuits,
componentsandcontrolswhicharenottoberepairednoradjusted.Shouldamalfunctionoccur
intheseareas,thefaultisrepairedbyreplacingthepanel.
HorizontalOscillator
The31.5kHzOscillatorontheHorizontalOscillatorModuleisadjusted
as
follows:
1.
Jumperthetwopinsat
TP301.
Thepicturewillrollverticallyandhorizontally.
2.
AdjustoscillatorcoilLIuntilthepicturerollsslightlyorstands
still.
3.Remove
the
jumperfrom
TP301.
Thepicture shouldlock.Ifthepicturedoesnot
lock,checkthersymptomindexforthetroubleshootingchartdescribingthecondition
viewedonthescreen.
AGC
TheAGCcontrolislocatedinsidetheIFModule.Itisaccessedthroughtheholeinthetopof
themoduleidentifiedasDelayedAGC.Use
a
plastichexalignmenttooltoreachtheAGC
controlshaft.
1.
Tunethesettoa strongTVchannel.
2.
Rotatethecontrolwhilewatchingthescreen.
3.Atthepointwhenthepicturebecomesnoisy,rotatethecontrolintheopposite
directionuntilthenoisedisappears.
4.
Checktheotherstrongchannelfornoise,andreadjustAGCasrequired.
VerticalHeight
TheVerticalHeightcontrol(RP2)islocatedontheHorizontalOscillatorModule.TheVertical
Linearitycontrol(RP3)islocatedbelow
RP1
ontheHorizontalOscillatorModule.
1.
WithaCrosshatchorpictureadjusttheHeightcontroltofilloutthepicturearea.
2.
AdjusttheVerticalLinearitycontroltocorrectnonlinearityinthepatternorpicture.
3.Readjustbothcontrolsasrequiredforbestpicturelinearity.
ComputerTextCentering
Ifthecomputertextareaisoff-center,lifttheconvergenceboardtoaccesstheHorizontal
OscillatorModule.TheRGBCenteringadjustment(RP1)islocatedonthelowerright.
1.
PlugthecomputercableintotheRGB"D"Connector,locatedintheJackPlate.
2.
SelectthecomputerinputwiththeRGBbuttononthecustomercontrolpanel.

3.Observetheviewingscreenandadjust
RP1
tocenterthetextontheraster.
WhiteBalance/GrayScaleTracking
TheCRTDriveControls(RP1ontheCRTDrivePanels)andScreenorG2Controls(onthe
G2/FocusAssemblybetweentheredandgreenlenses)areadjustedusingthefollowingsteps.
1.
SetthePicture,Sharpness,andBrightnesscontrolsatmidrange.
2.
TurntheColorfullydown.
3.SetallCRTDriveControlstomaximum(CW)andtheScreenstominimum(CCW).
4.
Tunethesettoa snowychannel.
5.MoveServicePlugJ216ontheDeflectionPaneltotheserviceSet-Upposition.
6.AdjusteachG2controltoobtaina faintline(whichappearswhitewithallthreecolors).
7.ReturntheServicePlugtothenormalposition.
8.Checkgrayscaletracking.AdjusttheBrightnesscontrolfrom maximumto
minimum,watchingforpossiblecolorshift.
9.Re-adjusttheCRTDrivecontrolsforbesthightolowlightgrayscale.
VideoProcessorPanelControls
1.
Setallcustomercontrolstomidrange.
2.
Inserta barpatternfrom anNTSCgenerator.
3.SetRP5(Peakcontrast)tofullCCW.
4.
AdjustRP4(Subbrightness)untilthelastlineisblack.
5.AdjustRP2(Blacklevel)untilthefirstbariswhite.
6.AdjustRP3(Subpicture)fora sharp,uniformdivisionbetweenbars.
7.View
a
picturewithbrightwhitehighlights.Checkforbloominginthewhiteareasr
orrasteredge.ReadjustRP2and/orRP4untilbloomingdisappears.
NOTE:
If
a
barpatterngeneratorisnotavailable,theadjustmentsmaybemadeonahighwhite
levelpicture.BeginwithRP2andRP4setfullyCCW.RP5shouldalwaysbesetfullyCCW.
SetRP3to75%rotationtowardsCCW.BeginrotatingRP2CWuntilminimumbloomingisthe
whiteareasisobserved.Iftheoverallpicturebrightnessisbelowproperviewinglevelbefore
thisoccurs,turnRP4CWslightlyandbeginprocedureagainwithRP2fullCCW.Repeatuntil
picturehasbrightwhites,properblacklevelandacceptablecontrastwithnobloomingorraster
bounce.
LuminancePeakingControl
TheLuminancePeakingadjustmentismadeusingtheinternalCrosshairpatternandthetuneron
alivechannel.
RP1,
PeakLuminancecontrol,islocatedontheVideoProcessorPanelnextto
theCombFilter.
1.
SetthePicturecontroltomidrange.
2.
SettheBrightnesscontroltomidrange.
3.SettheSharpnesscontroltofullCW.
4.
Adjust
RP1
untilminimumringingoccursattheleftedgeoftheverticalline.
NOTE:
Thesetroubleshootingchartscannotbeallinclusive.Theyaremeanttobea service
guideonly.Thereareseveralsafetyand/orprotectioncircuitsinthesetwhich,if
activated,
can
resembleormasktheactualdefect.Onesuchcircuitistheverticalfailsafecircuitwhichcan
causea lossof
video.
Useoftheservicemanualwillbeneededtoresolvethistypeofproblem.

SymptomPage
DeadSet- Chart
1
18
NoAudio,NoVideo- Chart2 18
NoAudio- Chart3 18
NoAudio,NoVideo- Chart4 19
NoVerticalDeflection- Chart5 19
PictureRolls- Chart6 19
SetShutsDown- Chart7 20
TunerVoltages- Chart8 20
OneColorMissing- Chart9 20
ColorBandAtBottomOfPicture- Chart1021
SetDoesNotConverge- Chart1121
PincushionErrorTop/BottomAndSides- Chart1222
NOTE:
Thesetroubleshootingchartscannotbeallinclusive.Theyaremeanttobea
serviceguideonly.Thereareseveralsafetyand/orprotectioncircuitsinthesetwhich,
ifactivated,canresembleormasktheactualdefect.Onesuchcircuitisthevertical
failsafecircuitwhichcancausea lossofvideo.Useoftheservicemanualwillbe
neededtoresolvethistypeofproblem.

r
SupplyPanel DeflectionPanel
ThePowerSupplyPanel,Figure
3,isnottobe
repaired
or
In.theNON«
dGVlf6S>and
Servlceadjustments
ntheNONSERVICEareasaresealedbymetalcovers.However
herearesomechecksintheTroubleshootingChartsthatshow
if
the
panelneedsreplacing.ChecktheSymptomIndex
RYt
POWER
RELAY T1
POWER
TRANSFORMER
NONSERVICEABLE
AREA
Figure3—PowerSupplyPanel
POWER
SUPPIV
PAKJP|
VOLTAGES
TEST
POINTS
'
12VDC
STAND-BY
J106-1
4
24VDC
START-UP
TP2,
J107-7
*
305VDC
TP6
130VDC
TP7.
J108-6
6.8VDC
TP5
TheDeflectionPanel,Figure
4,
uses
one
socketed
ICinthe
verticalcircuit.IC3
isthe
VerticalRampAmpwhichdrives
hP
VerticalWaveformAmpIC4ontheConvergencePane?Should
replaced"eCeSSary
°'her
C"CU,,S-
,he
DeflectionPanel
is
NONSERVICEABLE
AREA
Figure
4—
DeflectionPanel
DEFLECTION
PANEL
VOLTAGES TESTPOINTS
24VDCSTART-UP J215-2.J217-11
130VDC
J210-1.
TPL
1
16VDCDERIVED TP12.J208-2
-16VDCDEIIVED TP13.J208-!
J206-8
24VDCDERIVED TP14.J206-7
J204-1.
J205-4
J215-3
13VDCDERIVED TP15.J206-1
J205-6.J207-5
J204-2.
TP11
J203-3.J202-5
200VDCDERIVED TP16.J205-1
45VDCDERIVED
TP17
40VDCDERIVED J204-4
2LOVDCDERIVED J215-8
LOVDCDERIVED J108-3
IC3
RAMP
AMP
RP3
V.
LINEARITY
RP1
OVERVOLTAGE
SENSE

Ai
nd
Tuner
TheAllBandTuner,Figure5 , isinterconnectedtotheCon-
trollerbyplugsP/J21andP/J22.Therearenoserviceadjust-
mentsorplug-incomponents.Malfunctionsareservicedby
replacingthetuner.Refertopage42forP/J21and
P/J22
voltages.
Figure5 —AllBandTuner
TS10P
Tuner
Interface
Panel
Lo6
16ViSes
ontheTS10PInterfacePanel,Figure6
are.
IFModule,Controller,andSerial/ParallelConverterIC1
SWorv
InnnTinH^!?9
V0'ta9eS^ Se'eCtingRFandAcces"
soryInputs,andsoundprocessingmodes.Malfunctionsinthe
remainingcircuitsareservicedbyreplacingthepanel.
TP10P
CONTROLLER
SERIAL
TO
PARALLEL
"CONVERTER
IC1
IF
MODULE
Figure6 - TS10PTunerInterfacePanel
IF
OUTPUT
PRESCALER
OUTPUT
RF
OUTPUT

TS10PController
Theplug-indevicesontheTS10PController,Figure7 , are:
MicrocomputerIC1000,CITACIC1200,andMicrocomputer
IC1400.TheControllerisreplacedifa malfunctionisinthe
remainingcircuitry.
MICROPROCESSOR
IC1000
CITAC
IC120Q
GRAPHICS
MICROPROCESSOR
IC1400
IC1500
GRAPHICS
GENERATOR
Audio/Video Input/OutputPanel
Video,Sync,Audio,andRGBVideoswitchingisdonebyfive
socketedBilateralSwitchICs.A sixthdevice,notsocketed,is
theSyncCorrectorIC6.MalfunctionsintheSyncCorrectorand
othernonsocketeddevicecircuitsareservicedbypanel
replacement,Figure8 .
VIDEOSW.
AUDIO
SW.
IC2
i
SYNC
SW.
R.VIDEOSW.
AUDIO
SW.
IC3
SYNC
CORRECTOR
IC6
VIDEOSW.
R.VIDEOSW
AUDIO
SW.
IC1
VIDEOSW.
CROSSHAIRSW.
B.VIDEOSW.
G.VIDEOSW.
IC4
AUDIO
SW.
G.VIDEOSW.
B.VIDEOSW.
IC5
Figure7 — TS10PController Figure8 —Input/OutputPanel

Stereo/SAP
DecoderModule
StereoPowerAmplifier
Allsolidstatedevices
are
nonsocketed.Monaural,Stereo
or
SAPaudiomalfunctions
are
serviced
by
DecoderModule
replacement,Figure
9 .
Allsolidstatedevices
onthe
StereoPowerAmp
are
nonsock-
eted.
Anymalfunctionisserviced
by
replacingtheStereoPower
Amp.
L-RLEVEL
R5Q
L•RLEVEL
R5S
8kHz
ADJ.
R83
SoundProcessingModule
TheSoundProcessingModule,Figure
10,
plugs
intotheStereo
Power
Ampandhasone
SoundProcessing
IC
socketed.This
module
is
serviced
by
replacingSoundProcessingchip
IC2or
SoundProcessingModule.
SPEAKER
JACK
J301
Figure
11—
StereoPowerAmplifier
AC
LINE
INPUT
J401
Q203,
Q204
MUTE
FETS
SOUND
PROCESSING
MODULE
INPUT
JACK
J201
TONE/
VOLUME
CONTROL
IC201
Figure
10—
SoundProcessingModule
SAPLEVEL
R26
Figure
9
—Stereo/SAPDecoderModule
.osc.
ADJUST
R3
.CURRENT
ADJ.
R74
SOUND
PROCESSING
IC2

VIdrocessorPanel
ThesocketedICsare:VideoProcessorIC2,Figure12,RGB
ProcessorIC4,SandCastleGeneratorICSandRGBBufferIC6.
TheseICsarereplaceable.Malfunctionsintheremaining
cir-
cuitsareresolvedbypanelreplacement.Therearefivecontrols
thatadjustthecompositevideosignalreferencesandlimits.
ThesecontrolsarereferredtointhePanelandModuleAdjust-
mentproceduresontheContentpage.
CombFilterModule
TheCombFilterisa module,whichisnonserviceable.Ithasno
socketedsolidstatedevices,andallcontrolsarefactory
adjustments.Shouldthismodule
require
servicing,itisdone
witha replacementmodule,Figure13.
RP1
CHROMA
ADJUST
IC1
COMB
FILTER
LUMINANCE
ADJUST
RP2
Figure13—CombFilterModule
RP3
VERTICAL
DETAIL
IC2
VIDEO
PROCESSOR•
RP2—•
DONOT
ADJUST
RP3
IC6
RGB—
BUFFER
IC5
SANDCASTLE
IC4
RGB
PROCESSOR
RP1
LUMINANCE
PEAK
RP4
"SUBBRITE
RP5
"PEAKCONTRAST
Figure12—VideoProcessorPanel

CrDrivePanels
TheRed,Green,andBlueCRTsaredrivenbyidenticalpanels,
Figure14.AllsolidstatedevicesontheCRTDrivePanelsare
nonsocketed.Malfunctionsonthesepanelsareservicedby
panelreplacement.
ConvergencePanel
AllICsaresocketedonthispanelexcept1C10throughIC15.
MalfunctionscreatedbycircuitryotherthanICsareservicedby
panelreplacement,Figure16
02
VIDEO-
AMP
03
VIDEO•
AMP
01
CRTDRIVER
-Q4
CRTDRIVER
RP1
CRTDRIVE
Figure14—CRTDrivePanel
HorizontalDelayModule
TheHorizontalDelaymodule,Figure15,hasallnonsocketed
solidstatedevices.Malfunctionsareservicedbyadjustmentor
modulereplacement.
Figure15—HorizontalDelayModule
GRN.
T/BGRN.REDBLUEBLUE
HORIZ.PIN-HORIZ.HORIZ.REDVERT.HORIZ.VERT.
OUTCUSHIONOUTOUTOUTOUTOUT
IC14IC3IC1SIC12IC13ICtOIC11
IC9IC8IC2IC5HORIZ.IC4
PULSEZEROTRAPSIDEWAVEFORMVERTICAL
GENERATORCROSSINGKEYSTONEPIC.AMPWAVEFORM
DET.GEN.GEN.IC1AMP
Figure16—ConvergencePanel

Chart
1
Symptom:
DeadSet
CheckPowerSupply
J106-112VStand-By
Pret*PowerOn
Button.
CheckPowerSupply
PanelQ1,02,03.
Note:
TheSUrl-Up24Vla
PresentNormally
For2 Seconds.Then
24VStart-UpIsShut
DownByEither
Derived24VFrom
DeflectionPanelOr
ItsTimingCircuit
R5,
CIO.
CheckACInter-
connectFusePower
SupplyTransistorT1,
ThermalBreaker®
CheckTSCon-
trollerIC1100,
IC1000.
CheckHorizontal
OscillatorIC1.IC2
OrReplaceModule.
CheckDefection
PanelOS.09,010
OrReplacePanel.
CheckTSCon-
trollerIC1000,QS20,
0522OrReplace
TSController.
Chart2
Symptom:
NoAudio,No
Video
Check
TunerInterlace
Panel,
Check:Deflection
PanelTP15,018,
CS2
L4,
C53.
MeasureTuner
InterlacePanel
TI'B
Check:Deflection
PanelJ204-4,C57,
C5S,
R82.
CheckTunerPlugs
P21AndP22.
UseTunerPlug
Charts.
SubTuner.
ReplaceTuner.
Chart3
Symplon:
NoAudio
PlugVoltOhm-
meterIntoTuner
InterlacePanel
Note:
1.
TuneToA LiveChannel
2.
UseA VoltOhmmeterWith
AnACOutputMeasuring
Ability.
IFModuleSound
DetectorIsOk
ReplaceIFModule
AudioCircuits
AreOk
CheckAudioSignal
AtI/OPanel
J7I2-3.1WithAC
OutputMeier.
CheckSlereo'SAP
DecoderPtugs
P25-2.3.OrReplace
Stereo/SAPDecoder
CheckAudioSignal
AtSoundProcessing
Module.J1104-1.4
WithACOutput
Meter.
CheckI/OPlugP718.
Butlers Q19.Q20.
AndIC3.OrReplace
I/OPanel
CheckAudioSignal
AtSoundProcessing
ModuleP1101-3.6
ReplaceSound
Processing
Module
CheckAudioSignal
AlSlereoPower
AmpSpeakerPlug
J301-1.5
CheckStereoPower
AmpO203.Q204.
O202.
Q201Or
ReplacePowerAmp
CheckSpeaker
WiringAndPlug
P301
UseAudioTest
Chan3.UseVideo
TestChart4.
Check:TSCon-
troller
OrReplace
Controller.

Chart4
Symptom:
NoAudio,No
Video
CheckTuner
InterfaceVoltage
Note:BeforeVideo
AndAudioTests.
CheckTheInput'
VoltageToTheIF
Module.IfVollageIs
Normal,
Proceed
WithTheCable
Tests.
CheckDiodeD18
C52.
CheckVoltageAt
TP15.
Replace
IFModule CheckR74.C52.14
C53.
Charts
Symptom:
NoVertical
Deflection
Chart
6
Symptom:
PictureRolls
CheckDeflection
PanelTP1745V
Source.
CheckR81.CS7,D20
CheckDeflection
PanelTP22.
CheckQf7,Q18,
R108,R107.
CheckTP20For
SawtoothSignal.
JumperHorli.
OscillatorModule
"OscSel"Pln».
AdjustLI.
CheckHorlj.
OscillatorIC1,
OscillatorCollLI,
OrReplaceModule.
RemoveJumper
From"OscSet"Pins.
Horltontal
OscillatorOK.
CheckHorli.Osc.
ModuleTP1For
VideoSignal
No
ReplaceTuner
Yes
CheckVollage
DeflectionPanel
DiodeD18Cathode.
CheckIC3.R93,
C70.
Horl/onlil
OscillatorModule
IC2OrReplace
Module.
CheckC72015.
018.
01B0rflspl.ce
DeflectionPanel.
CheckYoke
Inter-
connectAndPlugs
C78.R117.RH8.
VerticalSweep
CircuitsOK.
UnplugSyncCable
ToI/OPanelJ707.
PlugCableInto
JackPlate.Tuner
VideoOut.
CheckI/OPanel
Q28.R124.R125,
OrReplaceI/O
Panel.
CheckHoriz.Osc.
Module01,02,C4,
OrReplaceModule.'
CheckSyncCable
FromI/OPanelJ707
ToHorli.Oscillator
ModuleJ302Or
ReplaceI/OPanel.

Chart
7
Symptom:
SetShutsDown
DefeatQ7On
DeflectionPanel
JumperCollectorTo
^
Ground.Power
Set.
Note:ShutDown
CircuitsAreLocated
OnThePower
SupplyAndDetec-
tionPanels.Defeat-
ingOneAtA Time
WillDetermineThe
ShutDownTrigger
Source.
Chart
9
Symptom:
one
colormissing
Interchange
CRTPanels.
PowerSet.Check
CRTFilaments.
Yes
No CheckYoke
Inter-
connectAndRGB
YokesWindings,
DeflectionPanel07.
26,
C36.
Color
Misslr
No CheckQ2,C2.03
01.
01.Q4Or
iReplaceCRT
Panel.
Remove07
Jumper.
JumperDeflection
PanelTP7To
Ground.
PowerSet.
Chart
8
TunerVoltages
Interchange
Video
CableAtCRT
Panels.
CheckDeflection
Panel04.Q3,Power
SupplyPanel014.
OrReplacePower
SupplyPanel.
CheckHorlx.Oscil-
latorModuleICt,
IC4,
OrReplace
PowerSupplyPanel.
All
BAND
TUNER
PlugP/J)J
VOIHOM
Pn
1
P.n? P,«] P.o
4
P.n
5
InO
3
S
5V
OV 4v ?4V <?V
"•
O
1
C*3H
S
Sv
5
5v
0;
17y i?V ?4V l?V
JHf-14 SSv Uv 65v
65V
?4V
1t\l
l?V
ALL
BANO
TUNER
PlugP'JJtVoll.g,i
P,n P.i? P.„1 P.n
4
IPC*3
ISV •?V.|jv
NC
MI
r>; i;v l?VI5V
NC
C*b 14
'?V
.IJV
NC
UMf14
»?v
OV-ISV
NC
Replace
VideoCable.
ChechVideoP'o-
ccssor
P.inel
026.
IC4.
C98OrReplace
VideoProcessor
Panel
CheckDeflecllon
PanelQ8,Q9.Q10,
OrReplaceDeflec-
tionPanel.PowerSet. ReplaceRGBButler
IC6VideoProcessor
IC2,
OrVideo.
ProcessorPanel.
Does
SetShut
Down?
No SystemOK.
Yes

Chart10
Symptom:
Color
Bandat
Bottom
Of
Picture
CheckPlclurtFor
ColoredBandAt
Bottom01Picture.
CRTsCoupling
LiquidLevelOK.
CheckColor
01Band.
ReplaceBlueCRT.
LiquidCoupling
LevelLow.
ReplaceRedCRT.
LiquidCoupling
LevelLow.
ReplaceGreenCRT.
LiquidCoupling
LevelLow.
Chart11
Symptom:
SetDoes
Not
Converge
AdjustCustomer
ConvergenceCon-
trolsRotateVertical
RedAndBlueCon-
trolsCWAndCCW
Check
I
VoltageSources
TP16Is8VTP!8Is
1SVJ604-2Is16V
TPUIs-BVTPI9I,
-•5VJ604-1Is-16V
ISelectCrosshair
PatternPlaceTest/
NormalSwitchIn
TestPosition.
3
TuneSetToLive
Channel.
RotateRedAndBlue
HorizontalControls
CWAndCCW.
Check
P/J606
Wires
R1W.ICII.R139
IC13.
Check
P/J606
Wires
R96.IC10.Rt20
IC12.
Customer
Convergence
CircuitsOK
CheckCrosihalch
UnplugRedAnd
BlueC2
Connector.
«UseCrosshatch
Generator*
GreenKeystone
CorrectionCircuits
OK.
AdjustTrapezoid
ControlRP32. CheckIC2,Q4,OS
Rt56,
R161,Or
ReplacePanel.
IReconnectRedAnd
BlueG2Connectors
TouchUp
1Convergence.
AdjustKeystone
ControlRP8.

Chart12
Symplom:
PincushionError
Top/BottomAndSide
CheckCrosshatch
ForSidePincushion
Error.
Setup
1.
UseCrosshatch
Generator.
SidePincushion
CircuitsOK.
AdjustSide
Pin-
cushionControls
RP29,RP30,And
RP31.
CheckIC2.Q7,Q|,
RH3,
Rt
19,
R95Or
ReplacePanel.
CheckCrosshatch
ForTop/Bottom
Pincushion
Error.
Top/Bottom
Pin-
cushionCorrection
CircuitsOK.
AdjustTop/Bottom
PincushionControl!
RP19,RP18.
CheckIC3,06R154
Rl33,R112,Or
ReplacePanel.
Top/Bottom
Pin-
cushionCircuitsOK.
Other manuals for 6810
2
This manual suits for next models
1
Table of contents
Other JBL Projector manuals