Jensen JCR-231 User manual

DIGITAL AM/FM DUAL ALARM CLOCK RADIO
WITH WAVE SENSOR
JCR-231
USER MANUAL
PLEASE READ THIS USER MANUAL COMPLETELY BEFORE
OPERATING THIS UNIT AND RETAIN THIS BOOKLET FOR
FUTURE REFERENCE.

E-1
WARNING
TO PREVENT FIRE OR SHOCK HAZARD, DO NOT USE THIS PLUG WITH AN
EXTENSION CORD, RECEPTACLE OR OTHER OUTLET UNLESS THE BLADES CAN BE
FULLY INSERTED TO PREVENT BLADE EXPOSURE. TO PREVENT FIRE OR SHOCK
HAZARD, DO NOT EXPOSE THIS APPLIANCE TO RAIN OR MOISTURE.
WARNING
To reduce the risk of fire or electric shock, do not expose this apparatus to rain or moisture.
IMPORTANT SAFETY INSTRUCTIONS
1. Read these instructions.
2. Keep these instructions.
3. Heed all warnings.
4. Follow all instructions.
5. Do not use this apparatus near water.
6. Cleaning – Unplug this product from the wall outlet before cleaning. Do not use liquid cleaners or
aerosol cleaners. Clean only with a dry cloth.
7. Do not block any ventilation openings. Install in accordance with the manufacturer’s instructions.
8. Do not install near any heat sources such as radiators, heat registers, stoves, or other apparatus
(including amplifiers) that produce heat.
9. Do not defeat the safety purpose of the polarized or grounding-type plug. A polarized plug has two
blades with one wider than the other. A grounding type plug has two blades and a third grounding
prong. The wider or the third prong is provided for your safety. If the provided plug does not fit into
your outlet, consult an electrician for replacement of the obsolete outlet.
10. Protect the power cord from being walked on or pinched particularly at plugs, convenience
receptacles, and the point where they exit from the apparatus.
11. Only use attachments/accessories specified by the manufacturer.
12. Use only with a cart, stand, tripod, bracket, or table specified by the manufacturer,
or sold with the apparatus. When a cart is used, use caution when moving the
cart/ apparatus combination to avoid injury from tip-over.
13. Unplug this apparatus during lightning storms or when unused for long periods of
time.
14. Refer all servicing to qualified service personnel. Servicing is required when the apparatus has
been damaged in any way, such as power-supply cord or plug is damaged, liquid has been spilled
or objects have fallen into the apparatus, the apparatus has been exposed to rain or moisture,
does not operate normally, or has been dropped.

E-2
15. This apparatus shall not be exposed to dripping or splashing water and that no object filled with
liquids such as vases shall be placed on the apparatus.
16. Main plug is used as disconnect device and it should remain readily operable during intended use.
In order to disconnect the apparatus completely, the main plug should be disconnected from the
main socket outlet completely.
17. Battery shall not be exposed to excessive heat such as sunshine, fire or the like.
18. The rating label is located at the bottom of the apparatus.
19. The Caution Marking is located at the bottom of the apparatus.
20. Danger of explosion if battery is incorrectly replaced. Replace only with the same or equivalent
type.
This symbol indicates that this product incorporates double insulation
between hazardous mains voltage and user accessible
parts
CAUTION:
TO PREVENT ELECTRIC SHOCK, MATCH WIDE BLADE
OF AC PLUG TO WIDE SLOT. FULLY INSERT.
SAVE THESE INSTRUCTIONS
COMPLIANCE WITH FCC REGULATIONS
This device complies with Part 15 of the FCC Rules. Operation is subject to the following two conditions:
(1) This device may not cause harmful interference, and
(2) This device must accept any interference received, including interference that may cause
undesired operation.
Note: This equipment has been tested and found to comply with the limits for a Class B digital device,
pursuant to Part 15 of the FCC Rules. These limits are designed to provide reasonable protection
against harmful interference in a residential installation. This equipment generates, uses and can
radiate radio frequency energy and, if not installed and used in accordance with the instructions, may
cause harmful interference to radio communications. However, there is no guarantee that interference
will not occur in a particular installation. If this equipment does cause harmful interference to radio or
television reception, which can be determined by turning the equipment off and on, the user is
encouraged to try to correct the interference by one or more of the following measures:
Reorient or relocate the receiving antenna.
Increase the separation between the equipment and receiver.
Connect the equipment into an outlet on a circuit different from that to which the receiver is
connected.
Consult the dealer or an experienced radio/TV technician for help.
WARNING

E-3
Changes or modifications not expressly approved by the party responsible for compliance could void
the user’s authority to operate the equipment.
DEAR JENSEN® CUSTOMER
Selecting fine audio equipment such as the unit you’ve just purchased is only the start of your musical
enjoyment. Now it’s time to consider how you can maximize the fun and excitement your equipment
offers. This manufacturer and the Electronic Industries Association’s Consumer Electronics Group want
you to get the most out of your equipment by playing it at a safe level. One that lets the sound come
through loud and clear without annoying blaring or distortion and, most importantly, without affecting
your sensitive hearing. Sound can be deceiving. Over time your hearing “comfort level” adapts to higher
volumes of sound. So what sounds “normal” can actually be loud and harmful to your hearing. Guard
against this by setting your equipment at a safe level BEFORE your hearing adapts.
To establish a safe level:
Start your volume control at a low setting.
Slowly increase the sound until you can hear it comfortably and clearly, and without distortion.
Once you have established a comfortable sound level:
Set the dial and leave it there. Taking a minute to do this now will help to prevent hearing damage or
loss in the future. After all, we want you listening for a lifetime.
We Want You Listening For a Lifetime
Used wisely, your new sound equipment will provide a lifetime of fun
and enjoyment. Since hearing damage from loud noise is often
undetectable until it is too late, this manufacturer and the Electronic
Industries Association’s Consumer Electronics Group recommend
you avoid prolonged exposure to excessive noise.
Customer’s Record:
The serial number of this product is found on its bottom cover. You should note the serial number of
this unit in the space provided as a permanent record of your purchase to aid in identification in the
event of theft of loss.
Model Number: JCR-231 Serial Number: ________________
PROTECT YOUR FURNITURE!!
This system is equipped with non-skid rubber ‘feet’ to prevent the product from moving when you
operate the controls. These ‘feet’ are made from non-migrating rubber material specially formulated to
avoid leaving any marks or stains on your furniture. However certain types of oil based furniture
polishes, wood preservatives, or cleaning sprays may cause the rubber ‘feet’ to soften, and leave
marks or a rubber residue on the furniture. To prevent any damage to your furniture we strongly
recommend that you purchase small self-adhesive felt pads, available at hardware stores and home
improvement centers everywhere, and apply these pads to the bottom of the rubber ‘feet’ before you
place the product on fine wooden furniture.

E-4
LOCATION OF CONTROLS
POWER REQUIREMENTS
This unit operates on 120V~ 60Hz and requires 1 x DC3V CR2032 Lithium battery (not included) for
clock backup during a power outage. Do not attempt to operate the radio on any other power source.
You could cause damage to the unit and void your warranty.
REPLACING BACKUP BATTERY
1. Remove the screw from the BATTERY DOOR and remove the battery compartment cover.
2. Install 1 brand new CR2032 Lithium 3V battery according to the polarity markings on the BATTERY
COMPARTMENT COVER.
3. Replace the battery compartment and tighten the screw to secure the compartment.
NOTE: The unit will operate without a battery installed, but your time and alarm settings will be lost and
will have to be reset in the event of a power interruption or failure.
IMPORTANT:
Be sure that the battery is installed correctly. Wrong polarity may damage the unit and void the
warranty. For best performance and longer operating time, we recommend the use of good quality
alkaline battery.
Controls and Functions of Unit
1. On/Off/Source Button
2. Preset /Time Set / Y-M-D Button
3. Tuning + / Minute Button
4. Tuning - / Hour Button
5. Volume + / Alarm2 Button
6. Volume - / Alarm1 Button
7.Temp / DST Button
8.Dimmer/SET Button
9.Snooze / Time Zone/Sleep Button
10. LED Display
11. Infrared Sensor
12. Speaker
13. AC Power Cord
14. Battery Door
15. FM Wire Antenna
16. Aux In Jack
17. Temperature Sensor (For indoor
temperature only)

E-5
WARNING
DO NOT INGEST BATTERY, CHEMICAL BURN HAZARD
This product contains a coin/button cell battery. If the coin/button cell battery is swallowed,
it can cause severe internal burns in just 2 hours and can lead to death.
Keep new and used batteries away from children. If the battery compartment does not
close securely, stop using the product and keep it away from children.
If you think batteries might have been swallowed or placed inside any part of the body,
seek immediate medical attention.
BATTERY CARE:
Use only the size and type of battery specified.
If the unit is not to be used for an extended period of time, remove the battery. Old or leaking
battery can cause damage to the unit and may void the warranty.
Do not try to recharge battery not intended to be recharged; they can overheat and rupture (Follow
battery manufacturer’s directions).
Do not dispose of battery in fire, battery may leak or explode.
GETTING STARTED
Please be sure the outlet you plug this unit into is working and provides uninterrupted power.
1. Insert the plug of the AC power cord into a 120V~ 60Hz outlet.
2. The unit will turn on, and 12:00AM is showing on the display.
IMPORTANT
There is a sensor located on top of the unit that picks up any movement or objects near the top or back
of the unit. Please be sure to place the radio on a surface with a no obstructions 9-12 inches above or
3-6 inches behind the unit. This will help maximize the area for recognizing the motion of your hand and
also reduce the chances of the unit false triggering. If the unit begins beeping and the display functions
erratically, it may be either too close to an object above or behind the unit. If this happens, please make
sure there are 9-12 inches of clearance above and 3-6 inches behind the unit to avoid the false
triggering.

E-6
SETTING THE CALENDAR AND CLOCK
Note: The radio and AUX must be OFF to set TIME/DATE. To turn off, press and hold the SOURCE (#1)
button for 2 seconds. The time will then be displayed.
IMPORTANT: Digits will flash during setup and time-out after 5 seconds if no buttons are
pressed.
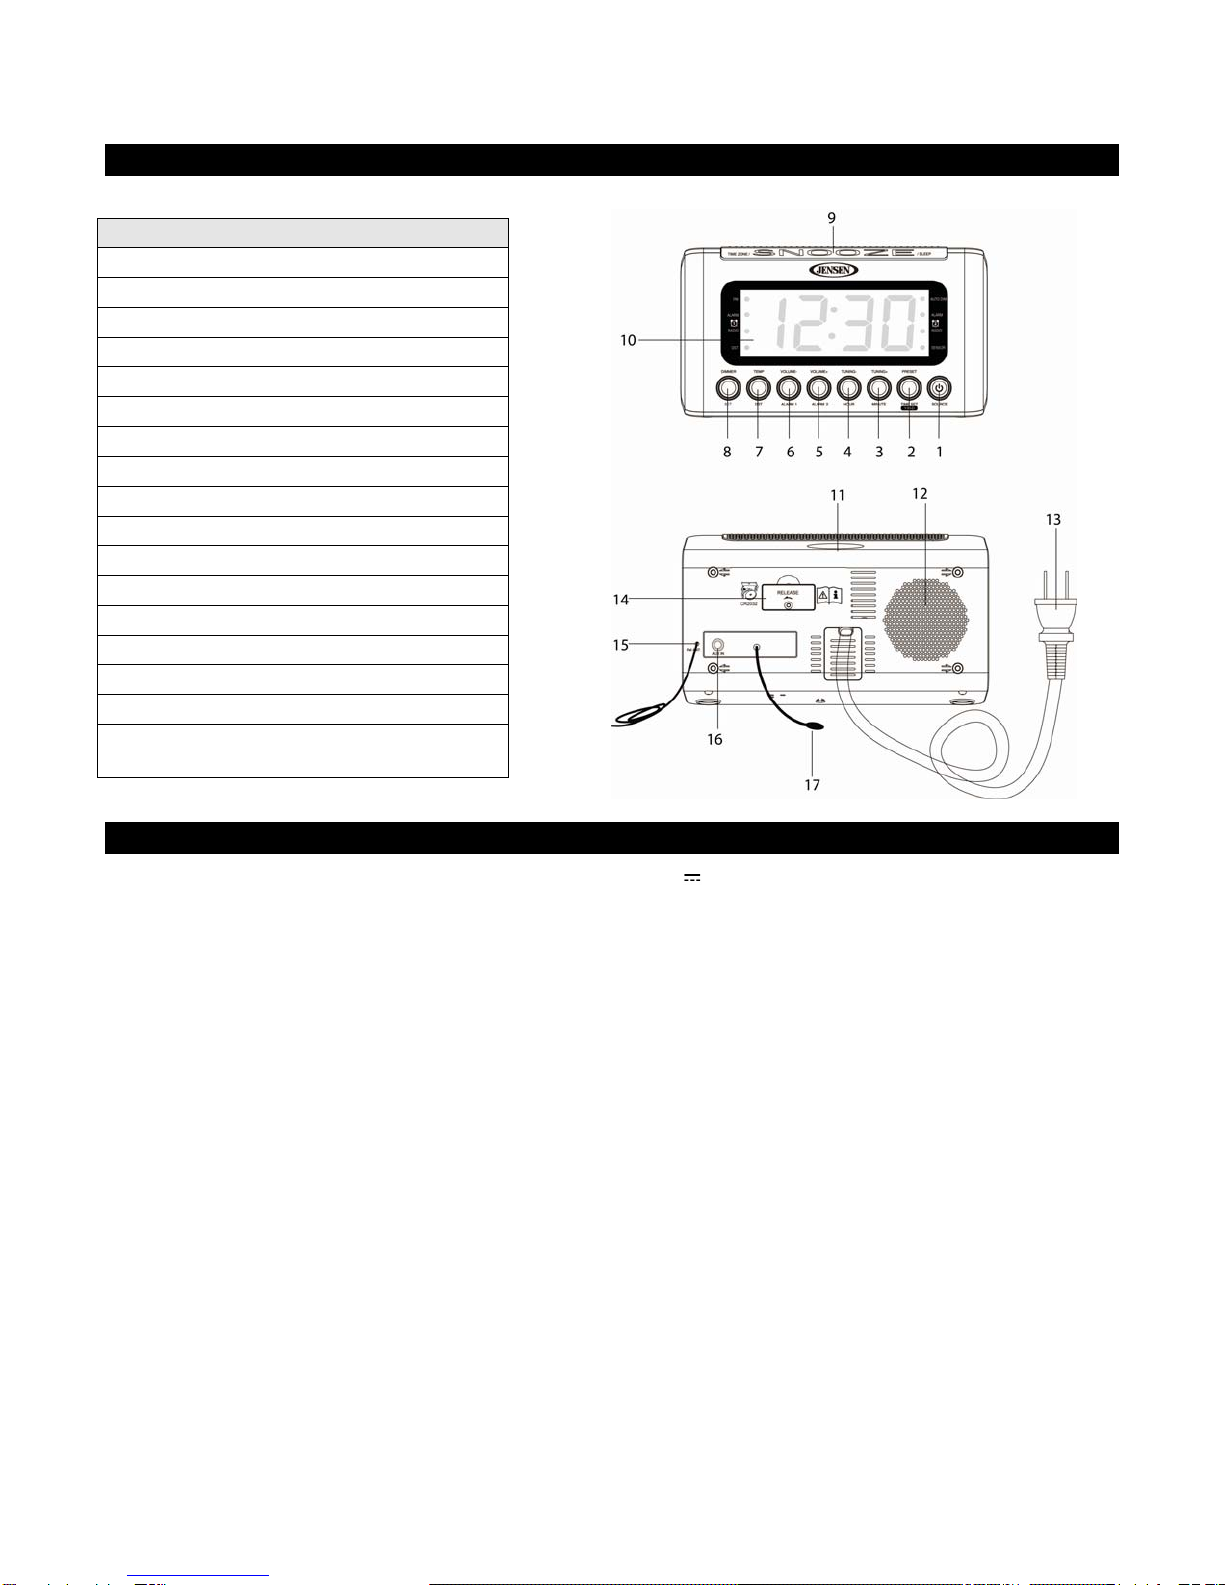
1. Press and hold PRESET (#2) for 2 seconds to enter calendar/time setting mode.
2. Setting the clock for the first time, the number 15 will flash on the display.
This represents the last 2 digits of the year.
3. Press TUNING+ (#3) or TUNING- (#4) to increase or decrease the YEAR.
Note: If display reverts back to time, press and hold PRESET for 2 seconds to re-enter the
programming mode.
4. Press PRESET (#2), and the MONTH will flash.
5. Press TUNING+ (#3) or TUNING-(#4) to increase or decrease the MONTH.
6. Press PRESET (#2), and the DAY will flash.
7. Press TUNING+ (#3) or TUNING-(#4) to increase or decrease the DAY.
8. Press PRESET (#2) and time will flash.
9. Press TUNING+ (#3) to set the MINUTES.
10. Press TUNING-(#4) to set the HOUR.
11. Press PRESET (#2) to complete the calendar/time setting.
SETTING UP THE TIME ZONE
There are 7 time zones programmed into your unit:
Zone 1: Atlantic Std Time ,UTC- 4 hrs
Zone 2: Eastern Std Time ,UTC- 5 hrs (factory preset)
Zone 3: Central Std Time, UTC- 6 hrs
Zone 4: Mountain Std Time, UTC- 7 hrs
Zone 5: Pacific Std Time, UTC- 8 hrs
Zone 6: Alaska Std Time, UTC- 9 hrs
Zone 7: Hawaii - Aleutian Std Time, UTC- 10 hrs
1. In standby mode, press and hold the TIME ZONE BUTTON (#9) until the current time zone number
shown on the LED DISPLAY #10.
2. Repeat the above step until the time zone number, 1-7 as shown above that corresponds to your
area.
3. The Time Zone will be stored after 5 seconds.
Note: Above time zones are not covering Alaska and Hawaii. If you plan to use this model in these
zones, you can still manually set the time regardless what position of time zone switch is. However,
time zones program above will not match the list under such setting.
DST - DAYLIGHT SAVING TIME
The DST function allows you to add one hour to the current time (in Spring) and subtract an hour from
the current time (in Fall), if DST is observed in your area.
Press and hold DST BUTTON (#7) 2 seconds at standby mode to turn on the DST function. The DST
LED indicator will light on the bottom left corner of the LED DISPLAY (#10).
Press and hold DST BUTTON (#7) 2 seconds again at standby mode to turn off the DST function. The
DST LED indicator will turn off.

E-7
CALENDAR AND TEMPERATURE DISPLAY
Tap the TEMP/DST BUTTON (#7) repeatedly to display the ambient indoor temperature
momentarily in Fahrenheit and Celsius alternately.
Note: the temperature will update every 2 minutes.
Tap the PRESET/TIME SET/Y-M-D BUTTON (#2) repeatedly at standby mode to display the
current Year and Month/day momentarily (5 seconds).
SETTING UP THE ALARMS
1. Press and hold the VOLUME-/ALARM 1 BUTTON (#6) at standby mode.
2. Alarm 1 LED indicator and the digits of time will flash.
3. Press the TUNING-/HOUR BUTTON (#4) or the TUNING+/MINUTE BUTTON (#3) to increase the
hour and minute.
4. Tap VOLUME-/ALARM 1 BUTTON (#6) again to set the weekly alarm schedule.
5. Tap TUNING-/HOUR BUTTON (#4) or the TUNING+/MINUTE BUTTON (#3) to select the desired
alarm schedule.
1 – 7 means alarm will sound from Monday to Sunday.
1 – 6 means alarm will sound from Monday to Saturday only.
1 – 5 means alarm will sound from Monday to Friday only.
6. Tap VOLUME-/ALARM 1 BUTTON (#6) repeatedly to select the wake up option.
Wake to alarm – Alarm LED indicator will light.
Wake to radio – Radio LED indicator will light.
Disable the Alarm – both Alarm and Radio indicator will turn off.
7. The setting will be stored after 5 seconds.
8. Press and hold the VOLUME-/ALARM 2 BUTTON (#5) at standby mode.
9. Alarm 2 LED indicator and the digits of time will flash.
10. Repeat steps 3 to 7 to set the alarm 2.
To view and change the wake up option.
1. Tap VOLUME-/ALARM 1 BUTTON (#6) at standby mode. The LED display will show the alarm
time and wake up option momentarily (5 seconds).
2. Tap VOLUME-/ALARM 1 BUTTON (#6) repeatedly within 5 seconds to select the wake up option
or disable the alarm.
3. The current setting will be store after 5 seconds.
4. Repeat above steps to view and change the wake up option of Alarm 2.
Turning Off the Alarm:
The alarm or radio will sound for 30 minutes unless interrupted by pressing the ON/OFF/SOURCE
BUTTON (#1). It will repeat the chosen alarm again at the same time on the following day according to
the weekday alarm schedule setting.
SNOOZE FUNCTION
When the preset alarm time is reached, the chosen alarm will sound. You can momentarily stop the
alarm sound for 9 minutes by using the snooze function.
Press the SNOOZE BUTTON (#9) for a 9 minutes snooze duration during beep or radio alarm.
During the Snooze delay, the alarm icon RADIO or ALARM will flash.
The Snooze function can be repeated within the alarm duration.
If you set the JCR-231 to the Auto Dim Mode, the LED DISPLAY (#10) will keep on turn on
automatically when the snooze function is activated.

E-8
LISTENING TO RADIO
1. Press the ON/OFF/SOURCE BUTTON (#1) to turn on the JCR-231.
2. Tap ON/OFF/SOURCE BUTTON (#1) to select AM or FM band.
3. To manual tune the radio station, tap the TUNING-/HOUR BUTTON (#4) or TUNING+/MINUTE
BUTTON (#3) repeatedly to your desired radio station.
4. To automatically tune to the next available radio, press and hold the TUNING-/HOUR BUTTON (#4)
or TUNING+/MINUTE BUTTON (#3) for 1-2 seconds until frequency readout on the display begins
to scan and then release the button. The tuner will stop scanning when it receives the next
broadcasting station of adequate signal strength.
5. Press the VOLUME-/ALARM 1 (#6) or VOLUME+/ALARM 2 BUTTOM (#5) to adjust to the desired
output level.
6. To turn off the radio, press and hold the ON/OFF/SOURCE BUTTON (#1) for 2 seconds.
TIPS FOR BEST RECEPTION
AM – The AM antenna is located inside the cabinet of the unit. If AM reception is weak, change the
position of unit until the internal antenna picks up the strongest signal.
FM – During FM reception, always keep the FM WIRE ANTENNA (#15) fully extended for best
performance. However, if FM reception is weak, try repositioning the unit until you get the best
reception.
NOTE: Automatic tuning depends on the signal strength of the broadcasting station, so weak stations
may be skipped. You can manually tune to find the weak stations if a station gets skipped. With
strong signals, the tuner may stop before it reaches the actual broadcast frequency, so you
may need to manually tune for the best reception.
PRESET RADIO STATIONS
This unit has 20 preset memories for the FM radio and 20 preset memories for the AM radio.
1. Press the ON/OFF/SOURCE BUTTON (#1) to turn on the JCR-231.
2. Tap ON/OFF/SOURCE BUTTON (#1) to select AM or FM band.
3. Tune to the desired radio station either by “manually” or “automatically” tuning method.
4. Press and hold the PRESET/TIME SET/Y-M-D BUTTON (#2) to enable the program function and the
preset channel number “P01” indicator will show on the LCD and flashing for 5 seconds.
5. Tap the TUNING-/HOUR BUTTON (#4) or TUNING+/MINUTE BUTTON (#3) to select the preset
number you want to assign the station to.
6. Press the PRESET/TIME SET/Y-M-D BUTTON (#2) to confirm the setting.
7. Repeat above steps 3-6 to store other stations.
Note: The unit can automatically search and store the preset memories. Press and hold the
SNOOZE/TIME ZONE//SLEEP BUTTON (#9) for 4~5 seconds to activate auto preset mode and
the total number of stations can be stored depends on the signal strength of broadcasting
stations.
RECALLING PRESET RADIO STATIONS
1. Press the ON/OFF/SOURCE BUTTON (#1) to turn on the JCR-231.
2. Tap ON/OFF/SOURCE BUTTON (#1) to select AM or FM band.
3. Tap PRESET/TIME SET/Y-M-D BUTTON (#2). The preset number will show on the LED DISPLAY
(#10).
4. Tap the TUNING-/HOUR BUTTON (#4) or TUNING+/MINUTE BUTTON (#3) to select the preset
station you want to listen.

E-9
SLEEP TIMER OPERATIONS
Tap the SNOOZE/TIME ZONE//SLEEP BUTTON (#9) to turn on the Sleep timer.
Tap the SNOOZE/TIME ZONE//SLEEP BUTTON (#9) repeatedly to select the desired sleep time.
The sleep timer can be chosen from 90 to 10 minutes in 10 minutes step. After sleep timer has been
selected, wait for 5 seconds to confirm. The unit will stop and go into Standby mode automatically
when the selected sleep time has expired.
To check remaining sleep time, simply press the SNOOZE/TIME ZONE//SLEEP BUTTON (#9).
Press and hold the ON/OFF/SOURCE BUTTON (#1) to switch off the unit before the selected sleep
time expires.
Notes:
• If you press the SNOOZE/TIME ZONE//SLEEP BUTTON (#9) once and the unit will go into Standby
mode automatically when the selected time has expired.
• If you have chosen to sleep to music from an external device connected to AUX input, the sleep timer
will shut off the power to this unit only but it will not turn off power to the external device.
USING THE AUX IN TO LISTEN TO EXTERNAL AUDIO PLAYER
You can playback your favorite music from your iPod or portable digital audio player using the Aux in
function.
1. Connect the headphone jack of your external device to the AUX IN JACK (#16) located on the back
of the unit using a audio cable (not included) with a 3.5mm stereo plug on either ends.
2. Press the ON/OFF/SOURCE BUTTON (#1) to turn on the JCR-231.
3. Tap the SOURCE BUTTON (#1) to select AUX mode.
4. Start playing your external audio device.
5. Slowly increase the volume control of the unit until the desired level is obtained. To avoid output
sound distortion due to overloading, you may need to lower the volume output of your audio device.
Notes:
the stereo music from your audio device will be converted to a monaural audio output.
If you connect this unit to the Line-Out Jack of your external device then you only need to adjust the
volume control of this unit. If you connect the Headphone Jack of your external device then you may
need to adjust both the volume controls of your external device and this unit to obtain the desirable
volume setting.
Press and hold the ON/OFF/SOURCE BUTTON (#1) to turn off the JCR-231 when you have
finished listening.
Don't forget to switch off the power of your external device as well.
Wave Sensor Function
1. Press and hold the DIMMER/SET BUTTON (#8).
2. The AUTO DIM LED indicator will flash.
3. Tap the DIMMER/SET BUTTON (#8) again, and the SENSOR LED indicator will flash.
4. Tap the PRESET/TIME SET/Y-M-D BUTTON (#2) once to turn the WAVE SENSOR FUNCTION ON.
The SENSOR LED indicator will light.
5. Tap the PRESET/TIME SET/Y-M-D BUTTON (#2) twice to turn the WAVE SENSOR FUNCTION
OFF. The SENSOR LED indicator will turn off.
Once the Wave Sensor function is enabled, information will be shown on the LED DISPLAY (#10)
without pressing any buttons.

E-10
1. In radio off mode, to display indoor temperature and alarm time settings:
Wave your hand over the IR
SENSOR (#11) once to show the
indoor temperature.
Wave your hand over the IR
SENSOR (#11) again within 1
second to show the ALARM 1
time .
Wave your hand over the IR
SENSOR (#11) again within 1
second to show the ALARM 2
time.
2. Activating the SNOOZE function when the alarm is sounding :
- Wave your hand over the IR SENSOR (#11) once to activate the
snooze for 9 minutes.
3. Display the radio frequency (in Radio mode) and indoor temperature:
Wave your hand over the IR SENSOR (#11)
to show the indoor temperature Wave your hand over the IR SENSOR (#11) again
within 1 second to show the radio frequency

E-11
Wave your hand over the IR SENSOR (#11)
again within 1 second to show the ALARM1
time
Wave your hand over the IR SENSOR (#11)
again within 1 second to show the ALARM 2
time
4. In radio off mode, and with the Display Dimmer Switch set to “AUTO OFF”, the time display will
automatically turn off in 15 seconds. Use the IR Sensor to turn it on again:
DIMMER CONTROL
Tap the DIMMER BUTTON (#8) repeatedly to select the high/low brightness of the LED DISPLAY (#10).
Notes:
• Every time you power up the unit, the LED brightness will revert back to the high setting (brightest
setting).
• After adjusting the LED brightness in standby mode, the intensity level will be stored and there is no
need to adjust it again unless you disconnect the unit without a battery installed.
AUTO DIM
1. Press and hold the DIMMER/SET BUTTON (#8).
2. The AUTO DIM LED indicator will flash.

E-12
3. Tap the PRESET/TIME SET/Y-M-D BUTTON (#2) once to turn the AUTO DIM FUNCTION ON.
The AUTO DIM LED indicator will light.
4. Tap the PRESET/TIME SET/Y-M-D BUTTON (#2) twice to turn the AUTO DIM FUNCTION OFFN.
The AUTO DIM LED indicator will turn off.
Note: The AUTO DIM FUNCTION allows the LED DISPLAY (#10) to automatically turn off after 15
seconds to conserve energy.
CARE AND MAINTENANCE
1. Children should be supervised when using this appliance.
2. Never wrap the ac power cord around any animal or person. Special care should be taken with long
wire.
3. Clean your unit with a dry cloth. Solvent or detergent should never be used.
4. Avoid leaving your unit in direct sunlight or in hot, humid or dusty places.
5. Keep your unit away from heating appliances and sources of electrical noise such as fluorescent
lamps or motors.
6. Backup Battery:
This unit is using “CR2032” backup battery and standard life time is 12 months and recommend
change the backup battery every 12 months to ensure it is functional
RESETTING THE UNIT
In very rare instances, such as an electrostatic discharge on a dry cold winter day, an erroneous display or
prolonged abnormal behavior during normal use, you should unplug it from the AC power source and then
remove the backup batteries from the battery compartment at the bottom of the unit for at least 10
minutes. After 5 minutes, reinsert the batteries and connect the AC power.
Please note that all personal settings including current time, alarm time and sleep session will be
cleared and will need to be reset, so be sure to set up the clock again according to previous sections
above.
SPECIFICATIONS
Frequency Range: AM 520 - 1710 kHz
FM 87.5 – 108 MHz
AC Power Source: AC120V~ 60Hz 5W
Backup Battery: 1 x DC3V type CR2032 Lithium battery (no included)
Clock Accuracy: up to +/- 60 seconds per month
Temperature Sensor Range: - 4 °F to 140 °F (-20°C to +60°C)

E-13
TROUBLESHOOTING GUIDE
If you experience difficulties in the use of this clock radio, please check the following or call 1-800-777-
5331 for Customer Service.
Symptom Possible Cause Solution
The Sensor has been
accidentally triggered The unit is too close to a wall or
there is a barrier (e.g. shelf) above
or behind that is too close to the
clock radio.
Relocate the clock radio to keep it a
minimum 3 – 6 inches from a wall
and make sure there is no barrier
(e.g. shelf) above the clock radio less
than the minimum 9 - 12 inches.
Noise or distorted sound
on AM or FM broadcast - Station not tuned properly for AM or
FM.
- FM: FM wire antenna is not
extended.
- AM: The unit is not placed in best
reception point.
- Retune the AM or FM broadcast
station.
- FM: Fully extend FM wire antenna.
-
A
M: Reposition the unit until the
best reception is obtained.
AM or FM no sound - Unit not in “RADIO” function mode.
- Volume set at minimum
- Press On/Off Button until radio is on.
- Increase Volume.
Sound appears
distorted at high volume
setting
- Volume control of this unit is set to
maximum. - Adjust Volume Control to a lower
comfortable level.
LCD brightness is too
dim - Display brightness set to dim mode - Set display brightness to HIGH.
At Spectra, environmental and social responsibility is a core value of our
business. We are dedicated to continuous implementation of
responsible initiatives with an aim to conserve and maintain the
environment through responsible recycling.
Please visit us at http://www.spectraintl.com/green.htm for more information on Spectra’s green
initiatives or to find a recycler in your area.
90 DAY LIMITED WARRANTY AND SERVICE VALID IN THE U.S.A. ONLY
SPECTRA MERCHANDISING INTERNATIONAL, INC. warrants this unit to be free from defective
materials or factory workmanship for a period of 90 days from the date of original customer purchase
and provided the product is utilized within the U.S.A. This warranty is not assignable or transferable.
Our obligation under this warranty is the repair or replacement of the defective unit or any part thereof,
except batteries, when it is returned to the SPECTRA Service Department, accompanied by proof of
the date of original consumer purchase, such as a duplicate copy of a sales receipt.
You must pay all shipping charges required to ship the product to SPECTRA for warranty service. If the
product is repaired or replaced under warranty, the return charges will be at SPECTRA’s expense.
There are no other express warranties other than those stated herein.
This warranty is valid only in accordance with the conditions set forth below:

E-14
1. The warranty applies to the SPECTRA product only while:
a. It remains in the possession of the original purchaser and proof of purchase is demonstrated.
b. It has not been subjected to accident, misuse, abuse, improper service, usage outside the
descriptions and warnings covered within the user manual or non-SPECTRA approved
modifications.
c. Claims are made within the warranty period.
2. This warranty does not cover damage or equipment failure caused by electrical wiring not in
compliance with electrical codes or SPECTRA user manual specifications, or failure to provide
reasonable care and necessary maintenance as outlined in the user manual.
3. Warranty of all SPECTRA products applies to residential use only and is void when products are
used in a nonresidential environment or installed outside the United States.
This warranty gives you specific legal rights, and you may also have other rights which vary from state
to state. TO OBTAIN SERVICE please remove all batteries (if any) and pack the unit carefully and send
it freight prepaid to SPECTRA at the address shown below. IF THE UNIT IS RETURNED WITHIN THE
WARRANTY PERIOD shown above, please include a proof of purchase (dated cash register receipt)
so that we may establish your eligibility for warranty service and repair of the unit without cost. Also
include a note with a description explaining how the unit is defective. A customer service representative
may need to contact you regarding the status of your repair, so please include your name, address,
phone number and email address to expedite the process.
IF THE UNIT IS OUTSIDE THE WARRANTY PERIOD, please include a check for $15.00 to cover the
cost of repair, handling and return postage. All out of warranty returns must be sent prepaid.
It is recommended that you contact SPECTRA first at 1-800-777-5331 or by email at
model you have may be discontinued, and SPECTRA reserves the right to offer alternative options for
repair or replacement.
SPECTRA MERCHANDISING INTERNATIONAL, INC.
4230 North Normandy Avenue,
Chicago, IL60634, USA.
1-800-777-5331
To register your product, visit the link on the website below to enter your information.
http://www.spectraintl.com/wform.htm
0218 Printed in China
Table of contents
Other Jensen Clock manuals
Popular Clock manuals by other brands

Conrad
Conrad 67 17 16 operating instructions

Meinberg
Meinberg GPS167LCD-MP operating instructions

Paragon
Paragon Atlanta EM3333 instruction manual

La Crosse Technology
La Crosse Technology 515-1912 quick start guide

La Crosse Technology
La Crosse Technology WT-3129S instruction manual

TFA
TFA 60.5002 operating instructions