Jensen JE1512LED User manual

JE1512LED
Guide de l’utilisateur du téléviseur
LED de 15’’
Veuillez observer toutes les mesures de sécurité en utilisant ce produit.
Veuillez lire soigneusement ce manuel avant d’utiliser ce produit.
15”LED TV User’s Guide
Please observe all safety precautions when using this product.
Please read this manual careful
English
Français

2
Safety Precautions
Important Information
Important Safeguards
3
4~5
User Guidance Information
Names of each part(Front View) / Accessories 6
Names of each part(Back View) 7
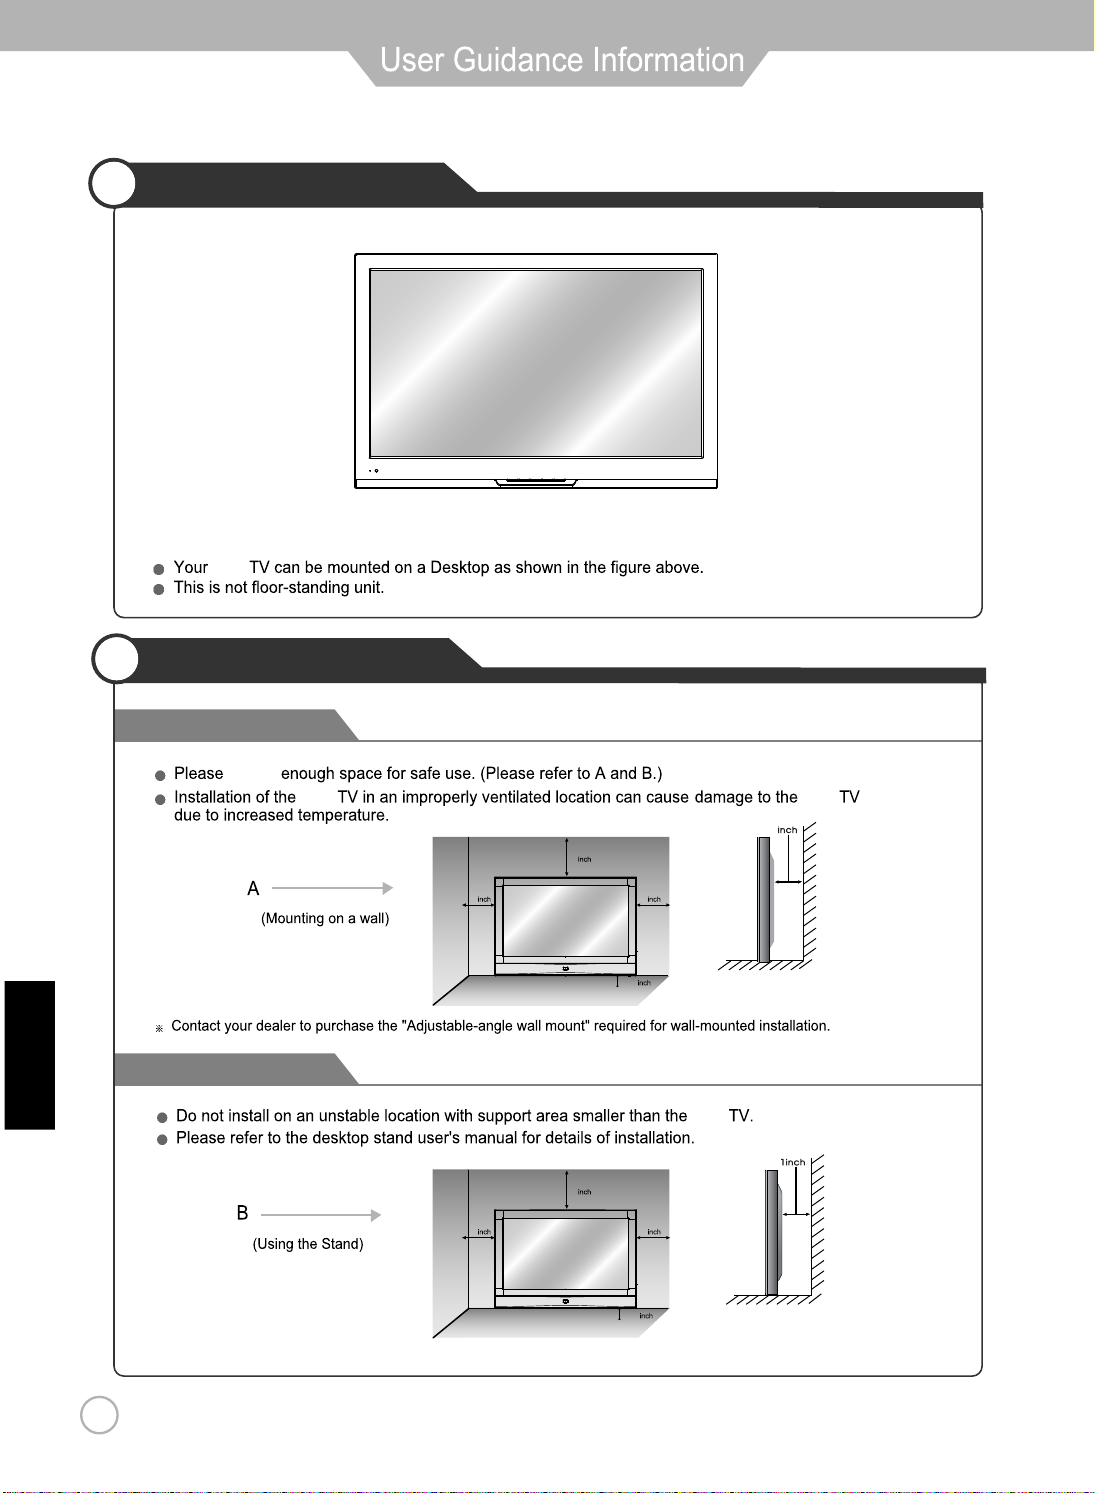
Mounting on a Desktop / Installation Precautions 8
9
Power Input Connections / Installing an Antenna
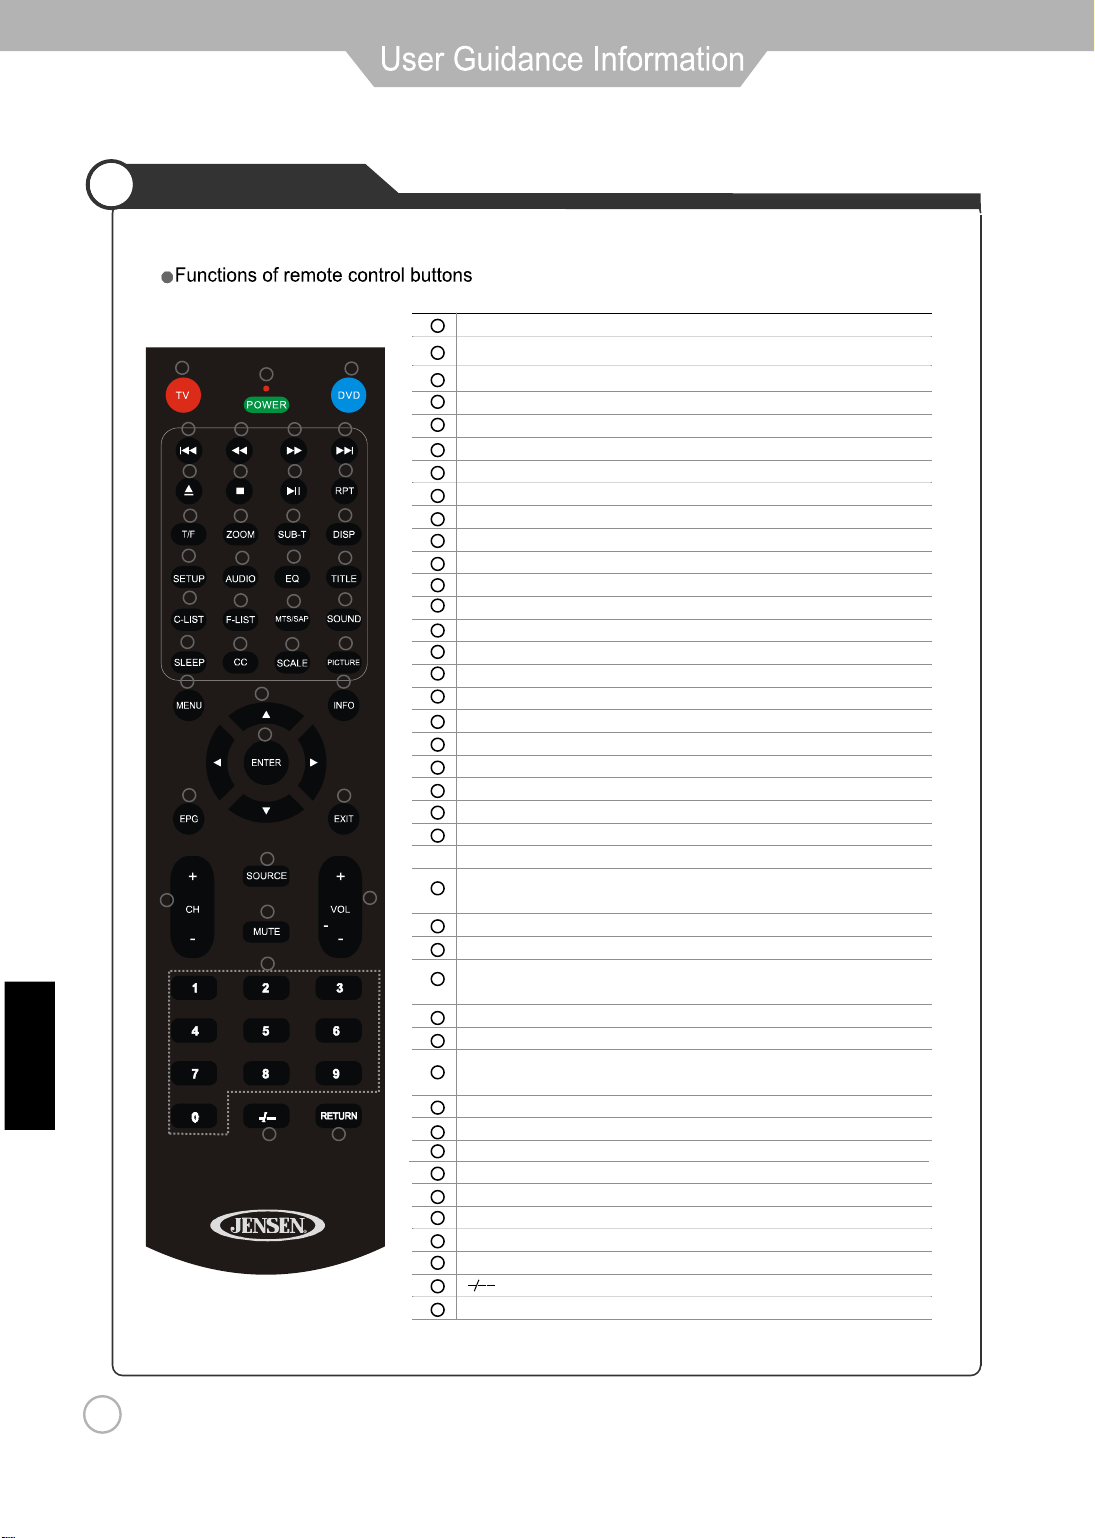
Remote control
Precautions / How to use remote control 12
Connection
VCR Connections / JENSEN DVD Connections for IR / Watching Video Tape 13
Satellite/Cable TV Set-Top Box Connections / Watching Cable TV 14
External Audio Amplifier / SERVICE USB Connections 15
16
Basic Use
Application
Selecting input source / Inital Setup Wizard 17
CONTENTS
Menu Operation 18
19
Customizing the PICTURE Settings
Customizing the TIMER Settings
Customizing the SETUP Settings
Customizing the LOCK Settings
Customizing the CHANNEL Settings
20
22~23
24~26
27~28
..............................................................................
...........................................................
.......................................................
.......................................................
.....................................................
.....................................................
....................................................................
....................................................................................
....................................................................................
.......................................................
...............................................................................
..................................................
PC Connections / How to use as PC monitor
.....................................
..........................
.................................................................
.................................................................
.............................................................
..................................................................
Customizing the AUDIO Settings
21
...................................................................
................................................................
Trouble shooting 29
Specifications 30
.................................................................................
....................................................................................
Maintenance and Service
10~11
English

3

4

5

Names of each part
Accessories
6
hsilgnE
MENU Button-OSD Menu Display Button
CH- / CH+ Button
VOL- / VOL+ Button
SOURCE Button
POWER Button
123 4 5
POWER
CableCable

AV IN ( VIDEO and AUDIO) DC 12V
HDMI jack
SERVICE jack
PC AUDIO
1
4
7
5
8
3
2
VGA
RF
6
9(ATSC/NTSC)IR jack
Names of each part
7
English
Back View
AUDIO(L/R) OUT
4
3
5
6
7
8
9
L R
PC INPC IN
SERVICE HDMI VGA AUDIO IR
PC RF
AUDIO OUT
2
1
DC 12V
V L R
AV

Mounting on a Desktop
Wall Mounting
Using the Stand
8
Installation Precautions
English
1 1
1
1
11
1
1
1
ensure
LED
LED LED
LED

9
English
POWER input Connections
Installing an Antenna
Connecting to POWER INPUT +12V
NOTE:Optional AC/DC adapter available.
Optional Cigarette adapter available.
(Included)
12V Power Cable (+)12VDC
(-)12VCC
L R
PC IN
SERVICE HDMI VGA AUDIO IR
PC RF
AUDIO OUT
DC 12V
V L R
AV

Remote Control
10
English
Activate TV Mode
POWER On / off for TV and DVD
PREVIOUS(DVD)
EJECT(DVD)
FAST REVERSE(DVD)
STOP(DVD)
T/F(DVD)
ZOOM(DVD)
AUDIO(DVD)
SET UP(DVD)
F-LIST Press this button to display the favourite list
Press C-LIST button to display the channel list
C-LIST
SLEEP Cycles through the LCD TV sleep time:off/5/
CC Close Caption
MENU Displays the OSD menu on the screen
Move up , down , left or right
NAVIGATION
EPG Displays the program guide
CH+/CH- Increase or Decrease channel
NUMERIC KEYS
SOURCE Displays AV Inputs
DVD
TV
Activate DVD Mode
FAST FORWARD(DVD)
NEXT(DVD)
PAUSE(DVD)
RPT(DVD) Repeat Selection
SUB-T(DVD)
Display Time or Chapter information
DISP(DVD)
EQ(DVD)
TITLE(DVD)
MTS/SAP Press MTS/RPT to select Stereo,SAP or Mono
SOUND Press SOUND to cycle select sound types:
Press PICTURE to cycle select picture
PICTURE
INFORMATION Press INFO to display a variety of information
about current channel.
SCALE
Cycles among scale mode:Wide,Cinemal,Normal,Zoom.
ENTER Press ENTER to confirm your opeartion
EXIT
VOL+/VOL- Increase or Decrease volume
MUTE Press once mutes audio,press again to restore audio
RETURN Return to previously viewed channel
Digital channel selection
1
2
3
4
5
6
7
8
9
10
11
12
13
14
15
16
17
18
19
20
21
22
23
24
25
26
27
28
29
30
31
32
33
34
35
36
37
38
39
40
Standard/ Music/ Movie/ Personal
10/15/30/45/60/90/120/180/240 minutes
types: Standard/ Dynamic/ Soft/ Personal
1
456 7
910 11
8
13 14 15
12
17 18 19
16
21 22 23
20
25
29
31
35
36
38
39 40
26 27
30
24
28
33
37
32
34
23

POWER
CH
VOL
RETURN
MUTE
MENU
INFO
ENTER
SOURCE
EXIT
EPG
1
2
3
ZOOM
SUBT
DISP
SETUP
AUDIO
EQ
TITLE
POWER POWER
CH+
CH-
VOL+
VOL-
VOL+
VOL-
RETURN
MUTE
MENU
INFO
UP UP
DOWN DOWN
LEFT LEFT
RIGHT RIGHT
ENTER OK
SOURCE SOURCE
EXIT
EPG
TFT-F
1
EJECT
1
2 2
3 3
PICTURE
PICTURE
TITLE
SOUND
SOUND
EQ
F-LIST F-LIST
AUDIO
C-LIST
C-LIST
SETUP
SLEEP
SLEEP
DISP
CC
CC
SUB-T
SCALE
SCALE
ZOOM
4
5
6
7
8
9
00 0
9 9
8 8
7 7
6 6
5 5
4 4
RPTRPT
NEXT
FAST-FORWARD
FAST-REVERSE
PREVIOUS
PLAY-PAUSE
STOP
BUTTON TV-FUNCTION DVD-FUNCTION TV-FUNCTION DVD-FUNCTION TV-FUNCTION DVD-FUNCTION
Remote Control
11
NOTE: DVD functions are intended for JENSEN DVD players only.
See your JENSEN DVD manual for more information.
BUTTON BUTTON
English
MTS-SAP
MTS/SAP

Precautions
12
are good .
How to use remote control
English
LED

SOURCE
3.Press to confirm the source selection or stop operation a few seconds,
4.Turn on the VCR,insert the tape and press play button.
ENTER
VCR Connections
Watching Video Tape
13
Terminals vary by manufacturer
(Included)
Connect the LED TV’S Composite In terminal to VCR’s Composite OUT terminal using the included Composite cable.
English
will automatically enter the selection mode.
JENSEN DVD Connections for IR
Composite Cable
LED
Connection to 12 volt JENSEN DVD player IR control.
All JENSEN Remote Control DVD Functions can be controlled Via the TV IR receiver.
You do not need to point the remote conrol at the JENSEN DVD player when this option is used.
NOTE: DVD IR control is intended for JENSEN DVD players only.
See your JENSEN DVD manual for more information.
L R
PC IN
SERVICE HDMI VGA AUDIO IR
PC RF
AUDIO OUT
DC 12V
V L R
AV

SOURCE
4.
3. Press to confirm
ENTER
Satellite/Cable TV Set-TOP Box Connections
Watching Cable TV
14
Composite Cable
Terminals vary by manufacturer
(Included)
(Not Included)
the source selection or stop operation a few seconds,
English
will automatically enter the selection mode.
LED
LED
L R
PC IN
SERVICE HDMI VGA AUDIO IR
PC RF
AUDIO OUT
DC 12V
V L R
AV

Connection
External Audio Amplifier
Connecting to an amplifer or home theater system.
15
Terminals vary by manufacturer.
(Not Included)
audio output level.
English
SERVICE USB Connections
Connection to SERVICE USB.
Note: This USB connection is for software upgrades only.
Does not support any other USB function .
LED
LED
L R
PC IN
SERVICE HDMI VGA AUDIO IR
PC RF
AUDIO OUT
L R
PC IN
SERVICE HDMI VGA AUDIO IR
PC RF
AUDIO OUT

16
English
PC Connections
Terminals vary by manufacturer.
VGA (Not Included)
(Not Included)
VGA a VGA
a 3.5mm (Headphone) audio cable.
(
LED
LED
LED SOURCE
3. Press to confirm the source selection or stop operation a few seconds,will automatically
enter the selection mode.
ENTER
How to use as PC monitor
L R
PC IN
SERVICE HDMI VGA AUDIO IR
PC RF
AUDIO OUT

INPUTSOURCE
INPUTSOURCE
TV
AV1
AV2
HDMI1
HDMI2
17
English
Selecting Input Source
Note: After you selected the desired input sorce, if stop operation a few seconds,
then will automatically enter the selection mode.
Inital Setup Wizard
Setup Wizard
Air/Cable
Cable System
Auto Scan
English
Cable
STD
SelectMoveExit
MENU
Menu Language
After connecting your TV antenna or cable wire, turn the television ON.
The quick setup wizard will display on-screen. Select your preferred
picture setting followed by antenna options and performing Auto Scan
to receive local broadcast channels that will be stored in the TV tuner
memory.
The wizard will direct you to the TV menu to select antenna options and run Channel Auto Scan. Channels found
will be stored in the TV tuner memory.
How to Navigate:
Press the •
Press the •
arrow button to highlight Menu Language and then press
arrow button to highlight CABLE or AIR based on your antenna connection.
Press the • arrow button to select Auto Scan and press ENTER (when Cable is selected, ‘AUTO’ is
recommended). Otherwise, press the arrow button to select Cable Systerm: STD > IRC > HRC > Auto.
button to select OSD Language.

SetupLock
12
6
Timer
Picture
Channel
ChangePassword
SystemLock
US
Canada
ResetRRT
RRTSetting
MoveExit
MENU
On
TIMER MENU:
Allows you to set up a variety of time options.
LOCK MENU:
Allows you to set up a variety of lock options.
SETUP MENU:
Allows you to set up a variety of setup options.
CHANNEL MENU:
Allows you to search channels and set up a variety of channel options.
Allows you to customize the sound options and effects.
Use the LEFT and RIGHT buttons to select your main menu option.
Press the MENU button to exit submenu to return to the main menu.
Press the MENU button again or EXIT button to exit the main menu.
Menu Operation
Some options are not available for all inputs.
SetupLock
12
6
Timer
Picture
Channel
AutoScan
Favorite
ShowHide
ChannelNo
ChannelLabel
DTVSignal
Air
SelectMoveExit
MENU
503
KOCELB
Good
Air/Cable
Audio
Audio
AUDIO
4
5
English
SetupLock
12
6
TimerChannel
SoundMode
Bass
Treble
Balance
AVC
AudioLanguage
Standard
English
SelectMoveExit
MENU
50
50
50
Off
Off
Picture
Audio
TV Speaker
SetupLock
12
6
Timer
Picture
Channel
PictureMode
Contrast
Brightness
Color
Tint
Sharpness
Color
Standard
Normal
SelectMoveExit
MENU
50
50
50
0
50
Audio
HDMI CEC
SetupLockChannel
SleepTimer
TimeZone
DaylightSavingTime
SelectMoveExit
MENU
Picture
Off
Pacific
Off
12
6
Timer
Audio Lock
12
6
TimerChannel
MenuLanguage
Transparency
ZoomMode
NoiseReduction
CloseCapation
Audio
RestoreDefault
English
SelectMoveExit
MENU
Picture
Off
Normal
Off
Setup
Audio
OUT Fixed
Next
18
LED
TempTemp SPDIF TypeSPDIF Type PCMPCM

19
Picture Mode Cycles through picture display modes: Standard, Dynamic, Mild, User.
Contrast Controls the difference between the brightest and darkest regions of the picture.
Brightness Controls the overall brightness of the picture
Color Controls the color.
Tint Controls the tint.
Sharpness Increase this setting to see crisp edges in the picture; decrease it for soft edges .
Color Temp Cycles through color modes: Normal, Cool, Warm.
or EXIT button to exit.
English
SetupLock
12
6
Timer
Picture
Channel
PictureMode
Contrast
Brightness
Color
Tint
Sharpness
Color
Standard
Normal
SelectMoveExit
MENU
50
50
50
0
50
Audio
HDMI CEC
HDMI CEC
SetupLock
12
6
Timer
Picture
Channel
SelectMoveMENU
Audio
CEC Mode
TV Auto Power
TV Auto Switch
Device Auto Standby
On
On
On
On
If you turn off the CEC Mode then the following items(TV Auto Power,TV Auto
Switch,Device Auto Standby) will not be used.
On-TV will turn on when compatible CEC device is activated on HDMI
connection.
TV Auto Switch On-TV will switch to HDMI inputs when compatible CEC device
is activated on HDMI connection.
Device Auto Standby
Customizing the PICTURE Settings
On-When TV turned off, any connected, compatible CEC device will
also turn off.
TV Auto Power
LED
TempTemp
ReturnReturn

20
Sound Mode Cycles through sound modes: Standard, Music, Movie and User.
Bass Controls the relative intensity of lower pitched sounds.
Treble Controls the relative intensity of higher pitched sounds
Balance To adjust the balance of the left and right sound track, or turn off the volume of the
left and right sound track.
TV Speaker Allows you to select between ON and OFF.
AVC On or off (Automatic Volume Control) keep volume level steady.
SPDIF Type Allows you to select beteen PCM and RAW (Digital connection to Home Theater system)
Audio Language Allows you to select audio languages: English, French and Spanish.
SetupLock
12
6
TimerChannel
SoundMode
Bass
Treble
Balance
AVC
AudioLanguage
Standard
English
SelectMoveExit
MENU
50
50
50
Off
Off
Picture
or EXIT button to exit
Customizing the Audio Settings
Audio
Audio
Audio
English
TV Speaker
SPDIF TypeSPDIF Type PCM
LED
Table of contents
Other Jensen LED TV manuals

Jensen
Jensen JE3212LED User manual

Jensen
Jensen JE4023 User manual

Jensen
Jensen JTV4015DC User manual

Jensen
Jensen JE2212LED User manual

Jensen
Jensen JE4020 User manual

Jensen
Jensen JE3214 User manual

Jensen
Jensen JE1912LED User manual

Jensen
Jensen JTV4020DC User manual

Jensen
Jensen JE3212LED User manual

Jensen
Jensen JE3217 User manual