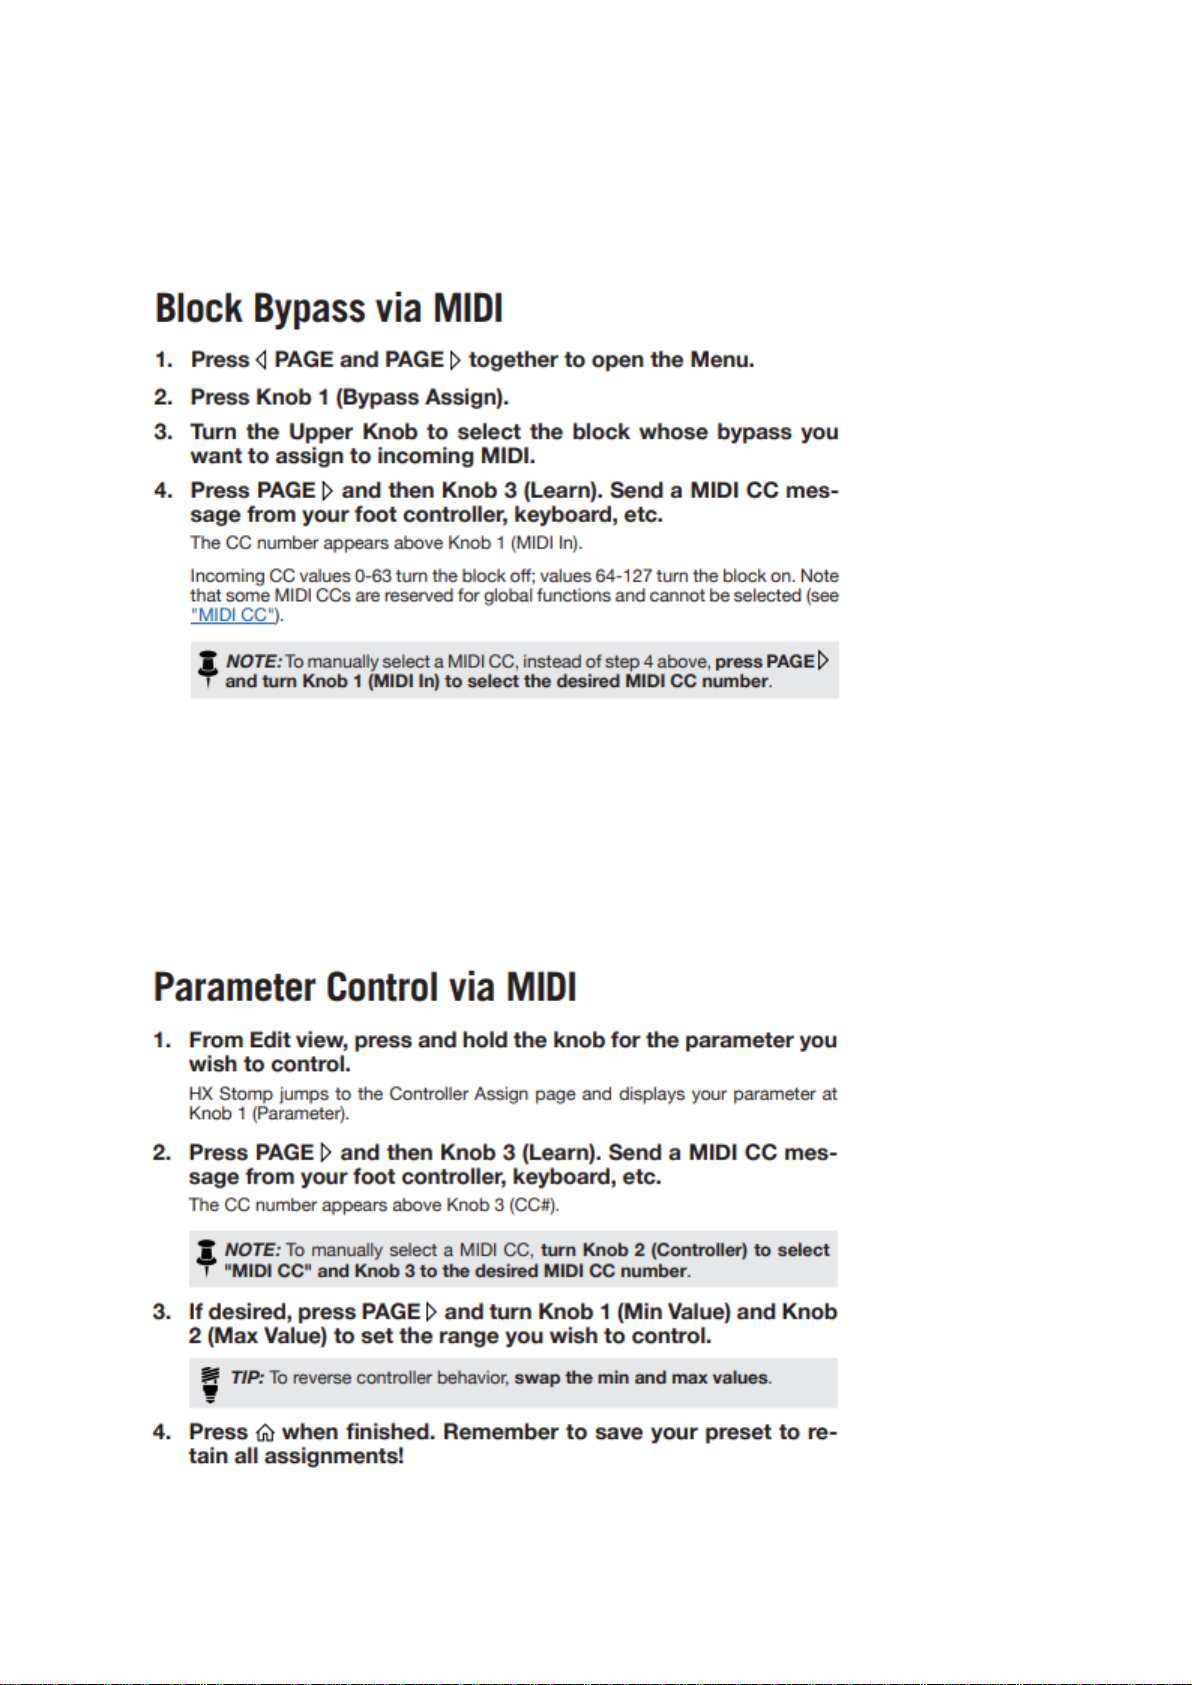
Jet Micro HX 3.0 User manual

Overview, Features, and how to use the JET Micro HX 3.0 MIDI controller
Overview
Description
Getting Started
Setting Up Your HX Stomp
Operating the JET Micro
Red Bank (Stomp Mode)
Green Bank (Looper Mode)
Blue Bank (Tap/Tuner Mode)
Navigating the Banks
Global Settings
Controlling External MIDI Pedals
Turning Off Double Press
Always Active Tap Tempo
FAQ
Can I Update the Software on my Old Micro?
Will my Old Micro Still Work with the New HX 3.0 Update?
JET Micro HX 3.0
User Manual

Basic features and controls of the JET Micro
Overview

Overview
The JET Micro HX 3.0 is a three button MIDI controller made specifically for the HX Stomp. The
Micro comes pre-programmed to control all of the Stomp's "utility" features such as preset
scrolling, tap tempo, tuner, snapshots, & looper controls. Alongside the pre-programmed "utility"
features, you can also use the three buttons to bypass blocks and/or toggle effect parameters
up/down for up to 6 individual blocks.
As an additional bonus, the JET Micro can also control limited functionality to several other
popular MIDI enabled pedals such as Strymon, Eventide H9, Boss, GFI Systems, Source
Audio, Chase Bliss, & Empress. The Micro will send PC messages on different MIDI channels
to control up to 5 additional pedals whenever you engage Snapshots. Snapshot 1 will send
out the first PC#, Snapshot 2 will send out the second PC#, and Snapshot 3 will send out the
third PC#. Use our "MIDI Implementation Table" to see which MIDI channel you should set
your other devices to for proper operation for each pedal manufacturer. Link to the "MIDI
Implementation Table" can be found here:
https://cdn.shopify.com/s/files/1/0219/3041/0084/files/JET_Micro_-
_Midi_Implementation_Chart.pdf?186
*Note that this feature can be turned off in the Global Settings if desired.
We've also had a lot of customers ask about making one of the buttons in the red bank
(Stomp Mode) be assignable to tap tempo, giving you access to an "always active" tap
tempo button in lieu of having to navigate to the blue bank (Tap/Tuner Mode) to access the
tap tempo. Now with the JET Micro HX 3.0 you can assign any of the three buttons (A, B, or
C) to tap tempo, which can be setup within the Global Settings.
Description

Instructions for setting up your HX Stomp to use with the JET Micro
Getting Started

Getting Started
Let's take a moment and setup your HX Stomp to work with the Micro...
1. On the Stomp, press <Page and Page> simultaneously to open the menu
2. Press Page> and then press Knob 1 (Global Settings)
3. Turn the Upper Knob to select the Footswitches menu
1. Turn Knob 2 and assign FS3 function to Stomp 3
2. Turn Knob 3 and assign FS4 function to Preset Down
Setting Up Your HX Stomp

How to use the JET Micro HX 3.0
Operating the JET Micro

Operating the JET Micro
The Red Bank is where you will likely spend most of your time with the JET Micro. In this bank you
can toggle blocks on/off, toggle effect parameters up/down, recall Snapshots, and scroll up and
down presets. You can even setup one of the buttons to be an "always active" tap tempo if you
wish, see "Global Settings" for details and how to set this up.
Each button has three time based press actions, which are a short press, double press, and
long press.
Short Press - quickly press and release the button within 1/2 of a second
Double Press - quickly press the button at least two times within a 1/2 of a
second
Long Press - press and hold the button for at lease 3/4 of a second and
then release
To recall Snapshots, simply do a long press of any button.
Long Press Button A - recalls Snapshot 1
Long Press Button B - recalls Snapshot 2
Long Press Button C - recalls Snapshot 3
Two button presses will scroll up and down presets. You can also hold down the buttons to
fast scroll in either direction
Short Press AB - scrolls down presets
Short Press BC - scrolls up presets
Red Bank (Stomp Mode)

To bypass blocks within the HX Stomp, make sure the block you want to control is
highlighted and then follow the steps below using the MIDI "Learn" feature. When you press
(or double press) a button, the Micro will automatically send its respective MIDI CC message
to the Stomp and the Stomp will sync to the Micro.
To toggle effect parameters up/down, follow the steps below to assign a button on the Micro
to the effect you choose. When you press (or double press) a button, the Micro will
automatically send its respective MIDI CC message to the Stomp and the Stomp will sync to
the Micro.

Operating the JET Micro
The green bank is dedicated to using the looper within the HX Stomp. Remember, in order to use
the looper features you must have one of the blocks assigned to the "Looper" within the Stomp. All
of the buttons listed below are pre-programmed and cannot be user assignable.
Short Press Button A - toggles between record and overdub
Short Press Button B - stops the active loop. If you press the record button (button A)
after stopping the active loop, the Stomp will automatically erase the previous loop
and begin to record a new loop.
Short Press Button C - plays the recorded (or overdub'd) loop
Long Press Button A - toggles between undo and redo the most recent loop
Long Press Button B - toggles between half speed and full speed
Long Press Button C - plays the loop once
Green Bank (Looper Mode)

Operating the JET Micro
The blue bank is used to access tap tempo and the tuner. When in the blue bank, the follow
buttons have been pre-programmed and cannot be user assignable.
Short Press Button A - toggles the tuner on/off
Short Press Button B - exits the Tap/Tuner Mode
Short Press Button C - tap tempo
Blue Bank (Tap/Tuner Mode)

Operating the JET Micro
The JET Micro has three different banks (Red, Green, & Blue), each bank is identified by the single
color changing LED and offers unique features to control your HX Stomp.
When the pedal first powers up it will automatically pull up the red bank (Stomp Mode). To
toggle back and forth between the red (Stomp Mode) and green (Looper Mode) banks,
quickly press and release all 3 buttons simultaneously.
The blue bank (Tap/Tuner Mode) can be called up in either the red or green bank. To access
the blue bank, simply press and hold all 3 buttons for at least 3/4 of a second and then
release the buttons. To exit the blue bank, simply press the B button and the pedal will
return to whichever bank you were previously in (red or green).
Navigating the Banks

Access various features of the Micro
Global Settings

Global Settings
For detailed information about this feature and how it works, please visit the Description page.
To enable or disable this feature, turn power off and back on to the Micro. While the Micro is
in the startup phase (blinking LED's) press down button A and continue to hold it down. Once
you are in the global settings (the LED will either be solid green or red) pressing button C will
toggle the LED between red and green. If the LED is green, this feature is enabled, if red, this
feature is disabled. Once you have reached your desired setting, simply release button A and
the Micro will save your settings into permanent memory and exit the global settings.
Controlling External MIDI
Pedals

Global Settings
In order for the Micro to tell the different between a single press and a double press, there is a
little bit of timing magic that has to happen behind the scenes. Unfortunately this will cause a
slight delay between the time you perform a single press and the time a block (or effect
parameter) is changed. While this slight delay is minimal (1/2 of a second) this may be undesirable
for some users. If you only need single press actions (access to 3 blocks) and not double press
actions (access to 6 blocks) you can turn off the double press action (and it's respective delay) by
following the steps below.
To enable or disable this feature, turn power off and back on to the Micro. While the Micro is
in the startup phase (blinking LED's) press down button B and continue to hold it down. Once
you are in the global settings (the LED will either be solid green or red) pressing button C will
toggle the LED between red and green. If the LED is green, double press is enabled, if red,
double press is disabled. Once you have reached your desired setting, simply release button
B and the Micro will save your settings into permanent memory and exit the global settings.
Turning Off Double Press

Global Settings
For detailed information about this feature and how it works, please visit the Description page.
To enable or disable this feature, turn power off and back on to the Micro. While the Micro is
in the startup phase (blinking LED's) press down button C and continue to hold it down. Once
you are in the global settings (the LED will either be off, solid red, green, or blue) pressing
button A will toggle the LED between off, red, green, or blue.
If the LED is:
Off - tap tempo is disabled
Red - button A is "Always Active" tap tempo and will no longer toggle blocks or
effect parameters
Green- button B is "Always Active" tap tempo and will no longer toggle blocks or
effect parameters
Blue - button C is "Always Active" tap tempo and will no longer toggle blocks or
effect parameters
Once you have reached your desired setting, simply release button C and the Micro will save
your settings into permanent memory and exit the global settings.
Always Active Tap Tempo

Frequently Askes Questions
FAQ

FAQ
Yes, currently we only have a solution for Windows users, however please check back as we are
working on a solution for Mac users.
In order to update your Micro please follow these steps below:
1. Remove the backplate by removing the four silver screws holding it into place.
2. Remove the backplate from the PCB by removing the two black screws.
Can I Update the Software
on my Old Micro?
Table of contents