manuals.online logo
Brands
  1. Home
  2. •
  3. Brands
  4. •
  5. JETWAY
  6. •
  7. Network Hardware
  8. •
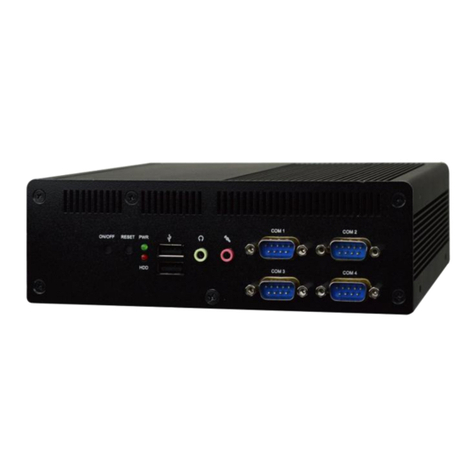
  9. JETWAY FDF13 Series Operating and maintenance instructions

JETWAY FDF13 Series Operating and maintenance instructions

1
Quick Installation Manual
NO: G03-FD_MF13QIG-F
Rev: 1.0
Release date: 2022-07-14
Notice:
The photos in this file are for illustration purpose only. The model may not be the latest
version. Please refer to the product you purchased for actual specification.
2
I/O Outlets
3
Dimension and Outlines
I. To Dissemble the Chassis
1. Locate the screws at the spots marked on this side of the system and unscrew them one by
one.
4
2. Remove the marked screw on the front IO panel.
3. Remove the marked screw on the rear IO panel.
4. Lift the cover up to open the chassis.
5. The overview of the internal structure of the system with HDD tray pre-installed.
5
6. Remove the marked screws to dissemble the HDD tray from the system.
7. The overview of the internal structure of the system.
6
II. To Install SO-DIMM to the board
1. Locate the SO-DIMM slot on the board.
2. Insert the gold-finger side of the compatible SO-DIMM into the slot at a 30 degree angle. See to
it that the break of the module fit into the notch of the slot and the golden-finger side should be
fully plugged into the slot.
3. Press down to secure the SO-DIMM to the slot. The eject tabs will lock automatically if installing
direction is correct.
7
III. To Install M.2 M-Key SATA(2242/2280) card
1. Locate the M.2 SATA slot on the board. System supports two types of M.2 M-Key card in different
lengths (2242/2280). Prepare compatible M.2 SATA card.
2. Toinstall compatible card, please remove the screw in the marked spot at first.
3. Insert compatible M.2 M-Key, type-2280 card into the slot. See to it that the golden-finger side
should be fully plugged into the slot.
2242
2280
8
4. Tighten up the screw removed before to the marked spot to secure the card.
*Note: The screw post and nut are fixed at location MH4 by default for 8cm type-2280 card
installation. If you wish to install type-2242 card, please remove corresponding screw post under the
screw as well and lock the screw post into location MH2 before installing 4.2 cm card to the slot.
The other steps are the same.
IV. To Install M.2 E-Key (2230) PCIe WiFi Card
1. Locate the M.2 E-Key PCIe(2230) slot on the board. Prepare compatible M.2 PCIe, type -
2230 card.
2. Remove the marked screw and use it to lock compatible card to the slot in later installation.
9
3. Insert the gold-finger side of the compatible card into the slot and press down. See to it that the
golden-finger side should be fully plugged into the slot.
4. Secure the card to the board by tightening up the screw to the marked spot.
5. Locate the reserved antenna holes on the rear panel. Remove the dust-proof plugs on the
marked spots from the panel to install the antenna.
6. Push this antenna screw head into antenna hole of the rear panel from the backside of the panel.
10
6-1 6-2
The washer ①& the hexagonal screw nut ②. Push the washer ①through the antenna head.
7. And then lock the antenna screw head to the front side of the rear panel with the
hexagonal screw nut②and tighten it up.
8. Press the metal hat on the end of the antenna string to corresponding antenna slot on the
card as showed.
11
9. Repeat step 6 to 8, to finish installation of the other antenna.
10. The rear panel with antenna screwheads installed.
11. Connect the external Wi-Fi receiver antenna to the antenna screw head on the rear panel.
12
V. To Install M.2 B-Key (3042/3052) card
1. Locate the M.2 B-Key PCIe (3042/3052) slot on the board. Prepare compatible M.2 B-Key
(3042/3052) card.
2. Remove the marked screw and use it to lock compatible card to the slot in later installation.
3. Insert the gold-finger side of compatible M.2 B-Key, type-3042 card into the slot until the golden
3042
3052
13
finger side fully emerged into the slot.
4. Install the screw back to the original spot.
*Note: the screw post and nut fixed at location MH2 by default for 4.2cm M.2 B-key type-3042 card
installation. If you wish to install M.2 B-key type-3052 card, please remove the M.2 B-key type-
3042 card and screw on the location MH3 before installing 5.2cm card to the slot. The other steps
are the same as M.2 B-key type-3042 card installation.
VI. To Install Hard Disk
1. Place compatible SATA HDD upon HDD tray as showed above. Plug this side of the cable to
SATA power-in connector and SATA connector of the hard disk.
14
2. Turn over the HDD tray and fix 2.5’’ HDD upon HDD tray by tightening 4* screws marked in
corresponding spots.
3. Plug SATA power connector and SATA port connector into connectors onboard.
4. Adjust the installed tray as showed above. Fix HDD tray into the system by tightening up 4
screws marked. (refer to I-6)
Notice: When all necessary installations are finished, please make sure that all cables
unplugged before installations are connected to their original locations before restoring the
back cover to the chassis and screws on the front panel/back panel/top cover locked to its
original locations (Refer to Part I). See to it that the cables inside are not blocked or pressed.
15
VII. To Wall Mount the system
1. Install wall mount rack to the system by tightening two screws in the marked positions.
2. Then lock the other two screws on the other side in the same way.
3. Wall mount the system by tightening 4 screws in the marked positions on both sides of the wall
racks.
*Note: The 3 smaller holes on both sides of the rack are reserved for DIN rail installation. See to
it that the three smaller screw holes on one installed rack should be parallel to those on the other
rack; otherwise please readjust the racks for correct installation.

This manual suits for next models

4

Other JETWAY Network Hardware manuals

JETWAY FDF20 Operating and maintenance instructions

JETWAY

JETWAY FDF20 Operating and maintenance instructions

Popular Network Hardware manuals by other brands

axing EOC 1-32 quick start guide

axing

axing EOC 1-32 quick start guide

Advantech MIC-730IVA user manual

Advantech

Advantech MIC-730IVA user manual

Asante AsanteBridge 1012 user guide

Asante

Asante AsanteBridge 1012 user guide

Trade Show 5G Football quick start guide

Trade Show

Trade Show 5G Football quick start guide

Idis IR-310 installation manual

Idis

Idis IR-310 installation manual

Linksys VELOP MX5500 Series user guide

Linksys

Linksys VELOP MX5500 Series user guide

Avigilon HD-NVR3-PRM-48TB installation guide

Avigilon

Avigilon HD-NVR3-PRM-48TB installation guide

Intermec EasyLAN Ethernet user guide

Intermec

Intermec EasyLAN Ethernet user guide

ADC Fiber Optic Panel FL2000 Series brochure

ADC

ADC Fiber Optic Panel FL2000 Series brochure

evertz 8010TM instruction manual

evertz

evertz 8010TM instruction manual

Belkin F5D9001 Series manual

Belkin

Belkin F5D9001 Series manual

NimbeLink NL-SWDK2 user manual

NimbeLink

NimbeLink NL-SWDK2 user manual

Cisco CE 2000 Platform SCE 2000 4xGBE Installation and configuration guide

Cisco

Cisco CE 2000 Platform SCE 2000 4xGBE Installation and configuration guide

ProfiTap XX Series user manual

ProfiTap

ProfiTap XX Series user manual

urmet domus 1093 Series User manual/instructions

urmet domus

urmet domus 1093 Series User manual/instructions

Meinberg LANTIME M300 manual

Meinberg

Meinberg LANTIME M300 manual

Force 10 Adit 3104 IP Reference manual

Force 10

Force 10 Adit 3104 IP Reference manual

Northern Telecom NAC user guide

Northern Telecom

Northern Telecom NAC user guide

manuals.online logo
manuals.online logoBrands
  • About & Mission
  • Contact us
  • Privacy Policy
  • Terms and Conditions

Copyright 2025 Manuals.Online. All Rights Reserved.