Jinhua Unisky Tools DJS-003 User manual

Operation Instructions
Product Name: Smart Bike Trainer (DJS‐003)
Product Model: TY‐DJS003
Jinhua Unisky Tools Co., Ltd.

Catalogue
Warning
After‐Sales Service
Disclaimer
Spare Parts List
Installation Instructions
1、Bike Confirmation
2、Assembly of Bike Trainer and Damper
3、Bike Installation and Debugging
Smart Training
Maintenance
Common Fault and Eliminating Methods
Product Specification Parameters
FCC Statement
Changes or modifications not expressly approved by the party responsible for
compliance could void the user's authority to operate the equipment.
This equipment has been tested and found to comply with the limits for a Class B
digital device, pursuant to Part 15 of the FCC Rules. These limits are designed to
provide reasonable protection against harmful interference in a residential

installation. This equipment generates uses and can radiate radio frequency energy
and, if not installed and used in accordance with the
instructions, may cause harmful interference to radio communications. However,
there is no guarantee that interference will not occur in a particular installation. If
this equipment does cause harmful interference to radio or television reception,
which can be determined by turning the equipment off and on, the user is
encouraged to try to correct the interference by one or more of the following
measures:
‐‐ Reorient or relocate the receiving antenna.
‐‐ Increase the separation between the equipment and receiver.
‐‐ Connect the equipment into an outlet on a circuit different from that to which the
receiver is connected.
‐‐ Consult the dealer or an experienced radio/TV technician for help
This device complies with part 15 of the FCC rules. Operation is subject to the
following two conditions (1)this device may not cause harmful interference, and (2)
this device must accept any interference received, including interference that may
cause undesired operation。
Warning
Thank you for purchasing UNISKY Intelligent Power Bike Trainer. Please read this
instruction carefully before use and follow the tips of this instruction for
installation, operation, and use, to ensure your bike runs well and is not damaged,

and prevent and avoid unnecessary accidents and injuries.
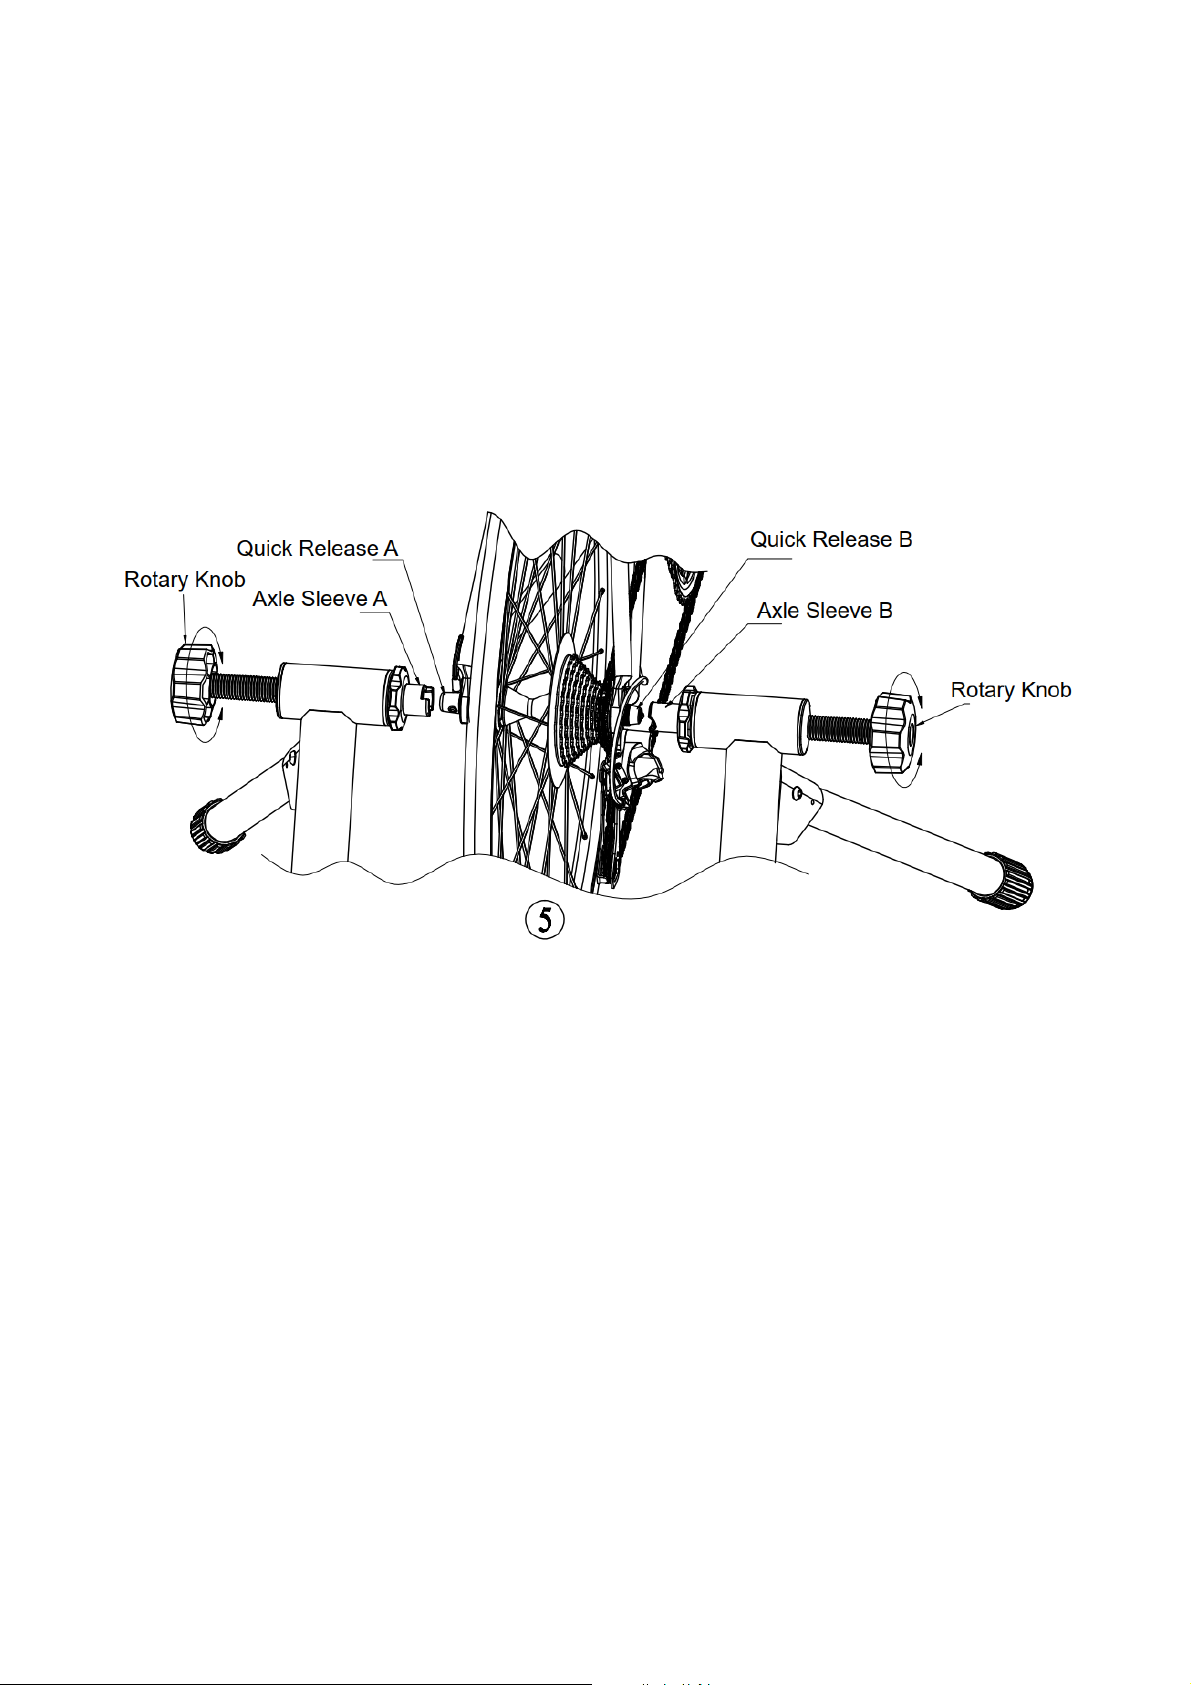
●Please replace and use our special quick release for the rear wheel of the bike
before use, and carefully check whether all parts in the package are complete.
●Before use, please confirm that the product has been placed on firm ground, and
the four‐foot pads on the feet touch the ground at the same time, to ensure that the
product is stable and does not shake.
●Before starting the training, please make sure you are in good health. It is
recommended that you consult your doctor to know whether you can do Cycling.
●If you feel unwell during use (such as physical tiredness, weakness, pain, chest
tightness, discomfort, or abnormal pulse beat), please stop using immediately and
take a rest. If you continue to feel unwell, you are recommended to see a doctor
immediately.
●Without supervision or guidance, people with physical, sensory, or mental
disabilities (including children) or who lack relevant experience or knowledge shall
not use this product.
●Do not allow children to use this product as a toy without supervision to avoid
danger or injury.
●Please pay attention to whether your clothes are too long, to avoid clothes or
accessories on clothes affecting cycling and avoid danger.
●When using this product, please keep enough space around to ensure that there
are no obstacles, children, pets or any potentially dangerous articles (furniture,
tables, and chairs, etc.) around, to avoid accidents due to inadvertent contact with
the moving parts on the bike and bike trainer.
●Pleasebecarefulwhenusingthisproduct while standing up. Do not stand and

shake the bike to avoid falling or damaging the bike.
●Please do not disassemble or convert this product by yourself.
●Please use the original spare parts. If there is any problem with this product,
please contact the authorized dealer of UNISKY.
After‐Sales Service
The products shall provide three guarantees of product quality within one year
from the date of sale. The specific implementation is as follows:
1. In case of performance failure within 7 days from the date of sale, the dealer shall
provide return, replacement, or repair services. The dealer shall bear the costs of repair,
replacement of parts, and transportation.
2. In case of performance failure within 15 days from the date of sale, the dealer shall
provide replacement or repair services. The dealer shall bear the costs of repair,
replacement of parts, and transportation.
3. In case of performance failure after 15 days from the date of sale, the dealer shall
provide repair services. The dealer shall bear the cost of repair and replacement of parts,
and the consumer shall bear the cost of transportation.
The three guarantees of product quality do not apply to the following situations:
1. Appearance damage during use, such as abrasion and nick.
2. Damage caused by failure to operate and use properly according to the
instructions
3. Damage caused by the repair of the dealer not authorized by UNISKY.
4. Damage caused by modification or change without the written permission of
UNISKY.
5. The damage caused by bumps in the process of storage and handling by

consumers themselves.
6. Damage caused by flood, fire, earthquake and other irresistible natural factors
Tip: For products not covered by the Three Guarantees, the dealer shall provide paid
maintenance services, and the consumer shall bear all costs for maintenance,
replacement of parts, transportation, etc.
Disclaimer
○
UNISKY shall not be responsible for the failure of software /application/equipment
of the third party manufacturer, and shall not be liable for any damage to the bike
trainer caused by software not developed or recommended by UNISKY.
○
The user must carefully read this instruction before using the product,
completely follow the installation steps, installation methods, and inspection
requirements of this instruction to install and inspect the product and use the
product in accordance with the warning requirements. If the product is used in
violation of the warning, resulting in temporary or permanent damage to the user's
body (whether direct or indirect), or property damage, UNISKY shall not be liable.
Spare Parts List
Parts No. Name Quan
tity
Graphical Representation
A Bike Trainer Stand 1

B Power Adaptor 12V‐4A 1
C
Electromagnetic Coil
Damper
1
DHexagonBoltM8*951
ELockNutM8 1
FFlat Washer φ82
GANT+Receiver 1
H
Front Wheel Fixing
Seat
1
IQuickRelease 1
JL‐Type Socket Spanner 2
Installation Instructions
Step 1. Bike Confirmation
Before using the bike trainer, please confirm the specification of the bike that you
want to use. This product is suitable for 26", 28', 700C and 29" mountain bikes and
road bikes.
Step 2. Assembly of Bike Trainer and Damper

2‐1 Open the box and check all the parts and quantity according to the spare parts
list.
2‐2Putuptheframe.
1)As shown in figure 1, put up the two A pipes of the bike trainer to the maximum
position, place them on the working surface, and ensure that the movable pin of B
cylinder slides into slot C.
2)As shown in the figure above, align the round hole on the electromagnetic coil
damper with the round hole on the iron stand, put a flat washer on the hexagon bolt,
and then pass the bolt through the round holes on the iron stand and the damper at
the same time to make it fixed in series, finally put on the flat washer, and tighten
the lock nut with the L‐type socket spanner.

3)As shown in Figure 3 above, hold the damper with the left hand and lift it slowly.
Adjust the position of the screw hole of the cylindrical movable pin with the right
hand, and then align the mouth of the adjusting screw with the screw hole of the
cylindrical movable pin. Slightly lift the left hand to make the mouth of the adjusting
screw completely align with the screw hole. Then screw the adjusting screw with the
right hand clockwise, and the screw thread goes more than 5mm out of the
cylindrical movable pin.
Note: In this process, the left hand shall always lift the damper upward with a little
force to prevent the damper from falling and hurting the hand!
4)As shown in Figure 4 above, the next step is to slide the cylindrical movable pin to
drive the whole damper slide from the slot C on the iron stand to the slot D, so that
it can be adjusted during riding training.

Note: during operation, hold the damper with one hand gently, and hold the
cylindrical movable pin with the other hand to slide it from slot C to slot D. Pay
attention to prevent hand injury during sliding!
Step 3. Bike Installation and Debugging
1)Place the bike trainer on stable ground, and adjust the rotary knobs on both sides
of the bike trainer so that the distance between the axle sleeve A and the axle sleeve
B is greater than the length of the bike quick release, as shown in Figure 5.
2)Replace the original quick release of the rear wheel of the bike into the standard
quick release, as shown in Figure 5. Lift the bike with a single hand to a certain
height. First, embed the B end of the quick release into the B hole of the axle sleeve.
Straighten the bike and adjust the knobs on the sides of the bike, insert the A end of
the quick release into the A‐hole of the axle sleeve and tighten the knob.

3)Adjust the knobs on both sides to make the bike tire roughly in the middle of the
roller, as shown in Fig. 6. The knobs on both sides should be tightened to prevent the
bike from shaking easily, and then lock the two nuts on the screw rods on both sides
for fixing.
4)Adjust the triangular knob clockwise to make the tire just touch the bicycle, and
then tighten the triangle knob for a circle and a half turns to make the roller press
into the tire tightly.

5)AsshowninFigure7,thestandardfront‐wheel stand is fixed under the front
wheel of the bike to reduce the left and right wing of the front wheel and improve
thecomfortwhileriding.
Note:
If you are not familiar with the correct operation of disassembling the rear
wheel of the bike, please consult the bike shop nearby or refer to your bike
instructions;
If you fail to master the correct operation of bike installation on the bike trainer,
please consult the professional bike maintenance personnel nearby or directly
contact the UNISKY Dealer;
Before riding, please make sure that your bike has been installed properly, or it
will fall off from the bike trainer due to the unstable fixation between the bike
and the bike trainer, resulting in accidental injury and property loss;
Ensure that the bike trainer is placed flat to avoid accidental injury caused by
shaking during riding;
Before getting on the bike, it is necessary to check the air pressure of the tire.
The air pressure while riding shall be in accordance with the value indicated on
the tire;
Whether it's a road bike or mountain bike, it's strongly recommended to use
slicks for riding training, especially for mountain bikes. Mountain bikes are with
bulky tire patterns, which will cause serious tire noise during riding training
and affect the rider’s mood and fun of riding.

Smart Training
1 Bike Trainer Pairing
This bike trainer needs to be connected with external power supply before it can be
used (When using PC, you need to plug the ANT+ receiver into the USB port of the
computer). Take out the power adapter in the packing box, connect the DC plug to
the bike trainer first, and then connect the power supply. When the power is
connected, the power signal indicator on the damper is always on, and the ANT +
signal indicator and Bluetooth signal indicator are flashing. After pairing with the
third‐party riding software of the computer, the ANT + signal indicator is always on,
and the FE‐C protocol is supported when using. After the Bluetooth signal is linked
with the app of mobile phone or tablet, the Bluetooth signal indicator is always on.
Meanwhile, you can use the app of mobile phone or tablet to operate the training of

power and other items. The advantages of using mobile phones or tablets are simple,
clear, and convenient. At present, the game video training mode is not supported on
mobile phones. This product can also be connected to ANT + riding stopwatch for
use. The specific operation methods of pairing and setting shall be according to the
operation instructions of each brand. The subsequent operation can be carried out
after confirming the connection.
This product supports pairing with the following third‐party riding software:
Zwift、Onelap、Strava
Tip: when pairing, if you can't detect the bike trainer device immediately, you can
use the USB data extension cable. First, insert one end of the extension cable into
the USB port on the computer, then insert the other end into ANT+ receiver and
place it near the bike trainer to detect the bike trainer device.
2 Riding with Zwift
This bike trainer is connected wireless to PC, enabling you to train with third‐party
apps which is Zwift. Smart trainers use ANT+ protocol for communication which
allows them to be controlled by third‐party software. The software receives the data
like speed, power and so on from trainers, and you can feel different resistance
according the different maps.
How to connect and use the Zwift software (Please choose installing it on laptop)
1. Download the Zwift software from the website:
www.zwift.com
2. Connection preparation

Connect the bike trainer to power, insert ANT+ USB disk into computer SUB port
to receive the data between the trainer and computer.
3. Click the downloaded APP Zwift, and enter in.
Register it if you are new for the APP, after this, login.
Or you could login directly if you have already had an ID.
4. Connect the trainer and the Zwift software.
Click the controllable one to connect the trainer.
5. Choose the training type and riding route.
As it is connected successfully, you can choose the training type and route as what
you like, and then, please click RIDE to start the riding training.
6. Riding data.
You can find your riding data and riding condition when you are training, and the
ones all over the world who using the riding app at the same time with you together.
If you want to watch someone riding details, just click his/her name.
7. End riding.
Click the MENU to check your riding data summary, and choose if you want to end
the riding.
8. Save or discard the riding data.
When you end the riding, there is choice come out, you can choose save or
discard the data.

Maintenance
The product can be folded for storage. Operation method: press down the two A
pipes directly and tuck them in. Take care not to hurt your hands when folding
and tucking.
This product must be stored in a clean indoor environment that is dry, away from
direct sunlight, fire, water, or other dangerous goods.
Due to the circuit board structure inside the product, please only wipe the
product with a clean cloth for cleaning. Do not use detergent, cleaning powder,
or other chemical solvents to avoid personal and financial safety.
Common Fault and Eliminating Methods
In case of abnormality, please inspect and solve it according to the following table:
Faults Inspection and Solutions
The bike trainer is
wobbly and shaking
Thegroundisnotflat.Pleaseputitontheflatground
or yoga mat for riding training
Check if both or one of the A tubes is fully open.
The bike trainer cannot
be paired with the
smart device
Check if the smart device is in the startup state
Check the wireless communication connection: check if
ANT+ is connected to your computer or tablet. If you
use Bluetooth connection, please confirm that the
Bluetooth function is turned on.

Excessive body
vibration during use
Check if the exposed counterweight wheel shakes and
if the knobs and nuts on both sides of the bike trainer
are loose.
Check whether the tire pressure of a bicycle is in
normal condition.
Note:
If the fault still cannot be eliminated, please contact the authorized dealer of
UNISKY for assistance. Do not disassemble the product by yourself, which will
cause damage to the product and affect the after‐sales service of the product!
Product Specification Parameters
Input Power DC 12V‐4A
Maximum Power 2000W
Maximum Gradient 15%
Power Accuracy 5%
FE‐C Protocol Support
Wireless
Communication
ANT+、Bluetooth
Unfold Size 760*735*420mm
Gross/Net Weight 18.8 Kg/15.8Kg
Flywheel Weight 5.5Kg
Damper Type Electromagnetic coil damper
Weight Restriction for ≤130 Kg(including bike weight)

Riders
Adaptable Bike Mode 26"、700C、28"、29."
Noise Level ≤68db(A‐Weight、1.5m、30Km/h)
Casing Temperature ≤75℃
Adaptable Third‐party
Riding Platforms
Zwift, Onelap, Strava, etc.
Adaptable Smart
Devices
ANT+ stopwatch, Computer, Tablet, Mobile phone, etc.
This manual suits for next models
1
Other Jinhua Unisky Tools Exercise Bike manuals
Popular Exercise Bike manuals by other brands

PRIXTON
PRIXTON BIKE FIT COMFORT manual

BH FITNESS
BH FITNESS G2336i Instructions for assembly and use

ICON Health & Fitness
ICON Health & Fitness PFEVEX72918.0 user manual

Kettler
Kettler RIDE 100 manual

Abilica
Abilica Racer WMN manual

Christopeit Sport
Christopeit Sport EMT2400 Assembly and exercise instructions