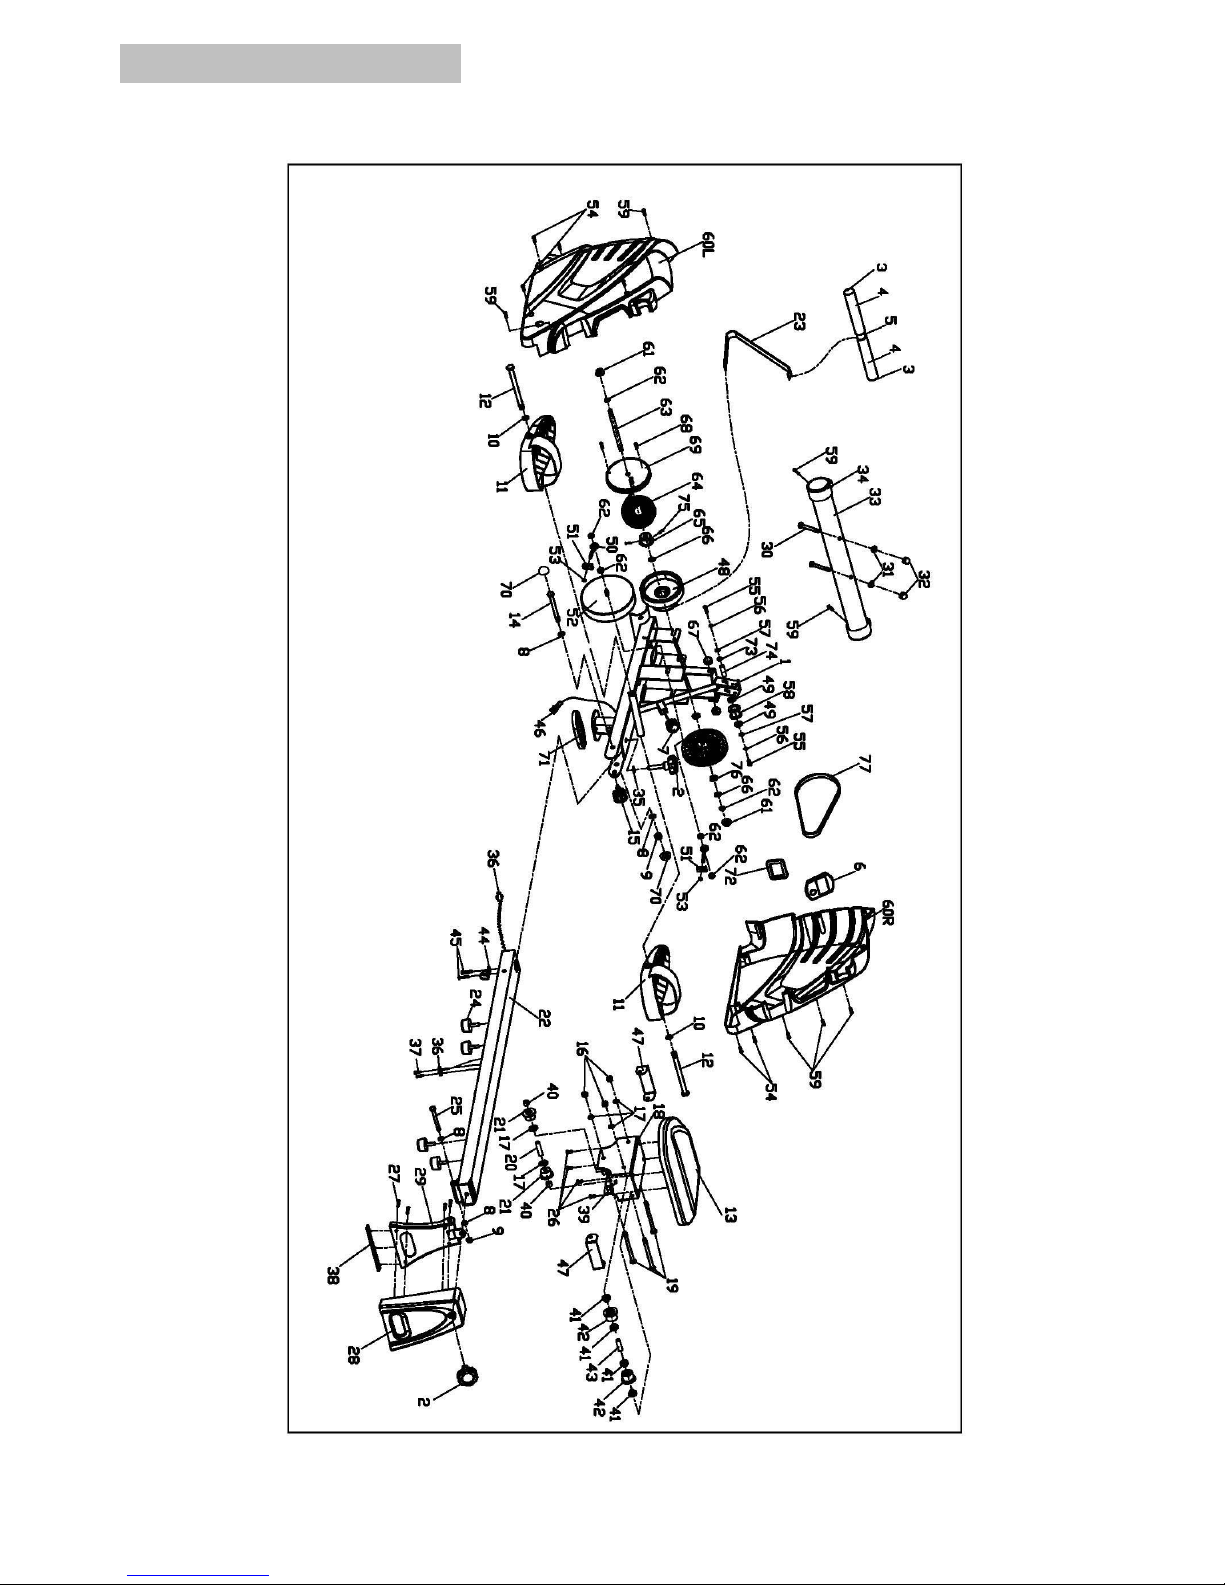
JLL R200 User manual

- 1 -
R
RO
OW
WI
IN
NG
G
M
MA
AC
CH
HI
IN
NE
E
OWNER’S MANUAL

- 2 -
IMPORTANT SAFETY NOTICE
Note the following precautions before assembling and operating the machine.
1. Read this Owner’s Manual and follow the instruction carefully before using the Rowing
Machine. Make sure that it is properly assembled and tightened before use.
2. We recommend having two people for assembling this machine.
3. To lubricate all moving parts annually is recommended.
4. Do not wear loose clothing to avoid entangling in any moving parts.
5. Set up and operate the rowing machine on a solid level surface.
6. Always wear shoes when using the machine.
7. Please keep children and pets away from the machine while it is in use. Do not allow children
to play or use the machine. This machine is designed for adults, not children.
8. Please maintain your balance while using the machine.
9. Stop exercise immediately in case of nausea, shortness of breath, faint, headache, pain,
tightness in your chest or any discomfort.
10.Do not place fingers or any other objects into the moving parts.
11.Prior to any exercise, consult with your physician first to establish the exercise frequency, time
and intensity appropriate for your particular age and condition.
12.Do not grasp the seat to move the Rowing Machine. The seat will move and it may hurt your
hand and fingers.
13.The rowing machine should be used by only one person at a time.
14.Maximum user’s weight is 100 KG.

- 3 -
EXPLOADED DIAGRAM

- 4 -
PARTS LIST
NO.
Description
QTY
NO.
Description
QTY
1
Main frame
1
40
Steel bushing
2
2
Knob M10×25
2
41
Bearing
8
3
End cap
2
42
PU wheel
4
4
Foam grip
2
43
Sleeve 1
2
5
Handlebar
1
44
Plate
1
6
Computer
1
45
Screw M6×20
2
7
Tension control
1
46
Connection wire
1
8
Flat washer D10×2.0×φ20
4
47
Slide plate
2
9
Nylon nut M10
2
48
Rotary plate
1
10
Flat washer D13×2.0×φ26
2
49
Bearing 6000
2
11
Pedal
2
50
Plug
2
12
Bolt M12×155×16
2
51
Bushing
2
13
Saddle
1
52
Flywheel
1
14
Hexagon bolt M10×100
1
53
Nut M6
2
15
Knob M16×1.5
1
54
Screw ST4.2X18
4
16
Nylon nut M8
3
55
Hexagon bolt M6×15
2
17
Flat washer D8×1.5×φ16
5
56
Arc washer D6
2
18
Slide rest
1
57
Flat washer D6×1.0×φ12
2
19
Hexagon bolt M8×110
3
58
Pulley
1
20
Sleeve 2
1
59
Screw ST4.2X18
7
21
Wheel
2
60L/R
Chain cover
1 each
22
Slide way
1
61
Bolt M10×1.0
2
23
Tension belt
1
62
Hexagon bolt M10×1.0
6
24
Cushion
4
63
Handlebar shaft
1
25
Hexagon bolt M10×95
1
64
Spring
1
26
Screw M6×15
4
65
Axle
1
27
Screw ST4.2×8
4
66
Washers D12
2
28
Protect guard
1
67
Cushion
2
29
Stand rail
1
68
Screw ST3.5×18
3
30
Carriage bolt M8×73
2
69
End cap
1
31
Arc washer
D8×2×Φ25×R30.5
2
70
Plastic cap S17
2
32
Cap nut M8
2
71
Rubber pad
1
33
Front bottom tube
1
72
Over lay
1
34
End cap
2
73
Washers D10
2
35
Flat washer
1
74
Sleeve3
1
36
Sensor
1
75
Hexagon bolt M8×10
2
37
Screw ST3X10
2
76
Bearing 6001
2
38
Rubber pad
1
77
Belt
1
39
Magnet
1

- 5 -
ASSEMBLY INSTRUCTIONS
STEP 1:
1. Remove the Carriage bolt (30), paper tubes (A), arc washer (31), and cap nut (32) from the front
bottom tube (33).
2. Tighten the front bottom tube (33) to the main frame (1) with carriage bolt (30), arc washer (31),
and cap nut (32).
STEP 2:
1. Take off the cushion (24), screw (45), plate (44), then insert the slide rest (18) onto the slide
way (22), and tighten the cushion (24) to the slide way (22).
2. Tighten the plate (44) to the slide way (22) with screw (45).

- 6 -
STEP 3:
Tighten the stand rail (29) to the slide way (22) with hexagon bolt (25), flat washer (8), and nylon
nut (9), and then tighten the protective guard (28) with screw (27), knob (2) to the stand rail (29).
STEP 4:
1. Connect the connection wire (46) to the sensor wire (36), then tighten the slide way (22) to
the mainframe (1) with hexagon bolt (14) 、knob (2) 、knob (15) 、flat washer (35) 、flat
washer (8) 、nylon nut (9) and put the plastic cap (70) at last.
2. Tighten the pedal (11) to the mainframe (1) with bolt (12) 、flat washer (10). When folding it,
take off the knob (15) and fold the slide way (22).

- 7 -
STEP 5:
The Rowing machine could be folded if you do not use it. First take off the knob (15), and the knob
(2), flat washer (35), then fold the slide way (22) and protective guard (28) as the diagram show. Fix
the mainframe (1) to the protective guard (28) with knob (2) and flat washer (35).

- 8 -
WARM-UP and COOL-DOWN
A successful exercise program consists of a warm-up, aerobic exercise, and a cool-down. Do the
entire program at least two and preferably three times a week, resting for a day between workouts.
After several months, you can increase your workouts to four or five times per week.
WARM-UP
The purpose of warming up is to prepare your body for exercise and to minimize injuries. Warm up
for two to five minutes before strength-training or aerobic exercising. Perform activities that raise
your heart rate and warm the working muscles. Activities may include brisk walking, jogging, jumping
jacks, jump rope, and running in place.
STRETCHING
Stretching while your muscles are warm after a proper warm-up and again after your strength
or aerobic training session is very important. Muscles stretch more easily at these times because of
their elevated temperature, which greatly reduces the risk of injury. Stretches should be held for 15 to
30 seconds. DO NOT BOUNCE.
Remember always to check with your physician before starting any exercise program.
COOL-DOWN
The purpose of cooling down is to return the body to its normal or near normal, resting state at the
end of each exercise session. A proper cool-down slowly lowers your heart rate and allows blood to
return to the heart.
Calf-Achilles Stretch
Inner Thigh Stretch
Toe Touch
Side Stretch
Hamstring Stretch
Other manuals for R200
4
Table of contents
Other JLL Home Gym manuals