JML BLAST VAC PRO User manual


2
Thank you for purchasing Blast Vac Pro from
JML. To ensure you enjoy the best performance
from this combination vacuum cleaner and
blower, make sure you read these instructions in
full before use and keep them safe so that they
can be referenced in future.
Contents
Safety Warnings & Advice _________ 3
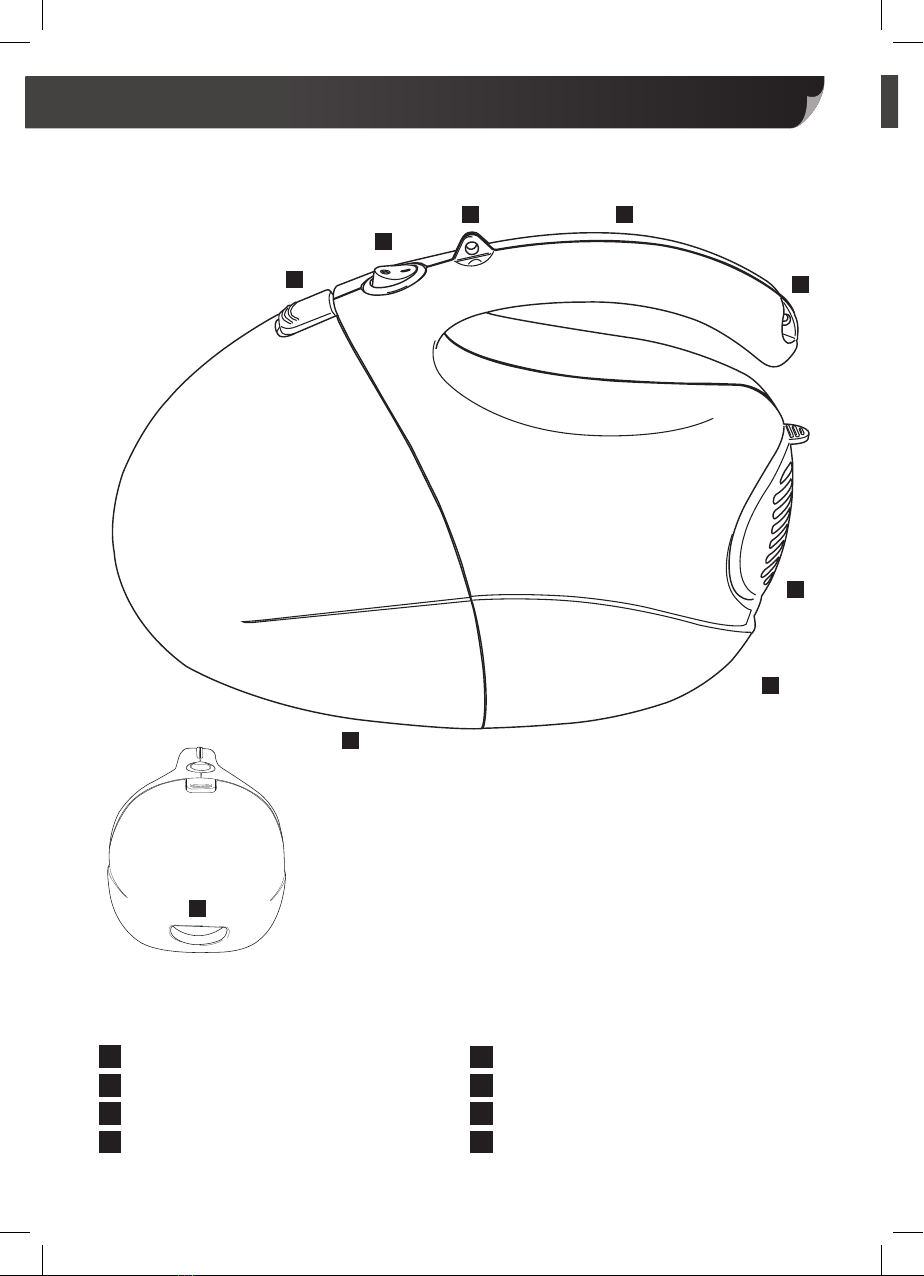
Your Blast Vac Pro________________ 4
Vacuum combinations ____________ 4
Blower combinations _____________ 5
Main unit _______________________ 6
Accessories_____________________ 7
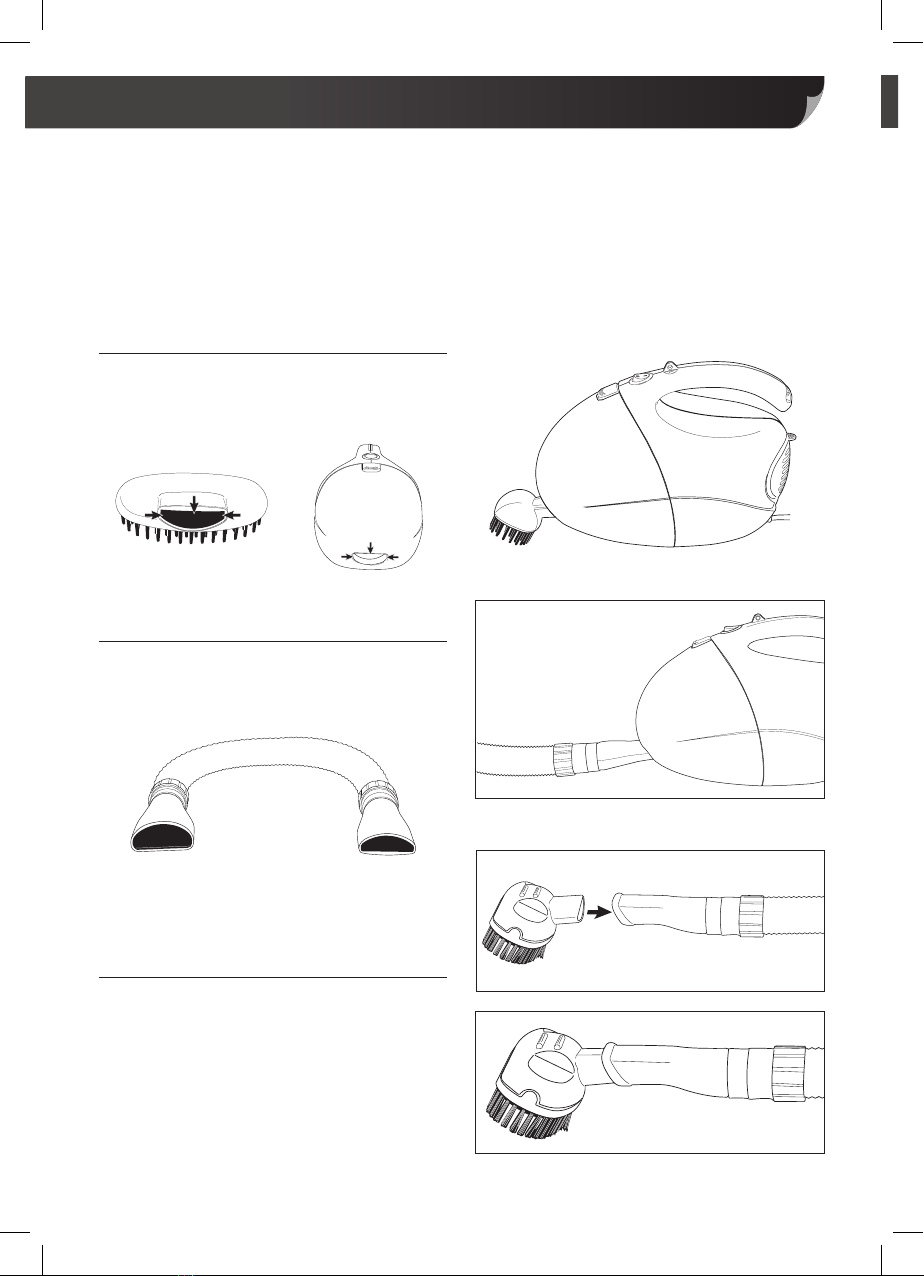
Using Your Vacuum_______________ 8
Brush attachment _______________ 8
Short hose______________________ 8
Attachment + short hose__________ 8
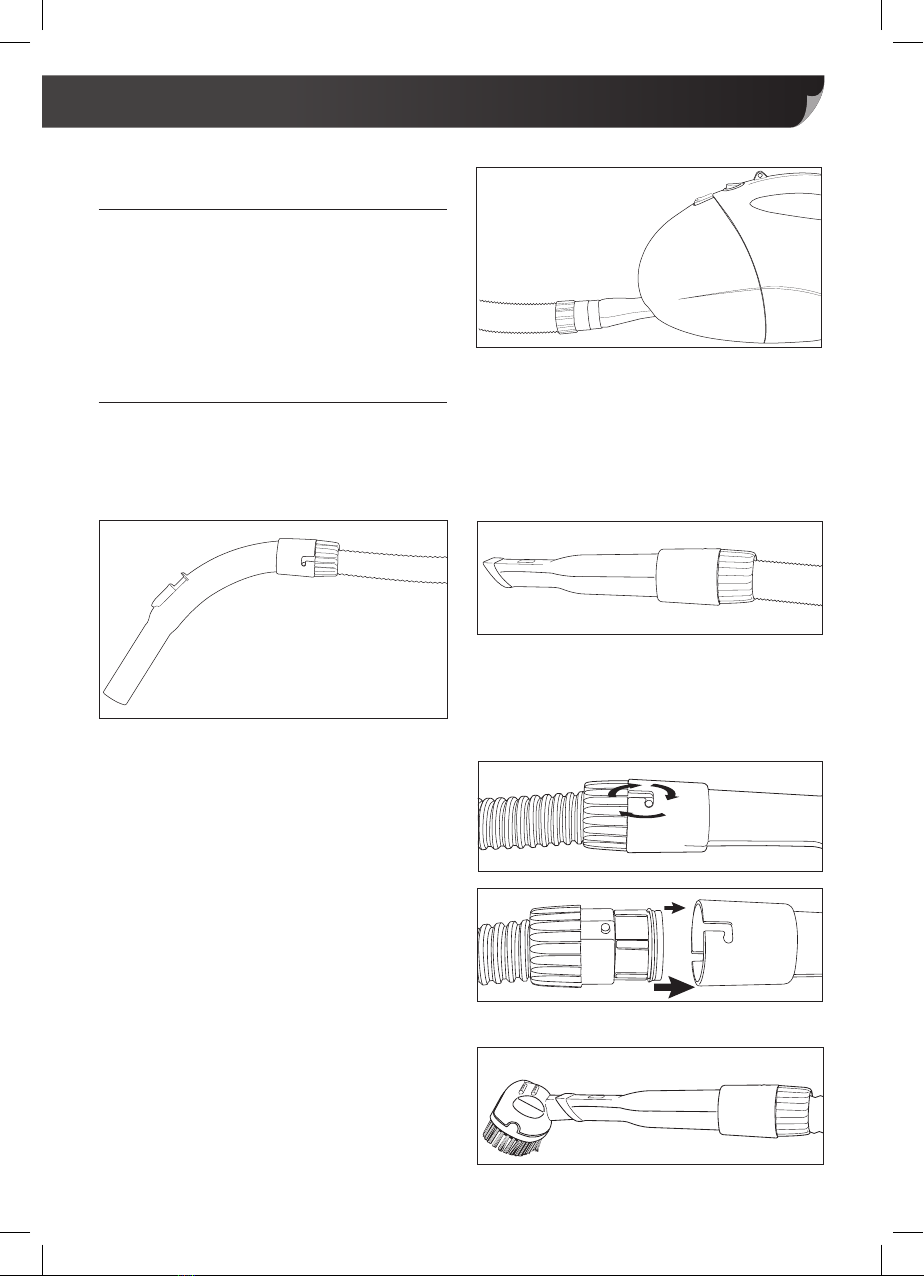
Long hose ______________________ 9
Long hose + attachment __________ 9
Long hose + attachment
+ flat vacuum head_______________ 9
Using Your Blower_______________ 10
Installing the blower port _________ 11
Short hose_____________________ 11
Short hose + attachment_________ 11
Short hose + extension tubes_____ 12
Attaching the shoulder strap______ 12
Care & Cleaning _________________ 13
Cleaning the dust filter ___________ 13
Cleaning Blast Vac Pro __________ 13
Cleaning the attachments ________ 13
Re-assembly ___________________ 13
Troubleshooting _________________ 14
Guarantee_______________________ 14
Technical Information____________ 15
Fuse & mains plug replacement ___ 15
Disposal & the environment_______ 15

This vacuum cleaner is intended for household use only.
Blast Vac Pro should not be used by persons with reduced
physical, sensory or mental capabilities, or a lack of experience
and knowledge, unless they are given supervision or instruction.
Keep out of reach of children at all times.
ALWAYS unplug the Blast Vac Pro immediately after use and
before cleaning.
DO NOT attach or remove attachments, including the hose, while
Blast Vac Pro is plugged in.
DO NOT leave Blast Vac Pro unattended when plugged in.
DO NOT unplug before switching the vacuum off.
DO NOT use any attachments not specifically designed for use
with Blast Vac Pro.
If the power cord of the vacuum cleaner becomes damaged,
discontinue use immediately.
DO NOT attempt to repair Blast Vac Pro by yourself.
DO NOT pull at the power cord or use the power cord to carry or
move Blast Vac Pro.
DO NOT handle the plug or Blast Vac Pro if your hands are wet.
Keep the power cord away from heated surfaces, such as
radiators.
Make sure all openings are always clear before use and clear away
any dust, lint, hair or anything that could obstruct the airflow.
Keep hair, loose clothing, fingers and all parts of the body or face
away from the end of the hose, the openings and the vents during
use.
DO NOT use the vacuum on objects that are hot, flammable or
creating smoke.
DO NOT use on liquids.
Make sure all the filters are fixed in place before use.
Please do not destruct any part of the Vacuum for maintenance.
Cleaning & Care
3

Your Blast Vac Pro
Vacuum combinations
1.
2.
3.
4.
5.
6.
4

Your Blast Vac Pro continued
Blower combinations
2.
1.
3.
5

A
B
C
C
F
E
H
D
G
A
B
C
D
E
F
G
H
Your Blast Vac Pro continued
Release button
ON/OFF power switch
Shoulder strap holes
Handle
Blower filter
Power cord
Dust container
Suction port
Main unit
Side view
Front view
6

A B C
F
E
G
D
I
I
K
J
M N
H
L QO R
A
L
B
C
D
E
F
G
H
I R
J
M
N
O
P
Q
K
P
Your Blast Vac Pro continued
Back filter cover
Blower port
Crevice brush
Connection tube
Extension tubes x3
Strap
Long nozzle tube
Long hose
Small D-shaped plug
Large D-shaped plug
Short hose
Small blower attachment
Medium blower attachment
Large blower attachment
Connection plug
Firm brush
Soft brush
Flat vacuum head
Accessories
7

Using your vacuum
Large D shape Small D shape
Brush attachment
Choose an attachment and slot the
D-shaped plug into the suction port.
Short hose
Locate the small D-shaped plug on the short
hose and slot into the suction port (Fig.1).
Attachment + short hose
Locate the small D-shaped plug on the
short hose and slot into the suction port
(Fig. 1). Choose an attachment and slot the
D-shaped plug into the D-shaped socket on
the end of the short hose (Fig.2 & 3).
Fig. 1
Fig. 2
Fig. 3
Blast Vac Pro comes with several different attachments to use with the vacuum suction
port. You get a firm brush, ideal for deep carpets, thick rugs and door mats; a soft brush,
great for soft fabrics and furnishings; a crevice tool for hard to reach areas, like skirting; and
a flat vacuum head with extension tubes, perfect for floor cleaning. (Please refer to vacuum
combination diagrams on page 4).
8

Using your vacuum continued
Long hose and long nozzle
Long hose
Locate the D-shaped plug and slot into the
suction port (Fig.4).
Long hose + attachment
Locate the D-shaped plug on the long hose
and slot into the suction port (Fig.4).
If the long nozzle is attached to the long
hose, you will need to replace it with the
connection tube. To remove the nozzle, twist
it anti-clockwise and pull off (Fig.5).
To attach the connection tube, locate the
two L-shaped channels cut into one end.
The long hose has two raised nodules at the
end, slide the channels over the nodules and
then twist clockwise to fit in place (Fig.6).
Choose an attachment and slot the
D-shaped plug into the D-shaped socket
on the end of the connection tube (Fig.7).
Long hose and connection tube
Fig. 4
Fig. 5
Fig. 6
Fig. 7
9

Using your vacuum continued
Long hose + extension tube + flat
vacuum head
Locate the D-shaped plug on the long hose
and slot into the suction port (Fig.8).
The long nozzle tube must be attached to
the long hose. Slot the wide end of one of
the extension tubes on to the end of the
nozzle (Fig.9). Add the other two tubes in the
same way.
Plug the end of the last extension tube into
the socket on top of the flat vacuum head
(Fig.10).
Fig. 8
Fig. 9
Fig. 10
Blast Vac Pro comes with several different
attachments to use with the blower port. You
get a choice of three different size blower
attachments, which you can use for blowing
Using your blower
up all kinds of inflatables or clearing waste.
You can also use the extension tubes to turn
Blast Vac Pro into a leaf blower, perfect for
clearing driveways or guttering.
10

T
A
K
E
O
F
F
P
U
T
I
N
Using your blower continued
Installing the blower port
Unclip the back filter cover by pressing the
button on top and pulling off (Fig.1).
Replace with the blower port by pressing the
button on top and slotting in to place (Fig.2).
Short hose
Once the blower port is installed, locate the
large D-shaped plug on the hose and slot
into the blower port (Fig.3).
Short hose + attachment
Once the blower port is installed, locate the
large D-shaped plug on the hose and slot
into the blower port (Fig.3).
You will need to replace the small D-shaped
plug with the connection plug before you
can add a blower attachment to the hose.
Do this by grabbing the end of the hose with
one hand (not the hose itself) and the small
D-shaped plug with the other. Twist and pull
the plug until it comes loose (Fig.4). Take the
(Please refer to blower combination
diagrams on page 5).
Fig. 3
Fig. 1
Fig. 2
Fig. 4
Fig. 5
11

Using your blower continued
connection plug and slot the narrow end into
the end of the short hose (Fig.5).
Choose an attachment and then slot into the
connection plug.
Short hose + extension tubes
Once the blower port is installed, locate the
large D-shaped plug on the hose and slot
into the blower port (Fig.3). Replace the
small D-shaped plug with the connection
plug (Fig.4 & 5).
Add an extension pole by sliding the narrow
end into the connection plug (Fig.6). Add the
other two extension tubes in the same way
(Fig.7).
Attaching the shoulder strap to
Blast Vac Pro
Locate the two clip holes on the top of the
Blast Vac Pro handle. The shoulder strap
has two metal clips at each end; clip each
of these into one of the holes to attach the
strap (Fig.8).
Connection plug Large blower tube
Medium blower tube
Small blower tube
Fig. 6
Fig. 7
Fig. 8
12

Cleaning & Care
Emptying Blast Vac Pro
Remove all attachments before opening
Blast Vac Pro. Hold the unit over a rubbish
bin or rubbish bag to avoid dust and dirt
from spilling on to the floor.
Push the release button at the top of Blast
Vac Pro to open the dust container. Most
of the waste will be held behind the dust
filter. Remove the filter carefully by pulling
it forward, then tip the waste in the dust
container into the bin (Fig.1).
Cleaning the dust filter
To clean the dust filter, first hold the filter over
a bin and try to remove as much dust and
dirt as possible. Then, rinse clean under a
cold water tap and leave to dry. Make sure it
is dry completely before placing back inside.
Cleaning Blast Vac Pro
Wipe clean the main unit by using a dry
cloth.
Fig. 1
Cleaning the hoses and
attachments
Wash in warm soapy water using a mild
detergent. Allow to dry fully before re-
attaching to Blast Vac Pro.
Re-assembly
To re-assemble, first place the dust filter
back into the dust container. To fit correctly,
ensure that the rubber hook on the filter fits
over the slot at the top of the dust container,
which is located below the release button.
To re-attach the dust container, locate
the two holes on the bottom. These two
holes need to fit over the two small raised
rectangles on the base of the main unit.
Once in place, press down on the release
button and push the dust container on to the
main unit, releasing the button once it has
clicked into place.
13

Troubleshooting
Ensure Blast Vac Pro is turned off before attempting to fix any problem.
Problem Possible reason Possible solution
Blast Vac Pro
will not turn on
May not be plugged in Ensure plug is firmly in place and
socket is switched on
May need servicing Contact JML customer services
Poor cleaning
and dust
pick-up
Dust filter is dirty Clean filter – see cleaning
instructions
Dust container is full Empty dust container
Dust container is not connected
to unit correctly
Re-attach the dust container
ensuring it is firmly fixed in place (see
re-assembly instructions)
Suction port is blocked Locate and remove any obstructions
Attachment is clogged Locate and remove any blockages
and clean if necessary – see cleaning
instructions
Dust escaping
from Blast Vac
Pro
Dust container may be full Empty out the dust container
Dust container may not be
correctly attached
Re-attach the dust container
ensuring it is firmly fixed in place
Dust container may have a hole
or crack
Contact JML services to enquire
about a replacement
Hose or
attachments
not picking up
or blowing
Hose clogged Locate and remove obstruction
Brush or blower attachments
clogged
Locate and remove obstruction
Hose damaged Contact JML services to enquire
about a replacement
Brushes worn or damaged Contact JML services to enquire
about a replacement
G
uarantee
This product is unconditionally guaranteed for
one year against all defects of workmanship
and materials. This guarantee does not
affect your statutory rights. If you have any
problems or queries about this product
please contact JML customer services.
14

Connect green/yellow
lead to ‘E’ or - Earth
Connect
blue lead
to ‘N’ -
Neutral
Connect
brown lead
to ‘L’ - Live
N
L
E
Technical Information
Model number XL.203A
Input power 800W
Air flow 6.13 CFM
Suction power 14,000 Pascals
Inches of water lift 56”
Air watt 40
Power supply 800W - 230V ~ 50Hz
Weight 1489.5g
Sound 85.1dB
Fuse and mains plug replacement
(UK and Ireland only)
This appliance is fitted with a BS 1363 13-amp
plug. If you have to replace the fuse, only use
those that are AS TA or BSI approved to BS
1362 and have a rated current of 13 amps.
Should you need to replace the plug; the
wires in the power cord are coloured in the
following way:
Blue – Neutral
Brown – Live
Green & Yellow – Earth
As the colours of the wires in the power
cord may not correspond with the coloured
markings identifying the terminals in your
plug, proceed as follows:
The wire that is coloured green & yellow
must be connected to the terminal in the
plug that is marked with the letter E or by the
earth symbol .
The wire that is coloured blue must be
connected to the terminal that is marked
with the letter N.
The wire that is coloured brown must be
connected to the terminal that is marked
with the letter L.
If the power lead is damaged, it must be
replaced by a qualified electrician.
Disposal and the environment
Please ensure you dispose of this product according to local requirements,
do not dispose of with normal household waste.
15
Technical Information

Distributed by JML
JML, Unit 1 Eastside, Port of Tyne, South Shields, NE33 5SP
Customer Services: UK: 0800 781 7831 (Freephone) • ROI: 041-978 0003 (Local rate)
©JohnMillsLtd/PF/08.15/SUS/E • Product code: V02364 • Made in China
This manual suits for next models
1
Table of contents
Other JML Vacuum Cleaner manuals