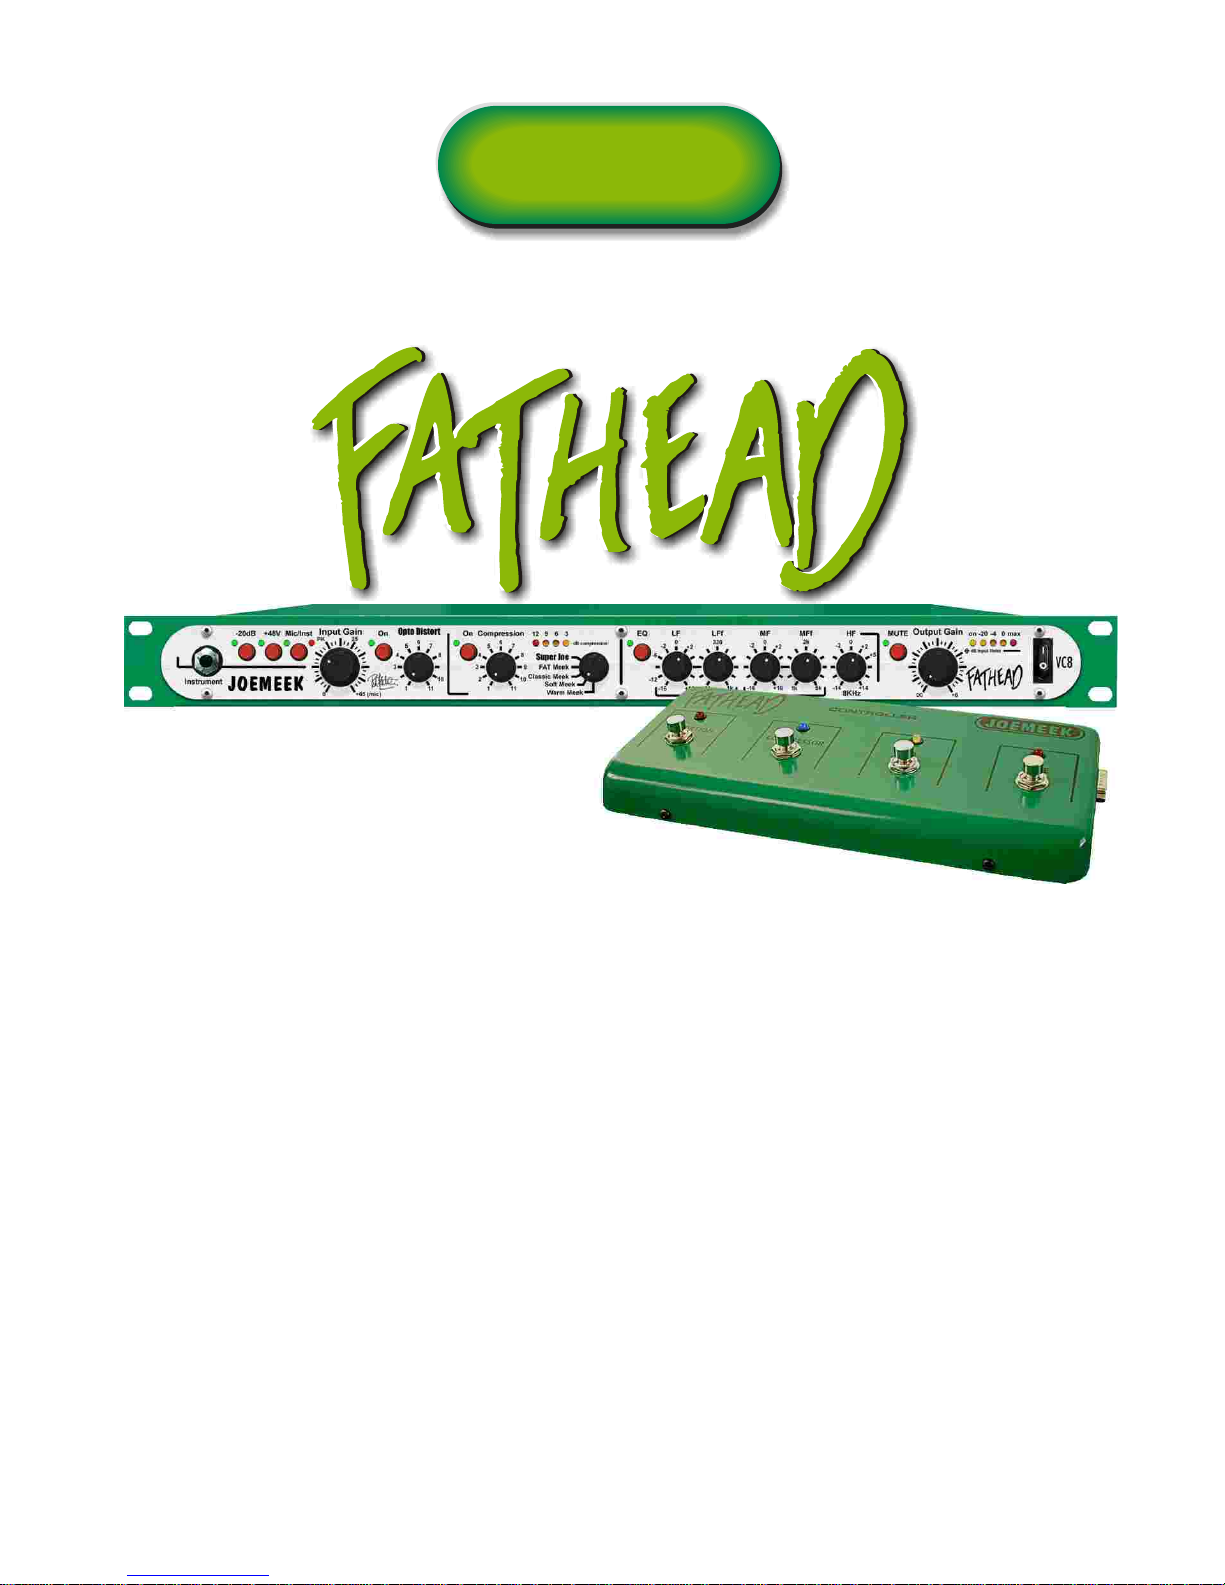
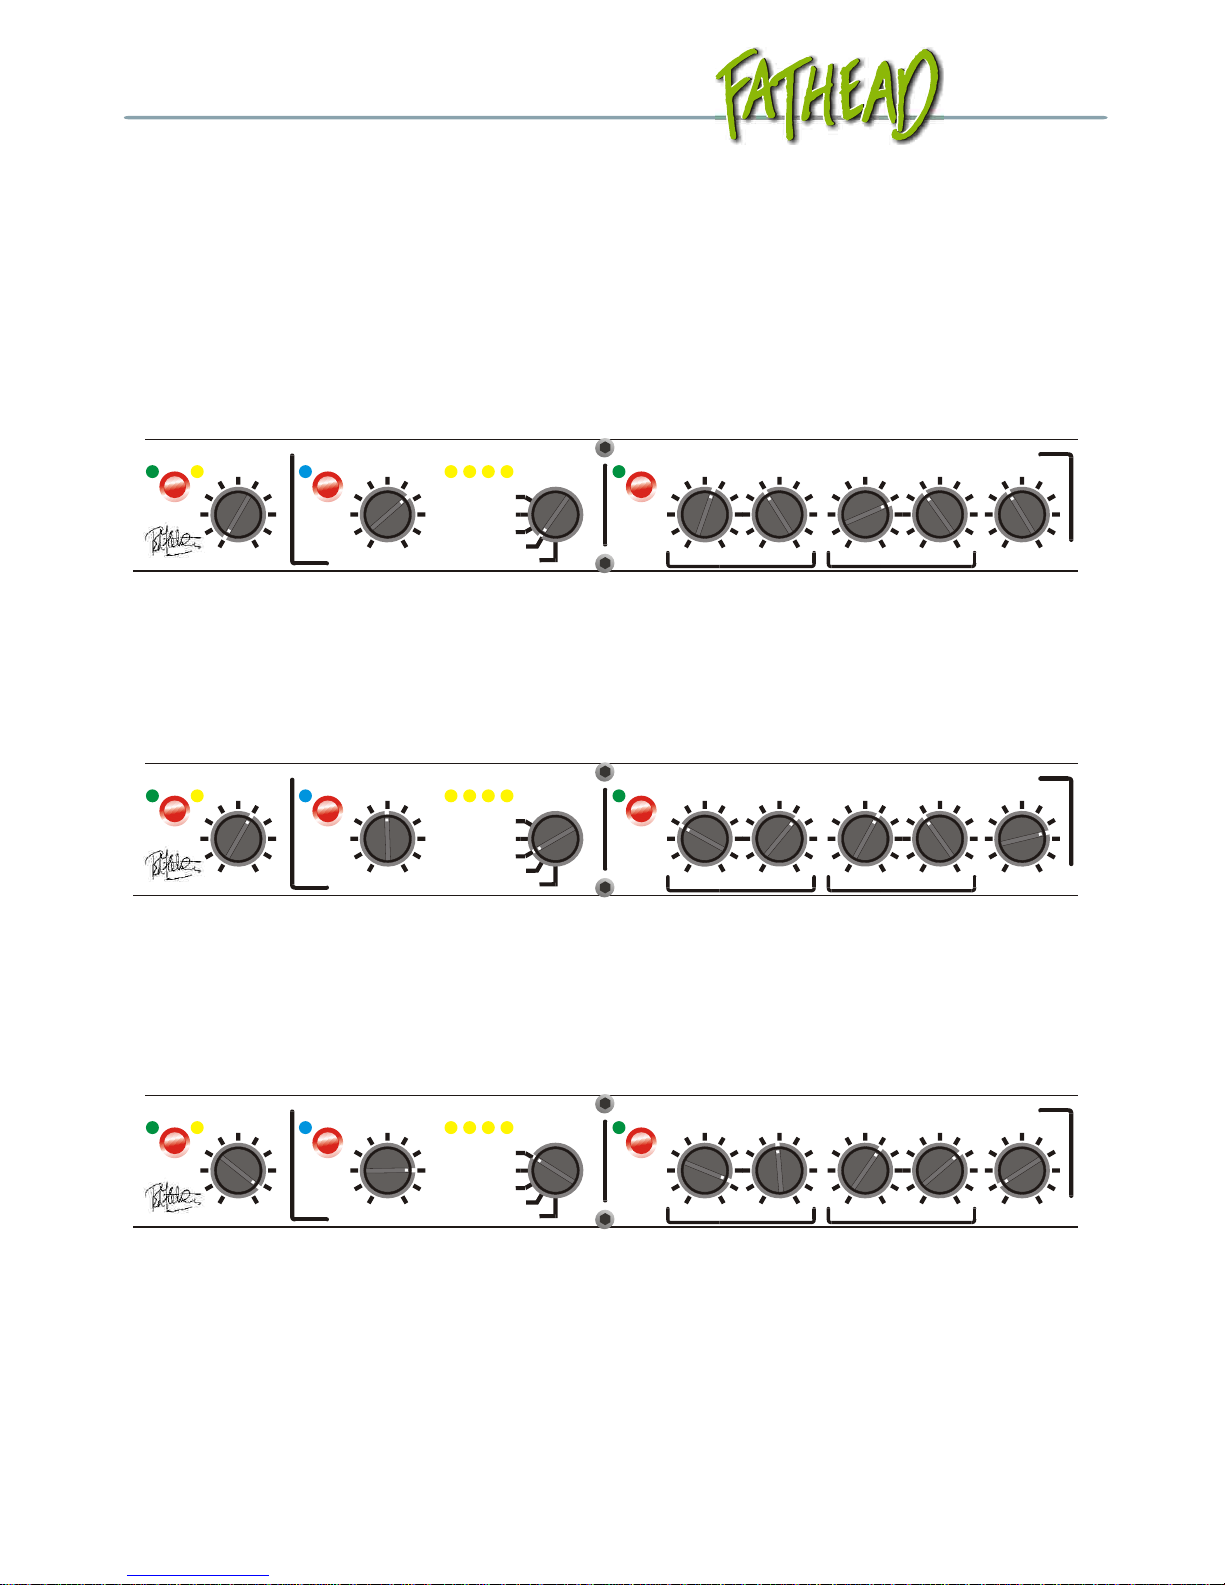
Joemeek Fathead User manual

User's guide
User's guide
JOEMEEK
JOEMEEK

User's guide

User's guide
2
1. Getting Started
basic setup 4
studio playing/recording 5
Advanced stage use 5
Use with a microphone 6
2. Using the Fathead
Front panel 7
Rear panel 8
Sample settings 9
3. Understanding the Fathead
The CurrentSense input amplifier 11
Opto distortion 12
The compressor 12
The Meequalizer 13
Digital Upgrade 14
4. Common Problems 14
5. Technical performance 16
6. System Diagram 19
7. User Settings 20
8. Safety and Warranty 21
Contents

User's guide
3
Welcome
Thank you for purchasing the JOEMEEK Fathead. We at JOEMEEK hope
you will have as much fun playing through this unit as we had designing and
building it!
About the fathead
The JOEMEEK Fathead is an uncompromising pre amplifier for musicians.
It combines the best available audio quality with vintage effects to create a
musical sound, highly suited to recording and live performance.
The Fathead aims to be an artistic tool that gives the musician more tones
and richness from their instrument. The Fathead also presents a superb
signal path, with huge possibilities for interconnection in live performance
and recording. So, whether recording, live playing, plugging in directly or
using a studio microphone, the Fathead will radically improve your results,
and give you more variety in sound.
Welcome

User's guide
Get playing (basic setup)
If you are a guitarist or bass player, you will want to use the Fathead as a
'signal heater' before your instrument amp, so to start getting great sounds
set up your equipment as follows:
HINT: The output of the Fathead is extremely hot (loud), so it is advisable to
use a 'pre amp link' or 'effect return' input on your instrument amplifier,
rather than the instrument input. You will also get less noise!
1. Connect your system as shown
2. Turn the output control of the Fathead to minimum
3. Switch on the Fathead, then the amplifier
4. Play test notes on the instrument and adjust the input gain on the
Fathead so that all but the last 2 leds are lighting
5. SLOWLY add output gain on the Fathead until a comfortable level is
achieved
6. Experiment with the effects, and enjoy!
JOEMEEK FATHEAD VC8Designed and manufactured in England by FLETCHER ElectroAcoustics Ltd.
CAUTION!
Removal of covers will
expose dangerous
voltages even
when power is removed!
No user serviceable parts
inside. Service strictly by
qualified personnel only.
Approved components
used.
CONTROLLER
PRE
MODEDI GAIN
DI OUTPUT INSERT TUNER LINE IN MIC INMAIN OUTPUT
OUT 1 OUT 2 (POST MUTE) (PRE MUTE)TIP: RETURN
RING: SEND
POST
GROUND LIFT
(fathead rear panel)
Instrument JOEMEEK
Input Gain Output Gain
Mic/Inst+48V MUTEEQOn-20dB on -20 -4 0 max
+65 (mic) +6
0
25
dB Input Meter
dB compression 0
¥
PK MFLF
OptoDistort MFfLFf HF
-14 +14
0
8KHz
0
06 6
+16
+1611 11 -16
-161 1
-2
-25 5 -2
+5
-6
4 48 8
9
2
33
10 10
+2
+2
7 7 +2
-12 1k
150 5k
1k
2k
330
On 912 6 3
SuperJoe
Warm Meek
Classic Meek
FAT Meek
Soft Meek
Compression
VC8
Getting started
HINTHINT
to effect return, or instrument input
4

User's guide
Studio playing/recording
In the Studio, the Fathead makes an excellent pre amp for direct recording
and acoustic recording alike. For direct recording onto a computer, you
might try the following:
HINT: Switch the DI output to 'pre' mode, and separately adjust the volume
control. This gives you a clean channel of pure guitar as well as a track
with effects on it. You can use effects liberally, and record them, while
gaining a separate clean track that can be used later on.
Advanced stage use
In a band that uses front of house PA, where you also want a great stage
sound, you may want to set up the Fathead as shown here:
JOEMEEK FATHEAD VC8Designed and manufactured in England by FLETCHER ElectroAcoustics Ltd.
CAUTION!
Removal of covers will
expose dangerous
voltages even
when power is removed!
No user serviceable parts
inside. Service strictly by
qualified personnel only.
Approved components
used.
CONTROLLER
PRE
MODEDI GAIN
DI OUTPUT INSERT TUNER LINE IN MIC INMAIN OUTPUT
OUT 1 OUT 2 (POST MUTE) (PRE MUTE)TIP: RETURN
RING: SEND
POST
GROUND LIFT
‘clean’ recording channel
set DI mode to pre for clean channel
main recording channel
monitoring desk
stage sound PA sound
effects unit
tuner - always on
HINTHINT
Getting started
5

User's guide
HINT: The tuner output is not muted, so check your tuning when you change
instruments by pressing mute, and using your tuner normally!
HINT: You may want to send the PA both an 'on stage' sound as well as a
clean one, feel free to use both the second output and DI outputs for greater
flexibility.
HINT: If you use extra effects, i.e. delay, chorus etc, use them in the Insert
point of the Fathead to increase the quality of your overall sound. To do
this, use a stereo to two mono jack ‘Y’cable.
Use with a microphone
The Fathead features JOEMEEK's CurrentSense mic pre, so you can record
and perform with all manner of acoustic instruments. Acoustic players will
find the Fathead superb on stage as a quality pre amp that also gives great
control over your sound.
HINT: The Fathead is extremely sensitive; when using live, feedback can
often be a problem. Be careful with compression, this can actually make
feedback worse! Always start with low gain, and no compression, and add
volume slowly.
HINT: For a more natural sound, remember to only boost frequencies that
are present; avoid excessive bass and HF boost with acoustic instruments.
HINTHINT
HINTHINT
HINTHINT
HINTHINT
HINTHINT
JOEMEEK FATHEAD VC8Designed and manufactured in England by FLETCHER ElectroAcoustics Ltd.
CAUTION!
Removal of covers will
expose dangerous
voltages even
when power is removed!
No user serviceable parts
inside. Service strictly by
qualified personnel only.
Approved components
used.
CONTROLLER
PRE
MODEDI GAIN
DI OUTPUT INSERT TUNER LINE IN MIC INMAIN OUTPUT
OUT 1 OUT 2 (POST MUTE) (PRE MUTE)TIP: RETURN
RING: SEND
POST
GROUND LIFT
stage sound PA sound Acoustic instrument/
microphone source
Getting started
6

User's guide
Front Panel
-20dB Enables a 20dB signal reduction on the microphone input.
+48V Enables +48V phantom power on the microphone input. Only
use with condenser microphones.
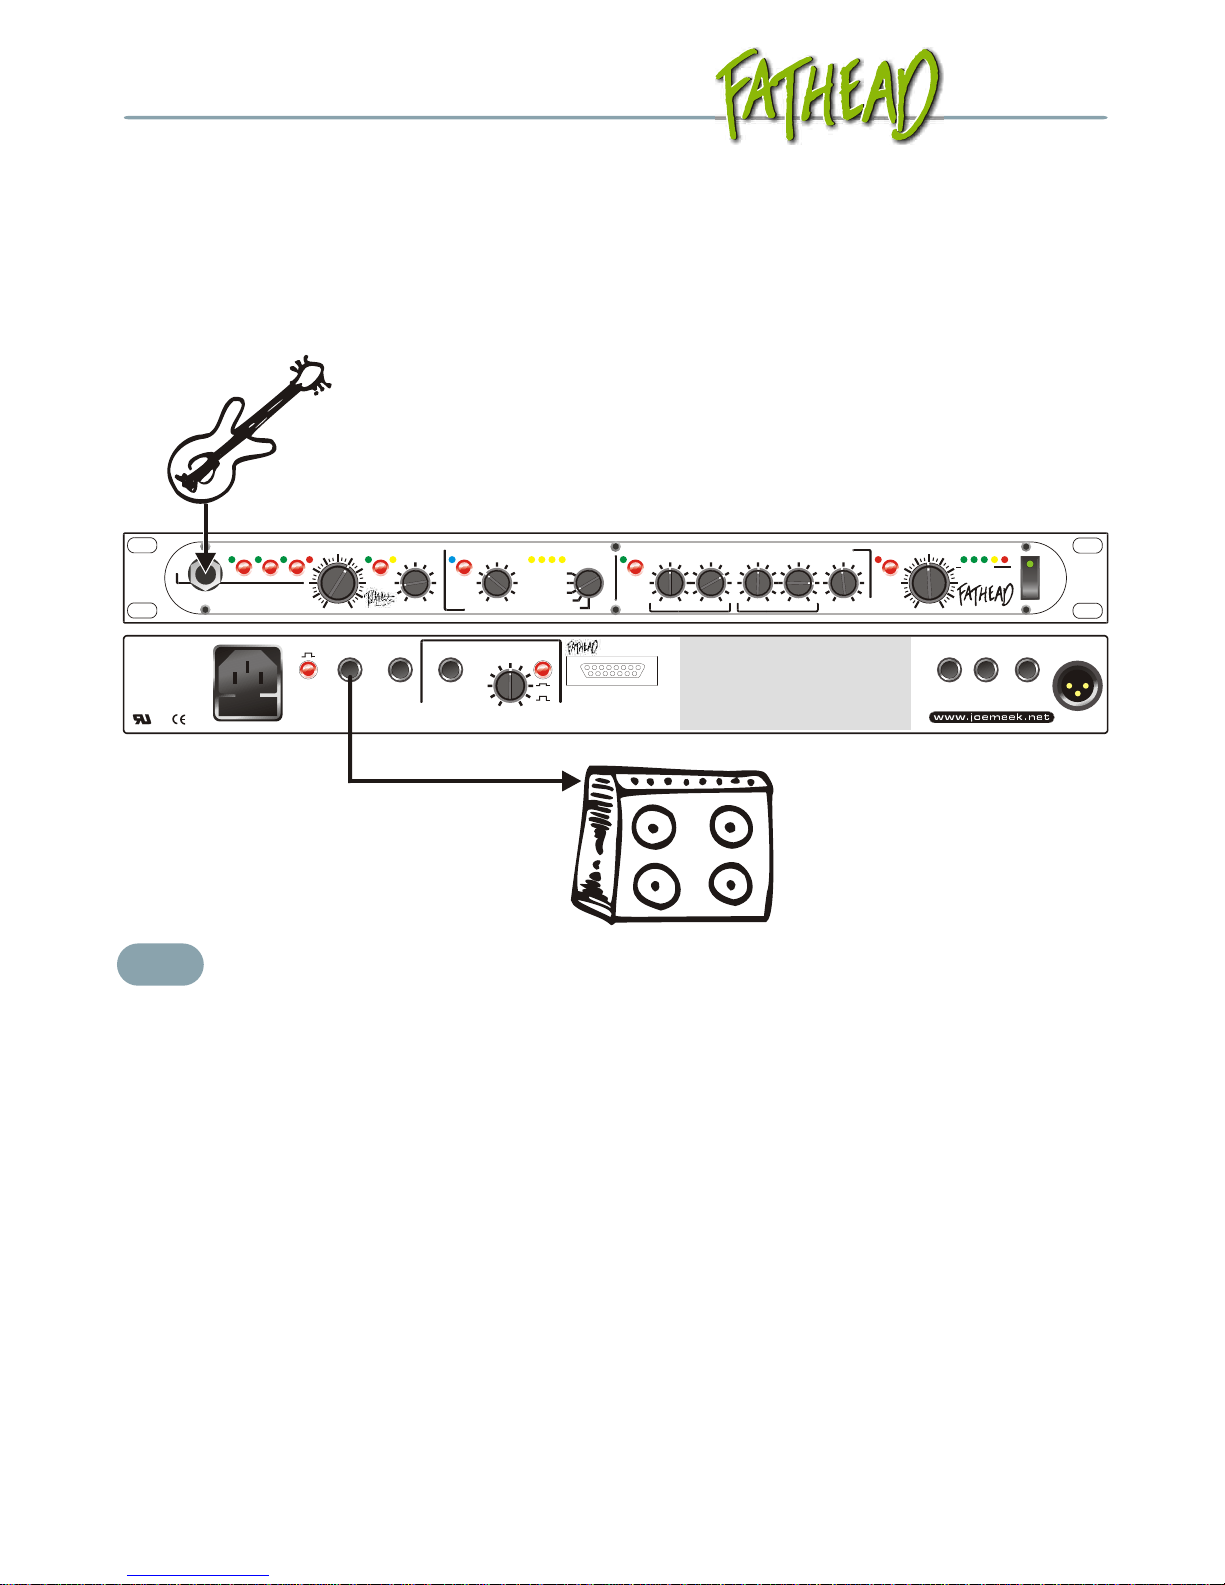
Mic/Inst Switches between Mic (pressed in) and line inputs. Plugging an
instrument into the front input bypasses the mic input.
Input Gain Adds gain to the input signal.
Opto Distort/On Rotary control from minimum (light distortion), to
maximium (heavy fuzz/distortion). The pushbutton enables the
distortion sound.
Compression/On Rotary control from minimum (no compression) to
maximum (full compression). In actual fact, this control is like a
threshold control. The pushbutton enables/bypasses the
compressor section.
Compression mode 5 position selector switch for compression effect.
The preset controls the compressor's attack, release and ratio
settings. Warm Meek is the lightest setting, Super Joe is the most
severe. Fat Meek is the most noticeable sound on solo
instruments.
Compression meter 4 LED meter that shows the gain reduction from the
compressor in dB.
EQ Bypass switch for EQ section.
LF Controls gain of the low frequencies in the equaliser section.
LFf Controls the centre frequency for the LF cut/boost
MF Controls gain of the mid frequencies in the equaliser section.
MFf Controls the centre frequency for the mid cut/boost
HF Controls gain of the high frequencies (8KHz).
MUTE Disables sound output on the main, DI, digital (optitional), insert
outputs. Note, does not affect tuner.
Output Gain Controls the output level of the main and digital outputs.
Input meter Shows the level of the signal before the output gain control.
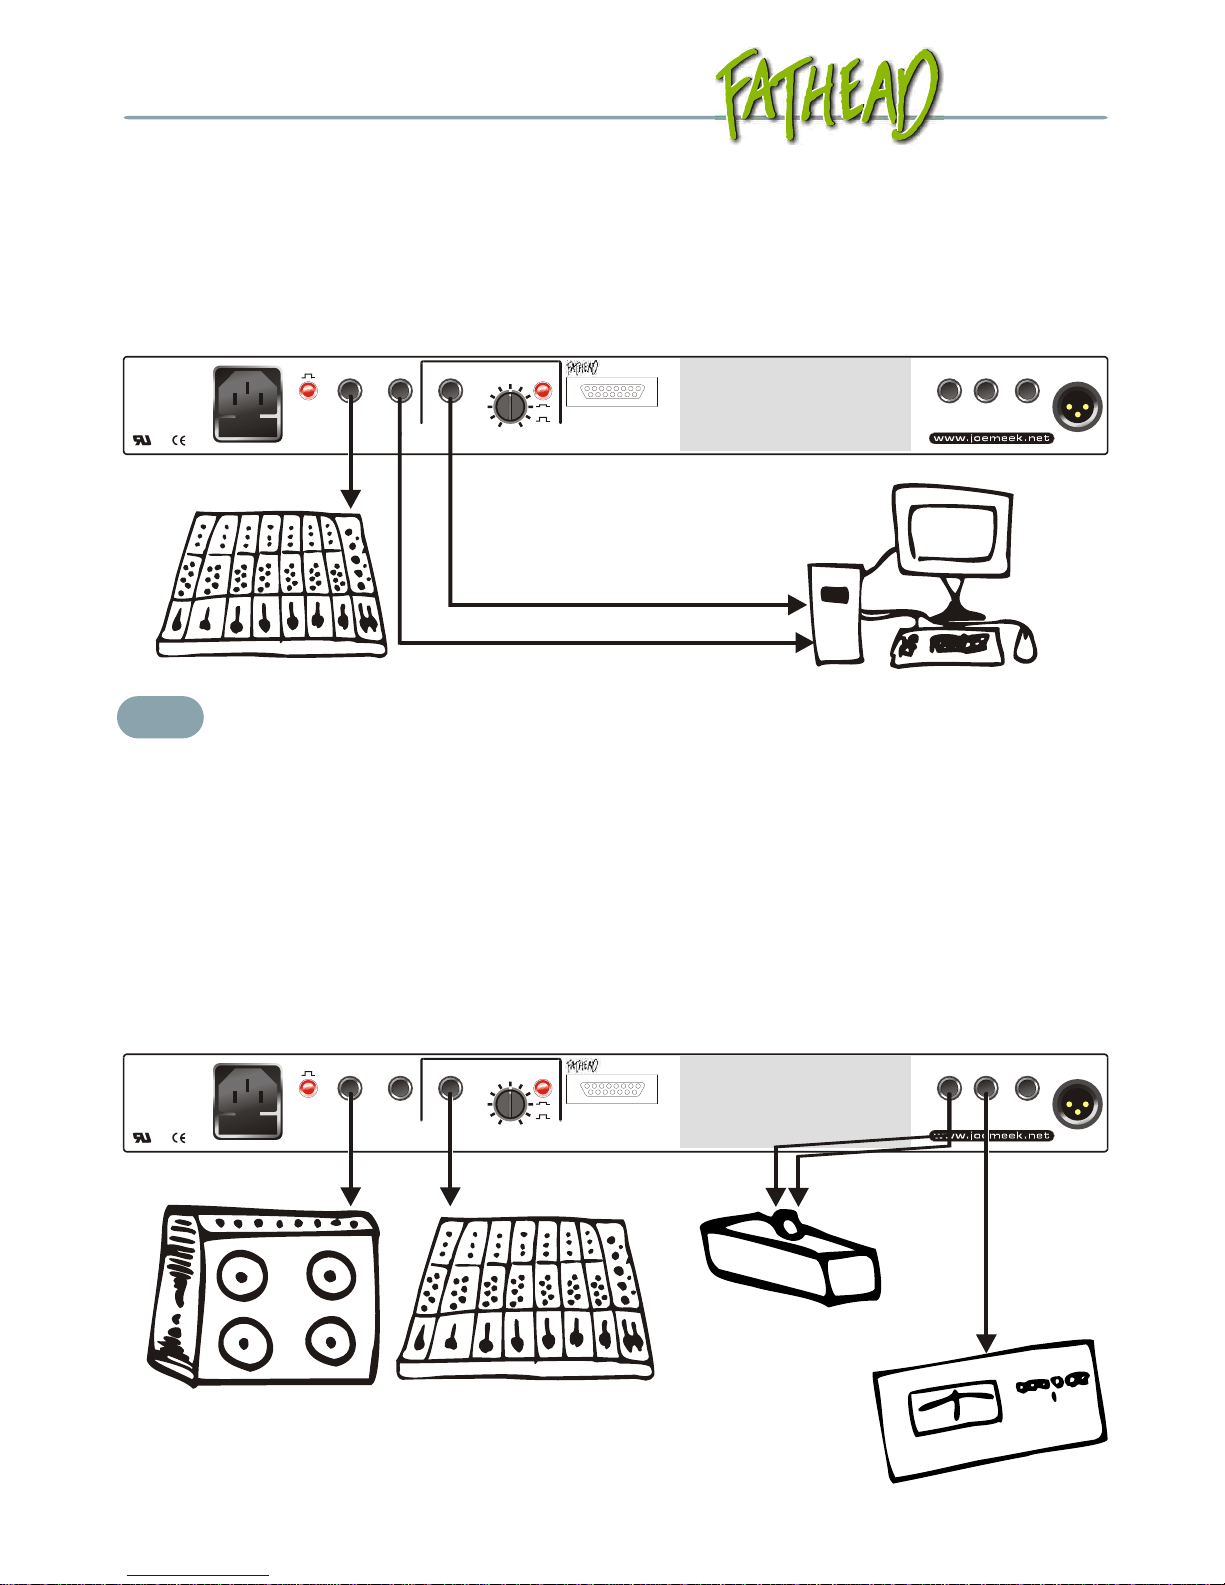
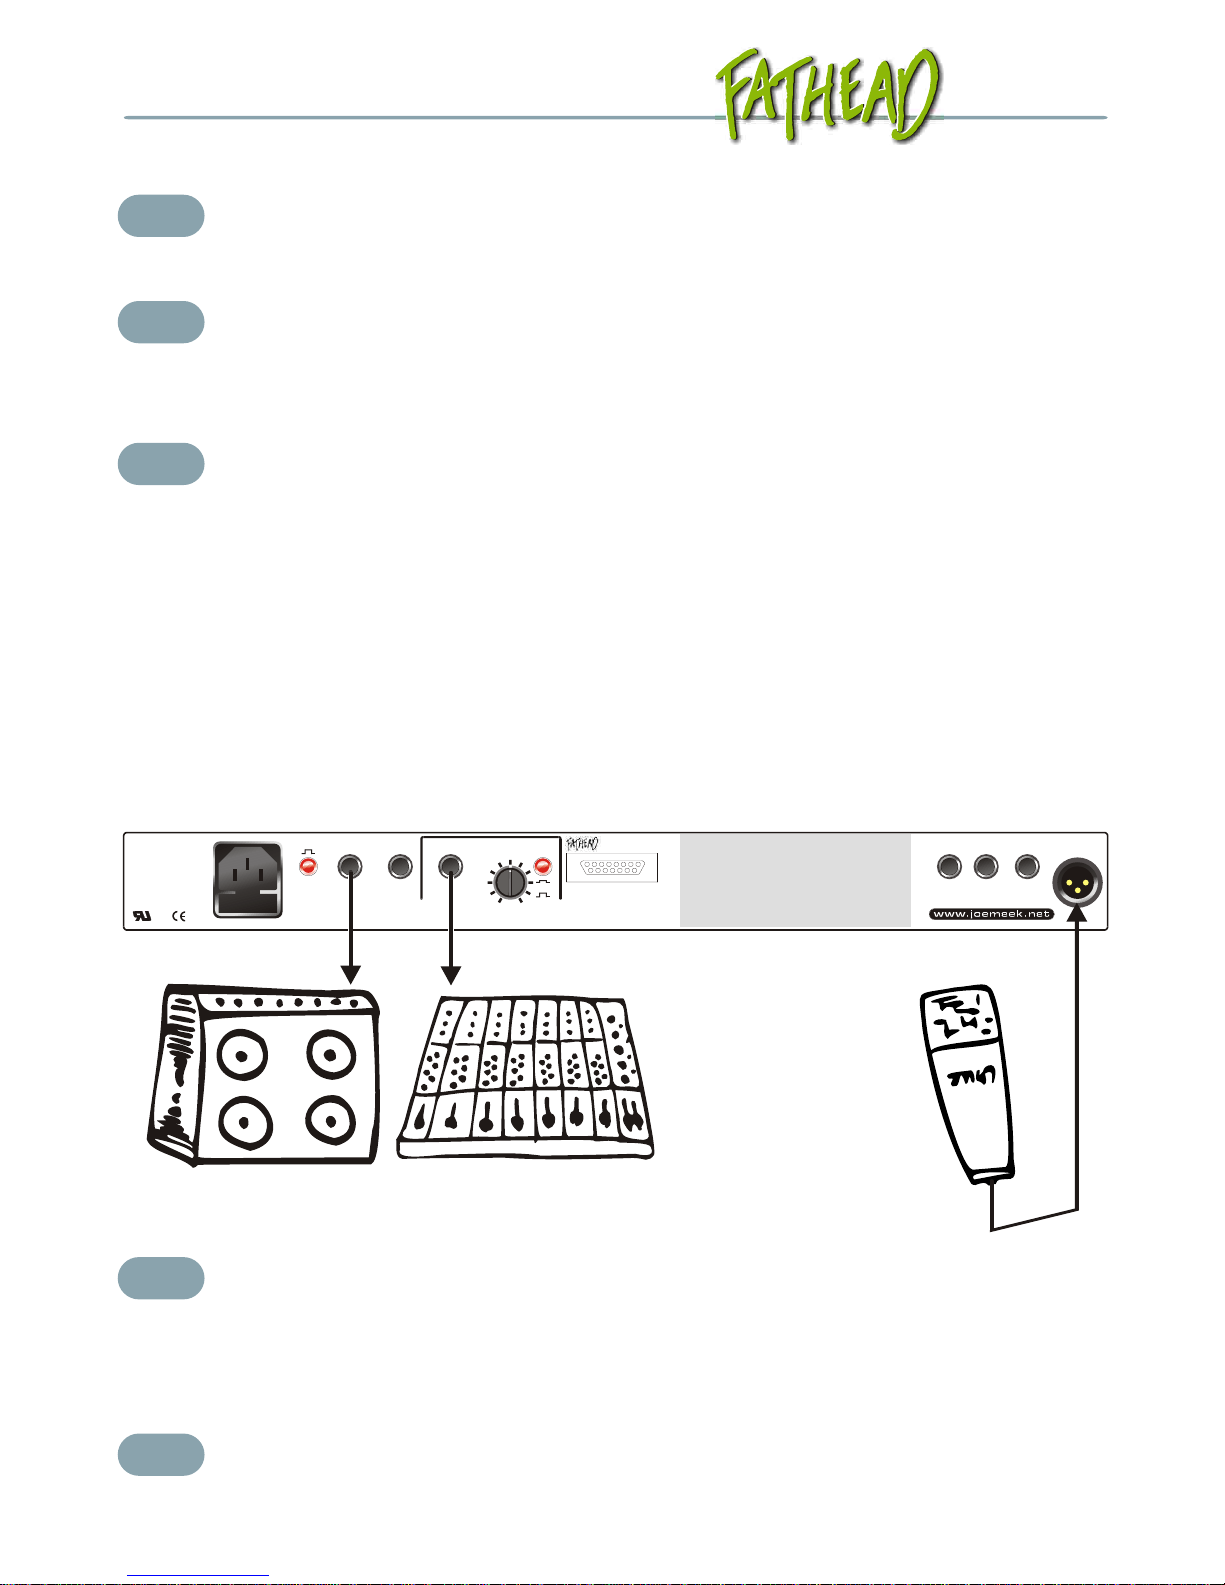
Using the Fathead
Instrument JOEMEEK
Input Gain Output Gain
Mic/Inst+48V MUTEEQOn-20dB on -20 -4 0 max
+65 (mic) +6
0
25
dB Input Meter
dB compression 0
¥
PK MFLF
OptoDistort MFfLFf HF
-14 +14
0
8KHz
0
06 6
+16
+1611 11 -16
-161 1
-2
-25 5 -2
+5
-6
4 48 8
9
2
33
10 10
+2
+2
7 7 +2
-12 1k
150 5k
1k
2k
330
On 912 6 3
SuperJoe
Warm Meek
Classic Meek
FAT Meek
Soft Meek
Compression
VC8
7

User's guide
8
Rear Panel
Ground Lift When button is out, the mains earth is disconnected from the
unit. LEAVE PRESSED IN FOR NORMAL OPERATION, it
is generally safer to have the mains earth connected to electrical
equipment.
Main Output Dual balanced line level outputs for the main signal. Connect
to your main listening/recording equipment.
DI Output Secondary balanced output with switchable signal source
DI Gain/Mode Controls the output gain of the DI out. DI mode (PRE)
causes the DI output to send a 'clean' signal, before the distortion,
compressor and EQ. DI mode (POST) causes DI output similar to
the main output but controlled by the DI gain control. See system
diagram for more information.
FATHEAD controller Connection point for the supplied footswitch
Insert Send/Return signal breakpoint. Allows access to the signal
before the compressor and EQ, but after distortion.
Tuner Constant output for connection to tuner device.
Line in Unbalanced input.
Mic In CurrentSensing microphone input.
Digi Upgrade Cover plate for optional digital card upgrade.
Footswitch
The Fathead controller footswitch may be connected to give the musician
easy access to bypass/enable the compressor/distortion/EQ and mute
functions. Simply attach the footswitch with the supplied cable, and
enable/disable the Fathead functions as required.
JOEMEEK FATHEAD VC8Designed and manufactured in England by FLETCHER ElectroAcoustics Ltd.
CAUTION!
Removal of covers will
expose dangerous
voltages even
when power is removed!
No user serviceable parts
inside. Service strictly by
qualified personnel only.
Approved components
used.
CONTROLLER
PRE
MODEDI GAIN
DI OUTPUT INSERT TUNER LINE IN MIC INMAIN OUTPUT
OUT 1 OUT 2 (POST MUTE) (PRE MUTE)TIP: RETURN
RING: SEND
POST
GROUND LIFT
Using the Fathead

User's guide
9
Using the Fathead
Sample settings
To help you get started using the Fathead, here are some sample settings of
some of our favourite sounds. Note that input and output gain settings are
not mentioned. These should be set according to the input and output levels
required. Always set the input gain high without showing overload on the
meters, and set the output to be comfortable for equipment after the Fathead.
Electric/Acoustic/Bass guitar : Warmth
For a nice sound that is rich and full bodied, use the ‘Soft Meek’ setting with
moderate compression. This will give you more sustain and tone. The EQ
is used to round off the top end slightly, while boosting the low end.
Electric guitar/bass : Vintage drive
A combination of distortion and compression, and mid-high contouring
gives a great big driving sound that is a lot like vintage amplifiers.
Electric guitar: heavy distortion
Winding up the distortion and compression give amazing sustain and
introduce some awesome harmonics. Sound that would normally be
unheard are amplified and distorted to great effect. The roll off in HF makes
for a much smoother sound.
EQ
EQ
EQ
On
On
On
dB compression
dB compression
dB compression
MF
MF
MF
LF
LF
LF
OptoDistort
OptoDistort
OptoDistort
MFf
MFf
MFf
LFf
LFf
LFf
HF
HF
HF
-14
-14
-14
+14
+14
+14
0
0
0
8KHz
8KHz
8KHz
0
0
0
0
0
0
6
6
6
6
6
6
+16
+16
+16
+16
+16
+16
11
11
11
11
11
11
-16
-16
-16
-16
-16
-16
1
1
1
1
1
1
-2
-2
-2
-2
-2
-2
5
5
5
5
5
5
-2
-2
-2
+5
+5
+5
-6
-6
-6
4
4
4
4
4
4
8
8
8
8
8
8
9
9
9
2
2
2
3
3
3
3
3
3
10
10
10
10
10
10
+2
+2
+2
+2
+2
+2
7
7
7
7
7
7
+2
+2
+2
-12
-12
-12
1k
1k
1k
150
150
150
5k
5k
5k
1k
1k
1k
2k
2k
2k
330
330
330
On
On
On
9
9
9
12
12
12
6
6
6
3
3
3
SuperJoe
SuperJoe
SuperJoe
Warm Meek
Warm Meek
Warm Meek
Classic Meek
Classic Meek
Classic Meek
FAT Meek
FAT Meek
FAT Meek
Soft Meek
Soft Meek
Soft Meek
Compression
Compression
Compression

User's guide
10
Acoustic guitar : Punchy
With big compression, and a fast release time (FAT Meek setting), the sound
of an acoustic becomes a lot more punchy. If you add to this eq contouring
with big bass and hf boost with a mid cut a fantastic solo acoustic guitar
sound is achieved. Please remember that with this setting, feedback through
a PA or foldback may be a problem. If so, simply reduce the compression
and bass eq until the problem goes.
Use with mic : guitar cabinet
You can use the Fathead to great effect when using a mic on a guitar cabinet.
The Distortion and drive that you get naturally can be picked up and
enhanced by the distortion feature, and a little compression adds to warmth.
This is worth considering as an alternative when you have a naturally good
sound to work with, and want to get an enhanced version in a recording or
PA system.
Out and out : Electric guitar & Bass
When you are using an electric guitar with a big system, there is not a lot
more fun that winding everything up full, and hearing your instrument like
nothing ever before. As with other high distortion settings, bass boost and hf
cut adds weight to the sound. This setting will generate a lot of noise, but
will sound fantastic!
EQ
EQ
EQ
On
On
On
dB compression
dB compression
dB compression
MF
MF
MF
LF
LF
LF
OptoDistort
OptoDistort
OptoDistort
MFf
MFf
MFf
LFf
LFf
LFf
HF
HF
HF
-14
-14
-14
+14
+14
+14
0
0
0
8KHz
8KHz
8KHz
0
0
0
0
0
0
6
6
6
6
6
6
+16
+16
+16
+16
+16
+16
11
11
11
11
11
11
-16
-16
-16
-16
-16
-16
1
1
1
1
1
1
-2
-2
-2
-2
-2
-2
5
5
5
5
5
5
-2
-2
-2
+5
+5
+5
-6
-6
-6
4
4
4
4
4
4
8
8
8
8
8
8
9
9
9
2
2
2
3
3
3
3
3
3
10
10
10
10
10
10
+2
+2
+2
+2
+2
+2
7
7
7
7
7
7
+2
+2
+2
-12
-12
-12
1k
1k
1k
150
150
150
5k
5k
5k
1k
1k
1k
2k
2k
2k
330
330
330
On
On
On
9
9
9
12
12
12
6
6
6
3
3
3
SuperJoe
SuperJoe
SuperJoe
Warm Meek
Warm Meek
Warm Meek
Classic Meek
Classic Meek
Classic Meek
FAT Meek
FAT Meek
FAT Meek
Soft Meek
Soft Meek
Soft Meek
Compression
Compression
Compression
Using the Fathead

User's guide
11
The JOEMEEK Fathead is a complete instrument channel. It has a lot of
capabilities and functions that can interact with each other to create nearly
infinite sounds and textures. To use it best, you need to understand each of
the Fathead's facilities as separate pieces equipment, then use them together
to make your sound.
1. THE CurrentSense input amplifier
The input amplifier takes audio signals from any microphone (XLR socket),
musical instrument (front mounted 1/4 inch jack) or high level source (1/4
inch line jack socket), and amplifies them up to 'line' level; that is, from a
few millivolts, up to about a volt. The phantom power supply provides
power to capacitor microphones through the mic input. Dynamic or ribbon
microphones should be used with the phantom power turned off, then full
advantage can be taken of the extreme low noise performance of this
amplifier. The CurrentSense pre amp design, unique to JOEMEEK,
guarantees optimised performance from all types of microphones, from
dynamic, to condenser, to classic ribbon types. It is important to select the
best input for a given job; here are some examples…
Mic input:
·Live mic in front of instrument cabinet.
·Acoustic instrument with extremely low output transducer.
·Acoustic recording of an instrument with a microphone.
Line input:
·Use with keyboards
·Use in subgroup on a mix
·Dynamic mic in front of live guitar/bass stack (very loud)
Instrument input:
·Use with electric instruments
HINT: If you have an active instrument that has a very high output level you
may find that you get better headroom using the line input.
Understanding the Fathead
HINTHINT

User's guide
12
2. Opto Distortion
Technically, the 'Opto distortion' feature on the Fathead uses a combination
of filtering and soft clipping (using optical components) to create anything
from warming tube drive to screaming distortion. This effect was originally
developed for guitar and bass. In the studio the optical distortion sound can
be used on everything as a truly analogue effect that is extreme yet adds
enormous warmth and character. Live, the sound gives the musician massive
distortion sounds that are unmistakably analogue and have a warm feel.
Experiment with this control, there is no 'correct' or ‘wrong’ way to use
distortion, just use your ears: “If it sounds right, it IS right”
HINT: Often the sound of the distortion can change greatly with different
settings of the EQ section, experiment with this interaction for more effects!
3. The Compressor
Compressors with instruments are great at adding punch and sustain, but
how? The JOEMEEK compressor is especially good at giving you big
vintage sounds. To get the best use out of the compressor it is necessary to
get technical; so even if you're not technical, read the next bit carefully and
get to be a compressor Guru!
A LIMITER is a device that stops the output of a signal path going above a
predetermined level. It is mainly used to protect amplifiers and recorders,
(and radio transmitters) against overload. The sound of a limiter is a bit like
compression but it tends to be flat and uninteresting.
A COMPRESSOR is a device that reduces the dynamic range of programme
material. Its use is necessary to squeeze both the loudest and softest sounds
onto records so that they can be listened to in all environments; ie, in the car
with lots of background noise, lack of compression would mean the
subtleties of a recording would be lost! Asecondary use of compression (and
most important for us) is to introduce some artificial dynamics into sound to
make it sound more exciting. This is what the JOEMEEK compressor does
best.
HINTHINT
Understanding the Fathead

User's guide
13
WHAT IS ACOMPRESSOR?
A perfect compressor is an amplifier where the input/output ratio is constant:
So using a 2:1 compressor, increasing the input by 2dB gives a
corresponding 1dB increase in the output.
Early compressors which used variable mu thermionic tubes or photoelectric
devices only approximated true compression over a limited range. They had
a soft 'threshold' where compression started and held to a predictable ratio
up to a certain level, then they returned to a more linear amplification
allowing transients through. This is in stark contrast to modern VCA
compressor/limiters where is seemed 'sensible' to combine the functions of
compressor and limiter and to 'stonewall' any and all signals
above a certain level; excellent for technical level control but hopeless for
musical effect. Generally, (I know I'm over simplifying) modern VCA
compressors sound muddy and flat, while old compressors sound lively and
retain sparkle. The compressor in the JOEMEEK FATHEAD is unique; it is
a recreation of an early photoelectric compressor in use in the mid 1960s. It
is capable of producing the same punchy sounds that were so characteristic
of the pop records of the time.
4. The Meequalizer
The equalizer controls the volume of three audio bands. It's used to modify
the tonal sound of the signal in the Fathead. To be ideal for instruments, the
Fathead's low frequency and mid frequency centers can cross over, allowing
for superb musical effect. The equalizer is after the compressor in the
Fathead's signal path.
The general rule about using EQ is to be very careful about too much 'lift'.
Increasing the gain by say 10dB in the high frequencies has the effect of
taking the Fathead closer to overload. This is generally OK as the Fathead is
designed with very generous overload margins, but when using EQ this has
to be remembered. The rule is that when 'lift' is used, it's often necessary to
compensate by reducing the input gain.
HINT: always alter sound from the ground up; i.e. with the EQ controls set
to the 'flat' or 0 position.
HINTHINT
Understanding the Fathead

User's guide
14
HINT: If the overload light flashes more than 'occasionally', then decrease
the input gain control. - See block diagram for detail on overload indicators.
Digital Upgrade
For use in the studio with digital systems it is possible to add JOEMEEK's
VC1QD, giving the Fathead an additional 24/96 S/PDIF output. This
effectively bypasses all noisy analogue stages going into a digital system,
while leaving the analogue outputs free for monitoring.
HINTHINT
Common Problems
I’ve got no sound!
- Check cabling.
- Never use an unbalanced cable for a microphone
- Check that mic/inst button is pressed in
- Is the phantom power on? (capacitor microphones only).
- Is the output volume control up?
- Is Mute disabled?
Got signal going through, but have no compression.
- Is there enough input signal?
- Is the compressor light on.
- Have you turned the COMPRESSION control high enough?
It's noisy
- The Fathead input amplifier and compressor are extremely quiet, but by
definition compressors raise the level of quiet passages, and EQ can
contribute high frequency hiss if overused; this also means that if there is
noise in the input, there will be more noise on the compressed and EQd
signal. It's a compromise so try reducing compression and HF EQ.
- Disable distortion for quiet operation
- If you still have excessive noise, either there is serious noise in the input
signal being fed into the unit, or something is still turned up far too high.
- Start turning things down.
Understanding the Fathead

User's guide
15
Common Problems
It distorts.
- No it doesn't! Distortion inside the compressor is virtually impossible;
however it is possible that the input amplifier is overcooking; turn down the
COMPRESSION control and readjust.
- Too much EQ can sometimes sound like distortion.
I can't make the compression gentle enough!
- It takes practice. The setting of the COMPRESSION control is quite
critical.
- Select a preset that is more anticlockwise, i.e. 'Soft Meek'
I have hum
- When you are using the Fathead with other amplifiers and studio
equipment, you may have a hum caused by 'double earthing'. To fix this,
press in the ground lift switch on the rear panel. BE SURE THAT AT
LEAST ONE MAJOR PART OFYOUR RIG IS EARTHED usually it is
best to have your amplifier or mixing desk earthed. Having an unearthed
system is DANGEROUS! But running parts of a system without earthing
improves noise performance.
- Are you recording in front of a computer screen? Instruments often pick
up noise from CRT displays.

User's guide
16
Pre amplifier
The Fathead uses JOEMEEK latest generation CurrentSense pre amplifier
circuit that gives ultimate flexibility and quality whether using line, mic, or
instrument sources. This means that the Fathead can be used equally well as
a head 'on stage' unit, or a pre amplifier for a mic or an instrument in the
studio.
·Currentsense Mic and instrument pre amp
·65dB gain swing with 33dB overload margin
·THD < .001 % @1Khz @ operating level
·+48V Phantom
·20dB pad
·Phase reverse
·Extremely low noise; noise is128dB below input @ 50dB of gain+
·Line, XLR mic (rear mounted), and instrument (front mounted)
inputs
·Auto impedance matching for all microphone types (CS mode mic
pre)
'Opto Distort'
To add to the Fathead's tonal variety, we have given it an 'opto distort'
feature. Technically, this is an arrangement of filters and limiters that utilise
optical circuitry to generate a distortion that can be fully varied from tube
like warmth to screaming fuzz.
·Bypass control
·Indicator, and active optical distortion indicator
·Distortion level/tone control.
JOEMEEK compressor
As with all JOEMEEK channels, the Fathead boasts the JOEMEEK optical
compressor. The compressor in the Fathead has been tweaked to produce
extremely high ratios, capable of causing huge effect with instruments. That
is, high compression without dulling of the sound. The 5 position switch
selects carefully chosen presets for the attack, release and a basic ratio
setting, while you control the 'compression' (similar to threshold) control.
Technical Performance

User's guide
17
The compressor can also be bypassed with the footswitch controller.
·Bypass control
·4 LED compression meter
·Threshold control
·5 position preset switch
·Automatic gain compensation
·Signal sensitive ratio
JOEMEEK Meequalizer
The Fathead features an all new 3 band, dual sweeping EQ, optimised for
instruments. The frequencies of the sweeping EQ bands cross over, allowing
for phasing and other classic effects. The EQ is JOEMEEK's best 'phase
levelling' design, featuring extremely smooth sound, even with extreme
settings.
·3 band classic EQ, LF, MF, HF shelf
·LF sweeps from 150 to 1000Hz
·MF sweeps from 1k to 5k
·HF shelf centres at 8KkHz
·MF and MF cut/boost 16dB
·HF cut/boost 14dB
Mute
To aid 'on line' instrument changes, and silent studio operation, the Fathead
is equipped with a silent operating mute function. Operated from the front
panel and the foot switch, the mute silently cuts all sound from the main
outputs, and DI output, whilst leaving the tuner output untouched.
Output Stages
The Fathead is equipped with the best technology for solid quality outputs.
The unit has dual superbal outputs, plus an additional 'DI' output with gain
control for Stage/PA use. The DI ouput is selectable pre/post EQ and output
gain control. For use in the studio with digital recording, the Fathead comes
with 24bit/96k digital upgradability. Fitting the VC1QD module adds digital
output to the main output bus.
Technical Performance

User's guide
18
·Superbal balanced outputs
·Di output with independent gain control and pre/post switching
·Tuner output - not affected by mute function
·Unbalanced insert point for use with pedals, reverbs, overdrive etc.
·24/96 digital output upgradability.
·Ground lift switch on rear panel
*note, the digital module is available now.
Technical Performance

User's guide
19
System Diagram
CurrentSense
mic pre
Ground Lift
switch
Mic / Instrument /
Line inputs Footswitch Footswitch Footswitch
Insert point
Tuner output
Output Gain
(balanced) Mute
(Footswitch)
Opto
Distortion Optical
Compressor Meequalizer
24bitA/D
(optional)
DI Output
(balanced)
DI out switch
PRE
POST
JOEMEEK Fathead block diagram
Table of contents
Other Joemeek Amplifier manuals