Johannus MIDI Sequencer + User manual

Showrooms at Shaw Lancashire and Mixbury Oxfordshire
User Manual - MIDI Sequencer +

Issue 2.0W 12/12/2012 Church Organ World Sequencer Plus - User Manual Page 2 of 27
Contents
1. Introduction................................................................................................................................4
2. Care of your MIDI Sequencer..............................................................................................4
3. MIDI system ...............................................................................................................................4
3.1. What is MIDI? .................................................................................................................................4
4. MIDI Terminology....................................................................................................................5
5. Installation...................................................................................................................................6
5.1. Connections .....................................................................................................................................6
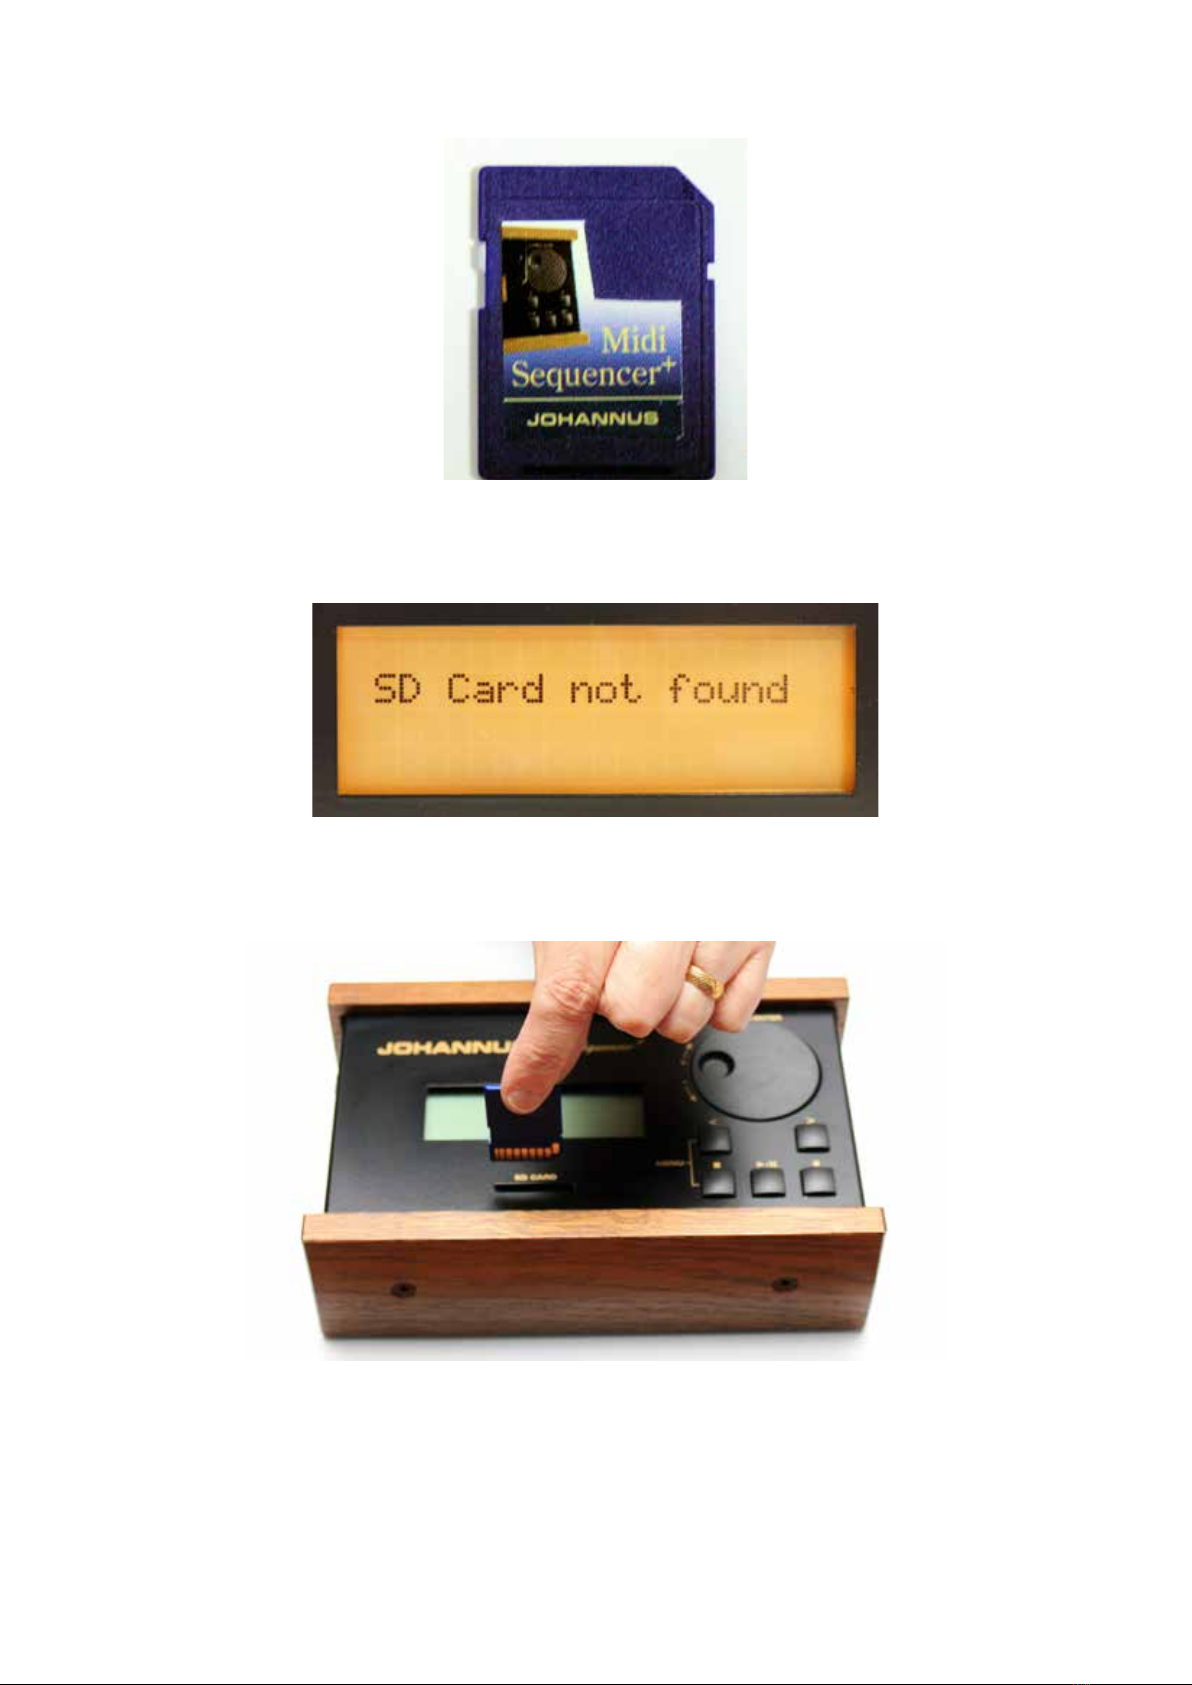
5.2. SD Memory Card.............................................................................................................................7
6. Controls ........................................................................................................................................8
7. Display Menu System ..............................................................................................................9
8. Play/Browse Screen................................................................................................................10
8.1. Navigation in the Play/Browse screen ..........................................................................................11
8.2. Play MIDI le ................................................................................................................................11
8.3. Play Hymn MIDI le .....................................................................................................................11
8.4. Play Playlist File ............................................................................................................................11
8.5. Options while playing....................................................................................................................12
8.5.1. To stop playing...............................................................................................................................12
8.5.2. To pause the playing ......................................................................................................................12
8.5.3. To restart playing ...........................................................................................................................12
8.5.4. To change the Tempo.....................................................................................................................12
9. Record Mode Screen..............................................................................................................12
9.1. Recording.......................................................................................................................................12
9.1.1. To record:.......................................................................................................................................12
10. Track Menu...............................................................................................................................13
10.1. Track Play/Record .........................................................................................................................13
10.1.1. To Record a Track:.........................................................................................................................13
10.1.2. To Play a Track ..............................................................................................................................13
10.1.3. To Add a track................................................................................................................................13
10.2. Rename a track ..............................................................................................................................14
10.3. Remove a track ..............................................................................................................................14
11. File Management ....................................................................................................................14
11.1. Rename File/Directory...................................................................................................................14
11.2. Delete File/Directory .....................................................................................................................15
11.3. Make Directory..............................................................................................................................15
12. Options........................................................................................................................................15
12.1. Auto Playlist .................................................................................................................................15
12.2. Hymn Mode ..................................................................................................................................15
12.3. Metronome ....................................................................................................................................15
12.4. MIDI Forward................................................................................................................................15
12.5. Repeat ...........................................................................................................................................15
12.6. Filter Menu ....................................................................................................................................16
12.7. Routing Menu ................................................................................................................................16
13. System Menu ............................................................................................................................17
14. Editing MIDI............................................................................................................................17
14.1. Reading the SD card on a computer ..............................................................................................17
14.2. Creating a Hymn MIDI le............................................................................................................19
14.3. The Playlist ....................................................................................................................................19

Issue 2.0W 12/12/2012 Church Organ World Sequencer Plus - User Manual Page 3 of 27
14.4. MIDI Channels ..............................................................................................................................20
15. Components Relevant to MIDI..........................................................................................21
15.1. Sequencer MIDI le format...........................................................................................................21
15.2. Software Editor/Synthesizer/Sequencer ........................................................................................22
15.3. MIDI Controllers ...........................................................................................................................23
15.3.1. Control Changes Received on Church Organ World instruments .................................................23
15.3.2. System Exclusive Messages for Church Organ World instruments ..............................................24
15.3.3. Sequencer Plus System Real Time Messages (Play/Browse mode)..............................................24
15.3.4. Plus System Real Time Messages (Record mode).........................................................................24
16. Troubleshooting ......................................................................................................................24
17. System Information................................................................................................................26
17.1. Technical Specication..................................................................................................................26
17.2. Factory Settings .............................................................................................................................26
17.3. MIDI Implementation........................................................................................... 26
18. Information...............................................................................................................................27

Issue 2.0W 12/12/2012 Church Organ World Sequencer Plus - User Manual Page 4 of 27
1. Introduction
We hope that you enjoy the use of your MIDI sequencer plus. It is compatible with any MIDI device although
it is primarily for use with Johannus and Makin organs.
This manual describes the installation and operation of the MIDI Sequencer Plus and provides information
on how it works with other MIDI devices.
If you are an owner of a Makin organ then you will be aware that some of the information in this manual
is repeated from your Organ User Manual. This is intentional to save you having to refer back to another
manual and for other users to have access to the information
2. Care of your MIDI Sequencer
To get the best out of your MIDI Sequencer please take care by doing the following:
• Keep it in a dry place, well away from any damp areas.
• Clean it with a lint free cloth
• Keep it away from liquids or any chance of accidental spillage.
• When in use, place the sequencer on a at stable surface or use the (optional) wooden stand.
• Switch the MIDI Sequencer off when it is not in use.
•
Switch the MIDI sequencer off before removing the SD card. (To prevent corruption of open MIDI les.)
• The MIDI sequencer may only be opened by a technician authorised by Johannus Organs. The MIDI
sequencer contains static-sensitive components. The warranty is invalidated if the MIDI sequencer is
opened by a non-authorised person.
• The MIDI Sequencer plus has internal connections to both the MIDI IN- and MIDI OUT-port pins 1
and 3. for future purposes. Please do not apply any kind of phantom power or signals to these pins.
Doing so may damage the Sequencer. If you plan to connect equipment, which sends signals or applies
power to pins 1 and/or 3 (and if that functionality cannot be disabled) please use MIDI cables that only
carries wires 2, 4 and 5.
3. MIDI system
3.1. What is MIDI?
MIDI is the abbreviation for Musical Instruments Digital Interface. With MIDI, musical instruments can be
coupled to each other, to a computer or to another MIDI device. The MIDI specication is produced by the
MIDI Manufacturers Association. Further information can be obtained from their web site www.midi.org.
The MIDI standard is partly based on hardware. In addition, it is a description of the way in which music
and sound are translated into a digital format which can be communicated to other devices equipped with
MIDI-functionality.

Issue 2.0W 12/12/2012 Church Organ World Sequencer Plus - User Manual Page 5 of 27
4. MIDI Terminology
The following table lists of some of the MIDI terminology that you may encounter. For more information
consult the MIDI Manufacturers Association web site.
Term Description
Sequencer
A device for playing musical performances. The more sophisticated sequencers
also record MIDI as well as other inputs and they will also
allow editing of saved data. The most common sequencers are software computer
programs running on Personal Computer hardware. There are many of these
available ranging from the simple to very sophisticated.
Patch
A patch is the sound that a device can produce i.e. a musical instrument such as
a piano, violin or drums. Patches are also referred to as “instruments, programs,
algorithms or timbres”. Some devices contain multiple patches and the MIDI
specication pre-denes a number of
sounds allocated to patches.
Channel Although there is only one physical MIDI connection between devices it is divided
by the MIDI signals into 16 command slots known as channels. An instrument can
generally be set to respond to one or all of the channels.
Multitimbral
An instrument, synthesizer or sound generator is said to be multitimbral if it is capable
of producing two or more different instrument sounds simultaneously
Polyphony The ability to play more than one note at a time.
Expander A MIDI device that provides patches or other MIDI control function or a device that
replicates data coming to a MIDI IN port to multiple MIDI OUT ports.
Voice Are the qualities of an individual note or group of notes that give a particular timbre
or sound. For example: a Trumpet or a Diapason
Synthesizer
A device for generating sound usually to emulate an instrument. Most modern synthesizers
can create more than one instrument sound or voice and are often incorporated into
sequencers for replaying sound les.
Controller Is any MIDI input device that implements a function but does not sound a note as a
direct result of its operation e.g. a piston, stop, expression peddle, switch, knob, etc.
MIDI allows 128 controllers per device. Many of the controller functions are predened
by the MIDI specication.
Module A device that can generate musical sounds. Typically a module will incorporate one or
more patches but require external (MIDI) keyboard input to make them sound. Also
referred to as an Expander or Synthesizer.
SysEx
System Exclusive MIDI messages. These are generally used by manufacturers to
generate messages that the Standard MIDI system does not provide or to send a chunk
of data in one message rather than using a lot of MIDI messages
Program Change
The MIDI message used to select an instrument, patch or program. There are 128
program changes available.
Bank Select The MIDI message used to select an instrument patch or program on a device that has
more than 128 patches. A device could have 128 programs with 128 banks of patches,
programs, instruments or timbres. Note that your Makin instrument does not implement
‘bank select’.

Issue 2.0W 12/12/2012 Church Organ World Sequencer Plus - User Manual Page 6 of 27
5. Installation
5.1. Connections
The connection points for the Sequencer are situated on the side together with the On/Off switch.
To connect the sequencer to another MIDI device
1. Ensure the power is switched off on the the sequencer and on the other MIDI device to be connected
2.
Connect the 9v connector to the sequencer and plug the associated mains adaptor into an electrical outlet.
3. Plug one end of the MIDI cables into the MIDI OUT socket and the other end of the cable into the the
MIDI IN socket of the other MIDI device.
4. Plug the other MIDI cable into the sequencer MIDI IN socket and its other end into the MIDI OUT
socket on the other MIDI device. Note that on Johannus and Makin organs MIDI OUT has been
changed to MIDI SEQ.
Warning
If you are connecting to a MIDI device that is not a Makin or Johannus organ. You are
strongly advised to consult the manual for that device before proceeding.

Issue 2.0W 12/12/2012 Church Organ World Sequencer Plus - User Manual Page 7 of 27
5.2. SD Memory Card
The sequencer has a slot for an SD memory card. The memory card must be inserted in the slot before you
use it otherwise the display will show a message that no card is present.
Insert the card
Note that:-
• The diagonal shoulder is bottom right nearest the push buttons and the contacts are closest to the edge
of the sequencer.
• The protect tab is in the unlock position. (You will not be able to record if it is locked.)
Write Protect Tab
shown in the unlock
position
Diagonal Shoulder

Issue 2.0W 12/12/2012 Church Organ World Sequencer Plus - User Manual Page 8 of 27
When the card is plugged in correctly the display will show a message:-
If a new card is plugged in the display will show a message:-
Pressing any key will cause the display to show the main menu. With a card installed the system should be
working.
6. Controls
To access the main menu press the Stop and Left Arrow Buttons simultaneously.
7. Display Menu System
Rotary Selector &
Push Button
Display Screen
SD Card Slot
Arrow Right Button ( > )
Record Button ( )
Play/Pause Button ( /|| )
Stop Button ( )
Arrow Left Button ( < )

Issue 2.0W 12/12/2012 Church Organ World Sequencer Plus - User Manual Page 9 of 27
The display menu system allows the selection of the sequencer modes and provides information on the
current status of the sequencer. The display defaults to Play/Browse mode at power up.
The menu system has the following structure:-
The rotary selector and push button is used to select items from the tree structured menu. Where other keys
have functions that relate to the menu a message will be displayed on the screen to show the function. For
example “exit: STOP select: RECORD” may be shown on the bottom of the screen meaning that the Stop
() and the Record () buttons have the functions Exit and Select respectively.
To bring up the main menu press the Left Arrow (<) and Stop () buttons simultaneously. Use the Rotary
Selector to move the pointer to the required menu item then push Rotary Selector button to select.
• Play/Browse: shows the Play/Browse screen.
• Record mode: shows the Record Mode screen.
• Track Menu: shows the Track Menu screen.
• File Management: shows the File Management menu screen
• Options: shows Options menu screen.
• System Menu: shows the System Menu screen.
Record Mode
Play/Browse
Track Menu
File Management
Options
System Menu
Track Play/Record
Add Track
Rename Track
Remove Track
Rename File/Dir
Delete File/Dir
Make Directory
File Menu
Routing
Channel On/Off

Issue 2.0W 12/12/2012 Church Organ World Sequencer Plus - User Manual Page 10 of 27
The Play/Browse screen will appear after the MIDI sequencer has been switched on.
To select screens through the key combinations:
• Play/Browse Stop key + Play/pause key together.
• Record Mode Stop key + Record key together
• Menu Stop key + Left arrow key together
To select a screen through the main Menu
• Select the main Menu screen.
• Turn the selector to select a screen.
• Press the selector to go to the selected screen.
8. Play/Browse Screen
• Song: Shows the name of the selected MIDI le.
• Tempo: Shows the set tempo (beats per minute).
• Status Indicator shows the current status (Stopped/Playing/Paused).
• Repeat Mode Indicator:
• Blank - Repeat mode not active.
• R: Repeats the selected MIDI le.
• RA: Repeats all MIDI les.
• Play Mode Indicator:
• Blank - Default play mode.
• HM: The selected MIDI le plays in the Hymn Mode.
• PL: A playlist has been detected. The MIDI les are played according to the programming of
the playlist.
• Busy indicator appears when MIDI sequencer is busy processing.
• Change indicator +/- shows behind the item that can be changed.
• Metronome Indicator: Shows the rhythm.
• Time Indicator: Shows the elapsed playing time.
Status Indicator
Elapsed Time Indicator
Change Indicator
Metronome Indicator
Busy Indicator
Play Mode Indicator
Repeat Mode Indicator

Issue 2.0W 12/12/2012 Church Organ World Sequencer Plus - User Manual Page 11 of 27
8.1. Navigation in the Play/Browse screen
• Turn the selector to the right to go forward / downward.
• Turn the selector to the left to go back / upward.
• Press the selector to select the menu, directory or song.
Directories can contain the following content:
Content Example
MIDI song RECO01
Subdirectory, which is marked by < and > <SUBDIRO1>
Back command. to leave the subdirectory [BACK]
Playlist, which is marked by [ and ] [PLAYLIST]
8.2. Play MIDI le
• Select the Play/Browse screen from the main menu
• Turn the selector to select a MIDI le.
• Press the Play/pause key. The MIDI sequencer starts playing the selected le.
Wait until stopped appears on the screen. The MIDI le has been played.
8.3. Play Hymn MIDI le
Playing the Hymn MIDI le is only possible when the Hymn Mode is active. (Hymn Mode can be set
On or Off via the Menu system.)
1. Select the Play/Browse screen from the main menu.
2. Turn the selector to select a Hymn MIDI le. A Hymn MIDI le begins an l_ (intro) or a V (verse).
The play mode HM is displayed on the screen.
3.
When selecting an intro, the associated verse will start immediately after the intro has been played.
When selecting verse, only the verse will be played.
4. Press the Play/pause key or the selector. The Hymn Mode screen appears. The MIDI sequencer
starts playing the MIDI le.
5. Press the arrow keys to change the number of times that a verse is to be played.
6. Wait until stopped appears on the screen. The MIDI le has been played.
8.4. Play Playlist File
Playing the Playlist le is only possible if the Playlist Mode has been set to active via the Menu System.
If Auto Playlist is ON, the sequencer will immediately go to the playlist, even if it is situated in a
subdirectory.
The le name of the playlist has to be playlist.txt. Other le names are not allowed, because the
sequencer will not nd the playlist with another le name.
1.
Insert an SD card containing a playlist into the SD card input. Browse to the playlist. The play mode
PL appears on the Play/Browse screen.
2. Press the Play/pause key. The MIDI sequencer starts playing the playlist.
3. Wait until the music stops.

Issue 2.0W 12/12/2012 Church Organ World Sequencer Plus - User Manual Page 12 of 27
At a programmed stop in the play list:
• Press the Play/pause ( /|| ) key to resume playing.
• End of play list appears on the screen: The play list has been played.
It is also possible to exit the play list. Turn the selector to the left until it says [ EXIT ] . Press the selector
to exit the play list.
8.5. Options while playing
8.5.1. To stop playing
Press the Stop key ( ).
8.5.2. To pause the playing
Press the Play/pause key ( /|| ). Playing is interrupted.
8.5.3. To restart playing
Press the Play/pause key ( /|| )to start playing again or restart from a pause.
8.5.4. To change the Tempo
Turn the rotary selector to change the Tempo.
9. Record Mode Screen
The record mode screen can be accessed either via the menu system or by pressing the Record button (
) while in Play Mode.
Record mode allows you to record what you play on the attached instrument keyboard(s).
9.1. Recording
9.1.1. To record:
1. On a Church Organ World instrument
Change tempo with the selector (optional).
Set the general volume of the organ.
Set the expression pedal(s) of the organ.
Program the required registration in preset on the organ (optional).
Set all stops OFF (A reset with the 0 key can be used if required)
On other instruments set the required settings
2. Press the Record ( ) key. The sequencer will go into Record Pause mode
3. The Sequencer waits for a MIDI event to occur. If you want to record silence at the beginning, press
the Play/Pause key to start recording manually.

Issue 2.0W 12/12/2012 Church Organ World Sequencer Plus - User Manual Page 13 of 27
4. On a Church Organ World instrument
Press the 0-piston (General Cancel) again for one second: the MIDI sequencer will record the
settings of the general volume and expression pedals.
Switch on the stops (manually or with a preset).
On other instruments make appropriate settings you want recorded as MIDI activities
5. Play the piece of music on the organ or other instrument.
6. Press the Stop key ( ). Stopped appears on the screen.
10. Track Menu
The Track Menu is a submenu for managing multitrack MIDI recordings. Options are:-
• [Back] returns to the Main Menu screen
• Track Play/Record
• Add Track
• Rename Track
• Remove Track
10.1. Track Play/Record
10.1.1. To Record a Track:
1. Select Track Play/Record from the main menu
2. Select a song with the rotary selector.
3. Select a track with the arrow keys ( < > ).
4. Make sure all stops are OFF.
5. Press the Record button ( ) to start recording the selected track while playing all other tracks.
10.1.2. To Play a Track
1. Select Track Play/Record from the main menu
2. Select a song with the rotary selector.
3. Select a track with the arrow keys. ( < > )
4. Press Play ( /|| ) to play the selected track.
10.1.3. To Add a track
1. Select Track Play/Record from the main menu
2. Select the Add a Track screen from the sub menu
3. Select the song to which a new track will be added using the rotary selector.
Warning
If the selected track already contains MIDI data, the data will be overwritten!

Issue 2.0W 12/12/2012 Church Organ World Sequencer Plus - User Manual Page 14 of 27
4. Press the Record button ( ) to continue {or Stop ( ) to cancel}.
5. Create name by changing selected character (underlined) with the rotary selector. Press the right
arrow key ( > ) for the next character and press the left arrow key ( < ) to go back one character.
6. When nished, press the Record button ( ) to add the track with the given name or press the Stop
Button ( ) to cancel.
10.2. Rename a track
1. Select Track Play/Record from the main menu
2. Select the Rename Track screen from the sub menu
3. Select a song with the selector.
4. Select a track with the arrow keys.
5. When nished, press Record ( ) to continue or press Stop ( ) to cancel.
6.
Change selected character with the rotary selector. Press the right arrow key ( > ) for the next character
and press the left arrow key ( < ) to go back one character.
7. When nished, press Record ( ) to continue or press Stop ( ) to cancel.
10.3. Remove a track
1. Select Track Play/Record from the main menu
2. Select the Remove Track screen from the sub menu
3. Select a song with the rotary selector.
4. Select a track with the arrow keys ( < > ).
5. Press Record ( ) to remove the selected track or press Stop ( ) to cancel
11. File Management
File management may be used to make a directory, delete a le or directory and rename a le or directory.
11.1. Rename File/Directory
1. Select the File Management screen from the main menu
2. Select Rename File/Directory from the sub menu
3. Select a song with the rotary selector.
4. Press Record ( ) to continue {or stop ( ) to cancel}.
5.
Change selected character with the rotary selector. Press the right arrow key ( > ) for the next character
and press the left key ( < )to go back one character.
6. When nished, press Record ( ) to continue or press Stop ( )to cancel.

Issue 2.0W 12/12/2012 Church Organ World Sequencer Plus - User Manual Page 15 of 27
11.2. Delete File/Directory
1. Select the File Management screen from the main menu
2. Select the Delete File/Dir screen from the sub menu
3. Select a le or directory with the rotary selector.
4. Press Record ( ) to remove the selected le or directory or press Stop ( ) to cancel.
11.3. Make Directory
1. Select the File management screen from the main menu
2. Select the Make Directory screen from the sub menu
3. Select a character with the rotary selector.
4. Press the right arrow key ( > ) for the next character and press the left arrow key ( < ) to go back one
character. The path in which the new directory is stored is shown at the third line.
5. Press Record ( ) to conrm or press Stop ( ) to cancel.
12. Options
The Options sub menu enable certain functions of the sequencer to be set to a default condition as follows:-
12.1. Auto Playlist
(ON/OFF): Activates the Auto Playlist mode.
12.2. Hymn Mode
(ON/OFF): Activates the Hymn Mode.
12.3. Metronome
(ON/OFF): Activates the Metronome.
12.4. MIDI Forward
(ON/OFF): Redirects MIDI IN to MIDI OUT. This only works in the Record Mode while recording and in
the stopped & MIDI Forward state.
12.5. Repeat
(ONE/ALL/OFF): ONE repeats the same MIDI le and ALL repeats all MIDI les.
Warning
If MIDI In and MIDI Out are connected to the same instrument and MIDI forward
is enabled ( ON ) then unpredictable results can occur such as ashing stop lights
and draw stops moving in and out.

Issue 2.0W 12/12/2012 Church Organ World Sequencer Plus - User Manual Page 16 of 27
12.6. Filter Menu
Selects to the Filter Sub-Menu screen.
[Back]: Returns to the Options menu screen.
Stops/Instr. (ON/OFF): Activates the stop and instrument changes.
Tempo (ON/OFF): Activates tempo changes.
Volume (ON/OFF): Activates general volume changes.
Channel ON/OFF: Selects the Channel ON/OFF screen.
Channel ON/OFF
[Back]: Returns to the Filter menu screen.
Channel 1-16 (ON/OFF): Activates the MIDI channels 1-16.
The channel ON/OFF mode relates to the original channels.
The channel ON/Off mode is active when playing a MIDI le and when forwarding MIDI data
(MIDI Forward mode).
The setting of the MIDI channels does not have any inuence on the record mode.
12.7. Routing Menu
Selects the Routing Sub-Menu screen.
[Back]: Returns to the opt ions menu screen.
MIDI Routing (ON/OFF): Enables MIDI routing to allow:
• moving a channel to another channel.
• splitting a channel into two channels at a given point (split Point). The tones above and below
a split point go to different channels.
The MIDI Routing mode is operational when playing a MIDI le and when forwarding MIDI data
(MIDI Forward mode). The setting of the MIDI channels does not have any inuence on the record
mode.
• Channel (1-16): displays the channel for which the options below are valid. This channel
number and the settings can be changed with the Arrow keys ( < > ).
• Channel Out (1-16): Selects the channel to which the channel is moved.
• Split (ON/OFF): Enables the assignment of a split point. Split Point (sscC - g6): Selects
the split point.
• Channel Out Upper (1-16): Notes above and including the split point will be sent to this
channel.
• Ch. Out Lower (1-16): Notes below the split point will be sent to this channel.

Issue 2.0W 12/12/2012 Church Organ World Sequencer Plus - User Manual Page 17 of 27
13. System Menu
[Back]: Returns to the main Menu screen.
Sort Files (ON/OFF): Sequencer will sort les and directories alphabetically.
System Real Time Messages (ON/OFF): Activates the System Time environment
Factory Preset: Restores the original factory settings.
Recording Counter Reset: Resets the RECxxxxx.mid number
Update Firmware: Updates the current rmware if a valid FIRMWARE.BIN le is present in the root
directory of the SD-card
14. Editing MIDI
Unless it is intended to edit your Sequencer MIDI les on a personal computer you will not need to know
the information contained in this section to use the Sequencer Plus. For some of these operations a software
sequencer will be needed that allows you to edit MIDI les.
14.1. Reading the SD card on a computer
Some computers have an SD card slot so that it is only necessary to plug the card in to be able to read it. On
other machines an SD card to USB converter (Shown below) may be required.
The SD card will appear as a Disk drive in Windows® Explorer.

Issue 2.0W 12/12/2012 Church Organ World Sequencer Plus - User Manual Page 18 of 27
In this case the removable disk (J:) is the SD card. Display the disk contents then the les may be edited,
renamed or deleted using the Windows® le or other software tools. When renaming a le ensure that the
.MID sufx is retained or the sequencer will be unable to recognise the le.
Double click on any .MID lename and this should start the Windows® Media Player (if it is the default
player) which should play the tune (as a piano piece). The le can be opened with more sophisticated software
sequencers that have a wider range of voices and the ability to edit the MIDI le.

Issue 2.0W 12/12/2012 Church Organ World Sequencer Plus - User Manual Page 19 of 27
14.2. Creating a Hymn MIDI le
To create a hymn le
1. Record a verse.
2. Record an introduction (intro.).
3. Select the main Menu screen.
4. Select the Rename le mode.
5.
Rename the recording of the intro such, that it begins with an I_ (I stands for Intro). Example: I_SONG1.
6. Rename the recording of the verse such, that it begins with a V_ (V stands for Verse). The text must be
the same as the text of the intro. Example: V_SONG1.
Note that steps 4 to 6 can be carried out on a computer as already described. The sequencer uses the old
DOS 8.3 naming convention of 8 characters followed by the .MID sufx. If a lename of more that eight
characters is created on a computer only the rst six characters of the le name will be displayed followed
by the ~ character and a number to make the lename unique.
14.3. The Playlist
A playlist enables multiple Songs/Hymns to be played in sequence. A directory can only contain one playlist.
The playlist could be used to set up a sequence of Songs/Hymns for a complete church service if required.
The following expressions are valid to be used in the playlist:-
Expression: Explanation
;comment
comment is a text description for the use of the
programmer. Its is ignored on play back.
{name}.MID Where {name} is the name of a .MID le in the
same directory that is required to be played
{name}.MID,{x}
Where {name} is the name of a Song/Hymn le and
{x}is the number of times it is to be played.
{name}.MID,{x},{y}
Where {name} is the name of a Song/Hymn le, {x}
is the number of times it is to be played and {y} is
denotes the play back speed as a percentage of the
speed of the original recording.
STOP The playlist stops playing until the Play/Pause key
( /|| ) is pressed.
END Ends the play list.
To create a playlist
1.
Create a text le with the name playlist.txt on a computer using a text editor (such as Windows Notepad).
2. Type the playlist using the available expressions:
3. Save the text le.
4. Copy the text le to the SD card.
Examples of a Playlists are shown below:-

Issue 2.0W 12/12/2012 Church Organ World Sequencer Plus - User Manual Page 20 of 27
14.4. MIDI Channels
MIDI can transmit data over 16 channels. MIDI devices can be usually be programmed to transmit or received
up data on one or more channels. By default the Church Organ World instruments, with a standard keyboard
layout, transmit MIDI data on the following channels:
15. Components Relevant to MIDI
;Sung Eucharist
;Pre service music
BOEL.MID
STOP
;First Hymn
OEH110I.MID
OEH110V.MID,3
STOP
;Kyrie-Inwood
KINW.MID
;Gloria-Powell
GINW.MID
STOP
;Psalm
PSALM148.MID
;Gradual Hymn
OEH107I.MID
OEH107V.MID,4
STOP
;Offertory Hymn
OEH351I.MID
OEH351V.MID,5
STOP
;Sanctus & Benedictus-Inwood
SINW.MID
BIND.MID
STOP
;Agnus Dei-Inwood
STOP
;Recessional Hymn
OEH124I.MID
OEH124.MID,6
;Alleluia and Amen
AMEN124.MID
STOP
;Post ServiceVoluntary
BACH.MID
END
When a Hymn has verses where different registrations
are used then a different recording must be used for each
verse. They can be run in sequence to form a complete
hymn although some external editing of the MIDI les
may be necessary to get the timing just right. The result
for hymn 110 might look like:-
;Intro
OEH110_1.MID
;Verses 1,2
OEH110_2.MID,2
;Last verse
OEH110_3.MID
STOP
or alternatively the complete Hymn may be recorded in
one MIDI le:_
OEH110.MID
STOP
The comments can be used as a reminder of sequence of
events.
Filenames starting with I_ will not play the associated V_
le when used in a playlist.
Channel 1 Manual 2 Manual 3 Manual 4 Manual
1 Keyboard Great Choir Choir
2 Swell Great Great
3 Pedal Swell Swell
4 Pedal Solo
5 Pedal
12 Stops Stops Stops Stops
Table of contents