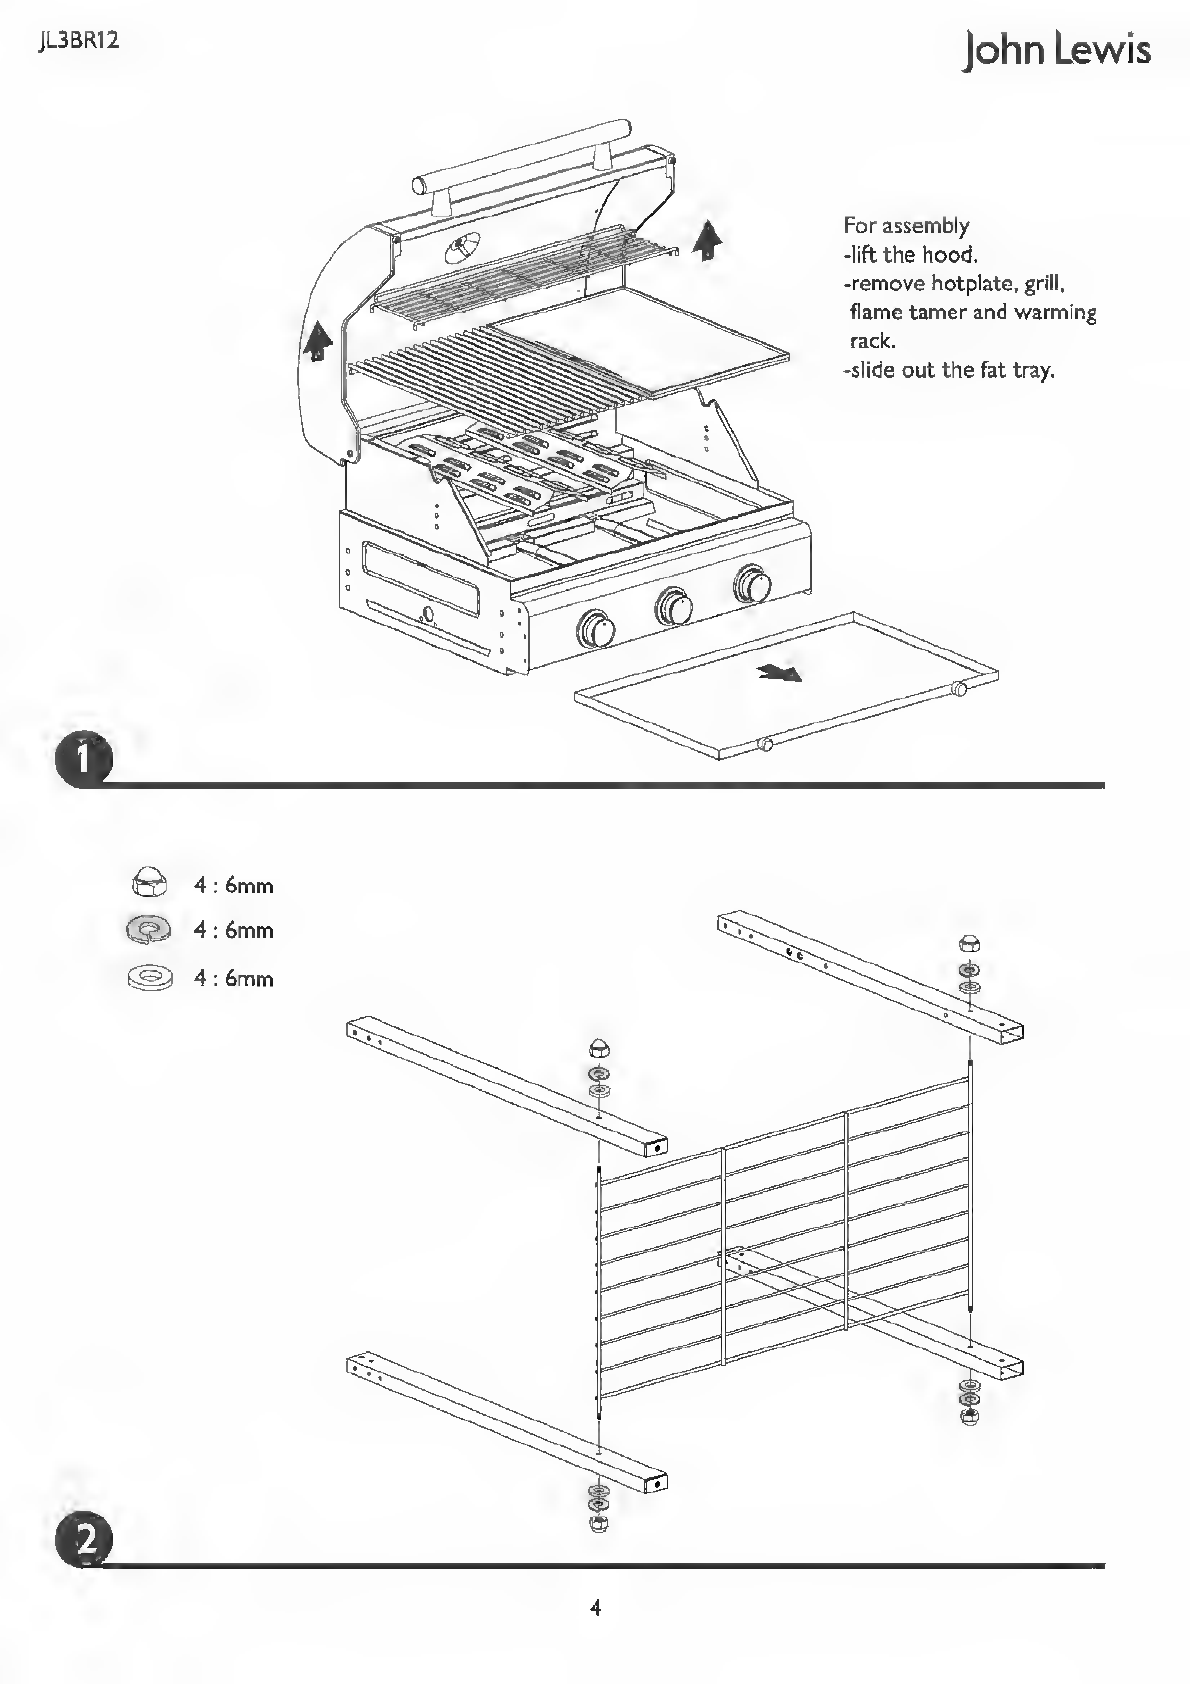
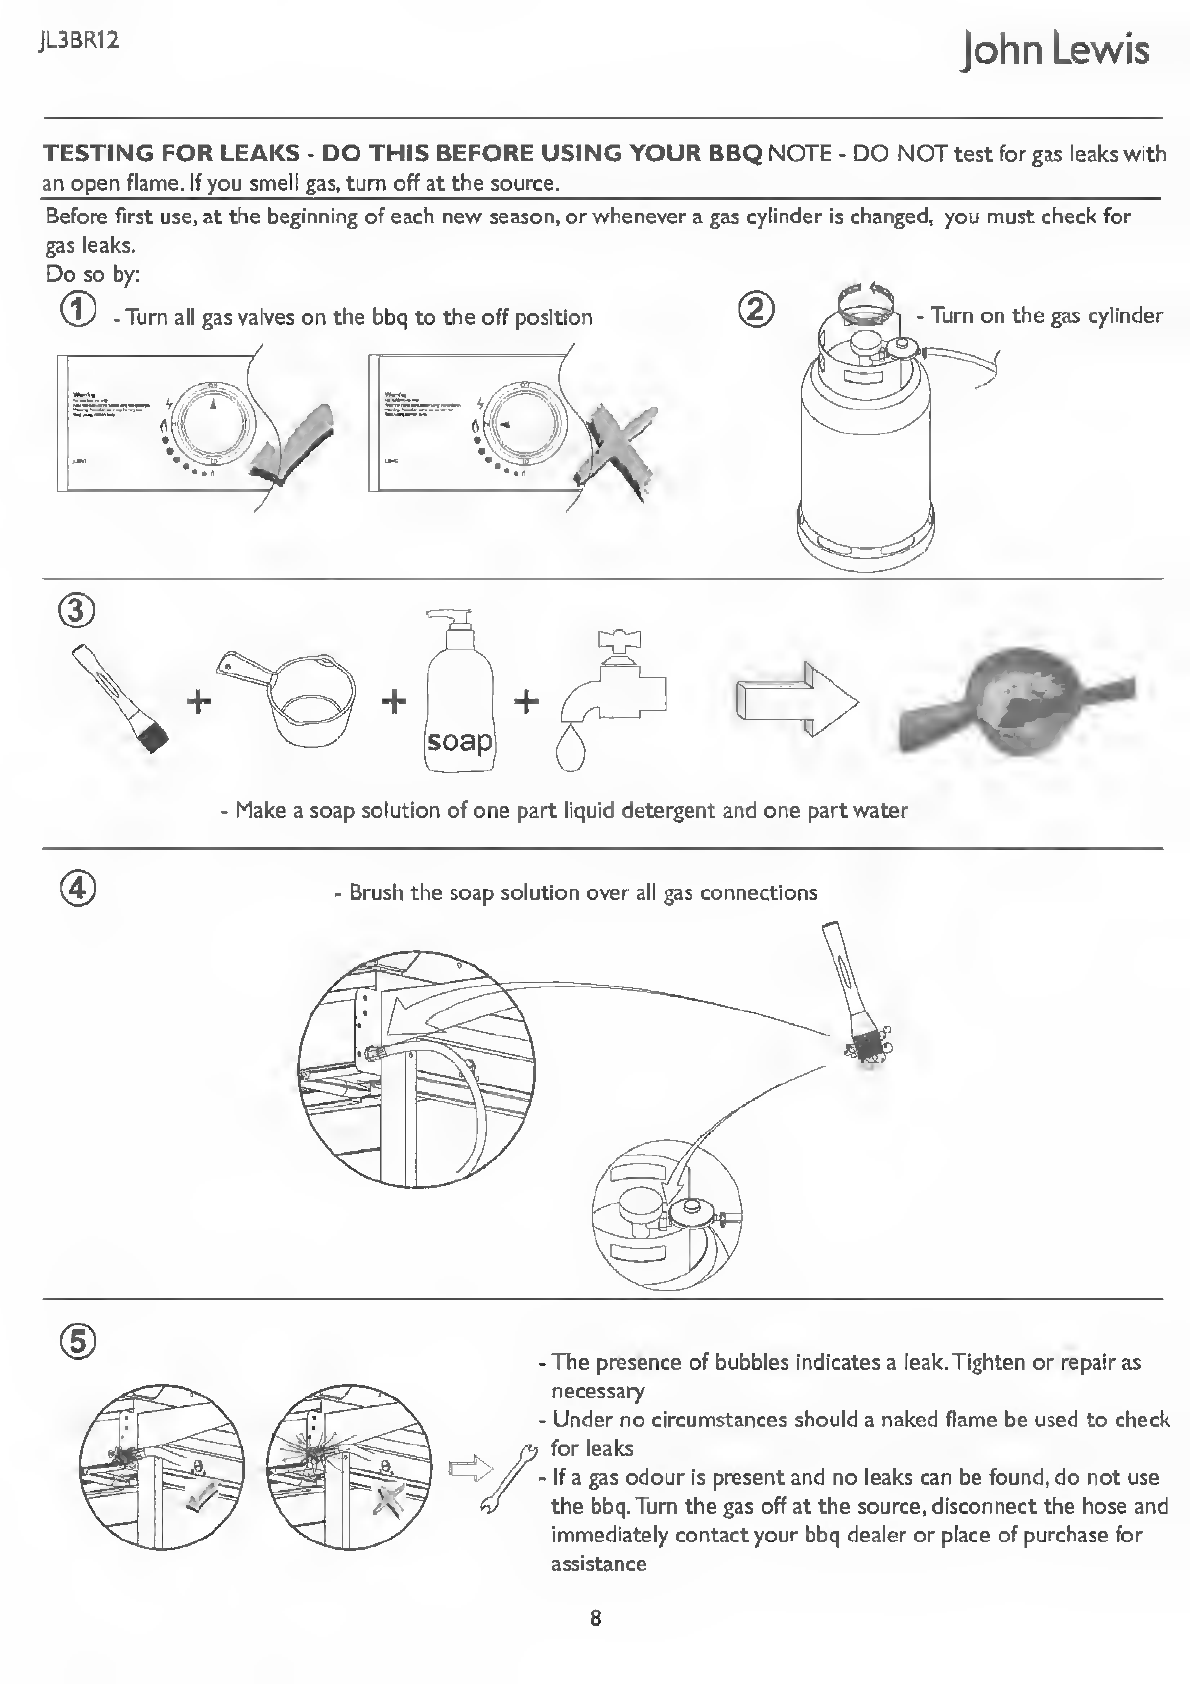
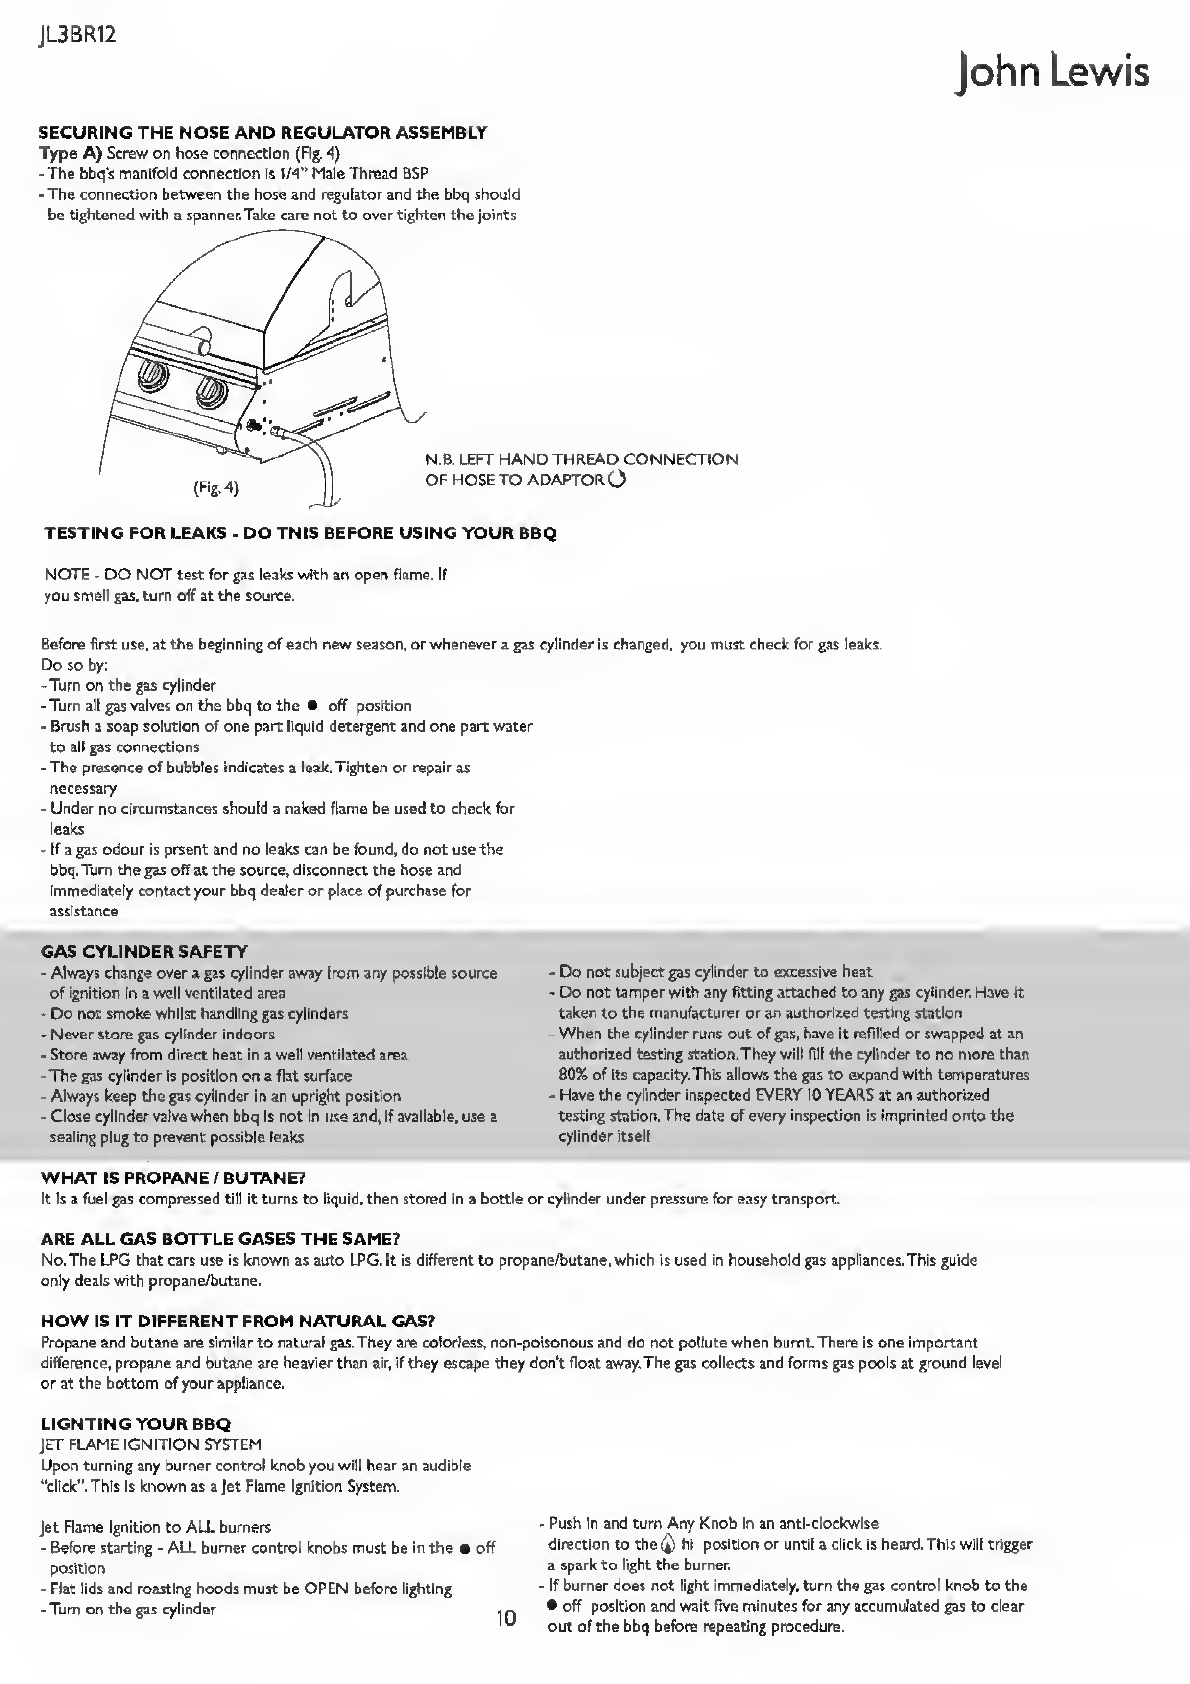
John Lewis JL3BR12 User manual

3
Burner
Roaster
JL3BR12
Thank
you
for
purchasing
this
barbecue.
Please
read
the
instructions
carefully
before
use
to
ensure
safe
and
satisfactory
operation
of
this
product
Pre-assembly
preparation
WARNING!
FOR
YOUR
SAFETY,
FOR
OUTDOOR
USE
ONLY
Please
read
these
instructions
carefully
and
ensure
that
your
barbecue
is
properly
installed,
assembled,
maintained
and
serviced
in
accordance
with
these
instructions.
Failure
to
follow
these
instructions
may
result
in
serious
injury
and/or
damage
to
property.
If
you
have
any
questions
concerning
the
assembly
or
operation
of
this
barbecue,
please
contact
your
local
John
Lewis
store.
Necessary
Tools
H
\
o
Please
check
the
pack
contents
before
attempting
to
assemble
this
product.
A
full
checklist
of
components
is
given
in
this
leaflet.
If
any
components
are
missing,
please
contact
the
retailer
from
whom
you
bought
this
product.
This
product
takes
approximately
50
MINUTES
to
assemble
with
2
PERSON
The
fittings
pack
contains
SMALL
ITEMS
which
should
be
KEPT
AWAY
FROM
YOUNG
CHILDREN.
Read
this
leaflet
in
full
before
commencing
assembly.

JL3BR12
John
Lewis
Contents
Parts
List
Exploded
Diagram
Assembly
instructions
Leak
Testing
Warning
information
Location
of
your
barbecue
Connecting
the
gas
cylinder
Testing
for
leaks
Gas
cylinder
safety
Lighting
your
barbecue
Using
your
barbecue
Maintenance
of
your
barbecue
Troubleshooting
Fittings
and
parts
checklist
PART
NUMBER
PART
NAME
1
Temperature
gauge
2
Hood
handle
base
3
Rubber
bumper
4
Hood
handle
5
Warming
rack
6
hood
outer
7
wire
grill
8
cast
iron
hotplate
9
shape
flame
tamer
10
Tube
burner
11
Manifold
12
Fat
tray
13
Fat
tray
knob
14
Fascia
15
Control
knob
bezel
PART
NUMBER
PART
NAME
16
Control
knob
17
Side
shelf
18
Hose
and
regulator
19
Wheel
axle
20
6'
wheel
21
Wire
base
22
Bolt
pack
23
Trolley
front
left
leg
24
Trolley
rear
left
leg
25
Trolley
front
top
decoration
strip
26
Trolley
rear
right
leg
27
Trolley
front
right
leg
28
Trolley
front
decoration
panel
29
Wheel
cap
30
BBQ
body
2

3

John
Lewis
For
assembly
-lift
the
hood.
-remove
hotplate,
grill,
flame
tamer
and
warming
rack.
-slide
out
the
fat
tray.

5

6

-replace
the
flame
tamer,
hotplate,
grill,
warming
rack
and
fat
tray

JL3BR12
John
Lewis
TESTING
FOR
LEAKS
-
DO
THIS
BEFORE
USING
YOUR
BBQ
NOTE
-
DO
NOT
test
for
gas
leaks
with
an
open
flame.
If
you
smell
gas,
turn
off
at
the
source.
Before
first
use,
at
the
beginning
of
each
new
season,
or
whenever
a
gas
cylinder
is
changed,
you
must
check
for
gas
leaks.
Do
so
bv:
-
Make
a
soap
solution
of
one
part
liquid
detergent
and
one
part
water
©
-
The
presence
of
bubbles
indicates
a
leak.
Tighten
or
repair
as
necessary
-
Under
no
circumstances
should
a
naked
flame
be
used
to
check
i
for
leaks
-
If
a
gas
odour
is
present
and
no
leaks
can
be
found,
do
not
use
the
bbq.Turn
the
gas
off
at
the
source,
disconnect
the
hose
and
immediately
contact
your
bbq
dealer
or
place
of
purchase
for
assistance
8

JL3BR12
MM.
WARNING
INFORMATION
Read
this
Operating
Manual
before
use
Ensure
there
is
adequate
clearance
away
from
flammable
materials
This
bbq
Is
only
to
be
used
outdoors
Do
not
allow
children
to
operate
the
bbq
Accessible
parts
may
be
veiy
hot,
keep
children
away
Any
modification
of
this
bbq
may
be
dangerous
Do
not
move
this
bbq
during
use
Turn
off
the
gas
supply
at
the
gas
cylinder
after
use
Parts
sealed
by
the
manufacturer
or
their
agent
must
not
be
manipulated
by
the
user
BBQ
specifications
can
be
found
on
the
data
label
attached
on
the
side
panel
of
the
bbq
frame'
Do
not
store
or
use
petrol
or
other
flammable
vapors
and
liquids
near
the
bbq
Do
not
store
empty
or
full
spare
gas
cylinders
under
or
near
the
bbq
Keep
the
gas
hose
and
any
electrical
cord
away
from
hot
surfaces
Avoid
unnecessary
twisting
of
the
gas
hose
Visually
inspect
hose
prior
to
each
use
for
cuts,
cracks,
excessive
wear
or
other
damage
The
hose
must
be
replaced
if
damaged
and
when
National
Conditions
require
it
Never
light
the
bbq
with
the
hood
or
lid
closed
Never
lean
over
the
cooking
surface
whilst
lighting
the
bbq
Use
bbq
tools
with
heat
proof
handles
or
good
quality
insulated
oven
mitts
when
operating
bbq
Never
alter
or
modify
the
regulator
or
gas
supply
assembly
LOCATION
OF
YOUR
BBQ
IMPORTANT
-
BBQS
MUST
BE
INSTALLED
IN
ACCORDANCE
WITH
THE
MANUFACTURER'S
INSTALLATION
INSTRUCTIONS,
LOCAL
GAS
FITTING
REGULATIONS
AND
MUNICIPAL
BUILDING
CODES.
Think
carefully
when
deciding
on
a
location
where
you
are
to
use
your
bbq.
The
bbq
must
not
be
installed
under
or
on
any
combustible
material.
Minimum
clearance
from
any
combustible
materials
on
ALL
sides
is
430mm
(18").
Minimum
clearance
from
any
combustible
material
from
the
TOP
of
the
bbq
is
1000mm
(39"),
(Fig.
I)
Not
to
be
used
in
garages,
porches,
breezeways,
sheds,
or
other
enclosed
areas
Not
to
be
used
on
recreational
vehicles
Do
not
obstruct,
flow
of
combustion
and
vetilation
air
around
the
bbq
CONNECTING
THE
GAS
CYLINDER
There
are
two
different
types
of
gas
that
can
be
used
on
your
gas
bbq
depending
on
where
you
live,
that
being
either
butane
or
propane
gas.
Both
are
supplied
in
gas
cylinders.The
connection
between
the
gas
cylinder
and
the
bbq
is
made
with
a
regulator.
(Fig.
2)
It
is
Important
that
you
use
the
correct
regulator
for
the
particular
type
of
gas
you
purchase.
See
your
local
gas
dealer
for
Information
on
purchasing
the
correct
regulator.
Never
operate
this
bbq
without
a
gas
regulator.
COUNTRY
The
following
gas
supply
pressures
are
a
guide
only:
DHL.RN0.NLSEHR3
stay_
maw
BUTANE
0.95mm
PROPANE:
30mfcaf
BiJIANE:
2S-30n>ba'
095mra
PROPANE-
37mfca?
BUTANE:
SOmfcar
Butane
-
28
millibars
Propane
-
37
millibars
095mm
PROPANE
50mttg
PROPANBOmbr
NOPANEJOniw
THE
HOSE
AND
REGULATOR
ASSEMBLY
(Fig.
3)
-
Must
be
suitable
for
liquefied
petroleum
gas
(LPG)
-
Must
withstand
the
above
pressures
-
Must
not
exceed
1000mm
(39”)
in
length
-
The
bbq
is
supplied
with
a
1/4”
BSP
LHT
adaptor
and
screw
on
hose
that
is
suitable
for
direct
connection
of
a
suitable
regulator
-
Before
connecting
inspect
the
hose,
its
Fittings
and
rubber
seals.
If
there
is
any
sign
of
cracking,
splitting
or
wear,
have
the
hose
replaced
-
While
in
use,
keep
the
hose
unobstructed
and
free
of
kinks
and
twisting
NOTErHose
and
Regulator
picture
for
reference
only.
law
iMp/h
HkW
IMffnt
iaw
Httfn/h
EUR01
EUR03
!
8JB04
RHOS

JL3BR12
John
Lewis
SECURING
THE
HOSE
AND
REGULATOR
ASSEMBLY
Type
A)
Screw
on
hose
connection
(Fig.
4)
-
The
bbq's
manifold
connection
is
1/4"
Male
Thread
BSP
-
The
connection
between
the
hose
and
regulator
and
the
bbq
should
be
tightened
with
a
spanner.
Take
care
not
to
over
tighten
the
joints
TESTING
FOR
LEAKS
-
DO
THIS
BEFORE
USING
YOUR
BBQ
NOTE
-
DO
NOT
test
for
gas
leaks
with
an
open
flame.
If
you
smell
gas,
turn
off
at
the
source.
Before
first
use,
at
the
beginning
of
each
new
season,
or
whenever
a
gas
cylinder
is
changed,
you
must
check
for
gas
leaks.
Do
so
by:
-Turn
on
the
gas
cylinder
-
Turn
all
gas
valves
on
the
bbq
to
the
•
off
position
-
Brush
a
soap
solution
of
one
part
liquid
detergent
and
one
part
water
to
all
gas
connections
-
The
presence
of
bubbles
indicates
a
leak.
Tighten
or
repair
as
necessary
-
Under
no
circumstances
should
a
naked
flame
be
used
to
check
for
leaks
-
If
a
gas
odour
is
prsent
and
no
leaks
can
be
found,
do
not
use
the
bbq.Turn
the
gas
off
at
the
source,
disconnect
the
hose
and
immediately
contact
your
bbq
dealer
or
place
of
purchase
for
assistance
GAS
CYLINDER
SAFETY
-
Always
change
over
a
gas
cylinder
away
from
any
possible
source
of
ignition
in
a
well
ventilated
area
-
Do
not
smoke
whilst
handling
gas
cylinders
-
Never
store
gas
cylinder
indoors
-
Store
away
from
direct
heat
in
a
well
ventilated
area
-
The
gas
cylinder
Is
position
on
a
flat
surface
-
Always
keep
the
gas
cylinder
in
an
upright
position
-
Close
cylinder
valve
when
bbq
Is
not
In
use
and,
If
available,
use
a
sealing
plug
to
prevent
possible
leaks
WHAT
IS
PROPANE
/
BUTANE?
It
is
a
fuel
gas
compressed
till
it
turns
to
liquid,
then
stored
in
a
bottle
or
cylinder
under
pressure
for
easy
transport.
ARE
ALL
GAS
BOTTLE
GASES
THE
SAME?
No.
The
LPG
that
cars
use
is
known
as
auto
LPG.
It
is
different
to
propane/butane,
which
is
used
in
household
gas
appliances.
This
guide
only
deals
with
propane/butane.
HOW
IS
IT
DIFFERENT
FROM
NATURAL
GAS?
Propane
and
butane
are
similar
to
natural
gas.They
are
colorless,
non-poisonous
and
do
not
pollute
when
burnt.
There
is
one
important
difference,
propane
and
butane
are
heavier
than
air,
if
they
escape
they
don’t
float
away.
The
gas
collects
and
forms
gas
pools
at
ground
level
or
at
the
bottom
of
your
appliance.
LIGHTING
YOUR
BBQ
JET
FLAME
IGNITION
SYSTEM
Upon
turning
any
burner
control
knob
you
will
hear
an
audible
"click".
This
is
known
as
a
jet
Flame
Ignition
System.
Jet
Flame
Ignition
to
ALL
burners
-
Before
starting
-
ALL
burner
control
knobs
must
be
in
the
•
off
position
-
Flat
lids
and
roasting
hoods
must
be
OPEN
before
lighting
-
Tum
on
the
gas
cylinder
-
Push
in
and
turn
Any
Knob
in
an
anti-clockwise
direction
to
the
£)
hi
position
or
until
a
click
is
heard.
This
will
trigger
a
spark
to
light
the
burner.
-
If
burner
does
not
light
immediately,
turn
the
gas
control
knob
to
the
•
off
position
and
wait
five
minutes
for
any
accumulated
gas
to
clear
out
of
the
bbq
before
repeating
procedure.
-
Do
not
subject
gas
cylinder
to
excessive
heat
-
Do
not
tamper
with
any
fitting
attached
to
any
gas
cylinder.
Have
it
taken
to
the
manufacturer
or
an
authorized
testing
station
When
the
cylinder
runs
out
of
gas,
have
it
refilled
or
swapped
at
an
authorized
testing
station.
They
will
fill
the
cylinder
to
no
more
than
80%
of
its
capacity.
This
allows
the
gas
to
expand
with
temperatures
■
Have
the
cylinder
inspected
EVERY
10
YEARS
at
an
authorized
testing
station.
The
date
of
every
inspection
is
imprinted
onto
the
cylinder
itself

JL3BR12
John
Lewis
LIGHTING
YOUR
BBQ
(cont.)
-
The
(*)
lo
position
is
obtained
by
turning
the
knob
fully
anti-clockwise
-
Adjusting
the
control
knob
to
your
heat
requirements
can
now
control
the
flame
-
If
ignition
cannot
be
achieved
see
section:
If
bbq
fails
to
operate
properly
IMPORTANT
-
It
is
important
that
all
control
valves,
and
the
gas
cylinder
are
turned
off
after
use
MANUAL
IGNITION
If
necessary
this
bbq
can
be
lit
manually
-
Light
a
90mm
bbq
match
and
hold
adjacent
to
the
light
hole
at
the
right
end
of
the
bbq
(Fig
6)
MANUAL
IGNITION:
Light
here
with
a
90mm
match
or
a
lighting
gun.
-
Turn
the
right
hand
gas
control
knob
to
the
Q)
hi
position.
The
burner
will
light
from
the
match
-
Once
the
right
burner
is
lit,
the
burner
next
to
it
can
be
turned
on
and
will
light
off
the
lit
burner
-
Repeat
till
all
burners
are
alight
-
The
Q
lo
position
is
obtained
by
turning
the
knob
fully
anti-clockwise
-
Adjusting
the
control
knob
to
your
heat
requirements
can
now
control
the
flame
IMPORTANT
It
Is
Important
that
all
control
valves,
and
the
gas
cylinder
are
turned
USING
YOUR
BBQ
GRILL
AND
FLAME
DIFFUSER
PLACEMENT
-
The
flame
diffuser
should
be
placed
underneath
the
grill
(Fig.7)
FIRST
TIME
USE
OF
BBQ
(
F
'g-7)
-
Before
using
the
bbq
for
the
first
time,
it
should
be
first
wiped
with
a
mild
soap
and
water
solution
to
remove
any
dust
-
Dry
cooking
surface
and
apply
a
light
coating
of
cooking
oil
-
Light
the
barbecue
and
leave
burning
for
30
minutes
on
the
Q>
lo
position.
This
is
to
bum
off
an
residual
oils
or
foreign
matter
on
the
grills
and
hotplates
FAT
COLLECTION
Using
the
DripTray
The
sand
tray
should
be
filled
with
a
layer
of
either
an
approved
“fat
catch"
material
or
sand
to
soak
up
dripping
fats
and
oils
during
cooking.
PREHEATING
Light
the
burners
as
previously
directed,
turn
to
(^)
hi
and
allow
the
bbq
to
preheat
for
2-5
minutes.
PREPARE
THE
COOKING
SURFACE
It
Is
preferable
to
apply
a
light
coat
of
cooking
oil
using
a
long
handled
brush
to
the
cooking
surface
prior
to
lighting
each
time.
The
oil
will
keep
the
food
from
sticking
to
the
cooking
surface.
FLARE-UP
CONTROL
Anytime
you
cook
meat
above
an
open
flame
you
will
have
flare-ups,
as
flare-ups
are
caused
when
the
natural
juices
from
the
meat
fall
onto
or
through
the
flame
diffuser.
Flare-ups
and
the
resulting
smoke
are
what
give
meat
that
delicious
bbq
flavour,
so
expect
and
encouage
some
flare-up.
However
excessive
flaring
can
be
caused
by
cooking
extra
fatty
foods
directly
on
the
grill,
or
by
cooking
with
too
high
temperature.
These
types
of
flare-ups
should
be
controlled
or
your
food
will
burn.
11

JL3BR12
John
Lewis
To
prevent
excessive
flare-ups:
-
Trim
off
exess
fat
from
meat
and
poultry
before
putting
it
on
the
grill
-
Cook
particularly
fatty
meat
on
the
hotplate
-
Turn
the
heat
control
knob
to
a
lower
setting
■
Throw
a
small
amount
of
baking
soda
or
gently
spray
a
small
amount
of
water
(from
a
meat
baster
or
spray
bottle)
directly
on
the
flame
diffuser
to
put
out
excessive
flaring
-
Always
position
the
flame
diffuser
beneath
the
open
grill
plate,
never
beneath
the
solid
hotplate
Note:
The
flame
diffuser
(steel,
volcanic
rock,
ceramic
tiles
or
cast
iron)
disperses
the
heat
from
the
burners.
This
results
in
a
uniform
heat
zone
beneath
the
cooking
grill.
COOKING
WITH
THE
ROASTING
HOOD
DOWN
When
using
the
bbq
with
the
hood
closed,
use
the
two
outside
burners
only
and
position
the
flame
diffuser
and
grill
over
the
centre
burners.
This
allows
for
good
air
circulation
within
the
bbq.
Check
cooking
progress
periodically.
Exceeding
250
C
can
damage
the
bbq
and
void
your
warranty.
CLEANING
UP
AFTER
USING
THE
BBQ
Allow
your
bbq
to
continue
burning
for
5
minutes
after
cooking
has
ceased,
which
will
bum
off
excess
fats
and
juices
etc.
that
may
block
the
flame
ports
of
the
burners.
To
keep
your
bbq
ready
for
the
next
time,
turn
the
burners
to
•
off
then
take
a
long
handled
brush
and
brush
the
cooking
surface
to
remove
excess
oils
and
food
scraps.
Be
careful
as
surfaces
are
hot.
Protect
your
hands
by
using
an
oven
mitt
to
hold
the
brush.
MAINTENANCE
OF
YOUR
BBQ
PROTECTION
Keep
your
bbq
beneath
a
weather
cover
and
out
of
the
rain.
Proper
care
and
maintenance
will
keep
your
bbq
in
top
operating
condition
and
prolong
its
life.
CLEANING
THE
COOKING
SURFACES
Allow
to
cool
before
washing
in
a
warm
soapy
solution.
Rinse
off
with
clean
water
and
dry
before
returning
to
bbq.
CLEANING
THE
FLAME
DIFFUSER
Periodically
wash
in
a
warm
soapy
solution.
Use
a
wire
brush
to
remove
stubborn
burnt
on
cooking
residue
If
necessary.
Dry
thoroughly
before
re-installing
to
the
bbq
body.
CLEANING
THE
BBQ
BODY
The
body
of
the
bbq
should
be
cleaned
regularly
dependant
on
the
use
and
type
of
food
cooked.
Use
warm
soapy
solution.
CLEANING
THE
DRIP
TRAY
-
IMPORTANT
-
the
drip
tray
and
fat
collector
should
be
cleaned
on
a
regular
basis.
If
this
is
ignored,
a
build
up
of
fats
and
greases
may
cause
a
fire
in
the
bbq
-
More
frequent
cleaning
may
be
necessary
as
usage
demands
-
FAT
FIRES
ARE
NOT
COVERED
BY
WARRANTY
CLEANING
THE
BURNERS
Occasionally
after
long
cooking
sessions,
excess
fats,
juices
and
marinades
can
clog
the
burners.
If
so.
remove
the
burners
(see
removing
burners
section)
for
cleaning.
-
Clean
by
washing
in
hot
water
and
detergant
-
Light
immediately
to
prevent
rust
and
corrosion
-
Ensure
that
all
burner
ports
are
free
from
obstruction
•
Brush
lightly
with
cooking
oil
if
bbq
is
not
used
for
an
extended
period
-
Rinse
in
water,
dry
and
return
to
bbq
FIRST
USE
AFTER
LONG
PERIODS
At
the
start
of
each
bbq
season
or
before
using
after
a
long
period
of
time
-
Read
this
operation
manual
again
thoroughly
-
Check
all
gas
valve
orifices,
burner
tubes
and
connections
for
obstructions
-
Check
that
all
burners
are
in
their
correct
positions
REMOVING
BURNERS
-
Make
sure
the
bbq
has
been
switched
off
and
has
completely
cooled
down
-
Ensure
all
gas
control
knobs
are
set
to
the
•
off
position
and
the
gas
cylinder
has
been
turned
off
-
Check
to
see
if
the
gas
cylinder
is
full
-
Check
for
gas
leaks
using
a
soapy
water
solution
-
Set
burner
controls
to
•
off
and
connect
gas
supply
-
Ensure
all
grills
and
hotplates
are
clean
before
use
-
Lift
the
grill
or
hotplate
off
the
bbq
as
shown
in
(Fig.9)
-
Lift
and
swing
out
the
burner
from
position
as
shown
in
(Fig.lt)
-
Reverse
the
previous
procedure
to
re-install
the
burners,
flame
diffuser
and
grill
or
hotplate
-
Remove
the
split
pins
located
beneath
the
burners
at
the
rear
of
the
bbq
body
12

JL3BR12
John
Lewis
TROUBLESHOOTING
IF
BBQ
FAILS
TO
OPERATE
PROPERLY
-
Stop,
turn
off
gas
at
its
source
and
turn
all
burner
controls
to
•
off
-
Do
not
smoke
-
Check
gas
supply
connections
-
Repeat
lighting
procedure
after
waiting
for
five
minutes
for
accumulated
gases
to
disperse
If
bbq
still
fails
to
operate
properly
TURN
OFF
GAS
AT
SOURCE,
TURN
BURNER
CONTROLS
TO
OFF,
wait
for
bbq
to
cool
and
check
the
following:
a)
Misalignment
of
burner
tubes
over
orifices
CORRECTION:
Reposition
burner
tube
to
properly
sit
over
orifice
b)
Obstruction
In
gas
line
CORRECTION:
Remove
hose
from
bbq.
Open
gas
supply
for
one
second
to
clear
any
obstruction
from
hose.
Close
off
gas
supply
at
source
and
re-connect
hose
to
bbq
c)
Blocked
orifice
CORRECTION:
Remove
burners
as
described
above.
Inspect
gas
valve
orifice,
clear
any
obstruction
with
a
fine
wire.
Re-install
burners
over
orifices
and
test
again
IF
THERE
IS
A
LEAK
-
Turn
the
gas
cylinder
off
-
Ventilate
the
area
to
disperse
any
accumulated
gas
-
Check
all
connections
-
If
the
leak
persists,
keep
cylinder
upright
and
take
to
an
open
area
-
Keep
skin
away
from
any
gas
or
liquid
escaping
from
the
cylinder
-
Keep
the
cylinder
at
least
20
meters
away
from
any
sparks
or
ignition
sources
including
electrical
equipment,
camera
flash,
engines
or
motors
-
Disperse
gas
by
providing
maximum
ventilation
and
spraying
with
a
fine
water
spray
IF
THERE
IS
A
FIRE
If
there
is
a
fire
at
the
appliance
-
If
there
is
a
fire
at
the
appliance,
tum
the
gas
off
at
the
cylinder.
-
Smother
the
flames
with
a
wet
cloth
If
there
is
a
fire
at
the
cylinder
or
you
cannot
get
to
the
valve
to
tum
it
off
-
call
the
fire
brigade
-
direct
a
garden
hose
to
the
middle
of
the
cylinder
to
keep
it
cool,
however
do
not
extingish
the
flame.
If
the
gas
is
burning
it
it
wont
build
up
and
explode
-
Evacuate
the
area
A
note
on
fire
prevention:
Most
fires
in
outdoor
bbqs
are
caused
by
a
build
up
of
greases
and
fat,
or
gas
connections
which
have
not
been
secured
properly.
Remember
to
follow
the
manufacturer's
instructions
on
proper
cleaning
and
connection
procedures.
INSECTS
Spiders
and
insects
can
occasionally
spin
webs
or
make
nests
in
the
burner
tubes.
These
can
obstruct
gas
flow
which
could
result
in
a
fire.
This
is
known
as
"Flashback”
and
can
cause
serious
damage
to
the
bbq
and
create
an
unsafe
operating
environment.
Frequent
inspection
and
cleaning
of
the
burner
tubes
Is
recommended.
13

PLEASE
KEEP
THESE
INSTRUCTIONS
FOR
FUTURE
REFERENCE
John
Lewis
Partnership
171
Victoria
Street
London
SW1E
5NN
www.johnlewis.com
Table of contents
Other John Lewis Burner manuals
Popular Burner manuals by other brands

Riello Burners
Riello Burners RS 68/M BLU Installation, use and maintenance instructions

Enertech
Enertech Bentone BFG1 Installation and maintenance instruction

Outdoor Gourmet
Outdoor Gourmet Crawfish Keg Assembly instructions & user manual

Yunca Heating
Yunca Heating MONTE installation instructions

EarthCore
EarthCore ISOFLAMES ISF18STB Installation, operation, maintenance and owner's manual

Riello
Riello RS 28/1 Installation, use and maintenance instructions