Johnny's Selected Seeds Six-Row Seeder 2nd Edition User manual

Copyright © 2020 Johnny’s Selected Seeds. All rights reserved.
1
SEED BREEDERS, GROWERS, AND MERCHANTS SINCE 1973
955 Benton Ave., Winslow, ME 04901 • Phone: 1-877-564-6697 • Fax: 1-800-738-6314
Email: service@johnnyseeds.com • Web Site: Johnnyseeds.com
Materials included:
• Seeder body
• Hopper cover
• Seed shaft
• 5/32 Allen wrench
• Oiled ashwood handle
• #10 x 3/4" wood screw
Additional materials needed:
• #1 Phillips screwdriver
• 7/16" wrench
ASSEMBLY INSTRUCTIONS
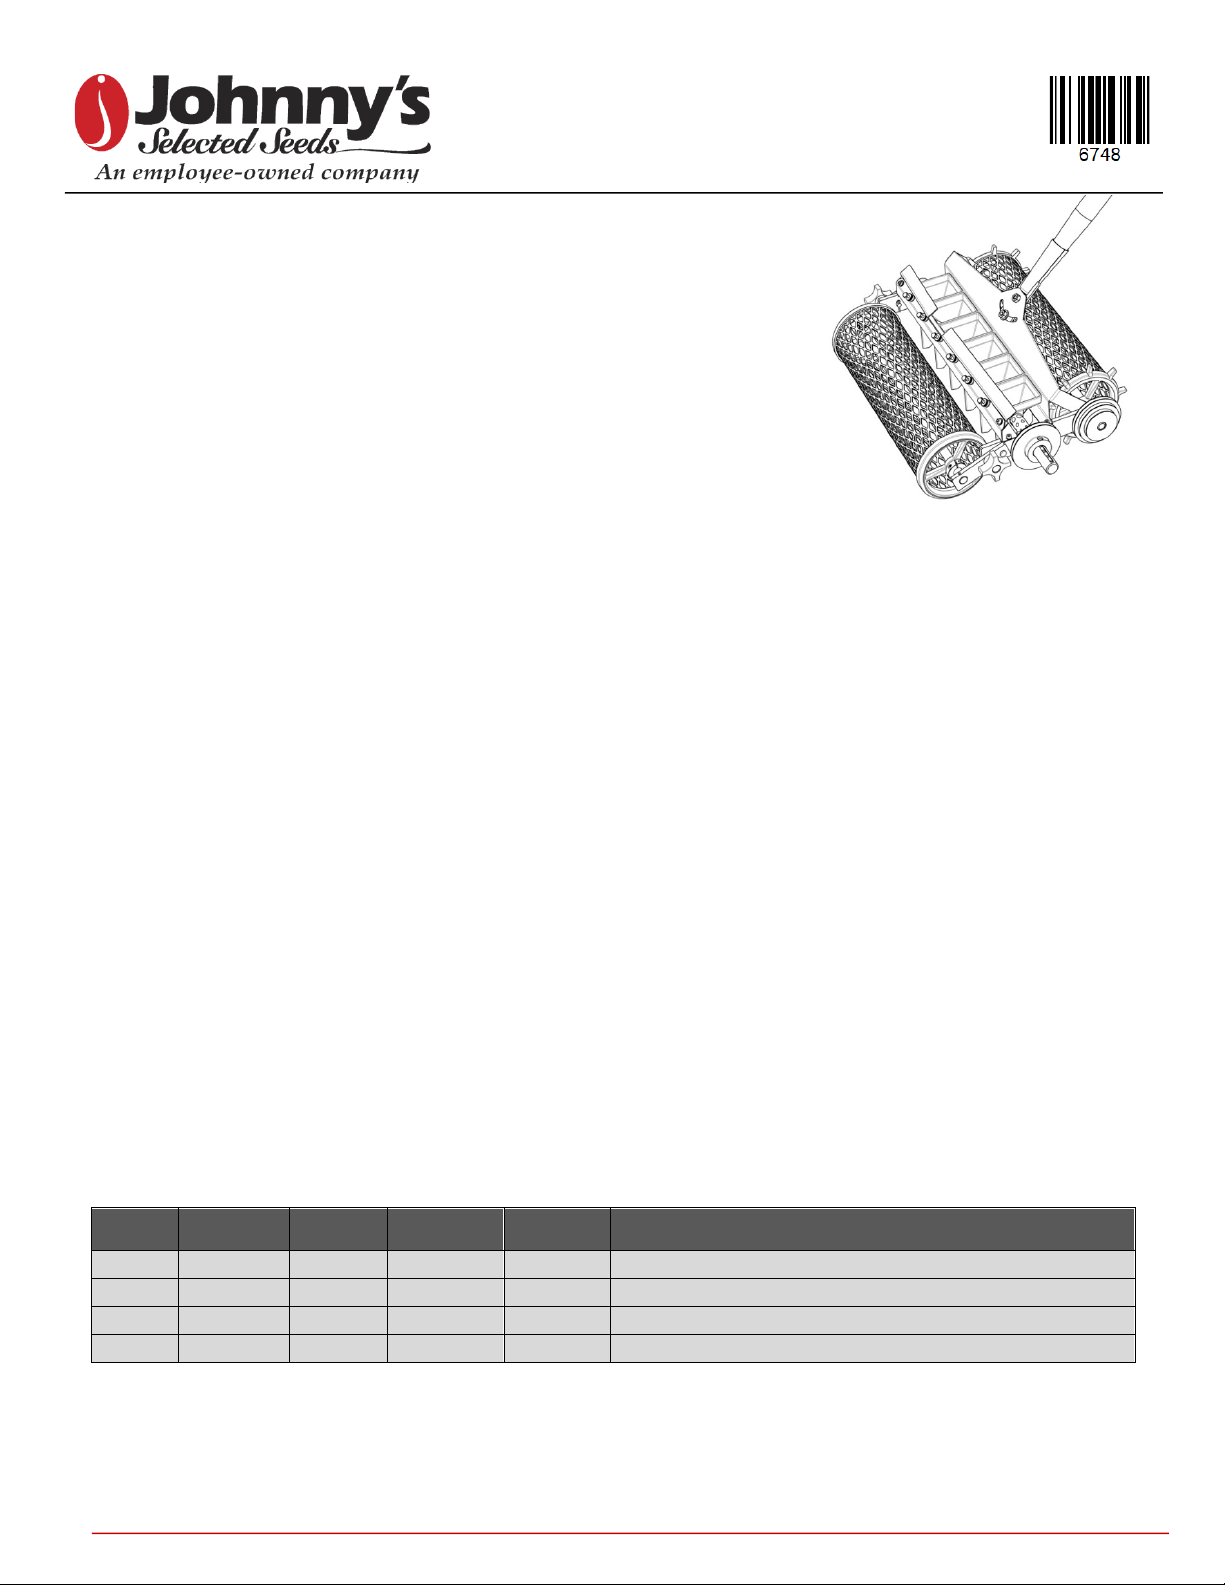
The Six-Row Seeder body comes fully assembled, so only requires attachment of its wooden handle before use.
• Insert the tapered handle into the metal ferrule of the seeder body as far as it will go, until it is seated,
without forcing it further. DO NOT force the handle into the ferrule, or you could damage your seeder.
• Use a #1 Phillips screwdriver to secure the handle onto the seeder body by inserting the wood screw
provided into the predrilled screw hole.
OPERATION & USE
Bed preparation
• To facilitate proper seeder function, prepare the seedbed so the soil is relatively smooth, level, and free
of debris or crop residue.
• It is also helpful to firm the seedbed with a bed-firming device such as Johnny’s Seedbed Roller before
using a precision seeder.
• Before use in sandy soils, it can also be helpful to lightly irrigate the bed.
Seed sizing and crop recommendations
• The ideal hole size is one that permits the seed to sit loosely at the bottom of the hole, fully below the
surface of the seed shaft.
• It is normal for more than one seed to drop per hole, especially if the seed is oblong in shape.
• Choosing an appropriate hole size ensures that your seed will not crack or jam while the seeder is in use.
• The shaft of the Six-Row Seeder offers four seed hole size options, for seeding a variety of different
crops. Use the following chart as a general guide to find the hole size for sowing your desired seed.
• A certain amount of experimentation should be expected, to identify the appropriate hole size for a crop.
Please take the time to find the hole size that works best for your desired seed variety.
Hole
Hole
Length
Hole
Width
Hole
Depth
# Holes/
Shaft
Recommended Crops
A
3.5mm
3.5mm
1mm
6
Arugula, Claytonia
B
6mm
5mm
2mm
6
Carrot (raw), Dill, Hakurei Turnip, Lettuce, Mustard
C
8mm
6mm
3mm
6
Brassicas, Bunching Onion (raw), Tokyo Bekana
D
10mm
8mm
4mm
6
Radish, Spinach
NOTE: Hole sizes and spacing are approximate.
Extended Range Shaft
An Extended Range Shaft (#9454) is also available for the Six-Row Seeder, offering four additional hole sizes;
two larger and two smaller than those on the standard shaft.
Six-Row Seeder, 2nd Edition
Manual for Assembly & Use

Copyright © 2020 Johnny’s Selected Seeds. All rights reserved.
2
SEED BREEDERS, GROWERS, AND MERCHANTS SINCE 1973
Seeding
• Slide the shaft into the seeder body so the desired seed hole size
is centered inside the hoppers, then secure the pulley to the seed
shaft by tightening the set screw inside of the machined notches
(see right).
• Fill seed hoppers equally with seed after making any necessary
adjustments (see below).
• Push the seeder slowly over a well-prepared seedbed so the
wheels are spinning continuously.
• When finished, tip the seeder body forward onto the front wheel
so any unused seed slides down the seed funnel, back into the packet or
collection container.
ADJUSTMENTS
Handle: To adjust the angle of the handle, loosen the two nuts located at the top
center of the seeder body; set the handle to the desired position; and retighten the
nuts. The offset handle position allows you to comfortably operate the seeder from
the footpaths.
Seed Brush: Each hopper is fitted with a brush for moving excess seed away from
the seed holes while in use. To narrow or widen the distance between the
brush and the seed shaft, tighten or loosen the knurled nut accordingly; a wider
gap is helpful for seeding slightly oversized seed or if denser plantings are
desired.
Seeding Depth: The seeding depth is determined by adjusting the position of
the front wheel using the two knobs located at either side of the frame. Simply
loosen the knobs, adjust arms so that the front wheel is raised or lowered to
the desired position, and retighten.
In-Row Spacing: In-row seed spacing is
determined by the position of the drive band on
the seeder pulleys. Please see the following chart
for specific spacing for each drive band position.
Row Spacing: The Six-Row Seeder has six seed hoppers that seed in parallel rows spaced approximately
2.5" apart. A wider row spacing can be achieved by leaving some hoppers empty.
12.22.2020 | JG, ms
In-Row
Spacing
Band Position
1"
Inner pulleys
Front: large diameter
Rear: small diameter
2.5"
Center pulleys
Front: medium diameter
Rear: medium diameter
4"
Outer pulleys
Front: small diameter
Rear: large diameter
Table of contents
Other Johnny's Selected Seeds Seeder manuals
Popular Seeder manuals by other brands

GREAT PLAINS
GREAT PLAINS YP-40 Series Operator's manual

GREAT PLAINS
GREAT PLAINS 3S-3000-3210 Operator's manual

Little Wonder
Little Wonder Classen TRS-20 Operator's & parts manual

AMAZONEN-Werke
AMAZONEN-Werke Amazone Centaya 3000 Super 1600 operating manual

Exmark
Exmark SD270SB20 Operator's manual

Chapin
Chapin 8701B Assembly / operation instructions / parts