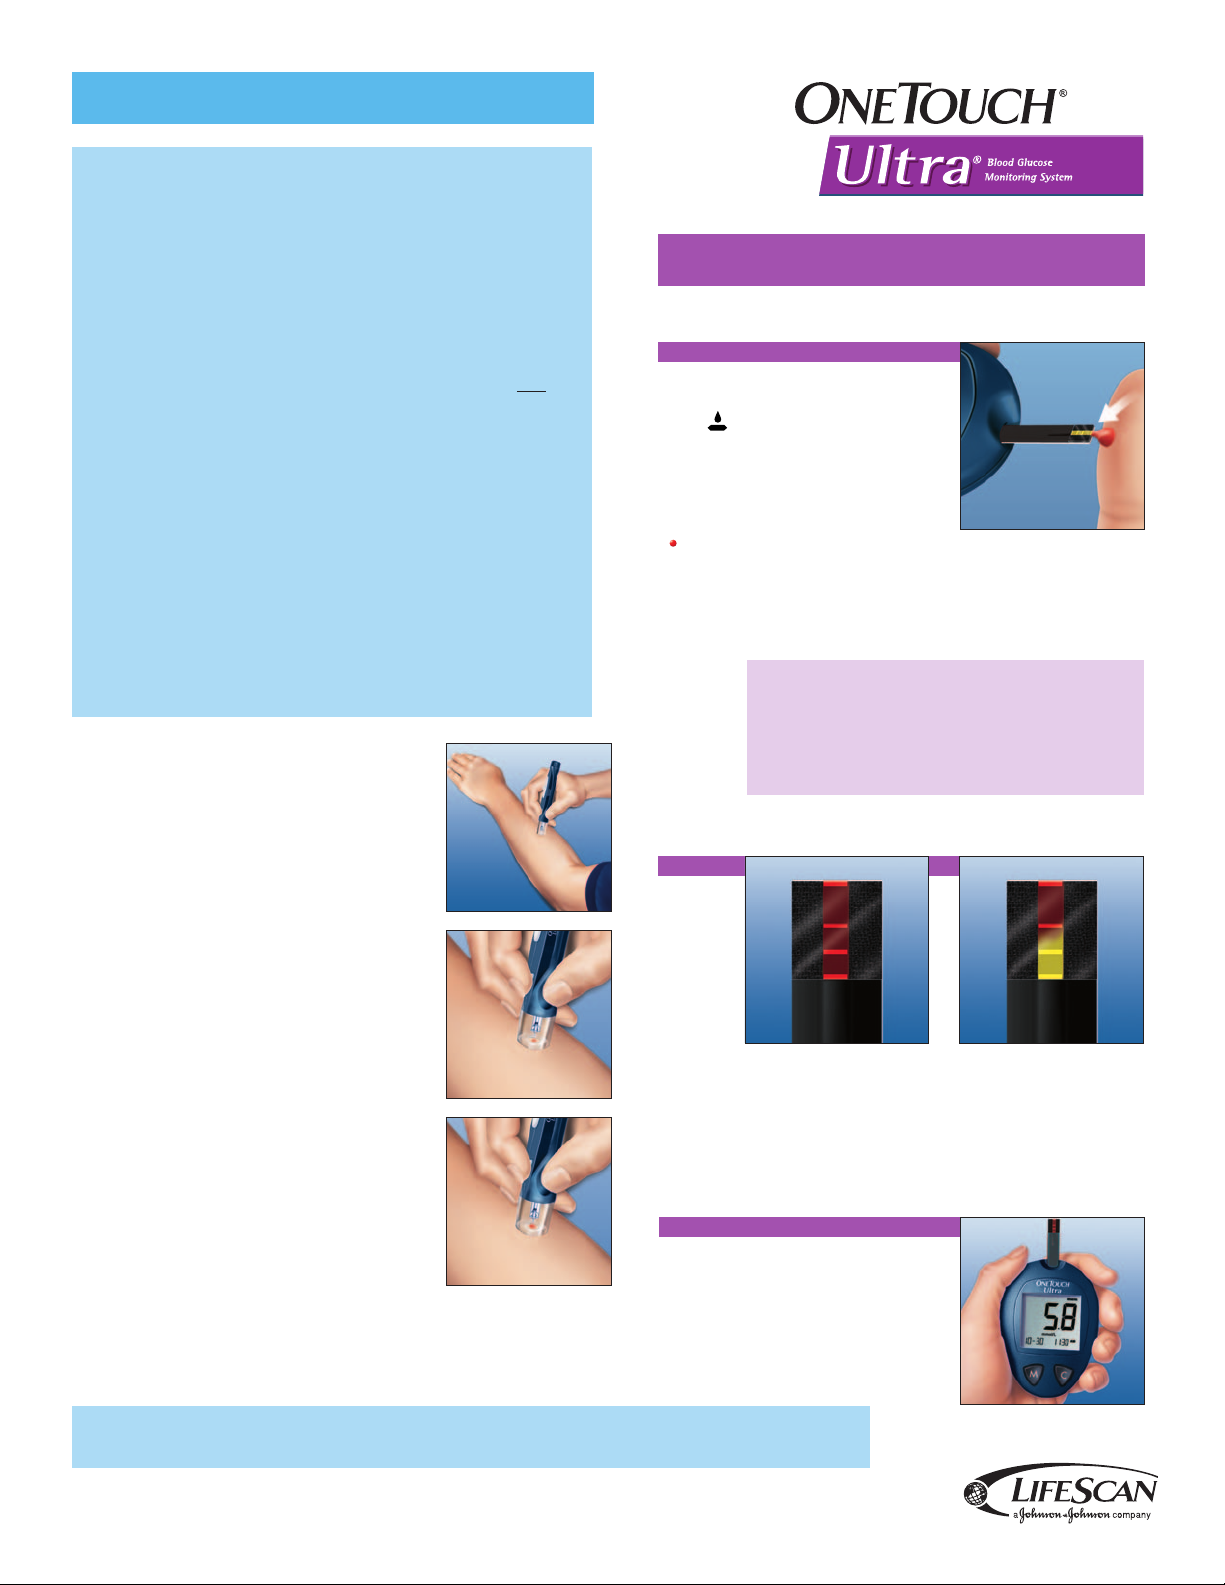
STEP 1
Select a puncture site.
If you choose to puncture the arm, select a soft,
fleshy area (away from bone) that is free of
visible veins or excess hair. Wash your hands
and the puncture site. Use warm, soapy water.
Rinse and dry thoroughly.
STEP 2
Obtain a blood sample.
Use the OneTouch®Penlet®Plus or OneTouch®
Ultrasoft™ adjustable blood sampler with the
OneTouch® UltraClear™ cap to obtain a drop of
blood. If puncturing the arm, you may choose to
set the OneTouch®Penlet®Plus or OneTouch®
UltraSoft™ adjustable blood sampler for a
greater puncture depth. To increase blood flow
to the puncture site, massage the area gently.
For individuals who experience difficulty in getting
sufficient blood for a test, rubbing the area more
vigorously or the brief application of heat may be
helpful. Do not squeeze excessively on the puncture
site. If you use an alcohol swab, make sure that
the site is completely dry before lancing it.
Press and hold sampler to arm for a few seconds. Press release button.
Continue to hold sampler against the skin for a few seconds
until enough blood forms.
Obtaining a Blood Sample from the Arm
Note: Consult your Healthcare Professional before you begin using the arm for testing. Read detailed instructions and
other important information in your OneTouch®Ultra®Brand Owner’s Booklet and Test Strip insert before doing a test.
Apply blood.
When symbol appears, touch and
hold a drop of blood to TOP EDGE
of test strip, where it meets the
narrow channel. The blood sample
must be at least 1 microliter in volume
(actual size) or you may get an
inaccurate test result.
DO NOT
• Apply blood to front or back of test strip.
• Push finger against test strip.
• Try to apply smeared sample.
Hold blood drop to TOP EDGE until confirmation window is
completely filled before meter begins to count down.
Check confirmation window.
If confirmation window does not fill completely before
meter begins to count down, do not add more blood to
test strip. Discard test strip and retest.
Read results.
Meter will count down from 5 to 1 and
display test result with date and time.
STEP 1
STEP 2
Good sample
Sample too small
STEP 3
Applying Blood to the Test Strip
Please read this information carefully:
• Under certain conditions, blood glucose test results obtained using samples
taken from your arm may differ significantly from fingertip samples.
• The conditions in which these differences are most likely to occur are when
your blood glucose is changing rapidly such as following a meal, an insulin
dose or associated with physical exercise.
• When blood glucose is changing rapidly, fingertip samples show these
changes more quickly than arm samples.
• When your blood glucose is falling, testing with a fingertip sample may
identify a hypoglycemic (low blood sugar) level sooner than a test with an
arm sample.
• Use arm samples only for testing prior to, or more than two hours after,
meals, insulin dose or physical exercise.
• Testing performed within two hours after meals, an insulin dose or physical
exercise, or whenever you feel that your glucose levels may be changing
rapidly, should be done from the fingertip.
• You should also use fingertip testing whenever you have a concern about
hypoglycemia (insulin reactions) such as when driving a car, particularly if
you suffer from hypoglycemic unawareness (lack of symptoms to indicate
an insulin reaction), as arm testing may fail to detect hypoglycemia.
• Routine testing before meals can be done either on the fingertip or the arm.
For more information, contact your Healthcare Professional or call the LifeScan Customer Care Line at: 1 800 663-5521
OneTouch®
, Penlet®
, Ultra®, UltraSoft™and UltraClear™are trademarks of Johnson & Johnson, used by LifeScan Canada Ltd.
©2003 LifeScan Canada Ltd., Burnaby, B.C. V5C 6C6 AW# 058-061B 09/03
www.OneTouch.ca