Human HumaSens2.0plus User manual

HumaSens2.0plus
Starter Pack
User Manual

Table of Contents
Chapter 1 HumaSens2.0plus Multi-Parameter System
1.1 Introduction _________________________________________________________________ 1
1.2 Contents of the Starter Pack _____________________________________________________ 2
1.3 Labelling and Information ______________________________________________________ 3
1.4 HumaSens2.0plus Meter _________________________________________________________ 4
LCD Screen Display and Alert Tones _______________________________________________ 5
Test Strip and Code Strip________________________________________________________ 6
Chapter 2 Setting the Meter
2.1 Installing/Replacing the Batteries_________________________________________________ 7
2.2 Set Date, Time and Units _______________________________________________________ 7
2.3 Code the Meter_______________________________________________________________ 8
Chapter 3 How to Perform a Test
3.1 Before Testing________________________________________________________________ 9
3.2 Perform the Test _________________________________________________________ 10–12
3.3 Care after Testing ________________________________________________________ 13–14

Chapter 4 Meter Memory Function___________________________________________________ 15–16
Chapter 5 Control Solution Test _____________________________________________________ 17–18
Chapter 6 Care and Maintenance
6.1 Care after Testing ____________________________________________________________ 19
6.2 Cleaning and Caring for Your Meter ______________________________________________ 19
Chapter 7 Error Message and Trouble Shooting _________________________________________ 20–21
Chapter 8 Specications _______________________________________________________________ 22
Chapter 9 Limitations
9.1 All Tests ___________________________________________________________________ 23
9.2 Limitations of Blood Glucose Test ________________________________________________ 23
9.3 Limitations of Uric Acid Test ____________________________________________________ 24
9.4 Limitations of Total Cholesterol Test ______________________________________________ 24

1
Chapter 1 HumaSens2.0plus Multi-Parameter System
1.1 Introduction
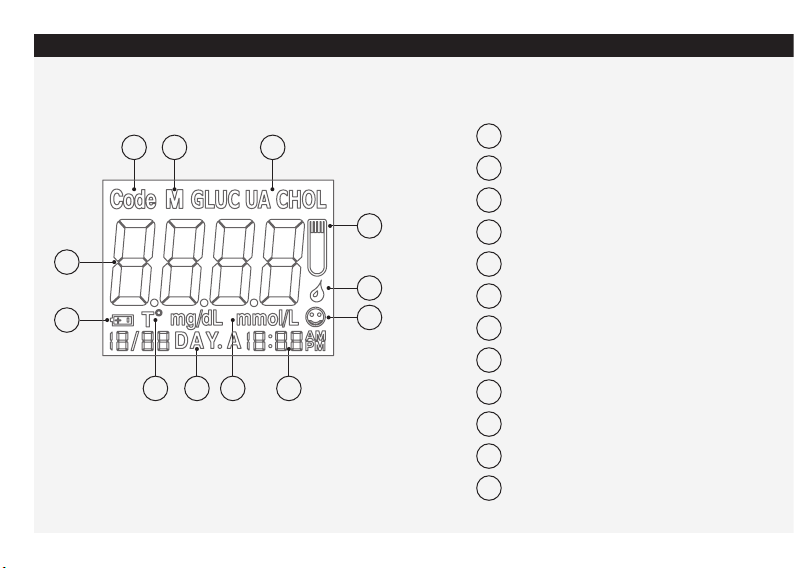
Thank you for choosing HumaSens2.0plus. HumaSens2.0plus Multi-Parameter System (meter) is based on electrochemi-
cal biosensor technology, which can check your blood glucose (GLU), total cholesterol (CHOL), and uric acid (UA) fast
and convenient. Please read this user’s manual carefully before using this product. If you need any further assis-
tance, please contact your local customer service.
Intended Use
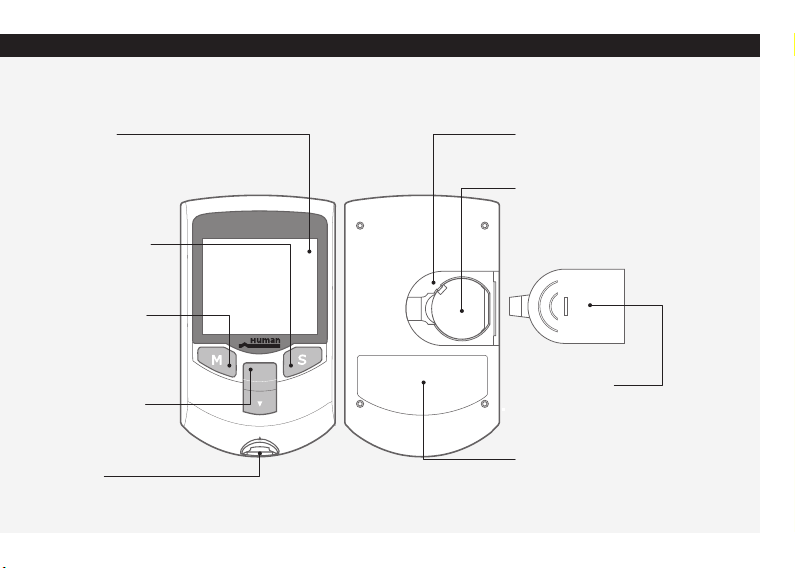
The HumaSens2.0plus Starter Pack contains a hand-held multi-parameter instrument. In combination with the Huma-
Sensplus test strips it is used for the quantitative determination of blood glucose, total cholesterol and uric acid levels in
human capillary whole blood from the nger prick. It is used to monitor the level of glucose, total cholesterol and uric
acid. The HumaSens2.0plus Starter Pack is designed as a semi-automated system. For near patient testing by healthcare
professionals and laboratory testing by laboratory professionals.
The HumaSens2.0plus System is plasma-calibrated by reference instruments which are traceable to the following standard
reference materials and methods:
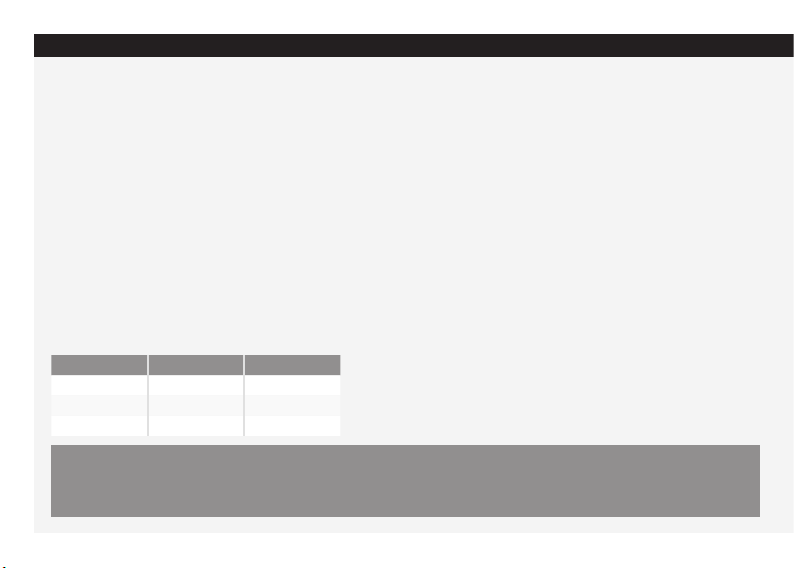
Test Standard Method
Glucose NIST SRM 917 Glucose Oxidase
Total Cholesterol NIST SRM 911 Abell/Kendall
Uric Acid NIST SRM 913 Uricase/UV
Warning: Please carefully read the instructions and test procedures in this user’s manual before using.
Users should consult a healthcare professional before making any important medical decision.

2
Chapter 1 HumaSens2.0plus Multi-Parameter System
1.2 Contents of the Starter Pack
The items included in the HumaSens2.0plus Starter Pack:
(please check the meter outer box for exact detail)
Description Quantity
HumaSens2.0plus Multi-Parameter Meter (with a CR2032 3V battery)________________________________________ 1
User’s Manual ______________________________________________________________________________ 1
Quick Guide ________________________________________________________________________________ 1
Pouch_____________________________________________________________________________________ 1
Optional (not included in the standard kit package, please contact your local distributor for ordering) REF
Glucose Test Strips Blue HumaSens2.0 /HumaSens2.0plus /HumaSens / HumaSensPlus (50) 2 x 25 pcs. _________17562
Glucose Control HumaSens2.0/HumaSens2.0plus / HumaSens*/ HumaSensPlus* (*BLUE GLU strip) 2 x 2 ml ___ 17562/10
Uric Acid Test Strips HumaSens2.0plus 1 x 25 pcs. ________________________________________________ 17566
Uric Acid Control Solution HumaSens2.0plus 2 x 2 ml___________________________________________ 17566/10
Total Cholesterol Test Strips HumaSens2.0plus 2 x 10 pcs. __________________________________________ 17567
Total Cholesterol Control Solution HumaSens2.0plus 2 x 1,5 ml ___________________________________ 17567/10

3
Chapter 1 HumaSens2.0plus Multi-Parameter System
1.3 Labelling and Information
Use by Recap immidiately
after use
Operation temperature
limitation
Manufacturer Use within 3 months
after initial opening
Storage and transpor-
tation temperature
limitation
Do not reuse Attention
Storage and transpor-
tation relative humidity
limitation
Keep dry In-vitro diagnostic Comply with WEEE
Directive 2012/19/EU
Keep away
from sunlight Lot number
Read instructions Serial number

HumaSens2.0plus
4
Chapter 1 HumaSens2.0plus Multi-Parameter System
1.4 HumaSens2.0plus Meter
Meter (Front Side & Back Side)
LCD Screen:
Display operating
information and
test results
Right “S” Button:
Conrm and set up
Left “M” Button:
Enter memory mode
Press long to turn off
Ejection Button:
Remove test strip
Test Port:
Insert test strip
Serial Number Sticker
Battery:
3V lithium battery (CR2032)
Please remove the plastic
tab before using
Battery Lid:
Slide to open.
Meter Label:
Information about meter

1
2
3 4 5 6
7
8
9
101112
5
Chapter 1 HumaSens2.0plus Multi-Parameter System
1.4 LCD Screen Display
Information and test result display
1.4 Alert Tones
> Normal Alert: a short “beep”
> Warning Alert: 3 short “beeps”
> Turning On/Off: a long “beep”
1Result Area
2Low Battery
3Temperature Icon
4Average (GLU)
5Unit Icon
6Time
7System Check
8Blood Loading Icon
9Strip Loading Icon
10 Test Mode Icon
11 Memory Mode Icon
12 Code Number Icon

GLU
CHOL
UA
GLU 7142
CHOL 7147
UA 7021
6
Chapter 1 HumaSens2.0plus Multi-Parameter System
1.4 Test Strip
GLU – Glucose
CHOL – Cholesterin
UA – Uric Acid
1.4 Code Strip
The code strip is used to code the meter.
Please do the coding step when you use a new vial of strip.
Electronic Contact Bars:
Insert this end into meter
test port.
Contact Bar:
Insert this end into the
test port of the meter. Code
Test Mode
Sample Inlet:
The whole blood sample and control
solution will be drawn from here.
Note:
Please ll up the round window with
blood sample CHOL test and avoid
disconnecting in the process.

1.
+
CR2032
2. 3.
7
Chapter 2 Setting the Meter
2.1 Installing/Replacing the Batteries
Please remove the plastic tab under the battery before using. This instrument uses a CR2032 3V lithium battery.
Do not use or install different types of battery. It will damage the meter.
Installing Instructions:
Note: Dispose the batteries according to your local environmental regulations.
2.2 Set Date, Time and Units
Press “S” button for over three seconds. You will hear one “beep” for entering the setting mode, then follow the
instruction below to set up.
Setting order: Year/Month/Date/Hour/Minute/Units
>Click “M” button to advance one unit.
>Click “S” button to enter next setting and to end setting mode.
>The meter will turn off automatically after setting.
Slide to remove
the battery lid.
Insert the
battery with
the positive (+)
side up.
Slide back the
battery lid.

7142
7142
2.
HumaSens2.0plus
GLU7142
HumaSens2.0plus
1.
8
Chapter 2 Setting the Meter
Note: Adjusting the correct time and date is important to help managing your health records.
Selectable units: “mg/dl” and “mmol/l”
2.3 Code the Meter
Each vial of strips has a code strip to code your meter. Code your meter when you rst use it or open a new vial of strips.
With the Auto Strip Identication function, once you code your meter, you do not have to switch the test mode every
time you perform a test.
>Make sure the
meter is off.
>Then insert the
code strip into
the test port.
> The Code number will show on the screen.
Make sure the numbers on screen, code strip,
and strip vial label are the same.
> Then remove the code strip.
> appears on the screen for a short moment,
indicating that the meter has been successfully
coded to the respective test mode and test strip lot.

9
Chapter 3 How to Perform a Test
Please follow the instruction carefully to ensure an accurate test result.
3.1 Before Testing
Materials you need to perform a test:
>HumaSens2.0plus Meter
>HumaSens2.0plus Test Strip
>Lancing Device/Lancets (not provided)
>Tissue or cotton ball with 75% ethanol or disinfection wipes for cleaning the sampling area before test.
Note: Wash your hands with water and soap thoroughly before and after testing, and make sure the sampling area
is dry before testing.

7142
1.
7142
3. HumaSens2.0plus
2.
HumaSens2.0plus
10
Chapter 3 How to Perform a Test
3.2 Perform the Test
>Insert the strip contact bar
into meter test port.
> The meter will turn on
automatically.
>Take out a test strip and close
the vial immediately, or other strips
will get damp.
>Make sure the code numbers are
the same on screen and strip vial
label.
>You can start testing after
appears.
Note: If
does not appear, remove
the unused strip and repeat step 2.
4. > The pa tient’s nger must be warm,
dry at surface, clean, including being
free from substances such as hand
cream.
> Use a single use lancet (not provided)
on the patient’s nger to get a droplet
of blood.
5. 6.
HumaSens2.0plus
> Wipe off the rst drop of blood.
> Massage your nger gently
until a round drop of blood forms.
Note: Make sure you have enough sample for the test.
If the blood smears, please wipe off and squeeze another drop of blood.
>Touch the blood sample with strip
inlet.
>The sample will be drawn
automatically.

GLU
0.7 μl 1 μl
UA
10 μl
7.
GLU
CHOL
CHOL
CHOL
CHOL
GLU
GLU
HumaSens2.0plus
11
Chapter 3 How to Perform a Test
3.2 Perform the Test
Note: Insufcient ll up of blood sample could lead to inaccurate or failed test result.
>After count down of the respective tests time need (seconds),
the result will display on the screen.
>Then eject the used strip into a biohazard waste container.
>The meter will turn off automatically.
Fill up OK
Fill up OK
Fill up FAILED
Fill up FAILED
Glucose/Uric Acid
Total Cholesterol

12
Chapter 3 How to Perform a Test
Note:
> Please code your meter when you rst use or open a new vial of strips.
If you have any question, please read Chapter 2.3.
>Please follow the instruction while testing. Improper operation may result
in inaccurate test result or damage the system.
> Please nish the test within 5 minutes or the meter will turn off automatically.
>The meter will not turn on if you insert the wrong end or wrong side of strip.
>Do not use expired strip.
>Apply the blood sample to the correct position on the test strip.
Warning :
>Lancets (not provided) cannot be reused.
> Please always use certied lancets (not provided) to ensure safety.
>Do not reuse test strips.
>Healthcare professionals using this system on multiple patients should follow
the infection control procedures approved by their facility.

生物醫療廢棄物
BIO-MEDICAL
WASTE
13
Chapter 3 How to Perform a Test
3.3 Care after Testing
1. Please follow the instruction to discard used lancets into an appropriate biohazard container.
>Discard the used lancet (not provided) into biohazard waste container.
2. Record your test result.
3. Store your instrument, strips and other items in a clean cool and dry environment. (Please check the specications in
Chapter 8.)
Test Mode Special Messages
Lo Hi
Glucose < 20 mg/dl (1.10 mmol/l) > 600 mg/dl (33.3 mmol/l)
Uric Acid < 3 mg/dl (0.18 mmol/l) > 20 mg/dl (1.19 mmol/l)
Total Cholesterol < 100 mg/dl (2.59 mmol/l) > 400 mg/dl (10.35 mmol/l)

14
Chapter 3 How to Perform a Test
Note:
>Please check your meter performance regularly.
>Dropping, bumping or other violent impact may damage the meter or cause malfunction.
>Do not use the meter in an environment with possible magnetic, electromagnetic, and radioactive interferences.
Warning :
> Do not disassemble the meter for any reason.
> Please follow local regulations to discard used test strips, lancets and batteries.
> Used test strips, lancets and any other materials which have been in contact
with blood should be treated as potential biohazards.
> If a user has an infectious disease, the used test strips and other materials
could be sources of infection.

15
Chapter 4 Meter Memory Function
The meter can record 360 results of glucose, 50 results of total cholesterol, and 50 results of uric acid (includes test
results and control solution test results). It can also count 7-, 14- 21- and 28-days average for glucose.
The latest test result will replace the oldest when the records exceed maximum memory capacity. The memories start
record from M1 to M360 or M1 to M50.
Stored results are unaffected by low battery power or a battery change.
Directions for Checking Memories:
1. No test strip in the meter.
2. Press “M” button for 3 seconds till a short “beep” to enter the memory mode.
3. After a full display on screen, press “M”button to switch between GLU, CHOL, and UA mode.
Press “S”button to select.
4. In GLU memory mode, it will display 7-, 14-, 21-, 28-days average rst then individual record.
CHOL and UA memory mode will show individual record directly.
Press “S”button for next test record, and press “M” button for previous record.
5. Once you enter one memory mode, you cannot switch.
Press “M” button for 3 seconds or wait for the meter to turn off. Then repeat step 1– 3 to select another test mode.
Note: The control results are not included in the average.

16
Chapter 4 Meter Memory Function
GLU Average
CHOL or UA Individual Record
CHOL or UA Control Record
GLU Individual Record
GLU Control Record

1. 2. HumaSens2.0plus
HumaSens2.0plus
17
Chapter 5 Control Solution Test
HumaSens2.0plus control solution is used to check the performance of the HumaSens2.0plus Multi-Parameter System.
The system performs adequately when control test falls within the range listed on the respective test strip’s vial label.
The system should be checked:
>If you suspect that the meter or test strips are not working properly.
>When the test result is or seems unusual, inaccurate or inconsistent.
>Any time you droped or bumped the meter.
Control solution range is shown as follow: Please check your strip vial label for exact range.
Directions:
EA13120901
7142
98-164 mg/dL
5.4-9.1 mmol/L
EA13120901
2015-01
control range
98-164 mg/dl
5.4-9.1 mmol/l control solution vial
/
>Insert an unused strip into
the meter.
>Press “M” button for 3 seconds to
enter the control solution mode.
Table of contents
Other Human Blood Glucose Meter manuals
Popular Blood Glucose Meter manuals by other brands

Ascensia Diabetes Care
Ascensia Diabetes Care Contour next GEN user guide

Contour
Contour PLUS ONE Pairing guide

Polymap Wireless
Polymap Wireless Polytel GMA2 PWR-09-02 user manual

BERLIN-CHEMIE
BERLIN-CHEMIE MENARINI GlucoMen areo quick start guide

Trividia
Trividia True Metrix Quick reference guide

Sejoy
Sejoy BG-211b owner's booklet