Johnson J-STATION User manual

J-STATION
USER’S GUIDE
MANUAL DE INSTRUCCIONES
MODE D’EMPLOI
BEDIENUNGSHANDBUCH

I
ENGLISH
ESPAÑOL
Los símbolos de aquí arriba están reconocidos internacionalmente como de advertencia de los riesgos potenciales con
aparatos eléctricos. El rayo dentro de un triángulo equilátero implica que dentro de la unidad existen voltajes peligrosos.
El símbolo de exclamación dentro del triángulo equilátero indica que es necesario que el usuario lea el manual de
instrucciones de la unidad.
Estos símbolos también le advierten que dentro de la unidad no hay ninguna pieza que pueda ser reparada por el propio
usuario. No abra el aparato. Nunca intente hacer ningún tipo de reparación por sus propios medios. Consulte cualquier
posible reparación únicamente a un Servicio Técnico cualificado. La apertura del chasis por cualquier razón anulará la
garantía del fabricante. No permita que la unidad se humedezca. Si cae algún líquido en el aparato, apáguelo
inmediatamente y llévelo al distribuidor o servicio técnico.Desconecte la unidad durante las tormentas para evitar daños.
WARNING TO REDUCE THE RISK OF FIRE OR ELECTRIC
RISQUE DE CHOC ELECTRIQUE - NE PAS OUVRIR
CAUTION
RISK OF ELECTRIC SHOCK
DO NOT OPEN
ATTENTION :
SHOCK DO NOT EXPOSE THIS EQUIPEMENT TO RAIN OR MOISTURE
These symbols are internationally accepted symbols that warn of potential hazards with electrical products.The
lightning flash means that there are dangerous voltages present within the unit.The exclamation point indicates that it
is necessary for the user to refer to the owners manual.These symbols warn that there are no user serviceable parts
inside the unit. Do not open the unit. Do not attempt to service the unit yourself. Refer all servicing to qualified
personnel. Opening the chassis for any reason will void the manufacturer’s warranty. Do not get the unit wet. If liquid is
spilled on the unit, shut it off immediately and take it to a dealer for service. Disconnect the unit during storms to
prevent damage.
WARNING TO REDUCE THE RISK OF FIRE OR ELECTRIC
RISQUE DE CHOC ELECTRIQUE - NE PAS OUVRIR
CAUTION
RISK OF ELECTRIC SHOCK
DO NOT OPEN
ATTENTION :
SHOCK DO NOT EXPOSE THIS EQUIPEMENT TO RAIN OR MOISTURE
INSTRUCCIONES DE SEGURIDAD
AVISO PARA LOS USUARIOS SI SU UNIDAD ESTA EQUIPADA CON UN CABLE DE ALIMENTACION.
PRECAUCION: ESTA UNIDAD DEBE SER CONECTADA A TIERRA.
Los filamentos del cable de alimetnación están coloreados de acuerdo al siguiente código:
VERDE y AMARILLO - Tierra AZUL - Neutral MARRON - Activo
Dado que los colores del cable de alimentación de esta unidad puede que no se correspondan con las marcas de color
identificativas de su enchufe, haga lo siguiente:
•El filamento que tiene color amarillo y verde debe ser conectado a la terminal del conector marcada
con la letra E, o con el símbolo de tierra o de colorverde o de color amarillo y verde.
•El filamento con color azul debe ser conectado a la terminal marcada con una N o de color negro.
•El filamento de color marrón debe ser conectado a la terminal marcada con una L o de color rojo.
Puede que para este aparato necesite usar un cable de alimentación o un conector distintos, dependiendo de la fuente
de alimentación disponible en su instalación. Si debe cambiar el enchufe, contacte con un técnico cualificado y que este
haga referencia a la tabla siguiente. El filamento verde/amarillo debería ser conectado directamente a la carcasa de la
unidad.
PRECAUCION: Si se elimina la toma de tierra, determinadas condiciones de avería de la unidad o del sistema al que
estéconectada pueden hacer que haya cargas de voltaje de línea entre el chasis y la toma de tierra. Esto podría producir
daños graves o incluso la muerte si tocase simultáneamente la carcasa y la toma de tierra.
L nea
Neutral
Toma tierra
CONDUCTOR
L
N
Marr n
Azul
Verde/Amarill.
Negro
Normal Alt
COLOR CABLE
Blanco
Verde
SAFETY INSTRUCTIONS
NOTICE FOR CUSTOMERS IFYOUR UNIT IS EQUIPPEDWITH A POWER CORD.
WARNING:THIS APPLIANCE MUST BE EARTHED.
The cores in the mains lead are colored in accordance with the following code:
Green andYellow - Earth Blue - Neutral Brown - Live
As colors of the cores in the mains lead of this appliance may not corre-spond with the colored markings identifying the
terminals in your plug, pro-ceed as follows:
•The core which is colored green and yellow must be connected to the terminal in the plug marked
with the letter E, or with the earth sym-bol, or colored green, or green and yellow.
•The core which is colored blue must be connected to the terminal marked N, or colored black.
•The core which is colored brown must be connected to the terminal marked L, or colored red.
This equipment may require the use of a different line cord, attachment plug, or both, depending on the available power
source at installation. If the attachment plug needs to be changed, refer servicing to qualified service personnel who
should refer to the table below.The green/yellow wire shall be connected directly to the unit’s chassis.
Warning: If the ground plug is defeated, certain fault conditions in the unit or in the system to which it is connected
can result in full line voltage between chassis and earth ground. Severe injury or death can then result if the chassis and
earth ground are touched simultaneously.
LIVE
NEUTRAL
EARTH GRD
CONDUCTOR
L
N
BROWN
BLUE
GREEN/YEL
BLACK
Normal Alt
WIRE COLOR
WHITE
GREEEN
ADVERTENCIA :
PARA SU SEGURIDADY PROTECCION, LEA LO SIGUIENTE:
AGUA Y HUMEDAD: No utilice este aparato demasiado cerca del agua (p.e. cerca de una piscina, fregadero, lavadora
o en un sótano húmedo). Evite que pueda caer ningún objeto o líquidos dentro de la carcasa a través de las aberturas.
FUENTE DE ALIMENTACION: Este aparato debe ser conectado a una toma de alimentación solo del tipo descrito
en este manual o marcado en la propia unidad.
TOMA DETIERRA O POLARIZACION: Tome las precauciones necesarias para que la toma de tierra o polarización
del aparato no queden anuladas.
PROTECCION DEL CABLE DE ALIMENTACION: Coloque los cables de alimentación de tal forma que no
puedan ser pisados y que queden enganchados o aplastados por cosas colocadas sobre o contra ellos, con un cuidado
especial en los receptáculos de entrada y conectores, y en el punto en el que los cables salen de las unidades.
REPARACIONES: Para reducir el riesgo de incendios o descargas eléctricas, el usuario nunca debe tratar de hacer
reparaciones en la unidad fuera de lo descrito en las instrucciones. Debe dirigir cualquier otra reparación al servicio
técnico cualificado.
PARA LAS UNIDADES EQUIPADAS CON RECEPTACULO DE FUSIBLE ACCESIBLE DESDE EL
EXTERIOR: Sustituya el fusible solo por otro del mismo tipo y características eléctricas.
Warning:
FORYOUR PROTECTION, PLEASE READ THE FOLLOWING:
WATER AND MOISTURE: Appliances should not be used near water (e.g. near a bathtub, washbowl, kitchen sink,
laundry tub, in a wet basement,or near a swimming pool,etc.) Care should be taken so that objects do not fall and liquids
are not spilled into the enclosure through openings.
POWER SOURCES: The appliance should be connected to a power supply only of the type described in the operating
instructions or as marked on the appliance.
GROUNDING OR POLARIZATION: Precautions should be taken so that the grounding or polarization means of
an appliance is not defeated.
POWER CORD PROTECTION: Power supply cords should be routed so that they are not likely to be walked on
or pinched by items placed upon or against them, paying particular attention to cords at plugs, convenience receptacles,
and the point where they exit from the appliance.
SERVICING: To reduce the risk of fire or electrical shock, the user should not attempt to service the appliance beyond
that described in the operating instructions.All other servicing should be referred to qualified service personnel.
FOR UNITS EQUIPPED WITH EXTERNALLY ACCESSIBLE FUSE RECEPTACLE: Replace fuse with same
type and rating only.
COMPATIBILIDAD ELECTROMAGNETICA
Esta unidad cumple con las Especificaciones de producto indicada en la Declaración de Conformidad. Esto hace que la
unidad estésujeta a las dos condiciones siguientes:
•esta unidad no puede producir interferencias molestas ni dañinas, y
•esta unidad debe recibir cualquier interferencia recibida, incluyendo las que puedan causar errores no
deseados. Debe tratar de evitar el uso de esta unidad dentro decampos electromagnéticos significativos.
•utilice solo cables de interconexión con blindaje.
ELECTROMAGNETIC COMPATIBILITY
Operation is subject to the following conditions:
•This device may not cause harmful interference.
•This device must accept any interference received, including interference that may cause undesired operation.
•Use only shielded interconnecting cables.
•Operation of this unit within significant electromagnetic fields should be avoided.
U.K. MAINS PLUG WARNING
A molded mains plug that has been cut off from the cord is unsafe. Discard the mains plug at a suitable
disposal facility. NEVER UNDER ANY CIRCUMSTANCES SHOULD YOU INSERT A
DAMAGED OR CUT MAINS PLUG INTO A 13 AMP POWER SOCKET. Do not use the
mains plug without the fuse cover in place. Replacement fuse covers can be obtained from your local
retailer. Replacement fuses are 13 amps and MUST be ASTA approved to BS1362.

DECLARATION OF CONFORMITY
Manufacturer’s Name: Johnson Amplification
Manufacturer’s Address: 8760 S. Sandy Parkway
Sandy, Utah 84070, USA
declares that the product:
Product Name: J-Station
Product Options: All (requires a Class II power adapter that
conforms to the requirements of EN60065,
EN60742, or equivalent.)
conforms to the following Product Specifications:
Safety: EN 60065 (1993)
IEC 65 (1985) with Amendments 1, 2 & 3
EMC: EN 55013 (1990)
EN 55020 (1991)
Supplementary Information:
The product herewith complies with the
requirements of the LowVolta Directive
73/23/EEC and EMC Directive 89/336/EEC as
amended by Directive 93/68/EEC.
Johnson Amplification
Vice-President of Engineering
8760 S. Sandy Parkway
Sandy, Utah 84070, USA
Tel: 801-566-8800
Fax: 801-566-7005
Effective March 31, 2000
European Contact: Your Local Johnson Amplification Sales and Service Office
or
Harman Music Group
8760 S. Sandy Parkway
Sandy, Utah 84070, USA
Tel. 801-568-7638
Fax 801-568-7642
DECLARACION DE CONFORMIDAD
Nombre fabricante: Johnson Amplification
Dirección fabricante: 8760 S. Sandy Parkway
Sandy, Utah 84070, USA
declara que el aparato:
Nombre aparato: J-Station
Optiones aparatop: Todas (necesita un adaptador de corriente de
clase II que cumpla con las normas EN60065,
EN60742, o equivalentes).
cumple con las siguientes especificaciones de producto:
Seguridad: EN 60065 (1993)
IEC 65 (1985) con las enmiendas 1, 2 & 3
EMC: EN 55013 (1990)
EN 55020 (1991)
Información complementaria:
El aparato citado arriba cumple con los requisitos
de la directiva de bajo voltaje 73/23/EEC y la
directiva EMC 89/336/EEC enmendada por la
directiva 93/68/EEC.
Johnson Amplification
Vicepresidente de diseño
8760 S. Sandy Parkway
Sandy, Utah 84070, USA
Tel: 801-566-8800
Fax: 801-566-7005
Vigencia desde el 31 de marzo del 2000
Contacto en Europa: Su comercio local o servicio técnico oficinal Johnson
Amplification o
Harman Music Group
8760 S. Sandy Parkway
Sandy, Utah 84070, USA
Tel. 801-568-7638
Fax 801-568-7642
II
ENGLISH
ESPAÑOL

Warranty
We at Johnson Amplification are proud of our products and back-up each
one with the following
warranty:
1.The warranty registration card must be mailed within ten days after purchase
date to validate this warranty.
2. Johnson Amplification warrants this product, when used solely within the U.S., to
be free from defects in materials and workmanship under normal use and
service.
3. Johnson amplification liability under this warranty is limited to repairing or
replacing defective materials that show evidence of defect, provided the product
is returned to Johnson amplificationWITH RETURN AUTHORIZATION, where
all parts and labor will be covered up to a period of one year.A Return
Authorization number may be obtained from Johnson amplification by
telephone.The company shall not be liable for any consequential damage as a
result of the product's use in any circuit or assembly.
4. Proof-of-purchase is considered to be the burden of the consumer.
5. Johnson amplification reserves the right to make changes in design, or make
additions to, or improvements upon this product without incurring any obligation
to install the same on products previously manufactured.
6.The consumer forfeits the benefits of this warranty if the product's main
assembly is opened and tampered with by anyone other than a certified
Johnson amplification technician or, if the product is used with AC voltages
outside of the range suggested by the
manufacturer.
7.The foregoing is in lieu of all other warranties, expressed or implied, and
Johnson amplification neither assumes nor authorizes any person to assume
any obligation or liability in connection with the sale of this product. In no event
shall Johnson amplification or its dealers be liable for special or consequential
damages or from any delay in the performance of this warranty due to causes
beyond their control.
NOTE:The information contained in this manual is subject to change at any
time without notification. Some information contained in this manual may also
be inaccurate due to undocumented changes in the product or operating
system since this version of the manual was completed.The information
contained in this version of the owner's manual supersedes all previous
versions.
Garantía
We at Johnson Amplification are proud of our products and back-up each
one with the following
warranty:
1. Deberá devolvernos por correo esta tarjeta de registro de garantía dentro de
los diez días siguientes a la fecha de compra para que tenga validez.
2. Johnson Amplification garantiza que este producto, solo cuando se use dentro
de EE.UU., está libre de defectos en materiales y mano de obra bajo
condiciones de uso y mantenimiento normales.
3. La responsabilidad de Johnson Amplification por esta garantía queda limitada a la
reparación o sustitución de los materiales defectuosos que muestren evidencias de
fallos, asumiendo que el producto sea devuelto a Johnson Amplification CON
AUTORIZACIÓN DE DEVOLUCIÓN, en cuyo caso quedarán cubiertas todas las
piezas y mano de obra durante un periodo de un año. Para obtener un número de
Autorización de Devolución póngase en contacto con Johnson Amplification por
teléfono. La compañía no será responsable de ningún daño emergente producido
por el uso del producto en cualquier circuito o montaje.
4. La prueba de compra se considera responsabilidad del comprador.
5. Johnson Amplification se reserva el derecho a realizar cambios en el diseño, adiciones o
mejoras en este producto sin por ello incurrir en ninguna obligación de instalar lo
mismo en los productos fabricados previamente.
6. El consumidor pierde los beneficios de esta garantía si la carcasa del producto
es abierta y modificada por cualquier persona que no sea un técnico
certificado por Johnson Amplification o si el producto es utilizado con voltajes
de CA fuera del rango sugerido por el fabricante.
7. Lo indicado anteriormente anula a cualquier otra garantía, expresa o implícita,
y Johnson Amplification ni asume ni autoriza a ninguna persona a asumir
ninguna obligación o responsabilidad relativa a la venta de este producto. En
ningún caso Johnson Amplification o sus vendedores serán responsables por los
daños emergentes especiales o por cualquier retraso en la ejecución de esta
garantía debido a causas que estén fuera de su contro.
NOTA:La información contenida en este manual estásujeta a cambios en cualquier
momento sin previo aviso. Parte de la información contenida en este manual
también puede que sea inexacta debido a cambios no documentados del producto o
del sistema operativo desde que esta versión del manual fue terminada. La
información contenida en esta versión del manual de usuario sutituye a todas las
versiones anteriores.
III
ENGLISH
ESPAÑOL

Table of Contents
Safety Information ................................................................................................I
Declaration of Conformity..................................................................................II
Warranty ................................................................................................................III
Table of Contents..................................................................................................IV
Section One - Introduction
Congratulations......................................................................................................1
Included Items........................................................................................................1
Features1
Quick Start..............................................................................................................2
A Guided Tour ......................................................................................................3
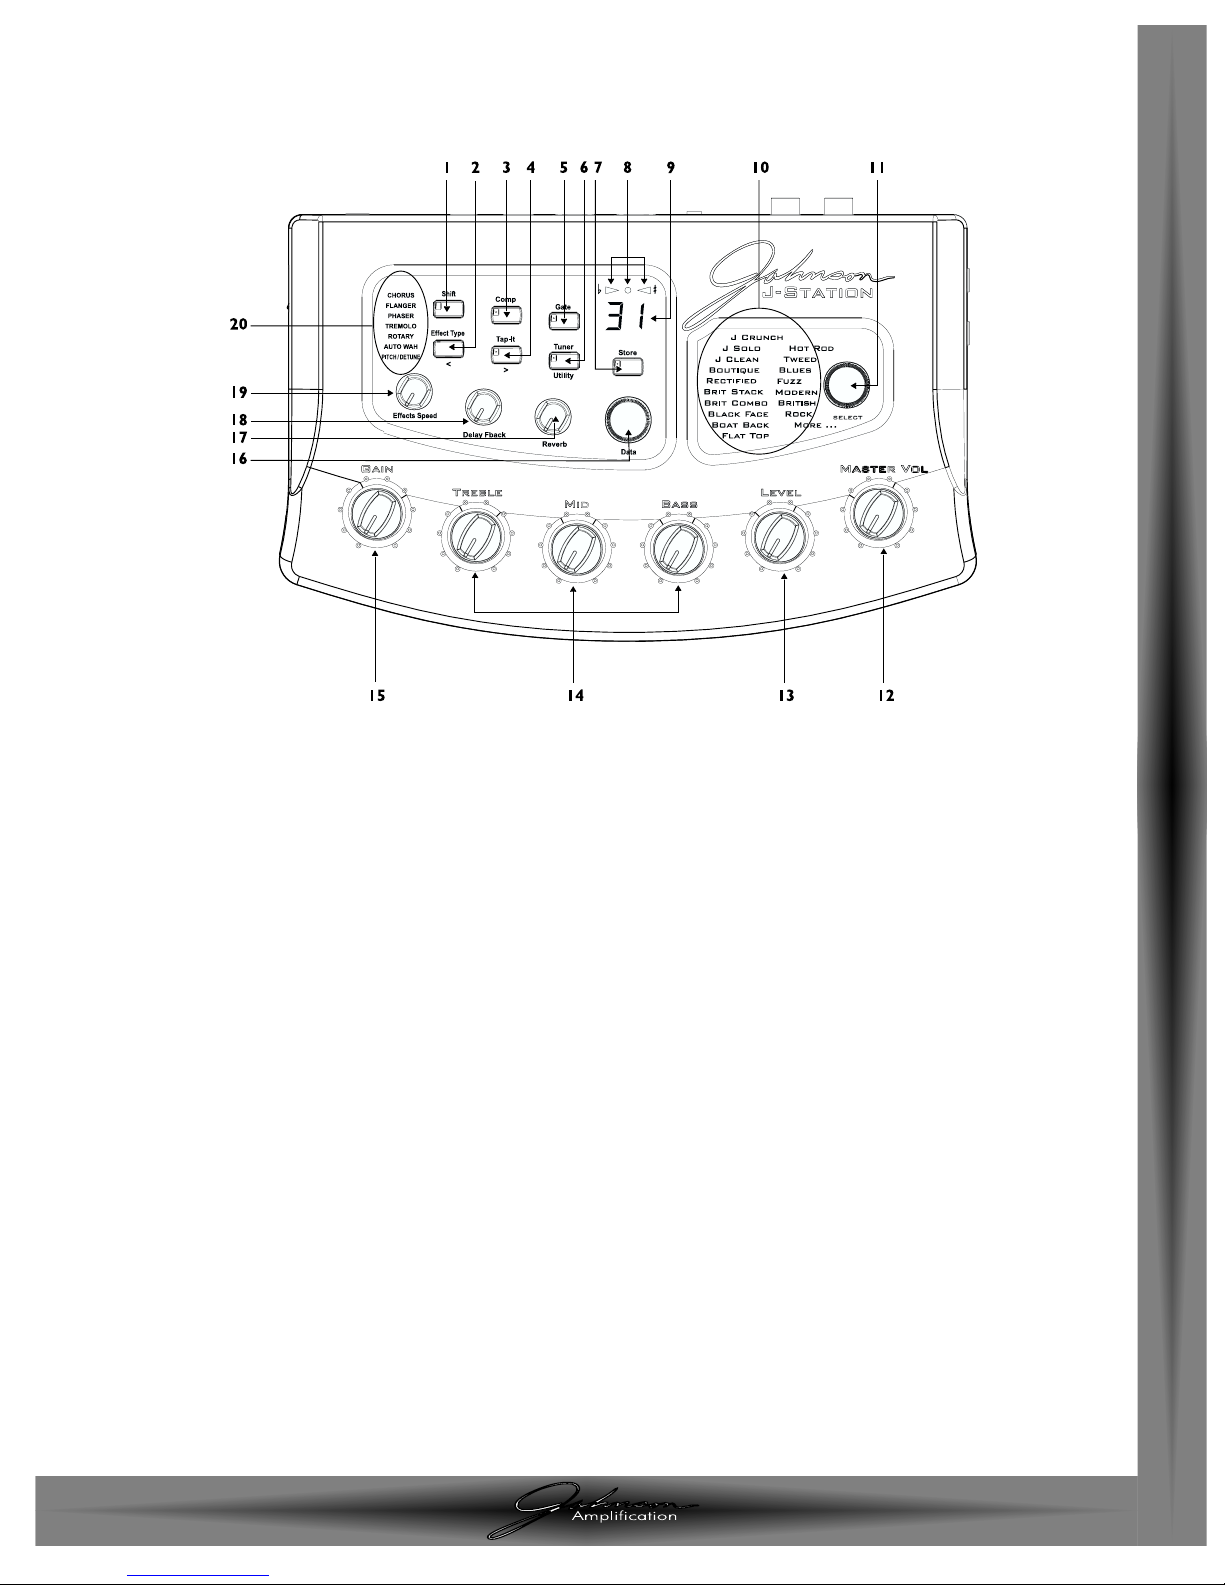
The Front Panel................................................................................................3
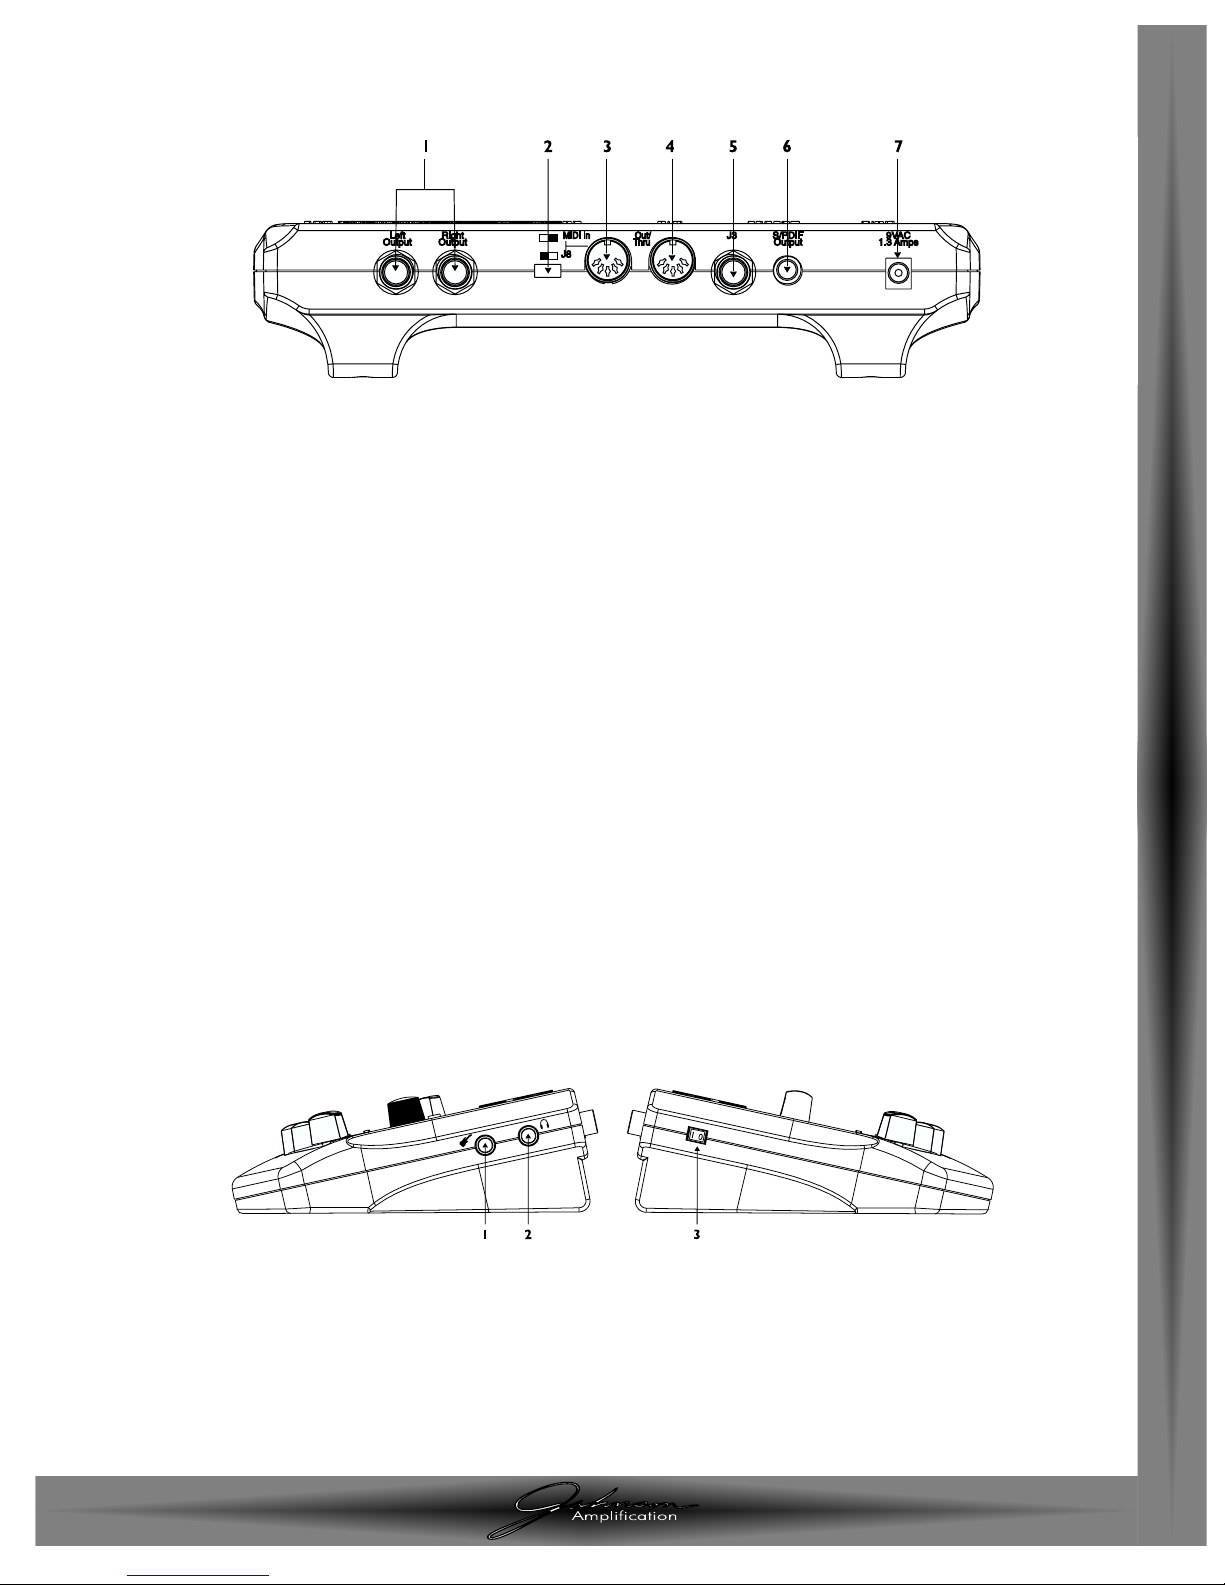
The Rear Panel..................................................................................................5
The Side Panels ................................................................................................5
Getting Started ......................................................................................................6
Making Connections ............................................................................................6
Mono/Stereo......................................................................................................6
S/PDIF Digital Output ....................................................................................6
Applying Power ................................................................................................6
About the J-Station ..............................................................................................7
The Presets........................................................................................................7
Bypass Mode......................................................................................................7
Edit Mode ..........................................................................................................7
Tuner Mode ......................................................................................................8
Utility Mode ......................................................................................................8
Section Two - Editing Functions
Editing/Creating Presets ......................................................................................9
Top Level Editing....................................................................................................9
Selecting an Amp Model ................................................................................9
Amp Model Editing ..........................................................................................9
Amp Controls ..................................................................................................10
Effects Editing....................................................................................................10
Delay Editing......................................................................................................11
Reverb Editing ..................................................................................................11
Compressor Editing ........................................................................................11
Noise Gate Editing ..........................................................................................11
Deep Level Editing ................................................................................................12
Storing/Copying a Preset ....................................................................................15
Section Three - Effects
About the Effects ..................................................................................................16
Effects Definitions..................................................................................................16
Compressor ......................................................................................................16
Wah Wah............................................................................................................17
Amp Modeling ..................................................................................................18
Cabinet Emulator ............................................................................................19
Noise Gate ........................................................................................................19
Effects..................................................................................................................20
Chorus..........................................................................................................20
Flanger ..........................................................................................................20
Phaser............................................................................................................21
Tremolo ........................................................................................................21
Rotary Speaker ..........................................................................................21
AutoWah......................................................................................................22
Pitch/Detune................................................................................................22
Delay ..................................................................................................................22
Reverb ................................................................................................................23
Section Four - Tutorial
Guided Example ....................................................................................................24
Choose a Preset....................................................................................................24
Turn the Compressor Off ..................................................................................24
Select the Amp Model..........................................................................................24
Adjust the EQ ........................................................................................................24
Adjust the Noise Gate ........................................................................................25
Select the Phaser ..................................................................................................25
Turn the Delay Off................................................................................................26
Adjust the Reverb ................................................................................................26
Set the Preset Level..............................................................................................26
Store the Preset ....................................................................................................26
Section Five - Other Functions
Utilities ....................................................................................................................27
Assign Menu ......................................................................................................27
Output Mode ....................................................................................................28
Dry Track............................................................................................................28
Digital Output Level ........................................................................................28
Global Cabinet Emulator................................................................................28
MIDI ....................................................................................................................29
MIDI Loop Back................................................................................................29
MIDI Channel....................................................................................................29
Sysex Dump ......................................................................................................29
Continuous Control........................................................................................30
Factory Reset....................................................................................................30
Foot Controller Options ....................................................................................31
Editor/Librarian......................................................................................................31
Section Six - Appendix
Factory Preset List................................................................................................32
MIDI Implementation ..........................................................................................32
Specifications ..........................................................................................................33
Indice
Información de seguridad....................................................................................I
Declaración de conformidad ..............................................................................II
Garantía ..................................................................................................................III
Indice ..................................................................................................................IV
Sección uno - Introducción
¡Enhorabuena! ........................................................................................................1
Elementos incluidos ..............................................................................................1
Características........................................................................................................1
Inicio rápido............................................................................................................2
Recorrido guiado ................................................................................................3
El panel frontal..................................................................................................3
El panel trasero ................................................................................................5
Los paneles laterales........................................................................................5
Inicio ..................................................................................................................6
Conexiones ............................................................................................................6
Mono/Stereo......................................................................................................6
Salida digital S/PDIF..........................................................................................6
Encendido ..........................................................................................................6
Acerca de la J-Station ..........................................................................................7
Los Presets ........................................................................................................7
Modo de anulación ..........................................................................................7
Modo de edición ..............................................................................................7
Modo de afinación............................................................................................8
Modo de utilidades ..........................................................................................8
Sección dos - Funciones de edición
Edición/Creación de presets ..............................................................................9
Edición de nivel superior ....................................................................................9
Selección de un modelo de amplificador ..................................................9
Edición de un modelo de amplificador ......................................................9
Controles del amplificador ............................................................................10
Edición de efectos............................................................................................10
Edición de retardo ..........................................................................................11
Edición de reverberación ..............................................................................11
Edición de compresor ....................................................................................11
Edición de puerta de ruidos..........................................................................11
Edición de nivel profundo ..................................................................................12
Grabación/copia de un preset............................................................................15
Sección tres - Efectos
Acerca de los efectos ..........................................................................................16
Definición de los efectos ....................................................................................16
Compressor ......................................................................................................16
Wah Wah............................................................................................................17
Modelado de amplificador..............................................................................18
Simulador de caja ............................................................................................19
Puerta de ruidos ..............................................................................................19
Efectos ................................................................................................................20
Chorus..........................................................................................................20
Flanger ..........................................................................................................20
Modulador de fase ....................................................................................21
Trémolo ........................................................................................................21
Altavoz giratorio ........................................................................................21
AutoWah......................................................................................................22
Modulador de tono/desafinación............................................................22
Retardo ..............................................................................................................22
Reverberación ..................................................................................................23
Sección cuatro -Tutorial
Ejemplo guiado ......................................................................................................24
Elección de un preset ..........................................................................................24
Desactivación del compresor ............................................................................24
Selección del modelo de amplificador..............................................................24
Ajuste del ecualizador..........................................................................................24
Ajuste de la puerta de ruidos ............................................................................25
Elección del modulador de fase ........................................................................25
Desactivación del retardo ..................................................................................26
Ajuste de la reverberación..................................................................................26
Ajuste del nivel de preset....................................................................................26
Grabación del preset............................................................................................26
Sección Cinco - Otras funciones
Utilidades ................................................................................................................27
Menúde asignación..........................................................................................27
Modo de salida..................................................................................................28
Pista seca............................................................................................................28
Nivel de salida digital ......................................................................................28
Simulador global de caja ................................................................................28
MIDI ....................................................................................................................29
Bucle de retorno MIDI ..................................................................................29
Canal MIDI ........................................................................................................29
Volcado de sistema exclusivo........................................................................29
Control continuo ............................................................................................30
Reinicialización a los valores de fábrica......................................................30
Opciones de la pedalera de control ................................................................31
Editor/biblioteca ....................................................................................................31
Sección seis - Apéndices
Lista de presets de fábrica ..................................................................................32
Implementación MIDI ..........................................................................................32
Especificaciones técnicas......................................................................................33 IV
ENGLISH
ESPAÑOL

¡Enhorabuena por la compra de la J-Station de Johnson! Ahora dispone
de una de las más potentes herramientas que puede tener en un estudio de
grabación. La J-Station es un sistema profesional de modelado de amplificador
de guitarra y bajo, y es también un completo sistema de procesado de efectos
con una salida digital para grabaciones en directo. En todo el mundo no hay
otro sistema de grabación en directo similar a la J-Station. La J-Station dispone
de 14 de los más famosos modelos de amplificador de guitarra, tres de bajo,
dos de guitarras acústicas, y doce efectos distintos entre los que puede elegir.
El interface de usuario es muy sencillo y le ofrece unos controles intuitivos y
un sistema operativo lógico. Aunque el sistema operativo es muy sencillo, le
recomendamos que lea detenidamente este manual de instrucciones para
sacarle el máximo partido posible a su J-Station.
Elementos incluidos
Su J-Station ha sido fabricada con sumo cuidado. Los elementos siguientes, que
le recomendamos que compruebe si están dentro del embalaje o no, deberían
estar incluidos y funcionar correctamente:
•J-Station
•Fuente de alimentación PS0913B o PSS3
•Programa editor/biblioteca para Windows
•Manual de instrucciones
•Tarjeta de garantía
Tómese un momento en rellenar la tarjeta de garantía. Serásu salvavidas en
caso de que su J-Station tenga alguna avería. Guarde todos los materiales del
embalaje y utilícelos para enviarnos su J-Station si es que en algún momento
debe ser reparada
Características
•14 modelos de amplificador de guitarra
•3 modelos de amplificador de bajo
•2 modelos acústicos
•12 efectos con calidad de estudio de grabación
•Salida digital S/PDIF
•Implementación MIDI total
•Procesado de 24 bits
•Afinador cromático
•Programa editor/biblioteca
•Capacidad de pista seca
•Fuente de alimentación externa
•30 presets de fábrica/30 de usuario
•Opciones de pedalera de control: J3 y J8
Congratulations on your purchase of the Johnson J-Station! You now
have one of the most powerful studio tools available anywhere.The J-Station is
a professional guitar amp modeling, bass amp modeling, and effects processing
system, complete with a digital output for direct recording. There is no other
direct recording device quite like the J-Station in the world. The J-Station
includes 14 of the most popular guitar amp models, 3 bass amp models, 2
acoustic guitar models, and 12 different effects to choose from.The simple user
interface provides intuitive controls and an obvious operating system. Although
the operating system is extremely simple, carefully reading this User’s Guide will
help you get the most satisfaction out of your
J-Station.
Included Items
The utmost care was taken as your J-Station was being manufactured.Everything
should be included and in perfect working order. Please make sure that you have
received the following items:
•J-Station
•PS0913B or PSS3 Power Supply
•Editor/Librarian Software for Windows
•User’s Guide
•Warranty Registration Card
Please take a moment to complete the Warranty Card. It is your safe guard in
the unlikely event that your J-Station malfunctions. Save all packing materials and
use them to return your J-Station should a problem arise.
Features
•14 Guitar Amp Models
•3 Bass Amp Models
•2 Acoustic Models
•12 Studio Quality Effects
•S/PDIF Digital Output
•Full MIDI Implementation
•24 bit Processing
•Chromatic Tuner
•Editor/Librarian Software
•Dry Track Capability
•External Power Supply
•30 Factory/30 User Presets
•Foot Control Options: J3 and J8
J-Station User’s Guide /Manual
Section 1- Introduction / Sección 1 - Introducción
ENGLISH
ESPAÑOL
Page / Página 1

J-Station User’s Guide / Manual
Section 1- Introduction / Sección 1 - Introducción
Inicio rápido
Hemos incluido esta guía de inicio rápido para aquellos de ustedes que estén
ansiosos por empezar a utilizar esta pedalera de efectos y prefieran tocar ya y
leer más tarde.
Conexiones:
Conecte su instrumento a la clavija de entrada del lado derecho de la
J-Station. Conecte las salidas Izquierda y/o derecha a la(s) entrada(s) de su
mezclador.
Encendido:
Gire totalmente hacia atrás (hacia la izquierda) el mando Master Volume del
panel frontal de la J-Station. Conecte la clavija de la fuente de alimentación a la
entrada de corriente de la J-Station. Conecte el otro extremo de la fuente de
alimentación a un enchufe de salida. Encienda el mezclador y ajuste el
volumen(es) a su posición nominal (0 dB). Gire gradualmente el mando Master
Volume de la J-Station hasta alcanzar el volumen deseado. Asegúrese de que
la(s) entrada(s) de su mezclador no se sature. Si sucede esto, disminuya el nivel
con el mando Master Volume de la J-Station.
Elección del modo de salida deseado:
Elija entre el modo de salida mono o el stereo. Para ello, pulse el botón Shift
y después el botón Tuner/Utility. Mantenga pulsado el botón Tap-It (>) hasta
que en pantalla aparezcan los caracteres St. Gire el mando Data para
seleccionar On para el modo stereo u OF para el modo mono. Pulse de nuevo
el botón Tuner/Utility para salir de la elección del modo de salida.
Selección de preset:
La J-Station viene con 30 presets pre-programados de fábrica, y con 30 presets
de usuario.Antes de que haya grabado nada en ellos, los preset de usuario son
duplicados exactos de los presets de fábrica. Esto le permite hacer las pruebas
que quiera sin correr el riesgo de perder ninguno de los sonidos originales de
la J-Station. Utilice el mando Data para seleccionar los distintos presets. Una
vez que haya conseguido localizar presets que le gusten, podráadaptar los
sonidos a sus necesidades específicas.
Personalización de su sonido:
Gire el mando Gain para ajustar la cantidad de distorsión. Los mandos Tre ble ,
Mid y Bass sirven para ajustar la ecualización y el mando Level le permitirá
ajustar el volumen del preset. Gire el mando Select para modificar el modelo
del amplificador. El botón Comp sirve para activar y desactivar el compresor,
cuyo grado de compresión puede ajustar manteniendo pulsado el botón
Compressor y girando el mando Data. Para ajustar la ganancia del compresor
pulse el botón Shift, mantenga pulsado el botón Compressor y gire el mando
Data. Los botones Gate activan y desactivan la puerta de ruidos; para modificar
el umbral de esta puerta deberámantener pulsado el botón Gate y girar el
mando Data. Para ajustar el tiempo de ataque de la puerta de ruidos, pulse el
botón Shift, después mantenga pulsado el botón Gate y gire el mando Data.
Las pulsaciones sucesivas del botón Effect Type le permitirán elegir el efecto de
modulación/cambio de tono, lo que quedaráindicado haciendo que se ilumine el
nombre del efecto en el lado izquierdo de su J-Station. El nivel de estos efectos
puede ser ajustado con el mando Effects , y la velocidad, tono o sensibilidad
(dependiendo del tipo de efecto elegido) podrán ser ajustados pulsando el botón
Shift y girando el mando Effect/Speed. El nivel del retardo puede ser ajustado
con el mando Delay, y para ajustar la realimentación deberápulsar el mando
Shift y girar el mando Delay/Feedback. Las pulsaciones repetidas del botón
Tap-It le permiten hacer que el tiempo de retardo quede ajustado con la
velocidad con la que pulse el botón. El mando Reverb sirve para ajustar el nivel
de la reverberación.
Recuerde que no hay ningún peligro de perder ninguno de los sonidos con que
viene la J-Station ya que los presets de usurario son réplicas de los presets de
fábrica. Por lo tanto, no tema hacer pruebas.
Quick Start
We have included this handy Quick Start guide for those of you who are anxious
to get started and prefer to play now and read later.
Making Connections:
Connect your instrument to the input jack on the right side of the J-Station.
Connect the Left and/or Right Outputs to the input(s) of your mixer.
Apply Power:
Turn the Master Volume knob on the front panel of the J-Station all the way
down (fully counter clockwise). Connect the plug of the power supply to the
power jack on the J-Station. Connect the other end of the power supply to an
AC outlet.Turn the power switch located on the left side of the J-Station to the
on position.Turn your mixer’s power switch to the on position and adjust the
volume(s) to their nominal position (0 dB). Gradually increase the J-Station’s
Master Volume knob to achieve the desired volume. Be sure that the input(s)
of your mixer are not clipping. If clipping occurs, reduce the level of the J-
Station’s Master Volume.
Select the Desired Output Mode:
Select either Mono or Stereo Output Mode.To do this, press the Shift button.
Then press the Tuner/Utility button. Press the Tap-It (>) button until St
shows in the Display. Rotate the Data knob to select On for Stereo Mode, or
OF for Mono Mode. Press the Tuner/Utility button again to exit the Output
Mode selection.
Select Preset:
The J-Station comes loaded with 30 pre-programmed Factory Presets, and 30
User Presets. From the factory, the User Presets are exact duplicates of the
Factory Presets. This allows you to experiment without running the risk of
losing any of the original sounds contained in the J-Station. Use the Data knob
to select different Presets. Once you have found Presets that suit your taste, you
can alter the sounds to your specific needs.
CustomizeYour Sound:
Rotate the Gain knob to adjust the amount of distortion.The Treble,Mid, and
Bass knobs will adjust the EQ, and the Level will adjust the volume of the
Preset. Rotate the Select knob to change Amp Models. The Comp button
turns the Compressor on and off, and the Compression Ratio can be adjusted
by pressing and holding the Compressor button and rotating the Data knob.
The Compressor Gain can be adjusted by pressing the Shift button, and then
pressing and holding the Compressor button and rotating the Data knob.The
Gate button turns the Noise Gate on and off, and the Gate Threshold can be
adjusted by pressing and holding the Gate button and rotating the Data knob.
The Gate Attack Time can be adjusted by pressing the Shift button, then
pressing and holding the Gate button and rotating the Data knob. Successive
presses of the Effect Type button will select the Modulation/Pitch Shift Effect,
which will be indicated by the Effect name lighting on the left side of the J-Station
console. The level of these Effects can be adjusted with the Effects knob, and
the speed, pitch or sensitivity (depending on the type of Effect selected) may be
adjusted by pressing the Shift button and rotating the Effect/Speed knob.The
Delay Level can be adjusted with the Delay knob, and the feedback is adjusted
by pressing the Shift button and rotating the Delay/Feedback knob. Repeated
presses of the Tap-It button will set the Delay time to the rate at which it is
tapped.The Reverb knob will adjust the level of Reverb.
Remember that you are not at risk of losing any sounds the J-Station came with
because the User Presets are duplicates of the Factory Presets. So, don’t be
afraid to experiment.
Page / Página 2
ENGLISH
ESPAÑOL

1. Shift - This button is used to access alternate functions for various editing
functions. Pressing and holding this button for 3 seconds will access the Deep
Level editing mode. See page 12 for more information on Deep Level editing.
2. Effect Type - This button is used to select the type of Modulation or Pitch
Shifting effect in the currently active Preset. Successive presses of this button
will advance through all of the available Modulation or Pitch Shifting effects.The
Effects button is also used to select the previous menu (<) in the Deep Level
editing mode and Utility functions.
3. Comp - This button turns the Compressor on and off. Pressing and holding
this button accesses the Ratio. It is also used in conjunction with the Shift
button to access the Compressor’s gain parameter.
4.Tap-It - This button is used to synchronize the Delay repeats with the tempo
of the music.Tapping this button will set the Delay Time at the rate in which it
is tapped. It is also used to select the next menu (>) in the Deep Level editing
mode and Utility functions.
5. Gate - This button turns the Noise Gate on and off. Pressing and holding this
button provides access to the Noise Gate’s Threshold. It is also used in
conjunction with the Shift button to access the Noise Gate’s Attack Time
Parameter.
6.Tuner/Utility - This button is used to activate and deactivate the Tuner. It is
also used in conjunction with the Shift button to access the Utility functions.
7. Store - This button is used to save custom settings to the User Presets.
Pressing this button once allows you to choose the User Preset where the
custom settings will be stored, and the second press of the Store button saves
the settings to the selected User Preset.
8.Tuner Indicators - These LEDs provide a visual reference while theTuner is
active.The arrow on the left indicates the note is flat.The arrow on the right
indicates the note is sharp,and the green LED in the middle lights when the note
is in tune.
1. Shift - Este botón sirve para acceder a funciones alternativas en distintas
funciones de edición. Mantenga pulsado este botón durante tres segundos para
acceder al modo de edición de nivel profundo. Vea la página 12 para más
información sobre la edición de nivel profundo.
2. Effect Type - Este botón se utiliza para elegir el tipo de modulación o el
efecto de cambio de tono para el preset activo en esos momentos. Si pulsa este
botón iráavanzando sucesivamente a través de todos los efectos de modulación
o de cambio de tono. El botón de efectos sirve también para elegir el menú
anterior (<) en el modo de edición de nivel profundo y las funciones de las
utilidades.
3. Comp - Activa y desactiva el compresor. El mantener pulsado este botón da
acceso al Ratio. También se utiliza junto con el botón Shift para modificar el
parámetro de ganancia del compresor.
4.Tap-It - Este botón sirve para sincronizar las repeticiones del retardo con el
tempo de la música. Si golpea este botón ajustaráel tiempo de retardo a la
velocidad a la que estédando los golpes.También se utiliza para elegir el menú
siguiente (>) en el modo de edición de nivel profundo y las funciones de las
utilidades.
5. Gate - Activa y desactiva la puerta de ruidos.El mantener pulsado este botón
da acceso al umbral de la puerta de ruidos.También se utiliza junto con el botón
Shift para acceder al parámetro de tiempo de ataque de la puerta de ruidos.
6.Tuner/Utility - Este botón activa y desactiva el afinador. Se utiliza también
junto con el botón Shift para acceder a las funciones de las utilidades.
7. Store - Este botón sirve para grabar los ajustes personales en los presets de
usuario. Pulse este botón una vez para elegir el preset de usuario en el que
quiera almacenar esos ajustes personalizados, y púlselo una segunda vez para
grabar los ajustes en el preset de usuario seleccionado.
8.Tuner Indicators - Estos LEDs le ofrecen una referencia visual mientras está
activo el afinador. La flecha de la izquierda indica que la nota estábemolada, y la
de deracha indica que estásostenida; el piloto verde central se enciende cuando
la nota estáafinada.
J-Station User’s Guide / Manual
Sección 1 - Introducción / Section 1 hIntroduction
Page / Página 3 ENGLISH
ESPAÑOL
Recorrido guiado
Panel frontal
Guided Tour
Front Panel

J-Station User’s Guide / Manual
Section 1- Introduction / Sección 1 - Introducción
9.Numeric Display - Mientras estéen el modo de ejecución, la pantalla le
mostraráel número del preset activo en esos momentos, y en determinadas
funciones de edición le mostrarálos valores de los parámetros.
10. Model Matrix - La matriz de modelos le ofrece una indicación visual del
modelo de amplificador activo en cada momento. Se iluminaráel nombre del
modelo de amplificador.
11. Model Select - Este mando sirve para elegir el modelo de amplificador que
quiera.
12.Master Volume - Ajusta el nivel de salida de todos los preset.
13. Level - Este mando ajusta el nivel de volumen individual del preset activo
en ese momento.
14. EQ Knobs - Estos mandos ajustan la cantidad de realce de agudos, medios
o graves para el modelo de amplificador del preset activo entonces.
15. Gain - Este mando ajusta la cantidad de control o de distorsión del modelo
elegido en el preset que estéactivo entonces.
16. Data - Sirve para elegir presets, y para aumentar o disminuir el valor de un
parámetro seleccionado.
17. Reverb - Ajusta la cantidad de efecto de reverberación añadida al preset
activo en ese momento.
18. Delay/Fback - Ajusta la cantidad de efecto de retardo añadida al preset
activo. Se utiliza junto con el botón Shift para ajustar el número de repeticiones
(realimentación) que produce el retardo.
19. Effects/Speed - Este mando sirve para ajustar el nivel de modulación o de
cambio de tono del efecto del preset activo en esos momentos. También se
utiliza junto con el botón Shift para ajustar la velocidad de los efectos de
modulación, la cantidad de desafinación o de cambio de tono, y la sensibilidad
del Auto Wah.
20. Effects Matrix - Le ofrece una indicación visual del tipo de efecto de
modulación o de cambio de tono elegido para el preset que estéactivo
entonces.
9.Numeric Display - The Display shows the currently active Preset number
while in Performance mode, and Parameter values during certain editing
functions.
10. Model Matrix - The Model Matrix provides a visual indication as to which
Amp Model is currently active.The name of the currently active Amp Model will
light.
11. Model Select - This knob is used to select the desired Amp Model.
12.Master Volume - The MasterVolume adjusts the output level of all Presets.
13. Level - This knob adjusts the individual volume level of the currently active
Preset.
14. EQ Knobs - These knobs adjust the amount of Treble, Midrange, and Bass
frequency enhancement for the model in the currently active Preset.
15. Gain - This knob adjusts the amount of drive or distortion content in the
model in the currently active Preset.
16. Data - This knob is used to select Presets, and to increase or decrease the
value of a selected Parameter.
17. Reverb - This knob adjusts the amount of Reverb effect added to the
currently active Preset.
18. Delay/Fback - This knob adjusts the amount of Delay effect added to the
currently active Preset. It is also used in conjunction with the Shift button to
adjust the number of repeats (Feedback) the Delay will produce.
19. Effects/Speed - This knob is used to adjust the level of Modulation or Pitch
Shifting effect in the currently active Preset. It is also used in Conjunction with
the Shift button to adjust the Speed of the Modulation Effects, the Amount of
the Shifted Pitch or Detune, and the Sensitivity of the Auto Wah.
20. Effects Matrix - The Effect Matrix provides a visual indication of the
selected type of Modulation or Pitch Shifting Effect in the the currently active
Preset.
Page / Página 4
ENGLISH
ESPAÑOL

J-Station User’s Guide / Manual
Section 1 - Introduction /Sección 1 - Introducción
ENGLISH
ESPAÑOL
1. Left/Right Outputs - Connect one of these jacks to a channel input on
your mixer for mono applications, or both of these jacks to two channel inputs
on your mixer for stereo applications. Be sure to select the desired output
mode from the Utility menu. See page 28 for more information on selecting the
output mode.
2. MIDI In/J8 Selector Switch - This switch is used to select whether the 5
pin DIN jack will be used for the Johnson J8 Foot Controller, or as a MIDI input.
Push this switch to the right for MIDI applications, and to the left for J8 use.
3. MIDI In/J8 Jack - Connect either the J8 Foot Controller, or the MIDI Out
of your computer to this jack for remotely controlling, or programming the J-
Station. Be sure to set the MIDI In/J8 selector switch to MIDI before connecting
any MIDI device.
4. MIDI Out/Thru - Connect from this jack to either the MIDI Input on your
computer for sending information from the J-Station to the computer, or to the
MIDI Input on other MIDI devices you wish to control.
5. Footswitch Jack - Connect the J3 Footswitch to this jack for Bank Up, Bank
Down, and Preset select.
6. S/PDIF Digital Output - This is the digital output from the J-Station.The
signal at this output is in a stereo digital format, and is to be connected to a
digital S/PDIF input such as those found on digital recording devices.
ATTENTION: Do not connect the S/PDIF output to analog auxiliary,
CD, phono, or tape inputs on consumer electronic
devices. It is not compatible with these inputs.
7. Power Jack - Connect only the provided PS0913B or PSS3 power supply to
this jack.
1. Salidas izda/dcha - Para aplicaciones mono, conecte una de estas clavijas a
una entrada de canal de su mezclador, y para stereo, conecte ambas clavijas a las
entrdas de dos canales. Asegúrese de elegir el modo de salida que quiera en el
menúde utilidades. Para más información sobre el procedimiento de selección
del modo de salida, vea la página 28.
2. Selector entrada MIDI/J8 - Este interruptor sirve para elegir si el
conector DIN de cinco puntas va a ser usado para la pedalera de control J8
de Johnson, o como entrada MIDI. Coloque este interruptor hacia la derecha
para aplicaciones MIDI, y hacia la izquierda para utilizar el conector como
entrada de la J8.
3. Clavija MIDI In/J8 - Conecte a esta toma la pedalera de control J8, o la
salida MIDI de su ordenador para un control remoto o para programar la J-
Station.Antes de conectar ninguna unidad MIDI, asegúrese de ajustar a MIDI el
selector entrada MIDI/J8.
4. Salida MIDI/Thru - Conecte esta clavija a la entrada MIDI de su ordenador
para enviar información desde la J-Station al ordenador, o a la entrada MIDI de
otras unidades MIDI que quiera controlar.
5.Toma para pedal de disparo - Conecte a esta toma el pedal de disparo
J3 para poder ir pasando por los distintos bancos y para la selección de
presets.
6. Salida digital S/PDIF - Es la salida digital de la J-Station. En ella, la señal
estáen un formato digital stereo, y debe ser conectada a una entrada digital
S/PDIF como la de algunas unidades de grabación digital.
ATENCION: No conecte la salida S/PDIF a entradas analógicas
auxiliares, de CDs, de tocadiscos o de cinta de unidades
electrónicas no profesionales. No es compatible con
esas entradas.
7. Entrada de corriente - Conecte solo a esta clavija las fuentes de
alimentación PS0913B y PSS3.
Side Panels
1. Input - Connect your instrument to this jack.
2. Headphone Output - Connect stereo headphones to this jack. Do not
connect a mono plug here as doing so may damage the output driver.
3. Power Switch - This switch is used to turn the J-Station on and off.
Paneles laterales
1. Entrada - Conecte su instrumento a esta toma.
2. Salida de auriculares - Conecte unos auriculares stereo a esta toma.
No conecte aquíninguna clavija mono ya que podría llegar a dañar la unidad
de salida.
3. Interruptor de encendido - Este interruptor sirve para encender y
apagar la J-Station.
Panel traseroRear Panel
Page / Página 5

J-Station User’s Guide / User’s Guide
Section 1- Introduction
J-Station User’s Guide / Manual
Section 1 / Sección 1 - Introducción
Page / Página 6
ENGLISH
ESPAÑOL
Inicio
Conexiones
Antes de conectar la J-Station, asegúrese de que estédesconectada la etapa de
potencia de sus altavoces y de que la J-Station estéapagada.
Hay varias opciones de conexión cuando utilice la J-Station.Puede funcionar en
mono en un canal, en stereo en dos canales, puede conectar esta pedalera a la
entrada de una grabadora digital o de una mezcladora, o a una combinación de
ambas. Los diagramas siguientes le muestran las conexiones que debe hacer para
algunas de estas opciones.
Ajuste Mono/Stereo
Conecte su instrumento a la entrada de la J-Station. Conecte la salida izquierda
(mono) de la J-Station o la izquierda y la derecha (stereo) a las entradas de linea
de un mezclador. Conecte la fuente de alimentación incluida entre la entrada de
corriente de la J-Station y una salida de corriente.
Ajuste digital S/PDIF
La J-Station incluye una salida digital S/PDIF que permite eliminar las múltiples
conversiones A/D y D/A que hay que hacer durante las grabaciones digitales.
Conecte la salida S/PDIF de la J-Station a la entrada S/PDIF de su grabadora o
mezcladora digital. Para poder utilizar esta salida su unidad receptora deberá
tener entradas S/PDIF. Puede usar simultáneamente las entradas analógicas y
digitales de la J-Station. Asegúrese de utilizar un cable de video RCA o de 75
ohmios para realizar la conexión desde la salida digital a la unidad de grabación.
ATENCION: No conecte la salida S/PDIF a las entradas analógicas
auxiliares,de CDs , de auriculares o de cinta de unidades
electrónicas no profesionales. No es compatible con
estas entradas.
Encendido
Una vez que haya realizado las conexiones audio, gire totalmente hacia atrás el
mando Master Volume (hacia la izquierda). Coloque en la posición de
encendido el Interruptor de encendido situado en el lado izquierdo de la J-
Station. Elija en el menúde utilidades el modo de salida que más le guste. Para
más información sobre la elección del modo de salida,vea la página 28. Encienda
el mezclador y la etapa de potencia de sus altavoces.Ajuste los faders de canal
de su mezclador a su nivel nominal (0 dB). Gire el mando Master Volume de
la J-Station hasta conseguir el volumen deseado.
Getting Started
Making Connections
Before connecting the J-Station, make sure that the power amplifier for your
speakers is turned off, and that the power switch on the J-Station is off.
There are several different connection options available when using the J-
Station.You may run mono into one channel, stereo into two channels, connect
digitally to the input of a digital recorder or mixer, or a combination of these.
The following diagrams show the connections for some of these options.
Mono/Stereo Set Up
Connect your instrument to the input of the J-Station. Connect the Left (for
mono) or Left and Right (for stereo) outputs of the J-Station to the line inputs
of a mixer. Connect the provided Power Supply from the Power Jack on the J-
Station to an AC outlet.
S/PDIF Digital Set Up
The J-Station includes a S/PDIF digital output eliminating multiple A/D and D/A
conversions when recording digitally. Connect from the S/PDIF output of the J-
Station to the S/PDIF input on your digital mixer or recorder. You must have
S/PDIF inputs on the receiving device in order to use this output.You may use
the analog and digital outputs of the J-Station simultaneously. Be sure to use a
75 ohm or RCA video cable to connect from the Digital Output to a recording
device.
ATTENTION: Do not connect the S/PDIF output to analog auxiliary,
CD, phono, or tape inputs on consumer electronic
devices. It is not compatible with these inputs.
Applying Power
Once the audio connections have been made, turn the Master Volume all the
way down (counterclockwise). Turn the Power Switch located on the left side
of the J-Station to the on position. Select your desired Output mode in the
Utility menu. See page 28 for more on selecting the Output mode. Turn your
mixer and the power amp for your speakers to the on position. Set the channel
faders of your mixer to the nominal level (0 dB).Turn the Master Volume of
the J-Station up to achieve the desired volume level.

J-Station User’s Guide /
User’s Guide
Section 1 - Introduction / Section 1 hIntroduction
J-Station User’s Guide / Manual
Section 1 Introduction/ Sección 1 - Introducción
ENGLISH
ESPAÑOL
Page / Página 7
Acerca de la J-StationAbout the J-Station
After selecting a Preset, all Parameter values will relate to the values of the
knobs at the time the Preset was stored.The current position of the knobs will
not reflect the values that you are hearing.The knobs must be turned at least
one whole number before the J-Station will update the Parameter value to the
position of the knob.
Bypass Mode
The J-Station does not have a total bypass function. Some effects can be
bypassed, other effects can in essence be bypassed by turning the level down,
but the Amp Modeling will always be active.
Edit Mode
The J-Station allows you to customize Presets to suit your particular needs and
applications.Editing functions allow you to replace, or modify several aspects of
the effects which make up the Preset.When a Preset is selected on the J-Station,
the settings which were stored to that particular Preset will be recalled.There
are 2 different levels of Edit Mode:Top Level and Deep Level. Top Level editing
provides quick access to commonly adjusted Parameters. Deep Level edit mode
provides access to all Parameters. Pressing any buttons (exceptTuner or Store),
or turning any knobs will access the Top Level Edit Mode. Pressing and holding
the Shift button will access the Deep Level Edit Mode. Editing functions are also
accomplished through the use of a computer and the J-Station Editor/Librarian
software. No edits will be stored to the Preset unless the Store function is
performed. See page 9 for more information on editing functions.
Left Number Indicates Bank
El número izquierdo indica el banco
Data Knob Select Presets
El mando Data elige los presets
Left Number Indicates Bank
El número derecho indica el preset
Los presets
Los presets son posiciones numeradas de sonidos programados que se encuentran
almacenados en la J-Station.Pueden cargarlos con el mando Data.La J-Station dispone
de 30 presets de fábrica y 30 de usuario. Como es habitual, no podráguardar ningún
cambio en los presets de fábrica. Los presets de usuario son posiciones en las que
puede grabar sus creaciones. Cuando reciba de fábrica la J-Station, los 30 presets de
usuario serán un duplicado exacto de los 30 presets de fábrica.Esto le permitirácrear
sus propios presets sin tener que preocuparse por perder ninguno de los sonidos que
viene con la J-Station. Cuando encienda su J-Station por primera vez, el preset activo
quedarápor defecto el último que haya sido seleccionado. Cuando elija un preset, en
pantalla apareceráel número de ese preset. En la esquina derecha de la pantalla
apareceráun piloto que le indicarási es un preset de usuario o uno de fábrica.
Para seleccionar un preset,simplemente gire el mando Data que hay en el centro del
panel. La pantalla numérica irácambiando con cada clic del mando Data para indicarle
el preset activo en cada momento. Los presets están distribuidos en 10 bancos de
usuario y en 10 bancos de fábrica con tres presets en cada banco. El número que hay
a la izquierda de la pantalla le indica el banco y el de la derecha el preset.
The Presets
Presets are numbered locations of programmed sounds which reside in the J-
Station. Presets can be recalled with the Data knob.The J-Station comes with
30 Factory and 30 User Presets available.The Factory Presets will not allow you
to store any changes to them. The User Presets are locations where your
creations may be stored. From the factory, the 30 User Presets are exact
duplicates of the 30 Factory Presets.This allows you to make your own Presets
without the worry of losing any of the sounds that the J-Station came with.
When you first turn your J-Station on, it will default to the last preset that had
been selected.When you select a Preset,the number of the Preset will be shown
in the Display. An LED in the right corner of the Display indicates whether you
are in a User Preset or a Factory Preset.
To select a preset, simply rotate the Data knob located in the center of the
front panel.The numeric display will change with each click of the Data knob to
indicate the current preset.The Presets are arranged in 10 User Banks and 10
Factory Banks with 3 Presets in each Bank. The left number in the Display
indicates the Bank and the right number indicates the Preset.
Después de elegir un preset,todos los valores de los parámetros estarán relacionados con
los valores activos de los mandos en el momento de hacer la grabación del preset. La
posición en que estén los mandos en ese momento no reflejarálos valores del sonido que
estéescuchando. Deberágirar los mandos al menos un número completo para que la J-
Station pueda actualizar el valor del parámetro a la posición del mando.
Modo de anulación
El J-Station no tiene una función de anulación total.Algunos efectos pueden ser
anulados del todo, otros pueden serlo casi del todo bajando el nivel, pero el
modelado de amplificador siempre estaráactivo.
Modo de edición
La J-Station le permite personalizar los preset para adaptarlos a sus necesidades y
aplicaciones propias. Las funciones de edición se usan para sustituir o modificar
distintos aspectos de los efectos que forman el preset. Cuando haya elegido un
preset en la J-Station, se cargarán los ajustes almacenados dentro de ese preset
concreto. En el modo de edición hay dos niveles diferentes: el nivel superior y el nivel
profundo. El nivel superior de edición le ofrece un acceso rápido a los parámetros
ajustados con mayor frecuencia. El nivel profundo le da accceso a todos los
parámetros. Para ir al modo de nivel superior de edición pulse cualquier botón (salvo
el del afinador y el de grabación), o gire cualquier mando. Para acceder al modo
profundo mantenga pulsado el botón Shift. Puede ejecutar también las funciones de
edición por medio de un ordenador y de un software editor/biblioteca para el J-
Station. En los preset no quedaráregistrada ninguna edición salvo que la haya
grabado. Para más información sobre las funciones de edición, vea la página 9.

Modo de afinador
El afinador de la J-Station le permite afinar su instrumento de un modo preciso
antes de una sesión de grabación. Para acceder el modo de afinador, pulse el
botón Tuner. Se encenderáel botón del afinador, y en pantalla aparecerán
durante unos instantes los caracteres tu para indicarle que estáen el modo de
afinador. Para empezar la afinación, toque una nota en su instrumento (suele dar
buen resultado tocar un armónico en el doceavo traste). La ventana de la
pantalla le mostrarála nota que estésiendo tocada, y los pilotos de afinación
que hay encima de la pantalla le dirán si la nota estásostenida, bemolada o
afinada. La flecha hacia la izquierda la indica que la nota estábemolada y que
debe aumentar su tono. La flecha hacia la derecha aparece cuando la nota está
sostenida y quiere decir que debe bajar el tono. Cuando la nota estáafinada, se
enciende el piloto verde central.
Tuner Mode
The Tuner in the J-Station allows you to accurately tune your instrument prior
to a recording session. Enter Tuner mode by pressing the Tuner button. The
Tuner button will light, and the display will briefly show tu indicating that you
are inTuner mode. To begin tuning, play a note on your instrument (a harmonic
at the 12th fret usually works best).The display window will show the note being
played, and the Tuning LEDs above the Display will indicate whether you are
sharp, flat, or in tune.The arrow to the left indicates the note is flat and should
be tuned up.The arrow to the right indicates the note is sharp and should be
tuned down.When your note is in tune, the green center led will light.
J-Station User’s Guide / Manual
Section 1- Introduction / Sección 1 - Introducción
Page / Página 8
ENGLISH
ESPAÑOL
In Tuner mode, you can change your tuning reference by rotating the Data
knob.The default factory setting is A=440 Hz which will be displayed as 40.The
tuning reference ranges from 427 Hz (displayed as 27) to 453 Hz (displayed as
53), which is the equivalent of ± 50 cents (1/2 semitone) in either direction
from 440 Hz.When you scroll down from 427 Hz, you will also find alternate
dropped tunings. Alternate tunings are A = Ab (1 semitone down displayed as
Ab), A = G (1 whole tone down displayed as G), and A = Gb (3 semitones down
displayed as Gb). The display window will briefly show the currently selected
tuning reference.
Exit Tuner mode by pressing the Tuner button again.
Utility Mode
The Utility Mode contains several menus affecting global functions for the J-
Station.The Tuner/Utility button is used in conjunction with the Shift button
to gain access the Utility Mode. Once the Utilities have been accessed, pressing
the Effect Type button (<) will select the previous Utility menu, and pressing
the Tap-It button (>) will move forward through the Utility selections.Rotating
the Data knob will change the value or status of the selected Utility. Pressing
the Tuner/Utility button will exit the Utility menu and return the J-Station to
the previous mode. See page 27 for detailed information regarding the Utility
functions.
En el modo de afinador, para modificar la referencia de la afinación,gire el mando
Data. El ajuste de fábrica por defecto es A=440 Hz, que apareceráen pantalla
como 40. La referencia de afinación varía entre 427 Hz (que aparece en pantalla
como 27) y 453 Hz (aparece como 53), lo que equivale a ±50 centésimas (1/2
semitono) en ambas direcciones desde 440 Hz. Si baja de los 427 Hz, también
podráacceder a afinaciones alternativas no standarizadas. Las afinaciones
alternativas son A = Ab (1 semitono por debajo y aparece como Ab), A = G (1
tono por debajo y aparece como G) y A = Gb (3 semitonos por debajo y
aparece como Gb). La ventana de la pantalla le mostrarádurante unos instantes
la referencia del afinador.
Para salir del modo del afinador, pulse de nuevo el botón Tuner.
Modo de utilidades
El modo de utilidades consta de varios menús que afectan a las funciones
globales de la J-Station. Para acceder al modo de utilizdades, pulse el botón
Tuner/Utility o Shift. Una vez que haya accedido al menúde utilidades, si pulsa
el botón EffectType (<) iráal menúde utilidades anterior, mientras que si pulsa
Tap-It (>) iráal menúde utilidades siguiente. Para modificar el valor o el estado
de la utilidad seleccionada, gire el mando Data. Para salir del menúde utilidades
e ir al modo anterior, pulse el botón Tuner/Utility. Vea la página 27 para
consultar una información más detallada acerca de las funciones del menúde
utilidades
Press Tuner Button to Access Tuner
Pulse el botón Tuner para acceder al afinador
Left Arrow indicates Note is flat
Right Arrow indicates Note is Sharp
Green LED indicates Notes is in Tune
La flecha izquierda indica que la nota estábemolada
La flecha derecha indica que la nota estásostenida
El piloto verde indica que la nota estáafinada
Dispay Flashes tu,
Then Shows Note Played
En la pantalla parpadea tu y aparece
después la nota que estátocando

Rotate Data Knob to select Preset
Gire el mando Data para elegir el preset
Amp Model Editing
Once you have selected the Amp Model that you intend to use, you can edit the
gain and tonal characteristics of that Model, as well as assigning a volume level
for the preset. This is done through the use of the knobs located along the
bottom of the J-Station. Each Amp Model defaults with a specific type of
Speaker Cabinet Emulation. However, you can select alternate Cabinet types.
See page 19 for more information on selecting Cabinet types.
Edición de un modelo de amplificador
Una vez que haya elegido el modelo de amplificador que quiera utilizar, puede
editar la ganancia y las características tonales de ese modelo,y puede asignar un
nivel de volumen para el preset. Para ello utilice los mandos que hay en la parte
inferior de la J-Station. Cada modelo de amplificador tiene por defecto un
simulador de recinto acústico o altavoz. Sin embargo, puede elegir otros tipos
de cajas. Para más información sobre la elección de cajas, vea la página 19.
Sección dos - Funciones de edición
Edición/creación de presets
Con la J-Station el crear un sonido con su firma personal es fácil e intuitivo. La
J-Station le permite construir sus propios presets y retocar con precisión
presets ya existentes para adaptarlos a sus necesidades. Hay dos niveles de
edición en la J-Station. El nivel superior sirve para hacer ajustes sencillos como
el de nivel o el de velocidad. El nivel profundo le permite acceder a todos los
parámetros de cada efecto para su ajuste.
Independientemente de si estácreando un preset utilizando el modo de edición
superior o el profundo, primero deberáempezar a partir de uno de los presets
de fábrica o de usuario. No es posible comenzar con un preset completamente
vacío. El número de preset no tiene por quéocupar necesariamente la posición
en la que quiera que quede ese preset; es decir, puede guardar su creación en
cualquier posición de preset de usuario durante el proceso de grabación.
Edición de nivel superior
Gire el mando Data para elegir un preset como punto de partida. Una vez que
haya seleccionado un preset, podráeditar diversos aspectos del sonido.
Section Two - Editing Functions
Editing/Creating Presets
Creating your own signature sound with the J-Station is easy and intuitive.The
J-Station lets you create your own Presets, or fine tune existing Presets to suit
your needs. There are two levels of editing in the J-Station.The Top Level editing
allows simple adjustments such as level, and speed.The Deep Level editing allows
all parameters of every effect to be adjusted.
Regardless of whether you are creating a Preset using the Top Level or Deep
Level editing modes, you must first start with one of the User or Factory
Presets. It is not possible to start with a completely empty Preset.The Preset
number does not necessarily need to be the location which you intend to have
it reside, as you can save your creation to any User Preset location during the
Store process.
Top Level Editing
Select a Preset as your starting point by rotating the Data knob.Once you have
selected a Preset, several aspects of the sound can be edited.
Selecting an Amp Model
The J-Station provides 14 Guitar Amp Models, 3 Bass Amp Models, and 2
Acoustic Models. Only one Model can be used at a time.The Models are
chosen by rotating the Select knob. The name of the currently active Model
will light in the Model Matrix.
Selección de un modelo de amplificador
La J-Station le ofrece 14 modelos de amplificador de guitarra, tres de bajo y dos
modelos acústicos. Gire el mando Select para elegir el modelo. En la matriz de
modelado se encenderáel nombre del modelo activo.
31
Left
Output Right
Output
Out/
Thru
J3 S/PDIF
Output 9VAC
1.3 Amps
MIDI In
J8
J-Station User’s Guide / Manual
Section 2 - Editing Functions / Sección 2 - Funciones de edición
Page / Página 9 ENGLISH
ESPAÑOL

Controles del amplificador
La sección de controles del amplificador consta de un mando de ganancia, uno
de agudos, otro de medios, otro de graves y otro de nivel. Estos mandos ajustan
el control de distorsión, la ecualización y el volumen de los modelos de
amplificador elegidos. Cuando estáseleccionado, cada modelo de amplificador
tiene por defecto un valor para cada mando. Cuando elija por primera vez un
modelo de amplificador, los mandos no reflejarán necesariamente los valores
activos asociados al sonido que estéescuchando. En otras palabras, el
amplificador "no se fija" en los ajustes activos del mando cuando se elige un
modelo de amplificador por primera vez. Una vez que haya girado el mando
como mínimo un número completo, el sonido seráactualizado para reflejar la
posición activa de los mandos.A continuación le hacemos una breve descripción
de la función de cada uno de los mandos.
Amp Controls
The amp control section consists of a Gain,Treble, Mid, Bass, and Level knob.
These knobs adjust the selected amp models Drive, EQ, and Volume. Each amp
model has a default knob setting when it is selected.When you first select an
amp model, the knobs will not necessarily reflect the current values associated
with the sound you are hearing. In other words, the amp does not “look”at the
current setting of the knob when an amp model is first selected. Once a knob
is turned at least one whole number, the sound will update to reflect the knobs
current position.The following is a description of each knobs function.
J-Station User’s Guide / Manual
Section 2- Editing Functions / Sección 2 - Funciones de edición
Page / Página 10
ENGLISH
ESPAÑOL
Gain - This knob controls the amount of distortion gain (drive).
Treble - This knob is used to increase or decrease the amount of high
frequency enhancement.
Mid - This knob is used to increase or decrease the amount of mid-range
enhancement.
Bass - This knob is used to increase or decrease the amount of low frequency
enhancement.
Level - This knob is used to increase or decrease the volume level for the
preset. This adjustment differs from the Master Volume in that the master
volume will increase, or decrease the level of all presets.The level knob will only
increase or decrease the volume of the selected preset.
Effects Editing
The Effects section includes Chorus, Flanger, Phaser, Tremolo, Rotary Speaker,
AutoWah, Pitch Shifting, and Detuning. These Effects are accessed by pressing
the Effect Type button.Only one of these Effects can be used at a time. The
name of the currently selected Effect will light in the Effect Matrix. Successive
presses of the Effect Type button will advance through all available Effects.
Once the desired Effect is selected, the level of the Effect can be adjusted by
rotating the Effect knob. Pressing the Shift button and rotating the
Effect/Speed knob will adjust the Speed of any Modulation Effect (Chorus,
Flanger, Phaser,Tremolo, Rotary Speaker), the Sensitivity of the AutoWah Effect,
or the Amount of Pitch/Detune.
Ganancia - Este mando controla la cantidad de ganancia de distorsión
(control).
Agudos - Este mando sirve para aumentar o disminuir la cantidad de realce
de agudos.
Medios - Este mando sirve para aumentar o disminuir la cantidad de realce
de medios.
Graves - Este mando sirve para aumentar o disminuir la cantidad de realce
de graves.
Nivel - Sirve para aumentar o disminuir el nivel de volumen del preset. Este
ajuste se diferencia con respecto al volumen master en que este último
aumenta o disminuye el nivel de todos los presets mientras que el de nivel de
preset solo lo hace para el preset seleccionado.
Edición de efectos
La sección de efectos consta de los siguientes efectos: chorus, flanger,
modulador de fase, trémolo, altavoz giratorio, autowah, cambio de tono y
desafinación. Para acceder a estos efectos pulse el botón Effect Type. Solo
puede utilizar uno de estos efectos al mismo tiempo. En la matriz de efectos se
iluminaráel nombre del efecto seleccionado en esos momentos. Si pulsa
sucesivamente el botón Effect Type iráavanzando a través de los efectos
disponibles. Una vez que haya elegido el efecto que quiera, puede ajustar el nivel
del efecto girando el mando Effect. Si pulsa el botón Shift y gira el mando
Effect/Speed podráajustar la velocidad de cualquier efecto de modulación
(chorus, flanger, modulador de fase, tremolo, altavoz giratorio), la sensibilidad del
efecto autowah o la cantidad de la desafinación/modificación de tono.
31
Left
Output Right
Output
Out/
Thru
J3 S/PDIF
Output 9VAC
1.3 Amps
MIDI In
J8
Effect Name Lights
Select effect with Effect button
Elija el efecto con el botón Effect
El nombre de efecto se ilumina

Edición de retardo
El efecto de retardo incluye ajustes del nivel de retardo, tiempo de retardo y
parámetros de regeneración. El giro del mando Delay le permitiráajustar el
nivel del retardo en el preset activo en ese momento. Si pulsa el botón Shift y
gira el mando Delay ajustarála regeneración (número de repeticiones) del
efecto de retardo. El botón Tap-It se utiliza para ajustar el tiempo de retardo
(la longitud de tiempo que hay entre cada repetición). La pulsación rítmica sobre
este botón hace que las repeticiones se sincronicen con la velocidad del golpeo.
Edición de reverberación
El único parámetro ajustable en el modo de edición de nivel superior para la
reverb es el nivel de reverberación. El giro del mando Reverb ajustarála
cantidad de reverb que es añadida a la señal.
Edición de compresor
El compresor le ofrece una compresión suave y transparente con la capacidad
de ajustar el ratio o relación, la ganancia y el bypass o activar el efecto. La
pulsación del botón Compressor haráque el efecto se active o se desactive.
Si mantiene pulsado el botón Compressor accederáal parámetro Ratio en el
cual podrágirar el mando Data para cambiar ese valor de relación. Si pulsa el
botón Shift y mantiene pulsado el botón Compressor accederáal parámetro
de ganancia del compresor, cuyo valor podráajustar si gira el mando Data.
Edición de puerta de ruidos
La puerta de ruidos es un efecto extremadamente útil que detiene la posible
emisión de ruido por su amplificador cuando no estátocando. Pulse el botón
Gate para activar o desactivar esta puerta de ruidos. El mantener pulsado el
botón Gate le daráacceso al parámetro de umbral de la puerta, cuyo valor
podrámodificar si gira el mando Data. Si pulsa el botón Shift y mantiene
pulsado el botón Gate iráal parámetro de tiempo de ataque de la puerta de
ruidos. Este tiempo de ataque puede ser ajustado con solo girar el mando Data.
Este tiempo de ataque es la longitud de tiempo que tarda la puerta de ruidos en
abrirse una vez que usted comienza a tocar.
Delay Editing
The Delay effect includes adjustments for the Delay Level, Delay Time, and
Regeneration Parameters. Rotating the Delay knob will adjust the Level of the
delay in the currently active Preset. Pressing the Shift button and rotating the
Delay knob will adjust the Regeneration (number of repeats) of the Delay
effect.The Tap-It button is used to adjust the Delay Time (the length of time
between repeats). Tapping this button synchronizes the repeats to the rate at
which it was tapped.
Reverb Editing
The Reverb Level is the only Reverb parameter available for adjustment in the
Top Level edit mode. Rotating the Reverb knob will adjust the amount of
Reverb added to the signal.
Compressor Editing
The Compressor provides smooth and transparent compression with the ability
to adjust the Ratio, Gain and bypass or activate the Effect. Pressing the
Compressor button will turn the Compressor on and off. Pressing and holding
the Compressor button will access the Ratio and rotating the Data knob will
change the Ratio. Pressing the Shift button and then pressing and holding the
Compressor button will access the Compressor’s Gain Parameter and
rotating the Data knob will adjust the Gain.
Noise Gate Editing
The Noise Gate is an extremely useful effect that stops noise from coming
through your amp when you are not playing. Pressing the Gate button will turn
the Noise Gate on and off. Pressing and holding the Gate button will access the
Gate Threshold and rotating the Data knob will adjust the Threshold. Pressing
the Shift button and then pressing and holding the Gate button will access the
Noise Gate’s Attack Time.The Attack Time can then be adjusted by rotating the
Data knob..The Attack Time is the length of time it takes the Noise Gate to
open once you begin playing.
J-Station User’s Guide / Manual
Section 2 - Editing Functions / Sección 2 - Funciones de edición
ENGLISH
ESPAÑOL
Page / Página 11

Edición de nivel profundo
Elija un preset que vaya a ser su punto de partida girando el mando Data. Una
vez que haya elegido un Preset,podráeditar cada uno de los aspectos del sonido
en el modo de edición de nivel profundo. Para acceder a esta edición de nivel
profundo, mantenga pulsado el botón Shift durante 3 segundos. Este botón
comenzaráa parpadear y después por la pantalla pasarábrevemente la palabra
edit. Tras ello la pantalla le mostraráun número entre 0y 39 que se
corresponderáa los 40 posibles parámetros distintos que pueden ser ajustados.
Use el botón EffectType (<) para elegir el número de parámetro anterior y el
botón Tap-It (>) para elegir el parámetro siguiente. Una vez que haya elegido
el parámetro que quiera, la pantalla irácambiando alternativamente entre el
número de parámetro elegido y el valor de dicho parámetro. Gire el mando
Data para modificar el valor del parámetro activo. Las tablas siguientes le
ofrecen un listado con cada uno de los parámetros, el número de parámetro
correspondiente y los valores posibles para cada uno de ellos.
Parámetro
Compresor
Activo/Bypass
Umbral
Ratio/Relación
Ganancia
Frecuencia
Número parámetro
00
01
02
03
04
Valores parámetro
00 = Bypass
01 = On
0 a 50 = -50dB a 0dB
00 = 1.1:1
01 = 1.2:1
02 = 1.5:1
03 = 2:1
04 = 3:1
05 = 4:1
06 = 6:1
07 = 8:1
08 = 10:1
09 = infinito:1
00 a 30 = 0dB a 30dB
00 = 50 Hz
01 = 63 Hz
02 = 80 Hz
03 = 100 Hz
04 = 125 Hz
05 = 160 Hz
06 = 200 Hz
07 = 250 Hz
08 = 315 Hz
09 = 400 Hz
10 = 500 Hz
11 = 630 Hz
12 = 800 Hz
13 = 1 kHz
14 = 1.25 kHz
15 = 1.6 kHz
16 = 2 kHz
17 = 2.5 kHz
18 = 3.15 kHz
19 = Rango completo
Deep Level Editing
Select a Preset which will be your starting point by rotating the Data knob.
Once you have selected a Preset, every aspect of the sound can be edited in the
Deep Level edit mode. To access the Deep Level editing, press and hold the
Shift button for 3 seconds.The Shift button will begin to blink and the word
edit will briefly scroll across the display.Then the Display will show a number
between 0and 39 which corresponds to the 40 different Parameters available
for adjustment. Use the Effect Type (<) button to select the previous
Parameter number, and the Tap-It (>) button to select the next Parameter
number. Once the desired Parameter has been selected, the Display will
alternate between showing the selected Parameter number, and the value for
the Parameter. Rotate the Data knob to change the value of the selected
Parameter. The following charts list every Parameter, the corresponding
Parameter number, and the possible values for each parameter.
Parameter
Compressor
On/Bypass
Threshold
Ratio
Gain
Frequency
Parameter Number
00
01
02
03
04
Parameter Values
00 = Bypass
01 = On
0 to 50 = -50dB to
0dB
00 = 1.1:1
01 = 1.2:1
02 = 1.5:1
03 = 2:1
04 = 3:1
05 = 4:1
06 = 6:1
07 = 8:1
08 = 10:1
09 = infinity:1
00 to 30 = 0dB to
30dB
00 = 50 Hz
01 = 63 Hz
02 = 80 Hz
03 = 100 Hz
04 = 125 Hz
05 = 160 Hz
06 = 200 Hz
07 = 250 Hz
08 = 315 Hz
09 = 400 Hz
10 = 500 Hz
11 = 630 Hz
12 = 800 Hz
13 = 1 kHz
14 = 1.25 kHz
15 = 1.6 kHz
16 = 2 kHz
17 = 2.5 kHz
18 = 3.15 kHz
19 = Full Range
J-Station User’s Guide / Manual
Section 2- Editing Functions / Sección 2 - Funciones de edición
Page / Página 12
ENGLISH
ESPAÑOL

Parámetro
Puerta de ruido
On/Bypass
Tiempo de ataque
Umbral
Número parámetro
16
17
18
Valores parámetro
00 = Bypass
01 = On
00 - 10
01 - 99
Parámetro
Simulador de caja
Tipo de caja
Número parámetro
15
Valores parámetro
00 = Sin recinto acústico
01 = Brit 4x12
02= Johnson 4x12
03 = Fane 4x12
04 = Johnson 2x12
05 = American 2x12
06 = Jennings Blue
2x12
07 = Tweed 1x12
08 = Blonde 2x12
09 = Bass 4x10 c/
Tweeter
10 = Trompeta plegada
1x18
11 = Flexi Bass
Parámetro
Modeladoo amplificador
Tipo de modelo
Ganancia
Agudos
Medios
Graves
Nivel
Número parámetro
09
10
11
12
13
14
Valores parámetro
00 = J Crunch
01 = J Solo
02 = J Clean
03 = Boutique
04 = Rectified
05 = Brit Stack
06 = Brit Class A
07 = BlackFace
08 = Boat Back
09 = Flat Top
10 = Hot Rod
11 = Tweed
12 = Blues
13 = Fuzz
14 = Modern
15 = British
16 = Rock
17 = More A1
18 = More A2
00 - 90
00 - 90
00 - 90
00 - 90
00 - 90
Parameter
Wah/modificación tono
On/Bypass
Tipo wah
Wah en talón
Wah en puntera
Número parámetro
05
06
07
08
Valores parámetro
00 = Bypass
01 = On
00
00 - 127
00 - 127
Parameter
Noise Gate
On/Bypass
Attack Time
Threshold
Parameter Number
16
17
18
Parameter Values
00 = Bypass
01 = On
00 - 10
01 - 99
Parameter
Cabinet Emulator
Cabinet Type
Parameter Number
15
Parameter Values
00 = No Cabinet
01 = Brit 4x12
02= Johnson 4x12
03 = Fane 4x12
04 = Johnson 2x12
05 = American 2x12
06 = Jennings Blue
2x12
07 = Tweed 1x12
08 = Blonde 2x12
09 = Bass 4x10 w/
Tweeter
10 = Folded Horn
1x18
11 = Flexi Bass
Parameter
Amp Modeling
Model Type
Gain
Treble
Mid
Bass
Level
Parameter Number
09
10
11
12
13
14
Parameter Values
00 = J Crunch
01 = J Solo
02 = J Clean
03 = Boutique
04 = Rectified
05 = Brit Stack
06 = Brit Class A
07 = BlackFace
08 = Boat Back
09 = Flat Top
10 = Hot Rod
11 = Tweed
12 = Blues
13 = Fuzz
14 = Modern
15 = British
16 = Rock
17 = More A1
18 = More A2
00 - 90
00 - 90
00 - 90
00 - 90
00 - 90
Parameter
Wah/Pitch
On/Bypass
Wah Type
Wah Heel
Wah Toe
Parameter Number
05
06
07
08
Parameter Values
00 = Bypass
01 = On
00
00 - 127
00 - 127
J-Station User’s Guide / Manual
Section 2 - Editing Functions / Sección 2 - Funciones de edición
Page / Página 13 ENGLISH
ESPAÑOL

J-Station User’s Guide / Manual
Section 2- Editing Functions / Sección 2 - Funciones de edición
Parámetro
Volumen
Nivel general
Pedal de volumen
Número parámetro
38
39
Valores parámetro
00 - 127
00 - 127
Parámetro
Reverb
On/Bypass
Tipo
Nivel
Difusión
Densidad
Decaimiento
Número parámetro
32
33
34
35
36
37
Valores parámetro
00 = Bypass
01 = On
00 = Club
01 = Estudio
02 = Baño
03 = Láminas
04 = Escenario
05 = Garage
06 = Salón
07 = Iglesia
08 = Estadio
09 = 2 muelles 7”
10 = 2 muelles 14”
11 = 3 muelles 14”
12 = Rattle & Boing
00 - 99
00 - 99
00 - 99
00 - 09
Parámetro
Retardo
On/Bypass
Tipo
Nivel
Tiempo ret. amplio
Tiempo ret. preciso
Realimentación ret.
Número parámetro
26
27
28
29
30
31
Valores parámetro
00 = Bypass
01 = On
00 = Retardo mono
01 = Retardo analógico
02 = Retardo ping pong
03 = Retardo ping
analógico
00 - 99
00 - 30
01 - 99
00 - 99
Parámetro
Efectos
On/Bypass
Type
Nivel
Velocidad
Profundidad
Regeneración
Posición
Número parámetro
19
20
21
22
23
24
25
Valores parámetro
00 = Bypass
01 = On
00 = Chorus
01 = Flanger
02 = Modulador de fase
03 = Tremolo
04 = Altavoz giratorio
05 = Filtro de envolvente
06 = Mod.tono/Desafinación
Depende del efecto escogido
00 = Modelado pre
amplif.
01 = Modelado post
amplif.
Parameter
Volume
Master Level
Volume Pedal
Parameter Number
38
39
Parameter Values
00 - 127
00 - 127
Parameter
Reverb
On/Bypass
Type
Level
Diffusion
Density
Decay
Parameter Number
32
33
34
35
36
37
Parameter Values
00 = Bypass
01 = On
00 = Club
01 = Studio
02 = Bathroom
03 = Plate
04 = Soundstage
05 = Garage
06 = Hall
07 = Church
08 = Arena
09 = 2 Spring 7”
10 = 2 Spring 14”
11 = 3 Spring 14”
12 = Rattle & Boing
00 - 99
00 - 99
00 - 99
00 - 09
Parameter
Delay
On/Bypass
Type
Level
Delay Time Course
Delay Time Fine
Delay Feedback
Parameter Number
26
27
28
29
30
31
Parameter Values
00 = Bypass
01 = On
00 = Mono Delay
01 = Analog Delay
02 = Pong Delay
03 = Analog Pong
Delay
00 - 99
00 - 30
01 - 99
00 - 99
Parameter
Effects
On/Bypass
Type
Level
Speed
Depth
Regeneration
Position
Parameter Number
19
20
21
22
23
24
25
Parameter Values
00 = Bypass
01 = On
00 = Chorus
01 = Flanger
02 = Phaser
03 = Tremolo
04 = Rotary Speaker
05 = Envelope Filter
06 = Pitch/Detune
Effect Dependent
Effect Dependent
Effect Dependent
Effect Dependent
00 = Pre Amp
Modeling
01 = Post Amp
Modeling
Page / Página 14
ENGLISH
ESPAÑOL

lmacenamiento/copia de un Preset
Una vez que haya editado un preset a su gusto, deberáalmacenar los cambios
en un preset de usuario si quiere que la J-Station recuerde sus modificaciones.
Si elige un nuevo Preset, o apaga la J-Station antes de ejecutar la función de
almacenamiento haráque se pierdan las modificaciones que hubiese hecho. El
botón Store se utiliza para guardar cualquier modificación que haya realizado
en un preset, o para copiar un preset en una posición diferente. Los pasos
siguientes le describen el proceso de almacenamiento o copia de un preset:
1.Pulse una vez el botón Store. En la pantalla comenzaráa parpadear el número
de preset para indicar que puede elegir una nueva posición de preset.
2. Gire el mando Data para elegir la posición de preset en la que vaya a guardar
las modificaciones.
3. Pulse de nuevo el botón Store para finalizar la función de almacenamiento.
Para copiar un preset en una nueva posición, elija primero el preset que quiera
copiar y después siga los pasos 1 a 3 anteriores.
Storing/Copying a Preset
After a Preset has been edited to your liking, the changes must be stored to a
User Preset if the J-Station is to remember your modification. Selecting a new
Preset, or turning the J-Station off before performing the Store function will
cause the modifications that you had made to be lost.The Store button is used
to save any modifications that you had made to a Preset, or to copy a Preset to
a different location. The following steps outline the procedure for Storing or
copying a Preset:
1. Press the Store button once. The Display will begin to flash the Preset
number indicating that you can select a new Preset location.
2. Rotate the Data knob to select the Preset location where changes will be
saved.
3. Press the Store button again to complete the Store function.
To copy a Preset to a new location, select the Preset you wish to copy and then
follow steps 1 through 3.
1. Press Store button once
Display begins to flash
2. Rotate Data knob to select location
3. Press Store again to complete Store function
1. Pulse el botón Store una vez y
la pantalla comienza a parpadear
3. Pulse Store de nuevo para completar la
operación de almacenamiento
2.Gire el mando Data para elegir la posición
J-Station User’s Guide / Manual
Section 2 - Editing Functions / Sección 2 - Funciones de edición
Page / Página 15 ENGLISH
ESPAÑOL
Other manuals for J-STATION
1
Table of contents
Other Johnson Music Pedal manuals