Joka Carpet MAX DELUXE User manual

Gebrauchsanweisung / Instruction Manual

Inhaltsverzeichnis
1. Technische Daten ..................................................................3
2. Sicherheitshinweise..............................................................4
3. Hinweis zur Entsorgung........................................................6
4. Gerätebeschreibung..............................................................7
5. Inbetriebnahme.....................................................................7
6. Handhabung ..........................................................................7
7. Elektroteppichbürste.............................................................8
8. Entnahme der Rundbürste....................................................9
9. Kombibodendüse ..................................................................................10
10. Filteranzeige........................................................................10
11. Wechsel der Filtertüte ........................................................10
12. Motorschutz- und Abluftfilter .............................................10
13. Verstopfungen beseitigen ...................................................11
Table of contents
1. Technical Details ...................................................................3
2. Safety Instructions ................................................................4
3. Note on disposal ...................................................................6
4. Machine Description .............................................................7
5. Assembly ...............................................................................7
6. Operating Instructions ..........................................................7
7. Power Head ...........................................................................8
8. Removing the Brush Roller ..................................................9
9. Combination Nozzle ............................................................10
10. Filters ..................................................................................10
11. Changing the Filter Bag ......................................................10
12. Motor Protection and Exhaust Filter...................................10
13. Removing Blockages...........................................................11
2

67
5
8
B
1. Technische Daten
Staubsauger:
Gebläsemotor..........................................700 Watt
Unterdruck ..............................................175 mbar
(1780 mm H2O)
Luftmenge ...............................................50 l/s
Filtertüte .................................................3,5 liter, 3-lagig
Gewicht....................................................7,0 kg
Vibrationspegel .......................................<= 2,5m/s2
Schalldruckpegel ....................................67,5 dB(A)
Isolationsklasse ......................................II, doppelt isoliert
Anschlussleitung..................................... 9,5 Meter
Elektroteppichbürste
Bürstenmotor..........................................175 Watt
Arbeitsbreite ...........................................31 cm
Bürstenantrieb ........................................Zahnriemen
Bürstendrehzahl......................................2700 U/min
Für technischen Service wenden Sie sich bitte an Ihren
Fachhändler oder direkt an die W. & L. Jordan GmbH.
A Zubehör
1Kombibodendüse
2 Zubehöraufnahme
3Fugendüse
4Polsterdüse
B Service-Teile
5 Filtertüte
6 Motorschutzfilter
7 Ersatzbürste 31 cm
8 Abluftfilter „JOKA“
Vacuum Cleaner:
Vacuum Motor..............................................700 Watt
Suction ........................................................175 mbar
(1780 mm H2O)
Air Flow .......................................................50 l/s
Filter Bag.....................................................3,5 litres, 3-layer
Weight.......................................................... 7,0 kg
Vibration level..............................................<= 2,5m/s2
Sound pressure level ................................... 67,5 dB(A)*
Protection ....................................................double insulated
Cable............................................................9,5 Meter
Power head
Brush Motor.................................................175 Watt
Working width..............................................31 cm
Brush Drive.................................................. tooth belt
Brush Speed ................................................2700 rpm
1. Technical Details
For service please contact your supplier or
W. & L. Jordan GmbH directly.
A Attachments
1 Combination Nozzle
2 Attachment Clip
3 Crevice Nozzle
4 Upholstery Nozzle
B Service Parts
5 Filter Bag
6 Motor Protection Filter
7 Brush Roller 31 cm
8Exhaust Filter „JOKA“
A
1
2
4
3
3

Original Bedienungsanleitung
Lesen Sie bitte diese Gebrauchsanweisung
und beachten Sie die darin enthaltenen Ge-
brauchs-, Sicherheits- und Warnhinweise,
bevor Sie das Gerät in Betrieb nehmen.
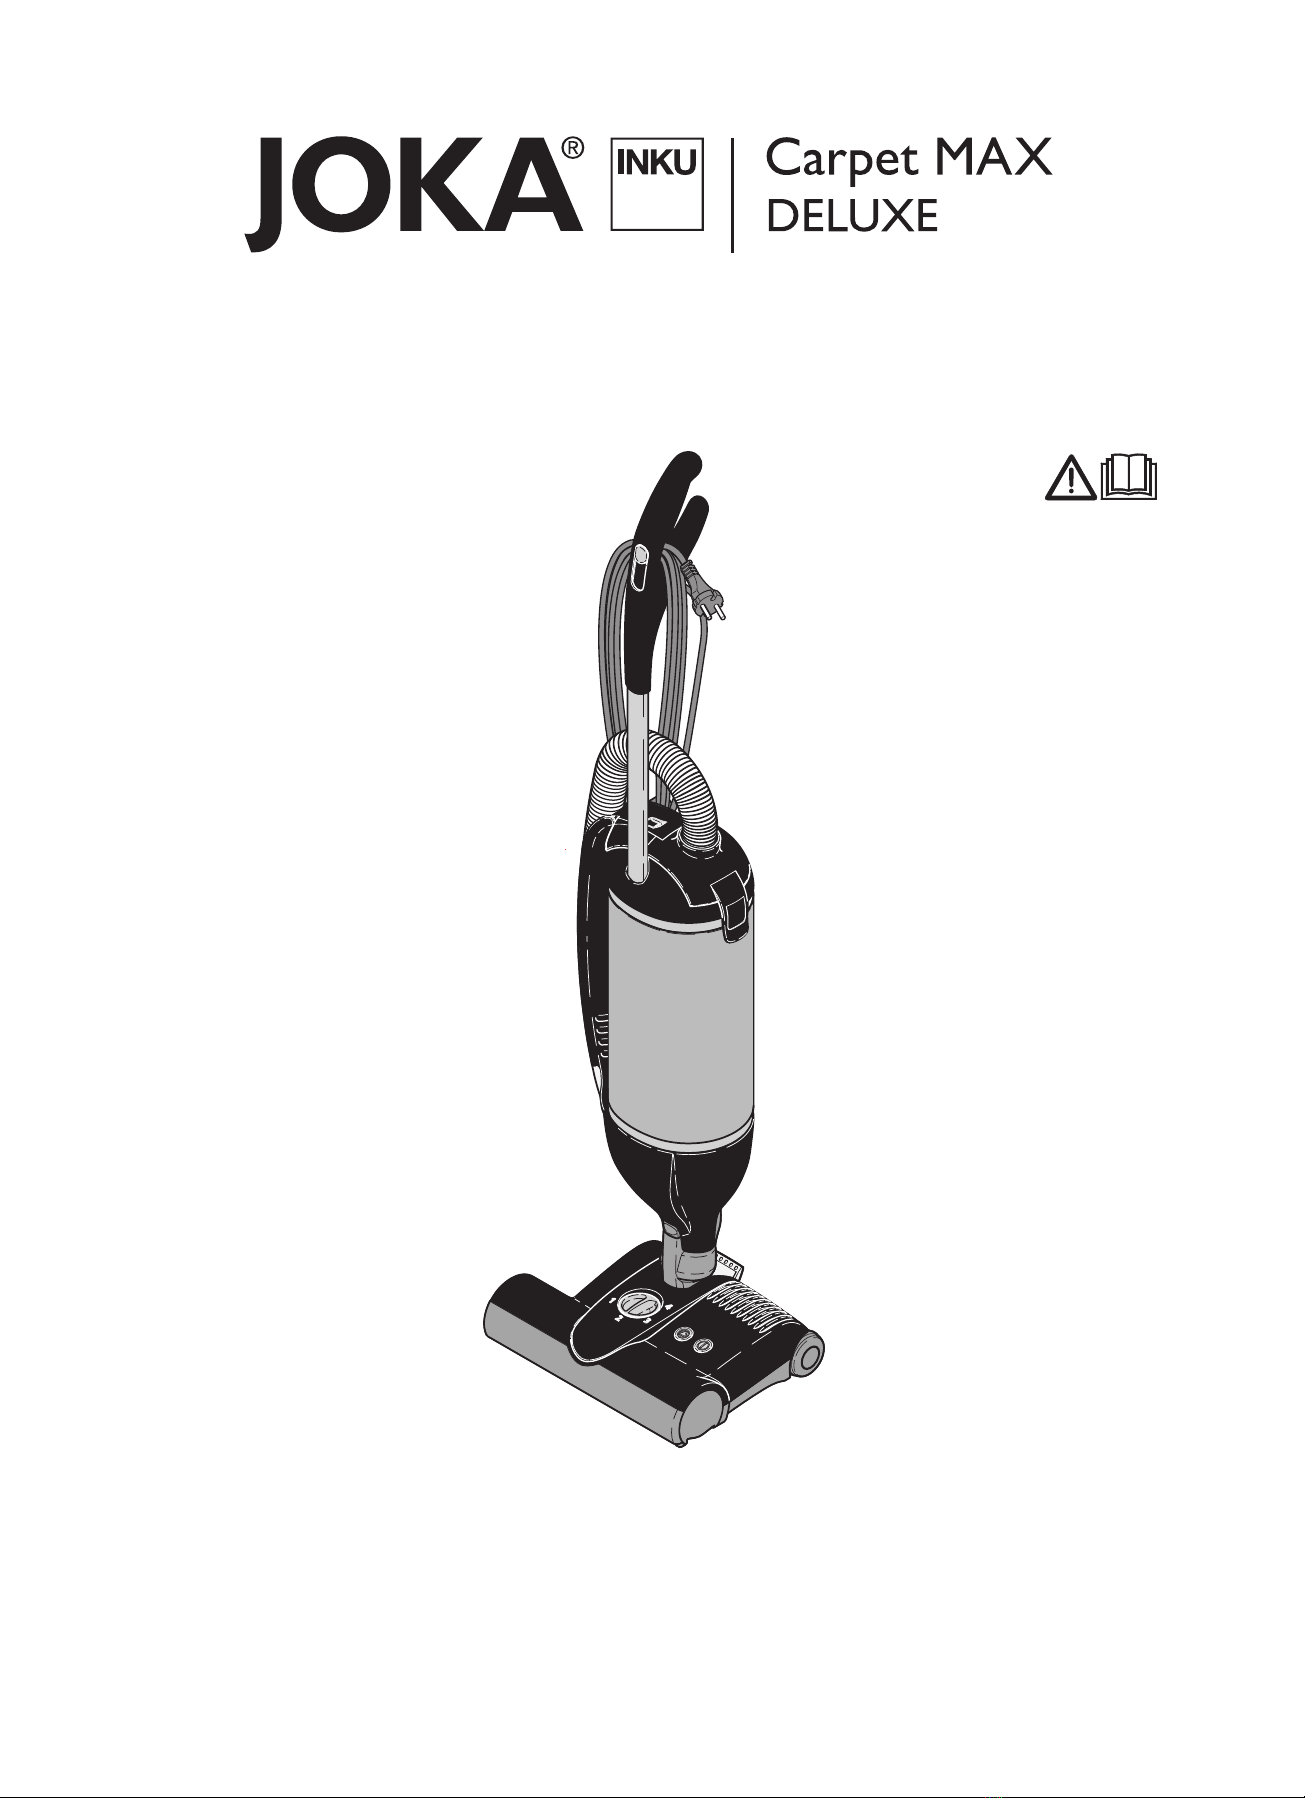
Vielen Dank, dass Sie sich für einen JOKA
Bürstsauger entschieden haben. Wir sind sicher,
dass Sie viel Freude an diesem Gerät haben
werden.
Für Ihre Hinweise und Wünsche stehen wir Ihnen
gerne unter www.joka.de oder www.inku.at zur
Verfügung.
Ihr neuer JOKA Bürstsauger ist ein hochwertiges,
langlebiges und innovatives Produkt, das nach
neuester Technologie in Deutschland entwickelt
und gefertigt wurde. Seine effiziente Saugleistung
und seine serienmäßig integrierte S-Klasse-
Filtration bieten Ihnen außergewöhnlich hohe
Standards. Erleben Sie selbst das professionelle
Saugerlebnis!
2. Sicherheitshinweise
Die Gebrauchsanweisung bitte gut aufbewahren.
Wird das Gerät an Dritte weitergegeben, muss un-
bedingt die Gebrauchsanweisung mit übergeben
werden.
Die Benutzung des Gerätes geschieht auf eige-
ne Verantwortung. Der Hersteller haftet nicht für
Schäden, die durch falsche Bedienung oder nicht
bestimmungsgemäßen Gebrauch verursacht wer-
den.
Bestimmungsgemäße Verwendung
Dieses Gerät kann von Kindern ab 8 Jahren und
darüber und von Personen mit verringerten phy-
sischen, sensorischen oder mentalen Fähigkeiten
oder Mangel an Erfahrung und/oder Wissen be-
nutzt werden, wenn sie beaufsichtigt werden oder
bezüglich des sicheren Gebrauchs des Gerätes
unterwiesen wurden und die daraus resultieren-
den Gefahren verstanden haben. Kinder dürfen
nicht mit dem Gerät spielen. Reinigung und Be-
nutzerwartung dürfen nicht durch Kinder ohne
Beaufsichtigung durchgeführt werden.
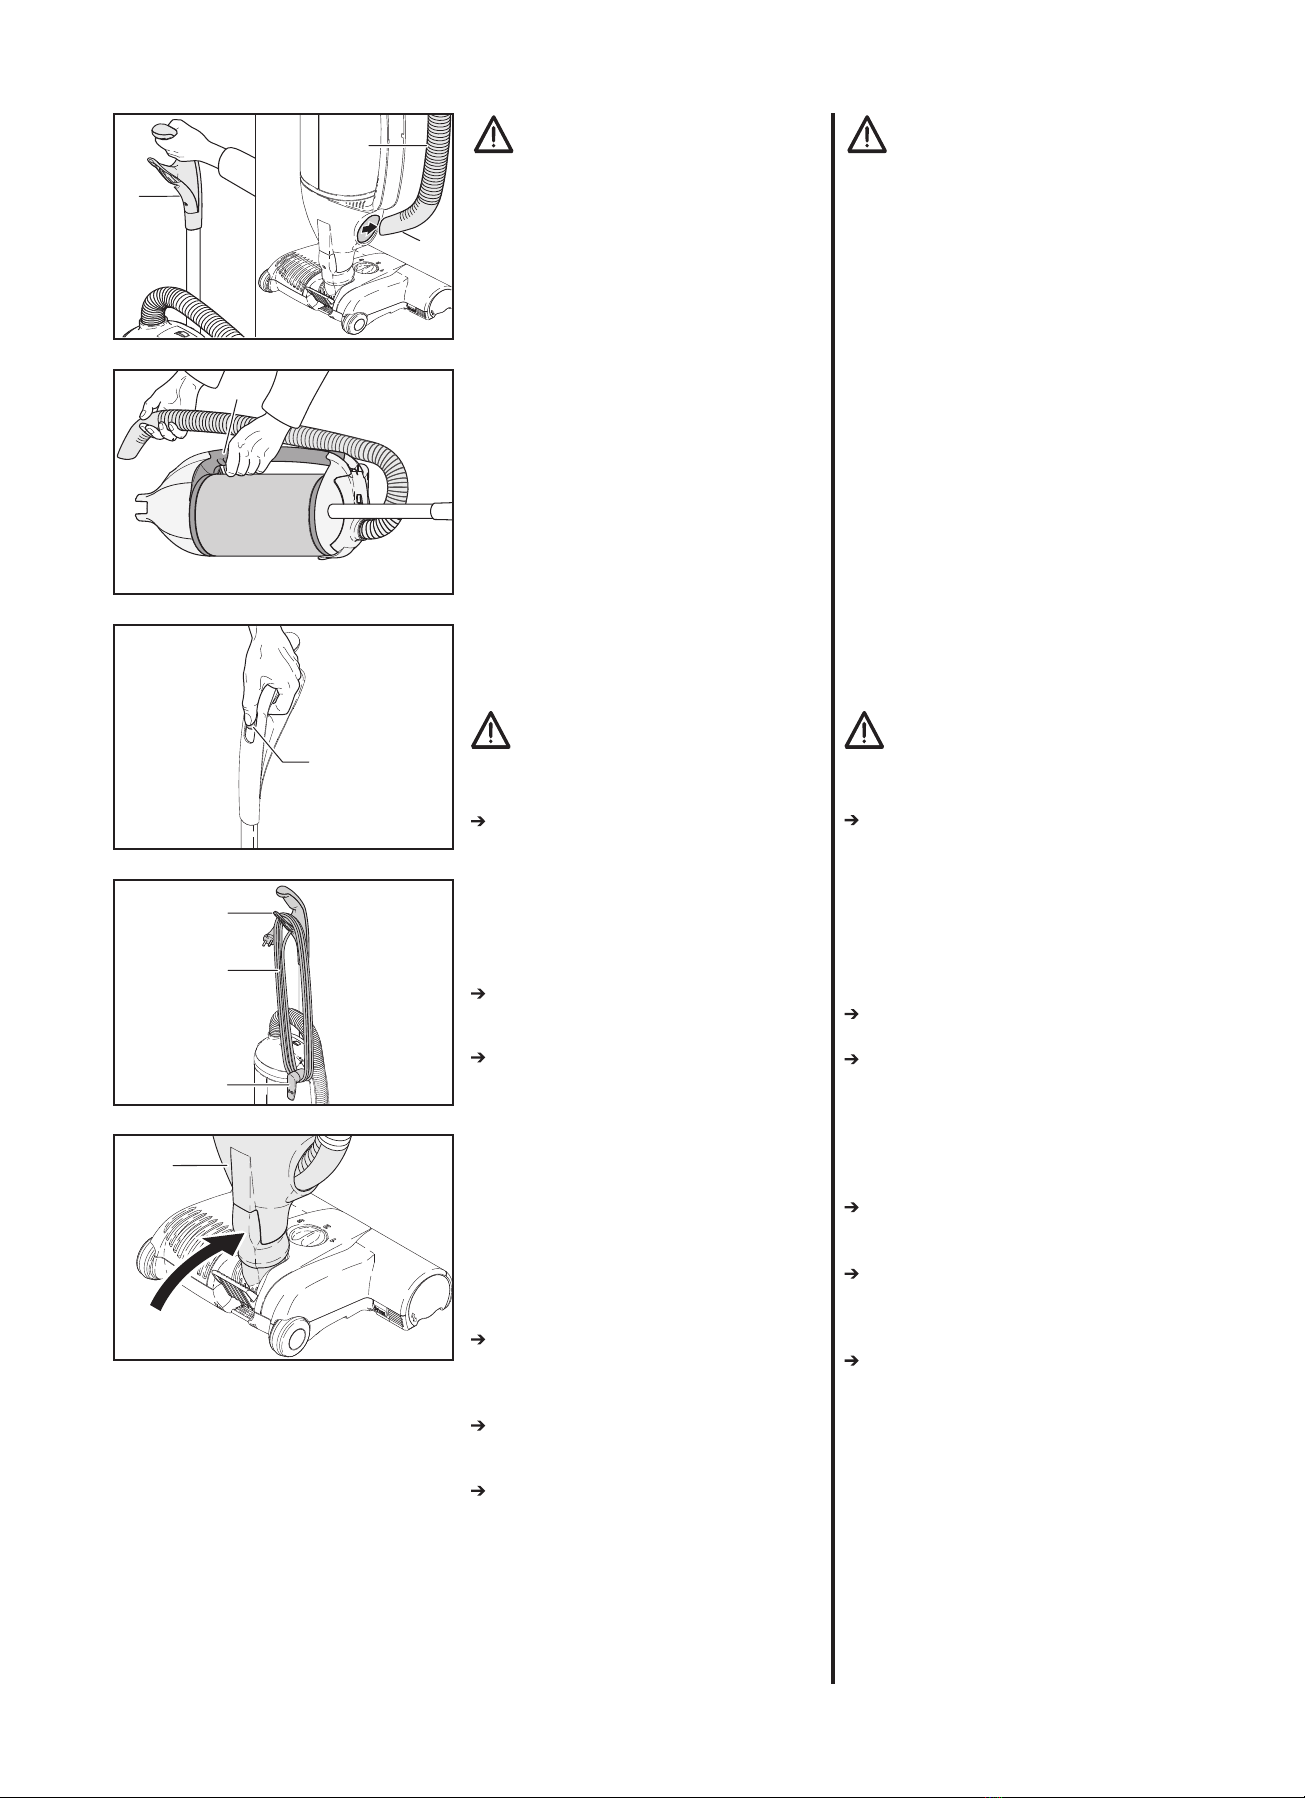
Vor Inbetriebnahme des Staubsaugers ist dieser
auf sichtbare Schäden am Gerät, der Netzan-
schlussleitung sowie dem Saugschlauch zu un-
tersuchen. Falls ein Defekt festgestellt wird, muss
dieser durch den Hersteller, seinen Kundendienst
oder qualifiziertes Servicepersonal behoben wer-
den. Ein Gerät mit Defekten nicht anschließen!
Menschen oder Tiere nicht ab- bzw. aufsaugen.
Keine scharfen, leicht entflammbaren, explosi-
ven und gesundheitsschädlichen Stoffe oder Gase
aufsaugen. Nichts Glühendes, Heißes oder Was-
ser aufsaugen.
Original instruction manual
Please read these instructions and also the
Floor maintenance guide carefully before
using the machine.
Thank you for choosing a JOKA machine. We are
sure you will enjoy owning this machine.
Your new JOKA machine is a high quality, reliable,
innovative product that was developed in Germany
with the most modern technology. The S-Class
filtration and the effective cleaning power give you
the highest standards of cleaning efficiency.
2. Safety Instructions
Please save these instructions. If you pass the
machine to a third party, please pass these on as
well. The use of the machine is at your own risk.
The manufacturer / supplier is not liable for any
injury or damage caused by incorrect usage of the
machine.
Safe Use
This appliance can be used by children aged from
8 years and above and persons with reduced
physical, sensory or mental capabilities or lack
of experience and knowledge if they are given
supervision or instruction concerning use of
the appliance in a safe way and understand the
hazards involved. Children should not play with the
appliance. Cleaning and user maintenance should
not be done by children without strict supervision.
Before using the vacuum cleaner, always check
for any signs of damage, especially to the mains
cable and hose.
If a component is damaged, it must be replaced
with a genuine JOKA part. For safety reasons this
must be done by a JOKA service representative
or an authorized service technician. The use of
non-genuine parts will waive the warranty for
this product and could pose a serious safety risk.
All repairs within the guarantee period should
be performed by an authorised JOKA service
representative.
Do not use a damaged machine.
Do not use on people or animals.
This machine must not be used for picking up
liquid, sharp objects, hot material, such as fire
ash, or hazardous/ harmful dust.
Do not use in the presence of flammable, explosive
or harmful materials and gases.
Do not touch the brush when it is turning as this
will cause a risk of injury to the fingers.
4

Niemals bei angeschlossenem oder laufenden
Gerät an die Bürste fassen! Es besteht Verlet-
zungsgefahr durch Einklemmung.
Das Gerät nur an einwandfreien und korrekt abge-
sicherten elektrischen Installationen betreiben.
Netzkabel von scharfen Kanten fern halten.
Dieser Staubsauger ist nur zur Trockenanwen-
dung bestimmt und darf nicht im Freien und unter
nassen Bedingungen verwendet oder aufbewahrt
werden.
Nach Benutzung des Gerätes den Staubsauger
ausschalten und den Netzstecker ziehen.
Den Staubsauger nur an den vorgesehenen Grif-
fen transportieren und bedienen. Handgriff wäh-
rend des Betriebes stets festhalten. Das Gerät erst
abstellen, sobald die rotierende Bürste komplett
zum Stillstand gekommen ist, der Netzschalter
ausgeschaltet und der Netzstecker gezogen wur-
de.
Wickeln Sie die Netzanschlussleitung nach dem
Betrieb wieder auf, da durch sie eine Stolperge-
fahr für Personen entsteht.
Den Staubsauger nur gemäß der Anschlusswerte
des Typenschildes anschließen und betreiben.
Benutzen Sie das Anschlusskabel oder den Saug-
schlauch nicht zum Tragen des Gerätes.
Netzstecker nicht am Kabel aus der Steckdose
ziehen.
Achten sie darauf, dass das Netzkabel niemals
eingequetscht wird.
Mit eingeschaltetem Gerät nicht über die An-
schlussleitung fahren.
Den Staubsauger niemals ohne Filtertüte bzw.
Filter benutzen. Der Filterdeckel schließt nur mit
korrekt eingesetzter Filtertüte. Wenden sie keine
Gewalt an.
Beobachten Sie die Füllanzeige des Staubbeutels
und wechseln Sie diesen bitte rechtzeitig.
Vor Hitzequellen, Feuchtigkeit und Wasser schüt-
zen und nur trocken oder mit einem leicht feuch-
ten Tuch reinigen.
Vor allen Arbeiten am Staubsauger:
Erst das Gerät ausschalten und den Netzste-
cker ziehen.
Das Gerät darf nur mit original JOKA Filtertü-
ten und original JOKA Ersatz- und Verschleiß-
teilen betrieben werden. Nur die Verwendung
von Originalteilen für dieses Produkt berechtigt
zu Garantieleistungen und gewährleistet die Be-
triebssicherheit des Gerätes. Änderungen am
Staubsauger sind nicht zulässig.
The machine should only be operated with fault-
free and correct electricity supply systems.
Do not connect a damaged appliance to the power
supply.
Keep the cable away from sharp edges and prevent
it becoming trapped, crushed, or over-stretched
(e.g. by winding on too tightly).
Use on dry surfaces only. Do not store outdoors or
in damp conditions.
When you finish or interrupt your work, always
turn off, unplug the machine and ensure the
rotating brush has stopped.
Only carry the vacuum cleaner by the carry
handle. Always hold the handle when operating
the vacuum cleaner.
Always stand the machine on a stable surface.
Rewind the mains cable if the machine is not in
use to reduce the risk of tripping.
Ensure that the connection data on the data
label (voltage and frequency) match the mains
electricity supply.
Do not carry the vacuum cleaner by the cable or
hose.
Only disconnect from the socket by pulling the
plug.
Do not run over the cable.
Do not over stretch the cable. When winding it on
the machine ensure there is some slack where it
enters the handle.
Do not use the vacuum cleaner without the filter
bag or filters. If a filter bag is not fitted, the cover
will not close. Never force it.
Inspect the filter bag indicator regularly and
change the filter bag when necessary. We
recommend changing all filters regularly, either
when they have become dirty, or once 20 filter
bags have been used.
Electrical appliance, do not expose to liquid,
moisture or heat. Only clean with a dry or slightly
damp cloth.
Always turn off and unplug the machine
before undertaking any maintenance.
This machine should only be operated with
genuine JOKA filter bags, filters and replacement
parts. The use of non-genuine parts will waive the
warranty for this product and could pose a serious
safety risk.
5

Aus Sicherheitsgründen ist die Elektroteppich-
bürste mit einem elektronischen Überlastungs-
schutz ausgestattet. Bei bestimmten Teppich-
qualitäten kann eine derart starke Bürstwirkung
eintreten, dass sie automatisch abschaltet. Sollte
dies der Fall sein: Gerät ausschalten, Netzstecker
ziehen und Bürste auf Verunreinigung prüfen. Da-
nach ist es ratsam, die Saugleistung zurückzuneh-
men bzw. den Stellknopf der Elektroteppichbürste
auf eine höhere Stufe (bis Stufe 4) zu drehen.
Zubehör
Die Steckdose am Staubsauger ist nur für original
JOKA Zubehör zu verwenden.
Allgemeine Bestimmungen
Die angegebenen Messwerte dieser Geräte-
baureihe wurden nach der Verordnung (EU) NR.
666/2013 unter Anwendung der harmonisierten
Normen EN 60312-1 und den zugehörigen Teilen
der Normen EN 60335 erstellt.
Die Gerätebaureihe carpet MAX ist als Universal-
staubsauger nach den oben genannten Verord-
nungen eingeordnet und muss als solcher geprüft
werden. Für eine hohe Energieeffizienz und tief-
gründige Reinigung Ihres Teppichbodens empfeh-
len wir das Einstellen der Bürste und die Nutzung
Ihres Staubsaugers auf Stufe 1. Der carpet MAX
ist (in der ausgelieferten Ausführung) für den Ein-
satz Teppich und auf harten Böden geeignet.
3. Hinweis zur Entsorgung
Sie können dieses Gerät kostenlos an jeder öffentlichen
Sammelstelle abgeben. Weitere Informationen erhalten Sie
durch Ihre Kommune.
For safety, the machine contains an electronic
overload protection. The power head could shut
itself off if used on certain carpets. If that should
occur, turn off the machine, unplug it, and look for
a blockage. If there is no blockage, reduce the load
on the brush roller by adjusting the brush height
to a higher level (up to 4).
Attachments
Use only genuine JOKA Attachments.
Miscellaneous Provisions
The declared values of this series have been
evaluated according to the commission regulation
(EU) No. 666/2013 applying the harmonized
standards EN 60312-1, and the applicable parts of
the EN 60335.
The series carpet MAX is classified as universal
vacuum cleaners according to the named above
regulations and has to be tested as such. For high
energy efficiency and a deep and intensive cleaning
performance we recommend using Position 1 of
the height adjustment knob. The series is in the
delivered configuration suitable for use on carpets
and hard floors.
3. Note on disposal
For disposal of used appliances, please follow the advice
of your local authority.
6

4. Gerätebeschreibung
1 Griff
2 Leistungsregler
3 Stiel
4 Anschlussleitung
5 Filtergehäuse
6 Filterdeckel
7 Leitungshaken
8 Schlauch
9 Schlauchdüse
10 Tragegriff
11 Abluftfilter
12 Filterbefestigungsringe
13 Entriegelungstaste
14 Gelenk
15 Elektroteppichbürste
16 Rastpedal
17 Kombibodendüse
Lesen Sie bitte vor Gebrauch gründ-
lich diese Gebrauchsanweisung und
die darin enthaltenen Sicherheits-
und Warnhinweise.
5. Inbetriebnahme
Ihr carpet MAX kann mit Elektroteppich-
bürste (15), Kombibodendüse (17) betrieben
werden. Stecken Sie dazu den Staubsauger
vorsichtig auf das Gelenk (14) des jeweiligen
Saugvorsatzes bis es einrastet. Bei Betrieb
mit Elektroteppichbürste kann der Staub-
sauger aufrecht hingestellt werden.
Achten Sie darauf, dass der Staubsauger
in der Mittelstellung eingerastet ist, sonst
kann das Gerät umkippen.
Danach den Schlauch (8) mit der schwarzen
Buchse in die Öffnung am Filterdeckel
(6) drücken bis sie einrastet. Schließlich
die Schlauchdüse (9) in die seitliche
Saugöffnung stecken und den Schlauch
andrücken. Fertig!
6. Handhabung
Stellen Sie sicher, dass der Schieberegler
(2) in der Stellung „OFF“ eingerastet und
somit das Gerät ausgeschaltet ist. Danach
die Anschlussleitung (4) durch Drehen des
Leitungshakens (7) lösen und den Netzste-
cker einstecken. Schalten Sie nun das Gerät
ein (2). Die Saugleistung läßt sich am Griff
regulieren. Das Gerät ist mit Sanftanlauf
ausgestattet, dadurch ergibt sich eine leicht
verzögerte Reaktion auf die Bedienung des
Reglers.
Für den Gebrauch der Elektroteppich-
bürste zuerst das Rastpedal (16) drücken.
Durch Abkippen des Gelenkes wird der
Bürstenmotor eingeschaltet und das Gerät
kann betrieben werden (siehe Abschnitt 6.
Elektroteppichbürste).
4. Machine Description
1 Handle
2 Power controller
3 Handle Tube
4 Power Supply Cable
5 Dust Bag Housing
6 Filter Cover
7 Cable Hook
8 Hose
9 Hose Handle
10 Carrying Handle
11 Exhaust Filter
12 Filter Retaining Rings
13 Release Button
14 Swivel Neck
15 Power Head
16 Foot Pedal
17 Combination Nozzle
Please read all the instructions
before using this machine.
5. Assembly
Your carpet MAX can be operated with an
electric power brush (15), or convenient
combinationnozzle (17). To assemble,carefully
attach the brush nozzle to the vacuum cleaner
through the fitting at the bottom of the vacuum
until it locks. The machine can be placed in an
upright position when used with the electric
power brush. When locking the vacuum in
the upright position, please ensure the bag
housing is clicked in place, facing forward to
the centre or the unit could overturn.
Push the black end of the hose (8) into the
connection on the filter cover (6). Finally, insert
the hose handle (9) into the suction opening on
the side and press the hose into its place on
the side of the machine.
6. Operating Instructions
Please ensure that the power controller (2)
is snapped in the “OFF” position. Then turn
the cable hook (7), release the cable (4) and
plug it into the wall mains outlet. Now you
can start the machine by moving the power
control button towards the “MAX” position.
Your machine is equipped with electronic
suction control. This may cause a slightly
delayed reaction to operating the knob.
To use the power head, press the footpedal
(16) on the rear of the power head and lower
the machine handle to an angled position.
The brush motor will then turn on.
1
4
3
8
6
5
10
11
12
13
16
15
17
2
1
4
5
12
7
9
10
12
14
16
13
14
15
6
8
9
4
2
7
+
16
7

Zur Benutzung des Schlauchs (8) mit
Schlauchdüse (9) das Gerät immer in
die aufrechte Position stellen!
Durch Herausnehmen der Schlauchdüse
(9) aus der seitlichen Saugöffnung kann der
Schlauch alleine oder mit dem Bürstsauger
Zubehör benutzt werden. Achten Sie bei der
Benutzung des Schlauchs stets darauf, dass
Sie den Griff (1) weiterhin festhalten, da das
Gerät sonst umfallen könnte.
Das Gerät kann auch ohne Saugvorsatz ver-
wendet werden. Dazu können Sie es prob-
lemlos am Tragegriff (10) transportieren.
Nach Ende des Gebrauchs das Gerät aus-
schalten (2). Ziehen Sie dann den Netzste-
cker und wickeln die Anschlussleitung (4)
über den Griff-(1) und Leitungshaken (7)
wieder auf.
Das Gerät ist mit einem Schlauchschalter
ausgerüstet. Wenn die Elektroteppichbürste
nicht anläuft, bitte den korrekten Sitz der
Schlauchdüse (9) im Gerät prüfen.
7. Elektroteppichbürste
Hinweise zum Gebrauch der
Elektroteppichbürste:
Die Bürste der Elektroteppichbürste
schaltet nur ab, wenn das Gerät in der
aufrechten Position (A) eingerastet ist.
Im abgekippten Zustand sollte das Ge-
rät ständig in Bewegung sein. Rotiert die
Bürste längere Zeit auf einer Stelle kann
die Oberfläche des Bodenbelags beschä-
digt werden.
Bitte achten Sie immer darauf, dass
Teppichkanten und –ecken nicht von der
Bürste eingezogen werden.
Bei sehr empfindlichen Bodenbelägen
wie z.B. lose gewebten, extrem langflori-
gen Teppichen oder sehr weichen, emp-
findliche Bodenbeschichtungen weisen
wir darauf hin, dass durch die Benut-
zung der Elektroteppichbürste Oberflä-
chenschäden entstehen können. Bitte
benutzen Sie bei den oben genannten
Bodenbelägen die Kombibodendüse mit
ausgeschwenkten Borsten, die Parkett-
düse oder die Schlauchdüse (9) und eine
der Düsen aus dem Joka Bürstsauger-
Zubehör.
Wir raten davon ab, alte und besonders
wertvolle handwerklich gearbeitete Tep-
pichbrücken mit der Elektroteppichbürs-
te zu reinigen.
Auf unebenen Böden ist der Kontakt mit
dem Bodenblech möglich. Vorsicht, es
können Kratzer entstehen!
Das Gerät über hohe Schwellen tragen.
When using the hose (8) and
attachments (9) , keep the machine
in upright position.
The hose handle (9) can be removed from
the side of the vacuum and can be used with
or without attachments. Also maintain a
grasp on the machine when using the hose
as it could tip if the hose is pulled too far.
The machine can also be used without a
power head or other floor tool. You can
easily carry the machine by using the
carrying handle (10).
When you have finished using the machine,
turn it off by moving the on/off switch (2)
into the off position. Then unplug the cable
(4) and wind it onto the cable hook (7) and
handle (1).
This machine is equipped with a hose
switch. When the power head does not start
please check the correct placing of the hose
nozzle (9) in the machine.
7. Power Head
Caution: Important instructions for the
use of a power head
The brush roller is off and stopped
only when the machine is in an upright
position (A) and the handle is completely
locked in place. If you have the machine
handle at an angle, the brush roller will
spin. Leaving the machine in a stationary
position for an extended period of time
while the brush roller is spinning may
cause damage to your floor or carpet.
Be sure not to allow carpet edges or
fringe into the brush.
As with any vacuum with a rotating brush,
this machine could cause damage to
loosely woven carpets or rugs, wool loop
carpets, long piled carpets, or very soft,
sensitive floor coverings. Please use the
Combination Nozzle or Parquet Brush on
these types of flooring or floor coverings.
We do not recommend the use of the
power head for cleaning old and specially
valuable hand-crafted carpets.
If you have uneven hard flooring, the
metal part underneath the machine may
come in contact with the floor, causing
scratches.
Please carry the machine across high
thresholds.
A
4
1
7
2
10
1
9
8
8

Für die professionelle und optimale Reinigung
Ihrer Teppichböden empfehlen wir die Elektro-
teppichbürste (15). Durch ein Dreh- Kipp-Gelenk
(14) ist die Elektroteppichbürste in alle Richtun-
gen beweglich und umsteuert spielerisch jedes
Hindernis. Die Elektroteppichbürste ist in der
Stärke der Bürstenwirkung variabel und sorgt
für eine optimale Reinigung bis zum Rand.
Das Rastpedal (16) arretiert das Gerät in senk-
rechter Ruhestellung und schaltet die Bürste ab.
Zum Arbeiten Rastpedal (16) betätigen und Ge-
rät nach hinten kippen. Die Bürste läuft jetzt
an. Ein Arbeiten ohne Betätigen des Rastpedals
führt auf Dauer zur Beschädigung des Gerätes.
Die Bürstenkontrolle überwacht ständig die
Funktion der Bürste.
Grün- und Rot: Die Bürstwirkung ist nicht aus-
reichend. Durch Drehen des Stellknopfes (22)
auf eine niedrigere Position, wird die Bürste
abgesenkt. Leuchten das grüne und rote Signal
auch auf Stufe 1, so ist die Bürste abgenutzt und
muß ausgetauscht werden. Diese Angaben gel-
ten nur für Teppichboden.
Grün: (20) Bürste arbeitet gut. Wir empfehlen
für den Gebrauch eine Bürsteneinstellung zu
wählen, die nur eine Stufe unterhalb der grün-
roten Anzeige liegt.
Für maximale Reinigungsleistung kann die Bür-
ste auf die niedrigste Position eingestellt wer-
den.
Rot blinkt: (21) Die Bürste wurde blockiert oder
überlastet (siehe Abschnitt 12. Verstopfungen
beseitigen). Gerät ausschalten, Netzstecker zie-
hen, Bürste auf Verunreinigung prüfen.
7a Fußschalter ein/aus
Für die Reinigung von empfindlichen Boden-
belägen ist die Elektroteppichbürste zusätz-
lich mit einem Fußschalter* (20) ausgestattet.
Ist dieser ausgeschaltet, steht die Bürste still
und eine gelbe Kontrolllampe leuchtet. Wird
der Fußschalter betätigt und das Gerät abge-
kippt (Rastpedal ausgelöst), leuchtet die Kon-
trolllampe wieder grün und die Bürste läuft
wieder.
8. Entnahme der Rundbürste
Bei allen Wartungs- und Reinigungsarbeiten:
Gerät ausschalten und Netzstecker ziehen.
Um die Rundbürste der Elektroteppichbürste zu
entnehmen, die Press-Taste (23) drücken und
gleichzeitig das Loslager (24) nach unten weg-
drehen. Die Bürste (25) etwas im Uhrzeigersinn
drehen und herausziehen. Es empfiehlt sich, re-
gelmäßig die auf der Rundbürste aufgewickelten
Fäden und Haare zu entfernen.
The use of a power head is recommended for
the optimal cleaning of carpets. The rotating
design of the swivel neck (14) allows the power
head to move in any direction, making it easily
manoeuvrable around obstacles. The power
head also has an adjustable brush height and
to-the-edge brush action for effective all round
cleaning.
By pushing the foot pedal (16) and lowering the
handle, you activate the power head and the
brush begins spinning.
Failure to use the foot pedal will cause lasting
damage to the machine. The electronic brush
control constantly monitors the status of the
brush, communicating the status through the
lights on top.
Green and red –
The brush is not fully engaged
in the carpet. The height adjustment should
be lowered. If the height adjustment is at its
lowest setting, the brush is worn and needs to
be replaced. These specifications are only valid
for carpet flooring.
Green light (20) only –
Brush is working well. We
strongly recommend selecting a brush height
that is only one level beneath that at which both
the green and red lights are on.
For maximum cleaning performance, the brush
height adjustment can be lowered to its lowest
setting.
Red flashing – The brush is blocked. (See below
chapter 12. Removing Blockages). Turn off
the machine, unplug it, and then remove the
blockage.
7a Brush on/off button
To clean delicate floor surfaces, the power
head is equipped with an on/off button* [20].
When this button is used to turn off the brush
roller, a yellow light will shine, indicating that
the head still has power. Pushing the button
again will turn the brush roller on and the
light will turn green.
8. Removing the Brush Roller
Always unplug the vacuum from the
mains outlet before dismantling any part
of the machine.
For removal of the brush roller, press the button
marked „PRESS“ (23) and turn the bearing (24)
downwards. Turn the brush (25) slightly to the
right and pull it out. We recommend to regularly
remove threads and hair, which have been
wound around the brush roller.
9
15
14 16
16
21 20
22
24
23
25
9

9. Kombibodendüse
Die Kombibodendüse (17) bietet mit dem 90°
Dreh-Kipp-Gelenk (14) größten Saugkomfort.
Die Düse verfügt über einen federnd gelager-
ten und einfach auswechselbaren Naturbors-
tenstreifen. Mit dem Fußschieber (26) kann
die Düse je nach Bedarf auf Hartboden (Bors-
ten raus) oder Teppichboden (Borsten rein)
eingestellt werden.
Sie ist zusätzlich mit eingelassenen Ver-
schleißbügeln und einem Bodenblech aus
Edelstahl für hohe Beanspruchung ausge-
stattet.
Zum Wechseln der Naturborstenstreifen der
Kombibodendüse die gelbe Abdeckung mit
einem Schraubendreher entfernen und den
Borstenstreifen herausziehen. Nach dem
Wechsel die Abdeckung wieder einrasten.
10. Filteranzeige
Die orangefarbene Filteranzeige (27) zeigt
einen reduzierten Luftstrom an. Entweder
liegt eine Verstopfung vor (siehe Abschnitt 13.
Verstopfungen beseitigen) oder die Filtertü-
te muß gewechselt werden. Je nach Art des
Füllgutes kann ein Wechsel erforderlich sein,
ohne das die Filtertüte bis oben gefüllt ist.
11. Wechsel der Filtertüte
Zum Wechseln der Filtertüte (28) den Filterde-
ckel (6) auf der Oberseite an der Verschluss-
lasche (29) entriegeln und aufschwenken.
Die Filtertüte mit dem Filtertütendeckel (30)
schließen und aus dem Filterraum heraushe-
ben. Legen Sie die neue Filtertüte in den Fil-
terraum ein. Bitte achten Sie hierbei auf die
Positionierungspfeile auf der Filtertüte. Diese
zeigen die korrekte Positionierung der Filter-
tüte an. Die grüne Lasche an der linken Sei-
te muss über dem Metallhebel liegen. Beim
Schließen des Filterdeckels wird der Metall-
hebel zur Seite gedrückt. Der Verschlusshe-
bel des Filterdeckels muss spürbar einras-
ten. Bei nicht korrekt eingelegter Filtertüte
lässt sich der Filterdeckel nicht schließen.
9. Combination Nozzle
The Combination Nozzle (17) is equipped with
a turnable swivel neck (14) and offers a full
range of manoeuverability for ease-of-use
and comfort. The nozzle has natural bristles
that can be easily replaced if worn.
The Combination Nozzle can be adjusted for
hard floors (bristles out) or carpet (bristles
in) through a slider (26).
Furthermore this nozzle is equipped with
heavy-duty embedded stainless steel clamps
and bottom plate.
To change the natural bristle brush strips of
the combination nozzle, remove the yellow
cap with a screw driver and pull out the bristle
brush strip. After changing the bristle brush
strip, the cap has to click into place again.
10. Filters
When the orange bag full indicator (27)
is showing, airflow is reduced. This could
be because the filter bag is full, the filters
clogged, or there may be a blockage (see
chapter 13. Removing blockages).
11. Changing the Filter Bag
To remove the filter bag (28), open the latch
on the side of the bag housing (29). Close the
filter bag with the sealing cap (30) and lift
it out. Insert the new filter bag into the bag
housing. Please ensure that the green bag
top is in the correct position. The green flap
on the left side of the filter bag top should
fit over the metal spring so that it covers it.
When the filter bag cover is closed with the
filter bag correctly in place, the metal spring
will move over to allow it to shut and click into
place. You cannot close the filter bag cover if
the filter bag is fitted incorrectly.
30
28
6
29
27
26
26
14
17
10

12. Motorschutzfilter und
Abluftfilter
Der Motorschutzfilter (31) ist nur zugänglich
nach Entnahme der Filtertüte. Ziehen Sie nun
den Filter an seinem Bügel nach oben heraus.
Beim Einsetzen eines neuen Motorschutzfil-
ters muss dieser fest angedrückt werden. Der
Motorschutzfilter muss gewechselt werden,
wenn er stark verschmutzt ist oder späte-
stens nach 20 Filtertüten. Gleichzeitig sollte
auch der außen liegende Abluftfilter (11) ge-
wechselt werden. Hierzu müssen die beiden
Filterbefestigungsringe (12) vorsichtig gelöst
und seitlich entfernt werden. Dann die beiden
Kunststoffschienen aus der Nut im Filterge-
häuse (5) herausziehen und den Abluftfilter
entfernen. Die Montage erfolgt in umgekehr-
ter Reihenfolge. Nur wenn der Abluftfilter
richtig montiert ist, d.h. die Kunststoffschie-
nen richtig in der Nut liegen und die Filter-
befestigungsringe den Filter abdichten und
verschlossen sind, kann der Abluftfilter seine
Wirkung entfalten.
Zur Gewährleistung der Sicherheit und
richtigen Funktion, nur Original JOKA
Bürstsauger Ersatzfilter verwenden.
Alle Filtermedien dürfen auf keinen
Fall gewaschen werden.
13. Verstopfungen beseitigen
Erscheint das orangefarbene Signal (27) am
Filterdeckel (6) bei neuwertiger Filtertüte,
kann eine Verstopfung vorliegen. Zuerst den
Schlauch (8) an der Schlauchdüse überprü-
fen. Wenn dort nur eine geringe Saugwir-
kung spürbar ist, ist er verstopft. Zuerst den
Schlauch durch Drehen des Sicherungsrings
(32) an der Innenseite des Deckels lösen.
Stecken Sie dann die Schlauchdüse (9) in den
Schlauchstutzen des Filterdeckels (6) und
saugen sie von der anderen Seite aus. Dazu
den Schlauch an der Verstopfung dehnen
und mit der flachen Hand auf die Öffnung des
Schlauches klopfen. Überprüfen Sie auch den
Saugkanal an der Einsteckstelle (33) für die
Schlauchdüse (9) !
Den Schlauch niemals mit einem Stab
reinigen!
Danach das Gelenk (14) des Saugvorsatzes
an der Einsteckstelle des Staubsaugers und
dann ggf. durch die Klappe (34) auf der Un-
terseite der Elektroteppichbürste überprü-
fen. Stellen Sie sicher, dass sich zwischen
der Klappe und der Einsteckstelle im Gelenk
keine Verstopfung befindet.
12. Motor Protection Filter
and Exhaust Filter
The motor protection filter (31) is only
accessible by removing the filter bag. Lift
the motor protection filter up by the bracket.
When replacing the motor protection filter
make sure that it is pressed in position
tightly. The motor protection filter should be
changed when it is dirty or at the latest when
you have used 20 filter bags.
Change the exhaust filter (11) at the same
time as the motor protection filter. To do this,
carefully remove the filter retaining rings
(12) and put them to the side. Next pull the
enforcement strips of the exhaust filter out of
the housing slot (5) and remove the exhaust
filter from the housing.
When reassembling, please ensure the
exhaust filter is fitted correctly in the housing
slots and the filter retaining rings are
installed correctly. Otherwise the filter will
be ineffective. The filter retaining ring clips
should be placed to the side under the hose
guide.
Use only genuine JOKA replacement
bags and filters to ensure effectiveness
and safety.
Do not wash any filters.
13. Removing Blockages
If the orange bag full indicator (27) is showing
after the filter bag has been changed and
the filters are in good condition, there is
likely a blockage in the system. First, check
for suction at the end of the hose (8). If you
can only feel a small amount of suction, the
blockage is in the hose. To unblock, loosen
the safety ring (32) on the lid. Remove the
hose from the machine and reverse the
airflow through the hose by putting the hose
handle (9) in the connecting tube of the filter
cover (6). Stretch the hose in the spot where
the blockage is and open and close the end
of the hose. Also check the suction opening,
which the hose handle (9) fits into.
Note – Never clean down the hose
with a stick or pointed object.
Other places to check for a blockage include
the suction neck (14) of the power head and
the orange trap-door (34) on the bottom of
the power head. Also check between these
two openings in the power head.
32
6
9
8
8
6
27
33
9
8
34
12
12
11
28
31
1111
5
11

W. & L. Jordan GmbH
Horst-Dieter-Jordan-Straße 7-10
D-34134 Kassel
Telefon: +49 / (0) 5 61 / 9 41 77-0
Fax: +49 / (0) 5 61 / 9 41 77-111
E-Mail: [email protected]
www.joka.de
INKU Jordan GmbH & Co. KG
IZ-NÖ Süd
Straße 3, Obj. M22
2355 Wiener Neudorf
Telefon: +43-22 36 - 67 01 -0
Fax: +43-22 36 - 67 01 -77
E-Mail: [email protected]
www.inku.at
Art.-No. 06935JN, 09/2019
Table of contents