JOSEF DAVIDSSONS Viking 40 Manual

Viking 40
Installaon and Maintenance Manual
A+

Technical facts 4
What is included in the range 5
Wood burning range Viking 40
About Viking 40
Here's how your Viking 40 works 10
11
for
Interchangeable details 15
How to use the range correctly 17
Problem solving

3
First, we would like to congratulate you on becoming a happy owner of a Viking wood burning
range, made in Austria with highest quality materials.
Your new wood burning range is both a meless and eecve heat source with more than 100
years of development and history. The Viking range is equipped with the latest combuson
technology to provide maximum heat output and minimal environmental impact. We hope
you will enjoy many cosy days with your new range and benet greatly from it in the future.
However, remember to read the installaon and maintenance manual carefully before
commencing assembly and before pung the range to use.
Warm regards,
Josef Davidssons
Dear Viking customer,

4
Eciency (%) 80
Nominal Power (kW) 6,0
Heang surface (approx. m²) up to 110
Weight (kg) 85
Size (HxWxD mm) 850–920x400x600
Hearth dimensions (HxWxD mm) 250x215x350
Log length (mm) 300–330
Flue pipe dimension (Ø, mm) 120
Distance to combusble material See page 8-9
CE marked according to standard EN12815
IMPORTANT BEFORE YOU
The manual contains instrucons on how to mount and
install the Viking 40. To ensure the funcon and safety
of the range, we recommend that installaon be carried
out by a professional. Contact one of our dealers who
can assist with the installaon or recommend a suitable
technician.
When installing a replace and erecng a chimney,
a building applicaon must be submied to the
municipality's building commiee. Contact your building
commiee if you are unsure of how the applicaon
works.
Make sure that the ground oor in your home has
sucient bearing capacity for a wood burning range with
a chimney. Normally, a wood burning range and chimney
can be placed on a standard wooden frame in a single-
family house if the total weight does not exceed 400 kg.
Hearthstone
Ember coming from the range poses a risk of re. If you
have a ammable oor in front of your wood burning
range, it must be protected by a hearthstone that covers
at least 300 mm in front of the door and 100 mm along
each side. The hearthstone can consist of, for example,
natural stone, concrete, sheet metal or glass.
The specied safety distances in this manual apply to the
Swedish market. If the wood burning range is installed in
another country, the local regulaons must be met.
When burning, some areas of the wood burning range become very hot and can cause burns when
touched. Also, be careful with heat radiang through the door glass. If combusble material is placed
closer than the specied safety distance, it can quickly catch re. Smouldering combuson can cause
rapid gas ignion with the risk of injury to persons and property.
The installaon must be inspected by a competent
chimney sweeper before using the range.
Approved for connecng to the chimney with 1/2
stone enclosure (350°). Mulple use (connecon to
common chimney) is allowed as long as respecve local
regulaons are adhered to.
COLOUR
RAL no. 9003/White
RAL no. 7016 / Anthracite

5
WHAT IS INCLUDED IN THE WOOD
Make sure all parts are included in the package.
13
The pallet is recycled as untreated wood. Corrugated cardboard is sorted as corrugated cardboard,
and plasc tapes go into the “ammable” containers at the recycling centre.
5
Guide to installaon and maintenance of your wood
burning range.
Sealing for connecon to the chimney.
Collects ashes le aer burning.
For installaon instrucons see page 11.
Ensures that the product meets all basic health and
safety requirements dened in the Construcon
Products Direcve. Is located behind the cover plate
under the replace door.
4
Produkt:
Viking 30/ JD 320
DOP: nr 6
13 EN 12815
Type/Type/Typ:
Raumheizer/Radiator/Vedspis
Brenstoff/Fuel/Bränsle:
Scheitholz/Log wood/
Vedbränsle
Nennwärmeleistung/
Nominal heating capacity/
Nominell värmekapacitet:
6 kW
Mindestabstände/
Least distances/
Minimiavstånd
Brännbart
Seitenwand/
Side wall/
Sida:
300mm
Rückwand/Back wall/Bakåt:
500mm
CO-Emission/
CO emissions/
Utsläpp av CO:
0,11%
Wirkungsgrad/
Efciency/
Verkningsgrad:
78%
Abgastemperatur/
Flue gas temperature/
Rökgastemperatur:
230°C
Staub/Dust/Partikel:
13,2 mg/m3
Serielle/Serial/Serienr:
Jahr/Year/
Tillverkningsår:
Zeitbrandfeuerstätte/
Time re heat/
Sekundär värmekälla
Ausschließlich empfohlene Brennstoffe
verwenden/
Exclusively recommended fuels use/
Endast för vedeldning
Mehrfachbelegung des Schorsteins ist
Zulässig/
Multiple allocation of the chimney is allowed/
Tillåten för skorsten med era eldstäder
Standard:
EN 12815
§15a
DIN+
BimschV. 1+2
Lesen und Befolgen Sie die
Bedienungsanleitung/
Reading and obeying the operating
instructions/
Läs och följ eldningsinstruktioner i manualen
Josef Davidssons Eftr. AB
Jättevägen 1
333 75 REFTELE
Sweden
Viking 40

6
DIMENSIONS AND INSTALLATION
Here are the most important dimensions required for
proper installaon and opmal operaon.
All measurements are indicated in millimetres.
Keep in mind that the hearthstone (oor
cover) should cover at least 300 mm in
front of and at least 100 mm on the side
of the replace opening.
Ø120
130
40
690–760 med förhöjningssockel
Kan anslutas bakåt och på både höger och vänster sida.
400
600
400
200
850–920 med förhöjningssockel
Vy framifrån
Ø120
Vy från sidan
Vy uppifrån
VIKING 40
Ø120
130
40
690–760 med förhöjningssockel
Kan anslutas bakåt och på både höger och vänster sida.
400
600
400
200
850–920 med förhöjningssockel
Vy framifrån
Ø120
Vy från sidan
Vy uppifrån
VIKING 40
Ø120
130
40
690–760 med förhöjningssockel
Kan anslutas bakåt och på både höger och vänster sida.
400
600
400
200
850–920 med förhöjningssockel
Vy framifrån
Ø120
Vy från sidan
Vy uppifrån
VIKING 40
850-920 with height adjustment
Can be rear connected as well as on both le and right side
Front view Side view
Top view


8
Between the range and insulang material
(light concrete or the like) there must be an
air gap of 5-10 mm.
300 mm
600 mm
100 mm
100 mm
5–10mm
Luspalt
600 mm
100 mm
100 mm
5–10mm
Luspalt
100 mm
100 mm
100 mm
100 mm
5–10mm
Luspalt
Gray = Combusble wall
Striped = Firewall
White = Air
300 mm
600 mm
100 mm
100 mm
5–10mm
Luspalt
600 mm
100 mm
100 mm
5–10mm
Luspalt
100 mm
100 mm
100 mm
100 mm
5–10mm
Luspalt
300 mm
600 mm
100 mm
100 mm
5–10mm
Luspalt
600 mm
100 mm
100 mm
5–10mm
Luspalt
100 mm
100 mm
100 mm
100 mm
5–10mm
Luspalt
Viking 40
- Distance sidewards without re protecon unit: 30cm
- Distance sidewards WITH re protecon unit: 0cm
- Distance backwards to ammable wall: 25cm
- Distance backward to NOT ammable wall (concrete): 0cm
- Distance from hob (cooker plate) upwards: 150cm
- Distance at FRONT at area of windows (glass): 70cm (add space for convecon air backwards of drawer 5cm)
- Distance at FRONT without glass: 50cm
with brick sides
Please consider the safety installaon distance.
The lowest possible ceiling height is 2 000 mm as a
safe distance.
Allow for at least 1 000 mm distance to combusble
material in front of the wood burning range.
The distances refer to installaon with an insulated
ue pipe.
Non-insulated ue pipes must have a distance of at
least 500 mm to combusble material.
The rewall at the back must extend at least 100 mm on
each side of the range.
The stove is tested and approved with a 100 mm rewall,
lightweight concrete or similar material for insulaon.
If you choose a diagonal posion, keep in mind that the
measurement always starts from the centre of the ue
pipe.
Between the stove and any wall cabinet there must be a
safety distance of at least 1 500 mm upwards and 300 mm
laterally.
Always contact your chimney sweeper if you are unsure
how to place and install your range.
Air gap
Air gap

9
Min 200 mm
Minimiavstånd ll brännbart
material ovanför spis: 1 500 mm
Min 200 mm
Minimiavstånd ll brännbart
material ovanför spis: 1 000 mm
5-10mm
5-10mm
Min 55 mm
5-10mm
5-10mm
5-10mm
5-10mm
The stove is approved with 55 mm convecon sides. The
convecon sides are also available in 100 mm if you have
a wider space to ll.
When using convecon sides, a re protecon kit must
be used in the back.
Minimum distance to combusble
material above the stove: 1500 mm

10
This product has been manufactured in accordance with
the product type approval document, which includes
assembly and maintenance instrucons as accompanying
documents.
Viking 40 is made in Austria with a tradion dang back
to the 1930s. The range consists of high quality steel
with cast iron doors. The combuson chamber is lined
with chamoe stone, and a cast iron grid forms the
replace base.
The range is equipped with an upper of steel or glass
ceramic (oponal) that serves as a single large cooker /
hot plate. The basic structure of the range consists of
machine-welded sheet metal plates to which external
plates are screwed. The replace door is equipped with
a double, air-polished ceramic hardened glass that allows
for a wonderful and soot-free view of the re. Maximum
heat output and low wood consumpon are obtained
due to the fact that the hearth and gaps are equipped
with a reproof sealant, and by burning the wood under
automac supply of preheated secondary air through the
holes in the hearth’s back plate. Primary air is supplied
above the door glass.
Chimney
The ue diameter should be at least 125 mm, have a
chimney dra of at least 0.12 mbar and a recommended
minimum height of 3.5 m on the ue (calculated from the
replace's connecon).
Adjustable cooking height
The total height of the hearth is adjustable between
850-920 mm. Li up the hearth in the front so that the
hearth rests on the rear adjusng screws to more easily
adjust the front adjusng screws and vice versa. The four
adjusng screws have a M10 thread with a key width of
17 mm.
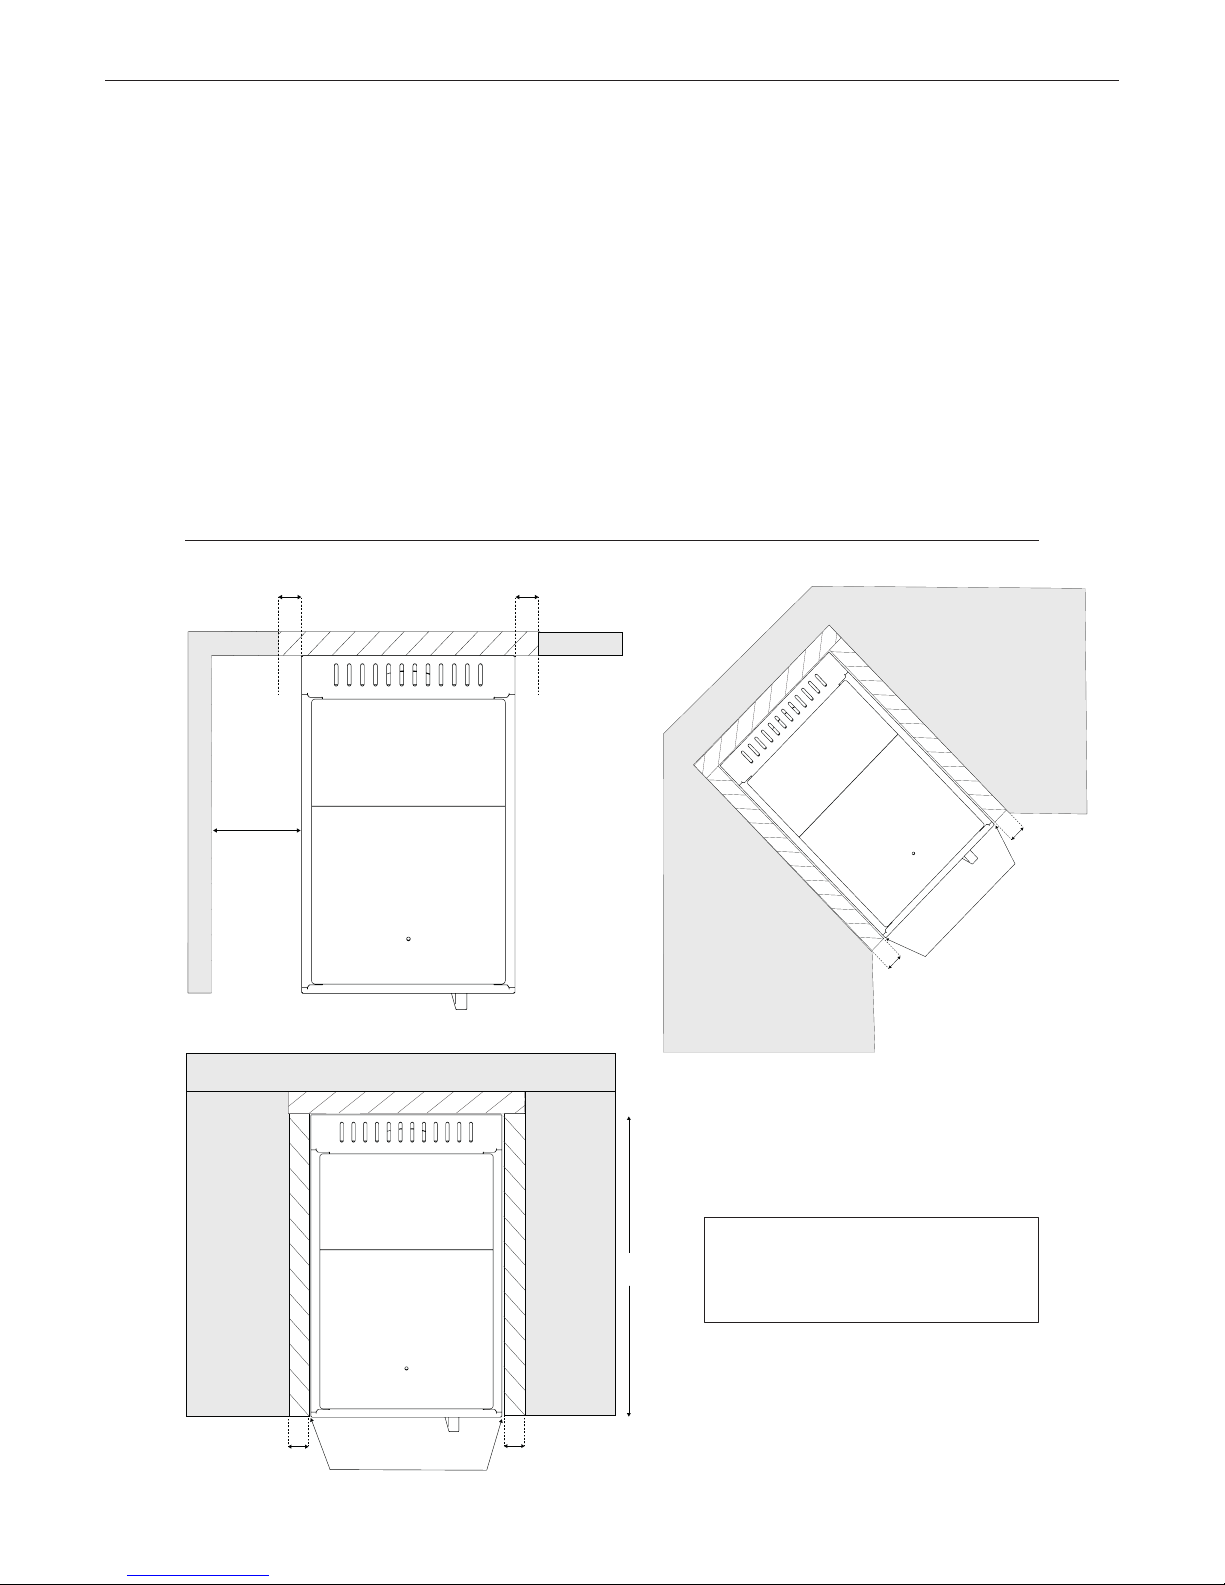
When mounng close to ammable components, re-
resistant spacers and a re protecon kit are required.
For dimensions and descripon see pages 12-15.
In addion to radiang heat, the Viking 40 is also
equipped with convecon technology. This means that
the cool room air is sucked into the sides of the wood
burning range, heated, pushed out through the oval holes
on the hob and nally ows into the room. This allows
the hot air to spread more easily around the room.
The primary air is supplied when the glass door of
the range is le half-open during the lling up of
rewood and during the ignion phase. Secondary
air is supplied through the buery valve under the
range. The secondary air is then heated in the range and
disseminates into the re through the holes in the range’s
back plate.
Buery valve
When burning, some areas of the wood burning range become very hot and can cause burns when touched.
Also, be careful with heat radiang through the door glass. If combusble material is placed closer than the
specied safety distance, it can quickly catch re. Smouldering combuson can cause rapid gas ignion with
the risk of injury to persons and property.
0 = Closed
1 = Fully open.

11
The wood burning range meets the requirements for
connecon to a chimney designed for 350°C smoke
temperature.
The adapter measures 120 mm on the outside; applicable
with both rear and side connecon.
The opmum chimney dra is between -10 to -15 Pa.
The dra is mainly aected by the length and area of
the chimney, but also by how pressure-ght it is. The
minimum recommended chimney length is 3.5 m, and
the appropriate cross seconal area is 120-180 cm² (125
mm in diameter).
A ue with narrow bends and horizontal draught reduces
the dra in the chimney. The maximum horizontal ue is
500 mm, provided that the vercal ue length is at least
5 m.
It should be possible to sweep the ue throughout its
length, and the soot doors must be easily accessible.
Check that the chimney is sealed and that no leakage
occurs near the soot doors and smoke connecons.
The range can be connected to the chimney with several
replaces.
1 2
Carefully open a hole in the spot where you will
connect your wood burning range to the chimney
stack.
Immure the wall lining.
When connecng the range, place the ue pipe on the
adapter with refractory mortar in between. Then put the
refractory mortar on the connecng pipe and press it
into the wall lining. You can remove excess mortar inside
the connecng pipe from within the range.
The installaon must be inspected by a competent chimney sweeper before using the range.
0 = Closed
1 = Fully open.

12
100-160*
850-920
600
50/100
Byggmå = 55mm
Byggmå = 105 mm
Detalj X
12
3
4
5
6
7
8
910
Max 15 mm
11
Above you will see the nished convecon side
assembled with dimensions.
INSTALLATION INSTRUCTIONS FOR
THE CONVECTION CABINET
Begin by opening the package and liing the cabinet
out of its packaging. Place the cabinet with the horizontal
grooves facing the side on which the cabinet is to be
mounted. Unscrew the 2 screws that hold the outer
plate, so that you look through.
100-160*
850-920
600
50/100
Byggmå = 55mm
Byggmå = 105 mm
Detalj X
12
3
4
5
6
7
8
910
Max 15 mm
11
100-160*
850-920
600
50/100
Byggmå = 55mm
Byggmå = 105 mm
Detalj X
12
3
4
5
6
7
8
910
Max 15 mm
11
3. 4.
Loosen the 2 screws that hold the outer plate on the
range. NOTE! The enamelled outer plate should stay put.
Keep the screws and washers, they will be used later.
Open the bag with spacers and screws, start by installing
2 spacers in the outermost holes, also screw in 2 pin
bolts for adjustment so that the cabinet ends up in a
vercal posion.
1.
100-160*
850-920
600
50/100
Byggmå = 55mm
Byggmå = 105 mm
Detalj X
12
3
4
5
6
7
8
910
Max 15 mm
11

13
100-160*
850-920
600
50/100
Byggmå = 55mm
Byggmå = 105 mm
Detalj X
12
3
4
5
6
7
8
910
Max 15 mm
11
100-160*
850-920
600
50/100
Byggmå = 55mm
Byggmå = 105 mm
Detalj X
12
3
4
5
6
7
8
910
Max 15 mm
11
100-160*
850-920
600
50/100
Byggmå = 55mm
Byggmå = 105 mm
Detalj X
12
3
4
5
6
7
8
910
Max 15 mm
11
100-160*
850-920
600
50/100
Byggmå = 55mm
Byggmå = 105 mm
Detalj X
12
3
4
5
6
7
8
910
Max 15 mm
11
Place the convecon cabinet so that the spacer rests
on the side plate. Now use the same screws as in no 3.
Tighten a lile light so that it holds on loosely; it may
need to be adjusted later.
5.
7.
Fit the base plate to the front panel of the convecon
cabinet as shown in gure A. Then slide the front panel
into place against the cabinet, be sure it slides into all 4
outlets and locks into the u-shape (gure B).
Use the 4 middle screws and screw them in halfway on the top side. Slide on the stainless steel top so that it is aligned
with the hob, and ghten the 4 screws.
A.
B.
100-160*
850-920
600
50/100
Byggmå = 55mm
Byggmå = 105 mm
Detalj X
12
3
4
5
6
7
8
910
Max 15 mm
11

14
8.
100-160*
850-920
600
50/100
Byggmå = 55mm
Byggmå = 105 mm
Detalj X
12
3
4
5
6
7
8
910
Max 15 mm
11
to the radiant heat on the sides.
Take the re protecon kit and hang it on the back of the
range with the hooks. The kit is xed with 2 metal screws
3.5 x 9.5 on the back.
100-160*
850-920
600
50/100
Byggmå = 55mm
Byggmå = 105 mm
Detalj X
12
3
4
5
6
7
8
910
Max 15 mm
11
Tighten the screws from no 3 when the cabinet is aligned
with the range.
Fit the outer plate and ghten it with the short screws.

15
The Viking 40 is built to be used for decades to come,
but do not forget to replace wear details when needed.
Keep an eye on reproof bricks, grids and sealing strips
and replace the parts when worn out.
10 mm
Sealant, for hob
102040259
Glass for the door
Usually you only have to replace the
innermost one
102040955
Fireproof bricks, 2 pcs
7 mm
Sealant, door
102040305
Ash pan
102040303
Grids
3year
warranty

16
MAINTENANCE
The grid should be shaken and cleaned from ashes
regularly.
Empty the ash pan as soon as it is full.
Aer a period of burning, some soot may have seled on
the glass. With the Sotrent dry sponge you can keep the
glass clean easily.
Keep the hearth and ue clean. If you use the range
oen, you should sweep the chimney every once in a
while in between the visits of the chimney sweeper.
Exterior of the range
The enamelled surfaces are cleaned with lukewarm
water when the range is cold. Under no circumstances
may abrasives, scraping or scouring detergents or objects
be used.
For cleaning and care of precious steel parts (stainless
steel, etc.), only the special products that are
commercially available should be used.
Steel hob
The hob is face grinded and oiled on delivery to prevent
rusng. The oil evaporates at the rst use and may
smoke a bit. The heat will make the steel hob darken, and
aer a while it will obtain an evenly dark colour. You can
use a sponge or a scraper if something has boiled over,
for example.
Ceramic hob
The ceramic hob is mechanically very stable and can
easily withstand medium impact bumps. If cracks or
scratches should occur due to mechanical impact, the
use of the range must be immediately disconnued.
The ceramic hob has to be replaced with a new one.
However, if the glass ceramic hob breaks due to improper
handling during use, the break should be covered with
the ash / soot collectors unl the range has cooled down.
The ceramic hobs are cleaned with the same detergent
that are used on the glass hob on an electric stove.
Products and recommendaons can be found on our
website josefdavidssons.se/en
Li o the top plate. Then li out the part that forces
the ue gases down (ue gas separator) at the back of
the range. This part is loose and you can li it straight
up. Aer that, you can reach into the space and into
the chimney sha. Do not forget to replace the ue gas
separator again.

17
A new wood burning range should be red with care
during the rst few occasions. That makes the heat-
resistant colour more durable. There may also be a
slightly unpleasant smell at the rst ring. This is normal
and due to the fact of excess paint or oil coang remains
on the range. The smell will disappear at the rst ring
and will not return.
Firewood
The best heat value is obtained from split birch wood.
Leafy trees generally burn calmer than conifer wood,
which creates a more even heat. If you are burning
oak, beech or other wood with high heat value, always
mix the wood with other wood. Otherwise you risk
damaging your hearth. The wood must be dry, with
preferably 15-20% moisture content. With a normal re,
approximately 1.5-2 kg wood / hour is a suitable amount
of wood. 1 kg birch wood produces about 4 kW power.
Fully open the supply air valve (buery valve under the
range door). Place briquees in the centre of the hearth.
Pile up about 1.5 kg of small wood logs crosswise, like a
log house, on top of the briquees. Start by lighng the
briquees. These should in turn ignite the wood. Keep
the hearth door open during the rst few minutes unl
the wood is properly ignited. Depending on the chimney
dra, you may need to have to leave the door open
slightly longer to build a temperature in the hearth and
get a sasfactory chimney dra. Then close the door
and adjust the valve to the desired intensity of the re.
The range should be properly heated before starng to
reduce the air supply.
When the intensity of the re has decreased, it is me to
replenish. Open the door carefully. That way, you avoid
smoke gusts. Use a replace tool or a piece of wood
to distribute ash and glow. Replenish with 2-4 logs and
close the door when the wood has ignited properly (1.5-2
kg wood). Firewood should only be relled when there is
only embers in the combuson chamber (no ames). Aer
the fuel rell, the hearth door must be kept half-open
unl the wood has ignited properly.
Make sure the logs don’t get too close to the door.
Otherwise, ember and ashes may fall out when the door
is opened.
In order to kindle the re correctly, it is necessary
to achieve as high a temperature as possible in the
hearth. Then you’ll have a clean combuson and get
the most out of the range and the rewood. With clean
combuson, you avoid soot coang in the hearth and
on the glass. When used correctly, the smoke will not be
visible when the range has heated up.
For operaon during seasonal change, that is, at higher
ambient temperatures than 15°C, the sudden change
in outdoor temperature can change the pressure in the
ue gas sha, so that the combuson gases are not
completely discharged. The range should then be lled
with less rewood at a me and have the buery valve
open (posion 1) so that the fuel burns faster and thus
stabilizes the outlet pressure.


19
• The connecon to the chimney has not been properly sealed. Ask the sweeper to check that the connecon between
the range and the chimney is completely sealed.
• The ue pipe is clogged. Clean the ue pipe and combuson chamber.
• The chimney is too short, has too much cross seconal area or has been clogged by a bird nest. Contact sweeper or
dealer for guidance.
• Negave pressure in the home. Open a window or place an exterior wall valve near the range.
The rewood has too high moisture content or is too cold. Only use dry wood with a maximum moisture content of 20%.
• The sealing tape at the door is worn. Check the sealing tape and replace worn tape.
• The chimney is too long. Contact chimney sweeper or dealer for guidance.
• The wood has too high moisture content. Only use dry wood with a maximum moisture content of 20%.
• The valve is too ghtly closed. Open the valve to provide more air to the combuson.
• Poor combuson. Follow the instrucons for the correct ring provided in this manual.
• Poor rewood quality. Do not use waste wood, grinded wood, impregnated wood, plasc laminate,
plywood or the like. Always use clean and dry rewood.
• Too quick opening of the door causes pressure equalizaon in the combuson chamber. Open the door slowly.
• Poor chimney dra. Contact your sweeper or dealer to check the height of the chimney
in relaon to the dra that the range requires.
• Negave pressure in the home. Open supply air valve or window to add oxygen to the air.
White smoke
• Combuson temperature is too low. Increase air supply.
• The rewood is moist and contains water vapour. Use clean and dry rewood.
Black or grey black smoke
• Incomplete combuson. Increase air supply.

20
Phone: +46 371 – 200 01 info@josefdavidssons.se josefdavidssons.se/en
WARRANTY TERMS
Josef Davidssons Er AB is responsible for ensuring that the products are not defecve in way that can be aributed
to manufacturing or storage at the factory. The warranty is valid from the date of delivery to the customer.
Josef Davidssons Er AB accepts no responsibility for dismantling and assembly costs for the exchange of a range.
Josef Davidssons Er AB accepts no liability for costs due to downme or other direct
or indirect costs and damages.
The warranty condions do not apply to glass or the replaceable details.
The warranty period for grids, reproof bricks and glass is 1 year.
Markus Andersson Mikael Andersson
WARRANTY CERTIFICATE
The installaon of a replace must be reported to the local building authority. The
homeowner is responsible for ensuring that the required safety requirements are met and
must have the installaon checked by a qualied inspector.
The chimney sweeper must be informed about the installaon as it causes a change in the
need for sweeping.
3 years Viking 40
Table of contents
Other JOSEF DAVIDSSONS Wood Stove manuals
Popular Wood Stove manuals by other brands

Sideros
Sideros DESIREE 760 Instructions for use and maintenance

Panadero
Panadero ONIX 3V Usage and maintenance instructions

HearthStone
HearthStone Equinox 8000 owner's manual

United States Stove
United States Stove VOGELZANG TR007E manual

Heta
Heta Vista Operating and installation instructions

Firenzo
Firenzo CONTESSA Installation and operation

HearthStone
HearthStone Mansfield 8011 owner's manual

RIKA
RIKA X-Back instruction manual

Regency
Regency Classic F1100 Owners & installation manual

Nectre Fireplaces
Nectre Fireplaces Big Bakers installation instructions

SUPREME
SUPREME AMBIANCE Elegance 42 owner's manual

HearthStone
HearthStone Homestead 8570F owner's manual