JOVIDENT EXCELLED CURING LIGHT User manual

Stand July 2019 Stand July 2019
User’s guide to
EXCELLED CURING LIGHT
Guide d’utilisation
EXCELLED CURING LIGHT
Bedienungsanleitung
EXCELLED CURING LIGHT
-1-
Ackerstraße 1, D-47269 Duisburg, Germany, Tel.+49 0) 203 607070,Fax+49 0) 203 60707 777,
Email: info@jovident.com, Website: www.jovident.com
EXCELLED CURING LIGHT
Wireless LED li ht curin unit

Stand July 2019 Stand July 2019
Pages
Deutsch 3-5
English 6-8
French 9-12
-2-
ARNUNG
Benutzen sie nur ori inal Teile
Schützen sie ihre Au en bei Gebrauch
Bei übermässi er Hitzeentwicklun vom Gebrauch absehen
Bitte beachten:
1. Beschädi te Lichtleiter müssen sofort aus etauscht werden, da ein beschädi ter Lichtleiter
die Lichtintensität erheblich verrin ern oder den Patienten verletzen kann.
2. Desinfizieren bzw. autoklavieren Sie den Lichtleiter vor dem ersten und nach jedem
Gebrauch.
3. Wenn der Akku vollständi auf eladen ist, entfernen Sie die Lampe vom Stromkreis.
4. Bitte berühren Sie die Elektroden nicht mit Metall e enständen.
5. Bitte benutzen Sie ein weiches Tuch mit anhydrischem Alkohol etränkt, um die
Ladekontakte zu reini en.
6. Lichtleiter fallen nicht unter die Garantie.
Entsorgung
Seit dem 24.03.2006 dürfen nach der esetzlichen Re elun Elektro-Alt eräte nicht
über den Hausmüll entsor t werden. Bitte senden Sie Ihr Alt erät an Ihren Händler zurück.
Gewährleistung
Bei Sach erechter Anwendun ewähren wir eine Garantie von 12 Monaten ab Kaufdatum.
Aus enommen sind Schäden am Lichtleiter und Schäden, die durch unsach emäße Behandlun
oder La erun entstanden sind.
Hersteller:
Jovident GmbH
Ackerstraße 1
D-47269 Duisbur
Germany
TEL: +49 203 607070
www.jovident.com
-3-

Stand July 2019 Stand July 2019
Einführung
Vielen Dank, dass Sie sich für unsere Excelled Aushärtun s- Lampe entschieden haben.
Lesen Sie bitte vor Inbetriebnahme diese Gebrauchsanweisun sor fälti durch, um den
sicheren Um an und das Beste Resultat zu ewährleisten.
Diese Gebrauchsanweisun beschreibt den Um an mit der Excelled Aushärtelampe und führt
Sie durch die Sicherheitshinweise, Installation, Gebrauch und Pfle e der Lampe.
Bitte prüfen Sie vor dem ersten Gebrauch, ob das unten auf eführte Zubehör komplett
vorhanden ist.
1. Handstück
2. Ladestation
3. Netzadapter
4. Akku (Batterie)
5. Lichtleiter
6. Schutzschild
7. Benutzerhandbuch
Installation
1.Ladestation:
Bitte verbinden Sie das Ladekabel mit der Ladestation und stellen Sie das Handstück in die
Ladestation. Bitte stellen Sie die Ladestation auf eine ebene Fläche. Ver ewissern Sie sich, dass
die Ladestation mit Strom versor t wird.
Bei dem Ladevor an leuchtet eine elbe Lampe auf. Erlischt die elbe Lampe und die rüne
Lampe leuchtet auf, dann ist das Gerät betriebsbereit.
Wenn Sie das erste Mal eine neue Lampe benutzen, ist es ratsam sie für 6-7 Stunden aufzuladen.
Eine Aufladun von über 7 Stunden sollte niemals erfol en.
Nach der Ladun bitte die Ladestation vom Stromkreis entfernen.
-4-
2. Arbeitsablauf
A)Schalten sie die Lampe ein, indem sie den Startknopf “P” drücken. Wenn die Lampe vor
Ablauf der ein estellten Zeit aus eschaltet werden soll, betäti en Sie den Startknopf “P” noch
einmal.
B) Modusauswahl
Bitte drücken Sie den Auswahlknopf “M”, um einen Modus auszuwählen:
01 lan sam anstei ende Lichtstärke
02 re elmäßi e Lichtintervalle
03 konstante volle Lichtstärken
C) Zeitauswahl.
Bitte drücken Sie den Zeitknopf “T”, um die ewünschte Zeit auszuwählen:
Modus 01: 10, 20, 30, 40 Sekunden
Modus 02; 10, 20, 30, 40 Sekunden
Modus 03: 10, 20, 30 Sekunden
D) Wenn sie Lampe ein eschaltet wurde, ertönt alle 5 Sekunden ein Si nal.
E) Automatische Abschaltun
Wird die Lampe 8 Minuten nicht benutzt, schaltet sie sich automatisch ab.
F) Auflade hinweis
Wenn die Lampe ein eschaltet wird und der Akku nicht mehr die nöti e Leistun brin en kann,
ertönt ein Alarmsi nal. Die Lampe blinkt und piep 5 mal. Bitte laden Sie in diesem Fall die
Lampe auf.
Technische Daten
Maße dia 22*175mm
Gewicht 165
Geräteklasse Klasse I, MEDDEV 10/93-rev 3 rule 12
Ein an sleistun 100-240 V, 50-60 HZ
Stromversor un Li-Ion Batterie, 3,7 V, 2200mAH
Wellenlän enbereich 430-485nm
Lichtintensität 5W>1100mw/cm2
Tiefenwirkun : 12 Sekunden , 3mm
-5-

Stand July 2019 Stand July 2019
Introduction
Thank you for choosin Excelled Curin Li ht. For the safety and for the sake of havin the
best result, please read the user’s uide carefully before usin the product.
This user uide describes the normal properties of the Excelled Curin Li ht, and introduces the
principle of the safety issues, installation, usa e and maintenance.
We are always tryin to improve our products, this may cause some chan es of the components,
this is acceptable. When you find the product is different with the description in the user uide,
please contact
the distributor or contact our service center to know the details.
Before the first use, please check the accessories; make sure they are all in ood condition.
• Main unit 1 set
• Li ht uide 1 piece
• Battery 1 piece
• Char e 1 set
• Adapter 1 piece
• Li ht cover plate 1 piece
• User manual 1 piece
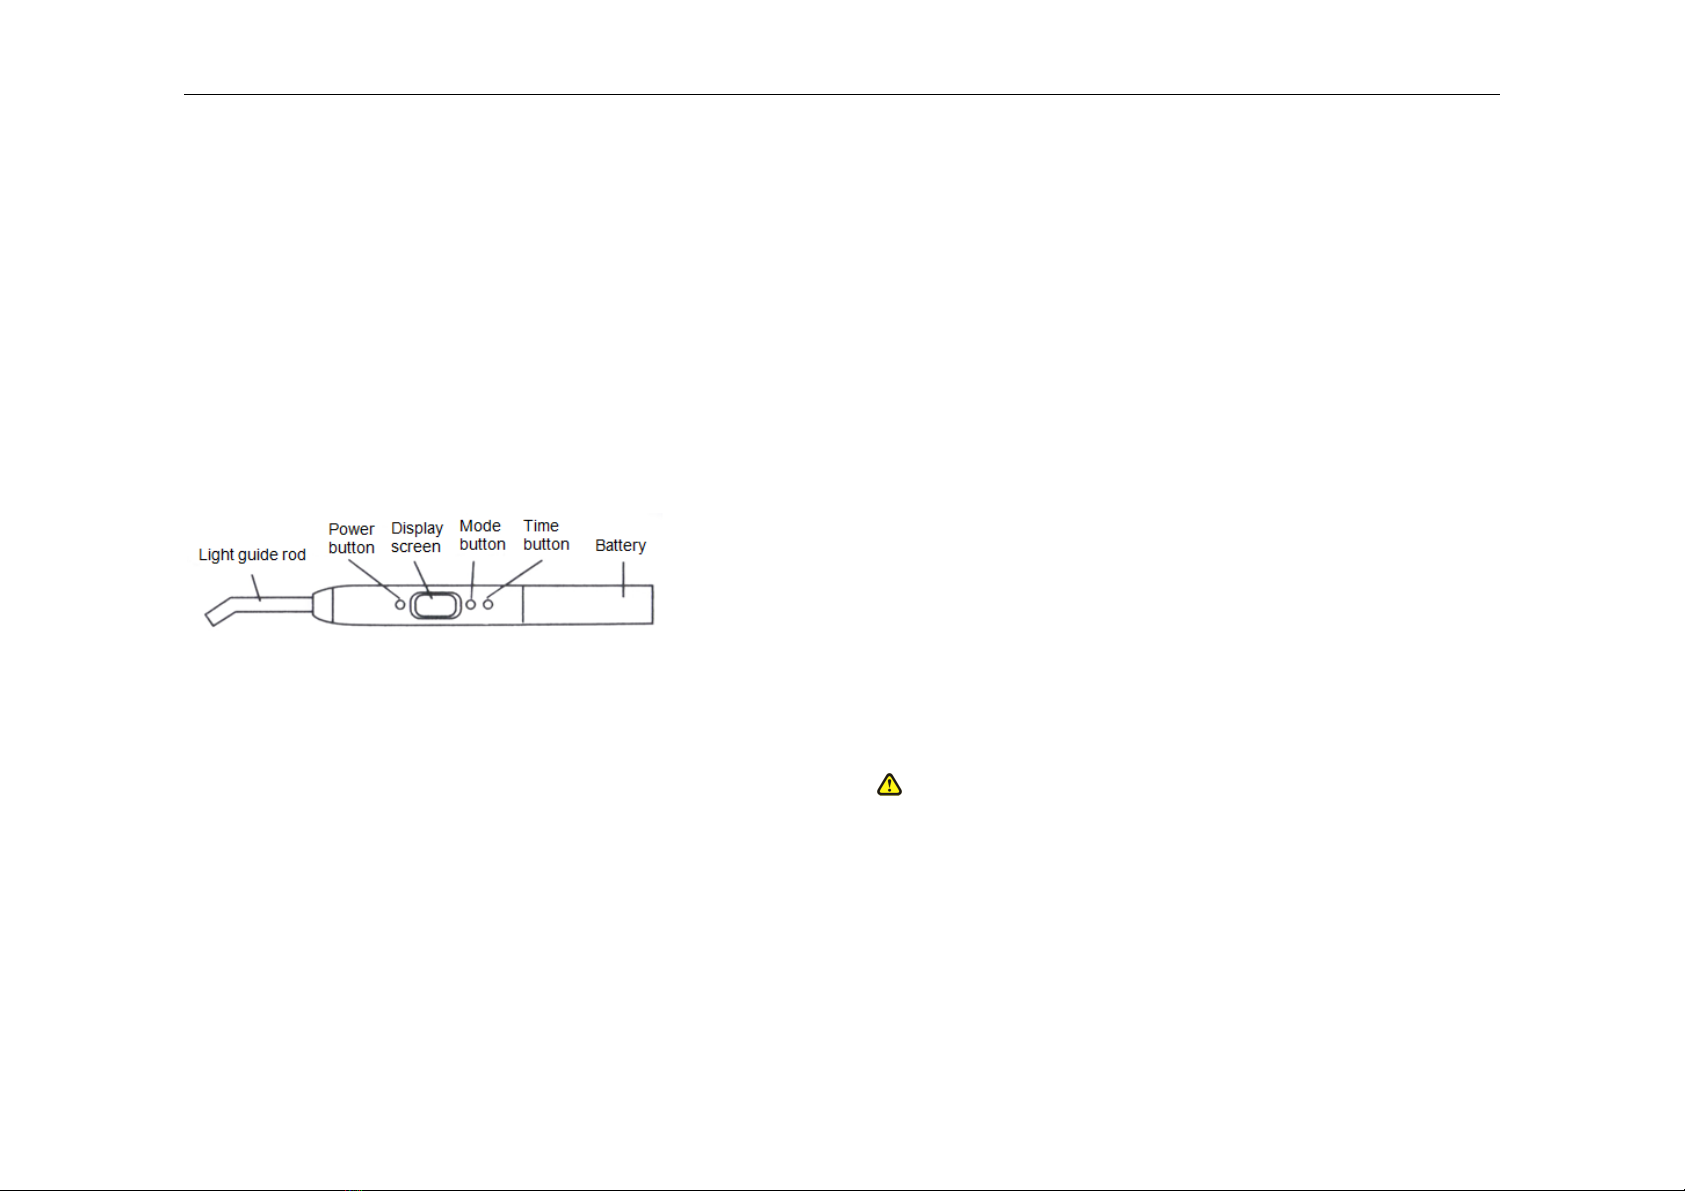
Structure
USAGE
1. Battery char e
connect the adapter to the AC power and connect then adaptor to char er. Place the hand piece
on the char er. When char in , the char in indicator (yellow) is on, the power indicator
( reen) is off. When the battery is fully char ed, the char in indicator (yellow) is off, the
power indicator ( reen) is on.
When usin a new battery for the first time, it is better to char e it for 6-7 hours, but should not
be char ed for over 7 hours.
When battery is full char ed, please disconnect the AC power.
-6-
2. Operation
A) Power on/off: when the unit is off or standby, press power button to make the unit workin ,
the li ht output shows a blue li ht, press the button a ain to stop workin and turn to standby.
B) Mode select: press mode button to select three types of work mode:
01 radually mode
02 flashin mode
03 all li ht mode
C) Time select: press time button to select time.
Four types of time settin : 10/20/30/40 seconds can be chosen.
D) When the unit is workin , the buzzer will beep every 5 seconds.
E) Automatically power down: when the unit is standby and without pressin the button for 8
minutes, the unit will be turned off automatically.
F) Low battery alert: If startin the unit power and the volta e of
the battery is lower than the set point the unit will ive an alarm;
the buzzer beeps 5 times and the indicator flashes.
Please char e the battery in time.
SPECIFICATONS
Size dia 22*175mm (unit)
Wei ht 165
Safety class Ordinary type B, non-continuous service, IP 40, Class II
Input volta e 100-240 V, 50-60 HZ
Battery capacity 2200mAH
Wavelen th 430-485nm
Intensity 5W>1100mw/cm2
Solidification effect
20s, > 3mm (3W), 6s 3mm (10W)
ARNING
Only use ori inal parts
Protect your eyes when usin device
Prevent from burns when usin extensively
NOTICE:
1. The workin time between each handlin is not less than 30 seconds.
2. Please replace the li ht uide when it has cracked or show scratches.
3. Disinfection of the li ht uide: immerse the rod in 75% alcohol several minutes.
4. When the battery is fully char ed, please disconnect the AC power.
5. Avoid touchin the electrodes of the battery with metal.
6. Please use a swab with anhydrous alcohol to clean the pins in the char er re ularly, it could
avoid weak contacts from char er to hand piece.
-7-

Stand July 2019 Stand July 2019
Distributor:
Jovident GmbH
Ackerstraße 1
D-47269 Duisbur
Germany
TEL: +49 203 607070
www.jovident.com
-8-
ATTENTION
Seulement utilisé des part ori inal
Proté er les oeil en cas d’utilisation
En cas d’utilisation la chaleur peut excessif
Avis:
1. Le temps de travail entre chaque utilisation n'est pas inférieur à 30 secondes.
2. Veuillez remplacez l'embout si cassé ou abîmé.
3. Désinfection de l'embout: immer ez dans une solution à 75% durant plusieurs minutes.
4. Quand la batterie est pleinement char e, déconnectez l'adaptateur du secteur.
5. Evitez le contact des electrodes de la batterie avec le metal..
6. Utilisez ré ulièrement un cotton-ti e imbibé d'une solution alcoolique anhydre pour nettoyer
les contacts du char eur afin de conserver la qualité de connexion entre le socle char eur et
l'appareil.
Distributeur:
Jovident GmbH
Ackerstraße 1
D-47269 Duisbur
Germany
TEL: +49 203 607070
www.jovident.com
-9-

Stand July 2019 Stand July 2019
Merci d'avoir choisi la lampe LED Excelled. Afin de vous offrir le maximum de sécurité et vous
permettre d'atteindre les meilleurs résultats possibles, merci de bien vouloir lire attentivement ce
mode d'emploi avant d'utiliser le produit.
Ce mode d'emploi décrit les caractéristiques principales de la lampe Excelled et présente les
consi nes de sécurité de base, le monta e, l'utilisation et l'entretien.
Nous tentons en permanence d'améliorer nos produits, ce qui peut expliquer d'éventuelles
différences acceptables de composants. S'il vous semble que l'appareil livré est différent de la
description faite dans ce uide, veuillez contacter votre distributeur ou notre service clientèle
pour plus de détails.
Avant la première utilisation, veuillez vérifier la présence de tous les accessoires et leur état.
1. Manche (lampe)
2. Socle
3. Char eur
4. Batterie Lithium
5. Embout
6. Plaque de protection
7. Manuel de l'utilisateur
Structure
-10-
Utilisation
1. Char e de la batterie
Connectez l'adaptateur sur le secteur et branchez le ensuite au socle char eur. Placez la lampe
sur le socle. Pendant la char e, le voyant lumineux de char e (jaune) est visible et le voyant
lumineux indiquant la marche (vert) est éteint. Quand la batterie est pleinement char ée, le
voyant jaune est éteint et la voyant vert est allumé.
Lors de la première char e, nous vous conseillons de laisser la lampe environ 6 à 7 heures sur le
socle char eur mais pas au delà.
Quand la batterie est pleinement char ée, débranchez l'adaptateur de la prise de courant.
2. Maniement
A) Activation on/off: Quand l'appareil est hors tension ou en position standby, appuyez sur le
bouton de mise en marche pour le faire fonctionner. La lampe émet une lumière bleue. Appuyez
à nouveau sur le bouton pour revenir en position standby.
B) Sélection du mode: Appuyez sur le bouton "Mode" pour sélectionner un mode parmi les 3
existants:
01 Mode raduel
02 Mode Flash
03 Mode lumière pleine
C) Sélection de la durée: Appuyez sur le bouton timin pour déterminer le temps d'exposition.
Quatre pro rammes peuvent être choisis: 10/20/30/40 secondes.
D) Quand la lampe fonctionne, un bip retentit toutes les 5 secondes.
E) Arrêt automatique: Quand l'appareil n'est plus utilisé, il se désactive automatiquement après
8 minutes.
F) Alerte de batterie faible: Lorsque l'appareil est mis sous tension et que le volta e émit est
inférieur à la limite donnée, l'appareil vous le si nale en émettant 5 bips consécutifs et l'écran
cli note. Rechar ez la batterie rapidement.
-11-

Stand July 2019 Stand July 2019
Spécifications
Taille 22 x 75mm (lampe)
Poids 165
Classe de sécurité Type B ordinaire, service non-continu, IP 40, Classe II
Volta e 100-240 V, 50-60 HZ
Capacité 2200mAH
Lon ueur d'onde 430-485nm
Intensité 5W>1100mw/cm2
Solidification
20s, > 3mm (3W), 6s 3mm (10W)
-12-
Table of contents
Languages:
Popular Dental Equipment manuals by other brands

mectron
mectron PIEZOSURGERY GP Use and maintenance manual

Cavitron
Cavitron Plus G136 Directions for use

Guilin Woodpecker Medical Instrument
Guilin Woodpecker Medical Instrument Fi-G instruction manual

Saeyang
Saeyang Marathon Multi600 user manual

XZeal
XZeal Z70 Series user manual

Owandy Radiology
Owandy Radiology RX-DC user manual