JRI Recordings Enterprises MoyerCam User manual

MoyerCam User Manual - Page 1
MoyerCam™
(patent pending)
User Manual
(Updated: March 15, 2016)
JRI Recordings Enterprises, LLC
88 Bo wood Lane
Dover, NH 03820
Phone: 603-842-5055
www.moyercam.com
Copyright 2016, RI Recordings, LLC

MoyerCam User Manual - Page 2
TABLE OF CONTENTS
TITLE PAGE
WHAT'S INCLUDED 3
GENERAL 4
SETUP
Step 1: Piano Position 4
Step 2: Hinge Examination 4
Step 3: Remove Contents from Long Bag 5
Step 4: Extension Cord Setup 6
Step 5: Camera Stand Setup 6
Step 6: Camera Setup 8
Step 7: Extended Stick Setup 11
Step 8: Screen Setup 18
Step 9: Projector Setup 18
Step 10: Projector and Camera Adjustment 23
Step 11: Masking the Image 26
Step 12: Tidying up 27
DISASSEMBLY 29
OPTIONAL: Using MoyerCam™ with a normal screen 30
TROUBLESHOOTING 31

MoyerCam User Manual - Page 3
WHAT'S INCLUDED:
1. Long Bag
2. E tension Cord
3. Camera Stand
4. Mitt
5. GoPro Hero 4 Silver Camera
6. Camera Charger
7. E tended Stick (2 pieces)
8. Roll of Screens (3 Screens)
9. Projector Tripod
10. Short Power Cord
11. Projector Case
12. InFocus IN126STa Projector
Miscellaneous items included in Long Bag:
13. Optional 15-foot HDMI cable e tension
14. Manuals for MoyerCam, Camera and Projector
15. Two e tra velcro masks

MoyerCam User Manual - Page 4
GENERAL
• The MoyerCam (hereafter referred to as "MoyerCam") is a patent pending device and as such requires a
license from JRI Recordings Enterprises, LLC for use in public performances.
• Please study this manual carefully before setting up the MoyerCam for the first time.
• During setup, be calm and focused. Allow plenty of time before the concert to set up the MoyerCam.
• While we believe the MoyerCam is safe if used as instructed, we rely on the user to actively look out for
situations that could lead to problems. We cannot spell out all of the do's and don't's in this manual. But here
are a few e amples:
- Do not leave the MoyerCam unattended.
- Do not move the piano with the E tended Stick in place.
- If the piano is on the same level as the audience, leave plenty of room between the MoyerCam
equipment and the front row, so that people can walk by easily.
SETUP
With practice, setup can be completed in as little as 5 minutes. Therefore, this lengthy manual may seem
unnecessary. However, it is important that you understand the process in order to avoid accidents and time-
consuming pitfalls.
STEP 1: Piano Position
Move the piano to its final position before setting up the MoyerCam.
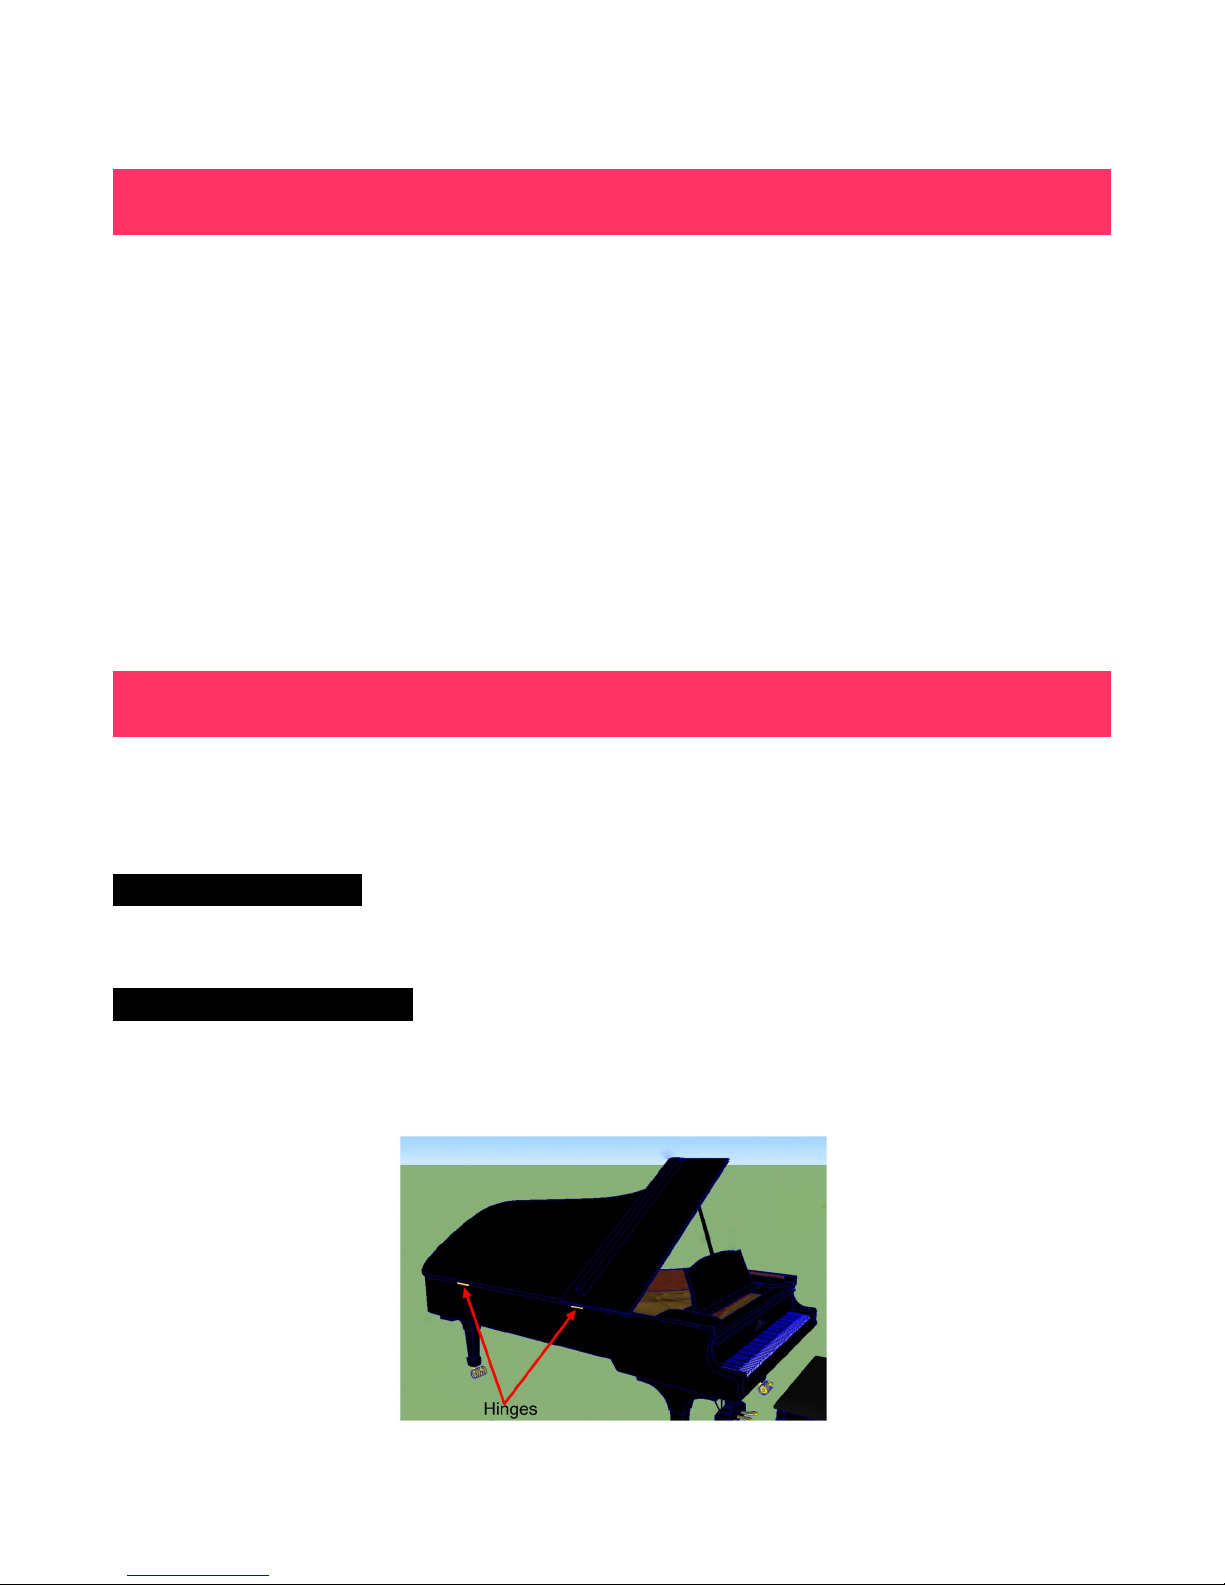
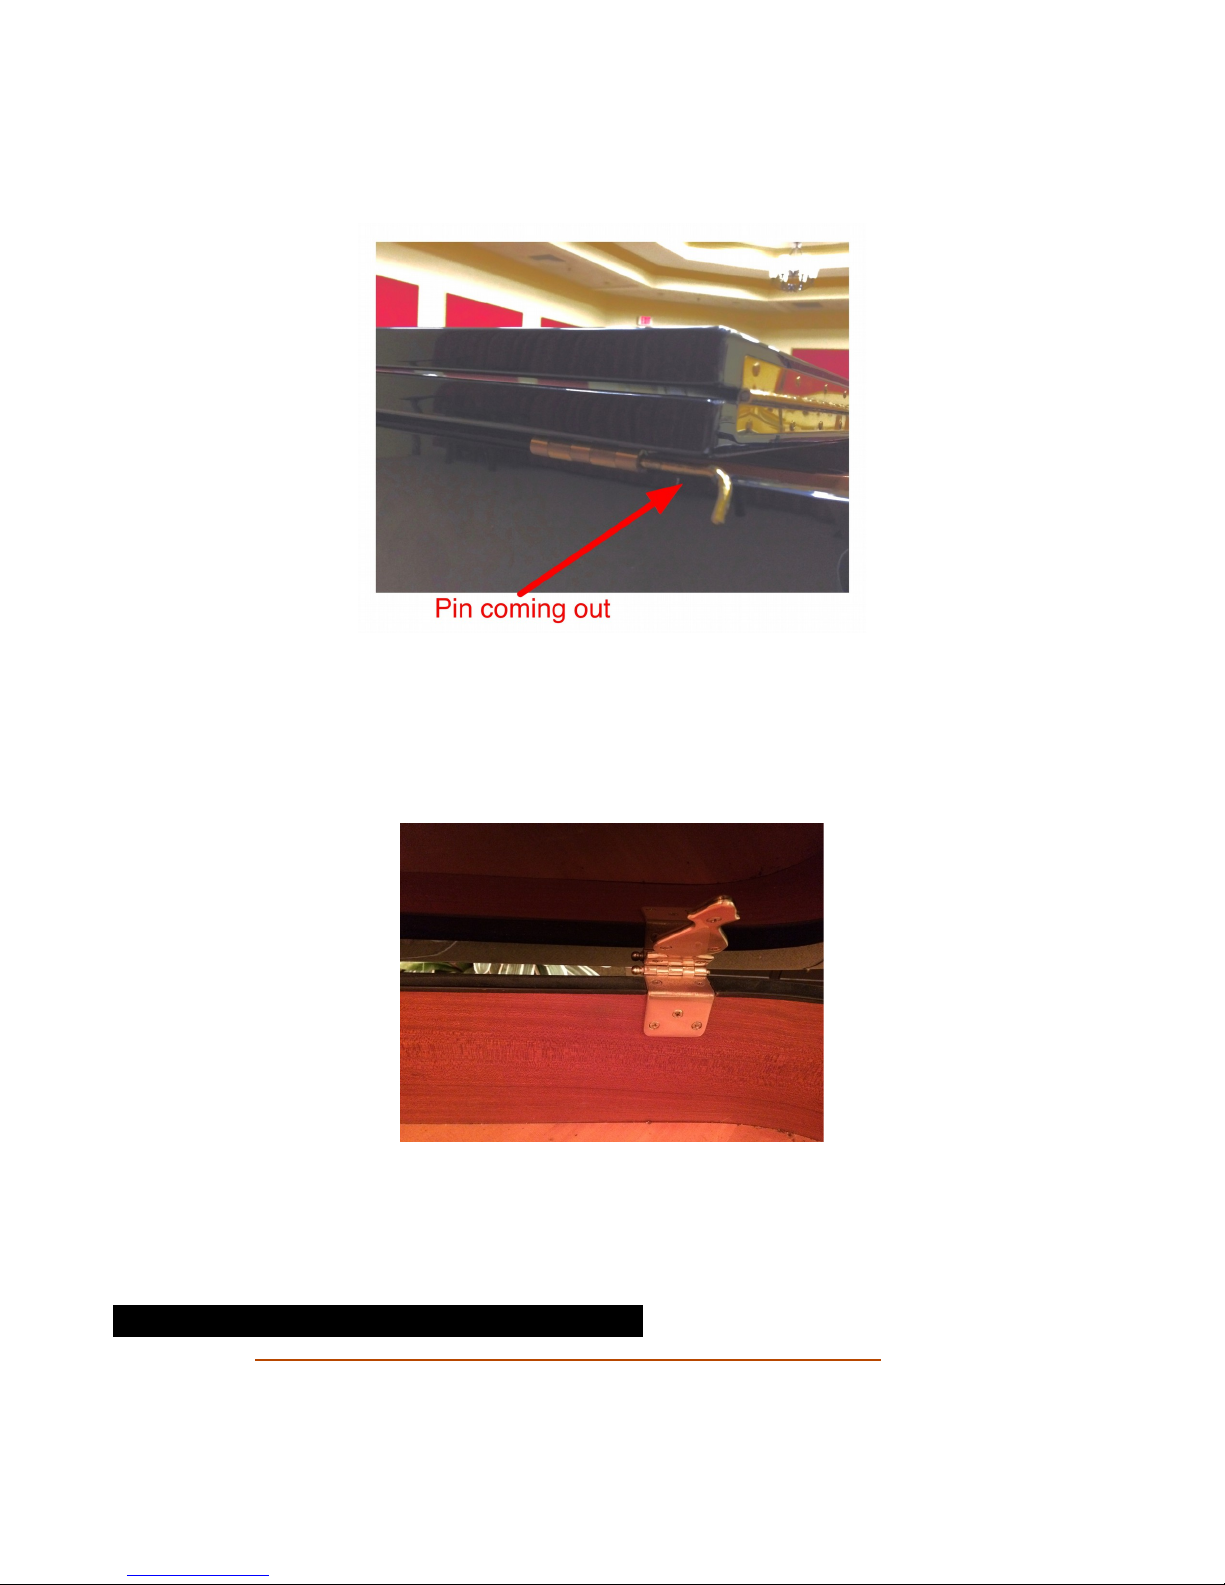
STEP 2: Hinge E amination
The MoyerCam requires that the lid be raised higher than usual, which puts e tra stress on the hinges that
hold the lid onto the piano:

MoyerCam User Manual - Page 5
Therefore, before setup, e amine the hinges. Make sure the pins are not partway out as in the following
photo:
If a pin is partially out, push it back in. (This might require a piano technician to avoid damaging the surface of
the piano.) If it has slid out completely and is now missing, stop! Do not use the MoyerCam until the pin has
been replaced.
Lift the lid to its fully open position. E amine the hinges and screws from the inside:
Screws may need to be tightened. If screws are missing, it is best to have them replaced by a piano technician.
If the wood is not grabbing the screws strongly enough due to age or accident, have your technician repair the
wood before using the MoyerCam.
STEP 3: Remove Contents from the Long Bag ①
Note: Circled numbers refer to items in "What's Included" on page 3.

MoyerCam User Manual - Page 6
STEP 4: Extension Cord ② Setup
Plug the E tension Cord into the wall, snake it under the piano (to minimize the possibility of someone tripping
over it) and bring the end to the crook of the piano.
STEP : Camera Stand ③ Setup
Below are the parts of the Camera Stand:

MoyerCam User Manual - Page 7
Push together the two pieces of pipe:
Unlock the lever that holds the leg assembly in place:
Pull the leg assembly down as far as it will go, lock the leg assembly lever. Open legs:

MoyerCam User Manual - Page 8
Place the Camera Stand appro imately a foot from the piano, between the keyboard and the audience:
STEP 6: Camera ⑤ Setup
The Camera should be stored either in a side pocket of the Long Bag ① or in the Mitt ④.
Remove the Camera from its protective housing:
A. B.
C. D.

MoyerCam User Manual - Page 9
Note: While handling the Camera, be careful not to touch the Touch Screen or any of the four buttons (circled
below.)
Push the Camera into the Camera Mount via the the USB and HDMI connectors:
Push the Camera all the way in, but do not force it. The USB / HDMI connectors are small and should be
treated with care.
In rare situations, you might want to adjust the e act position of the
USB and HDMI cables:

MoyerCam User Manual - Page 10
Plug the Camera Charger ⑥ into the E tension Cord:
Plug the USB cable into the Charger:
Turn on the camera by pressing the Power button once:
You will know it is turning on because it will beep 3 times. If it doesn't turn on, see Troubleshooting
section:"Camera will not turn on."
Do not adjust the e act position of Camera at this point. We'll get to that later.

MoyerCam User Manual - Page 11
STEP 7: Extended Stick ⑦ Setup
Make sure the wooden dowels are in the larger pipe. (They are made to come out in case you want to adjust
the length of the E tended Stick.)
Insert the smaller pipe into the larger pipe:
Important: When the E tended Stick is vertical, the thinner pipe will be
above, the thinner pipe below. The thicker pipe will rest in the body of
the piano; the thinner pipe will push up the lid.
At this point, the piano lid should be up and supported by the piano's own built-in stick.
We suggest that two people perform the remaining Extended Stick Setup tasks.
However, with experience, one person may be able to do it .

MoyerCam User Manual - Page 12
Accomplished by 2 people:
1. Person 1: stand at the crook of the piano and face the piano. Person 2: stand in front of the built-in
stick, face the piano, and gently hold the built-in stick:
2. Person 1: push the lid up even higher. Person 2: Keep ahold of the built-in stick and then lower it to its
resting position:

MoyerCam User Manual - Page 13
Above procedure accomplished by one person:
1. With your left hand, hold the lower (thicker) half of the E tended Stick while
keeping your hand close to the piano's built-in stick (which should be holding up the
lid.) Place your right hand on the crook of the lid:
2. While lifting the lid with your right hand, lower the built-in stick with your left:
Now that the built-in stick is in its resting position, the ne t task is to decide the optimum location for the
lower end of the E tended Stick.

MoyerCam User Manual - Page 14
There are three possible locations:
Possibility 1: Ne t to the built-in stick on the keyboard side:
Note: with some pianos, the highest strings are too close to make this option possible.
Possibility 2: Ne t to the built-in stick, but on the side away from the keyboard:
Possibility 3: With some pianos, the E tended Stick can fit inside a slot that holds the half-stick:

MoyerCam User Manual - Page 15
The main consideration in your decision should be stability. Do not locate the bottom of the E tended Stick in
any place where its position could suddenly shift. Note in the above photos that it is always butted up against
a solid wall. Never balance it on top of the built-in stick! Also this is not good:
Reason: The E tended Stick is putting pressure on the built-in stick. If that one screw that holds the built-in
stick were to let go, or if someone were to lift the built-in stick, the E tended Stick could dislodge.

MoyerCam User Manual - Page 16
Another aspect of stability is illustrated in the ne t three photos:
1- Keyboard side of built-in stick: OK, but E tended Stick leans to the right:
2- Ne t to built-in stick but away from the keyboard: better (but leans slightly to the left):
3- Inside the half-stick slot: Perfect:
After placing the bottom end of the E tended Stick, you now need to guide the top end into the correct notch
on the lid. First, if there is no notch, STOP! Do not use the MoyerCam without a notch. Some pianos have two

MoyerCam User Manual - Page 17
notches, the second one being for a half-stick. Choose the notch that creates the most stability (generally the
lower one.) The principle is to try to get the stick and the lid to create as close to a 90 degree angle as
possible. Piano manufacturers choose a stick length based on this principle:
The purpose of our E tended Stick is to make the lid go higher than normal, and so a perfect 90º angle is not
achievable. But we rely on you to have common sense. If there is a choice of notches, pick the notch that gets
as close to a 90º angle as possible. Generally that will be the lower notch:
No: too unstable Good
If the lid still seems unstable, try taking some dowels of the E tended Stick to make it shorter:
If your gut still tells you the lid is unstable: put the MoyerCam away. Contact us.

MoyerCam User Manual - Page 18
STEP 8: Screen ⑧ Setup
Warning: During Screen Setup, be careful not to bump against the E tended Stick or to put undue pressure on
the lid. Remember: it is only the weight of the lid that is holding the E tended Stick in place!
Remove the roll of Screens from the bo , and unroll one Screen directly onto the piano:
Use the Mitt ④ to smooth out the Screen and to introduce more static so that it clings better:
Step 9: Projector ⑫ Setup
E tend one section of each leg of the Projector Tripod ⑨. Place it in front of the piano so that the velcro

MoyerCam User Manual - Page 19
straps are facing the piano:
Get the squarish receptacle at the top of the Projector Tripod ready to accept the Projector by moving the
thumb lever as follows:
1. 2. 3.

MoyerCam User Manual - Page 20
Remove the Projector from the Projector Case ⑪. Connect the Projector to the Projector Tripod by following
the three steps below:
1.Lower front side into receptacle 2. Lower back side into receptacle 3. Push thumb lever to lock
Projector onto Tripod
Make sure the Projector is securely attached to the Projector Tripod.
Pull off the 2 velcro straps that cover the lens cap:
Table of contents