manuals.online logo
Brands
  1. Home
  2. •
  3. Brands
  4. •
  5. JVC
  6. •
  7. Camcorder
  8. •
  9. JVC GZX900US - Everio Camcorder - 1080i Instructions for use

JVC GZX900US - Everio Camcorder - 1080i Instructions for use

QOpen the LCD monitor and turn off the camera.
RAfter attaching the battery pack, close the LCD
monitor and connect the AC adapter.
•The battery (BN-VF908U) will take 110 minutes to
completely charge.
•The power/charge lamp blinks and charging starts.
The power/charge lamp turns off when the battery is
fully charged.
Charging the Battery Pack
How to Use the Touch Sensor
LHow to change the MENU settings
LUsing on-screen buttons
ATo select an on-screen
button appearing on
the left side, touch the
portion of the sensor
next to the on-screen
button.
BTo select an on-screen button appearing at the
bottom of the screen, touch the buttons underneath
them.
LHow to play back your videos
QTouch the MENU
button.
RSlide your finger up
and down on the
Touch Sensor.
STouch the OK button.
Q
Press the PLAY/REC
button to display
thumbnails on the screen.
RHighlight thumbnail
using Touch Sensor
and touch OK button.
Preparation:
•Load the provided CD-ROM
into the PC.
•In Windows Vista, the auto
play dialog box appears.
QClick [Easy Installation].
Follow the on-screen
instructions.
RClick [Next].
SClick [Finish].
•Everio MediaBrowser HD
edition icon and Everio
MediaBrowser Player icon
are created on the desktop.
Recording Files
Preparation:
QOpen the LCD monitor to turn on the camera.
RPress PLAY/REC to select the recording mode.
SSelect video or still image mode on the recording dial.
Installing the Software to the PC
START/STOP
Video (!) mode
Press the START/STOP button to start or stop recording.
•You can take pictures during video recording only by
pressing SNAPSHOT button.
Still image (#) mode
Press the SNAPSHOT button to take pictures.
To view the video or image you just recorded;
Press the QUICK REVIEW ( )
button.
•During the preview you can
delete the video or image by
pressing the DELETE (;) button.
Video (!) mode
Press the INFO button twice
or the INFO button and then
select ;.
Still image (#) mode
Press the INFO button.
LChecking the remaining battery power
2
13
•The sensors do not function if you touch them with
your finger nail or with gloves on.
QAbra la pantalla LCD y apague la cámara.
RUna vez que insertó la batería, cierre la pantalla LCD
y conecte el adaptador de CA.
•
La batería
(BN-VF908U)
tardará 110 minutos en cargarse
por completo.
•La luz de alimentación/carga parpadea y la carga
empieza. La luz de alimentación/carga se apaga
cuando la batería está completamente cargada.
Carga de la Batería
Cómo Utilizar el Sensor Táctil
LCómo cambiar los ajustes
LUso de los botones en pantalla
APara seleccionar un
botón en pantalla que
aparezca en el lado
izquierdo, toque la
parte del sensor que
se encuentre junto al
botón en pantalla.
BPara seleccionar un botón en pantalla que aparezca
en la parte inferior de la pantalla, toque el botón que
se encuentre debajo de él.
LCómo reproducir vídeos
QToque el botón MENU.
RDeslice un dedo hacia
arriba y hacia abajo
por el sensor táctil.
SToque el botón OK.
QPulse el botón PLAY/REC
para mostrar miniaturas
en la pantalla.
R
Resalte una miniatura
mediante el sensor láser
y toque el botón OK.
Preparativos:
•Inserte el CD-ROM
suministrado en el PC.
•En Windows Vista aparece
el cuadro de diálogo de
reproducción automática.
QHaga clic en
[Easy Installation].
Siga las instrucciones que
aparecen en pantalla.
RHaga clic en [Siguiente].
SHaga clic en [Finalizar].
•Se crea un icono de Everio
MediaBrowser HD edition
y un icono de Everio
MediaBrowser Player en el
escritorio.
Grabación de Archivos
Preparativos:
QAbra la pantalla LCD para encender la cámara.
RPulse PLAY/REC para seleccionar el modo de
grabación.
SSeleccione el modo video o imagen fija en el selector
de modo de grabación.
El icono de cámara de
cine (!) representa la
grabación de vídeo.
El icono de cámara (#)
representa imágenes
jas.
Instalación de Software en el PC
START/STOP
Modo vídeo (!)
Pulse INFO dos veces o pulse
INFO y seleccione ;.
Modo imagen fija (#)
Pulse INFO.
LComprobación de la carga restante de la batería
2
13
Modo vídeo (!)
Pulse el botón START/STOP para empezar o detener la
grabación.
•Es posible tomar fotografías durante la grabación de un
vídeo simplemente pulsando el botón SNAPSHOT.
Modo imagen fija (#)
Pulse el botón SNAPSHOT para tomar fotografías.
Para ver el vídeo o la imagen que acaba de grabar,
Pulse el botón QUICK
REVIEW ( ).
•Durante la vista preliminar se
puede eliminar el vídeo o
imagen pulsando el botón
DELETE (;).
•
Los sensores no funcionan si los toca con la uña o con
guantes puestos.
QOuvrez l’écran LCD et éteignez la caméra.
RAprès avoir fixé la batterie, refermez l’écran LCD et
branchez l’adaptateur secteur.
•
Il faut 110 minutes pour charger complètement la batterie
(BN-VF908U)
.
•
Le voyant d’alimentation/recharge clignote et la
recharge commence. Lorsque la batterie est entièrement
rechargée, le voyant d’alimentation/recharge s’éteint.
Charger la Batterie
Comment Utiliser le Capteur Tactile
LComment changer les réglages à l'aide
LUtilisation des boutons à l'écran
APour sélectionner une
touche apparaissant
sur le côté gauche
de l’écran, touchez
le capteur près de
bouton à l’écran.
BPour sélectionner une des touches apparaissant au
fond de l’écran, touchez son bouton correspondant.
LComment lire vos vidéos à l'aide
QTouchez la touche
MENU.
R
Faites glisser votre doigt
vers le haut et le bas sur
le capteur tactile.
STouchez la touche OK.
QAppuyez sur le bouton
PLAY/REC pour afficher
des miniatures sur
l'écran.
RSélectionnez les
miniatures à l'aide
du capteur
tactile
et
toucher le bouton OK.
Préparation:
•Insérez le CD-ROM fourni
dans le lecteur CD de
l’ordinateur.
•Sous Windows Vista, la
boîte de dialogue de lecture
automatique apparaît.
QCliquez sur
[Easy Installation].
Suivez les instructions sur
l’écran.
RCliquez sur [Suivant].
SCliquez sur [Terminer].
•L’icône Everio MediaBrowser
HD edition et l’icône Everio
MediaBrowser Player sont
créées sur le bureau.
Enregistrement de Fichiers
Préparation:
QOuvrez l’écran LCD pour allumer la caméra.
RAppuyez sur PLAY/REC pour sélectionner le mode d’
enregistrement.
SSélectionnez le mode vidéo ou photo sur le cadran d’
enregistrement.
L'icône de la caméra
(!) correspond à
l’enregistrement de vidéo.
L'icône de l’appareil
photo (#) correspond à
l’enregistrement d’images
fixes.
Installer le logiciel sur l’ordinateur
START/STOP
Mode vidéo (!)
Appuyez deux fois sur la
touche INFO ou appuyez
sur la touche INFO puis
sélectionnez ;.
Mode photo (#)
Appuyez sur la touche INFO.
LVérifier la charge restante de la batterie
2
13
Mode vidéo (!)
Appuyez sur la touche START/STOP pour démarrer ou
arrêter l'enregistrement.
•Vous pouvez prendre des photos pendant
l’enregistrement vidéo en appuyant simplement sur la
touche SNAPSHOT.
Mode photo (#)
Appuyez sur la touche SNAPSHOT pour prendre des photos.
Pour afficher la vidéo ou l'image que vous venez
d'enregistrer,
Appuyez sur la touche QUICK
REVIEW ( ).
•Dans l’aperçu, vous pouvez
supprimer la vidéo ou
l’image en appuyant sur la
touche DELETE (;).
•
Les capteurs ne fonctionnent pas si vous les touchez
avec un ongle ou avec des gants.
The video camera
icon (!) represents
recording video.
The camera icon (#)
represents recording
stills.
Access lamp
AC Adapter to AC
Outlet (110V to 240V)
Open the cover
Power/charge lamp
!Attach the battery
#Close the monitor
$Connect the AC adapter
(Charging starts)
The battery pack is not charged
at the time of purchase.
INFO button
Luz de acceso
Adaptador de CA
A la toma de CA
(de 110 V a 240 V)
Abrir la cubierta
Luz de alimentación/carga
!Sujete la batería
#Cierre la pantalla
$Conecte el adaptador CA
(la carga se ha iniciado)
La cámara se suministra con la
batería descargada.
Botón INFO
Voyant d’accès
Adaptateur secteur
Sur une prise secteur
(110 V à 240 V)
Ouvrez le volet de protection
Voyant de alimentation/
recharge
!Fixez la batterie
#Fermez l’écran LCD
$
Raccordez l’adaptateur secteur
(la recharge commencé)
La batterie n’est pas chargée
lors de l’achat.
Touche INFO
Easy Start Guide
This easy start guide is designed to navigate you to
using your new Everio quickly. Please refer to the
owner’s manual for a detailed listing of features.
For our online tutorials please visit:
http://camcorder.jvc.com/tutorials.jsp
JVC Company of America
A Division of JVC Americas Corp.
1700 Valley Road, Wayne, NJ 07470
www.jvc.com
Customer Service
TOLL FREE: 1-800-252-5722
For our online tutorials please visit:
http://camcorder.jvc.com/tutorials.jsp
Register your EVERIO online at:
REGISTER.JVC.COM
and receive a special offer.
0309MNH-SW-VM
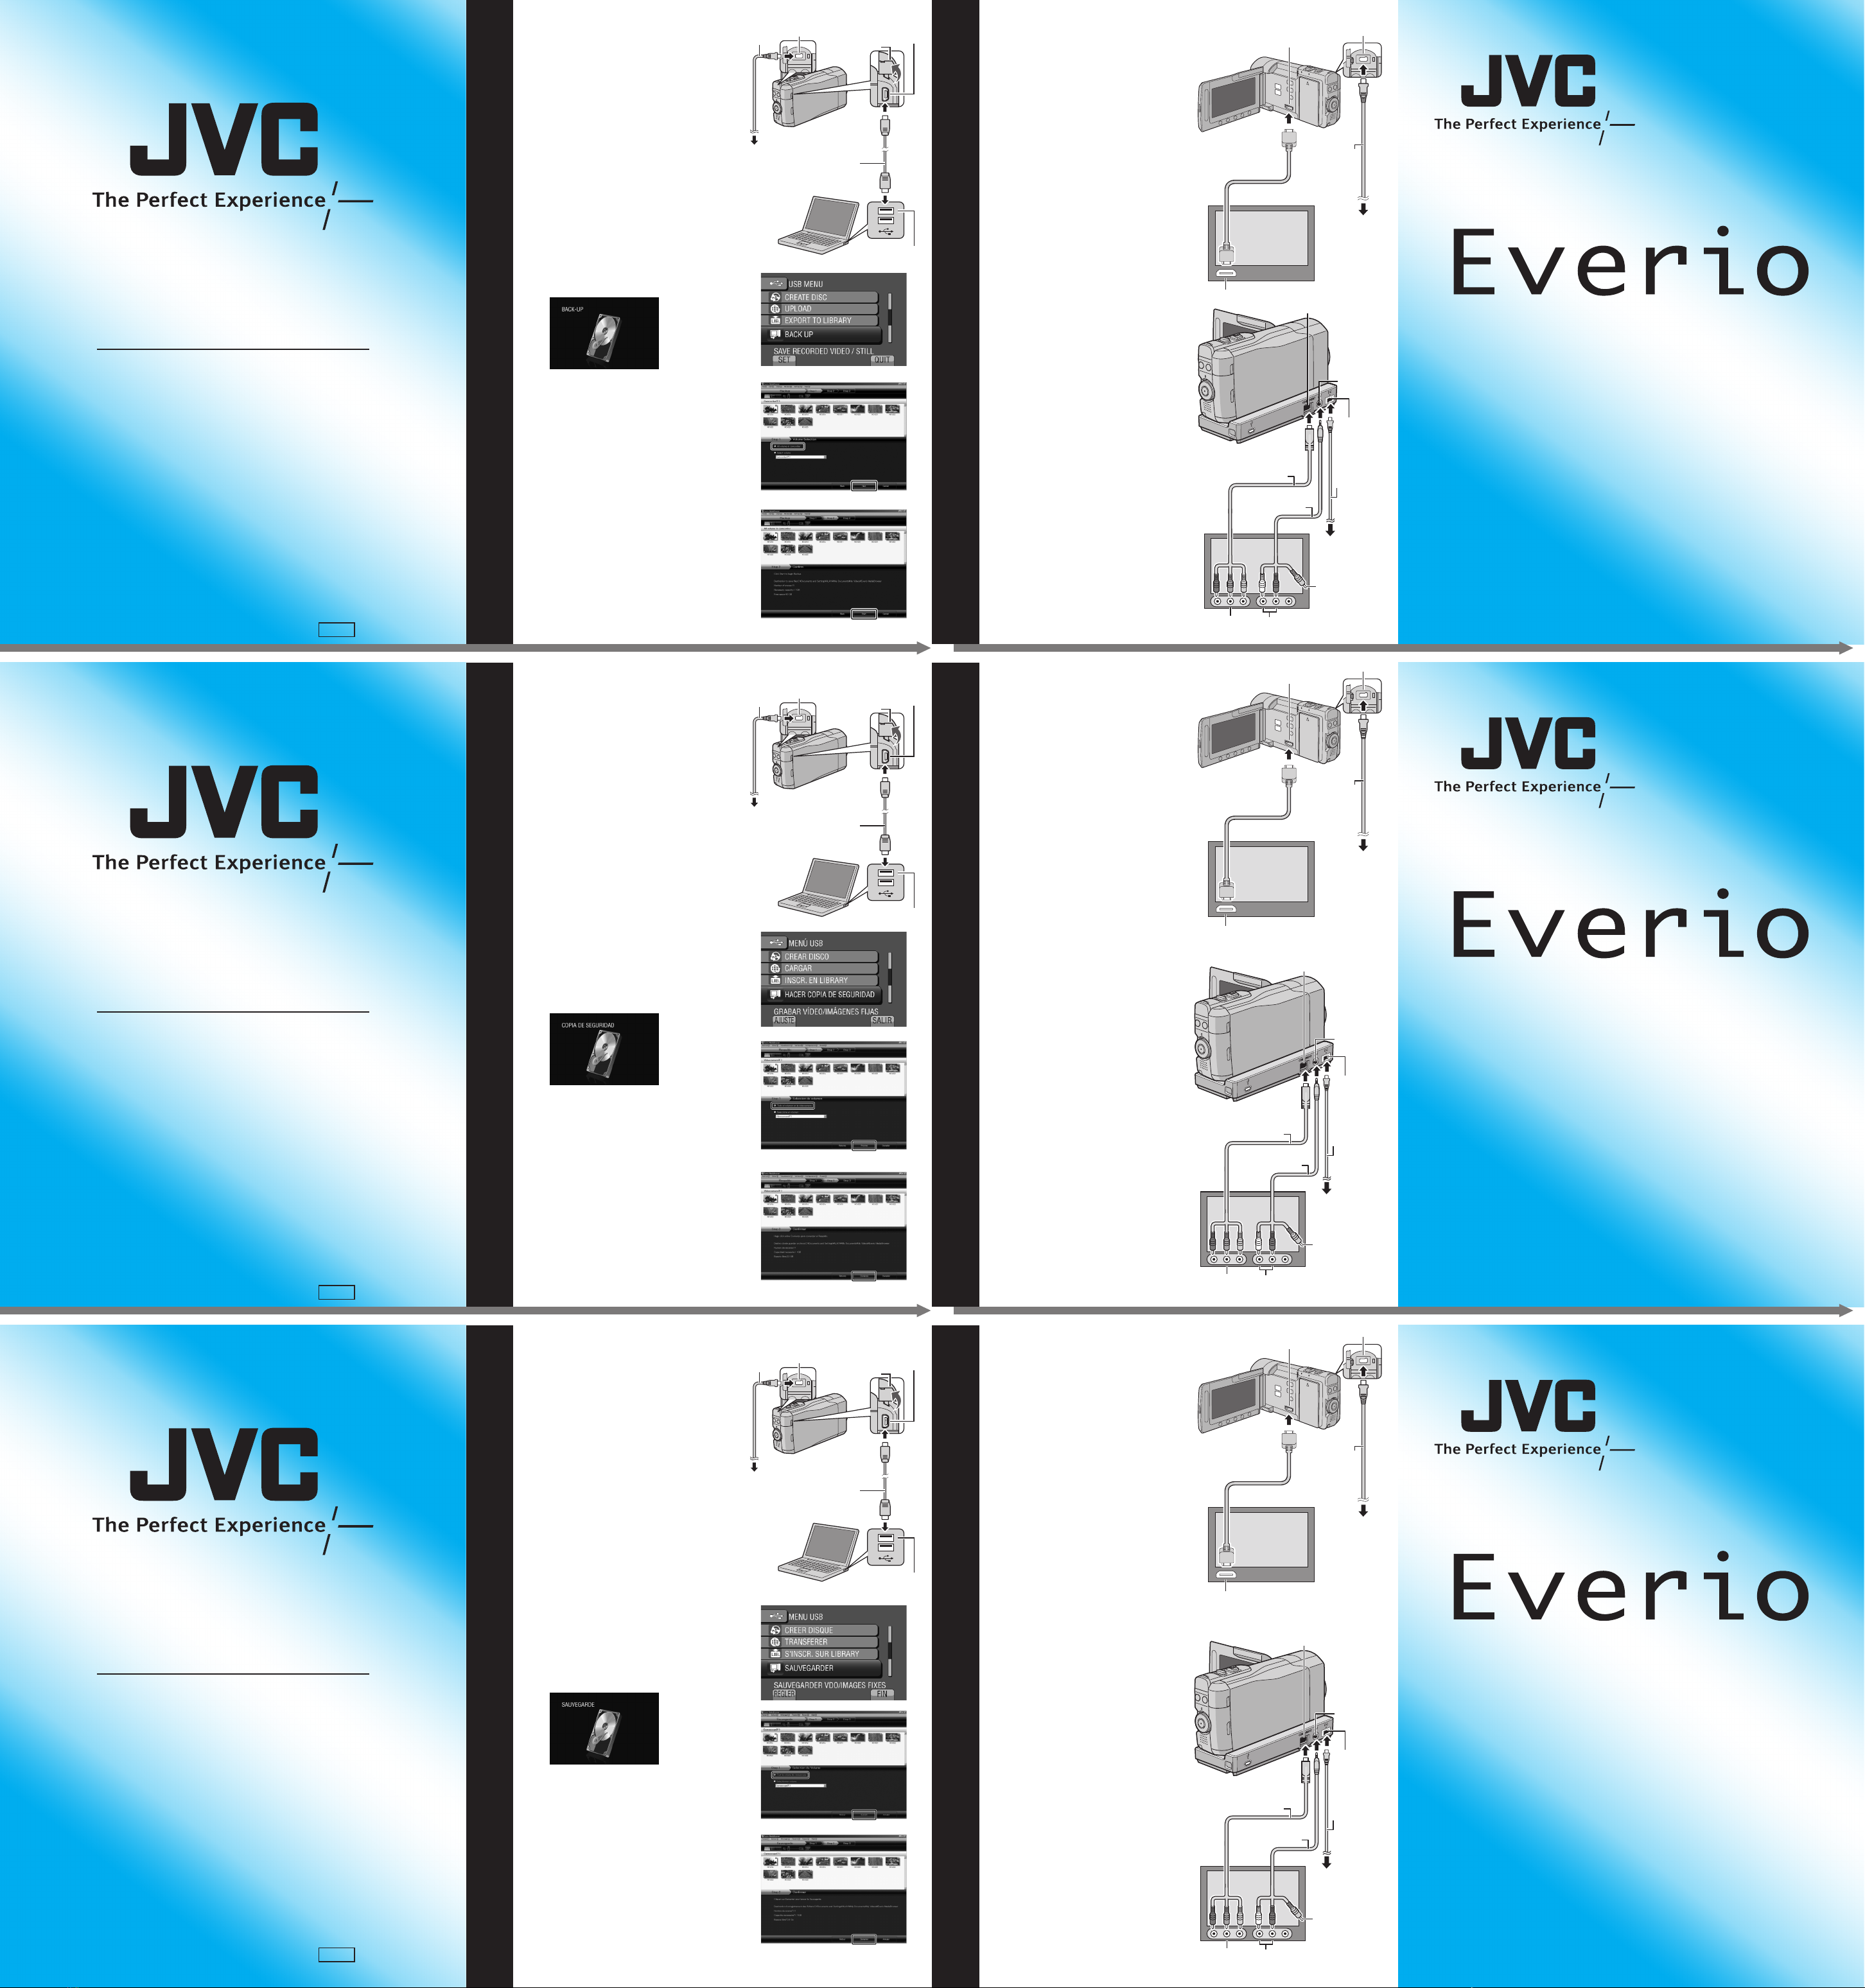
Making Backup on the PC
Viewing Files on TV
LTo connect using the
HDMI mini connector
•Turn off all units.
•When connecting to a
1080p compatible TV,
set [HDMI OUTPUT] to
[AUTO 1].
LTo connect using
the COMPONENT
connector
•Turn off all units.
•Change the settings
in [COMPONENT
OUTPUT] according to the
connection.
LPlayback Operation
After the connection with TV
is completed
QTurn on the camera and
the TV.
RSet the TV to its VIDEO
mode.
SStart playback on the
camera.
Preparation:
•Install the software to the PC.
•Make sure that enough free
space is left in the PC’s HDD.
•Close the LCD monitor to
turn off the camera.
•Connect the camera to the
PC with the USB cable.
QOpen the LCD monitor to
turn on the camera.
RSelect [BACK UP].
Everio MediaBrowser starts
on the PC.
SClick [All volume in
camcorder] and click [Next].
TClick [Start].
Backup starts.
USB Connecter
USB Cable
USB Connecter
LYT2079-001A-M
M9S8
AC
Adapter DC Connector
To AC Outlet
AC Adapter
DC Connector
Component Cable
AV Connector
COMPONENT Connector
AV Cable
COMPONENT
Input Connector Audio L/R Input
Connector
Video
Connector is not
in use.
HDMI Mini Connector
AC Adapter
DC Connector
HDMI Connector
HDMI Cable (optional)
(Mini to full-sized HDMI cable)
To AC Outlet
Guía de inicio rápido
Esta guía de inicio rápido se ha diseñado para que
pueda empezar a usar su nueva Everio rápidamente.
Consulte el manual del propietario para obtener una
lista detallada de características.
Para consultar nuestros tutoriales en línea, visite:
http://camcorder.jvc.com/tutorials.jsp
Copia de Seguridad en un PC
Visualización de Archivos en un Televisor
LPara realizar la
conexión con el
miniconector HDMI
•
Apague todas las unidades.
•Si se conecta a un
televisor compatible con
1080p, ajuste [SALIDA
HDMI] en [AUTO 1].
LPara realizar la
conexión con el
conector COMPONENT
•
Apague todas las unidades.
•
Cambie los ajustes de
[SALIDA COMPONENTES]
de acuerdo con la conexión.
LOperación de
reproducción
Una vez realizada la
conexión con el televisor
QEncienda la cámara y el
televisor.
RAjuste el televisor en el
modo de vídeo.
SInicie la reproducción en
la cámara.
Preparativos:
•Instale el software en el PC.
•Asegúrese de que dispone
de suficiente espacio libre en
el disco duro del PC.
•Cierre la pantalla LCD para
apagar la cámara.
•Conecte la cámara al PC con
el cable USB.
QAbra la pantalla LCD para
encender la cámara.
RSeleccione [HACER COPIA
DE SEGURIDAD].
El programa Everio
MediaBrowser se inicia en
el PC.
SHaga clic en [Todo el
volumen en la videocamara]
y en [Proximo].
THaga clic en [Comienzo].
Se inicia la copia de
seguridad.
JVC Company of America
Una división de JVC Americas Corp.
1700 Valley Road, Wayne, NJ 07470
www.jvc.com
Atención al cliente
NÚMERO GRATUITO: 1-800-252-5722
Para consultar nuestros tutoriales en línea, visite:
http://camcorder.jvc.com/tutorials.jsp
Registre su EVERIO en línea en:
REGISTER.JVC.COM
y recibirá una oferta especial.
Conector USB
Cable USB
Conector USB
Adaptador
de CA Conector de CC
A la toma
de CA
0309MNH-SW-VM
M9S8
Adaptador
de CA
Conector
de CC
Cable componente
A la toma
de CA
Conector AV
Conector COMPONENT
Cable AV
Conector de entrada
COMPONENT Conector de entrada
de audio L/R
El conector de vídeo
no está en uso.
Miniconector HDMI
Adaptador
de CA
Conector de CC
Conector HDMI
Cable HDMI (opcional)
(Cable HDMI de tamaño mini a tamaño completo)
A la toma de CA
Guide de démarrage facile
Ce guide de démarrage facile est conçu pour vous
guider rapidement dans l'utilisation de votre nouvel
Everio. Reportez-vous au manuel d'utilisation pour
une liste détaillée des fonctions.
Pour nos tutoriels en ligne, consultez :
http://camcorder.jvc.com/tutorials.jsp
Effectuer une Sauvegarde sur l’ordinateur
Visualiser des Fichiers sur un Téléviseur
L
Pour connecter à l’aide
du mini connecteur HDMI
•Éteignez tous les
appareils.
•En connectant à un
téléviseur compatible avec
1080p, réglez [SORTIE
HDMI] sur [AUTO 1].
LPour connecter à
l’aide du connecteur
COMPONENT
•
Éteignez tous les appareils.
•Modifiez les réglages
dans [SORTIE
COMPOSANTES] en
fonction de la connexion.
LOpération de lecture
Une fois la connexion au
téléviseur effectuée
QAllumez la caméra et le
téléviseur.
R
Réglez le téléviseur au
mode VIDÉO.
S
Lancez la lecture sur la
caméra.
Préparation:
•Installez le logiciel sur
l’ordinateur.
•Vérifiez que l’espace libre sur
le disque dur de l’ordinateur
est suffisant.
•Fermez l’écran LCD pour
éteindre la caméra.
•Connectez la caméra à
l’ordinateur à l’aide du câble
USB.
QOuvrez l’écran LCD pour
allumer la caméra.
RSélectionnez
[SAUVEGARDER].
Everio MediaBrowser
démarre sur l’ordinateur.
SCliquez sur [Tout le volume
du camescope] puis sur
[Suivant].
TCliquez sur [Demarrer].
La sauvegarde démarre.
Service après-vente
APPEL GRATUIT : 1-800-252-5722
Pour nos tutoriels en ligne, consultez :
http://camcorder.jvc.com/tutorials.jsp
Enregistrez votre EVERIO en ligne sur :
REGISTER.JVC.COM
et recevez une offre spéciale.
JVC Company of America
Une division de JVC Americas Corp.
1700 Valley Road, Wayne, NJ 07470
www.jvc.com
Connecteur USB
Câble USB
Connecteur USB
Adaptateur
secteur Connecteur CC
Sur une prise
secteur
0309MNH-SW-VM
M9S8
Adaptateur
secteur
Connecteur CC
Câble composantes
Sur une prise
secteur
Connecteur AV
Connecteur
COMPONENT
Câble AV
Connecteur d’entrée
COMPONENT Connecteur
d’entrée audio G/D
Le connecteur
vidéo n’est pas
utilisé.
Mini connecteur HDMI
Adaptateur
secteur
Connecteur CC
Connecteur HDMI
Câble HDMI (en option)
(câble HDMI mini à long)
Sur une prise
secteur
To AC Outlet
Open the cover
Abrir la cubierta
Ouvrez le volet
de protection

Other JVC Camcorder manuals

JVC GY-HD250U - 3-ccd Prohd Camcorder User manual

JVC

JVC GY-HD250U - 3-ccd Prohd Camcorder User manual

JVC GY-DV300U - 1/3" 3-ccd Dv Camcorder Installation and operating instructions

JVC

JVC GY-DV300U - 1/3" 3-ccd Dv Camcorder Installation and operating instructions

JVC GR-DX25EX User manual

JVC

JVC GR-DX25EX User manual

JVC GZ MG630R - Everio Camcorder - 800 KP User manual

JVC

JVC GZ MG630R - Everio Camcorder - 800 KP User manual

JVC Everio GZ-MG37E User manual

JVC

JVC Everio GZ-MG37E User manual

JVC GZ-MG50E/EK User manual

JVC

JVC GZ-MG50E/EK User manual

JVC Everio GZ-RX610 Operating and maintenance manual

JVC

JVC Everio GZ-RX610 Operating and maintenance manual

JVC GR-FXM41 User manual

JVC

JVC GR-FXM41 User manual

JVC GR-SXM607 User manual

JVC

JVC GR-SXM607 User manual

JVC Everio R GZ-R560U Operating and maintenance manual

JVC

JVC Everio R GZ-R560U Operating and maintenance manual

JVC GR-DV500US User manual

JVC

JVC GR-DV500US User manual

JVC GZ-E100BUA User manual

JVC

JVC GZ-E100BUA User manual

JVC GR-D200 User manual

JVC

JVC GR-D200 User manual

JVC GZ-MG31U User manual

JVC

JVC GZ-MG31U User manual

JVC GR-AX230U User manual

JVC

JVC GR-AX230U User manual

JVC GR-AX1010U User manual

JVC

JVC GR-AX1010U User manual

JVC GR-D31US User manual

JVC

JVC GR-D31US User manual

JVC GR-AX480 User manual

JVC

JVC GR-AX480 User manual

JVC GR-DX97 User manual

JVC

JVC GR-DX97 User manual

JVC GR-AX358EG User manual

JVC

JVC GR-AX358EG User manual

JVC GR-D47 User manual

JVC

JVC GR-D47 User manual

JVC Connected Cam GY-HC500U User manual

JVC

JVC Connected Cam GY-HC500U User manual

JVC GR-SXM720 User manual

JVC

JVC GR-SXM720 User manual

JVC GR-AXM250 User manual

JVC

JVC GR-AXM250 User manual

Popular Camcorder manuals by other brands

Panasonic NV-GS1B operating instructions

Panasonic

Panasonic NV-GS1B operating instructions

Sony Handycam DCR-HC16E Service manual

Sony

Sony Handycam DCR-HC16E Service manual

Canon ZR900 Specifications

Canon

Canon ZR900 Specifications

Samsung VP-D30(i) Owner's instruction book

Samsung

Samsung VP-D30(i) Owner's instruction book

Samsung VP-D651 Owner's instruction book

Samsung

Samsung VP-D651 Owner's instruction book

Sony DIGITAL HANDYCAM DCR-TR7000E instruction manual

Sony

Sony DIGITAL HANDYCAM DCR-TR7000E instruction manual

Sanyo VM-EX370P instruction manual

Sanyo

Sanyo VM-EX370P instruction manual

Canon VIXIA HF M300 quick start guide

Canon

Canon VIXIA HF M300 quick start guide

Panasonic AVCCAM AG-AC90 brochure

Panasonic

Panasonic AVCCAM AG-AC90 brochure

Sony PXW-FS7 Before using

Sony

Sony PXW-FS7 Before using

Ikegami CTC-2110 Operating instructions and service manual

Ikegami

Ikegami CTC-2110 Operating instructions and service manual

Sony NXCAM HXR-NX3 Brochure & specs

Sony

Sony NXCAM HXR-NX3 Brochure & specs

Sony Handycam HDR-HC7E Specifications

Sony

Sony Handycam HDR-HC7E Specifications

Philips CAM102BL brochure

Philips

Philips CAM102BL brochure

HP Hard Drive Camcorder Specification sheet

HP

HP Hard Drive Camcorder Specification sheet

Samsung 8 VP-W70U Owner's instruction book

Samsung

Samsung 8 VP-W70U Owner's instruction book

Sony Handycam CCD-TR99 Operation manual

Sony

Sony Handycam CCD-TR99 Operation manual

Sony Handycam DCR-TRV230E operating instructions

Sony

Sony Handycam DCR-TRV230E operating instructions

manuals.online logo
manuals.online logoBrands
  • About & Mission
  • Contact us
  • Privacy Policy
  • Terms and Conditions

Copyright 2025 Manuals.Online. All Rights Reserved.