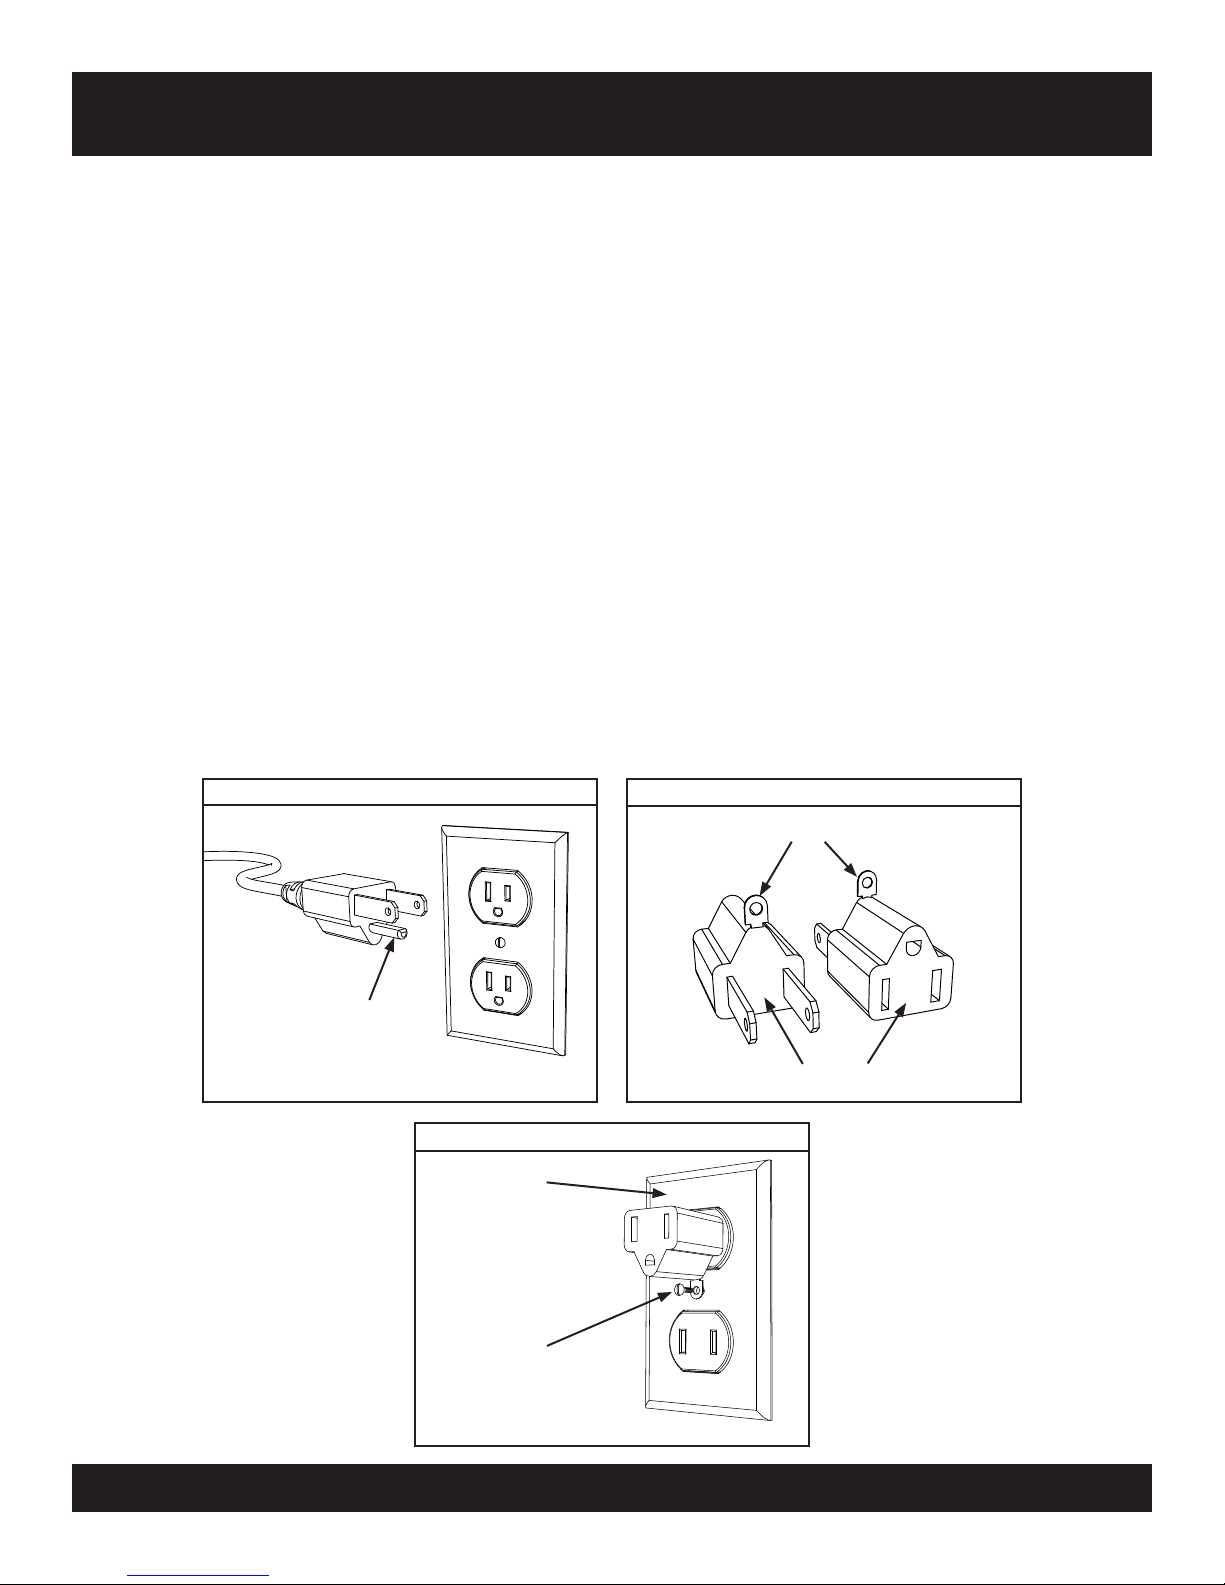
JSJ Greentouch 1801-FM User manual

HOME DECOR
FOR CUSTOMER SERVICE
CALL 1-855-571-1044 OR VISIT WWW.JSJWORLDWIDE.COM 1
INSTRUCTION
MANUAL
MODELS / MODELOS / MODÈLES:
1801-FM, 1801-FG, 2301-FM, 2301-FG
2602-FM, 2602-FG, 2602-CM, 2602-CG
2801-FM, 2801-FG, 2801-CM, 2801-CG
2803-FM, 2803-FG, 2803-CM, 2803-CG
3302-FM, 3302-FG, 3302-CM, 3302-CG
V001

PRODUCT
INFORMATION
STICKER
DETAIL OF
PRODUCT INFORMATION STICKER
LOCATION
OF MODEL
NUMBER
ELECTRIC FIREPLACE
FOYER ÉLECTRIQUE
INSERTO PARA CHIMINEA
MODEL / MODÈLE / MODELO
2602-CM
VOLTS AMPS/AMPÈRES/AMPERO Hz
120VAC 12.5 60
CAUTION: RISK OF FIRE - DO NOT OPERATE
UNLESS INSTALLED IN AN APPROVED CABINET.
AVERTISSEMENT: RISQUE DE FEU - NE PAS FAIRE
FONCTIONNER À MOINS QU;IL NE SOIT INSTALLÉ
DANS UN MEUBLE SUPPORT APPOUVÉ.
CUIDADO: REISGO DE INCENDIO. NO FUNCIONE
A MENOS QUE ESTÉ INSTALLED EN UN GABINETE
APROBADO.
Manufactured by:
JSJ Worldwide Trading Ltd.
MADE IN CHINA
FABRIQUÉ EN CHINE
FABRICADO EN CHINA
E468567
VIEW OF BACK OF INSERT
2
PRODUCT INFORMATION
1. Locate the PRODUCT INFORMATION STICKER on the back of the insert.
Write the model number in the space provided below, please also make
note of the purchase date and location for future reference. You will
need this information for product registration and customer service.
MODEL NUMBER:___________________________________________________
PURCHASE DATE:___________________________________________________
PURCHASE PLACE:__________________________________________________
PRODUCT SPECIFICATIONS
VOLTAGE 120VAC, 60 Hz
AMPS 11.7 Amps
WATTS 1400 Watts
WRITE YOUR INFORMATION HERE

3
When using electrical appliances, basic precautions should always be followed
to reduce the risk of re, electric shock, and injury to persons including the following.
1. Read all instructions before using this appliance
2. This appliance is hot when in use. To avoid burns, do not let bare skin touch hot
surfaces. If provided, use handles when moving this appliance. Keep combustible
material. Such as furniture, pillows, bedding, papers, clothes and curtains at least
3 feet (0.9m) from the front of this appliance and keep them away from the sides
and rear.
3. Extreme caution is necessary when any heater is used by or near children or
individuals with disabilities and whenever the replace is left operating and
unattended.
4. If possible, always unplug this appliance when not in use.
5. Do not operate any heater with a damaged cord or plug or after the heater
malfunctions or if it has been dropped or damaged in any manner. Disconnect power
at service panel and have heater inspected by a reputable electrician before
reusing.
6. Any repairs to this replace should be carried out by a qualied service person.
7. Under no circumstances should this replace be midied. Parts having to be removed
for servicing must be replaced prior to operating this replace again.
8. Do not use outdoors
9. This heater is not intended for use in bathrooms, laundry areas and similar indoor
locations. Never locate heater where it may fall into a bathtub or other water
container.
10. Do not run cord under carpeting. Do not cover cord with throw rugs, runners, or
similar covering. Arrange cord away from trafc areas and where it will not be
tripped over.
11. To disconnect this appliance, turn controls to the off position, then remove plug
from outlet.
12. Connect to properly grounded outlets only.
13. This appliance, when installed, must be electrically grounded in accordance with
local codes, with the current CSA C22.1 Canadian Electrical Code or follow U.S.A.
Installations, follow local codes and the National Electrical Code, ANSI/NFPA N0.70.
14. Do not insert or allow foreign objects to enter any ventilation or exhaust opening as
this may cause and electric shock or re, or damage the appliance.
15. To prevent a possible re, do not block air intakes or exhaust in any manner. Do not
use on soft surfaces, like a bed, where opening may become blocked.
16. The heaters must not be located immediately below a socket-outlet.
IMPORTANT INFORMATION

4
17. This appliance has hot and arching or sparking parts inside. Do not use it in areas
where gasoline, paint or ammable vapors or liquids are used or stored. This replace
should not be used as a drying rack for clothing. Christmas stockings or decorations
should not be hung in the area of it.
18. Use this appliance only as described in the manual. Any other use not recommend-
ed by the manufacturer may cause re, electric shock or injury to persons.
19. Always plug heaters directly into a wall outlet / receptacle. Never use with an
extension cord or re-loadable power tap (outlet / power strip).
20. This heater has a VISUAL alarm to warn that parts of the heater are getting
excessively hot. If the alarm ashes, immediately turn the heater off, unplug the unit
and inspect for any objects on or adjacent to the heater that may have blocked the
airow or otherwise cause high temperatures. DO NOT OPERATE THE HEATER WITH THE
ALARM FLASHING.
21. This heater is for use on 120 volts. The cord has a plug as shown in Figure A. An
adapter as shown in gure B is available for connecting three-blade grounding type
plugs to two-slot receptacles. The green grounding plug extending from the adapter
must be connected to a permanent ground such as a properly grounded outlet box
as shown in gure C. The adapter should not be used if a three-slot grounded
receptacle is available.
IMPORTANT INFORMATION
FIGURE BFIGURE A
FIGURE C
GROUNDING PIN
ADAPTER
GROUNDING MEANS
METAL SCREW
COVER OF
GROUNDED
OUTLET BOX

IMPORTANT INFORMATION
SAVE THESE INSTRUCTIONS
FOR FUTURE REFERENCE
HEATER OVERRIDE SWITCH
DETAIL OF HEATER OVERRIDE SWITCH
HEATER OVERRIDE
SWITCH
HEATER POWER
ON
HEATER POWER
OFF
5
This appliance has a rocker switch located on the side of the unit. This switch
will override power to the heater to prevent the heater from being acciden-
tally or unintentionally powered on. This feature is primarily added to help
prevent children from powering on the heater when it is not desired.

C
F88:88
C
F88:88
6
OPERATING INSTRUCTIONS
CONTROLS FOR MODELS
1801-FM, 1801-FG, 1801-CM, 1801-CG
2301-FM, 2301-FG, 2301-CM, 2301-FG
CONTROLS FOR MODELS
2602-FM, 2602-FG, 2301-CM, 2301-CG
2801-FM, 2801-FG, 2801-CM, 2801-CG
2803-FM, 2803-FG, 2803-CM, 2803-CG
3302-FM, 3302-FG, 3302-CM, 3302-CG
4-BUTTON CONTROL PANEL 5-BUTTON CONTROL PANEL
4-BUTTON REMOTE 5-BUTTON REMOTE
The LED readout will light up with the corresponding icon when any control button
is pushed. The LED readout will fade to black after 10 seconds.

REMOVE BEFORE USE
BATTERY
7
MASTER POWER BUTTON: Press button to turn the master power on then press
again to turn the master power off. The master power can be powered on and
all the other unit functions can be off. When the power button is powered on
the ember bed(logs) will have a slight glow to act as a power indicator.
OPERATING INSTRUCTIONS
FLAME BRIGHTNESS BUTTON: Press button to scroll through 5 levels of bright-
ness, pressing a sixth time turns the ames off. When the ame is powered on,
it will start with the brightest setting (5), push the ame button one time to step
through each ame brightness. The ame levels in order are 5, 0, 1, 2, 3, 4, 5.
TEMPERATURE BUTTON: Press button to scroll upward through temperatures to
set the heater thermostat. Available temperatures settings are 65, 70, 75, 80
and 85 F. The thermostat will shut off the heater when it reaches the tempera-
ture you have set. The thermostat will switch the heater on when it drops 3º
Fahrenheit below your set temperature. Hold the button down for 4 seconds
to toggle between Fahrenheit and Celsius.
TIMER BUTTON: Press the button to scroll upward through quantities of time for
the heater to run before automatically shutting off. The times available are :30,
1:00, 1:30, 2:00, 2:30, 3:00, 3:30, 4:00, 4:30, 5:00, 5:30, 6:00, 6:30, 7:00, 7:30, 8:00,
8:30, 9:00. (The heater must rst be powered ON for timer to work)
DOWN LIGHT BUTTON: Press this button to power the LED down lights on, press it
again to power them off. (This feature is only on models with a 5-Button control
panel and remote control)
To use the remote control rst re-
move the plastic tab labeled
“REMOVE BEFORE USE” by
Gently pulling.
To change the battery, turn the remote control
over. Squeeze the catch toward the center,
then pull to slide the battery tray out.
BACK OF REMOTE
BATTERY FOR REMOTE
SQUEEZE
THE
CATC H
BATTERY TYPE
CR-2025 3V

ISSUE CAUSE ACTION
Display shows “E1” The thermostat sensor is
disconnected
Contact customer service
Display shows “E2” The thermostat sensor is
broken
Contact customer service
Display shows “E3” Manual reset overheat
protection has triggered
Power off and unplug the replace insert then inspect
the back and top of the replace insert to check that
the air intakes are not blocked as this will cause over-
heating. Wait for 30 minutes the replug the unit and
power on to see if the problem repeats while monitor-
ing the heater for overheating. If the problem returns
discontinue use of the heater and contact customer
service.
No power (when pow-
ered the logs will glow)
The unit does not have
power
Check that the power cord is securely plugged into a
standard 120V outlet.. Then check to make sure the
unit is powered on.
No ame effect but
logs are glowing
The ame effect is pow-
ered off
Push the ame brightness button several time to scroll
through the ames brightness.
Heater and blower do
not power on but rest
of functions are work-
ing
Heater override switch is
engaged which disables
the heater
On the side of the unit is the heater override toggle
switch. Change the position of the switch to the on
position. (See page 4)
Power cord gets warm
to the touch
This is normal (be alerted
if it extremely hot to the
touch)
This is normal for a heater appliance as it requires more
current to operate. Check the connections of the
appliance cord and the outlet. Make sure the plug ts
tightly into the outlet. During use check the plug and
outlet frequently to determine if it is HOT, is it is discon-
tinue use of the appliance and consult with a qualied
electrician to check or change the overheating out-
let(s).
Remote control does
not work
Weak or failing batteries Replace with a new battery.
Remote control signal
is weak and only works
sometimes
Pressing the buttons too
quickly
As many of the functions require the buttons to push
multiple times in succession. The transmitter cannot
keep up if the button is press to fast. Try pressing the
buttons more slowly and steadily.
Using the remote too far
away or at an off angle
The remote will only work within a distance of 20 feet
and 45 degrees to either side from the front of the re-
place insert.
8
TROUBLESHOOTING

9
1. All the internal parts do not require any maintenance.
2. Make sure the unit is unplugged or turned off before cleaning the replace
Insert or heater vents. The heater vents along the top back and front can be cleaned
with a vacuum periodically to remove dust.
CARE AND CLEANING
This equipment has been tested and found to comply with the limits for Class B digital de-
vices, pursuant to part 15 of the FCC rules. These limits are designed to provide reasonable
protection against harmful interference in a residential installation. The equipment gener-
ates, uses, and can radiate radio frequency energy and, if not installed and used in accor-
dance with the instructions, may cause harmful interference to radio or television recep-
tion, which can be determined by turning the equipment off and on, th user is encouraged
to try and correct the interference by one or more of th following measures:
1. Reorient or relocate the receiving antenna
2. Increase the separation between the equipment and the receiver
3. Connect the equipment into an outlet on a circuit different from that to which the re-
ceiver is connected.
4. Consult the dealer or an experienced radio/TV technician for help.
This device complies with Part 15 of the FCC rules. Operation is subject to the following two
conditions:
1. This device may not cause harmful interference, and
2. This device must accept any interference received, including interference that may
cause undesired operation.
Modications not approved by the party responsible for compliance could void user’s au-
thority to operate the equipment.
This Class B digital apparatus complies with Canadian ICES-003
FCC/IC INFORMATION
For Customer Service please call 1-855-571-1044 or visit www.jsjworldwide.com to down-
load a copy of these instructions and for various trouble shooting instructions.
Please have the following information ready before calling Customer Service
• Model Number
• Sales Receipt or a Proof of Purchase
CUSTOMER SERVICE

10
1 YEAR WARRANTY
This Electric Fireplace Appliance is warrantied by the manufacturer to be free of material
and manufacturing defects for the time period of one year from the purchase date. This
is subject to the following limitations and conditions.
This appliance must be installed and operated in accordance with the installation instruc-
tions and the operating instructions that were provided with the product. Unauthorized
repairs or alterations, accidents, willful abuse and misuse of the product will nullify this
warranty.
This warranty is non-transferable and is offered to the original owner in so long as the
product was purchased from a licensed and authorized supplier and reseller of the prod-
uct.
The warranty is limited to the repair or replacement of part(s) that have been determined
to be defective in material or workmanship. This is provided that the part(s) have been
subjected to “normal” conditions of use once the defect is agreed upon through the
manufacturers inspection process.
Any costs or related expenses that have arised from the transportation, construction,
labor or otherwise of same that have arisen from repairs, replacement, defective part(s),
or otherwise the same, is not covered by this warranty, nor shall the manufacturer assume
the same.
The manufacturer may, at it’s discretion, fully discharge all obligations with respect to this
warranty by refunding the wholesale price of defective part(s).
The owner/ user assumes all other risks, if, any, including the risk of any direct, indirect or
consequential loss or damage arising out of use, or inability to use the product, except as
provided by law.
All other warranties- expressed or implied- with respect to the product, it’s components
and accessories, or any obligations/ liabilities on the part of th manufacturer are hereby
expressly excluded.
The manufacturer neither assumes, nor authorizes any third party to assume on it’s behalf,
any other liabilities with respect to the sale of the product.
The warranties as outlined within this document do not apply to non accessories used in
conjunction with the installation of this product.
This warranty gives you specic legal rights, and you may also have other rights which
vary from state to state.
This warranty is void if:
1. The replace is subjected to prolonged periods of dampness or condensation.
2. Any unauthorized alterations, willful abuse, accident, or misuse of the product.
3. You do not have the original receipt.

HOME DECOR
PARA SERVICIO AL CLIENTE
LLAME AL 1-855-571-1044 O VISITE WWW.JSJWORLDWIDE.COM 11
MANUAL DE
INSTRUCCIONES
MODELS / MODELOS / MODÈLES:
1801-FM, 1801-FG, 2301-FM, 2301-FG
2602-FM, 2602-FG, 2602-CM, 2602-CG
2801-FM, 2801-FG, 2801-CM, 2801-CG
2803-FM, 2803-FG, 2803-CM, 2803-CG
3302-FM, 3302-FG, 3302-CM, 3302-CG

UBICACIÓN
DEL
NÚMERO
DEL
MODELO
ELECTRIC FIREPLACE
FOYER ÉLECTRIQUE
INSERTO PARA CHIMINEA
MODEL / MODÈLE / MODELO
2602-CM
VOLTS AMPS/AMPÈRES/AMPERO Hz
120VAC 12.5 60
CAUTION: RISK OF FIRE - DO NOT OPERATE
UNLESS INSTALLED IN AN APPROVED CABINET.
AVERTISSEMENT: RISQUE DE FEU - NE PAS FAIRE
FONCTIONNER À MOINS QU;IL NE SOIT INSTALLÉ
DANS UN MEUBLE SUPPORT APPOUVÉ.
CUIDADO: REISGO DE INCENDIO. NO FUNCIONE
A MENOS QUE ESTÉ INSTALLED EN UN GABINETE
APROBADO.
Manufactured by:
JSJ Worldwide Trading Ltd.
MADE IN CHINA
FABRIQUÉ EN CHINE
FABRICADO EN CHINA
E468567
12
INFORMACIÓN DEL PRODUCTO
1. Encuentre la ETIQUETA DE INFORMACIÓN DEL PRODUCTO en la parte trasera
del inserto. Escriba el número del modelo en el espacio a continuación; tam-
bién tome nota de la información de fecha y de lugar de la compra, para
referencia en el futuro. Necesitará dicha información para hacer el registro
del producto y solicitar servicio al cliente.
NÚMERO DEL MODELO :___________________________________________
FECHA DE COMPRA :______________________________________________
LUGAR DE LA COMPRA :___________________________________________
ESPECIFICACIONES DEL PRODUCTO
VOLTAJE 120VAC, 60 Hz
AMPERIOS 11.7 Amps
VATIOS 1400 Watts
VISTA DE LA PARTE TRASERA DEL INSERTO VISTA DE LA ETIQUETA DE
INFORMACIÓN DEL PRODUCTO
ETIQUETA
DE INFORMACIÓN
DEL PRODUCTO
ESCRIBA AQUÍ LA INFORMACIÓN DE SU UNIDAD

13
Usted debe cumplir con algunas precauciones básicas a n de reducir el riesgo de des-
cargas eléctricas, de lesiones y de incendio. A continuación algunas directrices:
1. Asegúrese de leer todas las instrucciones antes de poner en uso este artefacto.
2. Este artefacto se calienta cuando está en funcionamiento. A n de evitar quemad
uras, evite el contacto de la piel desnuda con supercies calientes. Si están provistas,
utilice las asas al llevar esta unidad de un lugar a otro. Mantenga todo material com-
bustible, como muebles, cojines y almohadas, ropa de cama, papeles, ropa y cor-
tinas al menos a 3 pies (90 cm) de distancia de la parte delantera de esta unidad, y
también alejada de las partes laterales y trasera.
3. Se debe tener sumo cuidado cuando niños y personas con discapacidades utilicen o
estén en las cercanías de unidades calefactoras, y también en toda oportunidad
que se deje al calefactor en operación sin vigilancia.
4. De ser posible, siempre desenchufe esta unidad cuando no esté en uso.
5. Nunca ponga en operación ningún calefactor cuyo cable de alimentación eléctrica
o enchufe esté dañado, ni después de que se haya producido una falla en el
calefactor, se haya dejado caer o haya sufrido daños de cualquier tipo. Desconecte
la alimentación de electricidad en el panel de servicio y haga que un electricista
calicado lo inspeccione antes de volver a utilizarlo.
6. Toda reparación de este inserto de chimenea debe ser realizada por personal cali-
cado de servicio.
7. Bajo ninguna circunstancia se puede hacer modicaciones a este inserto de chime-
nea. Toda pieza que se desmonte de la unidad para que se le dé servicio se debe
reemplazar antes de volverla a poner en operación.
8. No utilice esta unidad en exteriores.
9. Este calefactor no está diseñado para su uso en baños, zonas de lavandería y otros
lugares similares bajo techo. Nunca coloque el calefactor en lugares en los que
podría caer en una tina de baño o en algún otro recipiente que contenga agua.
10. Nunca coloque el cable de alimentación de electricidad debajo de alfombras. No
cubra el cable de alimentación con alfombras largas o de área, ni con coberturas
similares. Al colocar el cable, hágalo de modo que quede alejado de las zonas de
tránsito de personas y de lugares en los que pudiera causar tropiezos.
11. Para desconectar esta unidad, lleve los controles a la posición de apagado y
desconecte del tomacorriente el enchufe.
12. Conéctela solamente a tomacorrientes provistos de una conexión a tierra
adecuada.
13. Esta unidad, una vez instalada, se debe conectar a tierra en conformidad con los
códigos eléctricos vigentes: CSA C22.1 (Canadá), Código Eléctrico Nacional (NEC)
estadounidense (U.S.A.), ANSI/NFPA N0.70 y con todo otro código y normativa local
pertinente.
INFORMACIÓN IMPORTANTE

14
14. No introduzca ni permita el ingreso de objetos extraños a través de las aberturas de
ventilación ni de descarga, dado que podría producir descargas eléctricas e incen-
dios y/o causar daños a la unidad.
15. A n de prevenir incendios, nunca obstruya las entradas ni las descargas de aire de
manera alguna. Nunca coloque la unidad sobre supercies suaves (p.ej., camas)
que podrían obstruir las aberturas.
16. Nunca se debe colocar el calefactor inmediatamente debajo de un tomacorriente.
17. Esta unidad incluye componentes que se calientan y que pudieran generar arcos y
chispas eléctricas. Nunca la ponga en operación en zonas en las que se utilicen o
almacenen líquidos inamables como gasolina, pintura y otros, ni tampoco donde
pudiera haber vapores de dichas sustancias. Este inserto de chimenea no se debe
utilizar para secar prendas de vestir. Tampoco se deben colgar medias ni adornos
navideños en la unidad ni en sus alrededores.
18. Utilice esta unidad exclusivamente como se indica en el manual. Todo otro uso no
recomendado por el fabricante podría causar incendios, descargas eléctricas y
lesiones a personas.
19. Siempre enchufe los calefactores directamente a un tomacorrientes. Nunca utilice
cables de extensión ni tomas de potencia eléctrica con cable (regletas o
multitomas).
20. Este calefactor incorpora una alarma VISUAL que advierte cuando los componentes
del calefactor se calientan en exceso. Si la alarma visual parpadea, apague de
inmediato el calefactor, desenchúfelo e inspeccione en busca de objetos en el
calefactor o en sus cercanías que pudieran haber obstruido el ujo de aire o haber
causado altas temperaturas por alguna u otra razón. NUNCA MANTENGA EN
OPERACIÓN EL CALEFACTOR SI EL INDICADOR DE ALARMA ESTÁ PARPADEANDO.
21. Este calefactor está diseñado para utilizar electricidad de 120 Voltios. El cable de
alimentación incorpora un enchufe como el mostrado en la gura A. Está disponible
un adaptador (gura B) que permite conectar enchufes de tres patas con
conexión a tierra a tomacorrientes de dos ranuras. Se debe conectar la pestaña de
color verde que sobresale del adaptador a una conexión permanente a tierra,
como la de un tomacorriente correctamente conectado a tierra, como se muestra
en la gura C. Dichos adaptadores no se deben utilizar si está disponible un
tomacorriente de tres ranuras con conexión a tierra.
INFORMACIÓN IMPORTANTE
FIGURA BFIGURA A
PATA DE CONEXIÓN
A TIERRA
ADAPTADOR
RANURA DE CONEXIÓN A TIERRA

INFORMACIÓN IMPORTANTE
GUARDE ESTAS INSTRUCCIONES
PARA REFERENCIA EN EL FUTURO
INTERRUPTOR DE ANULACIÓN
FORZADA DEL CALEFACTOR
VISTA DEL INTERRUPTOR DE ANULACIÓN
FORZADA DEL CALEFACTOR
INTERRUPTOR DE
ANULACIÓN FORZADA
DEL CALEFACTOR ALIMENTACIÓN DE ELEC-
TRICIDAD AL CALEFACTOR
HABILITADA
ALIMENTACIÓN DE ELEC-
TRICIDAD AL CALEFACTOR
DESHABILITADA
15
En uno de los lados de la unidad está provisto un interruptor basculante. Dicho interruptor per-
mite anular la alimentación de electricidad al calefactor, a n de prevenir que se encienda de
manera accidental o no intencional. Esta función se incorpora principalmente a n de contribuir
a prevenir que los niños enciendan el calefactor de manera accidental o no intencional.
Además, este interruptor se utiliza para deshabilitar la alimentación de electricidad en los modos
de demostración en tienda.
FIGURA C
TORNILLO METÁLICO
CUBIERTA DE CAJA
TOMACORRIENTES
CON CONEXIÓN A
TIERRA

C
F88:88
C
F88:88
16
INSTRUCCIONES DE USO
CONTROLES DE LOS MODELOS
1801-FM, 1801-FG, 1801-CM, 1801-CG
2301-FM, 2301-FG, 2301-CM, 2301-FG
CONTROLES DE LOS MODELOS
2602-FM, 2602-FG, 2301-CM, 2301-CG
2801-FM, 2801-FG, 2801-CM, 2801-CG
2803-FM, 2803-FG, 2803-CM, 2803-CG
3302-FM, 3302-FG, 3302-CM, 3302-CG
PANEL DE CONTROL DE 4 BOTONES PANEL DE CONTROL DE 5 BOTONES
CONTROL REMOTO DE 4 BOTONES
El indicador de LED se enciende y muestra el icono correspondiente cuando se presion-
an los botones de control. El indicador de LED se oscurecerá después de 10 segundos.
CONTROL REMOTO DE 5 BOTONES

REMOVE BEFORE USE
BATERÍA
17
BOTÓN DE ENCENDIDO Y APAGADO MAESTROS: Presione el botón para habilitar la
alimentación maestra de electricidad a la unidad y presiónelo de nuevo para de-
shabilitarla. La alimentación maestra de electricidad puede estar habilitada aunque
estén apagadas todas las demás funciones de la unidad. Cuando se encuentra ha-
bilitada la alimentación maestra de electricidad, el lecho de brasas (troncos de leña)
mostrará un brillo tenue a n de indicar que la alimentación está habilitada.
INSTRUCCIONES DE USO
BOTÓN DE BRILLO DE LAS LLAMAS: Presione este botón para desplazarse a través
de 5 niveles de brillo; al presionarlo por sexta vez las llamas se apagarán. Cuando se
enciendan las llamas su brillo estará en su ajuste más alto (5); presione el botón de
brillo para desplazarse a través de todas las posiciones. Los niveles de la llama en
orden son 5, 0, 1, 2, 3, 4, 5.
BOTÓN DE LA TEMPERATURA: Presione este botón para desplazarse de manera
ascendente por las temperaturas y ajustar el termostato de la unidad. Las posiciones
disponibles de ajuste de la temperatura son 65, 70, 75, 80 y 85 °F (18, 21, 24 y 29 °C).
El termostato apaga el calefactor cuando se alcanza la temperatura que se haya
seleccionado. El termostato volverá a encender el calefactor cuando la temperatura
descienda 3 °F (1.7 °C) respecto a la temperatura establecida. Mantenga presiona-
do el botón durante 4 segundos para alternar entre grados Fahrenheit y Celsius.
BOTÓN DEL TEMPORIZADOR: Presione este botón para desplazarse de manera
ascendente por los valores del lapso de tiempo que el calefactor debe mantenerse
encendido antes de apagarse automáticamente. Los lapsos disponibles son :30, 1:00,
1:30, 2:00, 2:30, 3:00, 3:30, 4:00, 4:30, 5:00, 5:30, 6:00, 6:30, 7:00, 7:30, 8:00, 8:30, 9:00.
(Para que el temporizador funcione, primero se debe encender el calefactor)
BOTÓN DE APAGADO DEL INDICADOR LUMINOSO: Presione este botón para de-
shabilitar el indicador de LED y vuélvalo a presionar para habilitarlo de nuevo. (Esta
función sólo está disponible en los modelos que incorporan un panel de control de 5
botones y control remoto)
Para utilizar el control remoto, primero
se debe retirar la lengüeta plástica que
tiene la leyenda “REMOVE BEFORE USE”
(retirar antes de utilizar); jálela (tire de ella)
cuidadosamente para retirarla.
Para cambiar la batería voltee el control remoto. Haga
presión sobre la traba en la zona central y lleve hacia un
lado la bandeja de la batería para extraerla.
PARTE TRASERA DEL
CONTROL REMOTO
BATERÍA DEL CONTROL REMOTO
HAGA
PRESIÓN
SOBRE LA
TRABA
TIPO DE BATERÍA
CR-2025 3V

PROBLEMA CAUSA ACCIÓN A TOMAR
La pantalla muestra
“E1”
El sensor del termostato
está desconectado
Comuníquese con servicio al cliente
La pantalla muestra
“E2”
El sensor del termostato
está dañado
Comuníquese con servicio al cliente
La pantalla muestra
“E3”
Se disparó la protección
contra recalentamien-
tos, de restablecimiento
manual
Apague y desenchufe la chimenea empotrada y,
luego, inspeccione la parte posterior y superior de
la chimenea empotrada para comprobar que las
entradas de aire no estén bloqueadas, ya que esto
causaría un sobrecalentamiento. Espere 30 minutos y
vuelva a conectar la unidad y encienda para ver si el
problema se repite mientras se controla el calentador
por sobrecalentamiento. Si el problema vuelve, deje
de utilizar el calentador y póngase en contacto con
servicio al cliente.
El calefactor no recibe
electricidad (cuando
recibe electricidad los
leños brillan)
La unidad no está
conectada al tomacor-
riente
Compruebe que el cable de alimentación de elec-
tricidad esté bien conectado a una toma de 120 V.
Después compruebe que la unidad esté encendida.
No hay efecto de
llamas pero los leños
brillan
El efecto de llamas está
apagado
Presione varias veces el botón del brillo de las llamas
para desplazarse a través de los niveles de brillo.
El calefactor y su venti-
lador no se encienden
pero el resto de las fun-
ciones sí funcionan
Está activo el interruptor
de anulación forzada
del calefactor, lo que
deshabilita el calefactor
En uno de los lados de la unidad se encuentra el inter-
ruptor de anulación forzada del calefactor. Cambie
la posición del interruptor a la posición de encendido.
(Vea la página 15).
El cable de ali-
mentación se siente
caliente al tocarlo
Eso es normal (si se
calienta excesivamente
compruebe la correcta
operación del calefac-
tor)
Es normal que se calienten los cables de alimentación
de las unidades de calefacción, debido a la alta inten-
sidad de corriente. Inspeccionen la conexión entre el
cable de alimentación y el tomacorriente. Compruebe
que el enchufe esté bien insertado en el tomacorrien-
te. Estando en operación el calefactor, inspeccione
frecuentemente el enchufe y el tomacorriente en bus-
ca de ALTA TEMPERATURA. Si están calientes, deje de
utilizar la unidad y acuda a un electricista calicado a
n de inspeccionar y/o reemplazar el tomacorriente.
No funciona el control
remoto
Batería débil o descar-
gada
Reemplace la batería
18
DIAGNÓSTICO DE FALLAS

19
1. Ninguno de los componentes internos requiere de mantenimiento.
2. Asegúrese de que la unidad esté desenchufada o apagada antes de limpiar el inserto
de chimenea y/o sus aberturas. Se puede limpiar periódicamente con una aspiradora
las aberturas de calefacción que se encuentran en la parte trasera y delantera, para
quitarles el polvo.
CUIDADOS Y LIMPIEZA
Este equipo fue sometido a pruebas y se determinó que cumple con los límites correspon-
dientes a los dispositivos digitales de la Clase B, en conformidad con la Parte 15 de las
normas de la FCC. Dichos límites están previstos para suministrar una protección razonable
contra interferencias nocivas en instalaciones residenciales. Esta unidad genera, utiliza y
puede irradiar energía de frecuencias de radio, y si no se instala y utiliza en conformidad
con las instrucciones podría causar interferencias nocivas a la recepción de radio y tele-
visión. El origen de dichas interferencias se puede determinar al apagar y encender la uni-
dad. Se recomienda a los usuarios probar con las medidas a continuación que pudieran
corregir las interferencias.
1. Cambie la orientación o la posición de la antena receptora.
2. Aumente la separación entre la unidad y el receptor.
3. Conecte la unidad a un tomacorriente o circuito distinto del que utiliza el receptor.
4. Comuníquese con el distribuidor o con un técnico experimentado de radio y televisión
para obtener ayuda.
Este dispositivo cumple con la Parte 15 de las normas de la FCC estadounidense. Su op-
eración está sujeta a las dos condiciones indicadas a continuación:
1. El dispositivo no debe causar interferencias nocivas, y
2. El dispositivo debe aceptar toda interferencia que reciba, incluyendo interferencias
que podrían tener efectos no deseados en su operación.
Toda modicación que no haya sido aprobada por el ente responsable de la conformi-
dad con las normas pudiera anular el derecho del usuario a hacer uso del equipo.
Este equipo digital de la Clase B cumple con la norma canadiense ICES-003
INFORMACIÓN RELATIVA A LA FCC/IC (USA)
Para comunicarse con el departamento de servicio al cliente llame al 1-855-571-1044 o
visite www.jsjworldwide.com a n de descargar una copia de estas instrucciones y para
diversas instrucciones de diagnóstico de fallas.
Antes de comunicarse con servicio al cliente, obtenga y tenga a la mano la siguiente
información:
• Número del modelo
• El recibo de ventas o la prueba de compra
SERVICIO AL CLIENTE

20
GARANTÍA DE 1 AÑO
Este artefacto de chimenea eléctrica está garantizado por el fabricante contra defectos
de materiales y de manufactura durante un período de tiempo de un año a partir de la
fecha de compra. Dicha garantía está sujeta a las siguientes limitaciones y condiciones.
Este artefacto se debe instalar y operar en conformidad con las instrucciones de insta-
lación y operación que fueron suministradas junto con el producto. Toda reparación o
modicación no autorizada, accidentes, mal uso intencional o uso indebido del produc-
to dejará sin vigencia esta garantía.
Esta garantía no es transferible, y se extiende al propietario original siempre que el pro-
ducto haya sido adquirido de un proveedor y revendedor autorizado y con licencia.
Esta garantía se limita a la reparación o el reemplazo de la(s) pieza(s) que se haya de-
terminado que presentan defectos en sus materiales o su mano de obra. Lo anterior es
válido siempre que la(s) pieza(s) hayan estado sometidas a condiciones “normales” de
uso una vez que se haya aceptado la existencia del defecto mediante el proceso de
inspección del fabricante.
Todo costo o gasto que surja en virtud del transporte, la instalación, la mano de obra y
todo costo o gasto sin importar su tipo que se haya producido en virtud de las repara-
ciones, el reemplazo, la(s) pieza(s) defectuosas y toda otra situación similar no está cubi-
erta por esta garantía ni el fabricante se hará cargo de las mismas.
El fabricante podría, a su exclusivo criterio, liberarse de todas sus obligaciones respecto a
esta garantía mediante el reembolso del precio de venta al por mayor de la(s) pieza(s)
defectuosas.
El propietario/usuario asume todos los demás riesgos que pudieran existir, incluyendo el
riesgo de toda pérdida o daño directo, indirecto o derivado que surja en virtud del uso,
o de la imposibilidad de uso del producto, excepto en lo previsto por las leyes.
Toda otra garantía, expresa o implícita, respecto al producto, sus componentes y acce-
sorios y toda otra obligación y responsabilidad por parte del fabricante se excluye de
manera expresa mediante este documento.
El fabricante no asume, ni autoriza a ningún tercero a asumir en su nombre, ninguna otra
responsabilidad respecto a la venta del producto.
Este documento establece que ninguna garantía es válida para ningún accesorio que
se utilice en conjunto con la instalación de este producto.
Esta garantía le otorga a usted derechos legales especícos, y usted también podría ten-
er otros derechos que varían de un estado a otro.
Esta garantía quedará anulada:
1. Si el inserto de chimenea se ve sometido a períodos prolongados de contacto con
humedad o con agua condensada.
2. Al haber una modicación no autorizada, mal uso intencional o uso indebido del pro-
ducto o accidentes.
3. Si usted no tiene el recibo de venta original.
This manual suits for next models
19
Table of contents
Languages:
Popular Indoor Fireplace manuals by other brands

EdilKamin
EdilKamin FORMA Installation, use and maintenance

Jydepejsen
Jydepejsen ORO user manual

MHSC
MHSC 400DVBNVMH7 Installation & operation manual

Continental Fireplaces
Continental Fireplaces CEFB26H Installation and operation manual

Nordpeis
Nordpeis Salzburg L installation manual

Nibe
Nibe Contura C690T manual

Montigo
Montigo R324-ST Installation & maintenance manual

Lennox Hearth Products
Lennox Hearth Products MPE-36R Installation instructions and homeowner's manual

Bionaire
Bionaire BFH5000 instruction manual

Napoleon
Napoleon GDIZC - N Installation and operation instructions

Modern Flames
Modern Flames SPECTRUM SLIMLINE SPS-50B-EU owner's manual

Dimplex
Dimplex XHD28L owner's manual