Jump Power Elite Series User manual

JUMP POWER 12x8FT ELITE SERIES
RECTANGULAR TRAMPOLINE&ENCLOSURE
INSTRUCTION MANUAL
Model: JP01-R01-144S
Smyths Toys item number: 182698
Smyths Toys HQ UC / Smyths Toys EU HQ Ltd
Lyrr Building 1, Mervue Business Park, Galway, Rep of Ireland, H91K4HV.
YOU MUST THOROUGHLY READ AND UNDERSTAND THE INSTRUCTIONS IN THIS
MANUAL BEFORE ASSEMBLING AND USING THIS TRAMPOLINE.
SAVE THIS MANUAL FOR FUTURE REFERENCE.
MAXIMUM WEIGHT OF USER MUST NOT EXCEED 100KG.
DO NOT ALLOW MORE THAN ONE PERSON ON THE TRAMPOLINE AT A TIME.
DO NOT ALLOW YOUNG CHILDREN TO USE UNLESS SUPERVISED BY AN ADULT.
THE ENCLOSURE FORMS PART OF THE STRUCTURAL INTEGRITY OF THE
TRAMPOLINE.
THE TRAMPOLINE MUST NOT BE USED WITHOUT THE ENCLOSURE ASSEMBLED.
FOR OUTDOOR DOMESTIC USE ONLY.
WARNING!
Lymedale Business Park, Newcastle under Lyme, UK, ST5 9QH

1
Thank you for purchasing this product. We hope that you will enjoy it. A trampoline is great fun and at
the same time good exercise. It takes some time to assemble so please read all instructions before
starting. It is possible that the assembly will take more than an hour, so please be patient and enjoy
this process with a friend or family member.
WARNING! MAX 100KG
TRAMPOLINE ASSEMBLY AND MOVING
Select a location where you want the trampoline permanently prior to assembly.
If you need to move the trampoline, two or three people are required. When moving, lift the
trampoline slightly off the ground and keep it horizontal to the ground. For any type of other
movement, you should disassemble the trampoline.
Lateral clearance is essential. Place the trampoline away from walls, structures, fences and other
play areas. Maintain a clear space on all sides of the trampoline.
Do not allow children to play or jump on the trampoline when it’s windy. Wind can lift up this
trampoline and cause serious injury or death.
In severe wind conditions, the trampoline can be blown away. If you expect windy weather conditions,
the trampoline should be moved to a sheltered area or disassembled.
INTRODUCTION
Before you begin using this trampoline, be sure to carefully read all the information provided to you in
this manual. Just like any other type of physical recreational activity, participants can be injured. To
reduce the risk of injury, be sure to follow appropriate safety rules and tips.
Misuse and abuse of this trampoline is dangerous and can cause serious injury!
Trampolines, being rebounding devices, propel the performer to unaccustomed heights and into a
variety of body movements.
Always inspect the trampoline before each use for worn mats, loose or missing parts.
Proper assembly, care and maintenance of product, safety tips, warnings, and proper techniques
in jumping and bouncing are all included in this manual. All users and supervisors must read and
familiarize themselves with these instructions. Anybody who chooses to use this trampoline must
be aware of their own limitations in regards to performing various jumps and bounces with this
trampoline.

2
ALWAYS CONSULT A PHYSICIAN BEFORE PERFORMING ANY KIND OF PHYSICAL ACTIVITY
Warning. Not suitable for children under 36 months. Falling hazard.
Warning. The trampoline must be assembled by an adult in accordance with
the assembly instructions and checked before the first use.
Warning. Maximum user weight 100kg.
Warning. Only one user. Collision hazard.
Adult supervision required.
Warning. Only for domestic use.
Warning. Only for outdoor use.
Warning. No somersaults
Warning. Always close the net opening before jumping.
Warning. Jump without shoes.
Warning. Do not use the mat when it is wet.
Warning. Empty pockets and hands before jumping.
Warning. Always jump in the middle of the mat.
Warning. Do not eat while jumping.
Warning. Do not exit by a jump.
Warning. Limit the time of continuous usage (make regular stops).
Warning. Do not use in strong wind conditions and secure the trampoline.
Warning. The trampoline is not intended to be buried into the ground.
Warning. The net should be replaced every year.
Size of the assembled product: 366 x 244 x 273cm.
Size of the free spaces around the trampoline: 2x2x8 meter
Always check your trampoline before use. Paying specific attention to all the
bolts, jump mat and pads position.
Do not use if any parts are missing or seem torn or worn.
Stop exercising immediately should you feel unwell or if you feel dizzy.
The enclosure is there to prevent the user from falling off the trampoline, and it
is not to be jumped into unnecessarily.
NO SOMERSAULTS OR FLIPS –
PARALYSIS OR DEATH can result
if you land on your head or neck!
No more than ONE user at a time.

3
JUMP INSTRUCTIONS
Please be aware of the health risks that incorrect or intensive training may cause.
Learn the basic body positions and jumps before attempting more advanced techniques. You can
vary trampoline routine by performing the basic jumps in different series or combinations, and
with or without vertical jumps between tricks.
To stop bouncing, bend your knees as your feet land on the trampoline's jumping surface.
Learn this technique first before attempting any others.
Avoid bouncing too high.
Stick to small bounces until you can jump and land in the middle of the trampoline under perfect
control.
Control is more important than height.
Never look away from the trampoline. This will help you control your bouncing.
Avoid bouncing on the trampoline when tired.
Keep your sessions short
Only use the trampoline if you are in good physical condition.
For information on learning additional techniques and tricks, contact a professional trampoline
instructor.
Place the trampoline on a level surface at least 2 meters from any structure or obstruction such
as a fence, garage, house, overhanging branches, laundry lines or electrical wires.
Trampolines shall neither be installed over concrete, asphalt or any other hard surface nor at
proximity of other conflicting installations (e.g. paddling pools, swings, slides, climbing frames).
ASSEMBLY INSTRUCTIONS & INSTRUCTIONS FOR USE
To ensure that the product is safe, heed the assembly instructions, and the instructions for use.
Please read carefully and retain for future reference.
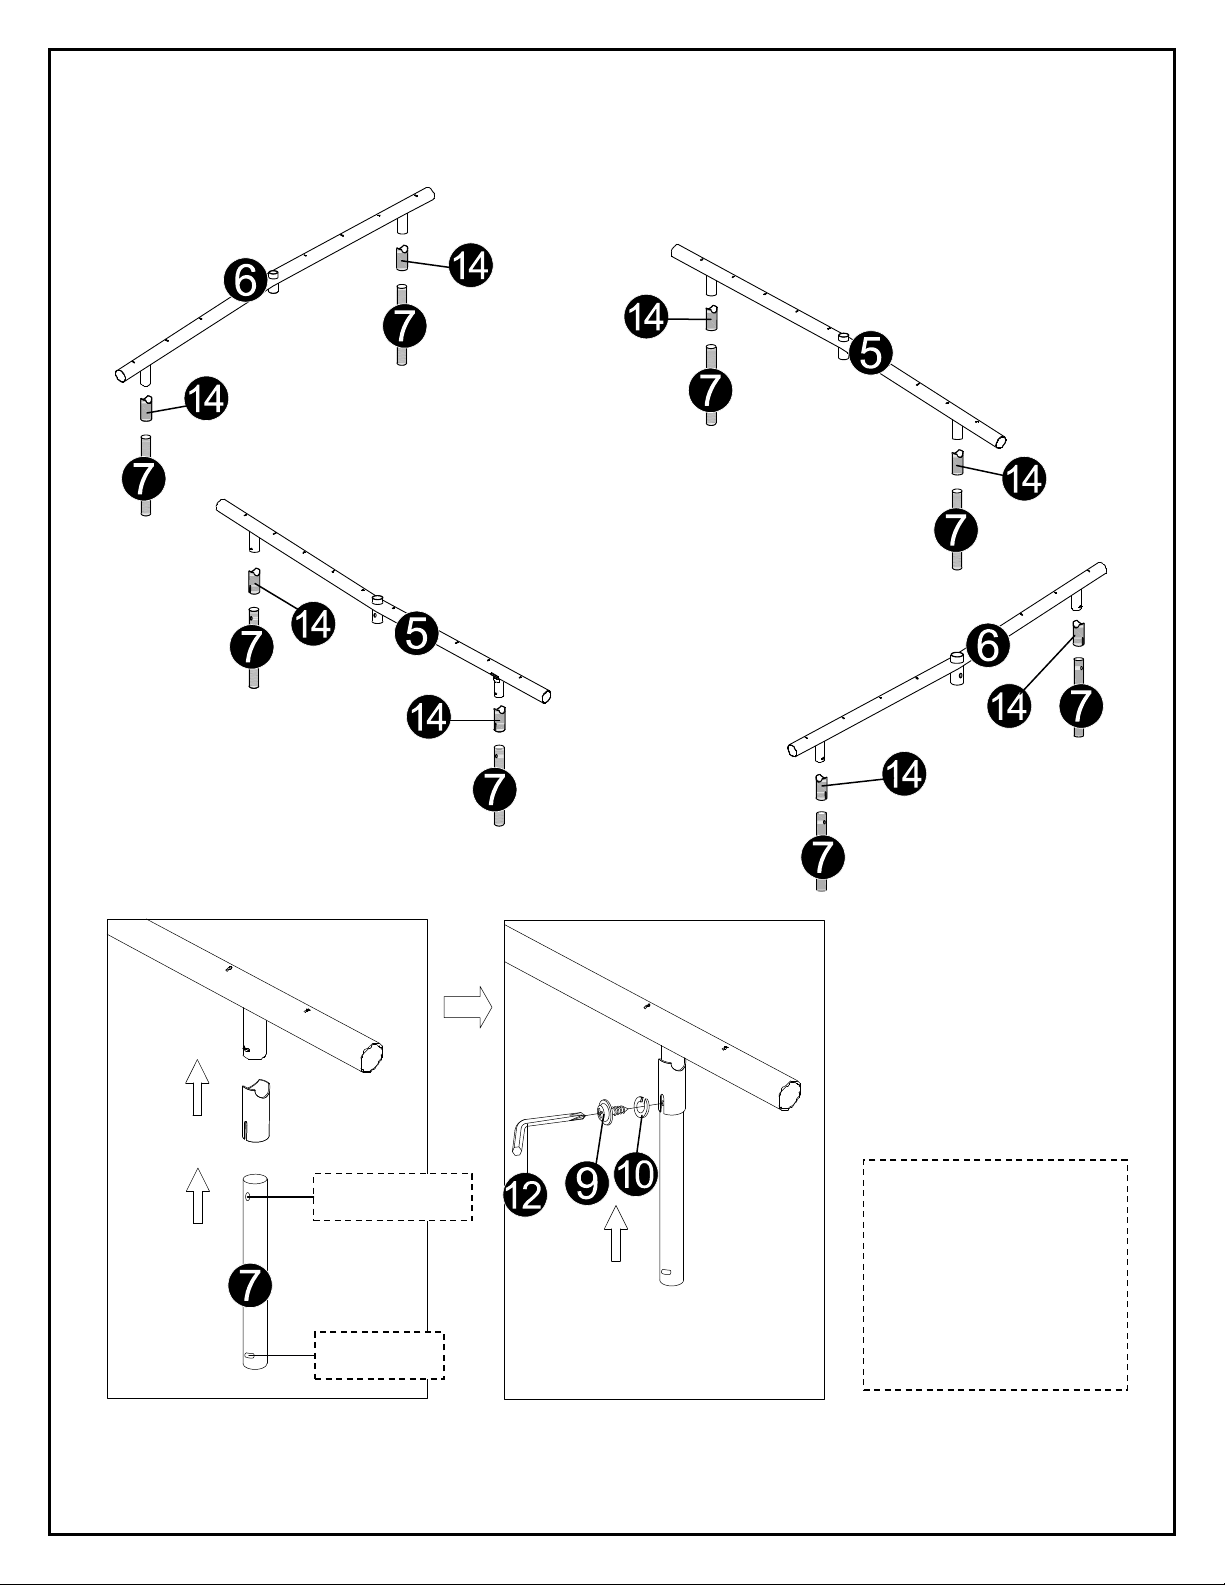
Assembly instructions
This product requires assembly. Please be sure to carefully follow the steps set out in these
instructions (parts lists and tools supplied, assembly procedure etc.).
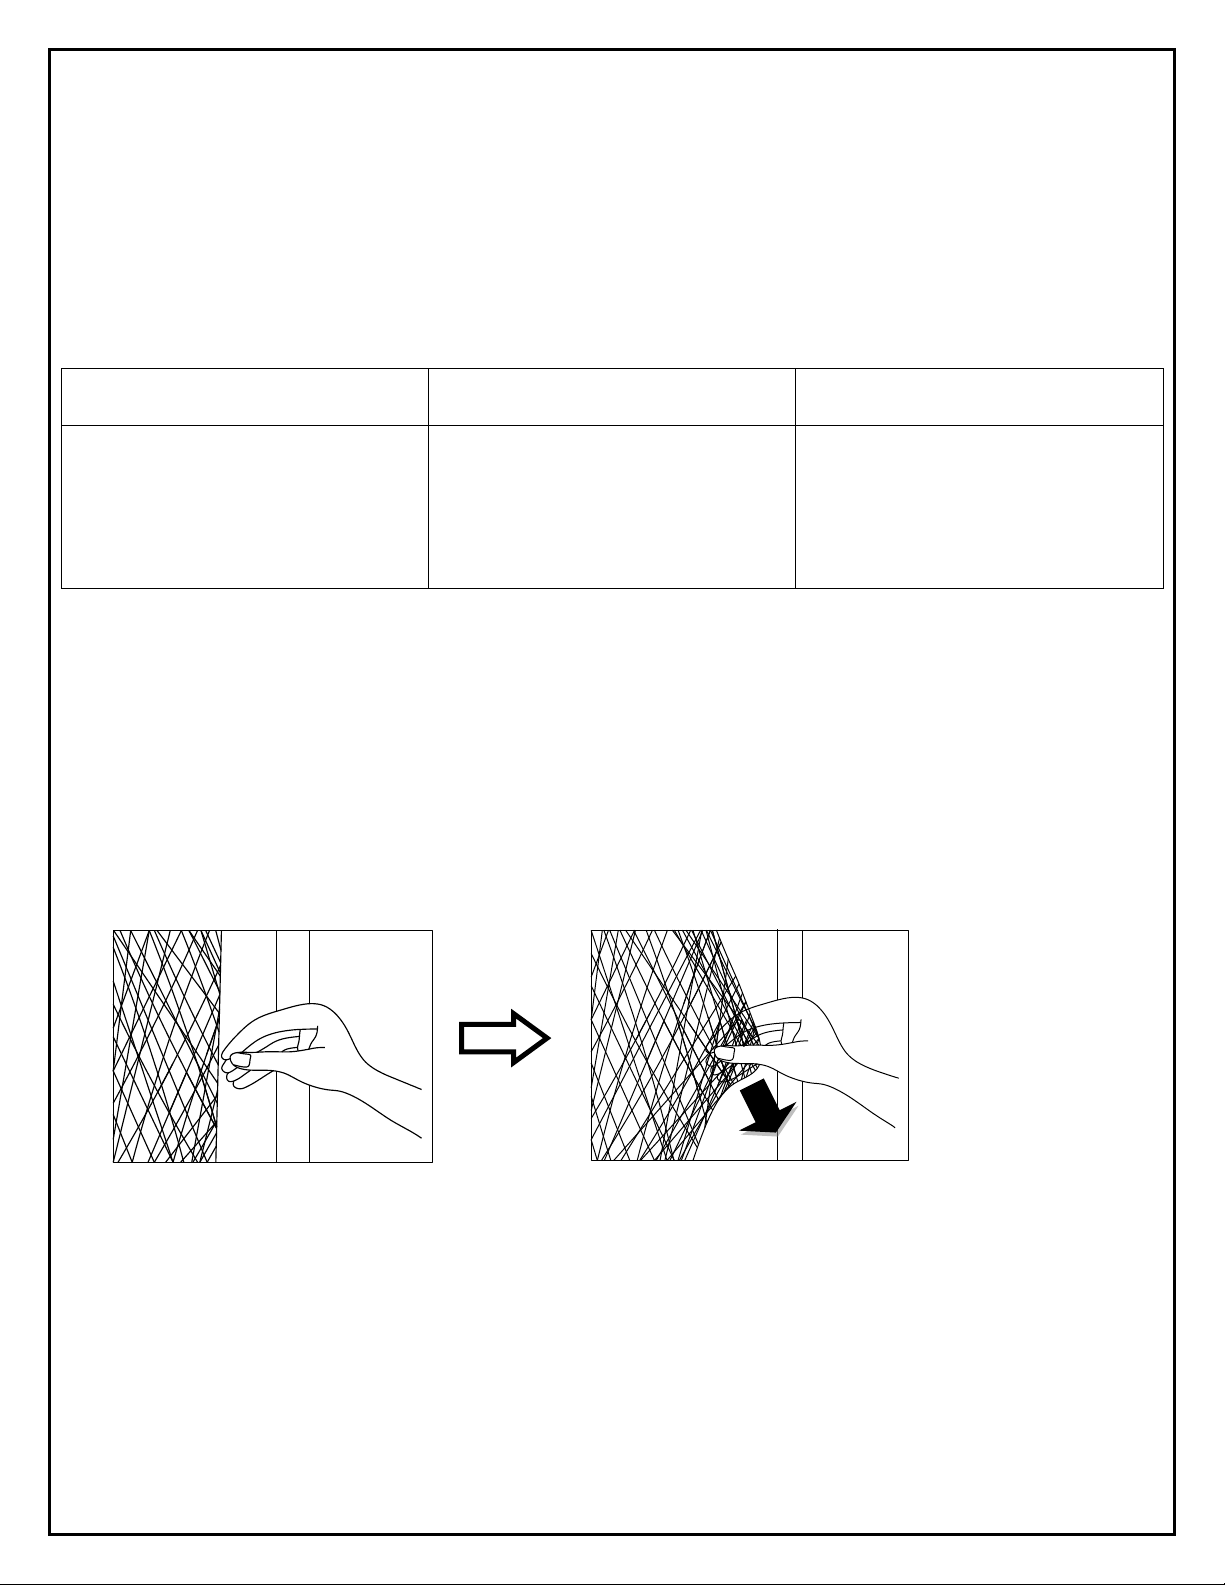
IMPORTANT INSTRUCTIONS FOR ENCLOSURE NETTING AND MAT
1. Maintenance of Trampoline Enclosure Net, Mat and Pad
Enclosure nets and padding are prone to wear and tear like tires on a car. Gradual deterioration
of the material will occur; the speed of which will depend on the level of exposure to UV rays and
outdoor weather conditions such as rain and wind.
The net and padding needs to be properly maintained and checked by following the Maintenance
Schedule set out in these instructions. When the material shows any signs of weakness, you
must stop using the trampoline immediately, properly store the trampoline and restrict access by
users until a new replacement net or padding is properly installed.

4
2. Maintenance Requirement for Enclosure Net
Your trampoline enclosure netting is manufactured with UV resistant material. Despite this the
netting is exposed to the outdoor elements including sunlight, wind, rain and wildlife. The net
surrounding the trampoline must be checked prior to each use. This includes, but is not limited to
inspecting the net for cracks, excess wear, brittleness, and stretching. Also inspect all
connections and the entire enclosure for overall integrity. The net must be immediately replaced if
it shows any signs of wear, damage, stretching, cracking, looseness, brittleness or other losses in
integrity. The following Maintenance Schedule must be followed:
IT IS RECOMMENDED THAT THE NET BE REPLACED ON A YEARLY BASIS UNDER NORMAL
USE, EVEN IF IT DOES NOT SHOW ANY VISIBLE SIGNS OF DAMAGE.
How to Inspect the Trampoline Net for Proper Use
Always check the enclosure netting for signs of UV damage, deterioration, brittleness, cracking, and
tearing every time before using the trampoline and enclosure.
Step 1 - Inspect the enclosure netting before EACH use for wear or tear by pinching and pulling a
section of the netting between fingers and pulling downward. Please see diagram below.
If it produces any tear or cracking or ripping sound, then the net is unsafe and MUST be taken down
immediately. STOP USING THE TRAMPOLINE IF YOU FIND ANY SIGNS OF WEAR OR TEARING
ON THE NETTING.
Step 2 - Walk around the whole perimeter of the trampoline to visually check for material deterioration
or other damage.
3. Maintenance Requirement for Trampoline Pad
Walk around the whole perimeter of the trampoline to visually check for material deterioration, tears,
looseness, loss of elasticity or other damage in the pad.
1 to 3 Months
3 to 6 Months
6 to 12 Months
Inspect the enclosure (net, net
hanger, and straps) prior to
every use.
Thorough inspection for UV
damage and prior to every use
for net, net hanger and straps.
Thorough inspection before
every use on net, net hanger,
straps, zippers, ties and strings.
Replace after 12 months or
earlier if necessary.

5
Trampoline and Enclosure Parts List
Trampoline
Part
No.
Diagram
Description
Q'TY
1
Trampoline Mat with Enclosure
Netting
1
2
Frame Pad
1
3
Corner Frame Tube A
2
4
Corner Frame Tube B
2
5
Long Side Frame Tube
(With 10 holes)
2
6
Short Side Frame Tube
(With 8 holes)
2
7
Leg Extension
8
8
Leg Base
4
9
Self-Locking Screw
24
10
Small Spring Washer
24
11
Galvanized Springs
60
12
Allen Wrench
1
13
Spring Loading Tool
1
14
Plastic sleeve pipe
8

6
Enclosure
Part
No.
Diagram
Description
Q'TY
A
Upper Frame Tube with Foam
8
B
Lower Frame Tube with Foam
8
C
Short Top Tube with Foam C
4
D
Long Top Tube with Foam D
(with one end shrinked)
4
E
Long Top Tube with Foam E
4
F
T shape tube F
4
G
T shape tube G
4
H
Screw Lock
8
I
Outer End Cap
8
J
Screw
16
K
Large Arc Washer
8
L
Arc Washer
16
M
Large Spring Washer
8
N
Middle Spring Washer
16

7
PARTS LIST AND ASSEMBLY
STEP 1
Lay the frame tubes on the ground similar to the figure shown below.

8
STEP 2
Assemble the Leg Extension.
DO NOT FULLY TIGHTEN THE SCREWS AT THIS STAGE TO ALLOW ROOM FOR ADJUSTMENT OF THE TRAMPOLINE
FRAME DURING ASSEMBLY.
Note: Repeat this
step until all
remaining tubes
are assembled.
Total 8pcs
Small Hole
Big Hole

9
STEP 3
Note: Repeat this step
until all remaining tubes
are assembled.
Total 4pcs

10
STEP 4
Insert Parts 3 and Parts 4 into the corners of the frame.
NOTE: The same part numbers need to be placed diagonally opposite each other, otherwise the
frame cannot be assembled properly.
IMPORTANT:
ONCE THE TRAMPOLINE FRAMES IS ASSEMBLED, FULLY TIGHTEN ALL THE
SCREWS.

11
STEP 5
There are a total of 60 springs, For even distribution of spring tension and ease of assembly, the
springs must always be installed on opposite sides of the mat in an alternating manner.
HINT: The number of triangle-rings sewn onto the Mat is equal to the number of holes on the frame. If
you notice that you have miscounted a hole or triangle-ring, remove and reinstall the springs as
necessary while maintaining an even distribution of tension as explained above.
Heavy gloves must be used to protect your hands from pinch points during assembly and
goggles must be worn to avoid injuries to the eyes.
TRIANGLE-RING
HOLE FOR SPRING
FRAME

12
STEP 6

13
STEP 7
Place the Frame Pad on top of the trampoline.
Secure the Frame Pad, tie the inner straps to the triangle rings and the outer straps to the frame
tubes.
TRIANGLE-RING
INNER STRAP
BEHIND THE LEG SOCKET
STRAP

14
STEP 8
DO NOT PLACE HANDS BETWEEN THE POLES DURING ASSEMBLY. MAKE SURE TO
WEAR PROTECTIVE GLOVES TO AVOID INJURIES DURING ASSEMBLY.

15
STEP 9
Lay the Top tubes on the ground similar to the figure shown below.

16
STEP10-1
X 2

17
STEP10-2
X 2

18
STEP 11
Big Hole
Shrinked end

19
STEP 12
This manual suits for next models
1
Table of contents
Popular Accessories manuals by other brands

Eichhorn
Eichhorn Ladybug Rider instruction manual

MAGINON
MAGINON MPP 3000 K user manual

Venture Measurement
Venture Measurement Genuine Bindicator VRF-2000 Series quick start guide

EVGA
EVGA GeForce GTX 480 Hydro Copper FTW installation guide

ATEN
ATEN VS92A quick start guide

Toro
Toro Wireless RainSensor TWRS Installation and operation guide