JumpXfun Standard 396 User manual

Assembly Instruction
JumpXFun trampoline
–Standard 396
396 cm
276 cm
90 cm
It is very important that you read and understand the instructions before assembling and
using the trampoline.
We hope that you will enjoy using the trampoline. A trampoline is great fun and at the same time
good exercise. It takes some time to assemble so please read all the instructions before starting
and it will be easier. It is possible that the assembly will take more than an hour, so be patient and
get the assistance of a friend.

IMPORTANT
Read the following statements and warnings to avoid serious or fatal injury.
Warning.
- Max 150 kg.
- Only for domestic use.
- Outdoor use.
- Only one user. Collision hazard.
- The net should be replaced every year.
- Do not perform somersaults (flips).This is very dangerous and you risk serious injury ordeath.
- Always close the safety net opening before jumping.
- Read the instructions.
- The trampoline shall be assembled by an adult in accordance with the assembly instructions
and then checked before the first use.
- Jump with proper gym shoes or barefoot only.
- Empty pockets and hands before jumping.
- Always jump in the middle of the mat.
- Do not use when the mat is wet.
- Do not eat while jumping.
- Do not exit by jumping.
- Limit the time of continuous usage (take regular breaks).
- Do not use in strong wind conditions and secure the trampoline.
- Do not try to jump over the net.
- Do not purposely jump onto the net.
- Do not try to purposely rebound off the safety net.
- Do not hang on the top of the net, or try to climb the netting.
- Takeoff any jewellery that could become entangled with the netting or cut thenetting.
Placement of the trampoline
Do not place the trampoline on a concrete floor or other hard surfaces. The ideal placement is a
level, stable surface like a lawn. There must be at least 2 meters of space around the trampoline.
Check that there are no wires, tree branches, fences or other possible hazards above and around
the trampoline. The trampoline should not be placed near any pools, swings, slides, climbing
frames or other obstructive installations. The trampoline is not intended to be buried in the ground.
Weather conditions
The trampoline should not be used when wet. In winter conditions, please disassemble the
trampoline and store all fabric parts (mat, foam pad, safety net) inside. In strong wind conditions,
disassemble the foam pad and safety net and secure the trampoline to the ground using Ground
Stakes/Anchors (sold separately).
How to use
Take it easy at first. Don’t try difficult moves.
Do not jump when tired - this increases the risk of injury. Be sure to wear proper shoes, e.g. gym
shoes, or be barefoot when jumping.
Never step on the frame pad. It is not constructed to support the weight of a person.
Never dismount by jumping off the trampoline. Always climb off. Don’t use the trampoline under
the influence of drugs or alcohol.
Always have someone else watching while you jump. If you should injure yourself you will have
someone to assist you.
Always start your jump at the centre of the mat. If you land more than 30 cm away from the edge
of the logo, stop your jump immediately!
Restart your jump at the centre of the mat.
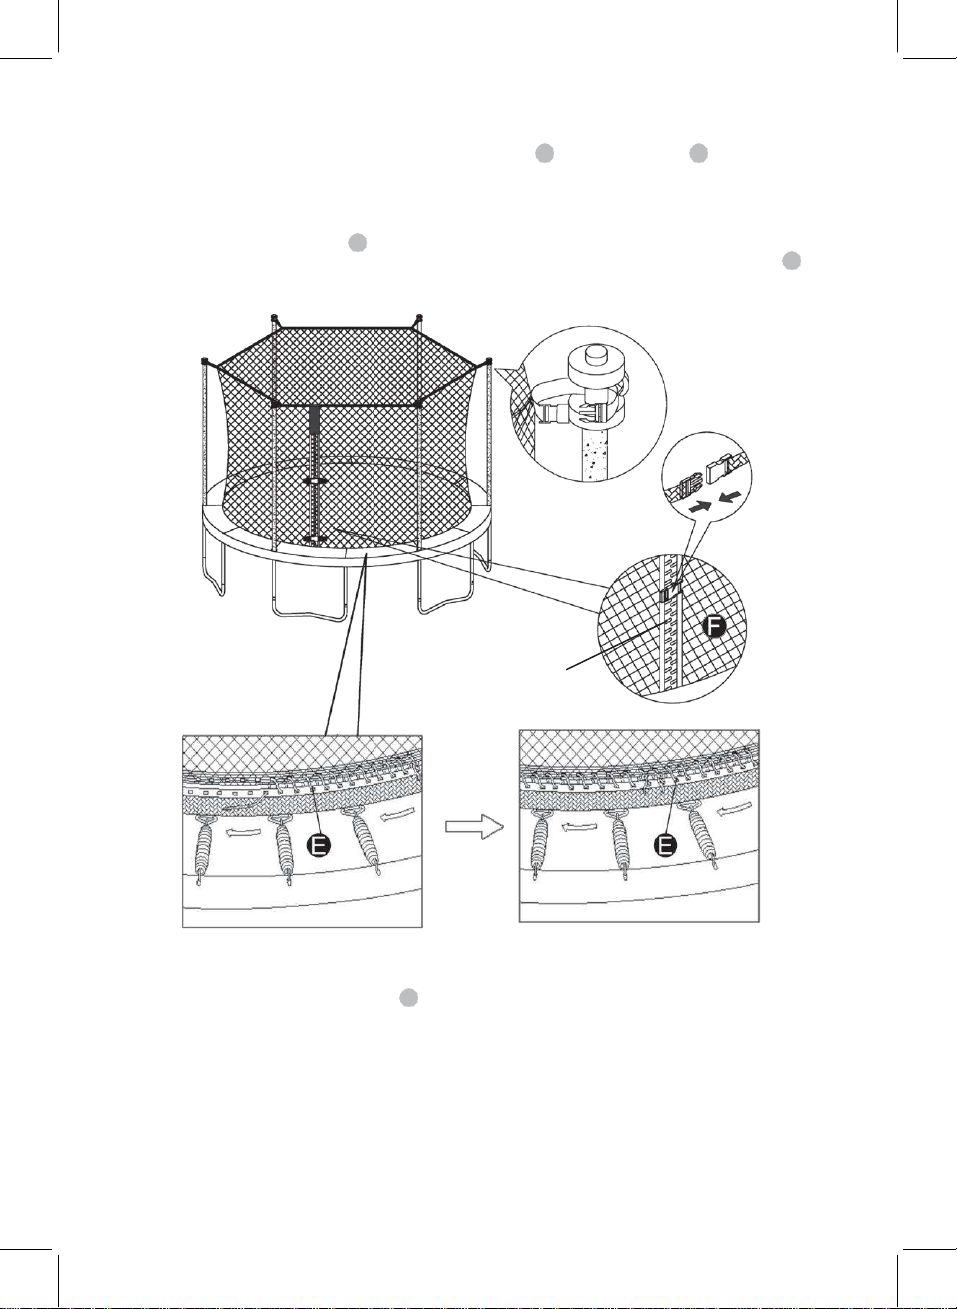
Assembly
Please read the assembly instructions fully before starting to assemble the trampoline.
It is advisable to have two people assembling it together.
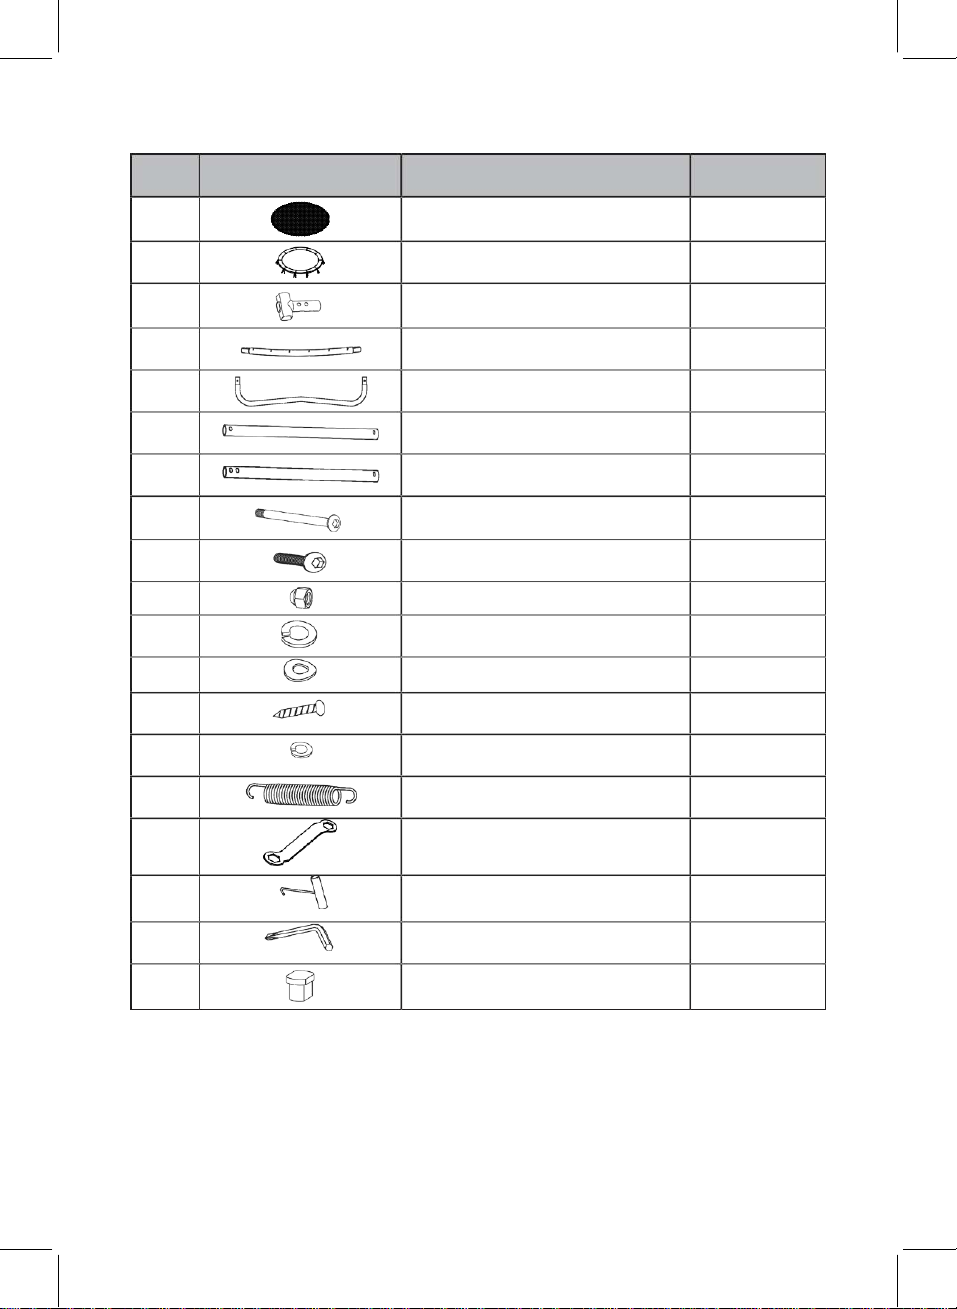
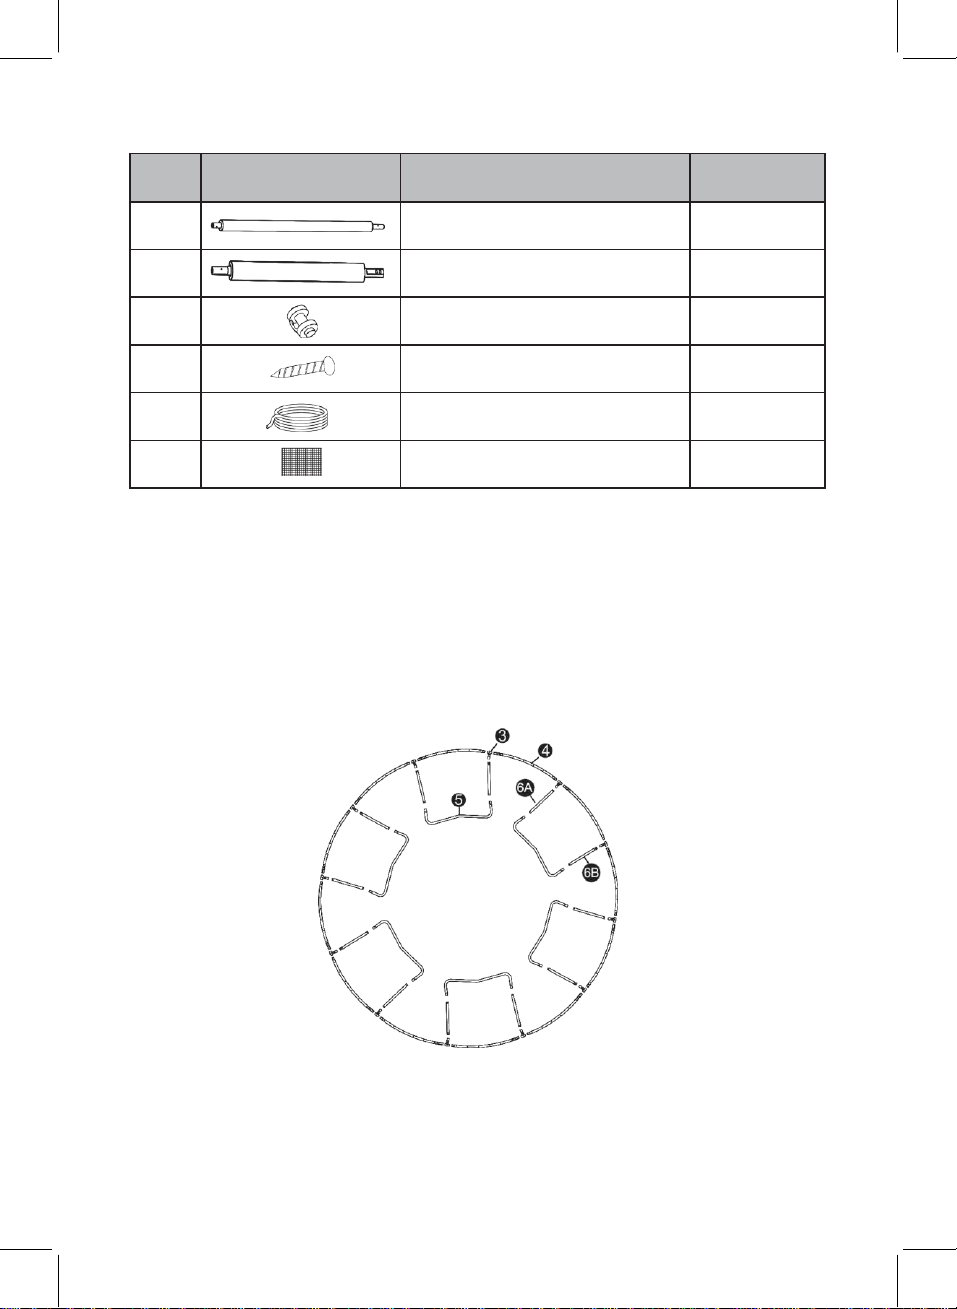
Start first by checking that you have all the required parts. The reference No. of each part will be
used in the instructions to guide you.
2

TRAMPOLINE Parts List:
Parts Parts Description Quantity
No.
1
Trampoline Mat
1
2
Frame Pad
1
3
T-Part with Leg Sockets
12
4
Top Rail
12
5
Leg Base
6
6A
Leg Extension A (2 holes)
6
6B
Leg Extension B (3 holes)
6
7
Long Bolt (43mm)
12
8
Long Screws (20mm)
6
9
Cap Nut
12
10
Spring Washer
18
11
Arc Washer
30
12
Self-Locking Screw
12
13
Small Spring Washer
12
14
Galvanized Springs
72
15
Wrench
1
16
Spring Loading Tool
1
17
Allen Wrench
1
18
Plastic End Cap
6
3

SAFETY NET Parts List:
Parts
No.
Parts
Description
Quantity
A
Upper Frame Tube with Foam
6
B
Lower Frame Tube with Foam
6
C
Tube Cap
6
D
Self-Locking Screw
12
E
Cord
8
F
Enclosure Netting
1
Trampoline assembly
Two people required for assembly.
Do not place hands near the ends when connecting tubes. Wear protective gloves to protect from
injury during assembly.
Step 1
Begin by laying out the pieces as shown in the picture.
4

Step 2
Assemble the “T-Part with Leg Socket” 3 together with the “Top Rail”
A” 6A as shown. Assemble in total 6 sets. and the “Leg Extension
Step 3
Now assemble the rest of the “T-Part with Leg Socket” 3 together with the “Top Rail” 4 , the “Leg
Extension B” 6B as shown and “Lower Frame Tube with Foam” B . Assemble in total 6 sets.
4
5

Step 4
Connect one assembled set from Step 2 and Step 3 and secure with the “Leg Base”
Repeat for all 6 sets until the entire trampoline ring is complete. as shown.
5
6

Step 5
Please take care when attaching the springs.
Start by laying out the “Trampoline Mat” 1 inside the frame.
Select a point to start. Call this 1. Use the special spring tool to attach the “Galvanized Springs”
14 as shown.
Start by putting the hook of the spring in the V-shaped ring on the trampoline mat. Then use
the special tool to pull the spring into place on the frame. Make sure that the spring hooks on
completely; otherwise it may come loose during jumping. When doing this you should wear
protective gloves to avoid injuries.
When the first spring is in place continue with the next in the numerical order shown on the
picture. When you have completed number 16 you can attach the remaining springs in any order.
It is important to follow this instruction carefully to get the right tension for the trampoline mat.
If you do not follow this pattern it will be very difficult to assemble the trampoline mat correctly.
Step 6
Lay the “Frame Pad” 2 over the trampoline so that it covers the springs and the metal frame.
Line up the straps so that you have one over each leg socket. Make sure to tie the straps tightly.
Tie the straps as shown.
Now go back and tighten all screws firmly on the trampoline.
Trampoline mat
7

Step 7
Slide down the “Upper Frame Tube with Foam” A on top of the “Lower Frame Tube with Foam”
B . Add the Tube Cap C and secure as shown.
Important Note
Zip of the entrance door should be located between two leg bases of the trampoline.
8

Step 8
Snap in the buckles on the top of the “Enclosure Netting”
Attach the top snap in buckles for all sets of tube frame.
Please make sure the cap holder is facing outwards.
to the “Tube Cap” as shown.
Step 9
First, tie the end of one “Cord” E to the Trampoline Mat ribbon. Then pull the cord through the
corresponding hole on the net as shown. Repeat this step until you have tied all the “Cords” E
to the Trampoline Mat ribbon and tie both ends together.
Step 8
Buckle
Step 10
Zip
Step 9
Step 10
Pull the zip of the “Enclosure Netting” F at the door which should be located between two leg
bases of the trampoline, then snap two buckles as shown.
Step 11
Important: Remember to go back and tighten all screws, nuts and buckles on both the Trampoline
and the Enclosure Netting. Otherwise it may not function properly and may lead to injuries that
could have been avoided by proper assembly.
The assembly of the trampoline is now complete. Remember to be careful when jumping.
F
C
9

BASIC TRAMPOLINE BOUNCES
THE BASIC BOUNCE
KNEE BOUNCE
1. Start from standing position, feet shoulder width
apart and with head up and eyes onmat.
2. Swing arms forward and up and around in a
circular motion.
3. Bring feet together while in mid-air and point
toes downward.
4. Keep feet shoulder width apart when landing
on mat.
1. Start with basic bounce and keep itlow.
2. Land on knees keeping back straight, body erect
and use your arms to maintain balance.
3. Bounce back to basic bounce position by swinging
arms up.
SEAT BOUNCE
1. Land in a flat sitting position.
2. Place hands on mat besides hips, do not lock
your elbows.
3. Return to erect position by pushing withhands.
FRONT BOUNCE
1. Start with a low bounce.
2. Land in prone (face down) position and keep
hand and arms extended forward onmat.
3. Push off the mat with arms to return to
standing position.
180 DEGREE BOUNCE 1. Start with front bounce position.
2. Push off with left or right hands and arms
(depending on which way you wish to turn).
3. Maintain head and shoulders in the same direction
and keep back parallel to mat and headup.
4. Land in prone position and return to standing
position by pushing up with hands and arms.
WARNING
ALWAYS START YOUR JUMP ATTHE CENTER OF THE MAT.WHEN YOU LAND MORE THAN
30 CM AWAYFROM THE LOGO, STOP YOUR JUMP IMMEDIATELY!
RESTART YOUR JUMP AT THE CENTER OF THE MAT.
NOTE
MAKE SURE ALL BUCKLES ARE CORRECTLY CLOSED DURING ANY USE OF THE
TRAMPOLINE.
10

CARE AND MAINTENANCE
This trampoline was designed and manufactured with quality materials and craftsmanship.
If proper care and maintenance is provided, it will provide all jumpers with years of exercise,
fun, and enjoyment as well as reduce the risk of injury. Please follow the guidelines listed below.
Instalments of additional accessories must be carried out as per manufacturer’s instructions.
This trampoline is designed to withstand a certain amount of weight and use. Please make sure
that only one person at any one time uses the trampoline. Jumpers should either wear socks,
gymnastics shoes, or be barefoot when using the trampoline. Please be aware that street shoes
or tennis shoes should NOT be worn while using the trampoline. In order to prevent the trampoline
mat from getting cut or damaged please do not allow any pets onto the mat. Also, jumpers should
remove all sharp objects from their person prior to using the trampoline. Any type of sharp or
pointed objects should be kept off the trampoline mat at all times. Regularly check that nuts and
bolts are securely tightened, since they may come loose over time. Check that all spring-loaded
(pit pin) joints are still intact and cannot be dislodged during play. Check sharp edges and all
coverings and replace when required. Check that mat, padding and enclosure are free from
defects.
Always inspect the trampoline before each use for worn, abused or missing parts. A number of
conditions could arise that may increase your chances of getting injured.
Please be aware of:
•Punctures, holes, or tears in the trampoline mat
•Sagging trampoline mat
•Loose stitching or any kind of deterioration of the mat
•Bent or broken frame parts, such as the legs
•Broken, missing, or damaged springs
•Damaged, missing, or insecurely attached frame pad
•Protrusions of any types (especially sharp types) on the frame, springs, or mat
Note. Sunlight, rain snow and extreme temperatures reduce the strength of these parts over time.
IF YOU FIND ANY OF THE PREVIOUS CONDITIONS, OR ANYTHING ELSE THAT YOU FEEL
COULD CAUSE HARM TO ANY USER, THE TRAMPOLINE SHOULD BE DISASSEMBLED OR
SECURED FROM USE UNTIL THE CONDITION(S) HAS BEENRESOLVED.
Do not modify the trampoline or any of its parts.
The net should for safety’s sake be replaced every year.
MOVING THE TRAMPOLINE
If you need to move the trampoline, two people should be used. All connector points should be
wrapped and secured with weather resistant tape, such as duct tape. This will keep the frame
intact during the move and prevent the connector points from dislocating and separating.
When moving, lift the trampoline slightly off the ground and keep it horizontal to the ground.
For any type of other move, you should disassemble the trampoline.
Keep this instruction manual.
11

Samlevejledning
JumpXFun Trampolin
–Standard 396
396 cm
276 cm
90 cm
Det er meget vigtigt, at du læ ser og forstår vejledningen, før trampolinen samles og
anvendes.
Vi håber, at du bliver glad for at bruge trampolinen. En trampolin er rigtig sjov og giver god motion
på samme tid. Det tager lidt tid at samle den, men det er lettere, hvis du læ ser alle anvisninger, før
du starter. Det kan tage over en time at samle trampolinen, så væ r tålmodig, og få en til at hjæ lpe
dig.

VIGTIGT
Læ s følgende erklæ ring og advarsler for at undgå alvorlige eller fatale ulykker.
Advarsel!
- Maks. 150 kg.
- Kun til privat brug.
- Til udendørs brug.
- Kun én bruger. Risiko for kollision.
- Nettet bør udskiftes hvert år.
- Lav ikke saltomortaler. Det er meget farligt, og du risikerer alvorlige skader ellerdødsfald.
- Luk altid sikkerhedsnettets åbning, inden du begynder at hoppe.
- Læ s brugsvejledningen.
- Trampolinen skal samles af en voksen ifølge samlevejledningen og derefter tjekkes før brug.
- Hop kun i gymnastiksko eller med bare fødder.
- Tøm lommerne, og hav ikke noget i hæ nderne.
- Hop altid på midten af dugen.
- Må ikke bruges, hvis dugen er våd.
- Spis ikke, når du hopper
- Hop aldrig ned fra trampolinen.
- Sæ t en begræ nsning på anvendelsestiden (hold regelmæ ssige pauser).
- Trampolinen skal fastgøres og må ikke anvendes i kraftig vind.
- Forsøg ikke at springe over nettet.
- Hop ikke ind i nettet medvilje.
- Forsøg ikke at hoppe tilbage fra nettet igen med vilje.
- Hæ ng ikke oven på nettet, og forsøg ikke at klatre op idet.
- Tagsmykker af, som kan vikle sig ind i nettet eller skæ re i det.
Placering af trampolinen
Placer aldrig trampolinen på et cementgulv eller andre hårde flader. Den bedste placering er på en
jæ vn og stabil overflade som for eksempel en græ splæ ne. Der skal væ re mindst 2 meters frirum
omkring trampolinen. Sørg for, at der ikke er nogen ledninger, grene, hegn eller andre mulige farer
over og rundt om trampolinen. Trampolinen må ikke placeres tæ t på pools, gynger, rutsjebaner,
klatrestativer eller andre installationer, der udgør en risiko. Trampolinen er ikke beregnet til at blive
gravet ned.
Vejrforhold
Trampolinen må ikke bruges, når den er våd. Skil trampolinen ad om vinteren, og opbevar alle
stofdele (dug, skumkanter og sikkerhedsnet) indendørs. Fjern skumkanter og sikkerhedsnet ved
stæ rk blæ st, og fastgør trampolinen til jorden med pløkker/jordspyd (sæ lges separat).
Vejledning
Start langsomt. Forsøg ikke at lave svæ re øvelser.
Hop ikke i trampolinen, når du er træ t. Det øger risikoen for skader. Sørg for at bæ re passende
fodtøj, f.eks. gymnastiksko, eller hop med bare fødder.
Træ d aldrig på sikkerhedsbetræ kket. Det er ikke konstrueret til at kunne bæ re en persons væ gt.
Når du skal ned fra trampolinen, må du aldrig hoppe. Kravl altid af. Hop aldrig i trampolinen, hvis
du har indtaget stoffer eller alkohol.
Der skal altid væ re andre til stede, når du hopper i trampolinen. Så er der nogen til at hjæ lpe dig,
hvis du skulle komme til skade.
Begynd altid med at hoppe midt i cirklen. Hvis du lander mere end 30 cm fra kanten af logoet,
skal du omgående holde op med at hoppe!
Begynd at hoppe på midten af dugenigen.
Montering
Læ s samlevejledningen omhyggeligt, før du begynder at samle trampolinen. Det kan anbefales,
at to personer hjæ lpes ad med at samle trampolinen.
Begynd med at kontrollere, at du har alle de nødvendige dele. Hver dels referencenummer vil
blive brugt her i vejledningen som en hjæ lp til dig.
13

Oversigt over dele (trampolin)
Delnr.
Dele
Beskrivelse
Antal
1
Trampolindug
1
2
Sikkerhedsbetræ k
1
3
T-del med benfæ stere
12
4
Topramme
12
5
Benbase
6
6A
Benforlæ nger A (2 huller)
6
6B
Benforlæ nger B (3 huller)
6
7
Lang bolt (43 mm)
12
8
Lange skruer (20 mm)
6
9
Hæ ttemøtrik
12
10
Fjederskive
18
11
Buet spæ ndeskive
30
12
Selvlåsende skrue
12
13
Lille fjederskive
12
14
Galvaniserede fjedre
72
15
Skruenøgle
1
16
Fjedermonteringsvæ rktøj
1
17
Unbrakonøgle
1
18
Plastikhæ tte
6
14

Oversigt over dele (sikkerhedsnet)
Delnr.
Dele
Beskrivelse
Antal
A
Ø vre rammerør med skum
6
B
Nedre rammerør med skum
6
C
Rørhæ tte
6
D
Selvlåsende skrue
12
E
Line
8
F
Sikkerhedsnet
1
Montering af trampolin
Der skal to personer til at montere trampolinen.
Hold ikke næ r enderne med hæ nderne, når rørene sæ ttes sammen. Bæ r beskyttelseshandsker
for at undgå beskadigelse under montering.
Trin 1
Begynd med at læ gge delene ud som vist på billedet.
15

Trin 2
Sæt ”T-del medbenfæstere”
Saml 6 sæ t i alt. sammen med ”toprammen” og ”benforlænger A” som vist.
Trin 3
Sæt nu ”T-del med benfæstere” 3 sammen med ”toprammen”
vist, og ”nedre rammerør med skum” B . Saml 6 sæ t i alt.
og ”benforlænger B” som
3
4
6A
4
6B
16

Trin 4
Saml et monteret sæt fra trin 2 og trin 3, og sæt det sammen med ”benbase”
Gentag dette for alle 6 sæ t, til hele trampolincirklen er samlet. som vist.
5
17

Trin 5
Væ r forsigtig, når fjedrene skal monteres.
Start med at læ gge trampolindugen 1 ud inde i rammen.
Vælg et startpunkt. Kald dette “punkt 1”. Brug det specielle fjedervæ rktøj til at sæ tte
de ”galvaniserede fjedre” 14 fast med som vist på billedet.
Begynd med at sæ tte fjederens krog ind i den V-formede ring på trampolindugen. Brug derefter
fjedermonteringsvæ rktøjet til at træ kke fjederen på plads på rammen. Sørg for, at fjederen
sidder ordentligt fast, ellers kan den løsne sig, når du hopper i trampolinen. Du bør have
beskyttelseshandsker på for at undgå at komme til skade.
Når den første fjeder er på plads, skal du fortsæ tte i numerisk ræ kkefølge som vist på billedet.
Når du er fæ rdig med nummer 16, kan du fastgøre de resterende fjedre i tilfæ ldig ræ kkefølge.
Det er vigtigt at følge vejledningen nøje for at få spæ ndt trampolindugen korrekt. Hvis du ikke
følger dette mønster, vil det blive meget svæ rt at montere trampolindugen korrekt.
Trin 6
Læ g sikkerhedsbetræ kket 2 over trampolinen, så det dæ kker fjedrene og metalrammen.
Læ g stropperne, så der ligger en over hver benfæ ster. Sørg for at stramme stropperne godt.
Stram stropperne som vist.
Nu skal du stramme alle skruerne grundigt på trampolinen.
Trampolindugen
18

Trin 7
B
Skub “øvre rammerør med skum” A ned oven på “nedre rammerørmed skum” .
Tilføj rørhæ tten C , og fastgør som vist.
Vigtigt:
Lynlåsen på indgangsdøren skal placeres mellem trampolinens to benbaser.
19

Trin 8
Fastgør spæ ndet øverst på sikkerhedsnettet
spæ nde til alle rørpar.
Sørg for, at propholderen vender udad.
til rørhæ tten som vist. Fastgør det øvre
Trin 9
Fastgør først enden af en line E til trampolindugens bånd. Træ k derefter linen gennem
det tilsvarende hul i nettet som vist. Gentag dette trin, indtil du har fastgjort alle liner E til
trampolindugens bånd, og bind begge ender sammen.
Trin 8
Spæ nde
Trin 10
Lynlås
Trin 9
Trin 10
Træ k i sikkerhedsnettets F lynlås ved indgangen til trampolinen. Indgangen skal væ re placeret
mellem to af trampolinens ben. Spæ nd så to spæ nder som vist.
Step 11
Vigtigt: Husk at stramme alle skruer, møtrikker og spæ nder på både trampolin og sikkerhedsnet.
Hvis ikke dette gøres, kan det ske, at den ikke fungerer korrekt, hvilket kan føre til skader,
der ellers kunne have væ ret undgået.
Trampolinen er nu fæ rdigmonteret. Husk at væ re forsigtig, når du hopper.
F
C
20
Table of contents
Languages:
Other JumpXfun Accessories manuals