manuals.online logo
Brands
  1. Home
  2. •
  3. Brands
  4. •
  5. Jungle Jim’s
  6. •
  7. Lawn Mower Accessories
  8. •
  9. Jungle Jim’s MTR User manual

Jungle Jim’s MTR User manual

MTR
ASSEMBLY
INSTRUCTIONS
Jungle Jim’s Accessory Products, Inc. – 550 O’Byrne Avenue – Louisville, KY 40223 –(502)244-7934
REV.A –8/23/18
ITEM #
PART NUMBER
DESCRIPTION
QTY
1
ATR-TH
TRIMMER HOOK WELDMENT
1
2
ATR-LN
LOCKING NUT
1
3
MTR-HBRACE
HORIZONTAL BRACE
1
4
MTR-UPPER V
UPPER VERTICAL SUPPORT
1
5
MTR-LOWER V
LOWER VERTICAL SUPPORT
1
6
ATR-CP
COMPRESSION PIN
1
7
ATR-WASH
3/8” SQUARE WASHER
2
8
MTR-MW
LOCKING POLE ASSEMBLY
1
9
206
3/8” – 16 x 2 ¼ ” FLAT HEAD SOCKET SCREW
1
10
502
TRAILER MATE EXTENSION SPRING
1
11
424
5/16” SPLIT LOCK WASHER
10
12
214
5/16” – 18 x 1” HEX CAP SCREW
10
13
308
5/16 –18 HEX FLANGE NUT
10
14
VINYL –4.5
½” x 4 ½” VINYL
1
15
VINYL –3.75
½” x 3 ¾” VINYL
2
16
MTR-SSW2
SHAFT SUPPORT WELDMENT
1
17
101
5/16” – 18 x 5/8” SERRATED BOLT
1
18
711
½” x 1” HOSE
1
7 (x2)
Jungle Jim’s Accessory Products, Inc. – 550 O’Byrne Avenue – Louisville, KY 40223 –(502)244-7934
REV.A –8/23/18
ASSEMBLY & MOUNTING INSTRUCTIONS
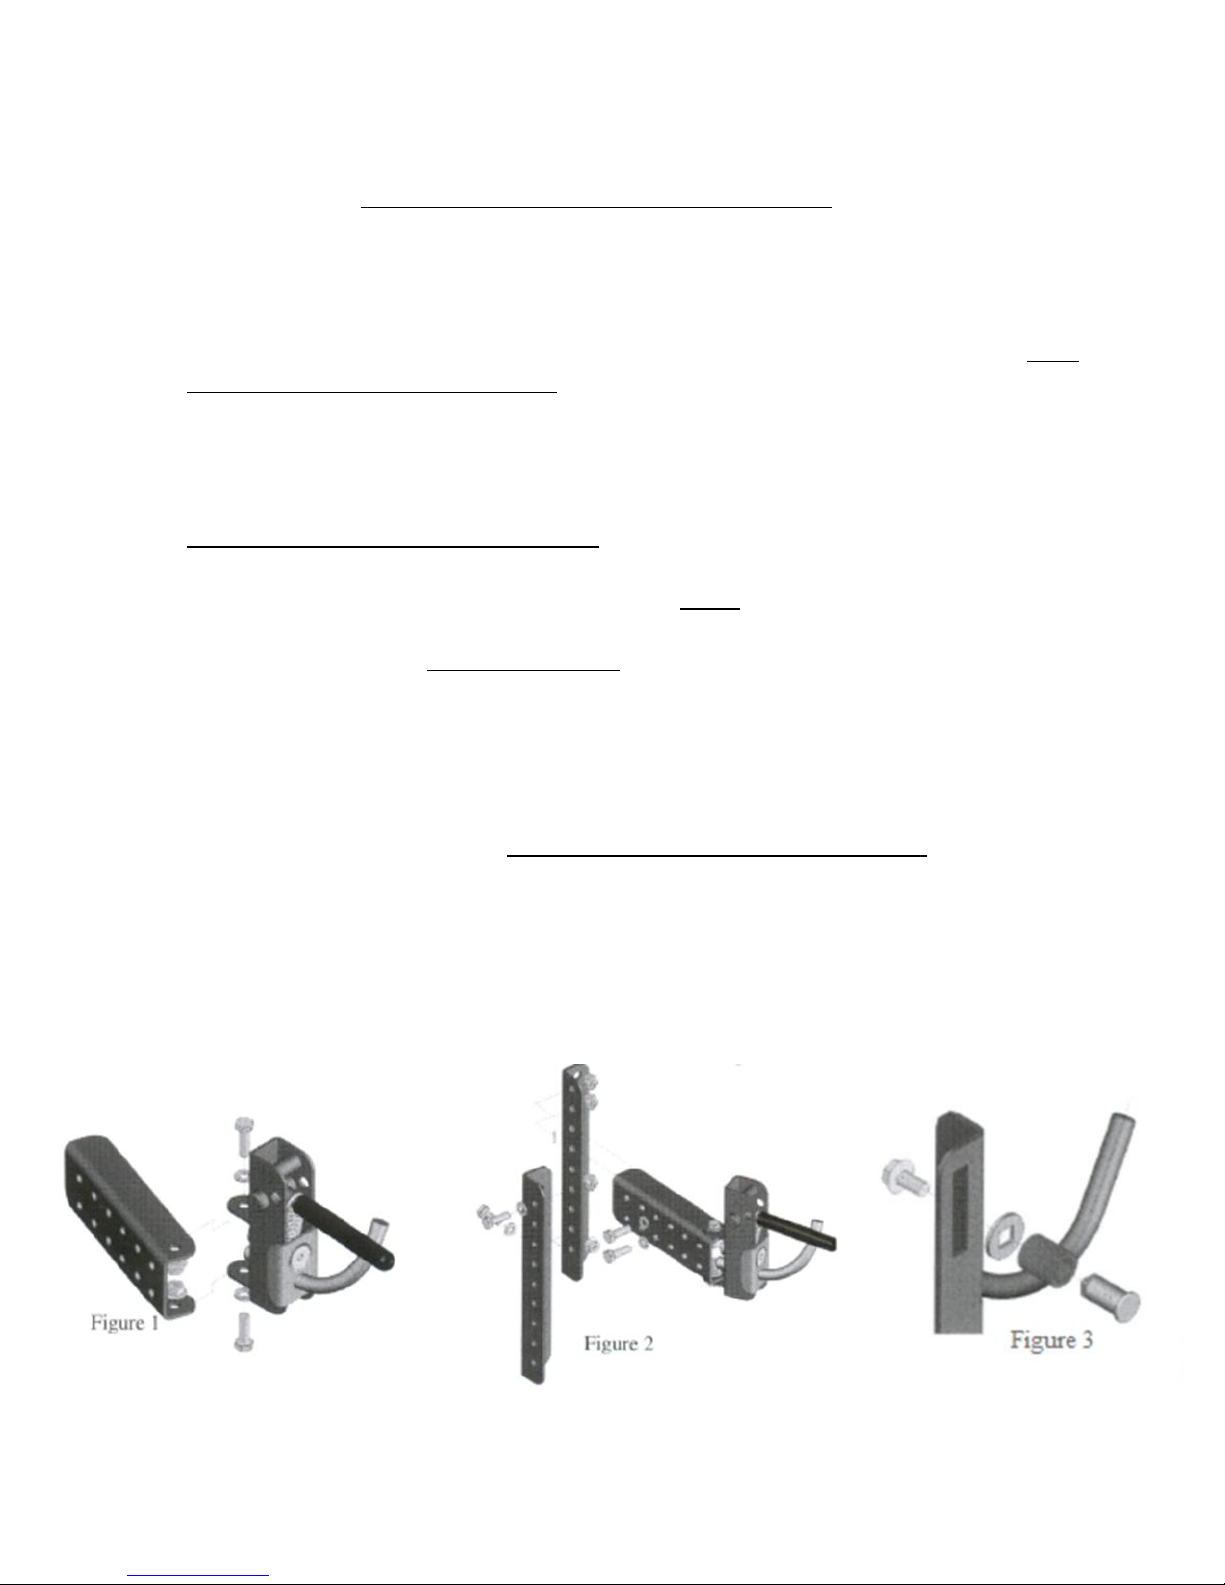
1Attach the locking pole assembly (# 8 –MTR-MW) to the horizontal brace (# 3 –MTR-HBRACE) with
two 5/16” hex cap screws (#12), two split lock washers (#11), and two hex flange nuts (#13) as
shown in Figure 1. Leave the hardware loose until the angle is adjusted.
2Attach the (#4 —upper vertical support) to the (#8 & #3 —horizontal brace assembly from step 1
using two 5/16” hex cap screws (#12), two split lock washers (#11) and two flange nuts (#13). Next
attach the (#5 —lower vertical support to the (#4) upper vertical support using two 5/16” hex cap
screws (#12) , two split lock washers (#11) and two flange nuts (#13) as shown in Figure 2. Leave
all hardware loose until angle is adjusted.
3To assemble the compression pin, take the ½” hose (#18) and slide over the pin and place the two
ATR-WASH (#7) on the end. Next, line up the assembled pin with the slot in the (#16 —SHAFT
SUPPORT WELDMENT and connect using the 5/8” serrated flange bolt (#17) as shown in Figure 3.
Do not tighten the assembly until after step 6.
4Next, determine the best placement on the mower. Before drilling holes, clamp the MTR in the
desired position and place the trimmer into the rack to make sure trimmer is easily accessed and
doesn’t interfere with any operations of mower. Make sure the trimmer clears the mower engine,
exhaust and any moving components the mower may have.
5Once satisfied with the location, mark the location of the holes in the (#5 —lower vertical support)
on the mower frame and (#16 —shaft support on the deck. Drill 5/16” holes at the marked
locations and attach using two 5/16” hex cap screws (#12), two split lock washers (#11) and two
flange nuts (#13) for each support. Securely tighten all hardware from steps 1 & 2.
6Finally, put a trimmer in the MTR and slide the compression pin assembly down in the slot until it
rests on top of the trimmer shaft. Remove the trimmer and slide compression pin assembly down
another 1/16” and tighten securely. The trimmer should not rotate in the rack when the
compression pin is in the correct position on the trimmer.
X 2

Popular Lawn Mower Accessories manuals by other brands

Cozy Cab JOHN DEERE 1400 Series Mounting instructions

Cozy Cab

Cozy Cab JOHN DEERE 1400 Series Mounting instructions

Toro 144-0389 installation instructions

Toro

Toro 144-0389 installation instructions

Toro 04650 installation instructions

Toro

Toro 04650 installation instructions

MTD 362-200 Operating/ Operating/service instructions

MTD

MTD 362-200 Operating/ Operating/service instructions

Husqvarna H354SG owner's manual

Husqvarna

Husqvarna H354SG owner's manual

Ferris 48550 installation instructions

Ferris

Ferris 48550 installation instructions

Land Pride OS1548 Specifications

Land Pride

Land Pride OS1548 Specifications

Simplicity 4000 parts manual

Simplicity

Simplicity 4000 parts manual

Toro Groundsmaster 136-4450 installation instructions

Toro

Toro Groundsmaster 136-4450 installation instructions

Simplicity 1009 owner's manual

Simplicity

Simplicity 1009 owner's manual

Toro Greensmaster eFlex 1018 Operator's manual

Toro

Toro Greensmaster eFlex 1018 Operator's manual

Simplicity 658 owner's manual

Simplicity

Simplicity 658 owner's manual

Simplicity 370 owner's manual

Simplicity

Simplicity 370 owner's manual

Craftsman 486.24226 owner's manual

Craftsman

Craftsman 486.24226 owner's manual

GrassFlap 49K Assembly instructions

GrassFlap

GrassFlap 49K Assembly instructions

Toro 140-8369 installation instructions

Toro

Toro 140-8369 installation instructions

Peco 28621206 Operator's manual

Peco

Peco 28621206 Operator's manual

Simplicity 4533 Illustrated parts list

Simplicity

Simplicity 4533 Illustrated parts list

manuals.online logo
manuals.online logoBrands
  • About & Mission
  • Contact us
  • Privacy Policy
  • Terms and Conditions

Copyright 2025 Manuals.Online. All Rights Reserved.