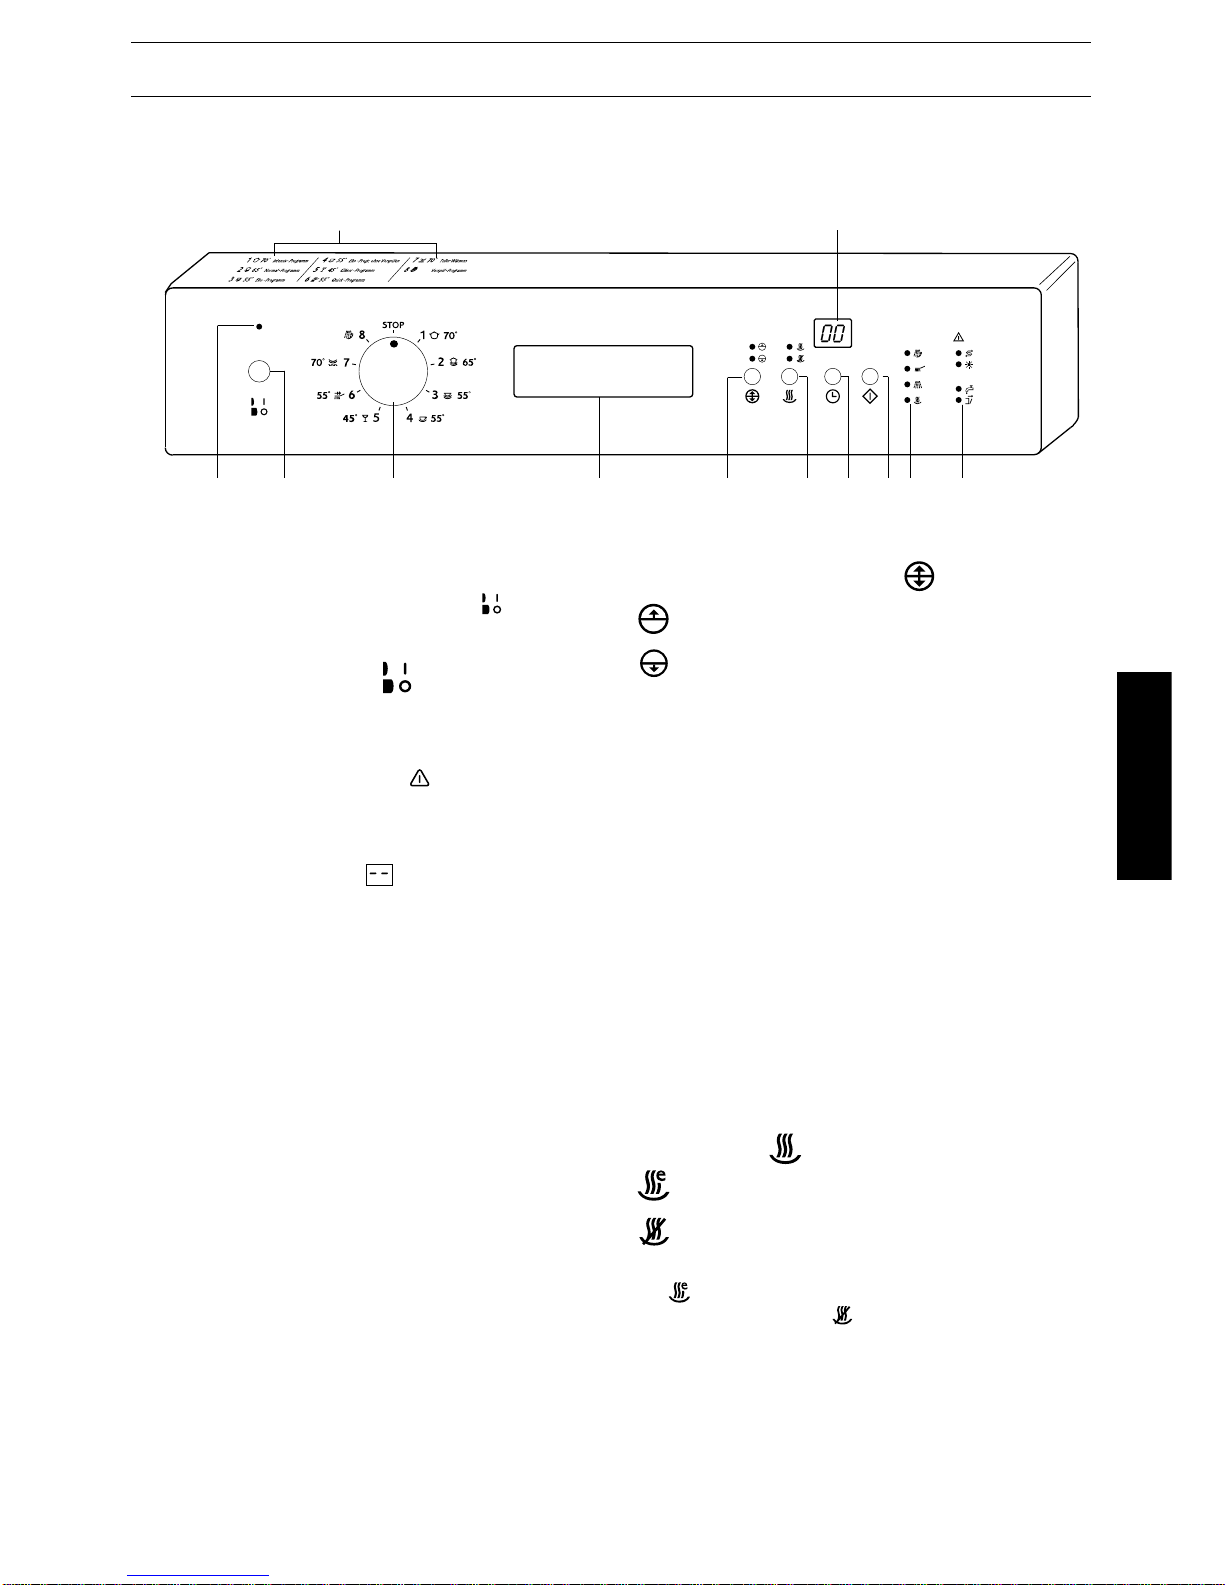
JUNO JSI6961B User manual

Geschirrspüler
Lave-vaisselle
Afwasmachine
Dishwasher
JSI 6961
Gebrauchsanweisung
Mode d’emploi
Gebruiksaanwijzing
Instruction booklet

PID31GB
54
CONTENTS
Warnings . . . . . . . . . . . . . . . . . . . . . . . . . . . . . . . . . . . . . . . . . . . . . . . . . . . . . . . . . . . . . . . . . . . . . . .page 55
Installation . . . . . . . . . . . . . . . . . . . . . . . . . . . . . . . . . . . . . . . . . . . . . . . . . . . . . . . . . . . . . . . . . . . . . .page 56
Positioning, levelling, . . . . . . . . . . . . . . . . . . . . . . . . . . . . . . . . . . . . . . . . . . . . . . . . . . . . . . . . . . . . . . . .page 56
Water supply connections, water outlet connection, electrical connections . . . . . . . . . . . . . . . . . . . . . . .page 56
Use . . . . . . . . . . . . . . . . . . . . . . . . . . . . . . . . . . . . . . . . . . . . . . . . . . . . . . . . . . . . . . . . . . . . . . . . . . . . .page 57
Control panel . . . . . . . . . . . . . . . . . . . . . . . . . . . . . . . . . . . . . . . . . . . . . . . . . . . . . . . . . . . . . . . . . . . . . .page 57
The water softener, filling with salt . . . . . . . . . . . . . . . . . . . . . . . . . . . . . . . . . . . . . . . . . . . . . . . . . . . . . .page 59
Use of rinse aid, use of detergent . . . . . . . . . . . . . . . . . . . . . . . . . . . . . . . . . . . . . . . . . . . . . . . . . . . . . . .page 60
Loading the machine, use of the lower basket . . . . . . . . . . . . . . . . . . . . . . . . . . . . . . . . . . . . . . . . . . . .page 61
Use of the upper basket, adjusting the height of the upper basket . . . . . . . . . . . . . . . . . . . . . . . . . . . . . .page 62
Helpful hints . . . . . . . . . . . . . . . . . . . . . . . . . . . . . . . . . . . . . . . . . . . . . . . . . . . . . . . . . . . . . . . . . . . .page 63
Washing programmes . . . . . . . . . . . . . . . . . . . . . . . . . . . . . . . . . . . . . . . . . . . . . . . . . . . . . . . . . . .page 64
Operating sequence . . . . . . . . . . . . . . . . . . . . . . . . . . . . . . . . . . . . . . . . . . . . . . . . . . . . . . . . . . . . . . . . .page 65
Maintenance and cleaning . . . . . . . . . . . . . . . . . . . . . . . . . . . . . . . . . . . . . . . . . . . . . . . . . . . . . .page 66
Cleaning the central filters, cleaning the large filter, internal and external cleaning . . . . . . . . . . . . . . . . .page 67
Servicing . . . . . . . . . . . . . . . . . . . . . . . . . . . . . . . . . . . . . . . . . . . . . . . . . . . . . . . . . . . . . . . . . . . . . . .page 68
Building-in . . . . . . . . . . . . . . . . . . . . . . . . . . . . . . . . . . . . . . . . . . . . . . . . . . . . . . . . . . . . . . . . . . . . . .page 70
TECHNICAL SPECIFICATIONS
DIMENSIONS Width cm 59,6
Height cm 81,8 - 87,8
Max depth cm 55,5
Max depth with door open cm 115
ELECTRICAL CONNECTION Voltage 220V/50Hz
MOTOR RATING DURING WASHING 200 W
POWER OF HEATING ELEMENT 2800 W
OVERALL POWER 3000 W
WATER SUPPLY PRESSURE minimum 5 N/cm2
maximum 80 N/cm2
CAPACITY (STANDARD IEC PLACE SETTINGS) 12
CONSUMPTION: Water 17 lt
Electricity 1.3 kW/h
This appliance complies with the following E.E.C. Directives:
- 73/23 of 19.2.73 (Low Voltage Directive) and subsequent modifications;
- 89/336 of 3.5.89 (Electromagnetic Compatibility Directive) and subsequent modifications.
ENGLISH

It is most important that this instruction book
should be retained with the appliance for future
reference.
Should the appliance be sold or transferred to
another owner, or should you move house and
leave the appliance, always ensure that the book
is left with the appliance in order that the new
owner can get to know the functioning of the
appliance and the relevant warnings.
These warnings are provided in the interest of
safety. You MUST read them carefully before
installing or using the appliance.
■Unplug the appliance and turn off the water after
use.
■If the appliance is supplied with obvious damage,
consult the supplier before installing it.
■Any plumbing work required to install this appliance
should be carried out by a qualified plumber or
competent person.
■Any electrical work required to install this appliance
should be carried out by a qualified electrician or
competent person.
■This appliance is designed to be operated by adults.
Children should not be allowed to tamper with
controls or play with the product.
■Care must be taken to ensure that the appliance
does not stand on the electrical supply cable or on
the water inlet and drain hoses.
■These dishwashers are designed to be used for
washing normal household utensils. Items that are
contaminated by petrol, paint, steel or iron debris,
corrosive, acidic or alkaline chemicals are not to be
washed in a dishwasher.
■Under no circumstances should you open the door
whilst, the appliance is in operation. Always turn off
the appliance before opening the door.
However, the dishwasher features a special safety
device which cuts off the water inlet, should the door
be accidentally opened, thus avoiding water leaks.
■Never touch the heating element during or
immediately after the end of the washing cycle.
■When finishing loading or unloading close the door,
as an open door can be a hazard.
■It is dangerous to lean or to sit on the dishwasher
door: the appliance could tip over.
■Built-in dishwashers only: the appliance must be
secured to the underside of the worktop using the
brackets provided. Failure to do this could result in
an unstable appliance which may cause damage or
injury.
■Under no circumstances should you attempt to
repair the machine yourself. Repairs carried out by
inexperienced persons may cause injury or serious
malfunctioning.
■This appliance should be serviced only by an
authorised Service Centre.
■Before disposing of the appliance, disconnect the
water hose, cut the electrical cable and ensure that
the door cannot close.
■For proper disposal of the appliance, contact your
local waste collection service.
WARNINGS
PAV05GB
55
ENGLISH

PIN18GB
56
INSTALLATION
Remove all packaging before positioning the
machine.
Positioning
If possible, position the machine next to a water tap
and a drain.
The dishwasher features fill and drain hoses which
can be turned either to the left or the right to suit the
installation.
Levelling
Good levelling is essential for correct closure and
sealing of the door.
Loosen or tighten the adjustable support feet, until the
machine is perfectly level.
Water Outlet Connection
The end of the drain hose can be connected as fol-
lows:
to the sink outlet siphon, securing it if necessary with
a clip;
to a wall outlet provided with vent-hole, minimum in-
ternal diameter 4 cm;
The waste connection must be at a height of between
30 cm (minimum) and 100 cm (maximum) from the
floor.
It makes no difference which way the drain hose
faces, either to the right or left of the dishwasher.
Avoid bending or kinking the hose as this could
prevent or slow down the discharge of water.
If you use a drain hose extension it must be no longer
than 2 meters and its internal diameter must be no
smaller than the diameter of the hose provided.
Likewise the internal diameter of the couplings used
for connection to the waste outlet must be no smaller
than the diameter of the drain hose.
Note: The sink plug must not be in place when the
machine is draining as this could cause the water ti
siphon back into the machine.
Clip the outlet hose and the
inlet hose together by means
of the pre-fitted plastic clips.
This makes it possible to
avoid flood damage due to
accidental falling of the outlet
hose. The clips can be easily
moved towards the tap and
fixed as required.
Water Supply Connections
This dishwasher must be plumbed into a cold water
supply and it is preferable for it to be permanently
plumbed in.
The water pressure must be within the limits given in the
technical specifications, as it will not function correctly if
outside these specifications.
For making the connection
itself, the coupling nut fitted
to the machine's supply
hose is designed to screw
onto either a 3/4 inch gas
thread spout, or to a pur-
pose made quick-coupling
tap such as the Press-
Block.
This hose is fitted with a safety device which stops the
water inflow in the event of the internal tube breaking
due to wear. The problem is signalled by the appear-
ance of a red marker in the window (B). If this hap-
pens, shut the water tap and have the hose replaced.
Be sure to incorporate the strainer (A) supplied with
the machine into the joint.
The water pressure must be within the limits given in
the technical specifications, as it will not function cor-
rectly if pressure is outside these specifications.
Note: the end of the hose
connected to the machine
can be positioned as re-
quired, by simply slacken-
ing the retaining ring.
Caution: the retaining ring
must be properly fitted so
as to avoid water leaks.
Re-tighten the ring securely to avoid water leaks.
Avoid bends or kinks in the hose, which could prevent
or slow down the flow of water.
If the machine is connected to new pipes or pipes
which have not been used for a long time, you are ad-
vised to run the water for a few minutes before con-
necting the inlet hose. This will prevent deposits of
sand or rust clogging the inlet hose filter.
Electrical connection
Electrical connection 220 - 230V (50 Hz).
Maximum power absorbed 3.00 kW ca.
The domestic wiring system (including wall sockets,
interior wiring, fuses and electricity meters) should
therefore be adequate and suitable to carry such a
load.
Safety standards require the appliance to be
earthed.
The Manufacturer accepts no liability for failure to
observe the above safety precautions.
B
A
CA01
CA06
min 30 cm
max 100 cm
max 100 cm
+ 2 m max
min 4 cm
Ø 21
Ø 18
Ø 18
Ø 21
CS01
CS03
ENGLISH

1. Pilot Light
This comes on when the ON/OFF button (2) is de-
pressed, indicating that the machine is on.
2. ON/OFF Pushbutton
ON
Pressing this button turns the dishwasher on. The pi-
lot light (1) and any of the Programme Sequence Indi-
cator lights (9) and Control lights (10) will come on.
The programme number corresponding to that select-
ed by the selector dial (3) will appear on the display
(11). If the programme selector dial (3) is in the
«STOP» position, two bars will appear across the
display.
OFF
When the washing programme has finished, the ma-
chine stops automatically, the pilot light (1) remains on
and two zeros appear on the display (11).
To switch the machine off at the end of the pro-
gramme or to stop it if required at any time during op-
eration, press the ON/OFF button (2) again.
3. Programme Selector Dial
To select a programme, push the Programme Selec-
tor dial in to make it pop out. Then turn it to the left or
right, making sure that the marker on the knob corre-
sponds with the programme you wish to select.
The number corresponding to the selected pro-
gramme (see programme chart) will appear on the
display (11) and all the phases of the chosen pro-
gramme are illuminated on the Programme Sequence
Indicator (11).
4. Door Handle
To open the door press the catch in the top of the re-
cess and pull the door towards you at the same time.
5. Half Load Pushbutton
Upper basket
Lower basket
By pressing this button, washing can be confined to a
single basket instead of both. The light corresponding
to the basket selected comes on.
This is very useful and economical when only a few
dishes need washing.
Remember to load all the dishes into the basket se-
lected.
Do however follow the instructions given in the sec-
tion «Loading your Machine».
If both lights are out, washing will be carried out in
both baskets.
Important:
If you have selected the HALF LOAD option, reduce
the quantity of detergent indicated in the washing pro-
grammes chart by about one third and pour all the de-
tergent into the dispenser.
6. Economy Drying / No Drying
Pushbutton
Economy drying
No drying
By pressing this button you can opt to shorten (sym-
bol , illuminated) or completely eliminate the hot air
drying cycle (symbol illuminated), so making a
considerable energy saving.
The light corresponding to the option selected comes
on.
If both lights are out, the full drying cycle will be
carried out.
USE
PPC35GB
57
12
23 4 56
7
8
9
10
11
1
Control panel
ENGLISH

7. Delayed Start Pushbutton
This button allows you to delay the start of the wash-
ing programme from a minimum of 1 hour to a maxi-
mum of 9 hours.
How to Set Delayed Start
By pressing the button, will appear on the display
(11); this means that you have delayed the start of the
programme by 1 hour.
By pressing the button repeatedly, you can delay the
start of the programme up to a maximum of 9 hours.
By pressing the button one more time you go back to
the programme setting.
After setting hours for delay press start button (8):
the machine will begin to count down and the display
will indicate, in hours, how much longer there is to go
before the start of the programme. The «H» on the
display will flash indicating the delay is operating.
8. Start Pushbutton
This is the last button to be pressed after setting the
washing programme and, if required, drying options
half load , delayed start .
This button starts the programme; the light corre-
sponding to the phase under way on the Programme
Sequence Indicator (9) illuminates. On the display
(10) you can read the approximate duration in min-
utes of the programme (obtained from laboratory
tests) and, as it proceeds, how much longer there is
to go before the end of the programme. Such duration
can vary depending on the temperature of the inlet
water.
Opening the door before the delay countdown has fin-
ished does not affect the delayed start or any other
programme settings.
To Cancel/Change the Programme:
If, after pressing the start button, you wish to change
the setting, turn the dial (3) to the stop position.
Two bars will appear on the display (11) and all
the lights of the Programme Sequence Indicator will il-
luminate indicating that the previous setting has been
cancelled. You can now select a new programme.
If during washing, you accidentally move the dial (3)
to another position, this will not change the pro-
gramme, and you can read the number of the pro-
gramme under way on the display (11) by pressing
button (5) (half load) or (7) (delayed start).
9. Programme Sequence Indicator
As soon as you select a washing programme, this illu-
minates all the phases the programme consists of.
After pressing the start button (10) this continuously
indicates what phase in the washing programme the
dishwasher has reached by illuminating the phase un-
der way. Each phase is represented by a symbol:
Prewash
Main wash
Rinse
Drying
At the end of the washing programme all the phases
are switched off.
10. Control Lights
Salt control
Flashes when the salt container needs refilling.
Rinse Aid control
Flashes when the rinse aid dispenser needs refilling.
Closed Tap control
Flashes if:
- You have forgotten to turn on the water tap
- The water supply has been cut off
- The water inlet hose is restricted
Opened door control
Flashes when the door is open.
11. Display
12. Programme guide
This is a quick reference washing programme chart
which will help you to select the correct programme.
PPC36GB
58
ENGLISH

The Water Softener
Water contains varying amounts of lime and mineral
salts depending on the area where you live: these are
deposited on the dishes leaving white marks.
The higher the content of these salts, the harder your
water will be. The «hardness» level is measured on 2
equivalent scales: French Degrees or German Degrees.
Contact your local Water Authority to find the exact
water hardness level for your area.
The dishwasher is equipped with a softener which us-
es special dishwasher salt to provide lime-free
(softened) water. The softener can treat water hard-
ness up to 90 french degrees via 9 adjustment levels.
Find on the table below the level corresponding to the
hardness of your water and the required adjustments:
*The dishwasher is factory set level «4» as this suits most users.
To set the dishwasher to a different level, proceed as follows:
Press the ON/OFF button to turn the dishwasher on.
Then simultaneously press
the HALF LOAD button
and DELAYED START but-
ton for approximately 5
seconds: an «L» followed
by number 4 ( the hardness
level set in the factory) will
appear on the display .
Press the DELAYED START button consecutively until
the required level appears on the display.
Each time the button is pressed, you will go up one
level.
When you have not pressed the Delayed Start button
for 5 seconds, the dishwasher will set the hardness
level to that shown on the display and return to the
programme setting mode.
Salt MUST be used regularly from level «1» upward,
if you use the new compact detergent containing
enzymes.
If you use traditional detergents containing phos-
phates, you should add salt starting from level «2».
If your water is level «0» it is already soft and there-
fore there is no need to use salt.
Filling with Salt
Only use salt which is specifically designed for use in
dishwasher. Other types of salt contain high
percentages of other substances which may reduce
the efficiency of the water softener.
Unscrew the cap of the salt container.
Place approximately 1,5 ÷ 1,8 kg of dishwasher salt
inside using the funnel provided (see figure).
Replace the cap making sure that there is no trace of
salt on the screw thread or on the gasket.
Screw the cap on tightly.
When this has been done, all that is then required is
to periodically top up the container with salt. You are
reminded of this by the Salt Refill Indicator Light on
the control panel which will illuminate when the salt
has finished.
The salt container has always some water inside
which will normally overflow when refilling with salt.
Important: The Salt Refill Indicator Light on the con-
trol panel can remain illuminated for 2-6 hours after
the salt has been replenished, assuring the dishwash-
er remains on. If you are using salts that take longer
to dissolve then this can take longer. The function of
the dishwasher is not affected.
Caution
Only fill with salt just before starting one of the
complete washing programmes (not the Rinse and
Hold programme). This will prevent any grains of salt or
salty water, which may have been spilled, remaining on
the bottom of the machine for any period of time.
This could cause corrosion.
PAA20GB
59
German degrees
(°dH)
French degrees
(°TH) PPM
(Parts per Million)
Level
0-8
9-14
15-20
21-30
31-40
41-50
51-60
61-70
71-80
81-90
0-4
5-8
9-11
12-17
18-22
23-28
29-33
34-39
40-45
46-50
0-80
81-140
141-200
201-300
301-400
401-500
501-600
601-700
701-800
801-900
0
1
2
3
*4
5
6
7
8
9
SALE
SALT
SALZ
SEL
SR06
SO131
ENGLISH

PBR03GB
60
Rinse Aid
The use of this liquid ensures through rinsing, spot
and streak free drying, making the water run quickly
off the dishes for sparkling results. It is automatically
added during the hot rinse. The dispenser, which is
positioned inside the door, holds about 110 ml of rinse
aid, which is sufficient for 16-40 dishwashing
programmes, depending upon the dosage setting.
Filling with Rinse Aid
Open the container by turning the lid (A) anticlockwise.
Add rinse aid until the container is completely full
(approx. 110 ml). The indicator (B) will be completely
dark.
Top up with rinse aid when the Rinse Aid control light
on the control panel flashes (approx. 70 - 80 ml).
Remember to CLOSE the lid after every refill.
Caution
Clean up any rinse aid spilt during filling with an
absorbent cloth to avoid excess foaming during the
next wash.
Adjusting the Dose
According to the finish and drying results obtained,
adjust the dose of rinse aid by means of the 6 position
selector (C) (position 1 - minimum dose, position 6
maximum dose). (Start from position 3). Gradually
in crease the dose if there are drops of water or lime
spots on the dishes after washing. Reduce it if there
are sticky whitish streaks on the dishes.
Caution: Do not put liquid detergent into the rinse aid
compartment
Use of Detergent
Before starting any of the dishwashing programmes,
except for the Rinse and Hold programme, load the
detergent in the dispenser.
Use only tablets, powder or liquid detergents specifi-
cally designed for domestic dishwashers.
Unsuitable detergents (such as those for washing by
hand) do not contain the right ingredients for machine
washing and hamper correct functioning of the
machine.
To open the dispenser lid,
pull the catch (D).To help
you to correctly dose the
right amount of detergent,
inside the container there
are two reference marks:
- MIN = 15 ml
- MAX = 30 ml
All the programmes with
prewash required a part of
the detergent to be poured
over the dispenser’s lid as
shown in the picture.
The amount of detergent to be used varies depending
on how soiled the dishes are and the type of dishes
being washed. We recommend the amounts shown in
the programme chart .
After filling the dispenser with detergent, close
the lid.
At the end of any washing programme the lid is always
open, ready for the next wash.
Since not all detergents are the same, you should
also consult the instructions on the packet.
Remember that insufficient quantities of detergent will
produce poor washing results whereas an excessive
amount of detergent does not improve washing
results and is also wasteful.
Using no more than the correct amount of detergent
also contributes to reducing pollution.
Phosphate free detergents with enzymes
These new detergents, although welcome from an
ecological point of view, react far more susceptibly to
water hardness than conventional products.
Therefore, in order to avoid white lime deposits on
crockery and the inner tub, you should add salt in the
water softener even if the hardness of your water is
as low as 5°dH (level 1), when using these new deter-
gents.
6
5
4
3
2
1
6
5
3
2
1
C
B
BR04 A
D
MIN
MAX
DE07
DE02
ENGLISH

PCE21GB
61
Loading your Machine
Before placing dishes in the machine, remove any
scraps of food from the plates (small bones,
toothpicks, fish bones, scraps of meat and vegetables,
fruit skins etc.) to avoid clogging the filters and
consequently reducing performance.
Open the door and slide out the baskets to load the
dishes.
Use of the Lower Basket
The lower basket is designed to take saucepans, lids,
plates (up to 27 cm in diameter), salad bowls, cutlery etc.
Serving dishes and large lids should be arranged
around the edge of the basket, ensuring that the
upper spray arm can turn freely.
Cutlery should be placed in the removable cutlery
basket with the handles facing downwards. If the
handles protrude from the bottom of the basket,
obstructing the lower spray arm, load the cutlery with
the handles facing upward.
Mix spoons with the other
cutlery to prevent them
sticking together.
Place teaspoons and other
small cutlery on special cut-
lery racks on both sides of
the cutlery basket.
The two rear rows of prongs on the lower basket can
be easily lowered to allow you to load pots, pans and
bowls.
To lower the prongs:
slightly pull them upward and let them drop down (see
picture); to bring them back to the standing position,
just pull them up again.
IEC 436 / DIN 44990
UI05
UI19
UI18
UI03
ENGLISH

Use of the Upper Basket
The upper basket is designed for plates (dessert
plates, saucers, dinner plates up to 24 cm in diame-
ter), salad bowls, cups and glasses; these should be
arranged as shown in the pictures. Glasses with long
stems can be placed upside-down in the raised cup-
racks.
Caution
When loading the dishes,
ensure that you do not cover
the water inlet funnel in the
middle of the upper basket.
Adjusting the Height of the Upper Basket
If washing very large plates (over 27 cm and up to 31
cm in diameter) you can load them in the lower
basket after moving the upper basket to the higher
position as follows:
- pull out the basket;
- grasp it on the two sides
and pull it upwards until
the mechanism is en-
gaged and the basket is
stable.
When the top basket is in the higher position it will on-
ly take plates up to 20 cm in diameter and you will not
be able to use the raised cup-racks.
To put the basket back in the lower position, grasp the
two sides, pull upwards again, then allow the basket
to drop back down slowly, keeping hold of it.
Warning: never lift or lower the basket on one side only.
PCE22GB
62
IEC 436 / DIN 44990
US13
US12
US16
US16
Before closing the door, ensure that the spray
arms can rotate freely.
RC04
ENGLISH

For Best Washing Results:
Before loading, remove all scraps of food and soak
very heavily soiled pots and pans.
Always arrange saucepans, cups and glasses etc. up-
side-down.
Tilt items with convex or concave surfaces so that the
water drains off easily.
Long items of cutlery such as ladles, carving knives
etc. should be positioned horizontally in the upper
basket.
Avoid contact between the dishes as far as possible;
correct arrangement of the items will give better
washing results.
Light items (plastic bowls etc.) should be loaded in the
upper basket and arranged so that they do not move
during washing.
Operating your dishwasher economically
and with regard for the environment
Do not prewash dishes under running water.
Place dishes in the machine immediately after every
meal and wait until the dishwasher is full before wash-
ing.
If necessary run the Rinse and Hold programme (see
Programme Chart on the following pages), so that any
food scraps do not become caked on the dishes while
you are waiting to run the complete wash programme.
If you use the modern «compact» powders containing
enzymes, we recommend that you select the Econo-
my with prewash programme at 55°C in place of the
Normal 65°C with prewash programme.
Select an economic programme when the baskets are
not very full and/or when the dishes are not very
soiled, following the instructions given in the Pro-
gramme Chart.
Select an Economic Drying or No Drying.
Drying will obviously be less effective in this case.
You will improve drying results by leaving the dish-
washer door ajar for at least 15-30 minutes as soon
as the programme finishes.
If you find that drying results are acceptable even
without rinse aid, there is no need to use this product.
Dishwasher performance will not be affected.
Items not Suitable for Dishwashers
The following should not be washed in the dishwasher:
Cutlery or dishes with wooden or horn handles or
glued parts.
Handmade items, wooden objects, antiques or hand-
painted china.
Certain types of decoration can discolour when
washed in a dishwasher.
Crystal-ware and plastic objects, if not guaranteed
dishwasher-proof, should be washed by hand. You
are advised to place them in the upper basket and to
select a delicate programme.
Certain types of glass can also become opaque after
being washed several times in a dishwasher.
Silver cutlery tends to go black if mixed with steel cut-
lery. Place it in the cutlery basket separate from the
others.
Iron and cast iron objects can rust and stain other
items.
Aluminium tends to go black; copper, pewter and
brass tend to stain.
Caution: You are advised not to load very small
items which can fall through the baskets.
Note: When buying new dishes, ensure that they are
dishwasher-proof.
HELPFUL HINTS
PCL20GB
63
ENGLISH

PTP31GB
64
2 level
dessert
spoonfuls
(20 g)
1 heaped
dessert
spoonful
(15 g)
2 level
dessert
spoonfuls
(20 g)
1 level
dessert
spoonful
(10 g)
2
dessert
spoonfuls
(25 g)
1 level
dessert
spoonful
(10 g)
1level
dessert
spoonful
(10 g)
Half
dessert
spoon
(5 g)
Half
dessert
spoon
(5 g)
/
/
/
/
/
/
1 heaped
dessert
spoon
(15 g)
Programmes Type of
load
Quantity of food scraps
Type of food Required
pushbuttons in the dispenser
on the door on the
dispenser lid Programme
duration
in minutes
Energy
consumption
in kWh
Water
consumption
in litres
Cycle description
Cold prewash
Main wash up to 55°C
2 cold rinses
1 hot rinse up to 65°C
Hot air drying
Prewash up to 40°C
Main wash up to 45°C
1 cold rinse
1 hot rinse up to 55°C
Hot air drying
Prewash up to 50°C
Main wash up to 70°C
2 cold rinses
1 hot rinse up to 70°C
Hot air drying
Prewash up to 50°C
Main wash up to 65°C
2 cold rinses
1 hot rinse up to 65°C
Hot air drying
Main wash up to 55°C
2 cold rinses
1 hot rinse up to 65°C
Hot air drying
Main wash up to 55°C
1 cold rinse
1 hot rinse up to 55°C
Economy drying
1 hot rinse up to 70°C
Hot air drying
1 cold rinse (to avoid food scraps
from sticking to the crockery). The
control light «No Drying» will
automatically illuminate.
Recommended quantity of detergent *** Approximate consumption values **
Pots - Pans
Crockery
Heavily soiled, also dried up and/or containing
starch (i.e. pasta, rice, semolina, potatoes, egg,
sauces, roast).
Normally or heavily soiled, also dried up and/or
containing starch (i.e. pasta, rice, semolina,
potatoes, egg, sauces, roast).
Normally soiled, not dried on and
starchless(i.e. meat, cooked or uncooked
vegetables, milk, coffee, drinks).
If using compact detergents containing enzymes, select
this programme instead of the Normal 65°C programme.
Delicate china and glassware, not resistent to
high washing temperatures. Few scraps not
dried on and starchless (i.e. sliced ham,
cheese).
Lightly soiled, not dried on and starchless (i.e.
drinks, cakes and pastry, salad, sliced ham,
cheese).
This is a programme designed both to heat plates before
serving or remove dust from dishes which have not been used
for a long time.
Lightly soiled, not dried on and starchless (i.e.
drinks, cakes and pastry, salad, sliced ham,
cheese).
Partial load to be completed later.
This programme does not require any detergent.
Crockery,
cutlery
Crockery,
cutlery,
or delicate
crockery
Dishes and
glasses
with delicate
decorations
1. Intensive
70°
2. Normal
65°
3. Economy
with prewash
55°
4. Economy
no prewash
55°
5. Delicates
45°
* 6. Quick wash
55°
8. Rinse & Hold
7. Plate warmer
70°C
Washing programmes
Testing programme according to IEC 436/DIN44990.
Programme 2 with detergent type A and programme 3 with detergent type B;
Standard place settings: 12;
Recommended quantity of detergent: 20 g in the dispenser
10 g over the dispenser lid
*This is a special programme for quick washing (approx.42 minutes) a full load of lightly soiled dishes, glasses and crockery (except pots) so that you
may re-use them promptly. Due to the shortness of this programme, Economy Drying is automatically selected by the dishwasher.
** These specifications are indicative values and depend on the pressure and temperature of the water, and also on voltage modification.
*** If you select washing in one basket only (HALF LOAD button), reduce the quantity of detergent by about one third and pour all detergent into the
dispenser.
1,8 22
80
1,3 17
75
1,2 17
80
1,2 15
75
0,9 15
55
0,9 13
42
0,9 5
28
0,1 4
10
ENGLISH

Operating Sequence
1 Check that the filters are clean
(see cleaning instructions)
2 Press the On/Off button
to turn the dishwasher on
The pilot light will illuminate.
3 Check that there is salt and rinse aid
If not the control lights Salt and Rinse Aid on
the control panel will flash.
4 Load the dishes
Remove larger scraps of food.
Pull the lower basket out and arrange the saucepans,
plates and cutlery in it.
Pull the upper basket out and arrange the plates,
saucers, glasses and cups etc. in it.
Slide the baskets back into the machine.
Ensure that the spray arms can rotate freely.
5 Measure out detergent
Pour the required amount of detergent according to
the indications in the Washing Programmes chart.
Close the dishwasher door
6 Set the programme
Push the Programme Selec-
tor Dial in to make it pop out.
Then turn it clockwise until
the marker on the knob
corresponds with the pro-
gramme you wish to select.
The number corresponding
to the programme selected
will appear on the display.
You may also select:
- Washing in a single basket, by pressing the «HALF
LOAD» button. The pilot light corresponding to the
basket selected will come on.
Remember to load dishes into this basket only.
- ECONOMY DRYING or NO DRYING by
pressing the «DRYING» pushbutton . The light
corresponding to the option selected will come on.
- DELAYED START by repeatedly pressing the
relevant pushbutton to set the required time delay.
7 Start the dishwasher up
Open the water tap.
Press the start button ; the programme begins.
The symbol corresponding to the programme phase
under way on the Programme Sequence Indicator illu-
minates.
The display shows the approximate duration of the
programme in minutes and, as it proceeds, how long
there is to go to the end of the programme.
If delayed starting has been selected, the dishwasher
starts to count down and the display indicates, in
hours, how much longer there is to go before the pro-
gramme starts.
The «H» on the display flashes to indicate that the de-
lay function is active.
Once the set time has elapsed, the programme will
start automatically.
If you wish to interrupt the wash at any time press the
On/Off button .
To restart the machine, depress the same button
again and the programme will continue from the point
where it was interrupted; the programme duration
may increase by a few minutes, depending on which
programme was in progress.
8 At the end of the programme
The machine stops automatically, will appear on
the display and all the lights of the Programme Phase
Indicator are switched off. The pilot light will remain on
until On/Off button is depressed.
Turn off the water tap.
Open the door and wait a few minutes before remov-
ing the dishes; in this way you will avoid burning your
fingers and drying will be improved.
Empty the lower basket first and then the upper one;
this will avoid water dripping from the upper basket
onto the dishes in the lower one.
Caution: In general it is not advisable to open the
door while the machine is working; if the door is
opened however, a safety device ensures that the
machine stops.
If you have to open the door while the machine is
working, always switch off the appliance first by press-
ing the On/Off button.
9 Cancel the wash programme
To cancel a wash programme in progress or to reset
the dishwasher if a wrong one has been selected, turn
the programme selector dial to the STOP position.
Two bars will appear on the display and all the
lights of the Programme Sequence Indicator illumi-
nate, indicating that the previous setting has been
cancelled. You can now select another programme.
PSO26GB
65
STOP
8
7
6
54
3
2
1
SO132
ENGLISH

Cleaning the Central Filter
(After each wash)
Scraps of food can sometimes accumulate in the cen-
tral filter (A) and should be periodically removed by
rinsing the filter under running water.
To remove the filter, simply
pull it outward by the handle.
Once cleaned, refit the filter by pushing it back to
its original position until it engages.
Cleaning the Large Filter
(Every two months)
If necessary clean the large filter (B) on both sides
under running water, using a brush.
To take it out remove the
spray arm by pulling it up-
ward on one side, turn the
column (C) anticlockwise by
90° and then slide out the
filter.
Once cleaned refit it follow-
ing the above instructions in
reverse order.
Ensure the filter is in its original position, the handle of
filter (A) should be pointing towards the front of the
appliance.
Caution: the dishwasher must not be used
without filters.
Incorrect repositioning of the filters will produce
poor washing results.
Cleaning of the filters is vital to ensure correct
operation of the machine.
Internal and External Cleaning
You must ensure that the seals around the door, the
detergent and rinse aid dispensers are cleaned
regularly with a damp cloth.
We recommend you carryout a maintenance wash
every 3 months, by running a 65° C wash programme
without dishes using detergent.Check that the spray
arm nozzles are not obstructed.
To remove the bottom spray arm, release it from its
securing catches and pull it out.
Clean the external surfaces of the machine and
control panel with a soft damp cloth. If necessary use
only neutral detergents. Never use abrasive products,
scouring pads or solvents (acetone, trichloroethylene
etc...).
Prolonged Periods of Non-Operation
If you are not using the machine for any period of time
you are advised to:
unplug the appliance and turn off the water;
fill the rinse aid dispenser;
leave the door ajar to prevent the formation of
unpleasant smells;
leave the inside of the machine clean.
Frost Precautions
Avoid placing the machine in a location where the
temperature is below 0°C.
If this is unavoidable, empty the machine, close the
water inlet tap, disconnect the water inlet pipe and
empty it.
Moving the Machine
If you have to move the machine (you are moving
house etc...):
unplug it;
turn off the water tap;
remove the water inlet and discharge hoses;
pull the machine out together with the hoses.
Caution: avoid over tilting the machine during
transport.
MAINTENANCE AND CLEANING
PMA13GB
66
A
MA04
C
90°
B
MA05
ENGLISH

The following flashing alarms appear on the display
(the machine does not start, or the machine stops
during operation).
ALARM A6
The machine does not drain water
■The drain hose is bent.
Straighten out the bend and press the Start button.
■The sink drain is blocked.
Clear the drain and press the Start button.
■The drain hose extension is not correct.
Follow the instructions for connecting to the waste
carefully and press the Start button.
■The wall drain has no vent-hole.
Consult a qualified technician, then press the Start
button.
ALARM A3
The dishwasher is stopped.
■The spray arms are not turning because they are
stopped by incorrectly loaded dishes.
Load the dishes correctly so that the spray arms
can rotate freely and press the Start button.
If the alarm reappears, call the Service Centre.
ALARMS A1 A2 A7
■General.
Press the Start button.
If the alarms persist, call the Service Centre.
The machine does not start or washing results are poor
The machine does not fill with water
■The warning light Closed tap is flashing.
■The water tap is off.
Turn the tap on and press the Start button.
■The water supply has been cut off.
Wait for it to be restored then press the Start button.
■The inlet hose is bent.
Straighten out the bend and press the Start button.
■The water inlet hose filter is clogged.
Clean the filter at the end of the inlet hose and
press the Start button.
■The filter is clogged.
Clean the filter and press the Start button.
The machine does not start
■The door has not been properly closed.
The warning light Opened Door is flashing
Close the door and press the Start button.
■The plug is not properly inserted in the power socket
Insert the plug into the socket.
■There is no current at the socket.
Check the fuse.
■The delayed start has been set.
Turn the programme selector dial to the Stop
position to reset the machine, then reselect the
programme and press the Start button.
The dishes are not clean (poor wash)
■The baskets are too full.
■The dishes have not been arranged properly.
■The spray arms do not rotate.
■The spray arm holes are clogged.
■The water inlet funnel in the centre of the upper
basket is covered by dishes.
■The end of the drain hose is submerged in waste
water (in the sink).
■The filters are clogged.
Clean the central filter as indicated on Maintenance
and Cleaning.
■The filters are not in position.
■Not enough detergent has been used or it is unsuit-
able.
SERVICING
PRA31GB
67
Certain problems are due to lack of simple maintenance and can be solved easily without having to call out an
engineer.
ENGLISH

PRA32GB
68
■The detergent is old or has gone hard.
■The washing programme selected is too gentle.
Visible lime deposits or white film on the dishes
■There is no salt or the softener has not been
adjusted to the hardness of the water.
■The rinse aid has run out or too little is being used.
The machine is noisy
■The dishes are rattling against each other.
■The spray arms are knocking against the dishes.
The dishes are not quite dry
■The dishes have been left too long inside the
machine.
The door is difficult to close
■The dishwasher is not level or is not properly built-in.
If, after the above checks, the fault persists, call your
nearest Service Centre, indicating the fault, the appli-
ance model (Mod.), the product number (Prod. No.)
and the serial number (Ser. No.). This information can
be found on the rating plate located on the right-
hand side of the dishwasher door (see picture).
Protection against flooding
In order to prevent water floods, the machine has
been provided with two additional devices, having the
following characteristics:
1. In the water inlet hose (see water connection): the
device comes into operation as a result of any
damage to the water inlet hose and stops the water
inflow. It functions even with the machine off.
2. In the bottom of the machine: the device comes
into operation as a result of any water leaks in the
machine and it functions only with the machine on.
To repair the machine, call the Service Centre.
Prod.No.
........
Ser. No.
.........
Mod.
........
RA01
ENGLISH

Building-in features
This dishwasher is designed to be fitted under a
kitchen counter or sink.
In either case, it is essential that the recess dimen-
sions indicated in the picture are followed.
No further openings for venting of the dishwasher are
required, but only to let the water inlet and drain
hoses and power supply cable pass through.
The recess height may be anywhere between 820
and 880 mm from the floor since the dishwasher in-
corporates levelling feet adjustable over a wide range
(max 60 mm).
Adjust the height of the appliance by turning these
feet.
A distance of 2 mm should be allowed between the
top of the dishwasher and the counter top.
Two pads are also supplied
to make sliding-in or sliding-
out of the appliance easier.
Fit the pads by pressing
them on the feet.
Fitting the vapour protecting strip
Screw the vapour protecting
strip onto the front part of
the worktop using four 3,5
x16 screws.
Fitting under a counter
(kitchen worktop or sink)
It is absolutely essential that the dishwasher is discon-
nected from the electricity supply before gaining access
to any internal component.
Fit the dishwasher into the appropriate housing space
and connect it. Make sure that the water fill and drain
hoses and the power supply cable are not bent or
kinked.
Fitting the panel to the door
The door which comes with this model is designed for the
overlay of a panel having the following dimensions:
Width: 596 mm
Height: 594 mm
Thickness: 20 mm max
Weight: 2 to 7.5 kg max
Note: The panel height should not be more than that
indicated, otherwise complete opening of the door will
no longer be possible as the panel hits against the
dishwasher plinth.
Furthermore, it is possible to fine up the control panel to
correspond with the height of the drawers of the
adjacent pieces of furniture, thus perfectly co-ordinating
with the style of the rest of the unit furniture in your
kitchen.
Add one or more of the
fillets provided until you
reach the desired height.
Secure the fillets as shown
in the picture, by means of
two screws 4,2 x 38 provid-
ed therewith.
Prepare the panel as follows:
Measure the distance (B)
between the part below the
control panel (or fillets) and
the reference notch (X) on
the door.
Measure the same distance
(B) on the wooden panel
starting from the upper edge.
At this distance position the supporting cross-bar provided,
in correspondence with the reference (Z). Keep the same
distance between the centre of the support's fastening
holes and the lateral edges of the wooden panel.
On the panel sign the seats for the four fastening
screws. Drill the panel with a Ø 2 x 12 bit and fix the
supporting cross-bar onto the wooden panel with the
3,5 x 16 screws provided.
Mount the decor panel by inserting the two pivots of
the cross-bar into the slotted holes of the door.
Lift the decor panel until the perfect alignment with the
facia panel is obtained.
BUILDING-IN
PII01GB
69
818÷878
600
820÷880
II31
596
555
575
max.
max.
0 ÷60mm
II07
II20
600 mm
600 mm
II25
II04
A
A
B
Z
X
==
550
B
2
1
II22
ENGLISH

PII10GB
70
Once the correct position
has been found, open the
door and fasten the decor
panel on the lower section
by means of the two long 4
x 40 screws provided, using
the holes through the inner
door (see fig.).
Securing under a counter
Open the door; vertically in-
sert the two mounting
brackets (A) on the front
part of the dishwasher and
turn them 90° (see fig.).
Secure the brackets to the
counter by means of two
3.5 x16 screws provided.
Important!
The dishwasher must be secured against tilting.
Therefore, make sure that the counter it is fitted un-
der, is suitably secured to a fixed structure (adjacent
kitchen cabinets, wall).
Attention!
When the dishwasher is secured to the kitchen
cabinets, do not drill any holes into the sides of
the machine.
Adjusting the door balance
The door of the dishwasher is balanced when it is
open in any position.
Fitting the decor panel
may sometimes affect this
balance. In this case it will
be necessary to adjust the
balance as follows:
Half-open the door and
regulate the screws located
on the kick plate.
By screwing or unscrewing these screws, the tension
of the door balancing springs is increased or
decreased respectively.
Attention!
The weight of the panel should be within the limits
given in the "dimensions of the panel", otherwise
balancing the door will not be possible.
Levelling
Make sure that the dishwasher door closes properly,
without rubbing on sides. Otherwise level the machine
by slightly screwing or unscrewing the two front feet
until perfect closure of the door is reached.
Kitchen plinth adjustment
To allow correct opening of
the door it is sometimes
necessary to cut the
kitchen plinth. Refer to the
cutting table below.
According to dimensions of
(a) and (b) as shown on
the figure, you will find on
the following table the
depth (x) of the cut to be
made on the plinth.
The dimensions (a) and (b) of the table are those
more frequently used in the kitchen furnitures.
12
A
90°
II18
A
II40
a
b
II15
II08
II10
170 160 150 140 130 120 110 100
136 131 125 118 110 100 93 85
135 131 125 118 110 102 92 85
137 132 125 118 110 102 94 85
138 134 128 120 110 104 95 85
139 130 124 115 105 98 88
138 129 120 110 100 90
135 125 115 105 95
/
/ /
/
40
50
60
70
80
90
100 / /
Height (a)*
Depth (b)*
X
X
600 mm
minimum
Dimensions of the
cut-out in plinth
(*) mm
ENGLISH


152996 43/0 0/0397
Total Chlorine free
FNL GBD
This manual suits for next models
4
Table of contents
Other JUNO Dishwasher manuals