manuals.online logo
Brands
  1. Home
  2. •
  3. Brands
  4. •
  5. Jupiter
  6. •
  7. Game
  8. •
  9. Jupiter Star 0102100 Instruction Manual

Jupiter Star 0102100 Instruction Manual

Assembly guidelines
Jupiter® Star
Football table
(PART# 0102100)
Remove packaging material till you see the condition like shown on the following picture:
Remove bubble protection till you have the following:
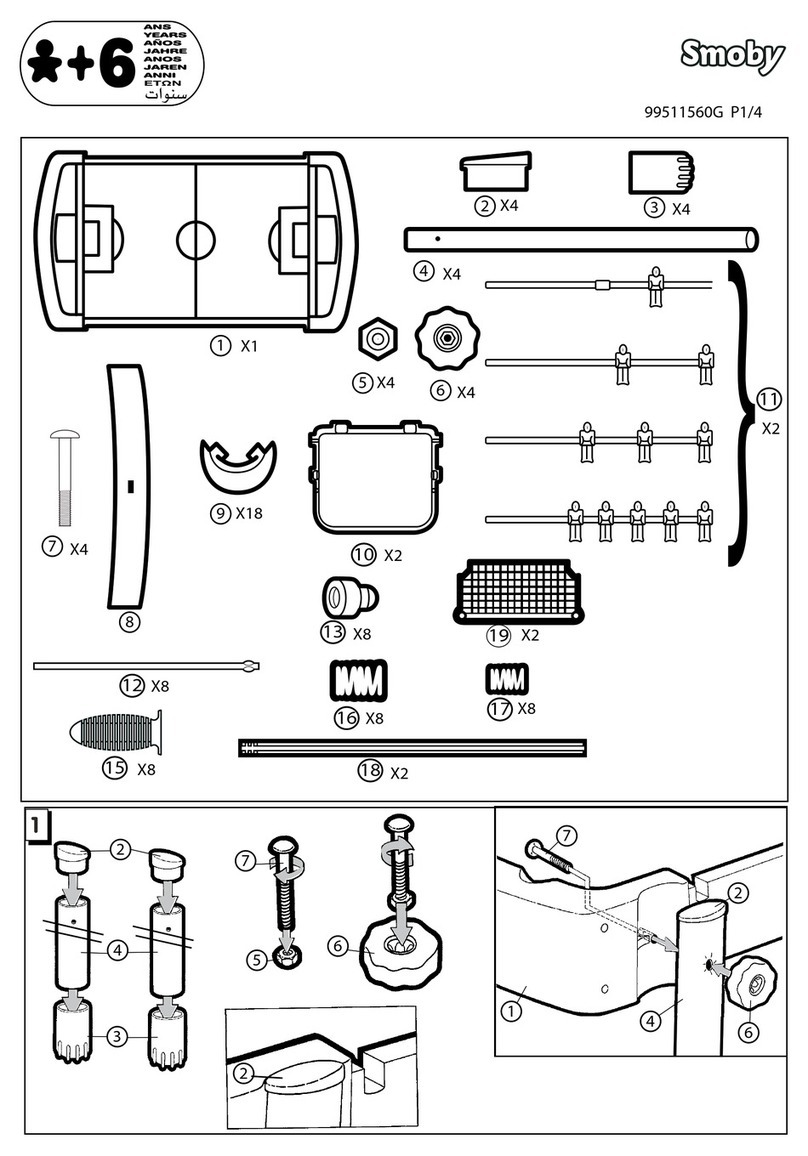
This package contains:
QTY
DESCRIPTION
QTY
PART#
DESCRIPTION
1
BODY OF FOOTBALL TABLE
2
0100359
NUMBER SET
2
LEG LEFT
2
0100105
ROD FOR NUMBERS
2
LEG RIGHT
2
0100111
MOUNTING BLOCK SET FOR NUMBERS
2
INTERCONNECTION PLATE FOR LEGS
8
0100117
MOUNTING SCREW COUNTER UNIT
16
ASSEMBLY SCREW FOR LEGS
2
0101125
2 PLAYER ROD
8
MOUNTING SCREW FOR LEGS
4
0101124
1/3 PLAYER ROD
2
0101123
5 PLAYER ROD
OPTIONAL (PART# 0101720)
8
0100163
END PLUG FOR ROD
1
LIGHTING SUPPORT WITH CABLE TIE HOLES
16
0100176
RUBBER
1
LIGHTING SUPPORT WITHOUT CABLE TIE HOLES
11
0100915
PLAYER DARK
1
LIGHTING FIXTURE
11
0100914
PLAYER LIGHT
4
0100422
STOPPER RING FOR GOALIE ROD
32
0100112
FIBRE
16
0100134
SPRING
8
0100348
HANDLE SET + MOUNTING SCREW
26
0101066
MOUNTING SET PLAYER/STOPPER RING
1
0101067
SUPER OIL
3
0100404
BALL
Tighten the 8 screws to assemble a left and right leg with the interconnection plate
Place the leg assembly into the body of the football table and fasten it with the 4 provided screws
Repeat this for the other leg assembly and turn the table over. Now you can insert the rods.
From left to right on this picture:
-3 player rod with handle hole on ‘TEAM 1’- side
-2 player rod with handle hole on ‘TEAM 1’- side
-3 player rod with handle hole on ‘TEAM 2’- side
-5 player rod with handle hole on ‘TEAM 1’- side
-5 player rod with handle hole on ‘TEAM 2’- side
-3 player rod with handle hole on ‘TEAM 1’- side
-2 player rod with handle hole on ‘TEAM 2’- side
-3 player rod with handle hole on ‘TEAM 2’- side
‘TEAM 2’- side
‘TEAM1’-side
Shift all the parts onto the rod without using the bolts!
Follow order parts on a goalie rod from left to right
-Fibre (flat side pointing outward)
-Spring (non clamping side of spring pointing to just placed fibre)
-Fibre (rounded side touching the spring)
-Rubber
-Stopper ring (flat side touching rubber)
-Player
-Stopper ring (rounded side pointing to the player)
-Rubber
-Fibre (flat side touching the rubber)
-Spring (clamping side pointing to previous placed fibre)
-Fibre (rounded side pointing to spring)
For other rods it’s the same except for placing more players and no
stopper rings!
Move parts over the corresponding holes and insert the bolts.
Place the washer on the backside and mount the nut. Hold the nut with a wrench (not supplied) and fasten the bolt.
Do this for each rod and each part.
Place handle and place ‘END PLUG’ on the opposite side.
Mount the score unit with the provided screws
Now your table should look like the following pictures:
Oil the rods like described in the maintenance instructions and you are ready to enjoy your Jupiter Star!

Popular Game manuals by other brands

Raw Thrills Winter X Games SnoCross Operator's manual

Raw Thrills

Raw Thrills Winter X Games SnoCross Operator's manual

Tiger Electronics Dear Diary SnapShot Organizer 71-555 instruction manual

Tiger Electronics

Tiger Electronics Dear Diary SnapShot Organizer 71-555 instruction manual

Hasbro Autobot Ratchet Allspark Blaster 6750370002 instructions

Hasbro

Hasbro Autobot Ratchet Allspark Blaster 6750370002 instructions

Radica Games KDC-U7056DAB instruction manual

Radica Games

Radica Games KDC-U7056DAB instruction manual

Hasbro Gaming Toilet Trouble C0447 instructions

Hasbro Gaming

Hasbro Gaming Toilet Trouble C0447 instructions

FAS SKY Assembly instructions

FAS

FAS SKY Assembly instructions

Hasbro The Incredible Crash Dummies 78-516 instruction manual

Hasbro

Hasbro The Incredible Crash Dummies 78-516 instruction manual

Hasbro ATTACKTIX 2 Series quick start guide

Hasbro

Hasbro ATTACKTIX 2 Series quick start guide

Tiger Electronics Pokemon Camera instruction manual

Tiger Electronics

Tiger Electronics Pokemon Camera instruction manual

Master Mikado MAS-B140 user manual

Master

Master Mikado MAS-B140 user manual

MUDPUPPY MY FIRST BINGO instructions

MUDPUPPY

MUDPUPPY MY FIRST BINGO instructions

Hasbro Star Wars Simon instruction manual

Hasbro

Hasbro Star Wars Simon instruction manual

Brunswick StringPin Service manual

Brunswick

Brunswick StringPin Service manual

Tiger Aladdin the Series Tower of Gold Adventure... manual

Tiger

Tiger Aladdin the Series Tower of Gold Adventure... manual

Jolly Roger INTERNATIONAL SPEEDWAY CAR CAROUSEL Handbook

Jolly Roger

Jolly Roger INTERNATIONAL SPEEDWAY CAR CAROUSEL Handbook

Hasbro Alarm Clock Game instruction manual

Hasbro

Hasbro Alarm Clock Game instruction manual

Rio Grande Games Bohnanza Princes and Pirates manual

Rio Grande Games

Rio Grande Games Bohnanza Princes and Pirates manual

Playcraft FairField Bull Run Assembly instructions

Playcraft

Playcraft FairField Bull Run Assembly instructions

manuals.online logo
manuals.online logoBrands
  • About & Mission
  • Contact us
  • Privacy Policy
  • Terms and Conditions

Copyright 2025 Manuals.Online. All Rights Reserved.