Archive/View Your Video (Windows)
Upload to YouTube™ (Windows) Everio MediaBrowser (Windows)
Playing Back Files (cont.)
Make a Disc or Tape Archive & Share Overview
USB Menu OperationsWorking with Apple
AVCHD DISC CREATION (Windows)
• Everio MediaBrowser makes it possible to create AVCHD discs to archive your
recordings in their original high definition quality.
• You can use any standard DVD-R, DVD-RW, DVD+R or DVD+RW disc.
• Recordings are recorded with no loss in quality.
• A standard 4.7 GB disc will hold approximately 35 minutes of video in the highest
quality setting.
• AVCHD discs can be played back in any Blu-ray
player that is AVCHD compatible. Just look for the
AVCHD logo.
Preparation:
• Install the software on your PC.
AClick on the “Create Disc” button.
BSelect the video clips you wish to include.
CChoose a menu background and enter a menu title.
DCreate the AVCHD disc.
• It is also possible to
record to a DVD or VHS
recorder. Please note
that this will create a
standard definition
recording with standard
definition picture quality.
Preparation:
• Use the supplied AV cable. The yellow connection is video. The white connection is left
channel audio. The red connection is right channel audio. Connect this cable to the AV
input on your DVD or VHS Recorder.
• Follow your DVD/VHS recorder instructions to copy (dub) the video.
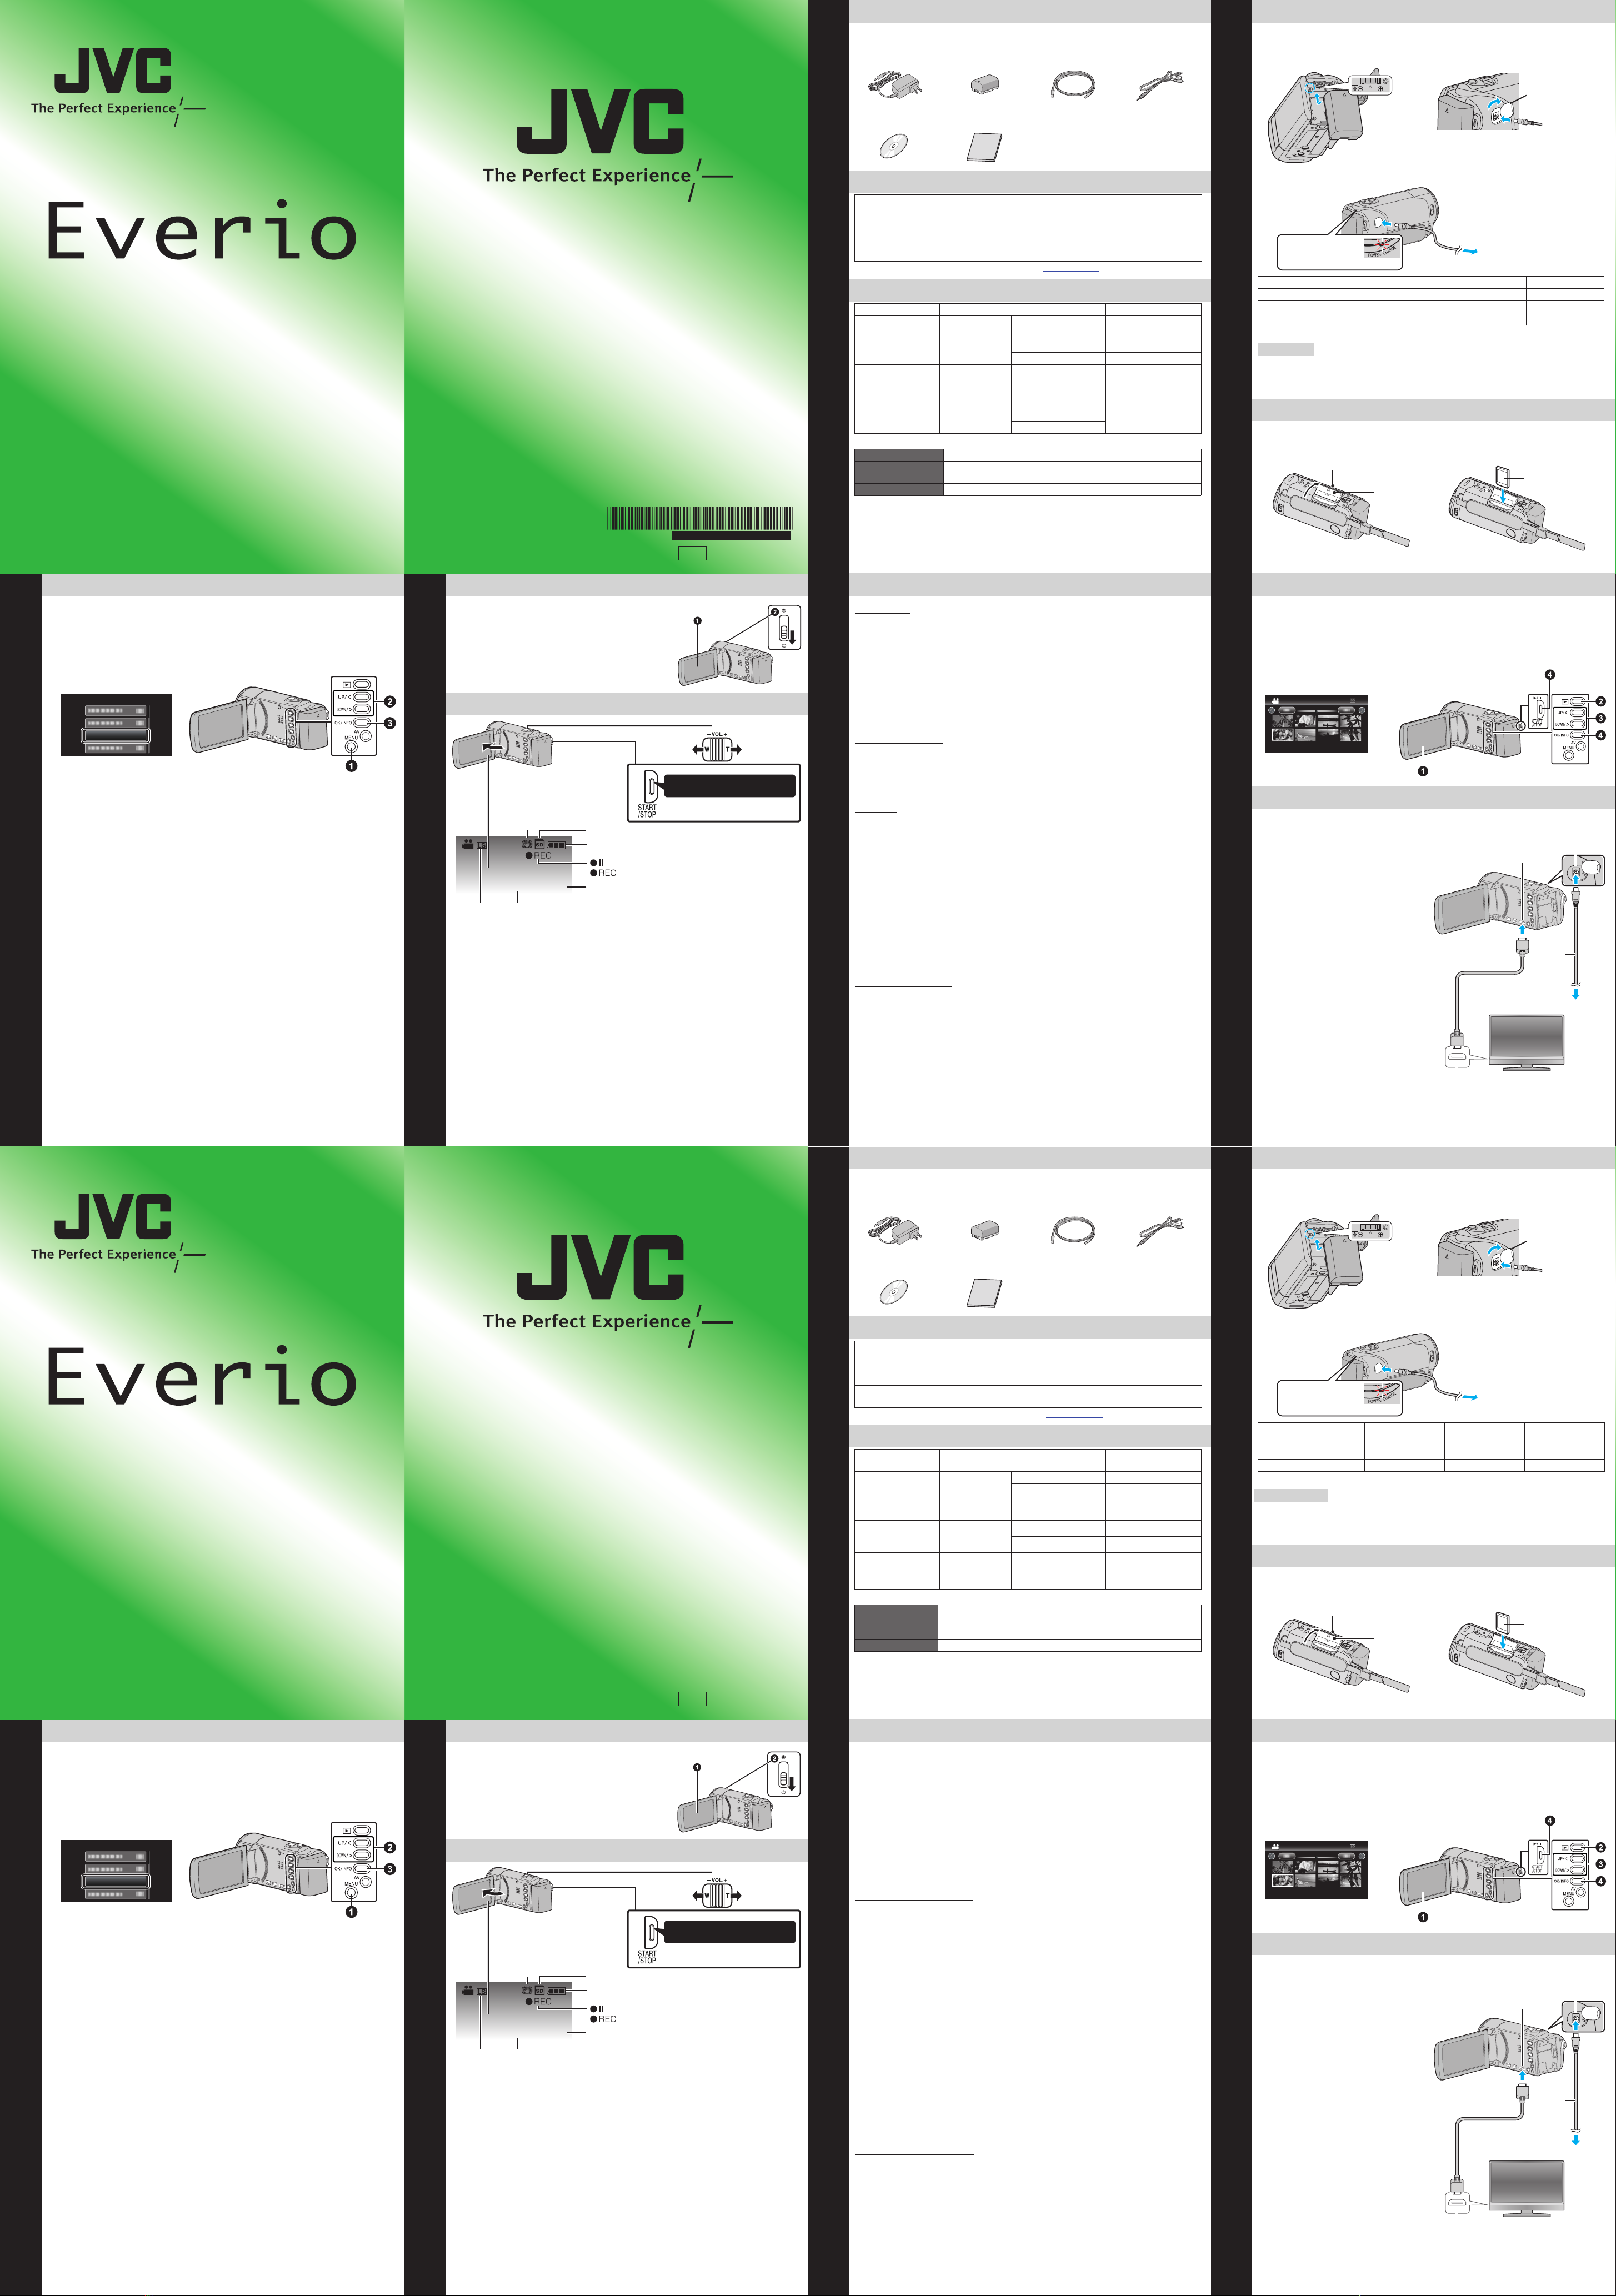
RECORD TO A DVD OR VHS RECORDER
To AV Connector
To DC Connector
AC Adapter
To AC Outlet
(110 V to 240 V) DVD/VHS Recorder
AV Cable (Provided)
Video Input
Video Input
Audio Input (L)
Audio Input (R)
Yell ow
White
Red
PLAYBACK ON A TV (CONT.)
Preparation:
• Turn off both camera and TV.
䡲To connect using the COMPONENT/AV connector
• Change the settings in [COMPONENT OUTPUT]/[VIDEO OUTPUT] according to
the connection.
䡲Playback Operation
After the connection with TV is completed
ATurn on the camera and the TV.
BSelect the TV input switch.
CStart playback on the camera.
AV Y
CB/PB
COMPONENT
CR/PR
Component Video Input
Video Input
Video Input
Audio Input (L)
Audio Input (R)
TV
To DC Connector
To COMPONENT Connector
Component Cable
(Optional)
To AV
Connector
AV Cable (Provided)
Do not connect the yellow plug
when using component cable.
Green
Blue
Red
Yell ow
White
Red
KEEP IT HIGH DEFINITION (Windows)
Back up to a computer
The provided JVC software also makes it easy to copy your videos to a computer.
For customers with a Blu-ray Player:
The provided JVC software lets you create high definition AVCHD discs using standard
blank DVD-R media, and your Windows PC with DVD Burner.
An AVCHD disc is a great choice because it contains the original HD video, which can be
stored on inexpensive blank DVD-R media.
These discs can be played back in virtually any recent Blu-ray player that has the AVCHD
logo.
It’s easy to connect a JVC HD Everio to a traditional DVD Recorder or VHS Recorder.
YouTube™ is a great way to share your videos, in either HD or SD quality. JVC makes it
easy.
JVC HD Everio camcorders also work great with Apple. There are a few things to check
for best results.
Each of these solutions is explained in detail in the
following sections.
MAKE A DVD OR VHS (NO PC REQUIRED!)
UPLOAD TO YouTube™
WORKING WITH Apple
INSTALL Everio MediaBrowser (Windows)
Everio MediaBrowser is included with your camcorder. It lets you archive and organize
your videos. It also lets you create discs and upload video to YouTube™, and other
popular web sites.
Preparation:
• Load the provided CD-ROM into the PC.
• In Windows Vista, the auto play dialog box appears.
AClick [Everio MediaBrowser 3].
• Follow the on-screen instructions.
BClick [Next].
CClick [Finish].
• Everio MediaBrowser icons are created on the desktop.
• Everio MediaBrowser uses a
Calendar based interface that
makes it easy to find any video
you have recorded by selecting
the appropriate date.
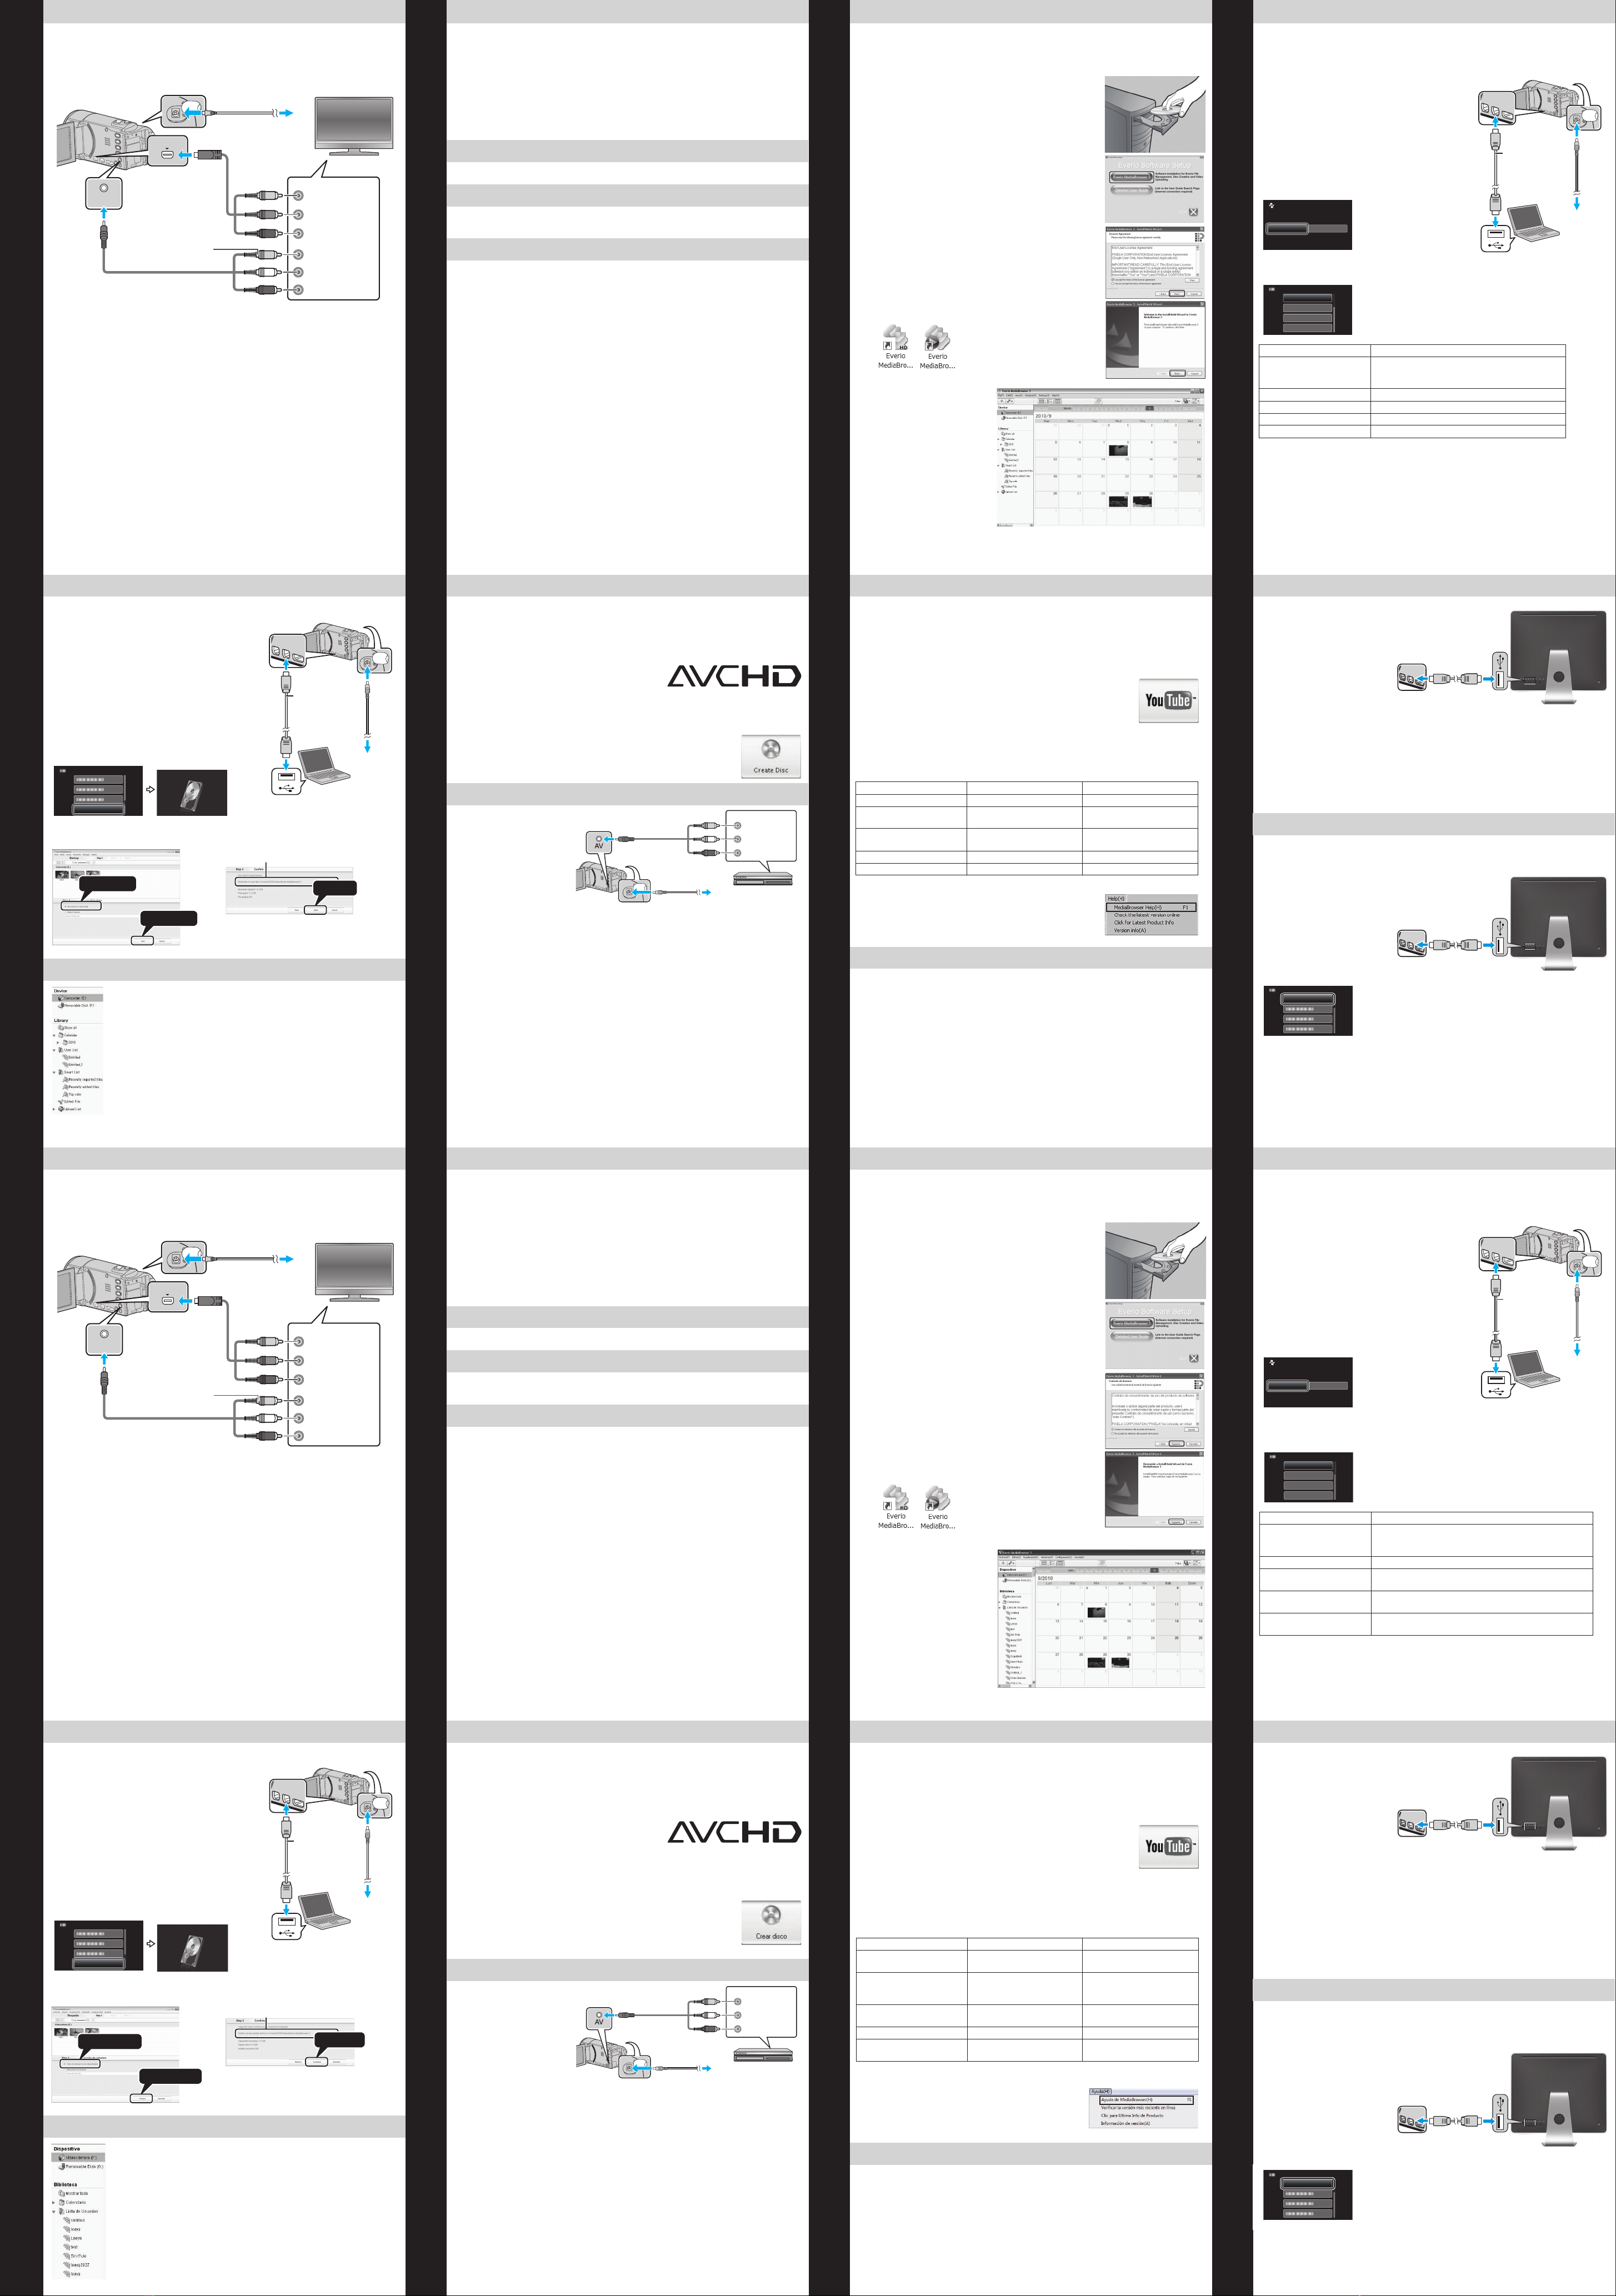
USB MENU OPERATIONS
By connecting a USB cable between this unit and your computer, you can perform
operations such as file backups to PC/disc or file uploads to file-sharing site using your
computer.
Preparation:
• Install the Everio MediaBrowser software onto the
PC.
• Close the LCD monitor to turn off the camera.
Disconnect the power supply.
AOpen the LCD monitor to connect to the PC with
the USB cable.
• Reconnect the power supply to turn on the camera.
BThe [SELECT DEVICE] menu appears. Select
[CONNECT TO PC] and press OK.
• Select [CONNECT TO OTHER] if the camera is
connected to a device other than a computer.
CThe [CONNECT TO PC] menu appears. Select an
option that best suits your needs and press OK.
For detailed operations on the above options, refer to the other sections in this guide or
the “Detailed User Guide”.
Option Usage
PLAYBACK ON PC • To play back your recordings on the PC.
• To back up your recordings on the PC without
using the provided software.
CREATE DISC • To save your recordings on a disc.
DIRECT DISC • To save all unsaved recordings on a disc.
UPLOAD • To upload videos to file-sharing sites.
BACK UP • To back up recordings on the PC.
To USB Connector
To DC Connector
AC Adapter
To AC Outlet
(110V to 240V
To USB Connector
USB Cable
(Provided)
To USB Connector
CONNECT TO PC
SELECT DEVICE
SELECT DEVICE
TYPE TO CONNECT
CONNECT TO OTHER
PLAYBACK ON PC
CREATE DISC
DIRECT DISC
UPLOAD
CONNECT TO PC
HOW TO UPLOAD A FILE (VIDEO CLIP) TO YouTube™ (Windows)
Uploading Videos
You can upload your videos to YouTube™ using the provided software “Everio
MediaBrowser”.
Preparation:
• Install the software on your PC.
AClick on the “YouTube™” button.
BSelect the video clips you wish to include.
CEnter account and upload information.
DStart upload to YouTube™.
Trouble with Uploading Videos
• Check if you have created an account with YouTube™.
Trouble with Using the Provided Software Everio MediaBrowser
Consult the customer service center below.
• Pixela User Support Center
For details on how to upload to YouTube™, refer to “MediaBrowser Help”.
• Windows® is either registered trademark or trademark of Microsoft Corporation in the
United States and/or other countries.
• Macintosh is a registered trademark of Apple Inc.
• iMovie is a trademark of Apple Inc., registered in the U.S. and other countries.
• YouTube and the YouTube logo are trademarks and/or registered trademarks of
YouTube LLC.
Region Language Phone #
USA and Canada English +1-800-458-4029 (toll-free)
Europe (UK, Germany,
France, and Spain) English/German/ French/
Spanish +800-1532-4865 (toll-free)
Other Countries in Europe English/German/ French/
Spanish +44-1489-564-764
Asia (Philippines) English +63-2-438-0090
China Chinese 10800-163-0014 (toll-free)
TRADEMARK
WORKING WITH iMovie
• You may use the software
supplied with the Mac
Computer to view and edit files
from the Everio Camera.
• Connect the Everio Camera to
the Mac Computer using a
USB Cable.
Note:
Files must be transferred to the
Mac Computer for editing.
iMovie
You can import files from this unit to a computer using Apple’s iMovie ‘08, ‘09, ‘11. To
verify the system requirements, select “About This Mac” from the Apple menu. You can
determine the operating system version, processor and amount of memory.
Note:
• For the latest information on iMovie, refer to the Apple website.
• For details on how to use iMovie, refer to the help file of the software.
• There is no guarantee that the operations will work with all computer environments.
Preparation:
• Make sure that enough space is left in the Mac’s HDD.
• Close the LCD monitor to turn off the camera. Disconnect the power supply.
AOpen the LCD monitor to
connect to the computer with
the USB cable.
• Reconnect the power supply
to turn on the camera.
On the camera:
BSelect [CONNECT TO PC]
and press OK.
CSelect [PLAYBACK ON PC]
and press OK.
DCopy and paste the files to the Mac Computer for backup.
To USB Connector
To USB port
SIMPLE FILE BACKUP WITH A Mac
To USB port
To USB Connector
PLAYBACK ON PC
CONNECT TO PC
FILE BACKUP (Windows)
Preparation:
• Install the Everio MediaBrowser software onto the
PC.
• Make sure that enough space is left in the PC’s
HDD.
• Close the LCD monitor to turn off the camera.
Disconnect the power supply.
AOpen the LCD monitor to connect to the PC with
the USB cable.
• Reconnect the power supply to turn on the camera.
On the camera:
BSelect [CONNECT TO PC] and press OK.
CSelect [BACK UP] and press OK.
Everio MediaBrowser starts on the PC.
On the PC:
DSelect the volume. EStart backup.
• To view video that is still on your camcorder, click on
Device>Camcorder in the left side panel of Everio MediaBrowser.
• To view video that has already been archived to the computer, click on
Library>Calendar and then choose the date the video was recorded.
Note:
Choose Settings/Preferences to see the folder where MediaBrowser
stores your videos. You can also play back your videos from this folder in
most popular media players.
To USB Connector
To DC Connector
AC Adapter
To AC Outlet
(110V to 240V
Cargar en YouTube™ (Windows) Everio MediaBrowser (Windows)
Archivar/ver su video (Windows) Reproducción de archivos (cont.)
Crear un disco o una cinta
Descripción general de archivar & compartir
Operaciones del menú USBTrabajar con Apple
CREACIÓN DE DISCO AVCHD (Windows)
• Everio MediaBrowser hace posible la creación de discos AVCHD para archivar sus
grabaciones en su alta definición original.
• Usted puede utilizar cualquier disco estándar de DVD-R, DVD-RW, DVD+R o
DVD+RW.
• Las grabaciones se graban sin pérdida de calidad.
• Un disco estándar de 4,7 GB tendrá aproximadamente 35 minutos de video en la
calidad más alta.
• Los discos AVCHD pueden reproducirse en
cualquier reproductor de Blu-ray que sea
compatible con AVCHD. Sólo busque el logo de
AVCHD.
Preparativos:
• Instale el software en su PC.
AHaga clic en el botón “Crear disco”.
BSeleccione los clips de video que desea incluir.
CSeleccione un fondo de menú e ingrese un título de
menú.
DCree un disco de AVCHD.
• También es posible
grabar a una grabadora
de DVD o VHS. Tenga
en cuenta que esto
creará una grabación de
definición estándar con
calidad de imagen en
definición estándar.
Preparativos:
• Utilice el cable AV proporcionado. La conexión amarilla es el video. La conexión blanca
es el canal izquierdo de audio. La conexión roja es el canal derecho de audio. Conecte
este cable a la entrada AV de su grabadora de DVD o VHS.
• Siga las instrucciones de su grabadora de DVD/VHS para copiar el video.
GRABAR A UNA GRABADORA DE DVD O VHS
A conector AV
A conector de CC
Adaptador de CA
A salida de CA
(110 V a 240 V)
Grabadora de DVD/VHS
Cable AV
(proporcionado)
Entrada de vídeo
Entrada de vídeo
Entrada de audio (L)
Entrada de audio (R)
Amarillo
Blanco
Rojo
REPRODUCCIÓN EN UN TELEVISOR (CONT.)
Preparativos:
• Apague la cámara y el televisor.
䡲Para conectar la unidad utilizando el conector COMPONENT/AV
• Cambie los ajustes a [SALIDA COMPONENTES]/[SALIDA DE VÍDEO] según la
conexión.
䡲Operación de reproducción
Luego de que la conexión a la televisión se haya completado
AEncienda la cámara y el televisor.
BSeleccione el interruptor de entrada del televisor.
CInicie la reproducción en la cámara.
AV Y
CB/PB
COMPONENT
CR/PR
Entrada de vídeo componente
Entrada de vídeo
Entrada de vídeo
Entrada de audio (L)
Entrada de audio (R)
TV
A conector de CC
A Conector COMPONENT
Cable componente
(Opcional)
A conector
AV
Cable AV
No conecte el enchufe
amarillo cuando utiliza un
cable componente.
Verde
Azul
Rojo
Amarillo
Blanco
Rojo
MANTENER EN ALTA DEFINICIÓN (Windows)
Realice una copia de seguridad en la computadora
El software JVC proporcionado también hace más sencilla la copia de sus videos a una
computadora.
Para clientes con reproductor de Blu-ray:
El software JVC proporcionado le permite crear discos AVCHD de alta definición
utilizando medios estándar de DVD-R en blanco, y su PC con Windows y grabadora de
DVD.
Un disco AVCHD es una gran elección porque contiene el video original en HD, el cual
puede ser almacenado en económicos medios de DVD-R.
Estos discos pueden reproducirse en casi cualquier reproductor de Blu-ray que incluya el
logo de AVCHD.
Es sencillo conectar un JVC HD Everio a una grabadora de DVD o de VHS tradicional.
YouTube™ es una forma grandiosa de compartir videos, ya sea en calidad HD o SD. JVC
hace que sea sencillo.
Las videocámaras de JVC HD Everio también funcionan muy bien con Apple. Sólo hay
unos pequeños detalles para obtener mejores resultados.
Cada una de estas soluciones son explicadas en detalles
en las siguientes secciones.
CREAR UN DVD O UN VHS (¡NO SE REQUIERE PC!)
CARGAR A YouTube™
TRABAJAR CON Apple
INSTALAR Everio MediaBrowser (Windows)
Everio MediaBrowser se incluye con su videocámara. Le permite archivar y organizar sus
videos. También le permite crear discos y cargar videos en YouTube™, y otros sitios Web
populares.
Preparativos:
• Introduzca el CD-ROM suministrado en el PC.
• En Windows Vista aparece el cuadro de diálogo de
reproducción automática.
AHaga clic en [Everio MediaBrowser 3].
• Siga las instrucciones que aparecen en pantalla.
BHaga clic en [Siguiente].
CHaga clic en [Finalizar].
• Los íconos de Everio MediaBrowser aparecerán creados
en su escritorio.
• Everio MediaBrowser utiliza
una interfaz basada en un
calendario que facilita
encontrar cualquier video que
usted haya grabado al
seleccionar la fecha
correspondiente.
OPERACIONES DEL MENÚ USB
Al conectar un cable USB entre esta unidad y su computadora, usted podrá realizar
operaciones tales como copias de seguridad de archivos a una PC/disco o cargas de
archivos a sitios de intercambio de archivos utilizando su computadora.
Preparativos:
• Instale el software Everio MediaBrowser en el PC.
• Cierre la pantalla LCD para apagar la cámara.
Desconecte la fuente de alimentación eléctrica.
AAbra el monitor LCD para conectar a la PC con el
cable USB.
• Vuelva a conectar la fuente alimentación eléctrica
para encender la cámara.
BAparece el menú [SELECCIONAR DISPOSITIVO].
Seleccione [CONECTAR A PC] y presione OK.
• Seleccione [CONECTAR A OTROS] si la cámara
está conectada a un dispositivo que no sea una
computadora.
CAparece el menú [CONECTAR A PC]. Seleccione
la opción que mejor se ajuste a sus necesidades y
presione OK.
Para operaciones detalladas sobre las opciones mencionadas anteriormente, consulte
las demás secciones de esta guía o la “Guía detallada del usuario”.
Opción Uso
REPRODUCIR EN PC • Para reproducir sus grabaciones en una PC.
• Para hacer una copia de seguridad de sus
grabaciones en su PC sin utilizar el software provisto.
CREAR DISCO • Para guardar sus grabaciones en un disco.
DISCO DIRECTO • Para guardar todas las grabaciones no guardadas en
un disco.
CARGAR • Para cargar videos en sitios de intercambio de
archivos.
HACER COPIA DE
SEGURIDAD • Para hacer copias de seguridad de sus grabaciones
en una PC.
A conector USB
A conector de CC
Adaptador de CA
A salida de CA
(110 V a 240 V)
A conector USB
Cable USB
(proporcionado)
A conector USB
CONECTAR A PC
SELECCIONAR DISPOSITIVO
SELECCIONAR TIPO DE
DISPOSITIVO PARA CONECTAR
CONECTAR A OTROS
REPRODUCIR EN PC
CREAR DISCO
DISCO DIRECTO
CARGAR
CONECTAR A PC
CÓMO CARGAR UN ARCHIVO (CLIP DE VIDEO) A YouTube™ (Windows)
Carga de vídeos
Puede cargar vídeos en YouTube™ utilizando el software proporcionado “Everio
MediaBrowser”.
Preparativos:
• Instale el software en su PC.
AHaga clic en el botón “YouTube™”.
BSeleccione los clips de video que desea incluir.
CIngrese a su cuenta de YouTube™ y luego cargue la
información.
DComience a cargar en YouTube™.
Problemas con la carga de vídeos
• Compruebe si ha creado una cuenta con YouTube™.
Problemas con el uso del software proporcionado Everio MediaBrowser
Consulte con el centro de servicio al cliente a continuación.
• Centro de soporte al usuario de Pixela
Para obtener detalles sobre cómo realizar cargas a YouTube™, consulte “Ayuda de
MediaBrowser”.
• Windows® es una marca registrada o una marca comercial de Microsoft Corporation
en los Estados Unidos y/o en otros países.
• Macintosh es una marca registrada de Apple Inc.
• iMovie es marca comercial de Apple Inc., registradas en los EE.UU. y otros países.
• YouTube y el logo de YouTube son marcas comerciales y/o marcas comerciales
registradas de YouTube LLC.
Región Idioma Número de teléfono
EE.UU. y Canadá Inglés +1-800-458-4029
(línea gratuita)
Europa (Reino Unido,
Alemania, Francia y
España)
Inglés/alemán/francés/
español +800-1532-4865
(línea gratuita)
Otros países de Europa Inglés/alemán/francés/
español +44-1489-564-764
Asia (Filipinas) Inglés +63-2-438-0090
China Chino 10800-163-0014
(línea gratuita)
MARCA COMERCIAL
TRABAJAR CON iMovie
• Es posible utilizar el software
suministrado con el PC Mac
para ver y editar archivos
desde la cámara Everio.
• Conecte la cámara Everio al
PC Mac utilizando un cable
USB.
Nota:
Los archivos se deben transferir
al PC Mac para su edición.
iMovie
Usted puede importar archivos desde esta unidad a una computadora utilizando iMovie
‘08, ‘09, ‘11 de Apple. Para corroborar los requisitos del sistema, seleccione “Acerca de
esta Mac” en el menú de Apple. Se puede determinar la versión del sistema operativo,
procesador y memoria.
Nota:
• Para obtener información actualizada sobre iMovie, consulte la página web de Apple.
• Para obtener más información sobre cómo utilizar iMovie, consulte el archivo de ayuda
del software.
• No hay garantía de que las operaciones funcionen en todos los entornos.
Preparativos:
• Asegúrese de que dispone de suficiente espacio libre en el disco duro de la Mac.
• Cierre la pantalla LCD para apagar la cámara. Desconecte la fuente de alimentación
eléctrica.
AAbra el monitor LCD para
conectar a la computadora
con el cable USB.
• Vuelva a conectar la fuente
alimentación eléctrica para
encender la cámara.
En la cámara:
BSeleccione [CONECTAR A
PC] y presione OK.
CSeleccione [REPRODUCIR
EN PC] y presione OK.
DCopie y pegue los archivos a cualquier carpeta del PC Mac para copia de seguridad.
A conector USB
Al puerto USB
COPIA DE SEGURIDAD SIMPLE CON UNA Mac
Al puerto USB
A conector USB
.
REPRODUCIR EN PC
CONECTAR A PC
COPIA DE SEGURIDAD DE ARCHIVOS (Windows)
Preparativos:
• Instale el software Everio MediaBrowser en el PC.
• Asegúrese de que dispone de suficiente espacio
libre en el disco duro de la PC.
• Cierre la pantalla LCD para apagar la cámara.
Desconecte la fuente de alimentación eléctrica.
AAbra el monitor LCD para conectar a la PC con el
cable USB.
• Vuelva a conectar la fuente alimentación eléctrica
para encender la cámara.
En la cámara:
BSeleccione [CONECTAR A PC] y presione OK.
C
Seleccione [HACER COPIA DE SEGURIDAD] y
presione OK.
El programa Everio MediaBrowser se inicia en el PC.
En la PC:
DSeleccione el volumen. EInicie la copia de seguridad.
• Para ver un video que aún se encuentra en su videocámara, haga clic
en Dispositivo>Videocámara en el panel izquierdo de Everio
MediaBrowser.
• Para ver un archivo que ya ha sido archivado en la computadora, haga
clic en Biblioteca>Calendario y luego seleccione la fecha en la que el
video fue grabado.
Nota:
Seleccione Configuración(S)/Preferencias (S) para ver la carpeta donde
MediaBrowser almacena sus videos. También puede reproducir sus
videos desde esta carpeta en los reproductores más populares.
A conector USB
A conector de CC
Adaptador de CA
A salida de CA
(110 V a 240 V)
A conector USB
Cable USB
(proporcionado)
A conector USB
HACER COPIA DE SEGURIDAD
HACER COPIA DE SEGURIDAD
CONECTAR A PC
2
1
Haga clic
Haga clic Haga clic
Destino de almacenamiento (PC)
VEA SU VIDEO (Windows)