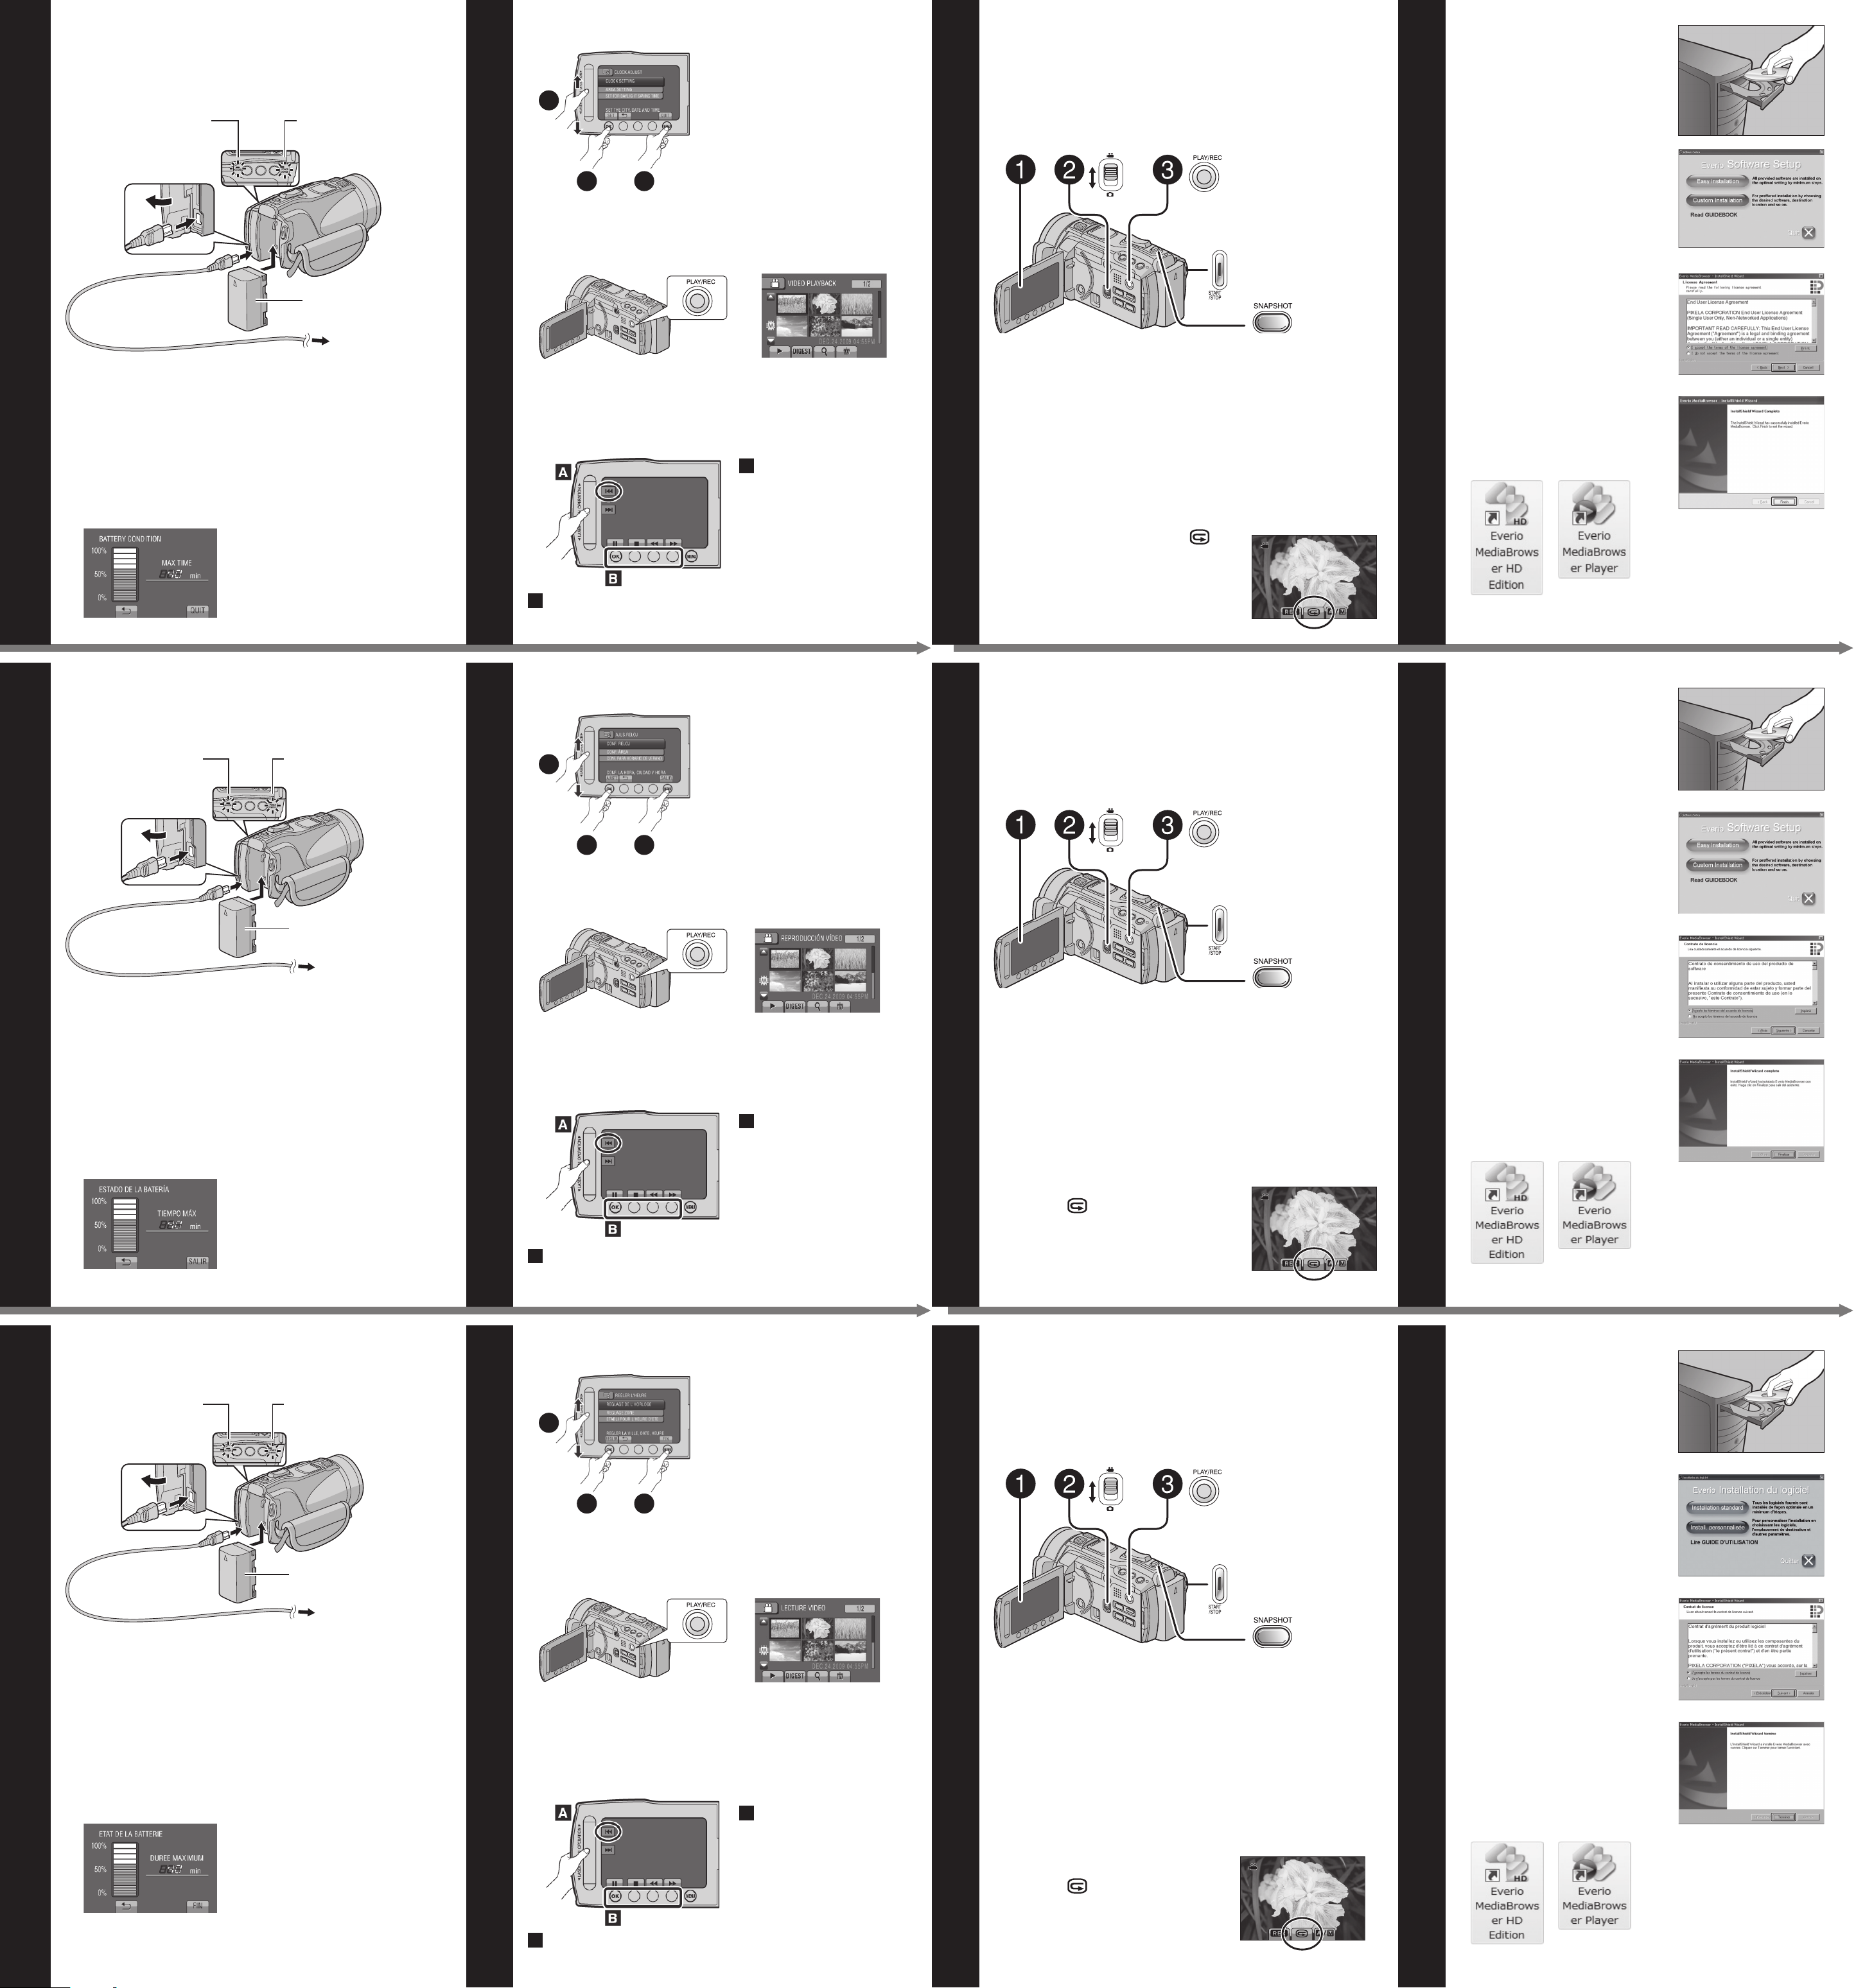
QCierre la pantalla LCD para apagar la videocámara.
RInstale la batería y conecte el adaptador de CA.
•
La batería
(BN-VF815U)
tardará 160 minutos en cargarse
por completo.
•La luz de alimentación/carga parpadea y la carga
empieza. La luz de alimentación/carga se apaga
cuando la batería está completamente cargada.
Carga de la Batería
Cómo Utilizar el Sensor Táctil
LCómo cambiar los ajustes
LUso de los botones en pantalla
APara seleccionar un
botón en pantalla que
aparezca en el lado
izquierdo, toque la
parte del sensor que
se encuentre junto al
botón en pantalla.
BPara seleccionar un botón en pantalla que aparezca
en la parte inferior de la pantalla, toque el botón que
se encuentre debajo de él.
LCómo reproducir vídeos
QToque el botón MENU.
RDeslice un dedo hacia
arriba y hacia abajo
por el sensor táctil.
SToque el botón OK.
QPulse el botón PLAY/REC
para mostrar miniaturas
en la pantalla.
R
Resalte una miniatura
mediante el sensor láser
y toque el botón OK.
Preparativos:
•Inserte el CD-ROM
suministrado en el PC.
•En Windows Vista aparece
el cuadro de diálogo de
reproducción automática.
QHaga clic en
[Easy Installation].
Siga las instrucciones que
aparecen en pantalla.
RHaga clic en [Siguiente].
SHaga clic en [Finalizar].
•Se crea un icono de Everio
MediaBrowser HD edition
y un icono de Everio
MediaBrowser Player en el
escritorio.
Grabación de Archivos
Preparativos:
QAbra la pantalla LCD para encender la cámara.
RDeslice el interruptor de modo para seleccionar el
modo (vídeo o imagen fija).
SPulse el botón PLAY/REC para seleccionar el modo
de grabación.
El icono de cámara de
cine (!) representa la
grabación de vídeo.
El icono de cámara (#)
representa imágenes
fijas.
Instalación de Software en el PC
Modo vídeo (!)
Pulse INFO dos veces o pulse
INFO y seleccione ;.
Modo imagen fija (#)
Pulse INFO.
LComprobación de la carga restante de la batería
Luz de alimentación/carga
Batería
Adaptador de CA
A la toma de CA
(de 110 V a 240 V)
Abrir la cubierta
La videocámara se
suministra con la
batería descargada.
Luz de acceso
Modo vídeo (!)
Pulse el botón START/STOP para empezar o detener la
grabación.
•Es posible tomar fotografías durante la grabación de un
vídeo simplemente pulsando el botón SNAPSHOT.
Modo imagen fija (#)
Pulse el botón SNAPSHOT para tomar fotografías.
Para ver el vídeo o la imagen que acaba de grabar,
Pulse el botón QUICK
REVIEW ( ).
•Durante la vista preliminar se
puede eliminar el vídeo o
imagen pulsando el botón
DELETE ( $).
•
Los sensores no funcionan si los toca con la uña o con
guantes puestos.
QFermez l’écran LCD pour éteindre le caméscope.
RFixez la batterie, puis connectez l’adaptateur CA.
•
Il faut 160 minutes pour charger complètement la batterie
(BN-VF815U)
.
•
Le voyant d’alimentation/recharge clignote et la
recharge commence. Lorsque la batterie est entièrement
rechargée, le voyant d’alimentation/recharge s’éteint.
Charger la Batterie
Comment Utiliser le Capteur Tactile
LComment changer les réglages à l'aide
LUtilisation des boutons à l'écran
APour sélectionner une
touche apparaissant
sur le côté gauche
de l’écran, touchez
le capteur près de
bouton à l’écran.
BPour sélectionner une des touches apparaissant au
fond de l’écran, touchez son bouton correspondant.
LComment lire vos vidéos à l'aide
QTouchez la touche
MENU.
R
Faites glisser votre doigt
vers le haut et le bas sur
le capteur tactile.
STouchez la touche OK.
QAppuyez sur le bouton
PLAY/REC pour afficher
des miniatures sur
l'écran.
RSélectionnez les
miniatures à l'aide
du capteur
tactile
et
toucher le bouton OK.
Préparation:
•Insérez le CD-ROM fourni
dans le lecteur CD de
l’ordinateur.
•Sous Windows Vista, la
boîte de dialogue de lecture
automatique apparaît.
QCliquez sur
[Easy Installation].
Suivez les instructions sur
l’écran.
RCliquez sur [Suivant].
SCliquez sur [Terminer].
•L’icône Everio MediaBrowser
HD edition et l’icône Everio
MediaBrowser Player sont
créées sur le bureau.
Enregistrement de Fichiers
Préparation:
QOuvriz l'écran LCD pour allumer le caméscope.
RFaites glisser la commutateur de mode pour
sélectionner un mode (vidéo ou image fixe).
SAppuyez sur la touche PLAY/REC pour régler le
mode d'enregistrement.
L'icône de la caméra
(!) correspond à
l'enregistrement de vidéo.
L'icône de l'appareil
photo (#) correspond à
l'enregistrement d'images
fixes.
Installer le logiciel sur l’ordinateur
Mode vidéo (!)
Appuyez deux fois sur la
touche INFO ou appuyez
sur la touche INFO puis
sélectionnez ;.
Mode photo (#)
Appuyez sur la touche INFO.
LVérifier la charge restante de la batterie
Voyant de
alimentation/recharge
Batterie
Adaptateur secteur
Sur une prise secteur
(110 V à 240 V)
Ouvrez le volet de
protection
La batterie n’est
pas chargée lors de
l’achat.
Voyant d’accès
Mode vidéo (!)
Appuyez sur la touche START/STOP pour démarrer ou
arrêter l'enregistrement.
•Vous pouvez prendre des photos pendant
l’enregistrement vidéo en appuyant simplement sur la
touche SNAPSHOT.
Mode photo (#)
Appuyez sur la touche SNAPSHOT pour prendre des photos.
Pour afficher la vidéo ou l'image que vous venez
d'enregistrer,
Appuyez sur la touche QUICK
REVIEW ( ).
•Dans l’aperçu, vous pouvez
supprimer la vidéo ou
l’image en appuyant sur la
touche DELETE ( $).
•
Les capteurs ne fonctionnent pas si vous les touchez
avec un ongle ou avec des gants.
QClose the LCD monitor to turn off the camcorder.
RAttach the battery pack, then connect the AC adapter.
•The battery (BN-VF815U) will take 160 minutes to
completely charge.
•The power/charge lamp blinks and charging starts.
The power/charge lamp turns off when the battery is
fully charged.
Charging the Battery Pack
How to Use the Touch Sensor
LHow to change the MENU settings
LUsing on-screen buttons
ATo select an on-screen
button appearing on
the left side, touch the
portion of the sensor
next to the on-screen
button.
BTo select an on-screen button appearing at the
bottom of the screen, touch the buttons underneath
them.
LHow to play back your videos
QTouch the MENU
button.
RSlide your finger up
and down on the
Touch Sensor.
STouch the OK button.
Q
Press the PLAY/REC
button to display
thumbnails on the screen.
RHighlight thumbnail
using Touch Sensor
and touch OK button.
Preparation:
•Load the provided CD-ROM
into the PC.
•In Windows Vista, the auto
play dialog box appears.
QClick [Easy Installation].
Follow the on-screen
instructions.
RClick [Next].
SClick [Finish].
•Everio MediaBrowser HD
edition icon and Everio
MediaBrowser Player icon
are created on the desktop.
Recording Files
Preparation:
QOpen the LCD monitor to turn on the camcorder.
RSlide the mode switch to select (video or still image)
mode.
SPress the PLAY/REC button to set on recording
mode.
The video camera
icon (!) represents
recording video.
The camera icon (#)
represents recording
stills.
Installing the Software to the PC
Video (!) mode
Press the START/STOP button to start or stop recording.
•You can take pictures during video recording only by
pressing SNAPSHOT button.
Still image (#) mode
Press the SNAPSHOT button to take pictures.
To view the video or image you just recorded;
Press the QUICK REVIEW ( )
button.
•During the preview you can
delete the video or image by
pressing the DELETE ( $) button.
Video (!) mode
Press the INFO button twice
or the INFO button and then
select ;.
Still image (#) mode
Press the INFO button.
LChecking the remaining battery power
Power/Charge lamp
Battery Pack
AC Adapter
To AC Outlet
(110V to 240V)
Open the cover
The battery pack is
not charged at the
time of purchase.
Access lamp
•The sensors do not function if you touch them with
your finger nail or with gloves on.
2
13
2
13
2
13


