manuals.online logo
Brands
  1. Home
  2. •
  3. Brands
  4. •
  5. JVC
  6. •
  7. Car Receiver
  8. •
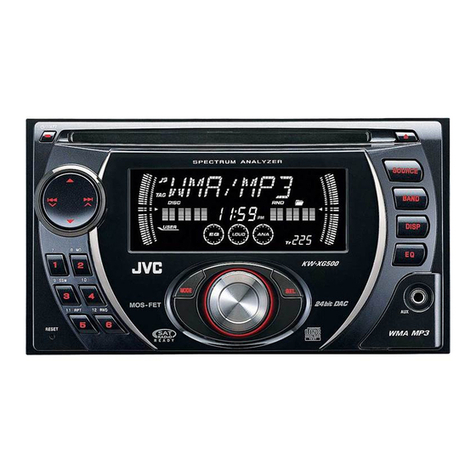
  9. JVC KD-LX50R User manual

JVC KD-LX50R User manual

SERVICE MANUAL
CD RECEIVER
No.49562
May. 2000
COPYRIGHT 2000 VICTOR COMPANY OF JAPAN, LTD.
Printed in Japan
200005(O)
VICTOR COMPANY OF JAPAN, LIMITED
MOBILE ELECTRONICS DIVISION
PERSONAL & MOBILE NETWORK B.U. 10-1,1Chome,Ohwatari-machi,Maebashi-city,Japan
KD-LX50R
(No.49562)
KD-LX50RKD-LX50R
This service manual is printed on 100% recycled paper.
Area Suffix
E ---- Continental Europe
Contents
Safety precaution 1-2
Preventing static electricity 1-3
Instructions 1-4~
Disassembly method 2-1
Maintenance of laser pickup 2-12
Extention cord connectiong method 2-13
Functions of the mechanism under
the service mode 2-16
Flow of functional operation
until TOC read 2-18
Description of major ICs 2-20
Block diagram 2-
Standard schematic diagrams 2-
Printed circuit boards 2-
Parts list 3-1~19
ATT
S
S
M
VCR
KD-LX50R
/I
SOURCE BBE
MODE BAND
DISP
INTLOCALMONOSCM 10789 11 12
RPT RND
OFFSEL
All manuals and user guides at all-guides.com
all-guides.com
Front bracket
CD mechanism
control board
Damper bracket
CD mechanism ass’y
FD screw
Feed motor ass’y
FD gear Pickup unit
Preventing static electricity
1.Grounding to prevent damage by static electricity
Electrostatic discharge (ESD), which occurs when static electricity stored in the body, fabric, etc. is discharged,
can destroy the laser diode in the traverse unit (optical pickup). Take care to prevent this when performing repairs.
2.About the earth processing for the destruction prevention by static electricity
Static electricity in the work area can destroy the optical pickup (laser diode) in devices such as CD players.
Be careful to use proper grounding in the area where repairs are being performed.
2-1 Ground the workbench
Ground the workbench by laying conductive material (such as a conductive sheet) or an iron plate over
it before placing the traverse unit (optical pickup) on it.
2-2 Ground yourself
Use an anti-static wrist strap to release any static electricity built up in your body.
3. Handling the optical pickup
1. In order to maintain quality during transport and before installation, both sides of the laser diode on the
replacement optical pickup are shorted. After replacement, return the shorted parts to their original condition.
(Refer to the text.)
2. Do not use a tester to check the condition of the laser diode in the optical pickup.The tester's internal power
source can easily destroy the laser diode.
4.Handling the traverse unit (optical pickup)
1. Do not subject the traverse unit (optical pickup) to strong shocks, as it is a sensitive, complex unit.
2. Cut off the shorted part of the flexible cable using nippers, etc.after replacing the optical pickup. For specific
details, refer to the replacement procedure in the text.Remove the anti-static pin when replacing the traverse
unit. Be careful not to take too long a time when attaching it to the connector.
3. Handle the flexible cable carefully as it may break when subjected to strong force.
4. It is not possible to adjust the semi-fixed resistor that adjusts the laser power. Do not turn it
Conductive material
(conductive sheet) or iron plate
(caption)
Anti-static wrist strap
Soldering
Attention when traverse unit is decomposed
1.Solder is put up before the card wire is removed from connector on
the CD substrate as shown in Figure.
(When the wire is removed without putting up solder, the CD pick-up
assembly might destroy.)
2.Please remove solder after connecting the card wire with
when you install picking up in the substrate.
*Please refer to "Disassembly method" in the text for pick-up and how to
detach the substrate.
All manuals and user guides at all-guides.com
Important for laser products
1.CLASS 1 LASER PRODUCT
2.DANGER : Invisible laser radiation when open and inter
lock failed or defeated. Avoid direct exposure to beam.
3.CAUTION : There are no serviceable parts inside the
Laser Unit. Do not disassemble the Laser Unit. Replace
the complete Laser Unit if it malfunctions.
4.CAUTION : The compact disc player uses invisible
laserradiation and is equipped with safety switches
whichprevent emission of radiation when the drawer is
open and the safety interlocks have failed or are de
feated. It is dangerous to defeat the safety switches.
5.CAUTION : If safety switches malfunction, the laser is able
to function.
6.CAUTION : Use of controls, adjustments or performance of
procedures other than those specified herein may result in
hazardous radiation exposure.
VARNING : Osynlig laserstrålning är denna del är öppnad
och spårren är urkopplad. Betrakta ej strålen.
VARO : Avattaessa ja suojalukitus ohitettaessa olet
alttiina näkymättömälle lasersäteilylle.Älä katso
säteeseen.
ADVARSEL : Usynlig laserstråling ved åbning , når
sikkerhedsafbrydere er ude af funktion. Undgå
udsættelse for stråling.
ADVARSEL : Usynlig laserstråling ved åpning,når
sikkerhetsbryteren er avslott. unngå utsettelse
for stråling.
REPRODUCTION AND POSITION OF LABELS
WARNING LABEL
DANGER : Invisibie laser radiation
when open and interlock or
defeated.
AVOID DIRECT EXPOSURE TO
BEAM (e)
VARNING : Osynlig laserstrålning är
denna del är öppnad och spårren är
urkopplad. Betrakta ej strålen. (s)
VARO : Avattaessa ja suojalukitus
ohitettaessa olet alttiina
näkymättömälle lasersäteilylle.Älä
katso säteeseen. (d)
ADVARSEL :Usynlig laserstråling
ved åbning , når
sikkerhedsafbrydere er ude af
funktion. Undgå udsættelse for
stråling. (f)
CLASS 1
LASER PRODUCT
!
CAUTION
Please use enough caution not to
see the beam directly or touch it
in case of an adjustment or operation
check.
All manuals and user guides at all-guides.com
Remove the two screws A attaching the bottom
cover to the top chassis on the bottom of the body.
Remove the two screws B attaching the top chassis
on both sides of the body.
Remove the two screws C and the two screws D
attaching the heat sink on the left side of the body.
Remove the two screws E and the screw F on the
back of the body.
Remove the two screws G on the upper side of the
body.
Move the top chassis upward and disconnect the CD
mechanism connector from the main board
connector by pulling it. Remove the top chassis from
the body.
1.
2.
3.
4.
5.
6.
Disassembly method
Removing the top chassis(See Fig.1 to 5)
Fig.1
Fig.2
Fig.3
Fig.4
Fig.5
Bottom cover
A
A
B
Top chassis
Top chassis
Heat sink
C
DB
EF
Top chassis
G
G
All manuals and user guides at all-guides.com
Prior to performing the following procedure, remove
the top chassis.
Disconnect the flexible harness from connector
CN701, the card wire from CN702 on the main board
and the harness from CN503 and CN504
respectively.
Remove the three screws H attaching the main
board assembly to the bottom cover on the upper
side of the body.
Remove the screw I attaching the rear panel and the
bottom cover on the back of the body. Move the
main board in the direction of the arrow and release
the two joints a. (At this point, the main board can be
removed with the rear panel and the rear heat sink.)
Remove the screw J and the two screws K
attaching the rear heat sink on the back of the body.
Remove the three screws L and the screw M
attaching the rear panel. Now, the main board
assembly will be removed.
1.
2.
3.
4.
5.
Removing the main board assembly
(See Fig.6 and 7)
when reassembling, correctly engage
the switch S561 and S562 on the main
board with the part e of the operation
assembly (Refer to Fig.6-2,17 and 18).
ATTENTION:
Fig.6-1
Fig.7
Fig.6-2
H
CN504
CN701
Front panel assembly
CN702
CN503
H
S652
Main board S651
J
I
K
L
M
Rear panel
Rear heat sink
L
Joint a Joint a
e
L
All manuals and user guides at all-guides.com
Prior to performing the following procedure, remove
the top chassis assembly.
Disconnect the flexible harness from connector
CN701 on the main board assembly.
Remove the four screws N attaching the front panel
assembly on both sides of the body. Remove the
front panel toward the front.
1.
2.
Removing the front panel assembly
(See Fig.8,9 and 10)
Prior to performing the following procedure, remove
the top chassis assembly and the front panel
assembly.
Remove the four screws O attaching the front board
on the back of the front panel assembly and release
the eight joints b.
1.
Removing the Front Board (See Fig.11)
Fig.8
Fig.9
Fig.10
Fig.11
CN701
Front panel assembly
CN701
Front panel assembly
N
N
Front panel assembly
O
O
Joints b
Joints b
All manuals and user guides at all-guides.com
all-guides.com
Prior to performing the following procedure, remove
the top chassis assembly and the front panel
assembly.
Disconnect the harness from connector CN503 and
CN504 on the main board.
Remove the four screws P and detach the lifter unit
from the bottom cover.
1.
2.
Removing the lifter unit (See Fig.12)
Prior to performing the following procedure, remove
the lifter unit.
Remove the washer attaching the clutch assembly
and detach the clutch assembly from the shaft of the
lifter unit.
Remove the two screws Q attaching the feed motor
(L).
1.
2.
Removing the feed motor (L) (See Fig.13)
Prior to performing the following procedure, remove
the lifter unit.
Remove the washer attaching the clutch assembly
and detach the clutch assembly from the shaft of the
lifter unit.
Remove the two screws R attaching the feed motor
(R).
1.
2.
Removing the feed motor (R) (See Fig.14) Clutch assembly
Fig.12
P
Lifter unit assembly
CN504
CN503
P
Fig.13
Fig.14
Lifter unit assembly
Feed motor (L) assembly
Washer Q
R
Clutch assembly
Washer
Feed motor (R) assembly
Lifter unit assembly
All manuals and user guides at all-guides.com
Prior to performing the following procedure, remove
the top chassis assembly, the front panel assembly
and the lifer unit.
Remove the screws S attaching the right and left
brackets which fix gears on both sides of the
operation assembly.
Remove the springs 5 and 6 from the operation
assembly.
Disconnect the card wire from connector CN702 on
the main board and remove the operation assembly.
1.
2.
3.
Removing the operation assembly
(See Fig.15 to 18)
when reassembling, correctly engage
the switch S561 and S562 on the main
board and the right gear with the part e
of the operation assembly.
ATTENTION: Fig.15
Fig.16
Fig.17Fig.18
S
Spring 6
CN702
Operation assembly
Spring 5
S
Operation assembly e
S652
S651
Operation assembly
e
Operation assembly e
S652 S651
Bracket (R) Bracket (L)
Bracket (R)
All manuals and user guides at all-guides.com
Prior to performing the following procedure, remove
the operation assembly.
Remove the six screws T attaching the button panel
on the operation assembly.
Pull out the operation switch board from inside of the
button panel.
1.
2.
Removing the operation switch board
(See Fig.19 and 20)
Prior to performing the following procedure, remove
the top chassis.
Remove the three screws U and the CD mechanism
assembly from the top chassis.
1.
Removing the CD mechanism assembly
(See Fig.21)
Button panel
Operation switch board
Button panel
CD mechanism assembly
Fig.19
Fig.20
Fig.21
TT
U
UU
All manuals and user guides at all-guides.com
Remove the two screws A on both sides of the body
and detach the top cover upward.
Remove the two screws B and the two screws C
attaching the voice board.
Remove upward the bushing attaching the cord.
Remove the main board from the base chassis while
detaching the pin jack.
Disconnect the sub board from connector CN851 on
the main board.
Disconnect the harness from connector CN852 on
the main board. Then disconnect the cord from the
main board.
1.
2.
3.
4.
Disassembly method
<Voice unit>
Removing the voice recorder
(See Fig.1 to 3)
Fig.1
Fig.2
Fig.3
A
A
Top cover
B
B
Bushing
C
Pin jack
Voice board
Voice board Sub board
CN852
CN851
Cord
All manuals and user guides at all-guides.com
Unsolder the part a and b on the CD mechanism
control board.
Remove the stator c fixing the CD mechanism
control board and the damper bracket (To remove
the stator smoothly, pick up the center part).
Remove the screw A attaching the CD mechanism
control board.
Remove the CD mechanism control board in the
direction of the arrow while releasing it from the two
damper bracket slots d and the front bracket slot e.
Disconnect the flexible wire from connector on the
pickup unit.
Removing the CD mechanism control
board(See Fig.1 and 2)
Turn the FD gear in the direction of the
arrow to move the entire pickup unit to
the appropriate position where the
flexible wire of the CD mechanism unit
can be disconnected easily (Refer to
Fig.2).
ATTENTION:
Fig.1
Fig.2
Fig.3
Fig.4
Front bracket CD mechanism
control board
Shift the lock
Flexible wire
Pickup unit
FD gear
CD mechanism control board
Loading motor Front bracket
Front bracket Pull outward
Pull outward
Flame
Damper bracket
mm
c
d
b
f
DD
D
CD mechanism ass’y
Ae
f
B
f
B
All manuals and user guides at all-guides.com
all-guides.com
Prior to performing the following procedure, remove
the CD mechanism control board.
Remove the two springs f attaching the CD mechanism
ass’y and the front bracket.
Remove the two screws B and the front bracket
while pulling the flame outward.
Remove the belt and the screw C from the loading
motor.
*
1.
2.
3.
Removing the loading motor
(See Fig.3 to 5)
Prior to performing the following procedure, remove
the CD mechanism control PWB and the front
bracket (loading motor).
Remove the three screws D and the damper bracket.
Raise the both sides fix arms and move the fix plates
in the direction of the arrow to place the four shafts g
as shown in Fig.8 and 9.
Remove the CD mechanism ass’y and the two
springs h attaching the flame.
Remove the two screws E and both sides rear
damper brackets from the dampers. Detach the CD
mechanism ass’y from the left side to the right side.
*
1.
2.
3.
4.
Removing the CD mechanism ass’y
(See Fig.1, 6 to 9)
The CD mechanism ass’y can be
removed if only the rear damper
bracket on the left side is removed.
ATTENTION:
Fig.5
Fig.6
Fig.7
Fig.8
Fig.9
Rear damper bracket
Fix arm (R)
Damper
C
DD
Loading motor
Belt
Damper bracket
CD mechanism ass’y
Flame h
h
D
D
Fix plate (L)
gg
Rear damper bracket
Fix arm (L)
Damper
E
Fix plate(R)
E
g
g
All manuals and user guides at all-guides.com
Prior to performing the following procedure, remove
the CD mechanism control board, the front bracket
(loading motor) and the CD mechanism ass’y.
Remove the two screws F and the feed motor ass’y.
*
1.
Removing the feed motor ass’y
(See Fig.10)
*Prior to performing the following procedure, remove
the CD mechanism control board, the front bracket
(loading motor), the CD mechanism ass’y and the
feed motor ass’y.
Detach the FD gear part of the pickup unit upward.
Then remove the pickup unit while pulling out the
part j of the FD screw.
*
1.
Remove the screw G attaching the nut push spring
plate and the pickup mount nut from the pickup unit.
Pull out the FD screw.
2.
Removing the pickup unit
(See Fig.10 and 11)
When reattaching the pickup unit,
reattach the part k of the pickup unit,
then the part j of the FD screw.
ATTENTION:
Prior to performing the following procedure, remove
the CD mechanism control board, the front bracket
(loading motor), the CD mechanism ass’y and the
feed motor ass’y.
Turn up the CD mechanism ass’y and remove the
two springs m on both sides of the clamper arms.
Open the clamper arm upward.
Turn the turn table, and remove the two screws H
and the spindle motor.
*
1.
2.
Removing the spindle motor
(See Fig.12 and 13)
Fig.10
Fig.11
Fig.12
Fig.13
Spindle motor
mm
Pickup unit
Part j
FD screw
Feed motor ass’y
FD gear Pickup unit
Part k
F
Nut push spring plate Pickup mount nut
Pickup unit
FD screw
G
H
H
All manuals and user guides at all-guides.com
Caution : Replacing the pickup
To prevent damage to the laser diode
static electricity destroys the laser diode.
Always take countermeasure to
performing repairs around the laser
pickup.
Do not touch the area around the laser
diode or the actuator.
Do not check the laser diode with a tester
or other device (the laser diode can be
broken quite easily).
Short-circuit the laser pickup
Solder the land in the center of the flexible
cable of the laser diode and help prevent
damage from static electricity.
Caution :
Solder rejection or cuts a pattern with
nipper at shortstop point after short
circuiting with clip with terminal face of
flexible cable in the static electricity
countermeasure soldering iron application
that is not done.
And the rejection back inserts it in
connector immediately and do not touch
terminal side of connector either.
Recommendation
Soldering iron
HAKKO ESD countermeasures product
1.
2.
3.
Soldering
Caution :
Do not forget to remove the soldered laser diode
short-circuit after finishing repair, and leave the circuit open.
Adjustment method
All manuals and user guides at all-guides.com
Maintenance of laser pickup
(1) Cleaning the pick up lens
Before you replace the pick up, please try to
clean the lens with a alcohol soaked cotton
swab.
(2) Life of the laser diode
When the life of the laser diode has expired,
the following symptoms will appear.
(1) The level of RF output (EFM output:ampli
tude of eye pattern) will be low.
Replacement of laser pickup
Is RF output
1.0 0.35Vp-p? Replace it.
NO
YES
O.K
(3) Semi-fixed resistor on the APC PC board
The semi-fixed resistor on the APC printed
circuit board which is attached to the pickup
is used to adjust the laser power.Since this
adjustment should be performed to match the
characteristics of the whole optical block,
do not touch the semi-fixed resistor.
If the laser power is lower than the specified
value,the laser diode is almost worn out, and
the laser pickup should be replaced.
If the semi-fixed resistor is adjusted while
the pickup is functioning normally,the laser
pickup may be damaged due to excessive current.
Turn off the power switch and,disconnect the
power cord from the ac outlet.
Replace the pickup with a normal one.(Refer
to "Pickup Removal" on the previous page)
Plug the power cord in,and turn the power on.
At this time,check that the laser emits for
about 3seconds and the objective lens moves
up and down.
Note: Do not observe the laser beam directly.
Play a disc.
Check the eye-pattern at TP1.
Finish.
All manuals and user guides at all-guides.com
EXTGS004-26P
EXTLX001-2P
EXTLX001-6PC
EXTLX001-6PF
EXTLX001-16PF
EXTLX002-4P
EXTLX002-SWPWB
EXTLX002-16PC
EXTLX001-2P
Using the extention cords to connect the front panel with the main board
Remove the main board follwing the disassembly
methode. Then reattachi the heat sink to main
board.
Using the 2pin extention cord (EXTLX001-2p),
connect the harness of the feed motor (L) assembly
with the connector CN503 on the main board.
Using the 2pin extention cord (EXTLX001-2p),
connect the harness of the feed motor (R)
assembly with the connector CN504 on the main
board.
Extension cord connecting method
1.
2.
Using the jig board (EXTLX002-SWPWB), its
installing to the chassis, then using 4pin extention
cord (EXTLX002-4P) connect the harness of the
lifter detecting board with the connector CN704 on
the board.
Connect the connector (EXTLX001-6PC) and
extension wire (EXTLX001-6PF), connect the 6pin
connector CN702 on the main board.
Connect the connector (EXTLX002-16PC) and
extension wire (EXTLX002-16PF), connect the
16pin connector CN701 on the main board.
3.
4.
5.
All manuals and user guides at all-guides.com
all-guides.com
EXTGS004-26P
EXTLX001-2P
EXTLX001-6PC
EXTLX001-6PF
EXTLX001-16PF
EXTLX002-4P
EXTLX002-SWPWB
EXTLX002-16PC
EXTLX001-2P
Extension cord list for KD-LX50R
EXTLX002-JIG : Kit including the following 8 extension parts.
1
2
3
4
5
6
7
2
1
1
1
1
1
1
2Pin, 30cm extension cord
6Pin, 30cm flat wire
6Pin x 2, interlocking connector
16Pin flat wire
16Pin, interlocking connector
3 switch PWB
4Pin, 30cm extension cord
EXTLX001-2P
EXTLX001-6PF
EXTLX001-6PC
EXTLX002-16PF
EXTLX002-16PC
EXTLX002-SWPWB
EXTLX002-4P
No. Parts number Quantity Description
Besides the above kit, we offer the conventional extension cord for CD mechanism
which are not essential to operation check or service.The mechanism should be
directly connected to the board using the extension wire. EXTGS004-26P
All manuals and user guides at all-guides.com
Reassembly
1. Perform reassembly be reversing the removing process of "removal of main parts".
CAUTION 1: Prior to reattaching the heat sink, make sure to reattache the top chassis.
All manuals and user guides at all-guides.com
SEL MODE DISP RDS PTY OFF/
Press the three buttons (UP button )+( button)+(Func button ).Then it is possible to select the follwing
service modes.After changing over to the service mode, press the UP button and DOWN button to
change the mode.For executing the respective service modes, press the SEL button.
With the service mode 2 , it is possible to call the error codes of the mechanism.
NORMAL MODE
DELEEPROM
CD-CH ERR
DEL CH-ERR
RUNNING
DELDATA
CD-ERR
(UP button ) + ( button) + ( button) at the same time.
: Deletion of entire EEPROM data.This mode is used when
shipping this system from factry.
:This mode is used only when the CD changer is connected.
: Running mode (Do not use this mode under the servise mode)
: (Deletion of CD error code and RDS data)
: Calling of CD mechanism error code
With the three error modes stored in maximum in the internal memory of the mechanism in the body of this
system, it is posible under the service mode to call the contents of error according to the following steps when
any error has occurred.
Data stored in EEPROM
1. RDS data
2. CD mechanism error cord
3. Station name (to be input by user)
4. DISC name (to be input by user)
5. AUX input name
*Any data 3 to 5 above should not be deleted.
Functions of the mechanism under the service mode
1234
56
SOURCE
All manuals and user guides at all-guides.com
Error codesDescriptionOccurrence condition
Disc loading error 1. SW4 is not turned off.
2. SW3 is not turned on.
1. SW# is not turned off.
1. In case SW2 has been positioned to "L" before
starting loading during waiting for 15sec.
09 0011
09 0013
1. Display of mechanism error
2. Display of CD error
01 0021
80 0031
Error during standby for loading
Pickup feeding error
1. Inner peripheral feeding error
(10sec.)
2. Outer peripheral feeding error
(10sec.)
Focus search error
In the case of focusing error after
3-way focus searching
Tracking balance adjusting error
In the case of time-over (1sec.)
of timer
TOC area searching error
In the case of time-over (10sec.)
of timer
Reading error
IN the case of time-over (30sec.)
of timer
1st tracking access error
In the case of time-over (10sec.)
of timer
Last tracking access error
In the case of time-over (10sec.)
of timer
Q code reading error
In the case of time-over (0.6sec.)
of timer
TEXT data reading error
04 0051
04 0052
81 0053
82 0054
82 0055
84 0059
80 0060
80 0061
80 0062
80 0063
The pickup cannot returned to the inner
peripheral, and the REST switch is not turned off.
The pickup cannot be returned to the outer
peripheral, and the REST switch is not turned off.
In case the focus cannot be searched by one set
of focus searching (3-way focus searching) after
disc change and focus shock, judge that the focus
searching system is in error.
In case tracking balance cannot be adjusted even
after elapse of 1sec. following execution of the
adjusting command (TBA).
In case TOC area searching is not ended even after
elapse of 10sec.
In case reading is not ended even after elapse of 30
sec. during TOC reading action.
In case the first tracking access is not ended even
after elapse of 10sec. following completion of TOC
reading.
In case the last tracking access is not ended even
after elapse of 10sec. following completion of first
tracking under the RUNNING mode.
In case the Q code cannot be read for 0.6sec.
during playing TOC program area.
In case all TEXT data cannot be read.
Eject error
All manuals and user guides at all-guides.com

Other manuals for KD-LX50R

3

This manual suits for next models

2

Other JVC Car Receiver manuals

JVC KW-XG500J User manual

JVC

JVC KW-XG500J User manual

JVC KD-LHX505 User manual

JVC

JVC KD-LHX505 User manual

JVC KW-R910BT User manual

JVC

JVC KW-R910BT User manual

JVC KD-SH1000E Guide

JVC

JVC KD-SH1000E Guide

JVC KD-G531 User manual

JVC

JVC KD-G531 User manual

JVC KD-R816 User manual

JVC

JVC KD-R816 User manual

JVC KD-MX2900R User manual

JVC

JVC KD-MX2900R User manual

JVC KDDV7400 - Car 50Wx4 DVD/CD Receiver Guide

JVC

JVC KDDV7400 - Car 50Wx4 DVD/CD Receiver Guide

JVC Car Cassette Deck KS-F500 User manual

JVC

JVC Car Cassette Deck KS-F500 User manual

JVC GET0063-001A User manual

JVC

JVC GET0063-001A User manual

JVC KD-G700 User manual

JVC

JVC KD-G700 User manual

JVC KD-G285 User manual

JVC

JVC KD-G285 User manual

JVC KD-R626 User manual

JVC

JVC KD-R626 User manual

JVC LVT1003-001B User manual

JVC

JVC LVT1003-001B User manual

JVC KD-G179UR User manual

JVC

JVC KD-G179UR User manual

JVC KD-SX1000R User manual

JVC

JVC KD-SX1000R User manual

JVC KD731BT User manual

JVC

JVC KD731BT User manual

JVC GET0195-001A User manual

JVC

JVC GET0195-001A User manual

JVC KD-AR270 - Radio / CD User manual

JVC

JVC KD-AR270 - Radio / CD User manual

JVC KD-G120 - Radio / CD Player User manual

JVC

JVC KD-G120 - Radio / CD Player User manual

JVC KW-NT300 User manual

JVC

JVC KW-NT300 User manual

JVC KD-MX3000 User manual

JVC

JVC KD-MX3000 User manual

JVC KD-ADV49 - DVD Player With LCD monitor Guide

JVC

JVC KD-ADV49 - DVD Player With LCD monitor Guide

JVC KW-AVX716 User manual

JVC

JVC KW-AVX716 User manual

Popular Car Receiver manuals by other brands

Pioneer DEH-P2900MP Operation manual

Pioneer

Pioneer DEH-P2900MP Operation manual

Boss Audio Systems CD-4500R user manual

Boss Audio Systems

Boss Audio Systems CD-4500R user manual

Clarion DXZ468RMP owner's manual

Clarion

Clarion DXZ468RMP owner's manual

Profile PCD920 Installation instructions & owner's manual

Profile

Profile PCD920 Installation instructions & owner's manual

Akai ACR-129MMU Service manual

Akai

Akai ACR-129MMU Service manual

Continental Refrigerator TR7411U-OR owner's manual

Continental Refrigerator

Continental Refrigerator TR7411U-OR owner's manual

Audio Analogue CRECSENDO owner's manual

Audio Analogue

Audio Analogue CRECSENDO owner's manual

Kenwood KDV-Z930 Service manual

Kenwood

Kenwood KDV-Z930 Service manual

Dual XDMA5280 Installation & owner's manual

Dual

Dual XDMA5280 Installation & owner's manual

Kenwood KDC-W237AY Service manual

Kenwood

Kenwood KDC-W237AY Service manual

Sony XR-6030 operating instructions

Sony

Sony XR-6030 operating instructions

Clarion DXZ365MP owner's manual

Clarion

Clarion DXZ365MP owner's manual

Sony CDX-GT56UI operating instructions

Sony

Sony CDX-GT56UI operating instructions

Tamco X5 1:5 Brushless Buggy Instruction manual & parts catalogue

Tamco

Tamco X5 1:5 Brushless Buggy Instruction manual & parts catalogue

Pyle PLCD67 owner's manual

Pyle

Pyle PLCD67 owner's manual

Alpine CDE-153BT owner's manual

Alpine

Alpine CDE-153BT owner's manual

Booster BCD-3250UB instruction manual

Booster

Booster BCD-3250UB instruction manual

Eclipse AVN 5495 installation manual

Eclipse

Eclipse AVN 5495 installation manual

manuals.online logo
manuals.online logoBrands
  • About & Mission
  • Contact us
  • Privacy Policy
  • Terms and Conditions

Copyright 2025 Manuals.Online. All Rights Reserved.