Booster BCD-3250UB User manual

CAR CD/MP3 PLAYER / RECEIVER
USB /SD /MMC/SLOT
BCD-3250UB
BC D- 325 0U B


01
Installation. .. . . . .. . .. .. . .. . .. .. . .. . .. .. . .. . .. .. . .. . .. .. . .. . 02.
Additional information.................................04
General operations. . .. . .. .. . .. . .. .. . .. . .. .. . .. . .. .. . .. . .05
Radio operations. . . .. . .. . . . .. . .. . . . .. . .. .. . .. . .. .. . .. . .. .09
CD/SD/MMC/USB Operations ..................... 11
MP3 WMA overview. . . .. . . . .. . . . .. . . . .. . . . .. . . . .. . . . . . . . 14
Remote control layout. .. .. .. .. .. . .. . .. . .. . .. . .. . .. . . .. . 15
Specification. .. . .. .. . .. . .. .. . .. . . . .. . .. . . . .. . .. . . . .. . .... ... . 17
Before playing discs..................................... 18
Trouble shooting............................................19

02
PRECAUTION S
Cho ose the moun ting loc ation whe re the un it wi ll no t int erfer e wi th the normal
driving function of the driver.
Bef ore final ly ins tal ling the uni t, conne ct the wiring tem por ar ily and mak e sure
it is all connected up properly and the unit and the system work properly.
Use onl y the par ts incl uded wi th the uni t to ens ur e proper inst allat ion. The use
of unauthorized parts can cause ma lfunctions.
Con sul t wi th you r neares t de aler if ins tal lat ion req ui res the dr illing of holes or
other mo difications of the vehicle.
Install the unit where it does not get in the driver's way and cannot injure the
passenger if there is a sudden stop. Like an eme rgency stop.
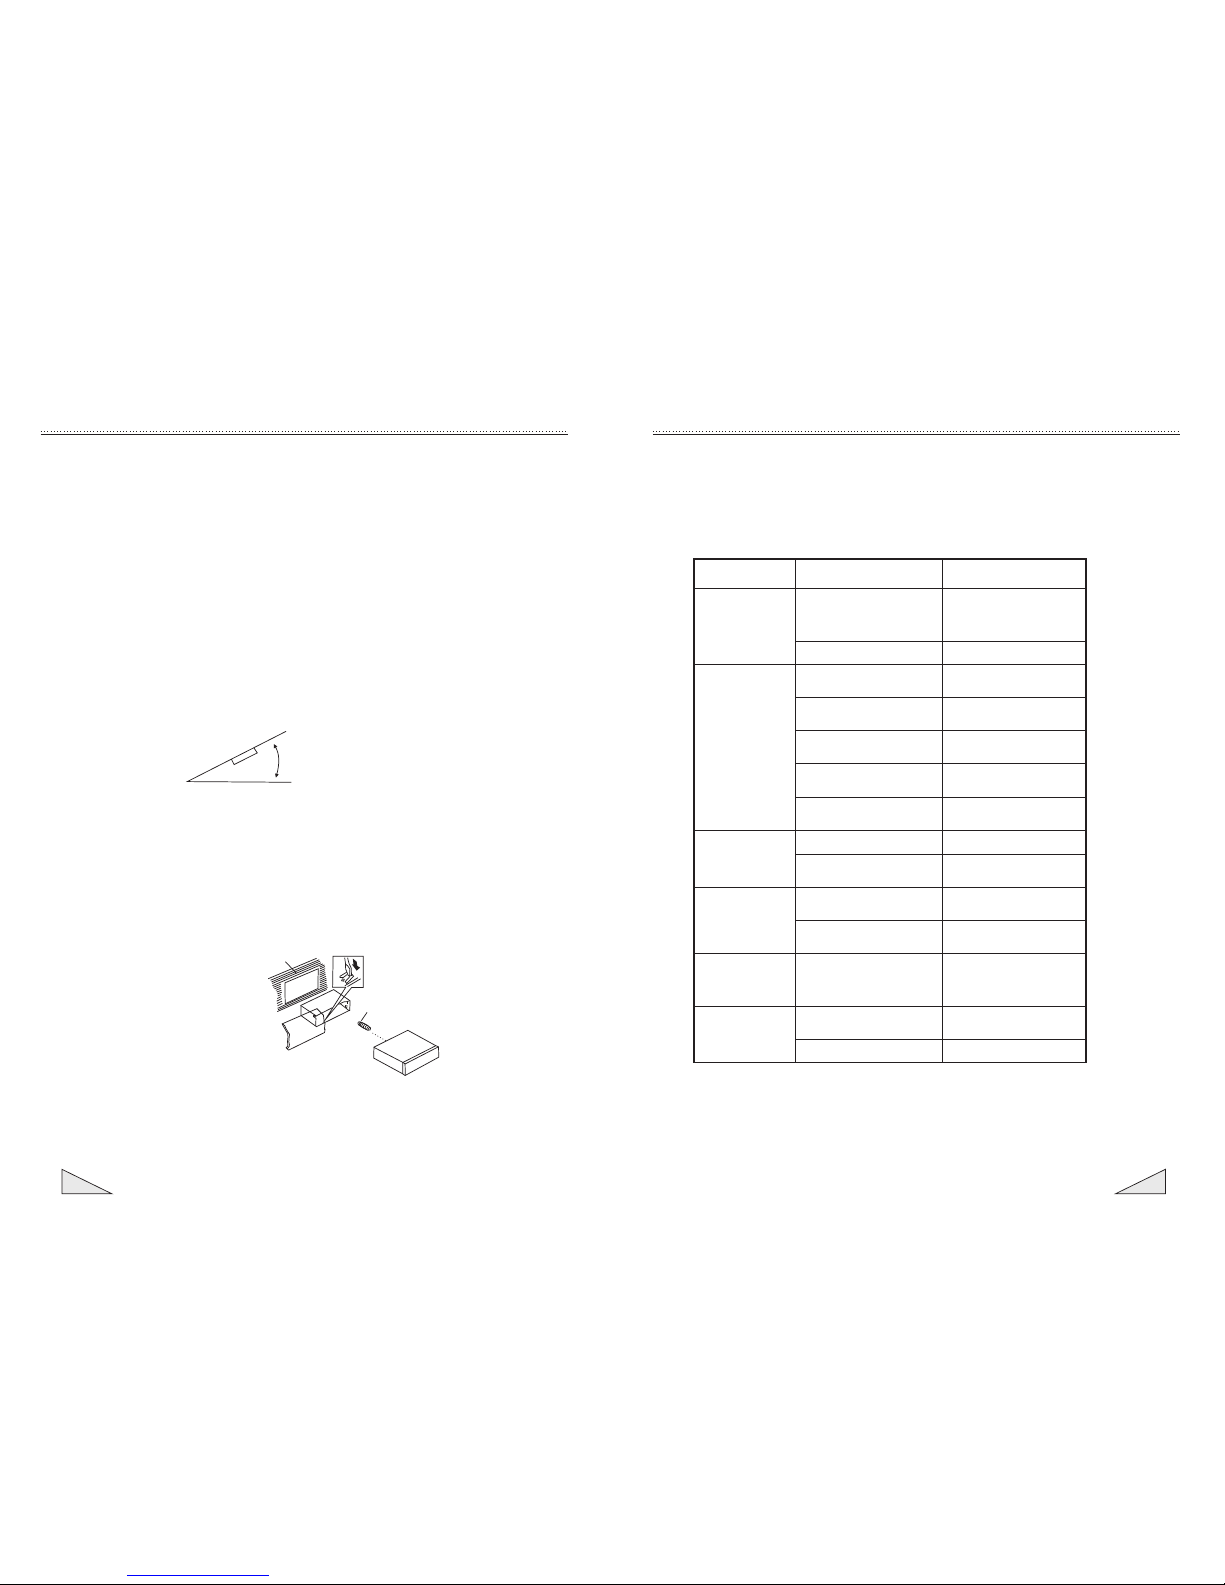
If installation angle exceeds 30 from horizontal, the unit might not give its
optimu m performance.
Avoid installing the unit where it would be subject to high temp erature, such
as from direct sunlight, or from hot air, form the heater, or where it would be
subject to dust, dirt or excessive vibration.
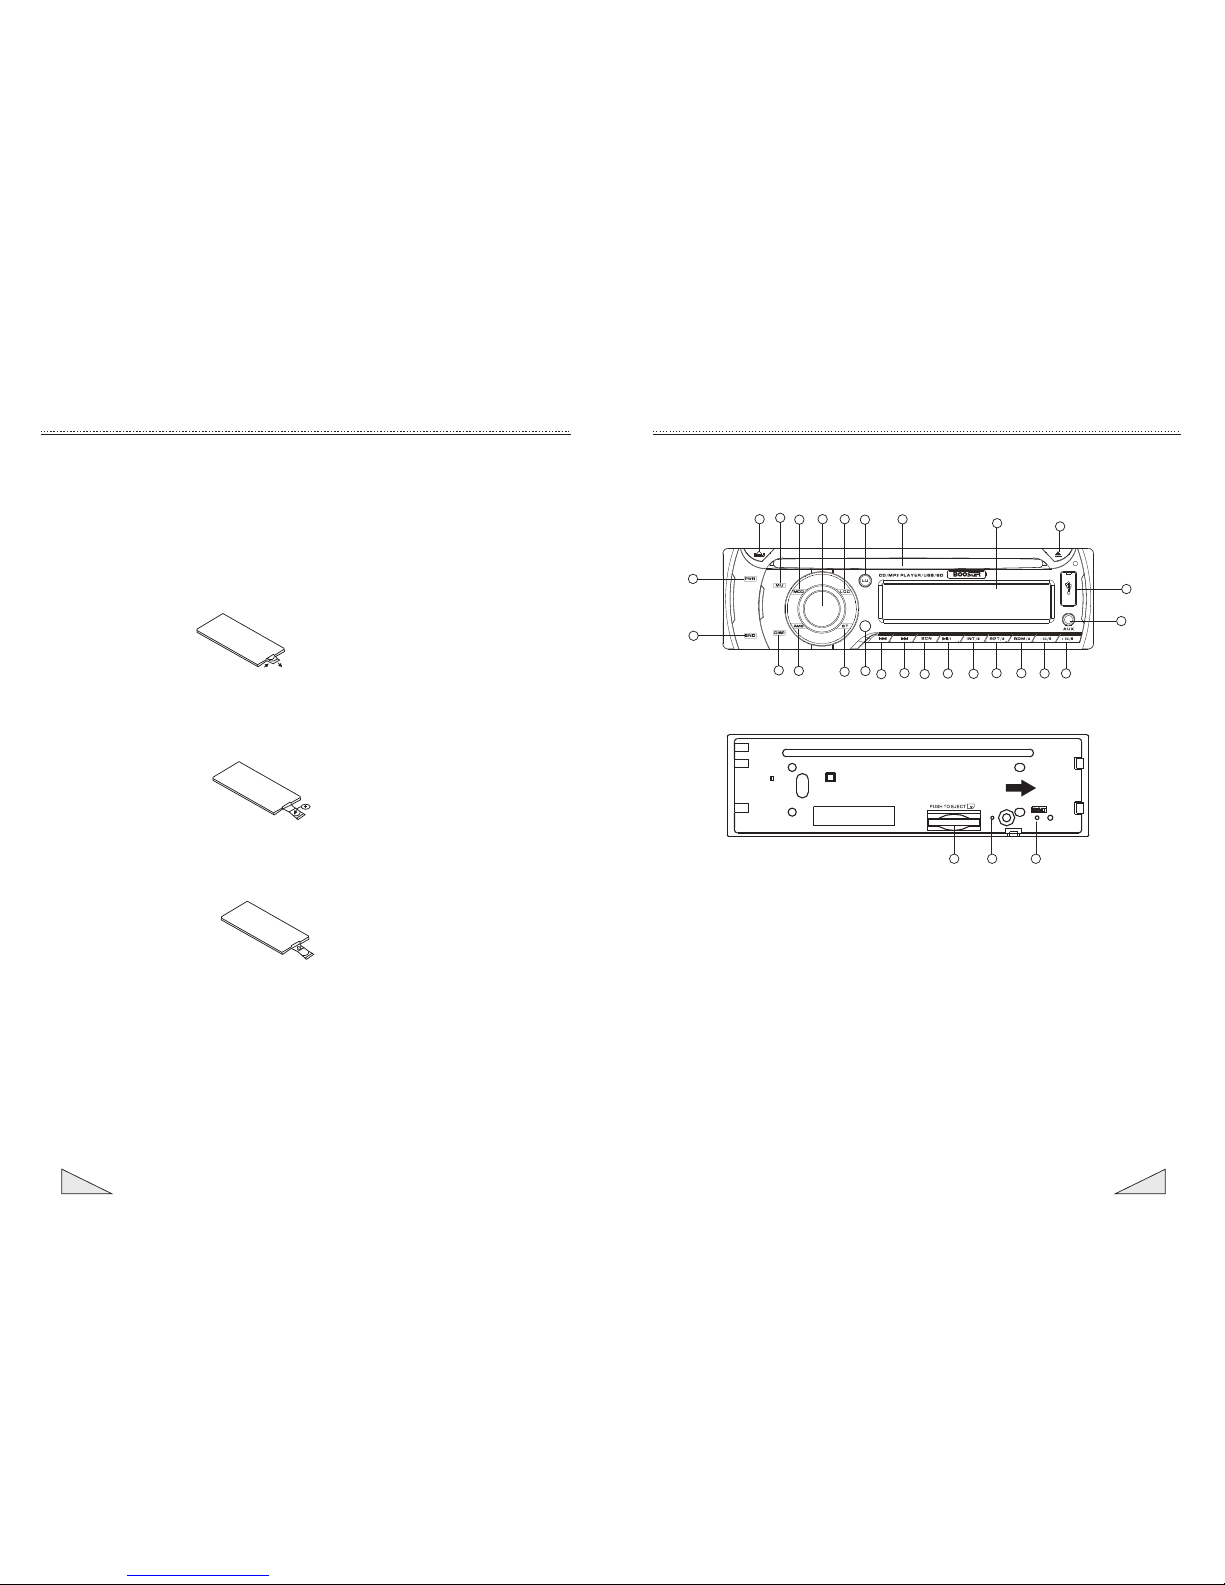
DIN FRON T-MOU NT (Me thod A)
Installing the unit
1. Dashboard
2. Holder
After inserting the holder into
the dashboard, select the
appropriate tab according to
the thickness of the dashboard
material and bend them
inwards to secure the holder in
(Fig. 1)
place.
3. Screw
INSTALLATION
(Fig. 1)
12
3
19
30
0
TROUBLE SHOOTING
No Power
No Sound
Sound Skipping
The Operation Keys
Do Not Work
The Radio or
Automatic Selection
Does Not Work
The fuse is blown
Inserting the CD in reverse
direction
The CD is extremely dirty or
defected
Temperature inside the car is
too high
Condensation
Volume is at minimum
Wiring is not properly
connected
The installation angle is more
o
than 30
CD is extremely dirty or
Defected
The built-in microcomputer is
not operating properly due to
Interference
The antenna cable is not
connected correctly
The signals are too weak
Replace a new fuse
Remove the CD from the player
and insert the new one
Insert the CD with the label
facing up
Clean the CD or try to play
a new one
Cool off until the ambient
temperature return to normal
Leave the player off for an
hour or so and try again
Adjust volume to desired level
Check wiring connection
Adjust the installation angle to
o
less than 30
Clean the CD or try to play
a new one
Press the RESET button or
reinstall the front panel
properly
Connect the antenna cable
correctly
Select the station manually
A CD is already inside the
player slot
CD Cannot Be
Loaded or Ejected
The car ignition key not
been switched on
If the power supply is properly
connected to the car accessory
terminal, switch the ignition
key to ACC
Symptom Causes Solution
Before going through the check list, check wiring connection. If any of the
problems persist after checklist has been made, consult your nearest service
dealer
Do not expose this equipment
to rain or moisture.

03
1. Dashboard
2. Nut (5mm)
3. Spring Washer
4. Screw (5 x 25mm)
5. Screw
2.Insert fingers into the groove in the
front of fram e and pul l out to rem ove
the fram e. ( When reatt achi ng the
frame , point the side wi th a groove
dow nwards and at tach it.)
3.Leve r
Insert the levers supp lied with the
uni t int o the grooves at both si des of
the uni t and show n in figure unti l they
cli ck. Pull ing th e levers makes possib le
to re move th e unit fro m th e dashboard .
DIN REAR-MOUNT (Method B)
Installation using the screw holes on
the sides of the unit
Fastening the unit to the factory
radio mounting bracket:
1. Select a position where the screw
holes of the bracket and the
screw holes of the main unit
become aligned (are fitted), and
tighten the screws at 2 places on
each side. Use either truss screws
(5 x 5mm) or flush surface screws
(4 x 5mm)
2. Screw
3. Dashboard or Console
INSTALLATION
6. Strap
Be sure to use the strap to
secure the back of the unit in
place. The strap can be bent by
hand to the desired angle.
7. Plain Washer
2
3
2
2
1
3
(Fig.3)
Removing the u nit
1
2
3
4
5
6
7
(Fig.2)
INPUT THE SD CARD
The SD oblique angle keeps
rightward exposure, put into
the SD slot and press it again
to eject.
18
BEFORE PLAYING DISCS
Before playing a CD, wipe it off with a clean, dust-free cleaning cloth.
Wipe the disc in the direction of the arrow.
Always insert the CD with the label side facing upwards.
If the CD is inserted with the printed side facing downwards, the device
may be damaged.
Note: If there is already a CD in the CD slot , do not try to insert a second
CD. This may damage the device.
Always hold CDs by the edge. In order to keep the CD clean do not touch
the surface. Pull out the CD as follows.
Do not attach any sticker or adhesive tape on the CD.
Do not expose the CD to direct sunlight or sources of heating.
Do not leave CDs in a car if it parked in direct sunlight as that will lead to
a considerable rise in the temperature inside the car.
Note: Do not use any solvents such as petrol or thinning agents. Commercially
available cleaning substances of antistatic spray will damage the device.
Cleaning the CD

HOW TO INSTALL AND REMOVE THE FRONT PANEL
04
ADDITIONAL INFORMATION
SUBWOOFER
INSTALLING THE FRONT PANEL
To install the front panel, insert the panel
into the housing and ma ke sure the panel
is properly installed, otherwise,
abnormalities occurs on the display or
some keys will not function properly
1
2
3
17
SPECIFICATION
5

05
GENERAL OPERATIONS
16
REMOTE CONTROL LAYOUT
Replacing the Batter y
When the operational range of the remote control becomes short or non functions while
operating. Replace a new CR2025 battery. Make sure the battery polarity before
replacement.
1.Pull out Battery Holder while pressing the stopper
2.Put the button type battery(+)mark upward into the Battery Holder.
3.Insert the Battery Holder into the Remote control
26
24
23
25
22
21
20 1918
17
16
15
14
13 11
12
6
5
4
1
2 3 7
10
28
29
27 8 9
FRONT PANEL LAYOUT
1. Power Button
3. Volume/ Sel Button
12. Tune Seek&Track Buttonreverse
10. Band switch
11. Tune Seek&Track Button forward
6. Display Button
14. Play / Pause & Preset Button 1
2. Release Button
7. LCD Display
13. Automatically memory storing
4. Mute Button
5. Mode switch
9. Reset Button
8. Flashing LED 22. Loudness Button
15. Intro & Preset Button 2
16. Repeat & Preset Button 3
17. Random & Preset Button 4
18. Preset Button 5
20. ST/MO Button
19. Preset Button 6
26. Mini USB connecter
21. LOC/DX Button
25. Remote Control Sensor
23. Eject knob
24. CD Slot
27. SD/MMC Slot
28. AUX IN JACK
29. SCN Button
BC D -3 2 50 U B

BASS
Press VOL/SEL button(3) one time. Adjust bass level by using VOL/SEL(3)Knob.
TREBLE
Press VOL/SEL button(3) two times. Adjust treble level by using VOL/SEL(3)
Knob
BALANCE
Press VOL/SEL button(3) three times. Adjust sound balance between left and
right speakers by using VOL/SEL(3)Knob.
06
GENERAL OPERATIONS
GENERAL OPERATIONS
Power ON/OFF
Press any button to turn the unit on. Press and hold POWER button to turn off the
unit.
Note: After the unit is off, the volume level and radio current settings will be
memorized, and when you turn the unit on it will resume the stored
status, which you set.
FRONT PANEL RELEASE
Press REL button (2) to detach the removable front panel
SOUND ADJUSTMENT
Turn on (3) can adjust the desired volume quality.
A).Press SEL button (3) will change in the following order.
Option:
Volume control/select
Rotating this knob, you can adjust VOL/BASS/TREB/BAL/FAD . To select the
functions, press the VOL knob shortly until the desired functions are shown on the
display.
Increase or decrease the volume by turn the VOL knob right or left. These buttons
can be used to adjust the BASS, TREBLE, BALANCE and FADER.
VOL BAS TRE BAL FAD
(Volume) (Bass) ( Treble) ( Balance)(Fader)
15
REMOTE CONTROL LAYOUT
1Power Button
Pause/play/ uttonPreset B 1
Intro/Preset Button2
Repeat Playing/Preset Button3
Random/Preset Button4
Preset Button5
Preset Button6
Mute Button
Volume Control
2
3
4
5
6
7
8
9
10
11
12
13
14
15
16
17
18
Mode Switch
ST/MO Button
Loudness Button
Scan Button
Display Button
APS/AMS Button
LOC/DX Button
Band Switch
Tuning/Selecting Tracks/ F.F / F.R
Select Button
19
Remote Control Optional
ST
LOUD
LOC
SEL
BAND
MODE
DISP
POWER
TOP INT
RDM
1 2
45
2
3
10
14
15
1
17
8
5
AMS
10
SCN
RPT
3
6
4
6
9
12
11
13
16
18
19
7
10

07
14
GENERAL OPERATIONS
· MP3 is short for MPEG Audio Layer 3 and refers to an audio compression
technology standard.
· This product allows playback of MP3 files on CD-ROM, CD-R or CD-RW discs.
· The unit can read MP3 files written in the format compliant with ISO 9660.
However it does not support the MP3 data written by the method of packet write.
· The unit can not read an MP3 file that has a file extension other than “.mp3”
· If you play a non- MP3 file that has the “.mp3” extension, you may hear some
noise.
· In this manual, we refer to what are called “MP3 file” and “ folder” in PC
terminology as “ track ” and “ album ”, respectively.
· Maximum number of directory level is 8, including the root directory. Maximum
number of files and folders per disc is 256.
· The unit may not play tracks in the order of Track numbers.
· The unit plays only the audio tracks if a disc contains both audio tracks and
MP3 files.
· When playing a disc of 8 kbps or “VBR”, the elapsed playing time in the display
window will not be correct and also the intro play may not function properly.
“ VBR ”:Variable Bit Rate.
· The unit supports the playback of WMA files. The playback of ID3 tags for WMA
format is not guaranteed, it depends on versions and availability of Cyrillic
alphabet.
· WMA (Windows Media Audio) -music data compression format, created by
Microsoft Corporation. This format uses coding algorithm for compression of
initial audio-record, greatly decreasing the file size, but, saving the good sound
quality even when the bit rate is low (for example, 64 Kbit/s).
· Remember that the unit may not play the tracks in order they are written on disc.
Notes on creating your own CD-R or CD-RW containing MP3 files:
· To enjoy high quality sound, we recommend converting to MP3 files with a
sampling frequency of 44.1 kHz and a fixed bit rate o f 128 kbps.
· DO NOT store more than 256 MP3 files per disc.
· For ISO 9660 - compliant format, the maximum allowable depth of nested
folders is 8, including the root directory (folder).
· When CD-R disc is used, playback is possible only for discs, which have been
finalized.
· Make sure that when MP3 CD-R or CD-RW is burned that it is formatted as a
data disc and NOT as an audio disc.
· You should not write non-MP3 files or unneeded folders along with MP3 files
on the disc otherwise it takes a long time until the unit starts to play MP3 files.
· With some CD-R or CD-RW media, data may not be properly written depending
on its manufacturing quality. In this case, data may not be reproduced correctly.
High quality CD-R or CD-RW disc is recommended.
· Up to 16 characters are displayed for the name of an Album or a Track. ID3TAG
version 1.x is required.
· Note that the unit may not play Tracks in the order that you wrote them to the
disc.

08 13
GENERAL OPERATIONS
LIQUID CRYSTAL DISPLAY
Exhibit current frequency and activated functions on the display (7).
FLASHING LED
If the front panel does not install in the main unit, the LED (8) will be flashing.
DISPLAY
Press DISP button (6) to operate as the conversion of each display mode as follow:
- Time is displayed for 5sec when DISP key is pressed, and it returns to its
previous display ( Folder, File name...) unless DISP key is pressed again.
3) From the clock mode, when DISP Key is pressed for longer than 1sec,
clock mode switches to clock Adjusting mode and the clock display
begins flashing. At this time clock can be changed by pressing (+/-),
or the ENCODER VOLUME.
SELECT MODE
By pressing this button(5) to go to different function mode:
- Tuner (radio)
- CD (MP3 CD)
to go to this mode must be have a CD in.
- Memory Card
to go to this mode must be have a Memory Card in.
- USB
to go to this mode USB device must be connected.
- AUX in put
2. Searching File Name:
·Press AMS twice, then file search is activated.
·Press VOL knob, then the first directory is displayed.
·Turn VOL knob to right or left, you can select the directory you want.
·Press VOL knob again, then the directory is fixed and the first file name is
displayed.
·Turn VOL knob to right or left, you can select the file you want.
·Press VOL knob, then the song you selected will start.
3.Searching Character:
·Press AMS 3 times, then character search mode is activated.
·Press VOL knob, then A?character is displayed.
·Turn VOL knob to right or left, you can select the letter you want.
·Press VOL knob longer than 2 sec.
·The song which has same character you selected is displayed.
·Turn VOL knob to right or left, you can select the song you want.
·Press VOL knob, then the song you selected will start.
CD/SD/MMC/USB OPERATIONS

09
12
ID3 Tag information
This unit supports ID3 tag ver2.0. If an MP3/WMA file has ID3 Tag information,
it will be displayed on the LCD. If there is no ID3 Tag information, nothing will be
shown on LCD. The ID3 Tag information may include File, Folder, Music,Album
or Artist data.
NEXT/PREVIOUS
Press NEXT/PREVIOUS buttons to choose next or previous track. Press longer
than 1 sec., to choose forward playback or backward playback.
PLAY/PAUSE
Press PAUSE button to pause the playback, press one more time to resume the
normal playback.
INTRO (Preview all Tracks)
When this button is pressed, "INT ON" indication is displayed and the first
several seconds of each track of the disc is played. Press again to stop intro and
listen to track.
REPEAT
When RPT button is pressed, "PT ON" indication is displayed and playback of
the selected track will be continually repeated until the track repeat mode is
cancelled by pressing RPT button again.
RANDOM
When RDM button is pressed,"RDM ON" indication is displayed and each track
of the disc is played in random instead of normal order. To cancel RANDOM
mode, press RDM button again.
TRACK DOWN/UP SELECT (In case of MP3/WMA files)
-10/5 button: 10 Track down
+10/6 button: 10 Track up
Selection of MP3/WMA files
1.Searching Track:
·Press AMS, then searching track is activated.
·Press VOL knob, then the first digit is blinking.
·Turn VOL knob to right or left, select first digit you want.
·Press VOL knob, then the first digit is fixed and second digit is blinking.
·Turn VOL knob to right or left, select 2nd 3rd respectively.
·Then automatically the song you selected will start.
CD/SD/MMC/USB OPERATIONS RADIO OPERATIONS
- Program Scanning
Press AMS(MP3) button (13) shortly to scan preset station. When the field strength
level is more than the threshold level of stop level, the radio is holding at that preset
number for several seconds with releasing mute, then searches again.
STATION STORING
Press preset button (14~19)
1) RADIO MODE.
M1 ~ M6
- PRESET MEMORY is loaded when key is pressed for less than 1 second.
- PRESET MEMORY is saved when key is pressed for longer than 1 sec.
2) CD MP3 / FLASH MP3 /
PLAY / PAUSE
Press button (14)preset is activated. During a PAUSE, DISC INDICATOR flashes.
TOP - Fi rst son g wi ll pl ay whe n Top key is pres sed for lon ger tha n 0. 5sec du ring pl ay.
INT
Press preset button (15): During INTRO ON, INT indicator comes on and
begins playing the first 10sec of each song, until the last song is played. It begins
playing the entire track from where INT started
AUTOMATICALLY MEMORY STORING & PROGRAM SCANNING
- Automatically Memory Storing
Press AMS(MP3) button (13) for several seconds, the radio searches from the
current frequency and checks the signal strength until one cycle search is finished.
And then 6 strongest stations are stored into the corresponding preset number
button.
BAND SELECTION
At tuner mode, press BAND button (10) to select the desired band. The
reception band will change in the following order:
STATION SELECTION
Press TUNE/SEEK/TRACK FORWARD button (11) or TUNE/SEEK/TRACK
REVERSE button (12) shortly for manual tuning function.
Press for several seconds the automatic tuning mode (SEEK
mode) is selected.
FM1 FM2 FM3 ( 1) ( 2)AM1 MW AM2 MW

10
RADIO OPERATIONS
11
CD/SD/MMC/USB OPERATIONS
Discs for playback:
This unit can play disc types: CD/CD -R/-RW.
Compatible with formats: CDDA/MP3/WMA.
Loading and ejecting a disc
1. Turn the power on.
2. Insert the disc with the printed side facing upward into the slot.
3. Press EJECT button to eject the disc.
Multi-media card MMC/SD card slot
Support MP3/WMA ID3 format music only. Detach the front panel. Carefully
insert the SD/MMC card into the card slot on the inner panel. Attach the panel.
Unit starts playback automatically.
USB jack
Carefully connect the USB driver to the USB adapter cable and then insert it into
the USB jack on the front panel. Unit starts playback automatically.
USB/SD/MMC notes:
USB functions (flash memory type) MP3 music play.
1. SD/ MMC card support.
2. FAT 12/ FAT 16/ FAT 32 is possible
- FAT 12/16 (dir: 200 support, file:500 support),
- FAT 32 (dir: 200 support, file:500 support).
3. Filename: 32 byte/ Dir name: 32byte.
4. Tag (id3tag ver2.0)
- Title/ Artist/ Album: 32 byte support.
5. Multi card reader not support.
6. USB 2.0 support.
Note:
USB format supports 2.0.
Capacity: up to 4 GB.
SD cards brands: Cannon, Fuji film, Palm, Motorola, Microsoft, IBM, HP,
Compaq, Sharp, Samsung, etc.
Capacity: up to 4 GB. s,
MMC cards brands: Ericsson, Nokia, Motorola, HP, Palm, Sanyo, Microsystem
etc.
Capacity: up to 4 GB.
Note: Because of the great variety of products with SD and MMC card slots and
r
their sometimes quite manufacturer-specific functions the producer can neithe
guarantee that all devices will be recognized nor that all operating options that
are possible in theory will actually work.
SCAN
Press scan button(29) to search radio station.When a station signal strength
level more than the level to stop.The radio will playing the station for 5
seconds and the frequency blinking on the LCD at the same time.
Press and hold scan button(29) more than 3 seconds to select the station which
you desired.The radio will start play the station.
In Radio mode. Press SEL button for several seconds. LCD with show from
DSP OFF/ON AREA USA/EUR. At AREA USA/EUR. You can use VOL +/-
to select the AREA frequency.
AREA USA/EUR SETUP
Table of contents
Other Booster Car Receiver manuals