JVC HR-XV48EK User manual

Filename [XV48EK_02Cov1.fm]
DVD PLAYER &
VIDEO CASSETTE RECORDER
INSTRUCTIONS
LPT0991-001A
HR-XV48EK
XV48EK_01.book Page 1 Thursday, November 18, 2004 10:45 PM

Filename [XV48EK_03Safety.fm]
Masterpage:Left0
2
Page 2 November 18, 2004 10:44 pm
SAFETY FIRST
Safety Precautions
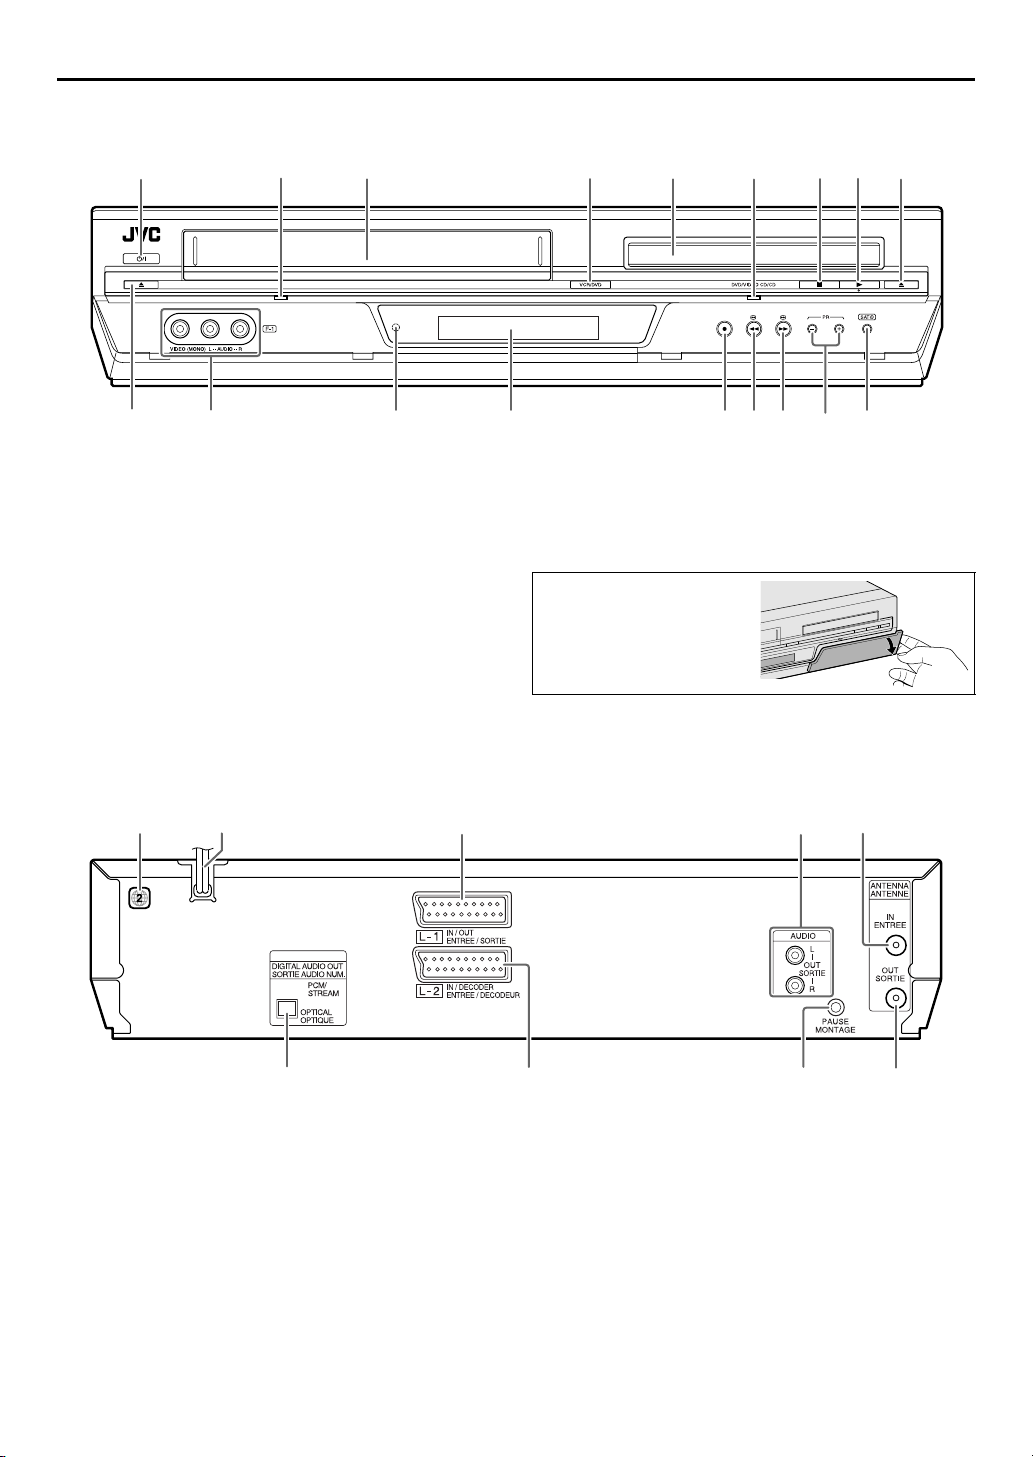
The rating plate and the safety caution are on the rear of the unit.
WARNING:DANGEROUS VOLTAGE INSIDE
WARNING:TO PREVENT FIRE OR SHOCK HAZARD, DO NOT
EXPOSE THIS UNIT TO RAIN OR MOISTURE.
CLASS 1 LASER PRODUCT
REPRODUCTION OF LABELS
WARNING LABEL INSIDE OF THE UNIT
Use only discs marked with the following.
●Manufactured under license from Dolby Laboratories. “Dolby”
and the double-D symbol are trademarks of Dolby
Laboratories.
●“DTS”and “DTS 2.0+ Digital Out” are trademarks of Digital
Theater Systems, Inc.
●Cassettes marked “VHS” (or “S-VHS”) can be used with this
video cassette recorder. However, S-VHS recording is not
possible with this model.
●This model is equipped with SQPB (S-VHS QUASI PLAYBACK)
that makes it possible to play back S-VHS recordings in the SP
mode with regular VHS resolution.
●HQ VHS is compatible with existing VHS equipment.
●VIDEO Plus+ and PlusCode are registered trademarks of
Gemstar Development Corporation. The VIDEO Plus+ system
is manufactured under license from Gemstar Development
Corporation.
●This product incorporates copyright protection technology that
is protected by U.S. patents and other intellectual property
rights. Use of this copyright protection technology must be
authorized by Macrovision Corporation, and is intended for
home and other limited viewing uses only unless otherwise
authorized by Macrovision. Reverse engineering or
disassembly is prohibited.
●“Official DivX Certified™ product”
“Plays DivX®5, DivX®4, DivX®3, and DivX®VOD video
content (in compliance with DivX Certified™ technical
requirements)”
“DivX, DivX Certified, and associated logos are trademarks of
DivXNetworks, Inc. and are used under license.”
CAUTION
8When you are not using the unit for a long period of time, it
is recommended that you disconnect the power cord from
the mains outlet.
8Dangerous voltage inside. Refer internal servicing to
qualified service personnel. To prevent electric shock or fire
hazard, remove the power cord from the mains outlet prior
to connecting or disconnecting any signal lead or aerial.
IMPORTANT
Connection to the mains supply in the United Kingdom.
DO NOT cut off the mains plug from this equipment. If the
plug fitted is not suitable for the power points in your home or
the cable is too short to reach a power point, then obtain a
proper safety approved extension lead/adapter or consult your
dealer.
In the unlikely event of the plug fuse failing be sure to replace
the fuse only with an identical approved type, as originally
fitted, and to replace the fuse cover. If the fuse fails again
consult your nearest JVC dealer.
If nonetheless the mains plug is cut off remove the fuse and
dispose of the plug immediately, to avoid a possible shock
hazard by inadvertent connection to the mains supply.
If this product is not supplied fitted with a mains plug then
follow the instructions given below:
DO NOT make any connection to the Larger Terminal coded E
or Green.
The wires in the mains lead are coloured in accordance with
the following code:
If these colours do not correspond with the terminal
identifications of your plug, connect as follows:
Blue wire to terminal coded N (Neutral) or coloured Black.
Brown wire to terminal coded L (Live) or coloured Red.
If in doubt — consult a competent electrician.
CAUTION
A DVD/VCR IS A CLASS 1 LASER PRODUCT. HOWEVER THIS
DVD/VCR USES A VISIBLE LASER BEAM WHICH COULD
CAUSE HAZARDOUS RADIATION EXPOSURE IF DIRECTED.
BE SURE TO OPERATE THE UNIT CORRECTLY AS
INSTRUCTED.
WHEN THIS DVD/VCR IS PLUGGED INTO THE WALL
OUTLET, DO NOT PLACE YOUR EYES CLOSE TO THE
OPENING OF THE DISC TRAY AND OTHER OPENINGS TO
LOOK INTO THE INSIDE OF THIS DVD/VCR.
USE OF CONTROLS OR ADJUSTMENTS OR PERFORMANCE
OF PROCEDURES OTHER THAN THOSE SPECIFIED HEREIN
MAY RESULT IN HAZARDOUS RADIATION EXPOSURE.
DO NOT OPEN COVERS AND DO NOT REPAIR YOURSELF.
REFER SERVICING TO QUALIFIED PERSONNEL.
Blue to N (Neutral) or Black
Brown to L (Live) or Red
IMPORTANT
8Please read the various precautions on pages 2 and 3 before
installing or operating the unit.
8It should be noted that it may be unlawful to re-record pre-
recorded tapes, DVDs, or discs without the consent of the
owner of copyright in the sound or video recording,
broadcast or cable programme and in any literary, dramatic,
musical, or artistic work embodied therein.
DVD VIDEO
(8 cm /12 cm disc) Audio CD
(8 cm /12 cm disc)
Video CD
(8 cm /12 cm disc) Super Video CD
(8 cm /12 cm disc)
The STANDBY/ON 1button does not completely shut off
mains power from the unit, but switches operating current on
and off. “`” shows electrical power standby and “!” shows
ON.
Video tapes recorded with this unit in the LP (Long Play) mode
cannot be played back on a single-speed video recorder. (VHS
deck only)
XV48EK_01.book Page 2 Thursday, November 18, 2004 10:45 PM

Masterpage:Right-No-Heading
3
Filename [XV48EK_03Safety.fm]
Page 3 November 18, 2004 10:44 pm
When the equipment is installed in a cabinet or a shelf, make
sure that it has sufficient space on all sides to allow for ventilation
(10 cm or more on both sides, on top and at the rear.)
When discarding batteries, environmental problems must be
considered and the local rules or laws governing the disposal of
these batteries must be followed strictly.
Failure to heed the following precautions may result in
damage to the unit, remote control or video cassette.
1. DO NOT place the unit —
— in an environment prone to extreme temperatures or
humidity.
— in direct sunlight.
— in a dusty environment.
— in an environment where strong magnetic fields are
generated.
— on a surface that is unstable or subject to vibration.
2. DO NOT block the unit’s ventilation openings or holes.
(If the ventilation openings or holes are blocked by a
newspaper or cloth, etc., the heat may not be able to get out.)
3. DO NOT place heavy objects on the unit or remote control.
4. DO NOT place anything which might spill on top of the unit
or remote control.
(If water or liquid is allowed to enter this equipment, fire or
electric shock may be caused.)
5. DO NOT expose the apparatus to dripping or splashing.
6. DO NOT use this equipment in a bathroom or places with
water. Also DO NOT place any containers filled with water or
liquids (such as cosmetics or medicines, flower vases, potted
plants, cups, etc.) on top of this unit.
7. DO NOT place any naked flame sources, such as lighted
candles, on the apparatus.
8. AVOID violent shocks to the unit during transport.
MOISTURE CONDENSATION
Moisture in the air will condense on the unit when you move it
from a cold place to a warm place, or under extremely humid
conditions—just as water droplets form on the surface of a glass
filled with cold liquid. Moisture condensation on the head drum
will cause damage to the tape. In conditions where condensation
may occur, keep the unit turned on for a few hours to let the
moisture dry.
Some Do’s And Don’ts On
The Safe Use Of Equipment
This equipment has been designed and manufactured to
meet international safety standards but, like any
electrical equipment, care must be taken if you are to
obtain the best results and safety is to be assured.
DO read the operating instructions before you attempt to
use the equipment.
DO ensure that all electrical connections (including the
mains plug, extension leads and interconnections
between pieces of equipment) are properly made
and in accordance with the manufacturer’s
instructions. Switch off and withdraw the mains plug
when making or changing connections.
DO consult your dealer if you are ever in doubt about
the installation, operation or safety of your
equipment.
DO be careful with glass panels or doors on equipment.
DON’T continue to operate the equipment if you are in
any doubt about it working normally, or if it is
damaged in any way — switch off, withdraw the
mains plug and consult your dealer.
DON’T remove any fixed cover as this may expose
dangerous voltages.
DON’T leave equipment switched on when it is
unattended unless it is specifically stated that it
is designed for unattended operation or has a
standby mode. Switch off using the switch on
the equipment and make sure that your family
knows how to do this. Special arrangements may
need to be made for infirm or handicapped
people.
DON’T use equipment such as personal stereos or radios
so that you are distracted from the requirements
of road safety. It is illegal to watch television
whilst driving.
DON’T listen to headphones at high volume, as such use
can permanently damage your hearing.
DON’T obstruct the ventilation of the equipment, for
example with curtains or soft furnishings.
Overheating will cause damage and shorten the
life of the equipment.
DON’T use makeshift stands and NEVER fix legs with
wood screws — to ensure complete safety
always fit the manufacturer’s approved stand or
legs with the fixings provided according to the
instructions.
DON’T allow electrical equipment to be exposed to rain
or moisture.
ABOVE ALL...
ATTENTION
To mobile phone users:
Using a mobile phone in the vicinity of the unit may cause
picture vibration on the TV screen or change the screen to a
blue back display.
On placing the unit:
Some TVs or other appliances generate strong magnetic fields.
Do not place such appliances on top of the unit as it may cause
picture disturbance.
—NEVER let anyone especially children push
anything into holes, slots or any other opening in
the case — this could result in a fatal electrical
shock;
—NEVER guess or take chances with electrical
equipment of any kind — it is better to be safe
than sorry!
XV48EK_01.book Page 3 Thursday, November 18, 2004 10:45 PM

Filename [XV48EK_03Safety.fm]
Masterpage:Left0
4
Page 4 November 18, 2004 10:44 pm
CONTENTS
SAFETY FIRST 2
Safety Precautions ............................................... 2
Some Do’s And Don’ts On The Safe Use Of
Equipment ........................................................ 3
DISC INFORMATION 5
About Discs ......................................................... 5
INDEX 7
INSTALLING YOUR NEW UNIT 10
Check Contents ................................................. 10
Basic Connections ............................................. 11
INITIAL SETTINGS 12
Auto Set Up ....................................................... 12
Preset Download ............................................... 13
Initial Set Up for DVD Deck .............................. 15
Language ........................................................... 16
OPERATIONS ON VHS DECK 18
Basic Playback .................................................. 18
Playback Features .............................................. 19
Basic Recording ................................................ 21
Recording Features ............................................ 22
B.E.S.T. Picture System ...................................... 23
VIDEO Plus+®Timer Programming ................... 24
Express Timer Programming .............................. 26
Automatic Satellite Programme Recording ......... 28
OPERATIONS ON DVD DECK 30
Basic Playback .................................................. 30
Playback Features .............................................. 31
Using the On-Screen Bar ................................... 38
Audio/Video Files Playback ............................... 40
EDITING (VHS DECK) 44
Editing from a Camcorder .................................. 44
Editing to or from Another Video Recorder ........ 45
Dubbing (from DVD to VHS) ............................. 46
EDITING (DVD DECK) 47
Digital Audio Dubbing ...................................... 47
REMOTE CONTROL 48
Remote Control Functions ................................. 48
SYSTEM CONNECTIONS 50
Connecting to a Satellite Receiver ..................... 50
Connecting to a Dolby Digital Decoder or an Ampli-
fier with a Built-In DTS (DVD deck only) ........ 51
SUBSIDIARY SETTINGS 52
Mode Set (VHS deck) ......................................... 52
Mode Set (DVD deck) ........................................ 55
Tuner Set ........................................................... 59
Video Channel Set ............................................. 64
Clock Set ........................................................... 65
Child Lock ......................................................... 66
TROUBLESHOOTING 67
SPECIFICATIONS 70
LIST OF TERMS 71
XV48EK_01.book Page 4 Thursday, November 18, 2004 10:45 PM

Masterpage:Right0
5
Filename [XV48EK_05DiscInfo.fm]
Page 5 November 18, 2004 10:45 pm
DISC INFORMATION
About Discs
Playable Discs
You can use discs with the following logos for playback only.
●The following discs also can be played back.
• DVD-R/-RW discs recorded in DVD VIDEO format and
finalized.
• CD-R/RW discs recorded in Video CD, SVCD (Super Video
CD), or Audio CD format and finalized.
• The DivX file on the DVD-R and DVD-RW discs written in
the UDF format.
• CD-R/RW discs written in MP3/JPEG/DivX in accordance
with the “ISO 9660” format. (See page 40 for details.)
●This unit can also play back audio signals recorded in MIX-
MODE CD, CD-G, CD-EXTRA, and CD TEXT.
●The image may be sometimes poor or noisy due to defects in
the disc itself.
●With some discs, operations may not be possible.
Marks of discs in this instruction manual
Unplayable Discs
The following types of discs cannot be played using this unit.
●CD-ROM discs (including PHOTO-CD)
●DVD AUDIO discs
●Super Audio CDs (SACD)
●DVD-RW discs recorded in VR format
●DVD-RAM discs
●DVD-ROM discs
In addition, this unit does not play:
●Unfinalized discs
●Discs of irregular shape or discs with tape, seals, or paste on
either the label side or playback side. Playing back these discs
may damage the unit.
Region Number
The world is divided into 6 regions for DVD VIDEO discs. DVD
VIDEO discs are assigned a region number to indicate which
region they may be played back in. A disc cannot be played
back on this unit unless the region number of the disc matches
that of the unit. The region number for this unit is “2.” Only discs
whose region number includes “2” can be played back such as
shown below.
Examples of DVD VIDEO labels which can be played back using
this unit.
DVD VIDEO Marks
Sometimes marks are printed on a DVD disc and/or on its
packaging to indicate information regarding the contents and
functions of a disc. Check marks indicating the contents and
functions of a disc. Note, however, that in some cases a disc may
not include a mark even for a function it supports.
Marks related to video
Marks related to audio
DVD VIDEO Video CD/Super Video CD
Audio CD
CD-DA files
Allows operation with a
DVD VIDEO disc.
Allows operation with a
Video CD disc.
Allows operation with a
SVCD disc.
Allows operation with
an Audio CD disc.
Number of subtitles Number of angles
Recorded under the
standard 4:3 aspect
ratio
Screen includes black
bands at top and
bottom of image
which has a standard
4:3 aspect ratio (letter
box)
Video playback is in Wide video mode (16:9) on
wide televisions, but in letter box on televisions
with standard 4:3 aspect ratio.
Video playback is in Wide video mode (16:9) on
wide televisions, but pan and scan is used on
televisions with standard 4:3 aspect ratio (either
the left or right side of the image is cut-out).
Number of audio tracks
Dolby Digital mark
Dolby Laboratories has developed a digital
surround system for the home. This mark
indicates that you may enjoy 5.1-channel
audio (front left and right, center, rear left and
right, and a channel for LFE (Low-Frequency
Effects)).
DTS (Digital Theater System)
You can enjoy DTS audio if you connect an
amplifier with a built-in DTS decoder to the
DIGITAL AUDIO OUT connector of the unit.
ALL 2
52 5
3
4
2
3
2
1
6
5
4
XV48EK_01.book Page 5 Thursday, November 18, 2004 10:45 PM

Filename [XV48EK_05DiscInfo.fm]
Masterpage:Left+
Page 6 November 18, 2004 10:45 pm
DISC INFORMATION (cont.)
6
File Structure of Discs
DVD VIDEO
Typically, DVD VIDEO discs are made up of larger units called
“titles.” Each title has a number (title number) that can be used to
select desired titles. Titles are further divided into units called
“chapters.” Each chapter has a number (chapter number) that
can also be used to select desired chapters. Note that some discs
are not divided into titles and chapters.
Audio CD/Video CD
Typically, Audio CD discs are divided into separate tracks each
containing one song. Each track is assigned a number. For
example, the third track is Track 3. The same is true for Video
CD discs.
NOTE:
Video CD discs that support Playback Control (PBC)
The still image or motion image which follows a menu screen is
called a “scene.” Each scene has a scene number.
For more details, refer to “Locating a Desired Scene Using the
Menu of a Video CD/SVCD with Playback Control (PBC)
Function” (墌pg. 31).
Placing a Disc
1Open the disc tray.
Press xon the DVD deck to open the disc tray.
●The unit’s power comes on
automatically.
●Do not block the disc tray with
your hand while it is opening or
closing as this may result in
hardware failure.
●Do not place unplayable discs or
any object other than a disc in
the disc tray.
●Do not press down strongly on the disc tray or place any heavy
objects on it.
2Place the disc.
Place the disc in the disc tray with
the label side facing up.
●Since disc size changes depending on
the disc to be played back, be sure to
correctly align the disc with the
grooves for its size. If the disc is not in
its groove, it may be scratched or
otherwise damaged.
●To insert an 8 cm disc, place it according to the inner groove.
3Press xon the DVD deck to close the disc tray.
●Pressing 4also closes the disc tray.
●Playback begins automatically if an auto-playback DVD disc is
loaded. Although the VHS deck is selected, the DVD deck is
selected automatically (except when the VHS deck is in the
timer mode or the Automatic Satellite Programme Recording
mode.)
Care and Handling of Discs
How to handle discs
When handling a disc, do not
touch the surface of the disc.
Since discs are made of
plastic, they are easily
damaged. If a disc gets dirty,
dusty, scratched or warped,
the images and sound will not
be picked up correctly, and such a disc may cause the unit to
malfunction.
Label side
Do not damage the label side, stick paper to or use any adhesive
on its surface.
Storage
Make sure that discs are kept in their cases. If discs are piled on
top of one another without their protective cases, they can be
damaged. Do not put discs in a location where they may be
exposed to direct sunlight, or in a place where the humidity or
temperature is high. Avoid leaving discs in your car!
Maintenance of discs
If there are fingerprints or other dirt
adhering to a disc, wipe with a soft dry
cloth, moving from the center outwards.
If a disc is difficult to clean, wipe with a
cloth moistened with water. Never use
record cleaners, petrol, alcohol or any
anti-static agents.
Title1 Title2
Chapter 1 Chapter 2
Chapter 1Chapter 3
Chapter 2
Track 1 Track 4Track 3Track 2
CAUTION
Sometimes during playback, noise or images may be garbled.
This is sometimes due to the disc. (It may not be up to
industry standards.)
These symptoms are caused by the discs, not by the
malfunction of the unit.
XV48EK_01.book Page 6 Thursday, November 18, 2004 10:45 PM

Masterpage:Right0
7
Filename [XV48EK_06Index.fm]
Page 7 November 18, 2004 10:45 pm
INDEX
Front View
ASTANDBY/ON Button (1) 墌pg. 12, 18, 40
BVCR Indicator 墌pg. 18, 21
CCassette Loading Slot 墌pg. 18
DVCR/DVD Button 墌pg. 18, 21, 30, 40
EDisc Tray 墌pg. 30
FDVD Indicator 墌pg. 30
GStop Button (8) 墌pg. 18, 21, 30, 41, 48
HPlay Button (4) 墌pg. 18, 21, 30, 41, 48
IDVD Open/Close Button (x) 墌pg. 30, 41
JCassette Eject Button (x) 墌pg. 18, 21
KVideo/Audio Input Connectors (VIDEO/AUDIO)
墌pg. 44
LInfrared Beam Receiving Window
MFront Display Panel 墌pg. 8
NRecord Button (7) 墌pg. 21, 22
ORewind Button (3) 墌pg. 18, 19, 32
PFast Forward Button (5) 墌pg. 18, 19, 32
QProgramme Button (PR +/–) 墌pg. 21
RAutomatic Satellite Programming Button (SAT#)
墌pg. 28
Rear View
ARegion Number Label 墌pg. 5
BMains Power Cord 墌pg. 11
CL-1 Input/Output Connector (L-1 IN/OUT) 墌pg. 11,
45, 50
DAudio Output Connectors (AUDIO OUT (L/R))
EAntenna Input Connector (ANTENNA IN) 墌pg. 11,
50
FDigital Audio Output Connector
(DIGITAL AUDIO OUT) 墌pg. 47, 51
GL-2 Input/Decoder Connector
(L-2 IN/DECODER) 墌pg. 45, 50
HRemote Pause Connector (PAUSE) 墌pg. 44
I
Antenna Output Connector (ANTENNA OUT)
墌
pg. 11,
50
FACBDEGHI
JK L M NOPQR
To access covered
connectors or buttons, pull
and open the cover.
DVD
AC
FI
B D E
H
G
XV48EK_01.book Page 7 Thursday, November 18, 2004 10:45 PM

Filename [XV48EK_06Index.fm]
Masterpage:Left+
Page 8 November 18, 2004 10:45 pm
INDEX (cont.)
8
Front Display Panel
AVCR Mode Indicator 墌pg. 21, 22
BChannel/Clock Display
Mode Display (L-1, L-2, F-1 or SAT*)
* When “L-2 SELECT” is set to “SAT” (
墌
pg. 54), “SAT” appears
instead of “L-2”.
Counter Display
Tape Speed (SP/LP) 墌pg. 21
Multi-information window*
* The current group/title/track/chapter number(s), time and status
information.
CVCR Indicator 墌pg. 22
D“Timer” Indicator 墌pg. 25, 26, 29
EAutomatic Satellite Programme Recording Indicator
(N) 墌pg. 29
On-Screen Display (VHS deck)
If you press ––:––on the remote control when “O.S.D.”
is set to “ON” (墌pg. 53), various operational indicators
appear on the TV screen.
For the on-screen display for DVD deck, refer to “Using
the On-Screen Bar” (墌pg. 38).
A“Cassette Loaded” Mark
BOperation Mode Indicators
CChannel Position Number and Station Name/Auxiliary
Input Indicator (L-1, L-2, F-1 or SAT*)
* When “L-2 SELECT” is set to “SAT” (
墌
pg. 54), “SAT” appears
instead of “L-2.”
DClock Display
ECurrent Day/Month/Year
FType of Broadcast 墌pg. 23
GPDC* Indicator 墌pg. 24, 26
* VPS (Video Programme System) recording is not currently available
in the U.K. and not possible with this unit.
HTape Position Indicator
The tape position indicator
appears on the TV screen
when you press 3or
5from the Stop mode or
perform an Index Search.
(墌pg. 19) The position of
“q” in relation to “0”
(beginning) or “+” (end)
shows you where you are
on the tape.
NOTE:
Depending on the type of tape being used, the tape position
indicator may not appear correctly.
IAudio Mode Display 墌pg. 20
JTape Speed (SP/LP)
KTape Direction
LIndex Mark Indicator (MARK) 墌pg. 21
MCounter Display
NTape Remaining Time Indicator 墌pg. 22
CDE
A B
Beginning End
XV48EK_01.book Page 8 Thursday, November 18, 2004 10:45 PM

Masterpage:Right-No-Heading
9
Filename [XV48EK_06Index.fm]
Page 9 November 18, 2004 10:45 pm
Remote Control ATV Standby/On Button (TV 1) 墌pg. 49
BTV/VCR/DVD switch 墌pg. 13, 15, 18, 21, 30, 40, 49
CDVD Button 墌pg. 15, 30, 40
DVCR Button 墌pg. 15, 18, 21, 24, 26
ENumber Keys
FDaily Button (DAILY) 墌pg. 25, 27
GPDC* Button 墌pg. 24, 26
* VPS (Video Programme System) recording is not currently available
in the U.K. and not possible with this unit.
HReset Button (0000) 墌pg. 22
Cancel Button (&) 墌pg. 24, 27
IAuxiliary Button (AUX) 墌pg. 44
JStart Time Button (START +/–) 墌pg. 26
Repeat Button (REPEAT) 墌pg. 33
Zooming Button (ZOOM) 墌pg. 32
KStop Time Button (STOP +/–) 墌pg. 26
On Screen Button (ON SCREEN) 墌pg. 38
LProgramming Button (PROG) 墌pg. 24, 26
MTape Speed Button (p) 墌pg. 21, 24, 26
Top Menu Button (TOP MENU) 墌pg. 31
NProgramme Check Button (") 墌pg. 27
Return Button (RETURN) 墌pg. 31
OweButton
rt Button
ENTER Button
VCR Programme Button (VCR PR +/–)
PSet Up Menu Button (SET UP) 墌pg. 13, 15, 52, 55
QPlay Button (4) 墌pg. 18, 30
RRewind Button (3) 墌pg. 18, 19, 32
SRecord Button (7) 墌pg. 21, 22
TForward Skip/Index Button (6) 墌pg. 19, 31
UReverse Skip/Index Button (2) 墌pg. 19, 31
Review Button ( ) 墌pg. 20
VDVD Picture Button (DVD PICTURE) 墌pg. 36
WSound Effect Button (SOUND EFFECT) 墌pg. 37
XStandby/On Button (1) 墌pg. 12, 18, 40
YTV Muting Button ( ) 墌pg. 49
Audio Monitor Button (A.MONITOR) 墌pg. 20, 23,
35
ZTV/VCR Button 墌pg. 22
aTV Volume Button (TV %+/–) 墌pg. 49
bWeekly Button (WEEKLY) 墌pg. 25, 27
cTV Programme Button (TV PR +/–) 墌pg. 49
dProgramme Button (PR +/–) 墌pg. 21, 26
eDate Button (DATE +/–) 墌pg. 26
Subtitle Button (SUBTITLE) 墌pg. 34
Angle Button (ANGLE) 墌pg. 35
Timer Button (#) 墌pg. 25, 26, 27
gMenu Button (MENU) 墌pg. 31
hAutomatic Satellite Programming Button (REC LINK)
墌pg. 28
iDisplay Button (– –:– –) 墌pg. 22
jFast Forward Button (5) 墌pg. 18, 19, 32
kStop/Clear Button (8) 墌pg. 18, 21, 30
lPause Button (9) 墌pg. 19, 21, 30
mOne Touch Replay Button ( ) 墌pg. 19, 32
nSkip Search Button ( ) 墌pg. 19
oTracking Button (TRACKING +/–) 墌pg. 20
Buttons with a small dot on the left side of the name can also
be used to operate your JVC TV. (墌pg. 49)
How To Use
The remote control can operate most of your unit’s functions,
as well as basic functions of TV sets of JVC. (墌pg. 49)
●Point the remote control toward the receiving window.
●The maximum operating distance of the remote control is
about 8 m.
NOTES:
●When inserting the batteries, be sure to insert in the correct
directions as indicated under the battery cover.
●If the remote control doesn’t work properly, remove its
batteries, wait a short time, replace the batteries and then try
again.
F
A
C
B
D
E
G
H
I
J
K
L
M
N
O
P
Q
R
S
T
U
V
W
b
Y
X
Z
a
c
d
e
g
h
i
j
n
k
l
m
o
XV48EK_01.book Page 9 Thursday, November 18, 2004 10:45 PM

Filename [XV48EK_06Index.fm]
Masterpage:Left0
10
Page 10 November 18, 2004 10:45 pm
INSTALLING YOUR NEW UNIT
Check Contents
CHECK ALL THE CONTENTS SHOWN BELOW
4
You are now ready to install your unit. (墌pg. 11)
DVD Player and Video Cassette Recorder
RF Cable “AA” Batteries (x 2)
Infrared Remote Control Unit
XV48EK_01.book Page 10 Thursday, November 18, 2004 10:45 PM

Masterpage:Right-No-Heading
11
Filename [XV48EK_06Index.fm]
Page 11 November 18, 2004 10:45 pm
Basic Connections It’s essential that your unit be properly connected.
ASituate the unit.
Place the unit on a stable, horizontal surface.
BConnect the unit to TV.
The connection method you use depends on the type of
TV you have.
RF Connection
8To connect to a TV with NO AV input connectors —
ADisconnect the TV aerial cable from the TV.
BConnect the TV aerial cable to the ANTENNA IN
connector on the rear panel of the unit.
CConnect the provided RF cable between the
ANTENNA OUT connector on the rear panel of the
unit and the TV’s aerial connector.
AV Connection
8To connect to a TV with AV input connectors —
If your TV is equipped with a 21-pin SCART connector,
perform AV connection to improve picture quality during
tape playback.
AConnect the aerial, unit and TV as per “RF
Connection.”
BConnect an optional 21-pin SCART cable between the
L-1 IN/OUT connector on the rear panel of the unit
and the TV’s 21-pin SCART connector.
CConnect the unit to mains.
Plug the end of the mains power cord into a mains outlet.
TV aerial cable
RF cable (provided)
21-pin SCART cable
(not provided)
Mains power cord
Mains outlet
Back of unit
TV
THESE STEPS MUST BE COMPLETED BEFORE ANY
VIDEO OPERATION CAN BE PERFORMED.
After the connection is completed, perform “Auto Set
Up” on page 12.
XV48EK_01.book Page 11 Thursday, November 18, 2004 10:45 PM

Filename [XV48EK_06Index.fm]
Masterpage:Left0
12
Page 12 November 18, 2004 10:45 pm
INITIAL SETTINGS
Auto Set Up
Auto Channel Set/Auto Clock Set/
Auto Guide Program Number Set
ATurn on the unit.
Press 1on the unit or remote control.
BPerform Auto Set Up.
The AUTO SET/T-V LINK display appears on the TV
screen.
.
●When you have connected the unit to a TV offering T-V Link
via a fully-wired 21-pin SCART cable (墌pg. 11) and the TV is
turned on, the unit automatically performs the Preset
Download (墌pg. 13) even if you select “AUTO SET” for Auto
Set Up function.
CConfirm/Set video channel.
With RF Connection
The video channel that is
blinking on the front display
panel is your video channel. Press ENTER.
●To view picture signals from the unit, set your TV to the video
channel.
With AV Connection
Press PR – until the front
display panel shows “– –.”
Now the video channel is set to off. Then press ENTER.
●To view picture signals from the unit, set your TV to its AV
mode.
NOTES:
●In areas where no TV station transmits a PDC (Programme
Delivery Control) signal, the unit can perform neither Auto
Clock Set nor Auto Guide Program Number Set.
●If there is a power cut, or if you press 1or SET UP while Auto
Set Up is in progress, Auto Set Up will be interrupted; be sure
to turn off the unit power once and try again from step A.
●Auto Clock Set may not function properly depending on the
reception condition.
After the 1button on the unit or remote control is pressed
for the first time to power on the unit, the Auto Set Up
function sets the tuner channels, clock and Guide Program
numbers automatically.
Before starting, make sure of the following:
●The TV aerial cable should be connected to the unit.
●The unit’s mains power cord should be connected to a
mains outlet.
●The TV should be set to its AV mode (with AV connection
墌pg. 11) or UHF channel 52 (with RF connection
墌pg. 11).
●Slide the TV/VCR/DVD switch on the remote control to the
right.
Press rt to move the
highlight bar (pointer) to
“AUTO SET” and press
ENTER or e.
●When selecting “AUTO SET,”
“Auto” also appears on the
front display panel.
Slide to the
right.
While Auto Set Up is in progress, do NOT press any
button on the unit or remote control until the front
display panel shows either the display as illustrated in
step Cor “– –:– –” as illustrated on page 14.
●The AUTO SET screen will
appear on the TV screen. As
Auto Set Up progresses, the
“q” mark on the TV screen
moves from left to right.
A
TTENTION
Once you have performed Auto Set Up, even if the unit’s
memory backup has expired, all the stored stations and their
Guide Program numbers remain in the unit’s memory and
the unit will not perform Auto Set Up again. The unit
performs only Auto Clock Set when the unit is turned on.
If you have moved to a different area, perform each setting as
required.
●Video channel setting (for RF connection users) 墌pg. 64
●Tuner setting 墌pg. 59
●Clock setting 墌pg. 65
If a new station starts broadcasting in your area, perform
tuner setting (墌pg. 59) and, if necessary, video channel
setting (墌pg. 64).
After “Auto Set Up” is completed, perform “Initial Set
Up for DVD Deck” on page 15.
Beginning End
XV48EK_01.book Page 12 Thursday, November 18, 2004 10:45 PM

Masterpage:Right-No-Heading
13
Filename [XV48EK_06Index.fm]
Page 13 November 18, 2004 10:45 pm
Preset Download
Auto Channel Set by Downloading
from TV/Auto Clock Set/Auto Guide
Program Number Set
If you have connected the unit to your TV via the AV connection
(墌pg. 11), the unit will automatically perform Preset
Download instead of the Auto Set Up in step Bon page 12.
After downloading, the unit sets the clock and Guide Program
numbers automatically.
NOTES:
●For details, refer to the instruction manual of your TV.
●In areas where no TV station transmits a PDC (Programme
Delivery Control) signal, the unit can perform neither Auto
Clock Set nor Auto Guide Program Number Set.
●If there is a power cut, or if you press 1or SET UP while
downloading or set up is in progress, it will be interrupted; be
sure to turn off the unit power once and try again from the
beginning.
●Auto Clock Set may not function properly depending on the
reception condition.
●On this unit, the characters available for station names (ID) are
A–Z, 0–9, –, f, + and I(space). Some names of downloaded
stations may differ from those of your TV. (墌pg. 61)
ATurn on the unit.
Press 1on the unit or remote control.
BPerform Preset Download.
The AUTO SET/T-V LINK display appears on the TV
screen.
CSet the video channel.
Set the video channel to off manually. (墌pg. 64)
ATTENTION
You can use this function only with a TV offering T-V Link,
etc.* Be sure to use a fully-wired 21-pin SCART cable.
* Compatible with TVs offering T-V Link, EasyLink, Megalogic,
SMARTLINK, Q-Link or DATA LOGIC via fully-wired 21-pin SCART
cable. The degree of compatibility and available functions may
differ by system.
Slide the TV/VCR/DVD switch on the remote control to the
right.
Slide to the
right.
Press rt to move the
highlight bar (pointer) to
“T-V LINK” and press ENTER
or e.
●When selecting “T-V LINK,”
“CH – –” also appears on the
front display panel.
Preset positions on the front display panel increase from “1”;
do NOT press any button on the unit or remote control until
the front display panel shows clock time, “1” or “– –:– –” as
illustrated on page 14.
●The T-V LINK screen will
appear. Then the GUIDE
PROG SET screen will appear
during Guide Program
Number Set. When Preset
Download is completed,
“COMPLETED” appears for
about 5 seconds, then the
normal screen appears.
●If you press any button on the
unit or remote control while
downloading is in progress, it
will be interrupted.
After “Preset Download” is completed, perform
“Initial Set Up for DVD Deck” on page 15.
XV48EK_01.book Page 13 Thursday, November 18, 2004 10:45 PM

Filename [XV48EK_06Index.fm]
Masterpage:Left+
Page 14 November 18, 2004 10:45 pm
INITIAL SETTINGS (cont.)
14
Results of Auto Set Up/Preset
Download Appear on the Front Display
Panel
If both Auto Channel Set and Auto
Clock Set have been performed
successfully, the correct current time
is displayed.
Turn on the TV and select its video channel or AV mode, then
make sure that all necessary stations have been stored in the
unit’s memory by using the PR button(s).
●If station names (ID – 墌pg. 62) have also been stored in the
unit’s memory, the station name will be displayed at the top
left corner of the TV screen for about 5 seconds when the unit
is tuned to a different station.
●If you want to set the tuner manually such as to add or skip
channels, to change channel positions, or to set or change
station names, see pages 60 – 62.
If Auto Channel Set has succeeded
but Auto Clock Set has not, “1”
(channel position) is displayed.
ATurn on the TV and select its video channel or AV mode, then
make sure that all necessary stations have been stored in the
unit’s memory by using the PR button(s).
●If station names (ID – 墌pg. 62) have also been stored in the
unit’s memory, the station name will be displayed at the top
left corner of the TV screen for about 5 seconds when the unit
is tuned to a different station.
●If you want to set the tuner manually such as to add or skip
channels, to change channel positions, or to set or change
station names, see pages 60 – 62.
BPerform “Clock Set” on page 65.
If both Auto Channel Set and Auto
Clock Set have failed, “– –:– –” is
displayed.
Make sure the cables are connected properly and turn off the
unit’s power once, then turn the unit’s power back on again.
Perform “Auto Set Up” on page 12 or “Preset Download” on
page 13 again.
IMPORTANT
●To check if the Guide Program numbers have been set
correctly, perform the VIDEO Plus+ Timer Programming.
(墌pg. 24) (VHS deck only)
●In certain reception conditions, station names may not be
stored correctly, and auto Guide Program Number Set may not
work properly. If the Guide Program numbers are not set
properly when you timer-record a TV programme using the
VIDEO Plus+ system, the unit will record a TV programme of a
different station. When programming the timer using the
VIDEO Plus+ system, be sure to check the desired channel is
selected correctly. (墌pg. 24, “VIDEO Plus+
®
Timer
Programming”) (VHS deck only)
●Your unit memorizes all detected stations even if reception of
some of them is poor. You can delete those stations with an
unacceptable picture. (墌pg. 60, “Deleting a Channel”)
INFORMATION
Language for the on-screen display (DVD deck)
About the on-screen language for the DVD deck, see page 15.
Just Clock
Your unit is equipped with the Just Clock function which
provides accurate time keeping through automatic adjustments
at regular intervals, by reading data from a PDC signal. If you
want to take advantage of this function, simply set it to “ON.”
(墌pg. 65, “Just Clock”)
T-V Link Functions
When you connect the unit to your TV via a fully-wired 21-pin
SCART cable (墌pg. 11), the following functions are available.
You can use these functions only with a TV offering T-V Link,
etc.*
For details, refer to the instruction manual of your TV.
* Compatible with TVs offering T-V Link, EasyLink, Megalogic,
SMARTLINK, Q-Link or DATA LOGIC via fully-wired 21-pin SCART
cable. The degree of compatibility and available functions may differ by
system.
TV Auto Power On
The TV will turn on and be set to its AV mode automatically
whenever you play a tape.
For details, refer to the instruction manual of your TV.
Unit Auto Standby
You can use your TV’s remote control to turn off the unit.
For details, refer to the instruction manual of your TV.
Direct Rec (VHS deck only)
You can easily start recording the programme that you are
watching on your TV. When you use this function, set “DIRECT
REC” to “ON.” (墌pg. 53)
If you have any difficulty with the above
procedures call the JVC Customer Service Hot Line
on 0870 330 5000
XV48EK_01.book Page 14 Thursday, November 18, 2004 10:45 PM

Masterpage:Right-No-Heading
15
Filename [XV48EK_06Index.fm]
Page 15 November 20, 2004 6:55 pm
Initial Set Up for DVD
Deck
When you turn on the DVD deck of the unit for the first
time after you purchase, the menu screen for making the
initial settings appears on the TV screen.
Make the following settings.
ATurn on the unit.
Press 1.
BSelect the DVD deck.
On the unit
Press VCR/DVD repeatedly so that the DVD indicator
lights up.
On the remote control
Press DVD so that the DVD indicator lights up.
The following message appears on the TV screen.
Press ENTER to start the initial setting.
CSelect the on-screen language for the DVD
deck.
The DVD deck offers you the
choice to view on-screen
messages in 3 different
languages.
Press rt to select the
desired language, then press
ENTER.
DSelect the type of your monitor connected to
the unit.
Press rt to select the
desired setting, then press
ENTER.
●16:9 (Wide television conversion):
Select this for a wide-screen (16:9) TV.
●4:3 LB (Letter Box conversion):
Select this for a conventional (4:3)
TV. While viewing a wide screen
picture, the black bars appear on the
top and the bottom of the screen.
●4:3 PS (Pan Scan conversion):
Select this for a conventional (4:3)
TV. While viewing a wide screen
picture, the black bars do not
appear; however, the left and right
edges of the pictures will not be
shown on the screen.
ESelect the signal type of the digital audio
output.
Set this item correctly
according to the logo on your
amplifier or decoder.
Press rt to select the desired
setting, then press ENTER.
(If you do not connect the unit
to such a device, press ENTER
to finish the initial setting.)
●PCM ONLY: Select this when connecting to an
amplifier/a decoder bearing neither Dolby Digital nor
DTS logo, or a digital recorder.
●DOLBY DIGITAL/PCM: Select this when connecting an
amplifier/a decoder bearing Dolby Digital (without
DTS) logo.
●STREAM/PCM: Select this when connecting an
amplifier/a decoder bearing both Dolby Digital and
DTS logos.
To access the initial setting menu screen again
Press SET UP for a few seconds until the initial setting
menu screen appears.
●Turn on the TV and select the video channel (or AV
mode).
●Slide the TV/VCR/DVD switch on the remote
control to the right.
Slide to the
right.
EXECUTE DVD PLAYER SETUP? - BASIC PICTURE/AUDIO
SETTING
YES - PRESS ENTER NO - PRESS STOP
ENGLISH
ENGLISH
ENGLISH
ENGLISH
DVD PLAYER SETUP
MENU LANGUAGE
ON SCREEN LANGUAGE
AUDIO LANGUAGE
SUBTITLE
ENGLISH
FRENCH
GERMAN
4:3LB
DVD PLAYER SETUP
MONITOR TYPE
PICTURE SOURCE
SCREEN SAVER
AUTO
ON
BACKGROUND STANDARD
16:9
4:3 LB
4:3 PS
4:3LB
DVD PLAYER SETUP
DIGITAL AUDIO OUTPUT
ANALOG DOWNMIX
D.RANGE CONTROL
AUTO
ON
OUTPUT LEVEL STANDARD
PCM ONLY
DOLBY DIGITAL/PCM
STREAM/PCM
XV48EK_06Index.fm Page 15 Saturday, November 20, 2004 6:56 PM

Filename [XV48EK_06Index.fm]
Masterpage:Left+
Page 16 November 18, 2004 10:45 pm
INITIAL SETTINGS (cont.)
16
Language Menu/Audio/Subtitle Language Set
(DVD deck only)
Some DVD discs contain the DVD menu display, audio,
subtitle in multiple languages. With these discs, you can
set the default language as you like.
●The procedure shows how to set “MENU LANGUAGE”
on the DVD menu screen as an example.
ATurn on the unit.
Press 1.
BSelect the DVD deck.
On the unit
Press VCR/DVD repeatedly so that the DVD indicator
lights up.
On the remote control
Press DVD so that the DVD indicator lights up.
CAccess the DVD Set Up menu screen.
DSelect the mode.
ESelect the mode setting.
Press rt to select the desired setting, then press ENTER.
●See “Language Code List” (墌pg. 17).
FReturn to the normal screen.
Press SET UP.
NOTE:
When the selected language is not available on the disc, the
disc’s default menu language is played back.
●Turn on the TV and select the video channel (or AV
mode).
●Slide the TV/VCR/DVD switch on the remote
control to the right.
Slide to the
right.
APress SET UP.
BPress weto select
“LANGUAGE.”
Press rt to move Hto
“MENU LANGUAGE,” then
press ENTER.
ENGLISH
ENGLISH
ENGLISH
ENGLISH
LANGUAGE
MENU LANGUAGE
ON SCREEN LANGUAGE
AUDIO LANGUAGE
SUBTITLE
ENGLISH
ENGLISH
ENGLISH
ENGLISH
LANGUAGE
MENU LANGUAGE
ON SCREEN LANGUAGE
AUDIO LANGUAGE
SUBTITLE
XV48EK_01.book Page 16 Thursday, November 18, 2004 10:45 PM

Masterpage:Right 3Column
17
Filename [XV48EK_06Index.fm]
Page 17 November 18, 2004 10:45 pm
Language Code List
AA
AB
AF
AM
AR
AS
AY
AZ
BA
BE
BG
BH
BI
BN
BO
BR
CA
CO
CS
CY
DA
DZ
EL
EO
ET
EU
FA
FI
FJ
FO
FY
GA
GD
GL
GN
GU
HA
HI
HR
HU
HY
IA
IE
Afar
Abkhazian
Afrikaans
Ameharic
Arabic
Assamese
Aymara
Azerbaijani
Bashkir
Byelorussian
Bulgarian
Bihari
Bislama
Bengali, Bangla
Tibetan
Breton
Catalan
Corsican
Czech
Welsh
Danish
Bhutani
Greek
Esperanto
Estonian
Basque
Persian
Finnish
Fiji
Faroese
Frisian
Irish
Scots Gaelic
Galician
Guarani
Gujarati
Hausa
Hindi
Croatian
Hungarian
Armenian
Interlingua
Interlingue
IK
IN
IS
IW
JI
JW
KA
KK
KL
KM
KN
KO
KS
KU
KY
LA
LN
LO
LT
LV
MG
MI
MK
ML
MN
MO
MR
MS
MT
MY
NA
NE
NL
NO
OC
OM
OR
PA
PL
PS
PT
QU
RM
Inupiak
Indonesian
Icelandic
Hebrew
Yiddish
Javanese
Georgian
Kazakh
Greenlandic
Cambodian
Kannada
Korean (KOR)
Kashmiri
Kurdish
Kirghiz
Latin
Lingala
Laothian
Lithuanian
Latvian, Lettish
Malagasy
Maori
Macedonian
Malayalam
Mongolian
Moldavian
Marathi
Malay (MAY)
Maltese
Burmese
Nauru
Nepali
Dutch
Norwegian
Occitan
(Afan) Oromo
Oriya
Panjabi
Polish
Pashto, Pushto
Portuguese
Quechua
Rhaeto-Romance
RN
RO
RU
RW
SA
SD
SG
SH
SI
SK
SL
SM
SN
SO
SQ
SR
SS
ST
SU
SV
SW
TA
TE
TG
TH
TI
TK
TL
TN
TO
TR
TS
TT
TW
UK
UR
UZ
VI
VO
WO
XH
YO
ZU
Kirundi
Rumanian
Russian
Kinyarwanda
Sanskrit
Sindhi
Sangho
Serbo-Croatian
Singhalese
Slovak
Slovenian
Samoan
Shona
Somali
Albanian
Serbian
Siswati
Sesotho
Sundanese
Swedish
Swahili
Tam il
Telug u
Tajik
Thai
Tigrinya
Tur kmen
Tagalog
Setswana
Tonga
Tur kish
Tsonga
Tatar
Twi
Ukrainian
Urdu
Uzbek
Vietnamese
Volapuk
Wolof
Xhosa
Yoruba
Zulu
XV48EK_01.book Page 17 Thursday, November 18, 2004 10:45 PM

Filename [XV48EK_07S-VHS.fm]
Masterpage:Left0
18
Page 18 November 18, 2004 10:44 pm
OPERATIONS ON VHS DECK
Basic Playback ALoad a cassette.
Make sure the window side is
up, the rear label side is
facing you and the arrow on
the front of the cassette is
pointed toward the unit.
●Do not apply too much
pressure when inserting.
●If the record safety tab has been removed, playback begins
automatically. Although the DVD deck is selected, the VHS
deck is selected automatically.
●The unit’s power comes on automatically and the counter is
reset to 0:00:00.
BSelect the VHS deck.
On the unit
Press VCR/DVD repeatedly so that the VCR indicator
lights up.
On the remote control
Press VCR so that the VCR indicator lights up.
CFind the programme start point.
If the tape is advanced past the start point, press 3. To
go forward, press 5.
DStart playback.
Press 4. “bESt” appears blinking on the front display
panel during automatic tracking. (墌pg. 23)
EStop playback.
Press 8. Then press xon the VHS deck to remove the
cassette.
●Turn on the TV and select the video channel (or AV
mode).
●Slide the TV/VCR/DVD switch on the remote
control to the right.
Clean the video heads using a dry cleaning
cassette — ECL-3F — when:
●Rough, poor picture appears while a tape is played back.
●The picture is unclear or no picture appears.
●“USE CLEANING CASSETTE” appears on the screen (only
with “O.S.D.” set to “ON”). (墌pg. 53)
NOTE:
The heads get dirty in the following cases:
●in an environment prone to extreme temperature or
humidity
●in a dusty environment
●flaw, dirt or mold on video tapes
●continuous usage for a long time
Slide to the
right.
Usable cassettes
●Compact VHS
camcorder
recordings can be
played on this unit.
Simply place the
recorded cassette
into a VHS Cassette
Adapter and it can be used just like any full-sized VHS
cassette.
●This video recorder is equipped with SQPB (S-VHS QUASI
PLAYBACK) that lets you watch tapes recorded in the
S-VHS format and the SP mode with regular VHS
resolution.
* SQPB does not deliver Super VHS resolution.
●This video recorder can record on regular VHS and Super
VHS cassettes. However, it will record regular VHS signals
only.
* S-VHS recording is not possible with this recorder.
XV48EK_01.book Page 18 Thursday, November 18, 2004 10:45 PM

Masterpage:Right-No-Heading
19
Filename [XV48EK_07S-VHS.fm]
Page 19 November 18, 2004 10:44 pm
Playback Features
Still Picture/Frame-By-Frame
Playback
1Pause during playback.
Press 9.
●If there is vertical jitter, press PR +/– on the remote control to
correct the picture.
2Activate frame-by-frame playback.
Press 9.
Slow Motion
While playback is paused, press and hold 9for 2
seconds, then release. Press 9and release again to return
to still picture.
NOTE:
During slow motion playback, some noise may appear on the TV
screen. Press PR + or –on the remote control to eliminate the
noises.
Variable Speed Search
During playback, press 5for forward variable speed
search, or 3for reverse variable speed search.
●The speed changes for each direction by pressing 3and
5repeatedly.
When pressing 5: +5x{+7x
When pressing 3: –1x]–5x{–7x
(Once 3is pressed, reverse search starts in –1x normal
playback speed. After this process, each press of 3changes
the search speed between –5x and –7x.)
NOTE:
The search speed changes in the same way for SP and LP mode.
Skip Search
During playback, press 1 to 6 times to skip over
unwanted sections.
Each press initiates a 30-second period of fast-motion
playback. Normal playback resumes automatically.
Index Search
Your unit automatically marks index codes at the beginning of
each recording. This function gives you quick access to any one
of 9 index codes in either direction.
NOTE:
Before starting, make sure the unit is in the Stop mode.
Activate Index Search.
Press 2or 6. “21” or “61” is displayed on
the TV screen and search begins in the corresponding
direction.
●To access index codes 2
through 9, press 2or
6repeatedly until the
correct index number is
displayed.
Example:
To locate the beginning of B
from the current position,
press 2twice.
To locate the beginning of D from the current position, press
6once.
●When the specified index code is located, playback begins
automatically.
Next Function Memory
The Next Function Memory “tells” the unit what to do after
rewinding. Before continuing, make sure the unit is in the Stop
mode.
a- For Automatic Start Of Playback
Press 3, then press 4within 2 seconds.
b- For Automatic Power Off
Press 3, then press 1within 2 seconds.
c- For Automatic Timer Standby
Press 3, then press #within 2 seconds.
d- For Automatic Cassette Ejection After Tape Rewind
Press 3, then press xwithin 2 seconds.
One Touch Replay
Press during playback.
Pressing once moves the playback position back to about 7
seconds before the current position. You can press up to 4
times each One Touch Replay.
●Turn on the TV and select the video channel (or AV
mode).
●Slide the TV/VCR/DVD switch on the remote
control to the right.
ATTENTION
In the search, still, slow-motion or frame-by-frame playback
mode,
●the picture will be distorted.
●the noise bars will appear.
●there may be a loss of colour.
●you cannot hear the sound.
To resume normal playback, press 4.
To resume normal playback during a Skip Search,
press 4.
Current position
Index number
XV48EK_01.book Page 19 Thursday, November 18, 2004 10:45 PM

Filename [XV48EK_07S-VHS.fm]
Masterpage:Left+
Page 20 November 18, 2004 10:44 pm
OPERATIONS ON VHS DECK (cont.)
20
Instant ReView
Simply by pressing a single button, the unit power comes on,
rewinds, and begins playback of the last timer-recorded
programme. If you have several programmes recorded, you can
easily access any of them.
NOTE:
Before starting, make sure that the unit is off and that the Timer
mode is disengaged.
Activate Instant ReView.
Press . The unit power comes on and the unit
searches for the index code indicating the start of the last
timer-recorded programme. Once it’s found, playback
begins automatically.
●To watch the first of the 3 programmes, press three
times. The unit searches and begins playback automatically.
You can access a programme as far as 9 index codes away
from the current tape position.
Repeat Playback
Your unit can automatically play back the whole tape 100 times
repeatedly.
1Start playback.
Press 4.
2Activate Repeat Playback.
Press 4and hold for over 5 seconds, then release.
●The Play indicator ($) on the front display panel blinks slowly.
●After playing back a tape 100 times, the unit stops
automatically.
3Stop Repeat Playback.
Press 8at any time.
Pressing 4, 3, 5or 9also stops Repeat Playback.
Manual Tracking
Your unit is equipped with automatic tracking
control. During playback, you can override this
and adjust the tracking manually by pressing the
TRACKING +/– buttons.
1Override automatic tracking.
During playback, press TRACKING + and –at the same
time.
2Adjust the tracking manually.
Press TRACKING +/–.
●Press TRACKING + and –at the same time again to return to
automatic tracking.
NOTE:
When a new tape is inserted, the unit enters the automatic
tracking mode automatically.
Soundtrack Selection
Your unit is capable of recording three soundtracks (HI-FI L,
HI-FI R and NORM) and will play back the one you select.
During Playback
Pressing A.MONITOR changes the soundtrack as follows:
NOTES:
●“HIFI L jhR” should normally be selected. In this mode,
Hi-Fi stereo tapes are played back in stereo, and the normal
audio track is played back automatically for tapes with only
normal audio.
●For instructions on recording stereo and bilingual
programmes, refer to page 23.
●“O.S.D.” must be set to “ON” or the on-screen displays will
not appear. (墌pg. 53)
NTSC Playback
Your unit is equipped with NTSC circuitry that can play back
NTSC tapes.
1Load a cassette.
Insert a cassette recorded in NTSC.
2Start playback.
Press 4.
●“NTSC]PAL” appears on the screen for about 5 seconds.
NOTES:
●Some TVs shrink the picture vertically and place black bars at
the top and bottom of the screen. This is not a malfunction on
the part of either the unit or the TV.
●The picture may roll up and down. This can be corrected using
the V-HOLD control found on some TVs. (This cannot be
corrected if the TV does not have a V-HOLD control.)
●
The counter and tape remaining time readings will be incorrect.
●During search, still, or frame-by-frame playback, the picture
will be distorted, and there may be a loss of colour.
●Depending on the type of TV, the top and bottom portions of
superimposed displays may be cut off during NTSC playback.
Slide to the
right.
Track Use
On-screen display
HI FI
L jhR For Hi-Fi stereo tapes
HI FI
L jFor main audio of Bilingual tapes
HI FI
hR For sub audio of Bilingual tapes
NORM For audio-dubbed tapes
HI FI
NORM For audio-dubbed tapes
XV48EK_01.book Page 20 Thursday, November 18, 2004 10:45 PM
This manual suits for next models
7
Table of contents
Other JVC DVD VCR Combo manuals